在CentOS-7-linux中安装mySQL
一、Linux系统中安装mysql
查看是否安装mysql
[root@localhost admin]#  rpm -qa | grep mysql
mysql-community-libs-5.6.44-2.el7.x86_64
mysql-community-release-el7-5.noarch
mysql-community-server-5.6.44-2.el7.x86_64
mysql-community-client-5.6.44-2.el7.x86_64
mysql-community-devel-5.6.44-2.el7.x86_64
mysql-community-common-5.6.44-2.el7.x86_64
安装wget工具
[root@localhost admin]# yum install -y wget.x86_64
下载mysql
[root@localhost admin]# wget http://dev.mysql.com/get/mysql-community-release-el7-5.noarch.rpm
[root@localhost admin]# yum install -y mysql-server
如果安装不成功,提示 No package mysql-server available时,可以用下列方法:
首先必须添加mysql社区repo通过输入命令:
[root@localhost admin]# sudo rpm -Uvh http://dev.mysql.com/get/mysql-community-release-el7-5.noarch.rpm
最后使用像安装MySQL的常规方法一样安装mysql:
[root@localhost admin]# yum install mysql mysql-server mysql-libs mysql-server
开启mysql服务,结果发现没有反应,判断安装出现错误!
[root@localhost admin]# service mysqld start
二、可能存在的错误
首先,查看错误日志
[root@localhost sbin]# systemctl status mysqld
mysqld.service - MySQL Community Server
  Loaded: loaded (/usr/lib/systemd/system/mysqld.service; enabled; vendor preset: disabled)
  Active: activating (start-post) since Sat 2019-05-18 04:24:30 PDT; 16s ago
 Process: 53606 ExecStart=/usr/bin/mysqld_safe --basedir=/usr (code=exited, status=0/SUCCESS)
 Process: 53592 ExecStartPre=/usr/bin/mysql-systemd-start pre (code=exited, status=0/SUCCESS)
Main PID: 53606 (code=exited, status=0/SUCCESS);         : 53607 (mysql-systemd-s)
   Tasks: 2
  CGroup: /system.slice/mysqld.service
          └─control
            ├─53607 /bin/bash /usr/bin/mysql-systemd-start post
            └─53881 sleep 1

May 18 04:24:30 localhost.localdomain systemd[1]: Starting MySQL Community Server...
May 18 04:24:31 localhost.localdomain mysqld_safe[53606]: 190518 04:24:31 mysqld_safe Logging to '/var/log/mysqld.log'.
May 18 04:24:31 localhost.localdomain mysqld_safe[53606]: 190518 04:24:31 mysqld_safe Starting mysqld daemon with databases from /var/lib/mysql
进入日志,查看具体错误的类型,发现了这个错误
[root@localhost sbin]# vim  /var/log/mysqld.log
[ERROR] Can't open the mysql.plugin table. Please run mysql_upgrade to create it.
[ERROR] /usr/sbin/mysqld: unknown variable 'default-character-set=utf8'
第一个错误是因为新安装的mysql服务后,一般需要执行数据库初始化操作 ,从而生成与权限相关的表,执行命令如下:
[root@localhost sbin]# /usr/bin/mysql_install_db --user=mysql
需要注意的是以上命令中的mysql_install_db与你安装的mysql服务位置有关,如果不知道在哪,可以使用find / -name mysql_install_db找到其位置,然后执行上面的命令。
[root@localhost sbin]# find / -name mysql_install_db
/usr/bin/mysql_install_db
第二个错误是因为之前修改配置文件的时候把default-character-server=utf8改为default-character-set=utf8,把其改回来就好了,进入 /etc/my.cnf将default-character-set=utf8改为default-character-server=utf8
[root@localhost sbin]# vim /etc/my.cnf
datadir=/var/lib/mysql
socket=/var/lib/mysql/mysql.sock
default-character-set=utf-8
修改完毕后重启一下系统
[root@localhost sbin]# shutdown -r now
再次启动mysql服务,成功!
[root@localhost admin]# service mysqld start
Redirecting to /bin/systemctl start mysqld.service
[root@localhost admin]#
三、mysql基本操作
mysql连接成功后,首次进行操作不知道密码,怎么修改用户密码,而且会出现如下错误,这里可以用修改配置文件( /etc/my.cnf)重新初始化密码。
ERROR 1045 (28000): Access denied for user 'root'@'localhost' (using password: YES)
在 /etc/my.cnf文件中添加代码“skip-grant-tables”,首先进入编辑模式
[root@localhost admin]#vi /etc/my.cnf
然后在 /etc/my.cnf文件中添加代码“skip-grant-tables”
skip-grant-tables
datadir=/var/lib/mysql
socket=/var/lib/mysql/mysql.sock
character_set_server=utf8
添加成功后重启服务器
[root@localhost admin]# service mysqld restart
重启之后输入#mysql即可进入mysql,接下来就是用sql来修改root的密码
[root@localhost admin]# mysql
mysql> use mysql;
mysql> update user set password=password("root") where user="root";
mysql> flush privileges;
mysql> quit
重启服务器
[root@localhost admin]# service mysqld restart
接着再在 /etc/my.cnf文件中将原来添加代码“skip-grant-tables”删除
[root@localhost admin]#vi /etc/my.cnf
然后在 /etc/my.cnf文件中删除代码“skip-grant-tables”
datadir=/var/lib/mysql
socket=/var/lib/mysql/mysql.sock
character_set_server=utf8
删除成功后,wq保存退出vi编辑器,然后重启服务器
[root@localhost admin]# service mysqld restart
最后成功
[root@localhost admin]# mysql -u root -p
Enter password:
Welcome to the MySQL monitor.  Commands end with ; or \g.
Your MySQL connection id is 3
Server version: 5.6.44 MySQL Community Server (GPL)

Copyright (c) 2000, 2019, Oracle and/or its affiliates. All rights reserved.

Oracle is a registered trademark of Oracle Corporation and/or its
affiliates. Other names may be trademarks of their respective
owners.

Type 'help;' or '\h' for help. Type '\c' to clear the current input statement.

mysql>
四、配置远程连接
首先切换到系统数据库
sql> use mysql
Reading table information for completion of table and column names
You can turn off this feature to get a quicker startup with -A

Database changed
mysql>
然后,会出现ERROR 1062 (23000): Duplicate entry '%-root' for key 'PRIMARY'的错误,不用理会它
mysql> update user set host = '%' where user = 'root';
ERROR 1062 (23000): Duplicate entry '%-root' for key 'PRIMARY'
接着再刷新一下数据库,并退出。
mysql>flush privileges;
mysql>quit
关闭防火墙
[root@localhost admin]# systemctl stop firewalld
关闭开机自动启动防火墙
[root@localhost admin]# systemctl disable firewalld
Removed symlink /etc/systemd/system/multi-user.target.wants/firewalld.service.
Removed symlink /etc/systemd/system/dbus-org.fedoraproject.FirewallD1.service.
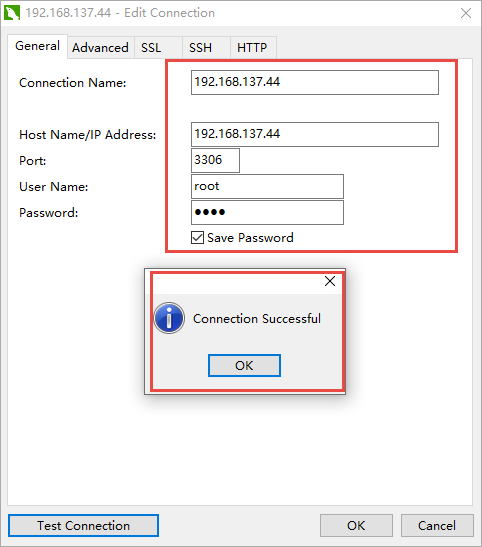
最后,连接成功

 浙公网安备 33010602011771号