
支付宝对接支付-JAVA版
前言
本文使用SpringBoot+SpringMVC对接支付宝电脑网站支付接口。接下来将详细讲解开发步骤及一些常见问题。
官方文档:https://opendocs.alipay.com/open/270
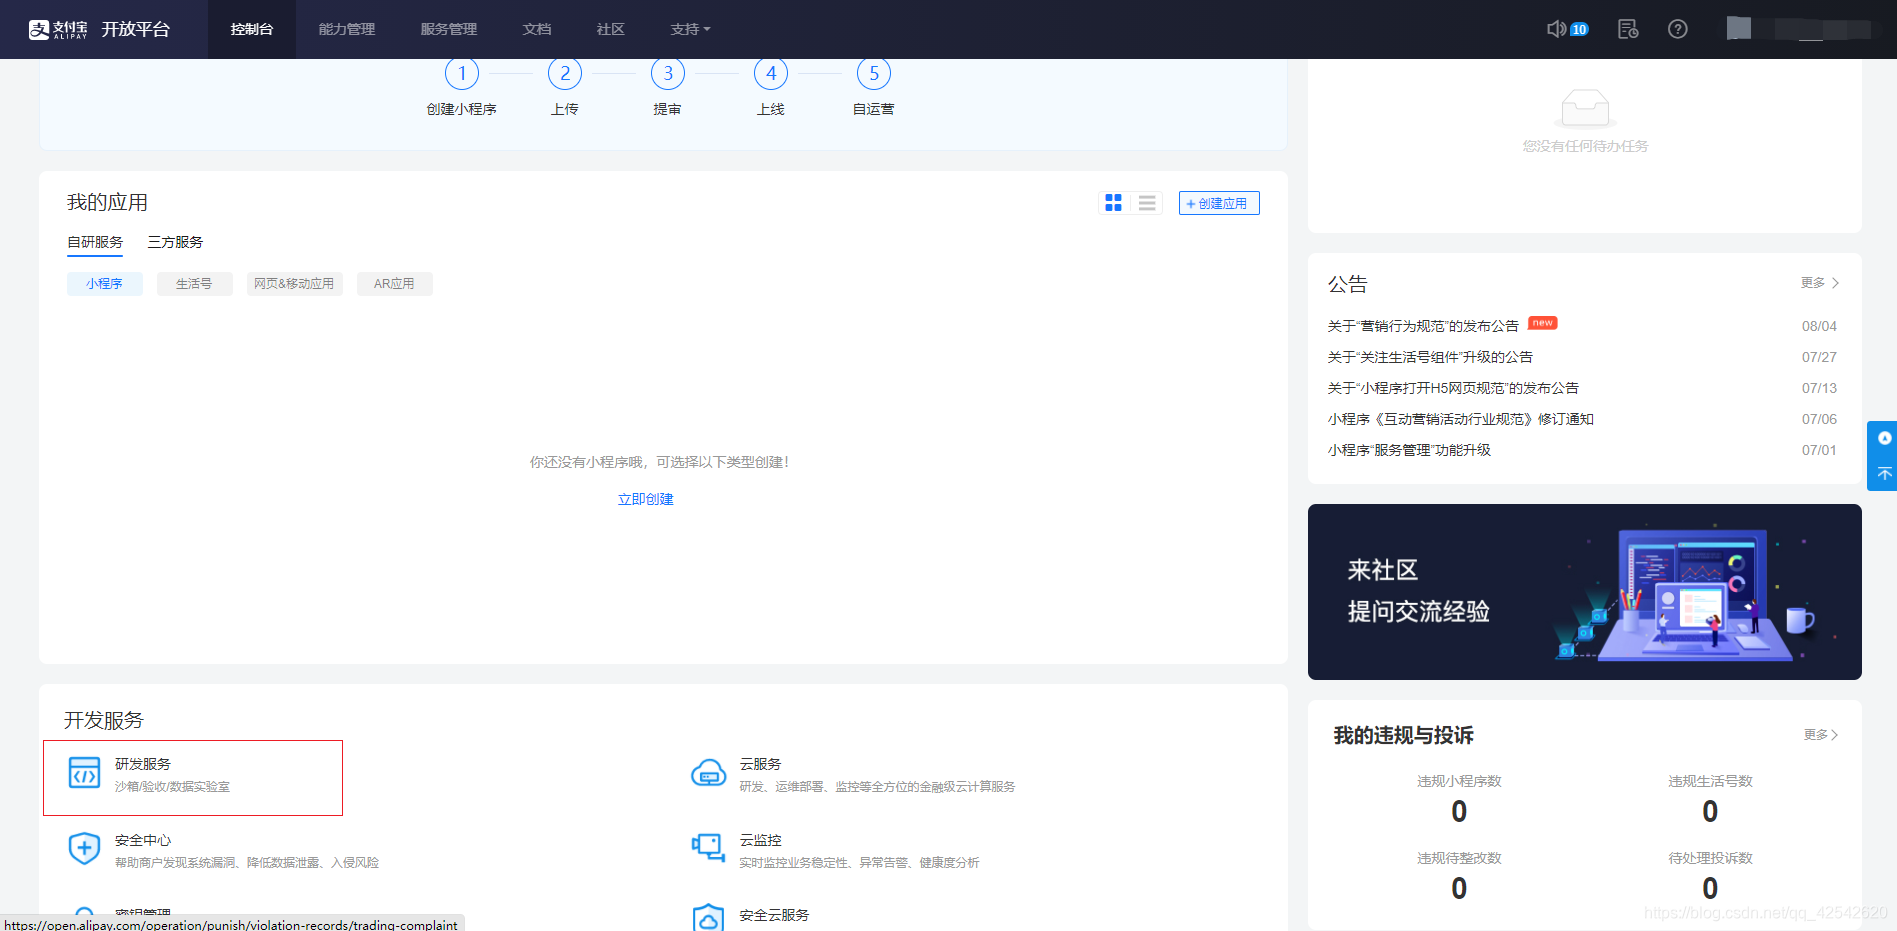
1.首先打开支付宝开放平台,

2.点击研发服务。因为正式接入需要企业签约,所以我们这里先用沙盒模式进行模拟接入,完成签约后将程序中的部分参数替换即可。
3.点击沙盒应用,查看APPID等参数
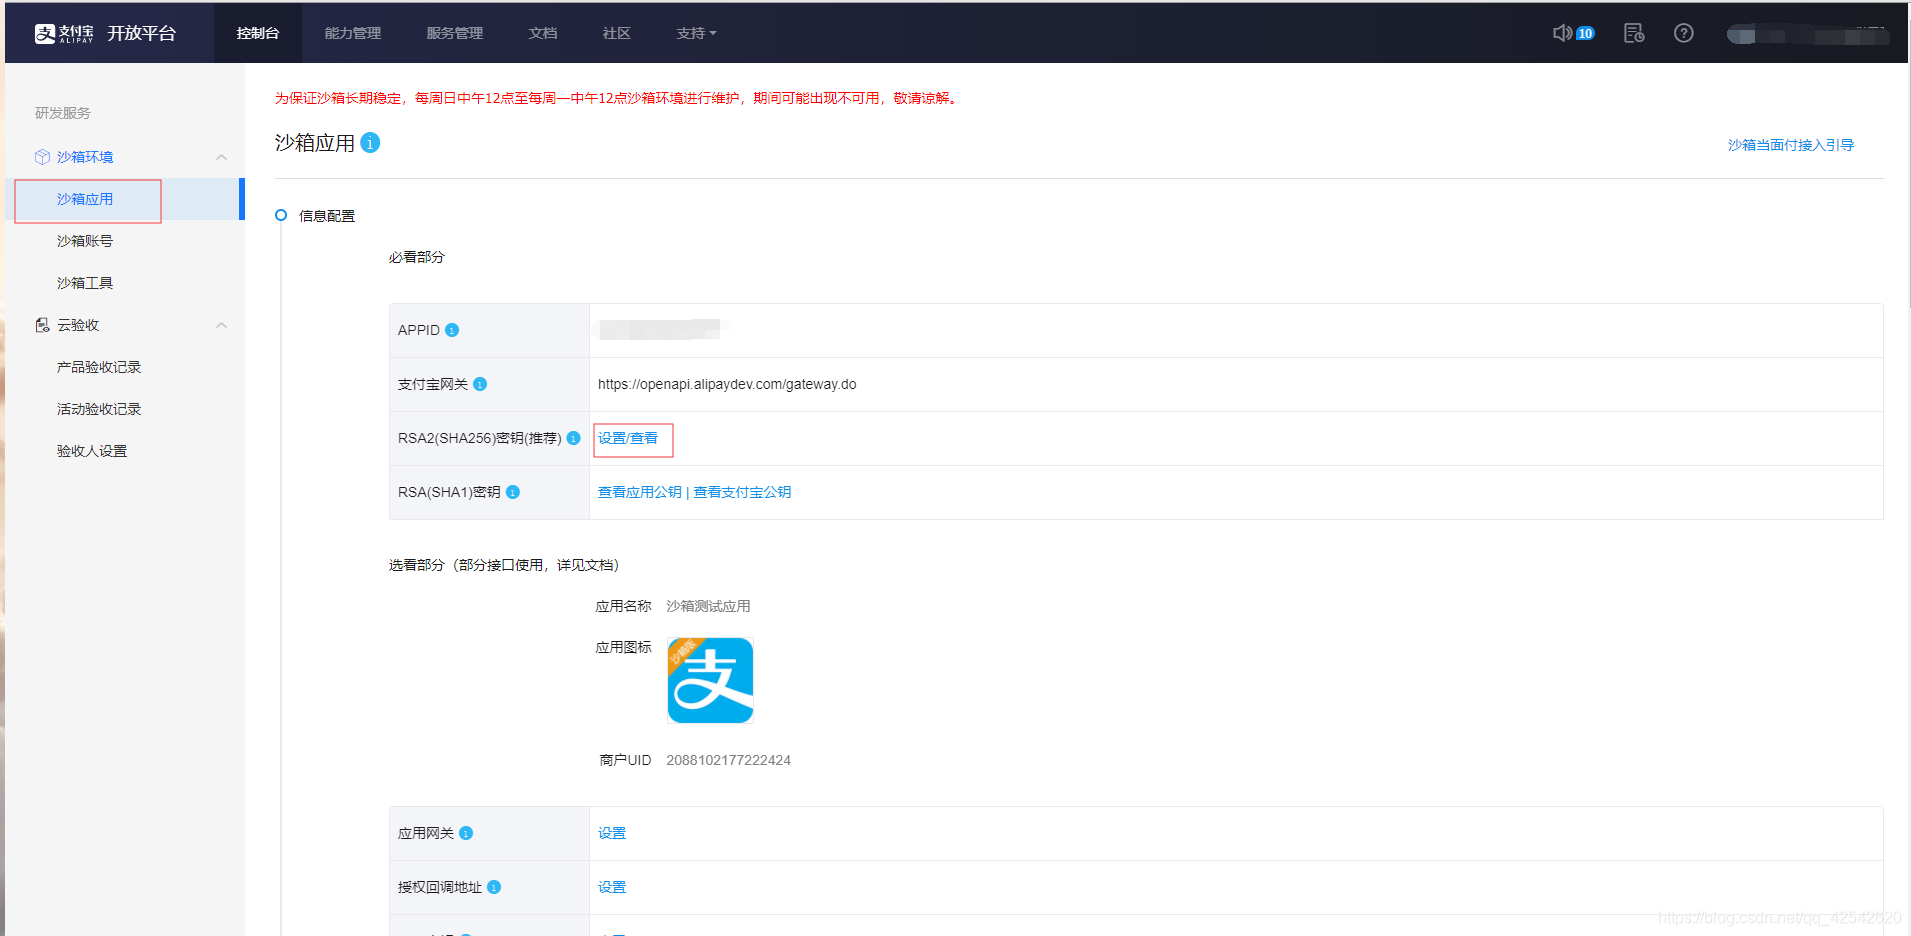
4.设置RSA2密钥
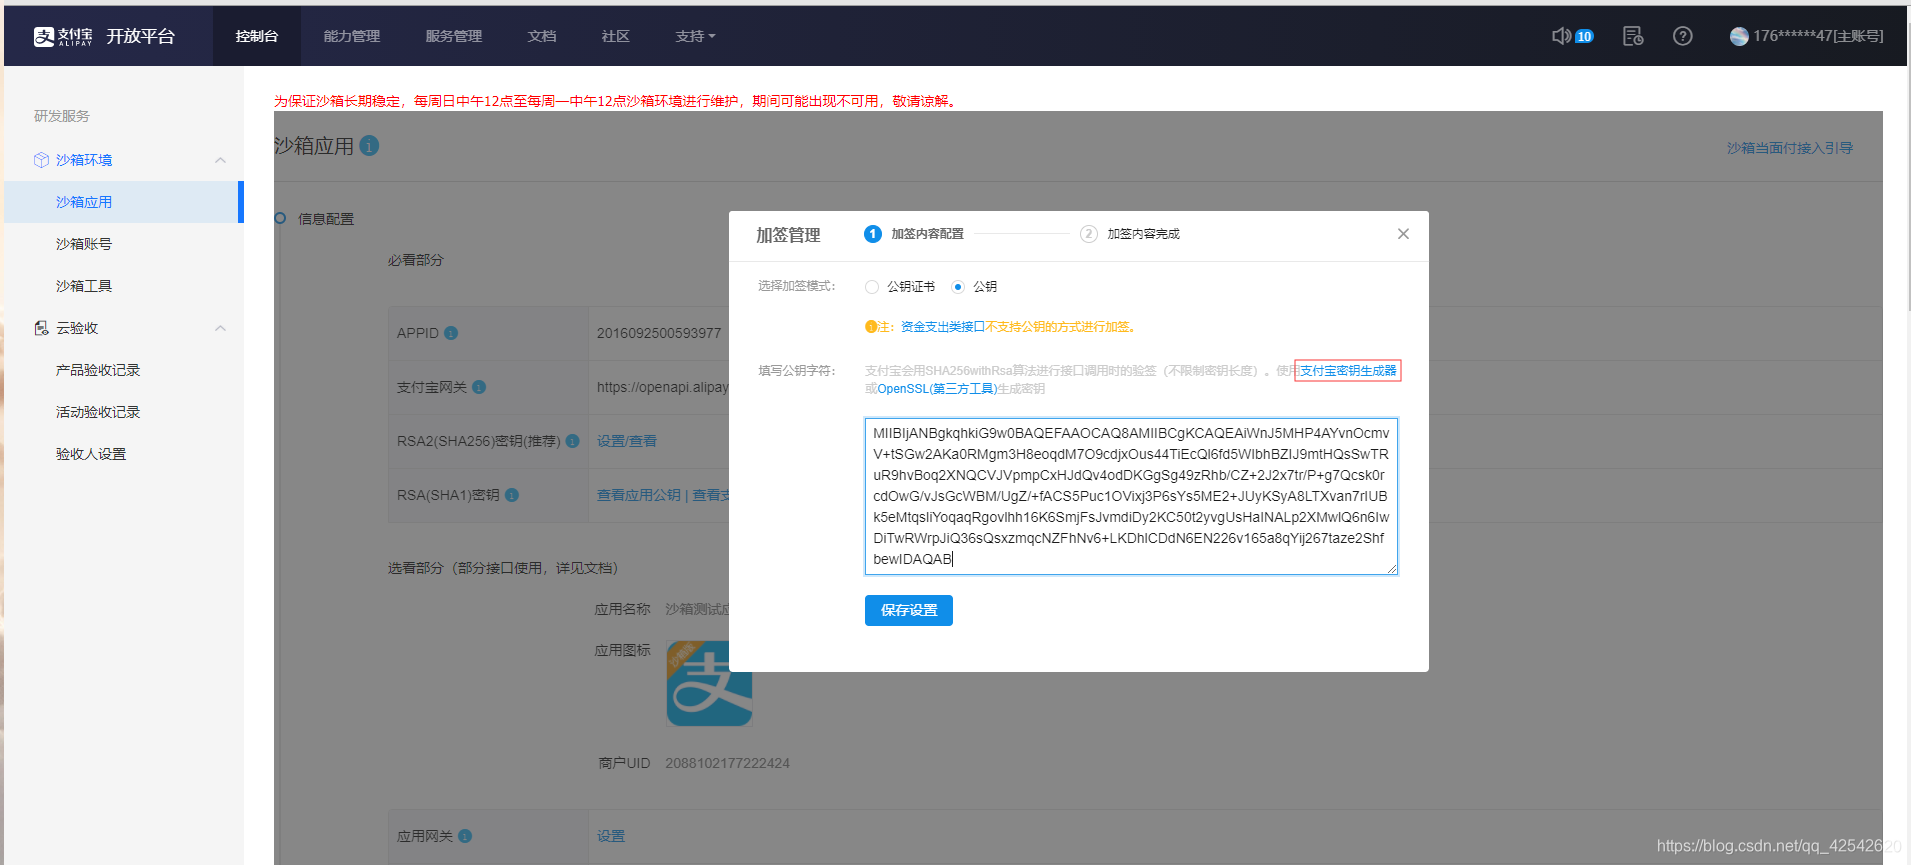
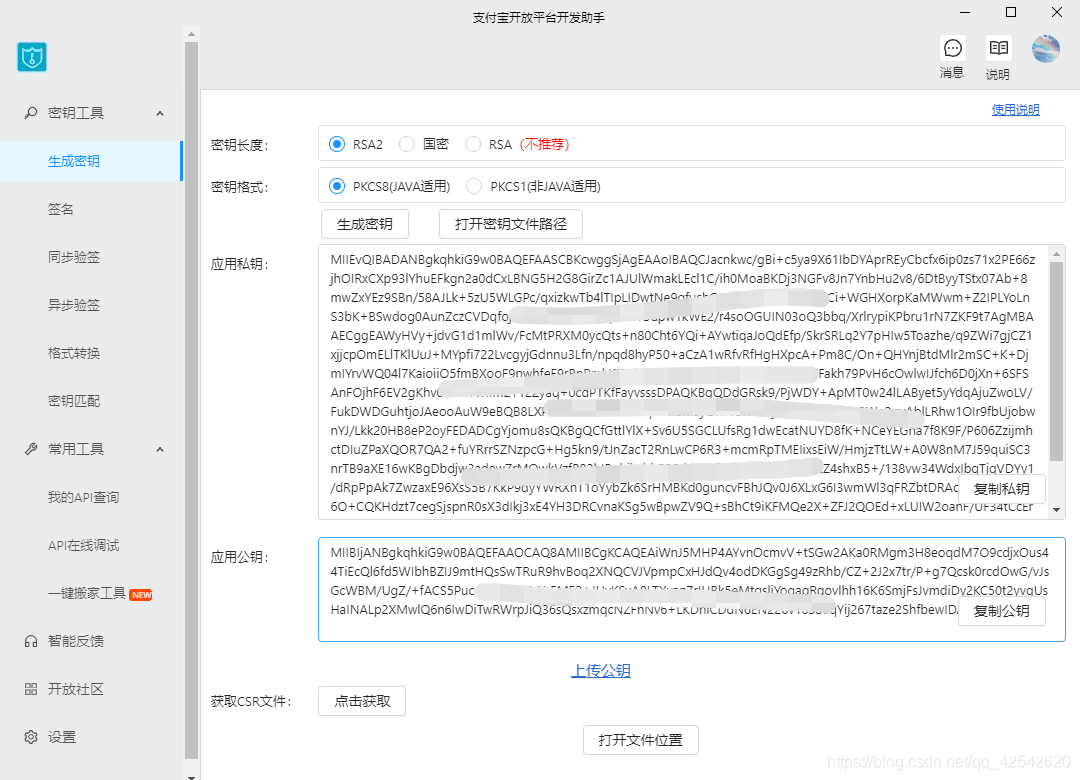
使用官方密钥生成工具生成密钥,将生成的密钥填入
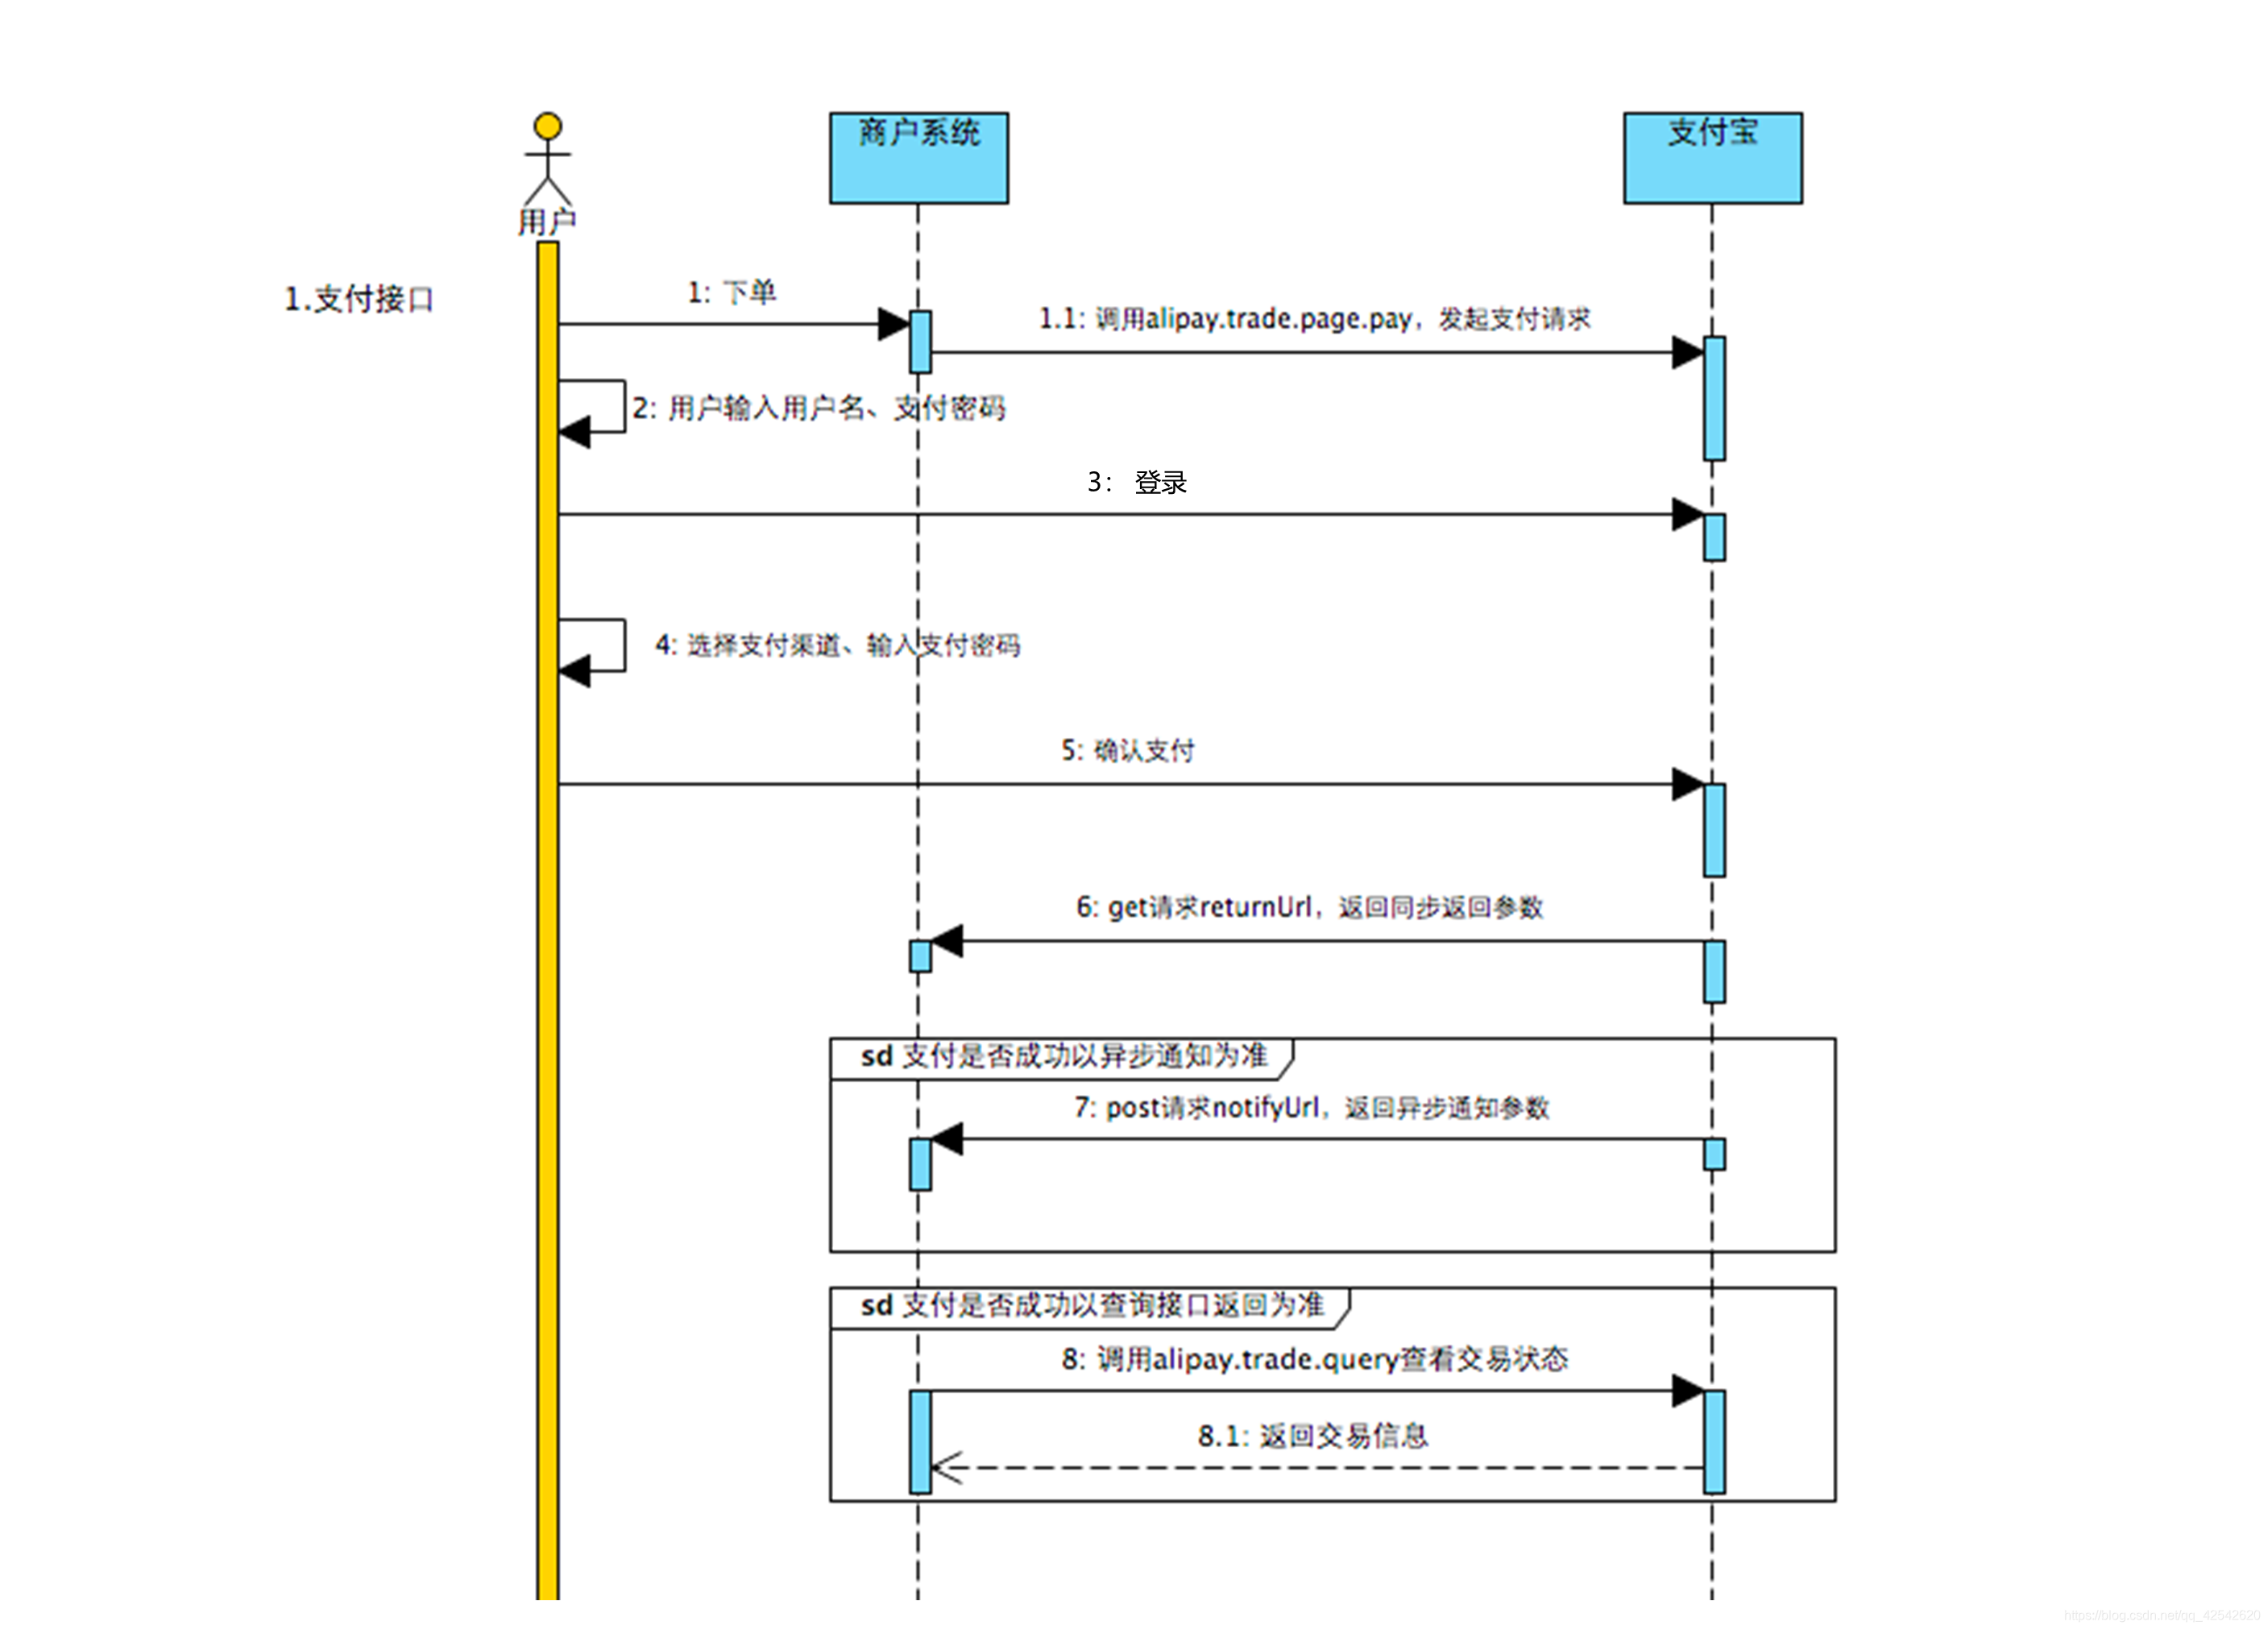
时序图
正式开发
依赖pom.xml
		<parent>
	        <groupId>org.springframework.boot</groupId>
	        <artifactId>spring-boot-starter-parent</artifactId>
	        <version>2.2.4.RELEASE</version>
	        <relativePath/> <!-- lookup parent from repository -->
	    </parent>
		<dependencies>
	        <dependency>
	            <groupId>org.springframework.boot</groupId>
	            <artifactId>spring-boot-starter-web</artifactId>
	        </dependency>

	        <dependency>
	            <groupId>org.springframework.boot</groupId>
	            <artifactId>spring-boot-devtools</artifactId>
	            <scope>runtime</scope>
	            <optional>true</optional>
	        </dependency>
	        <dependency>
	            <groupId>org.projectlombok</groupId>
	            <artifactId>lombok</artifactId>
	            <optional>true</optional>
	        </dependency>
	        <dependency>
	            <groupId>org.springframework.boot</groupId>
	            <artifactId>spring-boot-starter-thymeleaf</artifactId>
	            <version>2.2.4.RELEASE</version>
	        </dependency>
	        <dependency>
	            <groupId>org.springframework.boot</groupId>
	            <artifactId>spring-boot-starter-test</artifactId>
	            <scope>test</scope>
	            <exclusions>
	                <exclusion>
	                    <groupId>org.junit.vintage</groupId>
	                    <artifactId>junit-vintage-engine</artifactId>
	                </exclusion>
	            </exclusions>
	        </dependency>
	        <!--支付宝支付SDK-->
	        <dependency>
	            <groupId>com.alipay.sdk</groupId>
	            <artifactId>alipay-sdk-java</artifactId>
	            <version>4.10.124.ALL</version>
	        </dependency>
    	</dependencies>
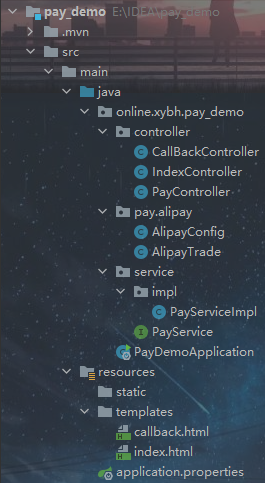
目录层级
关键代码
AlipayConfig类
创建DefaultAlipayClient所需参数,文档中提及DefaultAlipayClient只需要创建一次,后续可直接调用,所以这里使用了双重校验锁方式创建单例对象。
如果不清楚双重校验锁的朋友可以看这篇博客: 双重校验锁
package online.xybh.pay_demo.pay.alipay;

import com.alipay.api.AlipayClient;
import com.alipay.api.DefaultAlipayClient;
import org.springframework.stereotype.Component;

@Component
public class AlipayConfig {

    /**
     * 支付宝网关(https://openapi.alipay.com/gateway.do)
     * 沙盒网关(https://openapi.alipaydev.com/gateway.do)
     */
    public static String URL = "https://openapi.alipaydev.com/gateway.do";

    /**
     * 创建应用时产生的应用号
     */
    public static String APP_ID = "你的APPID";

    /**
     * 开发者私钥
     */
    public static String APP_PRIVATE_KEY = "你的开发者私钥";

    /**
     * 参数返回格式, 只支持json
     */
    public static String FORMAT = "json";

    /**
     * 编码集,支持GBK/UTF-8,根据自己工程编码进行调整
     */
    public static String CHARSET = "UTF-8";

    /**
     * 支付宝公钥
     */
    public static String ALIPAY_PUBLIC_KEY = "你的支付宝公钥";

    /**
     * 签名算法类型
     */
    public static String SIGN_TYPE = "RSA2";

    /**
     * 回调地址
     */
    public static String RETURN_URL = "你的回调地址";

    /**
     * 异步通知地址
     */
    public static String NOTIFY_URL;

    /**
     * 私有化构造方法
     */
    private AlipayConfig(){}

    private volatile static AlipayClient instance = null;

    /**
     * 双重校验锁,单例模式
     * @return 支付宝请求客户端实例
     */
    public static AlipayClient getInstance(){
        if(instance == null){
            synchronized (AlipayConfig.class){
                if(instance == null){
                    instance = new DefaultAlipayClient(URL, APP_ID, APP_PRIVATE_KEY, FORMAT, CHARSET, ALIPAY_PUBLIC_KEY, SIGN_TYPE);
                }
            }
        }
        return instance;
    }
}
AlipayTrade类
这个类主要完成与支付宝的常用对接,如支付,退款,查询是否成功支付等。这里我们只完成支付功能。
package online.xybh.pay_demo.pay.alipay;

import com.alibaba.fastjson.JSON;
import com.alipay.api.AlipayApiException;
import com.alipay.api.request.AlipayTradePagePayRequest;
import lombok.extern.slf4j.Slf4j;
import org.springframework.stereotype.Component;

import java.util.Map;


@Slf4j
@Component
public class AlipayTrade {

    public String trade(Map<String, String> content){
        AlipayTradePagePayRequest alipayRequest = new AlipayTradePagePayRequest();
        alipayRequest.setReturnUrl(AlipayConfig.RETURN_URL);

        alipayRequest.setBizContent(JSON.toJSONString(content));

        String form = "";
        try {
             form = AlipayConfig.getInstance().pageExecute(alipayRequest).getBody();
        } catch (AlipayApiException e) {
            log.error("支付宝构建表单失败", e);
        }
        log.debug("支付宝构建表单"+form);
        return form;

    }
}
这里用来lombok中的Slf4j注解,如果不需要的话可以与下面的log.error,log.debug一同删除。
Service
PayService接口
package online.xybh.pay_demo.service;

public interface PayService {
    /**
     *  @param total    订单总金额
     * @param subject   订单标题
     * @param body      订单详情
     * @param goodsId   商品id
     * @param goodsName 商品名
     * @param quantity  数量
     * @param price     单价
     * @return  支付表单
     */
    String pay(double total, String subject, String body, String goodsId, String goodsName, int quantity, double price);
}
这里只写了一部分常用参数,如需其他参数可看alipay.trade.page.pay
PayServiceImpl实现类
package online.xybh.pay_demo.service.impl;

import online.xybh.pay_demo.pay.alipay.AlipayTrade;
import online.xybh.pay_demo.service.PayService;
import org.springframework.beans.factory.annotation.Autowired;
import org.springframework.stereotype.Service;

import java.util.HashMap;
import java.util.UUID;

@Service
public class PayServiceImpl implements PayService {

    @Autowired
    private AlipayTrade alipayTrade;

    @Override
    public String pay(double total, String subject, String body, String goodsId, String goodsName, int quantity, double price){
        HashMap<String, String> content = new HashMap<>();
        content.put("out_trade_no", UUID.randomUUID().toString());
        content.put("product_code", "FAST_INSTANT_TRADE_PAY");
        content.put("total_amount", String.valueOf(total));
        content.put("subject", subject);
        content.put("body", body);
        content.put("goods_id", goodsId);
        content.put("goods_name", goodsName);
        content.put("quantity", String.valueOf(quantity));
        content.put("price", String.valueOf(price));
        return alipayTrade.trade(content);
    }
}
测试
首页 IndexController
package online.xybh.pay_demo.controller;

import org.springframework.stereotype.Controller;
import org.springframework.ui.Model;
import org.springframework.web.bind.annotation.RequestMapping;

@Controller
public class IndexController {
    @RequestMapping({"/", "/index"})
    public String index(Model model){
        return "index";
    }
}
支付 PayController
package online.xybh.pay_demo.controller;

import online.xybh.pay_demo.service.PayService;
import org.springframework.beans.factory.annotation.Autowired;
import org.springframework.stereotype.Controller;
import org.springframework.web.bind.annotation.PostMapping;
import org.springframework.web.bind.annotation.RequestParam;

import javax.servlet.http.HttpServletResponse;
import java.io.IOException;

@Controller
public class PayController {

    @Autowired
    private PayService payService;

    @PostMapping("/pay")
    public String pay(@RequestParam String subject,
                      @RequestParam String body,
                      @RequestParam String goodsId,
                      @RequestParam String goodsName,
                      @RequestParam int quantity,
                      @RequestParam double price,
                      HttpServletResponse response){
        String form = payService.pay(quantity*price, subject, body, goodsId, goodsName, quantity, price);
        response.setContentType("text/html;charset=" + "UTF8");
        try {
            response.getWriter().write(form);
            response.getWriter().flush();
            response.getWriter().close();
        } catch (IOException e) {
            e.printStackTrace();
        }
        return "callback";
    }

}
回调 CallBackController
package online.xybh.pay_demo.controller;

import org.springframework.stereotype.Controller;
import org.springframework.web.bind.annotation.GetMapping;

@Controller
public class CallBackController {

    @GetMapping("CallBack/alipay_back")
    public String callback(){
        return "/callback";
    }
}
index.html
<!DOCTYPE html>
<html xmlns:th="http://www.thymeleaf.org">
<head>
    <meta charset="UTF-8">
    <title>Title</title>
</head>
<body>
    <form action="http://localhost:8080/pay" method="post">
        <table>
            <tr>
                <td>订单标题:</td>
                <td><input type="text" name="subject"></td>
            </tr>
            <tr>
                <td>订单描述:</td>
                <td><input type="text" name="body"></td>
            </tr>
            <tr>
                <td>商品编号:</td>
                <td><input type="text" name="goodsId"></td>
            </tr>
            <tr>
                <td>商品名称:</td>
                <td><input type="text" name="goodsName"></td>
            </tr>
            <tr>
                <td>商品数量:</td>
                <td><input type="text" name="quantity"></td>
            </tr>
            <tr>
                <td>商品单价:</td>
                <td><input type="text" name="price"></td>
            </tr>
            <tr>
                <td colspan="2"><input type="submit" value="提交"></td>
            </tr>
        </table>
    </form>
</body>
</html>
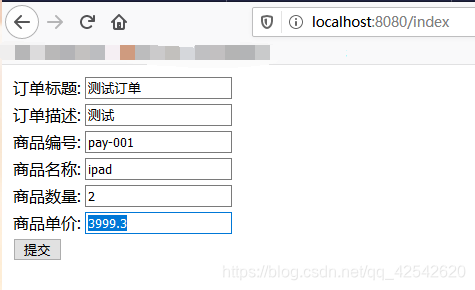
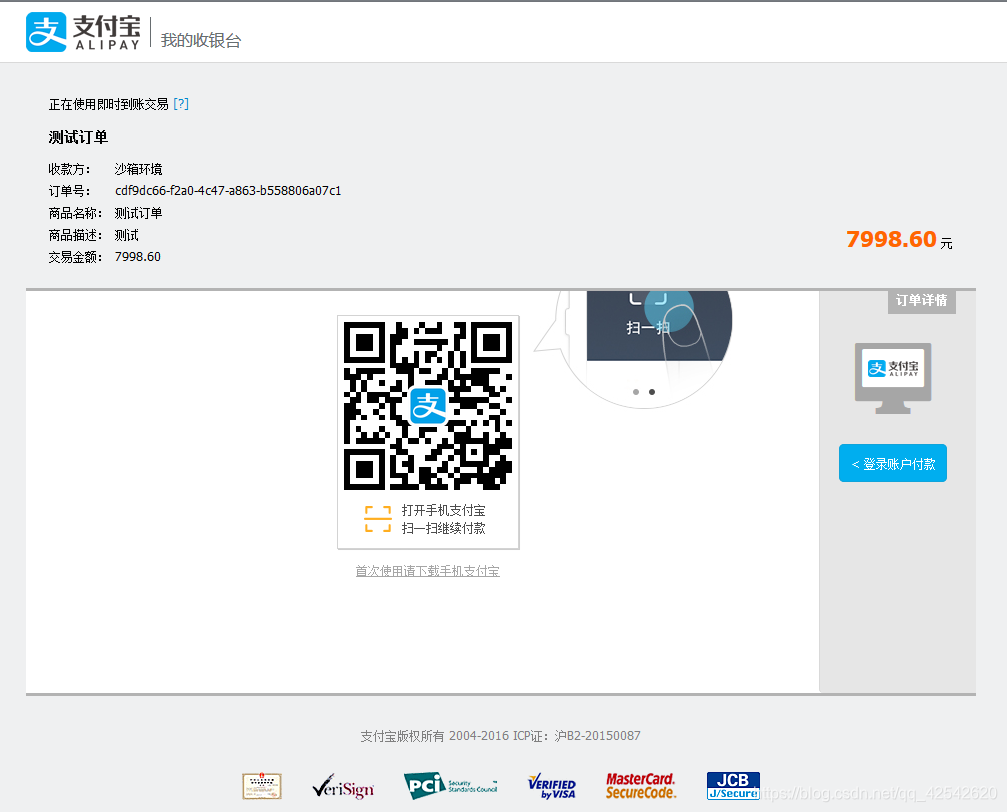
实现效果
1.商品详情
2.支付页面

 浙公网安备 33010602011771号