

springmvc记录二:(页面回显、url模板映射、自定义参数绑定、全局异常处理、文件上传、拦截器、hibernate validation数据校验、静态资源映射)
1、页面回显和url模板映射
2、自定义参数绑定
3、全局异常处理
4、文件上传
5、拦截器
6、springmvc中使用hibernate的校验框架validation
7、总结
1、页面回显和url模板映射 <--返回目录
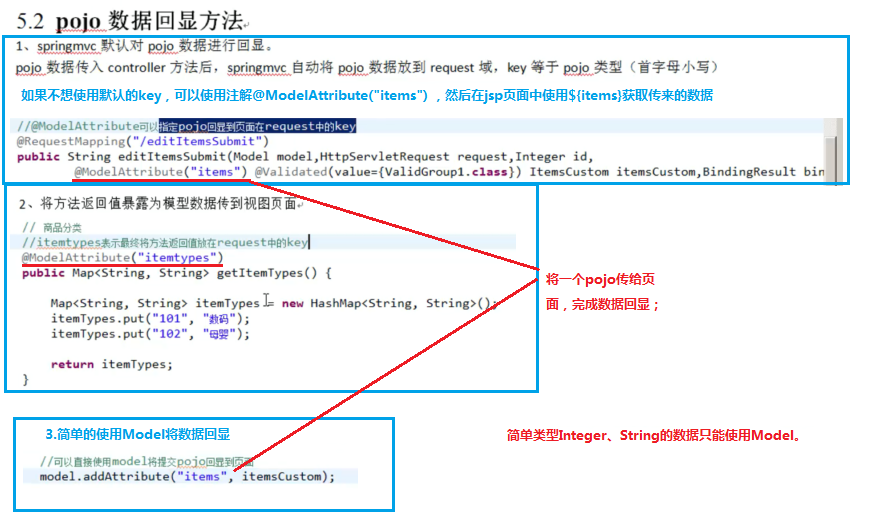
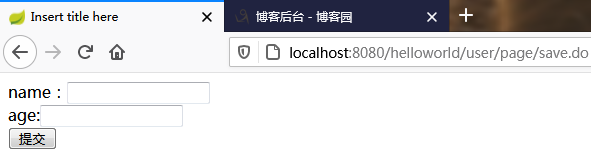
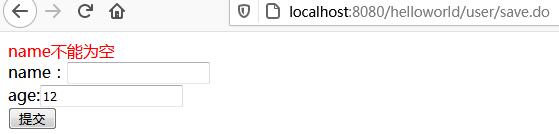
页面回显:springmvc使用Model对象,相当于request域。
url模板映射:使用@PathVariable从url中取数据
@Controller
@RequestMapping("/user")
public class IndexController {

    @RequestMapping("/page/{pageName}.do")
    public String toPage(Model model, User user, @PathVariable String pageName) {
        model.addAttribute("user", user);
        return "user/" + pageName;
    }

    @RequestMapping("/save.do")
    public String saveUser(Model model, User user) {
        // 这里不手动添加user, 其实默认也会添加进model(方法里面的参数自动添加进model对象)
        //model.addAttribute("user", user);
        if (user.getName() == null || user.getName().isEmpty()) {
            model.addAttribute("msg", "name不能为空");
        }
        return "user/save";
    }
}
save.jsp
<%@ page language="java" contentType="text/html; charset=UTF-8" pageEncoding="UTF-8"%>
<!DOCTYPE html PUBLIC "-//W3C//DTD HTML 4.01 Transitional//EN" "http://www.w3.org/TR/html4/loose.dtd">
<html>
<head>
<meta http-equiv="Content-Type" content="text/html; charset=UTF-8">
<title>Insert title here</title>
</head>
<body>
<font color="red">${msg}</font>
<form action="${pageContext.request.contextPath }/user/save.do" method="post">
    name:<input type="text" name="name" id="name" value="${user.name}"><br/>
    age:<input type="text" name="age" id="age" value="${user.age}"><br/>
    <input type="submit" value="提交">
</form>
</body>
</html>
访问http://localhost:8080/helloworld/user/page/save.do
age输入值,name不输入,提交表单。age填写的值也会带回进行数据回显。
2、自定义参数绑定 <--返回目录
2.1、Converter转换器
Spring在org.framework.core.convert.converter包中定义了3中类型的转换器接口;
- Converter<S,T>接口:提供单一方法:T convert(S source);该方法负责将S类型的对象转换为T类型的对象;
- ConverterFactory<S,R> :提供单一方法 <T extends R> Converter<S,T> getConverter(Class<T> targetType);该方法负责将一种类型的对象转换为另一种类型及其子类对象,例如String转换为Number及Number子类Integer、Double等对象;
- GenericConverter接口:该接口会根据源类对象及目标类对象的上下文信息进行类型转换。接口定义的方法如下
1)Set<GenericConverter.ConvertiblePair> getConvertibleTypes();
2)Object convent(Object source TypeDescriptor sourceType,TypeDescriptor targetType);
2.2、应用场景:全局日期转换器
在实际的开发过程中,前台如果传递字符串类型的参数birthday(2018-08-01 12:06:11),后台Date类型的birthday去接收这个值会报错,所以我们需要自定义字符串转时间类型的转换器,将传递的字符串转换为Date类型。
定义实现Converter<S,T>接口的实现类
package com.oy.controller;

import java.text.ParseException;
import java.text.SimpleDateFormat;
import java.util.Date;

import org.springframework.core.convert.converter.Converter;

public class DateConverter implements Converter<String, Date> {

    private String pattern;

    public String getPattern() {
        return pattern;
    }

    public void setPattern(String pattern) {
        this.pattern = pattern;
    }

    @Override
    public Date convert(String date) {
        try {
            SimpleDateFormat dateFormat = new SimpleDateFormat(this.pattern);
            return dateFormat.parse(date);
        } catch (ParseException e) {
            e.printStackTrace();
            return null;
        }
    }
}
springmvc.xml配置
<mvc:annotation-driven conversion-service="conversionService" />
<bean id="conversionService" class="org.springframework.format.support.FormattingConversionServiceFactoryBean">
    <!-- 转换器 -->
    <property name="converters">
        <set>
            <bean class="com.oy.controller.DateConverter" p:pattern="yyyy-MM-dd HH:mm:ss></bean>
        </set>
    </property>
</bean>
3、全局异常处理 <--返回目录
目前推荐使用方式:
参考1:别再写满屏的try-catch了,真丑,全局异常处理不会吗?
参考2:springmvc请求参数异常统一处理,结合钉钉报告信息定位bug位置
另一种处理方式:
3.1、自定义全局异常处理器


package com.oy.springmvc.exception;
import javax.servlet.http.HttpServletRequest;
import javax.servlet.http.HttpServletResponse;
import org.springframework.web.servlet.HandlerExceptionResolver;
import org.springframework.web.servlet.ModelAndView;
/**
 * 全局异常处理器
 * @author Steven
 *
 */
public class CustomerExceptionResolver implements HandlerExceptionResolver {
    @Override
    public ModelAndView resolveException(HttpServletRequest request, HttpServletResponse response, Object hanlder,
            Exception ex) {
        String result = "系统发生异常了,请联系管理员!";
        //自定义异常处理
        if(ex instanceof MyException){
            result = ((MyException)ex).getMsg();
        }
        ModelAndView mav = new ModelAndView();
        mav.addObject("msg", result);
        mav.setViewName("msg");
        return mav;
    }
}
3.2、自定义异常(为了根据自己的需求进行msg的提示)
package com.oy.springmvc.exception;
/**
 * 自定义异常
 * @author Steven
 */
public class MyException extends Exception {
    private String msg;
    public MyException() {
        super();
    }
    public MyException(String msg) {
        super(msg);
        this.msg = msg;
    }
    public String getMsg() {
        return msg;
    }
    public void setMsg(String msg) {
        this.msg = msg;
    }
}
3.3、springmvc.xml的配置
<!-- 全局异常处理器,只有实现了HandlerExceptionResolver接口的就是全局异常处理器,有多个也只生效一个 -->
<bean class="com.oy.springmvc.exception.CustomerExceptionResolver"/>
4、文件上传 <--返回目录
参考1:springmvc文件上传和下载,下载excel模板和导入excel数据(poi解析)
参考2:springmvc文件上传
5、拦截器 <--返回目录
参考:过滤器/拦截器/AOP----springmvc之拦截器
6、springmvc中使用hibernate的校验框架validation <--返回目录
参考1:https://blog.csdn.net/shaolun1992/article/details/78988204
参考2:springmvc使用注解进行数据校验 https://blog.csdn.net/changqing5818/article/details/53574919?utm_source=blogxgwz2
例子1:
pom.xml
<?xml version="1.0" encoding="UTF-8"?>
<project xmlns="http://maven.apache.org/POM/4.0.0" xmlns:xsi="http://www.w3.org/2001/XMLSchema-instance"
    xsi:schemaLocation="http://maven.apache.org/POM/4.0.0 http://maven.apache.org/xsd/maven-4.0.0.xsd">
    <modelVersion>4.0.0</modelVersion>
    <parent>
        <groupId>org.springframework.boot</groupId>
        <artifactId>spring-boot-starter-parent</artifactId>
        <version>2.1.1.RELEASE</version>
        <relativePath/> <!-- lookup parent from repository -->
    </parent>
    <groupId>com.example</groupId>
    <artifactId>SpringBootDemo-Valid</artifactId>
    <version>0.0.1-SNAPSHOT</version>
    <packaging>jar</packaging>
    <name>SpringBootDemo-Valid</name>
    <description>Demo project for Spring Boot</description>

    <properties>
        <java.version>1.8</java.version>
    </properties>

    <dependencies>

        <dependency>
            <groupId>org.springframework.boot</groupId>
            <artifactId>spring-boot-starter-web</artifactId>
        </dependency>

        <dependency>
            <groupId>org.springframework.boot</groupId>
            <artifactId>spring-boot-starter-test</artifactId>
            <scope>test</scope>
        </dependency>


        <dependency>
            <groupId>org.springframework.boot</groupId>
            <artifactId>spring-boot-starter-data-jpa</artifactId>
        </dependency>
        <dependency>
            <groupId>org.springframework.boot</groupId>
            <artifactId>spring-boot-starter-freemarker</artifactId>
        </dependency>
        <dependency>
            <groupId>mysql</groupId>
            <artifactId>mysql-connector-java</artifactId>
            <version>5.1.40</version><!--$NO-MVN-MAN-VER$-->
            <scope>runtime</scope>
        </dependency>


    </dependencies>

    <build>
        <plugins>
            <plugin>
                <groupId>org.springframework.boot</groupId>
                <artifactId>spring-boot-maven-plugin</artifactId>
            </plugin>
        </plugins>
    </build>

</project>
application.properties
server.port=80
server.servlet.context-path=/

spring.datasource.driver-class-name=com.mysql.jdbc.Driver
spring.datasource.url=jdbc:mysql://localhost:3306/db_springbootJPA?useUnicode=true&characterEncoding=utf8&serverTimezone=GMT%2B8
spring.datasource.username=root
spring.datasource.password=

#spring.jpa.hibernate.ddl-auto=update
#spring.jpa.show-sql=true
Application
package com.oy;

import org.springframework.boot.SpringApplication;
import org.springframework.boot.autoconfigure.SpringBootApplication;
import org.springframework.boot.builder.SpringApplicationBuilder;
import org.springframework.boot.web.servlet.support.SpringBootServletInitializer;

@SpringBootApplication
public class Application extends SpringBootServletInitializer {

    public static void main(String[] args) {
        SpringApplication.run(Application.class, args);
    }

    @Override
    protected SpringApplicationBuilder configure(SpringApplicationBuilder builder) {
        return builder.sources(Application.class);
    }

}
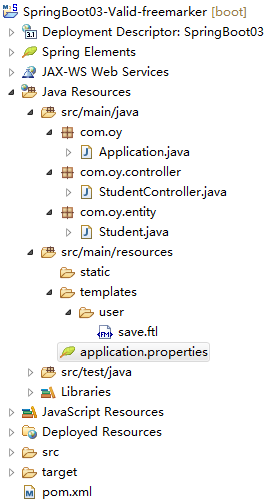
Student
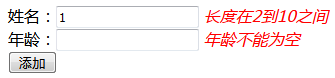
package com.oy.entity;

import javax.persistence.Column;
import javax.persistence.Entity;
import javax.persistence.GeneratedValue;
import javax.persistence.GenerationType;
import javax.persistence.Id;
import javax.persistence.Table;
import javax.validation.constraints.Max;
import javax.validation.constraints.Min;
import javax.validation.constraints.NotEmpty;
import javax.validation.constraints.NotNull;
import javax.validation.constraints.Size;

/**
 * @author oy
 * @version 1.0
 * @date 2018年12月25日
 * @time 上午5:30:35
 */
@Entity
@Table(name = "t_stu")
public class Student {
    @Id
    @GeneratedValue(strategy = GenerationType.IDENTITY)
    // 主键策略IDENTITY:主键由数据库自动生成(主要是自动增长型)
    private Integer id;

    @NotEmpty(message = "姓名不能为空")
    @Size(min = 2, max = 10, message = "长度在2到10之间")
    @Column(length = 100)
    private String name;

    @NotNull(message = "年龄不能为空")
    @Min(value = 0, message = "年龄必须大于等于20")
    @Max(value = 100, message = "年龄必须小于等于100")
    private Integer age;

    // getXxx和setXxx省略
}
StudentController
package com.oy.controller;

import java.util.HashMap;
import java.util.List;
import java.util.Map;

import javax.validation.Valid;

import org.springframework.stereotype.Controller;
import org.springframework.validation.BindingResult;
import org.springframework.validation.FieldError;
import org.springframework.web.bind.annotation.PathVariable;
import org.springframework.web.bind.annotation.RequestMapping;
import org.springframework.web.servlet.ModelAndView;

import com.oy.entity.Student;

@Controller
public class StudentController {

    @RequestMapping("/page/{base}/{pageName}")
    public String toPage(@PathVariable String base, @PathVariable String pageName) {
        return base + "/" + pageName;
    }

    /**
     * 添加学生
     * 数据校验@Valid
     * 测试URL:http://localhost/page/user/save
     *
     * @param stu
     * @param bindResult
     * @return
     */
    @RequestMapping("/stu/add")
    public ModelAndView add(@Valid Student stu, BindingResult bindResult) {
        ModelAndView mv = new ModelAndView();
        System.out.println(stu);
        /*if (bindResult.hasErrors()) {
            List<ObjectError> allErrors = bindResult.getAllErrors();
            for (ObjectError objectError : allErrors) {
                System.out.println(objectError.getObjectName()); // Student的student字段
                System.out.println(objectError.getCode()); //NotNull
                System.out.println(objectError.getDefaultMessage()); // 姓名不能为空 /年龄不能为空 等
            }
            mv.addObject("msg", allErrors.get(0).getDefaultMessage());
        } else {
            studentService.add(stu);
        }*/

        if (bindResult.hasFieldErrors()) {
            List<FieldError> errors = bindResult.getFieldErrors();
            Map<String, Object> map = new HashMap<>();
            for (FieldError error : errors) {
                map.put(error.getField(), error.getDefaultMessage());
            }
            mv.addObject("map", map);
        }

        mv.setViewName("user/save");
        return mv;
    }
}
save.ftl
<!DOCTYPE html>
<html>
<head>
<meta charset="UTF-8">
<title>Insert title here</title>
</head>
<body>
${msg!}
<form action="/stu/add" method="post">
    姓名:<input type="text" name="name" value="${(student.name)!}"/>
    <i style="color:red">${(map.name)!}</i><br/>

    年龄:<input type="text" name="age" value="${(student.age)!}"/>
    <i style="color:red">${(map.age)!}</i><br/>

    <input type="submit" value="添加"/>
</form>
</body>
</html>
访问:http://localhost/stu/add
例子2:
pom.xml
<dependency>
    <groupId>org.springframework.boot</groupId>
    <artifactId>spring-boot-starter-web</artifactId>
</dependency>

<dependency>
    <groupId>org.springframework.boot</groupId>
    <artifactId>spring-boot-starter-tomcat</artifactId>
    <scope>provided</scope>
</dependency>
<dependency>
    <groupId>org.springframework.boot</groupId>
    <artifactId>spring-boot-starter-test</artifactId>
    <scope>test</scope>
</dependency>
<dependency>
    <groupId>org.springframework.boot</groupId>
    <artifactId>spring-boot-starter-thymeleaf</artifactId>
</dependency>
PersonForm
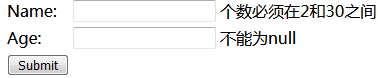
package com.oy.entity;

import javax.validation.constraints.Min;
import javax.validation.constraints.NotNull;
import javax.validation.constraints.Size;

/**
 * 用来做数据校验的实体类
 *
 * @author oy
 * @version 1.0
 * @date 2019年1月12日
 * @time 下午4:20:42
 */
public class PersonForm {

    @NotNull
    @Size(min=2, max=30)
    private String name;

    @NotNull
    @Min(18)
    private Integer age;

    public String getName() {
        return this.name;
    }

    public void setName(String name) {
        this.name = name;
    }

    public Integer getAge() {
        return age;
    }

    public void setAge(Integer age) {
        this.age = age;
    }

    public String toString() {
        return "Person(Name: " + this.name + ", Age: " + this.age + ")";
    }
}
PersonFormValidController
package com.oy.controller;

import javax.validation.Valid;

import org.springframework.stereotype.Controller;
import org.springframework.validation.BindingResult;
import org.springframework.web.bind.annotation.GetMapping;
import org.springframework.web.bind.annotation.PostMapping;
import org.springframework.web.servlet.config.annotation.ViewControllerRegistry;
import org.springframework.web.servlet.config.annotation.WebMvcConfigurer;

import com.oy.entity.PersonForm;

/**
 * 例子来源:https://spring.io/guides/gs/validating-form-input/
 * Validating Form Input
 * 使用了模板引擎thymeleaf,在页面显示错误信息
 *
 * @author oy
 * @version 1.0
 * @date 2019年1月12日
 * @time 下午4:18:25
 */
@Controller
public class PersonFormValidController implements WebMvcConfigurer {

    @Override
    public void addViewControllers(ViewControllerRegistry registry) {
        registry.addViewController("/valid/results").setViewName("valid/results");
    }

    @GetMapping("/")
    public String showForm(PersonForm personForm) {
        return "valid/personForm";
    }

    @PostMapping("/")
    public String checkPersonInfo(@Valid PersonForm personForm, BindingResult bindingResult) {

        if (bindingResult.hasErrors()) {
            return "valid/personForm";
        }

        return "redirect:/valid/results";
    }
}
personForm.html
<!DOCTYPE html>
<html xmlns:th="http://www.thymeleaf.org">
<head>
<meta charset="UTF-8">
<title>Insert title here</title>
</head>
<body>
    <form action="#" th:action="@{/}" th:object="${personForm}" method="post">
        <table>
            <tr>
                <td>Name:</td>
                <td><input type="text" th:field="*{name}" /></td>
                <td th:if="${#fields.hasErrors('name')}" th:errors="*{name}">Name Error</td>
            </tr>
            <tr>
                <td>Age:</td>
                <td><input type="text" th:field="*{age}" /></td>
                <td th:if="${#fields.hasErrors('age')}" th:errors="*{age}">Age Error</td>
            </tr>
            <tr>
                <td><button type="submit">Submit</button></td>
            </tr>
        </table>
    </form>
</body>
</html>
results.html
<!DOCTYPE html>
<html xmlns:th="http://www.thymeleaf.org">
<head>
<meta charset="UTF-8">
<title>Insert title here</title>
</head>
<body>
    验证成功...
</body>
</html>
访问:http://localhost/
7、总结 <--返回目录
1.web.xml中的配置
* 前端控制器DispatcherServlet
<servlet>
    <servlet-name>springmvc</servlet-name>
    <servlet-class>org.springframework.web.servlet.DispatcherServlet</servlet-class>
    <init-param>
        <param-name>contextConfigLocation</param-name>
        <param-value>classpath:spring-mvc.xml</param-value>
    </init-param>
</servlet>
<servlet-mapping>
    <servlet-name>springmvc</servlet-name>
    <url-pattern>*.do</url-pattern>
</servlet-mapping>
* post请求的编码过滤器CharacterEncodingFilter
<filter>
    <filter-name>characterEncodingFilter</filter-name>
    <filter-class>org.springframework.web.filter.CharacterEncodingFilter</filter-class>
    <init-param>
        <param-name>encoding</param-name>
        <param-value>utf-8</param-value>
    </init-param>
</filter>
<filter-mapping>
    <filter-name>characterEncodingFilter</filter-name>
    <url-pattern>*.do</url-pattern>
</filter-mapping>
2.ModelAndView的使用:
/**
* 目标方法的返回值可以是ModelAndView类型。
* 其中可以包含视图和模型信息
* SpringMVC会把ModelAndView的model(模型信息)中的的数据放入到request域对象中
*/
@RequestMapping(value="/testModelAndView")
public ModelAndView testModelAndView(){
    //所要返回的页面
    String viewName = "helloworld";
    ModelAndView modelAndView = new ModelAndView(viewName);
    //添加模型数据到ModelAndView中
    modelAndView.addObject("time",new Date());
    return modelAndView;
}

ModelAndView modelAndView = new ModelAndView();
modelAndView.setViewName("helloworld");
modelAndView.addObject("msg","您好!");
3.请求参数@RequestParam()
@RequestParam(value="前台name",required=true|false)
- required=true是默认的设置,表示必须传值,如果前后不传值则报错http400;
- required=false,表示可以不传值。
4.转发或重定向
@RequestMapping("/save")
public String save(Student student){
    if(student.getId()!=0){
        Student s=studentList.get(student.getId()-1);
        s.setName(student.getName());
        s.setAge(student.getAge());
    }else{
        studentList.add(student);
    }
    // return "redirect:/student/list.do";  // 重定向
    return "forward:/student/list.do";  //转发
}
5.springmvc中使用servlet API
@RequestMapping("/login")
public String login(HttpServletRequest request,HttpServletResponse response){
    System.out.println("----登录验证---");
    String userName=request.getParameter("userName");
    String password=request.getParameter("password");

    Cookie cookie=new Cookie("user",userName+"-"+password);
    cookie.setMaxAge(1*60*60*24*7);
    response.addCookie(cookie);

    HttpSession session=request.getSession();
    User currentUser=new User(userName,password);
    session.setAttribute("currentUser", currentUser);

    return "redirect:/main.jsp";
}

// 可以直接获取HttpSession,例如:
@RequestMapping("/login")
public String login(HttpSession session){
    System.out.println("----登录验证---");
    String userName=request.getParameter("userName");
    String password=request.getParameter("password");
    User currentUser=new User(userName,password);

    HttpSession session=request.getSession();
    session.setAttribute("currentUser", currentUser);

    return "redirect:/main.jsp";
}
6.rest风格和@pathVariable和静态资源映射
* rest风格:前端控制器拦截地址不再是*.do,而是/
* 因此,需要在springmvc里面配置静态资源映射
<mvc:resources mapping="/images/**" location="/images/"/>
<mvc:resources mapping="/css/**" location="/css/"/>
* 注解@pathVariable
@RequestMapping("/details/{id}")
public ModelAndView details(@PathVariable("id") int id){
ModelAndView mav=new ModelAndView();
if(id==1){
mav.addObject("article", new Article("文章一","文章一的内容"));
}else if(id==2){
mav.addObject("article", new Article("文章二","文章二的内容"));
}
mav.setViewName("article/details");
return mav;
}
7.springmvc.xml
<?xml version="1.0" encoding="UTF-8"?>
<beans xmlns="http://www.springframework.org/schema/beans"
    xmlns:xsi="http://www.w3.org/2001/XMLSchema-instance"
    xmlns:p="http://www.springframework.org/schema/p"
    xmlns:context="http://www.springframework.org/schema/context"
    xmlns:mvc="http://www.springframework.org/schema/mvc"
    xsi:schemaLocation="
        http://www.springframework.org/schema/beans
        http://www.springframework.org/schema/beans/spring-beans.xsd
        http://www.springframework.org/schema/mvc
        http://www.springframework.org/schema/mvc/spring-mvc.xsd
        http://www.springframework.org/schema/context
        http://www.springframework.org/schema/context/spring-context.xsd">

    <!-- 使用注解的包,包括子集 -->
    <context:component-scan base-package="com.java1234"/>

    <!-- 支持对象与json的转换。 -->
    <mvc:annotation-driven/>

    <!-- 静态资源映射 -->
    <mvc:resources mapping="/images/**" location="/images/"/>
    <mvc:resources mapping="/css/**" location="/css/"/>

    <!-- 视图解析器 -->
    <bean id="viewResolver"
        class="org.springframework.web.servlet.view.InternalResourceViewResolver">
        <property name="prefix" value="/WEB-INF/jsp/" />
        <property name="suffix" value=".jsp"></property>
    </bean>

</beans>
8.文件上传
springmvc实现文件上传,除了spring相关的jar,还需要

* 首先在springmvc中配置
<bean id="multipartResolver" class="org.springframework.web.multipart.commons.CommonsMultipartResolver">
    <property name="defaultEncoding" value="UTF-8"/>
    <property name="maxUploadSize" value="10000000"/>
</bean>
* 代码:
@RequestMapping("/upload")
public String uploadFile(@RequestParam("file1") MultipartFile file1,HttpServletRequest request)throws Exception{
    String filePath=request.getServletContext().getRealPath("/");
    System.out.println(filePath);
    file1.transferTo(new File(filePath+"upload/"+file1.getOriginalFilename()));
    return "redirect:success.html";
}

@RequestMapping("/upload2")
public String uploadFiles(@RequestParam("file") MultipartFile[] files,HttpServletRequest request)throws Exception{
    String filePath=request.getServletContext().getRealPath("/");
    System.out.println(filePath);
    for(MultipartFile file:files){
        file.transferTo(new File(filePath+"upload/"+file.getOriginalFilename()));
    }
    return "redirect:success.html";
}
页面jsp
<!DOCTYPE html>
<html>
<head>
<meta charset="UTF-8">
<title>Insert title here</title>
</head>
<body>
<form action="upload2.do" method="post" enctype="multipart/form-data">
    <table>
        <tr>
            <th colspan="2">上传文件</th>
        </tr>
        <tr>
            <td>文件一</td>
            <td>
                <input type="file" name="file"/>
            </td>
        </tr>
        <tr>
            <td>文件二</td>
            <td>
                <input type="file" name="file"/>
            </td>
        </tr>
        <tr>
            <td colspan="2">
                <input type="submit" value="上传文件"/>
            </td>
        </tr>
    </table>
</form>
</body>
</html>
9.json交互

---
posted on 2021-01-03 23:34 wenbin_ouyang 阅读(281) 评论(0) 收藏 举报

 浙公网安备 33010602011771号