
图像数字化——图像锐化:改变图像的灰度级数(不调用库函数)
图像锐化:改变图像的灰度级数
一、灰度级数调整原理
-
灰度量化公式:
给定输入像素值 P∈[0,255]P \in [0,255]P∈[0,255] 和目标灰度级数 LLL,量化后的值为:
P′=⌊P256/L⌋×256L P' = \left\lfloor \frac{P}{256/L} \right\rfloor \times \frac{256}{L} P′=⌊256/LP⌋×L256
其中 ⌊⋅⌋\lfloor \cdot \rfloor⌊⋅⌋ 表示向下取整 -
数学推导:
-
将256级灰度均匀划分为 LLL 个区间
-
每个区间的宽度为 Δ=256L\Delta = \frac{256}{L}Δ=L256
-
映射关系:
P→⌊PΔ⌋×Δ+Δ2 P \rightarrow \left\lfloor \frac{P}{\Delta} \right\rfloor \times \Delta + \frac{\Delta}{2} P→⌊ΔP⌋×Δ+2Δ
-
二、算法实现步骤
-
预处理阶段:
-
计算量化步长:
step=255L−1 \text{step} = \frac{255}{L-1} step=L−1255 -
建立量化查找表(LUT):
LUT[i]=round(i×step),i=0,1,...,L−1 \text{LUT}[i] = \text{round}\left(i \times \text{step}\right), \quad i=0,1,...,L-1 LUT[i]=round(i×step),i=0,1,...,L−1
-
-
像素处理:
对每个像素 PPP:-
计算量化索引:
k=⌊Pstep⌋ k = \left\lfloor \frac{P}{\text{step}} \right\rfloor k=⌊stepP⌋ -
边界处理:
k=min(k,L−1) k = \min(k, L-1) k=min(k,L−1) -
输出值:
P′=LUT[k] P' = \text{LUT}[k] P′=LUT[k]
-
三、色彩空间转换(RGB→灰度)
-
亮度公式:
ITU-R BT.601标准:
Y=0.299R+0.587G+0.114B Y = 0.299R + 0.587G + 0.114B Y=0.299R+0.587G+0.114B -
实现方法:
- 对每个RGB像素 [R,G,B][R,G,B][R,G,B]:
Y=round(0.299R+0.587G+0.114B) Y = \text{round}(0.299R + 0.587G + 0.114B) Y=round(0.299R+0.587G+0.114B)
- 对每个RGB像素 [R,G,B][R,G,B][R,G,B]:
四、代码结构设计
-
核心函数:
def change_grayscale_levels(img_array, levels): # 转换为灰度图像 gray_img = rgb_to_grayscale(img_array) # 计算量化参数 step = 255 / (levels - 1) lut = np.round(np.arange(0, levels) * step).astype(np.uint8) # 应用量化 quantized = lut[(gray_img / step).astype(int)] return quantized -
辅助函数:
def rgb_to_grayscale(rgb_array):
    return np.dot(rgb_array[...,:3], [0.299, 0.587, 0.114]).astype(np.uint8)
五、数学特性分析
-
量化误差:
-
最大量化误差:
ϵmax=Δ2=128L \epsilon_{max} = \frac{\Delta}{2} = \frac{128}{L} ϵmax=2Δ=L128 -
均方误差(MSE):
MSE=1HW∑i=1H∑j=1W(Pij−Pij′)2 \text{MSE} = \frac{1}{HW}\sum_{i=1}^H \sum_{j=1}^W (P_{ij} - P'_{ij})^2 MSE=HW1i=1∑Hj=1∑W(Pij−Pij′)2
-
-
信息熵变化:
-
原始图像熵:
H0=−∑k=0255pklog2pk H_0 = -\sum_{k=0}^{255} p_k \log_2 p_k H0=−k=0∑255pklog2pk -
量化后熵:
HL=−∑m=0L−1qmlog2qm H_L = -\sum_{m=0}^{L-1} q_m \log_2 q_m HL=−m=0∑L−1qmlog2qm
其中 qmq_mqm 是第 mmm 个灰度级的概率
-
六、可视化效果预测
| 灰度级数L | 视觉效果 | 文件大小比 |
|---|---|---|
| 256 | 连续渐变 | 100% |
| 64 | 轻微色阶 | ~75% |
| 16 | 明显色块 | ~50% |
| 4 | 强烈对比 | ~25% |
| 2 | 黑白二值 | ~12.5% |
七、应用场景
- 医学成像:CT/MRI图像常用16位灰度(L=65536L=65536L=65536)
- 数字半调:印刷行业使用 L=256L=256L=256 模拟连续色调
- 图像压缩:通过减少灰度级数降低存储需求
八、算法复杂度分析
-
时间复杂度:
- RGB转灰度:O(H×W×3)O(H \times W \times 3)O(H×W×3)
- 量化处理:O(H×W)O(H \times W)O(H×W)
- 总体:O(H×W)O(H \times W)O(H×W)
-
空间复杂度:
- 额外存储LUT:O(L)O(L)O(L)
- 输出图像:O(H×W)O(H \times W)O(H×W)
import numpy as np
from PIL import Image
import matplotlib.pyplot as plt

def rgb_to_grayscale(rgb_array):
    """手动实现RGB转灰度"""
    # ITU-R BT.601标准系数
    return np.dot(rgb_array[...,:3], [0.299, 0.587, 0.114]).astype(np.uint8)

def change_grayscale_levels(image_array, levels):
    """
    手动改变图像灰度级数
    :param image_array: 输入图像数组 (H,W,3)
    :param levels: 目标灰度级数 (2-256)
    :return: 量化后的灰度图像 (H,W)
    """
    # 转换为灰度图像
    gray_img = rgb_to_grayscale(image_array)

    # 计算量化参数
    step = 255 / (levels - 1)

    # 创建量化查找表
    lut = np.round(np.arange(0, levels) * step).astype(np.uint8)

    # 应用量化
    quantized = np.floor_divide(gray_img, step).astype(int)
    quantized = np.take(lut, quantized)

    return quantized

def display_results(original, processed, levels):
    """显示对比结果"""
    plt.figure(figsize=(12, 6))

    plt.subplot(1, 2, 1)
    plt.imshow(original, cmap='gray', vmin=0, vmax=255)
    plt.title(f'Original Image (256 levels)')
    plt.axis('off')

    plt.subplot(1, 2, 2)
    plt.imshow(processed, cmap='gray', vmin=0, vmax=255)
    plt.title(f'Processed Image ({levels} levels)')
    plt.axis('off')

    plt.tight_layout()
    plt.show()

# 主程序
if __name__ == "__main__":
    # 读取测试图像
    try:
        img = Image.open('imori.jpg')
        img_array = np.array(img)

        # 设置目标灰度级数 (可修改为4/8/16/32等)
        target_levels = 8

        # 处理图像
        quantized_img = change_grayscale_levels(img_array, target_levels)

        # 显示结果
        display_results(rgb_to_grayscale(img_array),
                       quantized_img,
                       target_levels)

    except FileNotFoundError:
        print("错误:找不到图像文件 'imori.jpg'")
    except Exception as e:
        print(f"发生错误:{str(e)}")
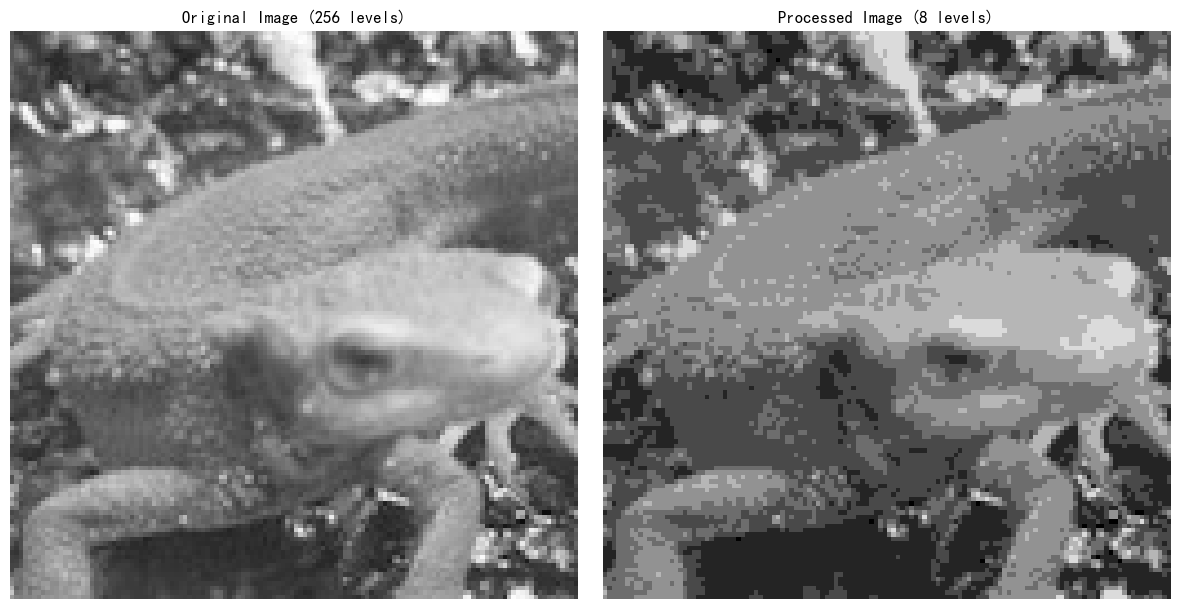
结果
运行代码后,将获得原图像的灰度化效果,以及经过 8 级灰度处理的图像效果。下图展示了读取的原始图像。

 浙公网安备 33010602011771号