4-6暂退法
 本章主要学习过惩罚权重的L2范数来正则化统计模型的经典方法
4-6 暂退法
1.从零开始实现
import torch
from torch import nn
from d2l import torch as d2l

def dropout_layer(x, dropout):
    assert 0 <= dropout <= 1
    # 在本情况中,所有元素都被丢弃
    if dropout == 1:
        return torch.zeros_like(x)
    # 在本情况中,所有元素都被保留
    if dropout == 0:
        return x
    mask = (torch.rand(x.shape) > dropout).float()
    return mask * x/(1.0 - dropout)
x = torch.arange(16, dtype = torch.float32).reshape((2, 8))
print(x)
print(dropout_layer(x, 0.))
print(dropout_layer(x, 0.5))
print(dropout_layer(x, 1.))
tensor([[ 0.,  1.,  2.,  3.,  4.,  5.,  6.,  7.],
        [ 8.,  9., 10., 11., 12., 13., 14., 15.]])
tensor([[ 0.,  1.,  2.,  3.,  4.,  5.,  6.,  7.],
        [ 8.,  9., 10., 11., 12., 13., 14., 15.]])
tensor([[ 0.,  0.,  0.,  0.,  0.,  0.,  0., 14.],
        [ 0., 18., 20., 22.,  0.,  0.,  0.,  0.]])
tensor([[0., 0., 0., 0., 0., 0., 0., 0.],
        [0., 0., 0., 0., 0., 0., 0., 0.]])
2.定义模型参数
| 变量名 | 含义 |
|---|---|
num_inputs |
输入层神经元数量,784 通常对应 28×28 像素的灰度图像(如 MNIST 手写数字)。 |
num_outputs |
输出层神经元数量,10 表示 10 分类任务(如数字 0~9 的分类)。 |
num_hiddens1 |
第 1 个隐藏层的神经元数量,256 个神经元,用于提取高阶特征。 |
num_hiddens2 |
第 2 个隐藏层的神经元数量,256 个神经元,进一步抽象特征。 |
num_inputs, num_outputs, num_hiddens1, num_hiddens2 = 784, 10, 256, 256
3.定义模型
一、相关用法说明
网络结构
784 → Linear → ReLU → Dropout(p=0.2)
↓
256 → Linear → ReLU → Dropout(p=0.5)
↓
256 → Linear
↓
10 (logits)
Dropout 放在训练阶段
只有在 model.train()(或手动 is_training=True)时才会随机置零神经元,防止过拟合;
推理阶段(model.eval())自动关闭 Dropout。
缺少的 dropout_layer
PyTorch 本身已有 torch.nn.Dropout/torch.nn.functional.dropout,
dropout1, dropout2 = 0.2, 0.5

class Net(nn.Module):
    def __init__(self, num_inputs, num_outputs, num_hiddens1, num_hiddens2, is_training = True):
        super(Net, self).__init__()   # 调用父类构造函数
        self.num_inputs = num_inputs  # 保存输入维度,用于 reshape
        self.training = is_training  # 记录当前模式(训练/推理)
        # 三层全连接:784 → 256 → 256 → 10
        self.lin1 = nn.Linear(num_inputs, num_hiddens1)
        self.lin2 = nn.Linear(num_hiddens1, num_hiddens2)
        self.lin3 = nn.Linear(num_hiddens2, num_outputs)
        self.relu = nn.ReLU()  # 激活函数
    def forward(self, x):
        # 将输入 x 展平成 (batch_size, 784)
        H1 = self.relu(self.lin1(x.reshape((-1, self.num_inputs))))
        # 只有在训练模型时才使用dropout
        if self.training == True:
            # 在第一个全连接层之后添加一个dropout层
            H1 = dropout_layer(H1, dropout1)  # 以 0.2 概率随机置零
        H2 = self.relu(self.lin2(H1))  # 第二层 256 → 256
        if self.training == True:
            # 在第二个全连接层之后添加一个dropout层
            H2 = dropout_layer(H2, dropout2)  # 以 0.5 概率随机置零
        out = self.lin3(H2)  # 输出层 256 → 10
        return out  # 返回 logits(未做 softmax)

# 实例化网络:输入784维,输出10类,两隐藏层各256个神经元
net = Net(num_inputs, num_outputs, num_hiddens1, num_hiddens2)
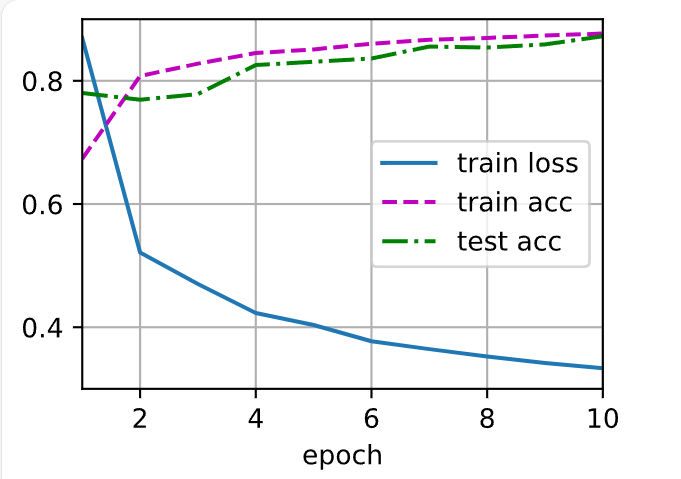
4.训练和测试
一、逐行含义说明
num_epochs, lr, batch_size = 10, 0.5, 256
设定训练过程的超参数:- 10 轮(epoch)遍历整个训练集
- 学习率 0.5(对 SGD 来说非常大,通常配合
lr_scheduler或减小到 0.01 左右) - 每个 mini-batch 取 256 张图片
loss = nn.CrossEntropyLoss(reduction='none')
创建交叉熵损失函数。reduction='none'表示 不汇总 损失,返回 每个样本的 loss 向量(形状[batch_size])。d2l.train_ch3内部会对这批向量再求平均,因此不影响最终效果。- 若改为默认
reduction='mean',返回标量亦可。
train_iter, test_iter = d2l.load_data_fashion_mnist(batch_size)
使用d2l(《动手学深度学习》配套库)加载 Fashion-MNIST 数据集,返回train_iter:训练集迭代器(每次产出 256 张图片+标签)test_iter:测试集迭代器(同样按 256 一批)
trainer = torch.optim.SGD(net.parameters(), lr=lr)
创建随机梯度下降优化器,对网络net的全部可训练参数做更新,学习率 0.5。d2l.train_ch3(net, train_iter, test_iter, loss, num_epochs, trainer)
调用d2l提供的训练函数train_ch3,自动完成- 前向、反向、参数更新
- 每轮在训练集/测试集上计算准确率并绘图
- 默认使用 CPU/GPU 上已放置的
net
# 设定训练参数:10 轮,学习率 0.5,每批 256 张图
num_epochs, lr, batch_size = 10, 0.5, 256

# 定义交叉熵损失,返回每个样本的 loss 向量
loss = nn.CrossEntropyLoss(reduction = 'none')

# 加载 Fashion-MNIST,返回训练/测试迭代器,每批 256 张图
train_iter, test_iter = d2l.load_data_fashion_mnist(batch_size)

# 创建 SGD 优化器,对 net 的所有参数应用学习率 0.5
trainer = torch.optim.SGD(net.parameters(), lr = lr)

# 调用 d2l 的封装训练函数,完成 10 轮训练与评估
d2l.train_ch3(net, train_iter, test_iter, loss, num_epochs, trainer)
5.简洁实现
一、逐句含义
net = nn.Sequential(...)
用 Sequential 容器把网络层按顺序堆叠,形成一条前向通路:nn.Flatten():把输入的二维图像 (batch, 1, 28, 28) 展平成 (batch, 784)。nn.Linear(784, 256):全连接层,784 → 256。nn.ReLU():激活函数。nn.Dropout(dropout1):以概率dropout1=0.2随机置零神经元(仅训练时生效)。nn.Linear(256, 256):第二个全连接层,256 → 256。nn.ReLU():再次激活。nn.Dropout(dropout2):以概率dropout2=0.5随机置零。nn.Linear(256, 10):输出层,256 → 10 类 logits。
def init_weights(m):
定义一个 权重初始化函数。当层m是nn.Linear时,用 正态分布 N(0, 0.01²) 初始化其权重;偏置默认初始化为 0(PyTorch 默认)。net.apply(init_weights)
递归地对net里所有子模块调用init_weights。
行末的分号;只是为了抑制 Jupyter Notebook 的自动输出,无语法意义。
net = nn.Sequential(nn.Flatten(),  # 将(batch,1,28,28)展平为(batch,784)
                   nn.Linear(784, 256),  # 全连接层:784个输入,256个输出

                   nn.ReLU(),    # ReLU激活
                   # 在第一个全连接层之后添加一个dropout层
                   nn.Dropout(dropout1),  # Dropout层,训练时以0.2概率丢弃
                   nn.Linear(256, 256),  # 全连接层:256→256
                   nn.ReLU(),  # ReLU激活
                   # 在第二个全连接层之后添加一个dropout层
                   nn.Dropout(dropout2),  # Dropout层,训练时以0.5概率丢弃
                   nn.Linear(256, 10))  # 输出层:256→10个类别logits

# 定义权重初始化函数:对Linear层用N(0,0.01)初始化
def init_weights(m):
    if type(m) == nn.Linear:
        nn.init.normal_(m.weight, std=0.01)

# 把初始化函数应用到net的所有子模块
net.apply(init_weights);
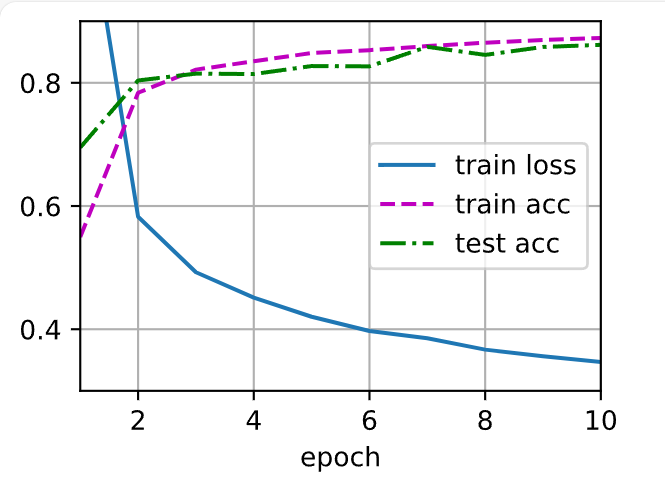
训练和测试
一、逐句含义
trainer = torch.optim.SGD(net.parameters(), lr=lr)
创建一个 随机梯度下降(SGD)优化器,用来更新网络net中 所有可训练参数。net.parameters():返回网络里所有权重weight和偏置bias的张量迭代器。lr=lr:学习率(之前设成了 0.5,可再调小)。
d2l.train_ch3(net, train_iter, test_iter, loss, num_epochs, trainer)
调用《动手学深度学习》配套库d2l的 训练函数train_ch3,它会:- 遍历
num_epochs轮; - 每轮用
train_iter取批次数据 → 前向 → 计算loss→ 反向 →trainer.step()更新参数; - 每轮结束后用
test_iter评估准确率; - 实时绘制训练/测试的 loss 与准确率曲线。
- 遍历
# 创建 SGD 优化器,负责按学习率 lr 更新网络所有参数
trainer = torch.optim.SGD(net.parameters(), lr=lr)

# 调用 d2l 的 train_ch3 进行 num_epochs 轮训练与测试评估
d2l.train_ch3(net, train_iter, test_iter, loss, num_epochs, trainer)

 浙公网安备 33010602011771号