7-卷积原理
 本章主要介绍卷积原理
1. 卷积原理
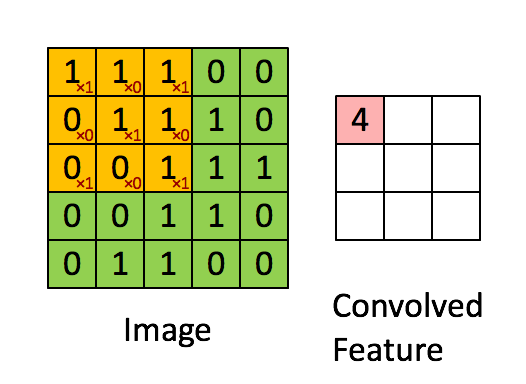
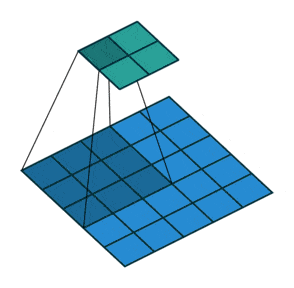
① 卷积核不停的在原图上进行滑动,对应元素相乘再相加。
② 下图为每次滑动移动1格,然后再利用原图与卷积核上的数值进行计算得到缩略图矩阵的数据,如下图右所示。
import torch
import torch.nn.functional as F
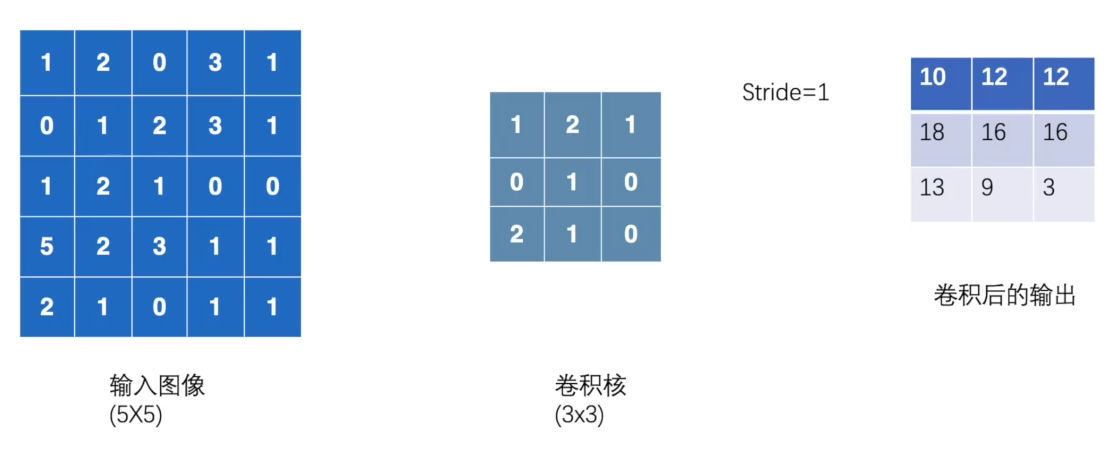
input = torch.tensor([[1, 2, 0, 3, 1],
[0, 1, 2, 3, 1],
[1, 2, 1, 0, 0],
[5, 2, 3, 1, 1],
[2, 1, 0, 1, 1]])
kernel = torch.tensor([[1, 2, 1],
[0, 1, 0],
[2, 1, 0]])
print(input.shape)
print(kernel.shape)
input = torch.reshape(input, (1,1,5,5))
kernel = torch.reshape(kernel, (1,1,3,3))
print(input.shape)
print(kernel.shape)
output = F.conv2d(input, kernel, stride=1)
print(output)
torch.Size([5, 5])
torch.Size([3, 3])
torch.Size([1, 1, 5, 5])
torch.Size([1, 1, 3, 3])
tensor([[[[10, 12, 12],
          [18, 16, 16],
          [13,  9,  3]]]])
import torch
import torch.nn.functional as F

input = torch.tensor([[1, 2, 0, 3, 1],
                      [0, 1, 2, 3, 1],
                      [1, 2, 1, 0, 0],
                      [5, 2, 3, 1, 1],
                      [2, 1, 0, 1, 1]])

kernel = torch.tensor([[1, 2, 1],
                       [0, 1, 0],
                       [2, 1, 0]])

print(input.shape)
print(kernel.shape)
input = torch.reshape(input, (1,1,5,5))
kernel = torch.reshape(kernel, (1,1,3,3))
print(input.shape)
print(kernel.shape)

output2 = F.conv2d(input, kernel, stride=2)  # 步伐为2
print(output2)
torch.Size([5, 5])
torch.Size([3, 3])
torch.Size([1, 1, 5, 5])
torch.Size([1, 1, 3, 3])
tensor([[[[10, 12],
          [13,  3]]]])
import torch
import torch.nn.functional as F

input = torch.tensor([[1, 2, 0, 3, 1],
                      [0, 1, 2, 3, 1],
                      [1, 2, 1, 0, 0],
                      [5, 2, 3, 1, 1],
                      [2, 1, 0, 1, 1]])

kernel = torch.tensor([[1, 2, 1],
                       [0, 1, 0],
                       [2, 1, 0]])

print(input.shape)
print(kernel.shape)
input = torch.reshape(input, (1,1,5,5))
kernel = torch.reshape(kernel, (1,1,3,3))
print(input.shape)
print(kernel.shape)

output3 = F.conv2d(input, kernel, stride=1, padding=1)  # 周围只填充一层
print(output3)
torch.Size([5, 5])
torch.Size([3, 3])
torch.Size([1, 1, 5, 5])
torch.Size([1, 1, 3, 3])
tensor([[[[ 1,  3,  4, 10,  8],
          [ 5, 10, 12, 12,  6],
          [ 7, 18, 16, 16,  8],
          [11, 13,  9,  3,  4],
          [14, 13,  9,  7,  4]]]])
2. 步幅、填充原理
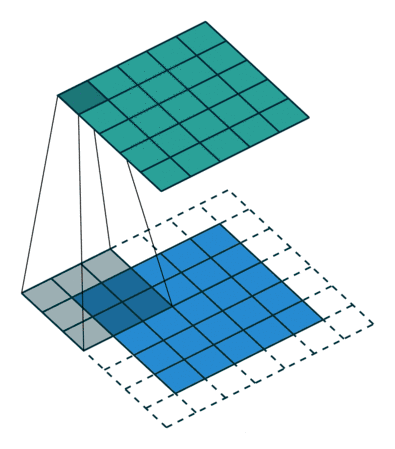
① 步幅:卷积核经过输入特征图的采样间隔。设置步幅的目的:希望减小输入参数的数目,减少计算量。
② 填充:在输入特征图的每一边添加一定数目的行列。设置填充的目的:希望每个输入方块都能作为卷积窗口的中心,或使得输出的特征图的长、宽 = 输入的特征图的长、宽。
③ 一个尺寸 a * a 的特征图,经过 b * b 的卷积层,步幅(stride)= c,填充(padding)= d,若d等于0,也就是不填充,输出的特征图的尺寸 =(a-b)/ c+1;若d不等于0,也就是填充,输出的特征图的尺寸 =(a+2d-b)/ c+1。
例子1:一个特征图尺寸为4 * 4的输入,使用3 * 3的卷积核,步幅=1,填充=0,输出的尺寸=(4 - 3)/1 + 1 = 2。
例子2: 一个特征图尺寸为5 * 5的输入,使用3 * 3的卷积核,步幅=1,填充=1,输出的尺寸=(5 + 2 * 1 - 3)/1 + 1 = 5。
例子3:一个特征图尺寸为5 * 5的输入, 使用3 * 3的卷积核,步幅=2,填充=0,输出的尺寸=(5-3)/2 + 1 = 2。
例子4:一个特征图尺寸为6 * 6的输入, 使用3 * 3的卷积核,步幅=2,填充=1,输出的尺寸=(6 + 2 * 1 - 3)/2 + 1 = 2.5 + 1 = 3.5 向下取整=3(降采样:边长减少1/2)。


 浙公网安备 33010602011771号