Spring-IOC学习笔记
Spring 是轻量级的开源的 JavaEE 框架。
Spring有两个核心部分IOC 和 Aop
- IOC(Inversion of Control):控制反转,把创建对象过程交给 Spring 进行管理
- Aop(Aspect Oriented Programming):面向切面编程,不修改源代码进行功能增强
Spring特点:
- 方便解耦,简化开发
- Aop 编程支持
- 方便程序测试
- 方便和其他框架进行整合
- 方便进行事务操作
- 降低 API 开发难度
本篇介绍主要介绍IOC
IOC底层原理:
- 配置xml文件,配置自己想要创建的对象
- 创建工厂类,在工厂类中通过xml解析获取配置文件中的class属性值,再通过反射机制创建对象从而获得对象实例。
Spring 提供了两种 IOC 容器实现方式(两个接口):
- BeanFactory:IOC 容器基本实现,是 Spring 内部的使用接口,一般不提供开发人员进行使用(想用也不是不可以拉)
- 加载配置文件时候不会创建对象,在获取对象(使用)才去创建对象
- ApplicationContext:BeanFactory 接口的子接口,提供更多更强大的功能,一般由开发人员进行使用
- 加载配置文件时候就会把在配置文件对象进行创建
Bean 管理
Bean 管理指的是两个操作
- Spring 创建对象
- Spirng 注入属性
其有两种实现方式
- 基于 xml 配置文件方式实现
- 基于注解方式实现
基于xml方式的Bean管理
-
在 spring 配置文件中,使用 bean 标签,标签里面添加对应属性,就可以实现对象创建
-
在 bean 标签有很多属性,常用的属性有
id 属性:唯一标识
class 属性:类全路径(包类路径)
-
创建对象时候,默认执行无参数构造方法完成对象创建
首先导入相关jar包,实际版本以自己的spring版本为最终结果,我的Spring版本是5.2.6
spring-expression-5.2.6.RELEASE.jar
commons-logging-1.1.1.jar
spring-beans-5.2.6.RELEASE.jar
spring-context-5.2.6.RELEASE.jar
spring-core-5.2.6.RELEASE.jar
使用set方法进行注入
-
创建类,定义属性和对应的 set 方法
public class Book { //创建属性 private String bname; private String bauther; private String baddress; //创建属性对应的set方法 public void setBname(String bname) { this.bname = bname; } public void setBauther(String bauther) { this.bauther = bauther; } public void setBaddress(String baddress) { this.baddress = baddress; } } -
在 spring 配置文件配置创建对象和注入的属性
<bean id="book" class="com.hnust.spring5.Book"> <!--使用property完成属性的注入 name:类里面属性的名称 value:向属性注入的值 --> <property name="bname" value="易筋经"></property> <property name="bauther" value="达摩老祖"></property> </bean> -
获取对象实例
 @Test
 public void testAdd(){
     //1 加载xml配置文件,参数就是xml文件的名字
     ApplicationContext context = new ClassPathXmlApplicationContext("bean1.xml");
     //2 获取配置创建的对象
     Book book = context.getBean("book", Book.class);
     //3 之后就是对创建好的对象进行操作,使用属性,调用方法之类的
 }
注入其他类型的属性:
注入属性-空值::
<bean id="book" class="com.hnust.spring5.Book">
    <!--设置一个空值-->
    <property name="baddress">
        <null/>
    </property>-->
</bean>
注入属性-包含特殊符号:
<bean id="book" class="com.hnust.spring5.Book">
<!--属性包含特殊符号
方法1 把<>进行转义 <>
方法2 把带特殊符号的内容写到CDATA中
-->
<property name="baddress">
<value><![CDATA[<<南京>>]]></value>
</property>
</bean>
注入属性-外部bean
这里以UserServiceImpl类和UserDaoImpl类进行示例
- 创建两个类 UserServiceImpl 类和 UserDaoImpl 类
- 在 service 调用 dao 里面的方法
- 在 spring 配置文件中进行配置
public class UserServiceImpl implements UserService{

    //创建UserDao类型属性,生成set方法
    private UserDao userDao;

    public void setUserDao(UserDao userDao) {
        this.userDao = userDao;
    }

    public void add(){
        System.out.println("service add ..........");
        userDao.update();
    }
}
<bean id="userService" class="com.hnust.spring5.service.UserServiceImpl">
        <!--注入userDao对象
            name属性值:类里的属性名称
            ref属性:创建userDao对象bean标签的id值,引入外部bean
        -->
        <property name="userDao" ref="userDaoImpl"></property>
</bean>
<bean id="userDaoImpl" class="com.hnust.spring5.dao.UserDaoImpl"></bean>
注入属性-内部bean
这里以部门(Dept)类和员工(Emp)类进行示例
//部门类
public class Dept {
    private String danme;
    public String getDanme() {
        return danme;
    }
    public void setDanme(String danme) {
        this.danme = danme;
    }
}

//员工类
public class Emp {
    private String ename;
    private String egender;
    //员工属于某一个部门,使用对象的形式进行表示
    private Dept dept;
    public Dept getDept() {
        return dept;
    }
    public void setEname(String ename) {
        this.ename = ename;
    }
    public void setEgender(String egender) {
        this.egender = egender;
    }
	public void setDept(Dept dept) {
        this.dept = dept;
    }
}
<bean id="emp" class="com.hnust.spring5.bean.Emp">
    <!--设置两个普通属性-->
    <property name="ename" value="lucy"></property>
    <property name="egender" value="woman"></property>
    <!--设置对象类型的属性-->
    <property name="dept" >
        <bean id="dept" class="com.hnust.spring5.bean.Dept">
            <property name="danme" value="AC"></property>
        </bean>
    </property>
</bean>
注入属性-集合:
public class Stu {
    //数组类型属性
    private String[] courses;
    //List集合类型的属性
    private List<String> list;
    //Map集合类型的属性
    private Map<String, String> maps;
    //set集合类型的属性
    private Set<String> sets;
    //Course类型的属性
    private List<Course> courseList;

    public void setCourses(String[] courses) {
        this.courses = courses;
    }
    public void setList(List<String> list) {
        this.list = list;
    }
    public void setMaps(Map<String, String> maps) {
        this.maps = maps;
    }
    public void setSets(Set<String> sets) {
        this.sets = sets;
    }
    public void setCourseList(List<Course> courseList) {
        this.courseList = courseList;
    }
}
<!--集合类型属性注入-->
<bean id="stu" class="com.hnust.spring5.Stu">
    <!--数组类型属性注入-->
    <property name="courses">
        <array>
            <value>java</value>
            <value>c++</value>
        </array>
    </property>
    <!--list类型属性注入-->
    <property name="list">
        <list>
            <value>张三</value>
            <value>小张</value>
        </list>
    </property>
    <!--map类型属性注入-->
    <property name="maps">
        <map>
            <entry key="JAVA" value="java"></entry>
            <entry key="PHP" value="php"></entry>
        </map>
    </property>
    <!--set类型属性注入-->
    <property name="sets">
        <set>
            <value>MySQL</value>
            <value>Redis</value>
        </set>
    </property>
    <!--注入list集合类型,值是对象-->
    <property name="courseList">
        <list>
            <ref bean="course1"/>
            <ref bean="course2"/>
        </list>
    </property>
</bean>
<!--创建多个course对象-->
<bean id="course1" class="com.hnust.spring5.Course">
    <property name="cname" value="Spring5"></property>
</bean>
<bean id="course2" class="com.hnust.spring5.Course">
    <property name="cname" value="SpringMVC"></property>
</bean>
对于需要反复使用的属性可以提取出来,以List为例,首先引入util名称空间,再设置自己要提取的属性值,最后将属性注入
<?xml version="1.0" encoding="UTF-8"?>
<!--引入名称空间-->
<beans xmlns="http://www.springframework.org/schema/beans"
       xmlns:xsi="http://www.w3.org/2001/XMLSchema-instance"
       xmlns:util="http://www.springframework.org/schema/util"
       xsi:schemaLocation="http://www.springframework.org/schema/beans http://www.springframework.org/schema/beans/spring-beans.xsd
                           http://www.springframework.org/schema/util http://www.springframework.org/schema/util/spring-util.xsd">
    <!--1 提取list集合类型属性-->
    <util:list id="bookList">
        <value>易筋经</value>
        <value>九阴真经</value>
        <value>九阳神功</value>
    </util:list>

    <!--2 将提取list集合类型属性注入使用-->
    <bean id="book" class="com.hnust.spring5.Book" scope="prototype">
        <property name="list" ref="bookList"></property>
    </bean>
</beans>
xml自动装配
<!--实现自动装配
    autowire属性常用两个值:
    byName根据属性名称注入,注入bean的id值要和类属性名称一样
    byType根据属性类型注入,相同类型的bean不能定义多个,不然会报错
-->
<bean id="emp" class="com.hnust.spring5.autowrite.Emp" autowire="byName"></bean>
<bean id="dept" class="com.hnust.spring5.autowrite.Dept"></bean>
xml引入外部属性文件
以数据库配置为例,jdbc.properties的路径在src下,其内容如下
prop.driverClass=com.mysql.jdbc.Driver
prop.url=jdbc:mysql://localhost:3306/userDb
prop.userName=root
prop.password=root
则在xml文件中,先引入context名称空间,再引入外部属性文件,如下所示
<?xml version="1.0" encoding="UTF-8"?>
<!--引入名称空间-->
<beans xmlns="http://www.springframework.org/schema/beans"
       xmlns:xsi="http://www.w3.org/2001/XMLSchema-instance"
       xmlns:context="http://www.springframework.org/schema/context"
       xsi:schemaLocation="http://www.springframework.org/schema/beans http://www.springframework.org/schema/beans/spring-beans.xsd
                           http://www.springframework.org/schema/context http://www.springframework.org/schema/context/spring-context.xsd">


        <!--引入外部属性文件-->
        <context:property-placeholder location="classpath:jdbc.properties"/>
        <bean id="dataSource" class="com.alibaba.druid.pool.DruidDataSource">
                <property name="driverClassName" value="${prop.driverClass}"/>
                <property name="url" value="${prop.url}"/>
                <property name="username" value="${prop.userName}"/>
                <property name="password" value="${prop.password}"/>
        </bean>
</beans>
基于注解方式的Bean管理
注解是代码特殊标记,格式:@注解名称(属性名称=属性值, 属性名称=属性值...)
注解作用在类上面,方法上面,属性上面
使用注解目的:简化 xml 配置
有4个注解,分别为(1)@Component (2)@Service (3)@Controller (4)@Repository
以上四个注解功能是一样的,都可以用来创建 bean 实例
基于注解方式实现对象创建
-
配置xml文件
<?xml version="1.0" encoding="UTF-8"?> <beans xmlns="http://www.springframework.org/schema/beans" xmlns:xsi="http://www.w3.org/2001/XMLSchema-instance" xmlns:context="http://www.springframework.org/schema/context" xsi:schemaLocation="http://www.springframework.org/schema/beans http://www.springframework.org/schema/beans/spring-beans.xsd http://www.springframework.org/schema/context http://www.springframework.org/schema/context/spring-context.xsd"> <!--开启组件扫描 如果扫描多个包,则在多个包中间使用逗号隔开 或者写这些包的上层目录 --> <context:component-scan base-package="com.hnust.spring5"></context:component-scan> <!--其他扫描方式示例1 use-default-filters="false" 表示现在不使用默认filter而使用自己配置的filter context:include-filter 设置扫描内容,该示例只扫描Controller注解 --> <context:component-scan base-package="com.hnust.spring5" use-default-filters="false"> <context:include-filter type="annotation" expression="org.springframework.stereotype.Controller"/> </context:component-scan> <!--其他扫描方式示例2 use-default-filters="false" 表示现在不使用默认filter而使用自己配置的filter context:include-filter 设置不进行扫描的内容,该示例不扫描Controller注解,剩下全部扫描 --> <context:component-scan base-package="com.hnust.spring5"> <context:exclude-filter type="annotation" expression="org.springframework.stereotype.Controller"/> </context:component-scan> </beans> -
在自己编写的类中添加注解
//在注解里面的value属性值可以省略不写,默认值是类名称并将其首字母小写 @Service(value = "userService") //与<bean id="userService" class="包的路径"/>写法类似 public class UserService { //普通属性注入 @Value(value = "abc") private String name; //自定义属性注入,以UserDao为例。定义UserDao类型的属性,不需要添加set方法,整个过程已经将set方法封装好了 @Autowired //根据类型进行自动注入 @Qualifier(value = "UserDaoImpl1")//根据名称进行注入,和@Autowired搭配使用 private UserDao userDao; public void add(){ System.out.println("service add ........"+name); userDao.add(); } } -
获取对象实例
 @Test
 public void testService1(){
     //加载xml配置文件,参数就是xml文件的名字
     ApplicationContext context = new ClassPathXmlApplicationContext("bean1.xml");
     //获取配置配置创建的对象
     UserService userService = context.getBean("userService", UserService.class);
     //3 之后就是对创建好的对象进行操作,使用属性,调用方法之类的

 }
完全使用注解,不使用xml配置文件
新建配置类,类名随意,添加两个注解,如下所示
@Configuration//把当前类作为配置类,代替xml配置文件
@ComponentScan(basePackages = {"com.hnust.spring5"})//开启组件扫描
public class SpringConfig {
}
在前文中,获取上下文对象的语句为ApplicationContext context = new ClassPathXmlApplicationContext("bean1.xml");
将其修改为ApplicationContext context = new AnnotationConfigApplicationContext(SpringConfig.class);即可
 @Test
 public void testService2(){
     ApplicationContext context = new AnnotationConfigApplicationContext(SpringConfig.class);//加载配置类
     UserService userService = context.getBean("userService", UserService.class);
 }
Bean的生命周期
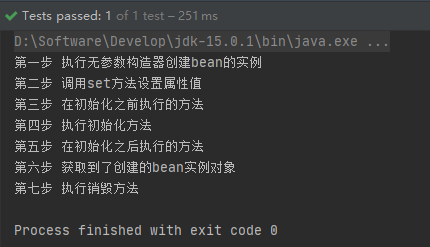
bean对象从诞生到销毁总共经历了7步,若去掉bean的后置处理器,则有5步。
示例代码如下,首先定义Orders类
public class Orders {

    public Orders() {
        System.out.println("第一步 执行无参数构造器创建bean的实例");
    }

    private String oname;

    public void setOname(String oname) {
        this.oname = oname;
        System.out.println("第二步 调用set方法设置属性值");
    }

    //创建执行的初始化方法
    public void initMethod(){
        System.out.println("第四步 执行初始化方法");
    }

    //创建执行销毁方法
    public void destroyMethod(){
        System.out.println("第七步 执行销毁方法");
    }
}
定义bean的后置处理器:
public class MyBean implements BeanPostProcessor {
    @Override
    public Object postProcessBeforeInitialization(Object bean, String beanName) throws BeansException {
        System.out.println("第三步 在初始化之前执行的方法");
        return bean;
    }

    @Override
    public Object postProcessAfterInitialization(Object bean, String beanName) throws BeansException {
        System.out.println("第五步 在初始化之后执行的方法");
        return bean;
    }
}
配置xml:
<beans xmlns="http://www.springframework.org/schema/beans"
       xmlns:xsi="http://www.w3.org/2001/XMLSchema-instance"
       xsi:schemaLocation="http://www.springframework.org/schema/beans http://www.springframework.org/schema/beans/spring-beans.xsd">

        <bean id="orders" class="com.hnust.spring5.bean.Orders" init-method="initMethod" destroy-method="destroyMethod">
                <property name="oname" value="手机"></property>
        </bean>

        <!--配置后置处理器-->
        <bean id="myBeanPost" class="com.hnust.spring5.bean.MyBean"></bean>

</beans>
测试代码:
@Test
public void testBean3(){
    ClassPathXmlApplicationContext context = new ClassPathXmlApplicationContext("bean1.xml");
    Orders orders = context.getBean("orders", Orders.class);
    System.out.println("第六步 获取到了创建的bean实例对象");
    //手动让bean实例销毁
    context.close();
}
测试结果:

 浙公网安备 33010602011771号