

linux权限管理
linux权限管理
1. linux用户权限管理
1.1 文件的权限和属主属组
在linux中,权限是用来定义用户能操作的行为的,每个文件都有其对应的权限,使用ls -l命令可以看到文件的权限
[root@xuzhichao ~]# ll /root/ -a
total 32
dr-xr-x---.  3 root root  163 Jun  1 01:31 .
dr-xr-xr-x. 20 root root  279 Jun  1 02:55 ..
-rw-------.  1 root root 1180 Jun  1  2021 anaconda-ks.cfg
-rw-------.  1 root root 3667 Jun  1 02:07 .bash_history
-rw-r--r--.  1 root root   18 Dec 28  2013 .bash_logout
-rw-r--r--.  1 root root  176 Dec 28  2013 .bash_profile
-rw-r--r--.  1 root root  176 Dec 28  2013 .bashrc
-rw-r--r--.  1 root root  100 Dec 28  2013 .cshrc
drwxr-----.  3 root root   19 Jun  1 00:38 .pki
-rw-r--r--.  1 root root  129 Dec 28  2013 .tcshrc
-rw-------.  1 root root 2153 Jun  1 01:31 .viminfo
其中文件的权限部分为从2-10这9个字符,rw-r--r--,这9个字符每3个字符为一个整体,分别代表文件属主user,属组group和其他人other的权限;而后面两个root则分别代表文件的属主和属组。
其中rwx分别代表读,写,执行权限。
1.1.1 chmod命令:修改文件权限
chmod命令可以修改文件的权限,语法格式为:
Usage: chmod [OPTION]... MODE[,MODE]... FILE...
  or:  chmod [OPTION]... OCTAL-MODE FILE...
  or:  chmod [OPTION]... --reference=RFILE FILE...
chmod命令主要选项如下:
| 选项 | 说明 |
|---|---|
| -R | 递归,修改目录和目录下所有文件的权限 |
| --reference=RFILE | 把RFILE文件的权限赋予指定的文件 |
chmod修改权限有两种形式,数字法和模式法。
-
数字法
每个权限都有一个特定的数字来代表:
权限 二进制 数字表示 r 100 4 w 010 2 x 001 1 而且这些数字可以互相叠加来组合使用来表示一组权限,这样文件的权限就可以使用三组数字来表示。
示例如下:
[root@xuzhichao test]# ll file -rw-r--r-- 1 root root 0 Jun 1 03:51 file [root@xuzhichao test]# chmod 644 file [root@xuzhichao test]# ll file -rw-r--r-- 1 root root 0 Jun 1 03:51 file [root@xuzhichao test]# chmod 777 file [root@xuzhichao test]# ll file -rwxrwxrwx 1 root root 0 Jun 1 03:51 file -
模式法
语法格式为:
[ugoa] [+-=] [PERMS]格式说明:
- u:代表为文件属主的权限
- g:代表文件属组的权限
- o:代表其他人other的权限
- a:代表属主,属组,other的权限
- +:代表增加指定的权限
- -:代表去掉指定的权限
- =:表示对文件赋予指定的权限
- ugoa不写时表示同时修改属主,属组,other的权限
示例如下:
[root@xuzhichao test]# ll file -rwxrwxrwx 1 root root 0 Jun 1 03:51 file [root@xuzhichao test]# chmod u-x file [root@xuzhichao test]# ll total 0 -rw-rwxrwx 1 root root 0 Jun 1 03:51 file [root@xuzhichao test]# chmod u=rw,g=r,o=r file [root@xuzhichao test]# ll file -rw-r--r-- 1 root root 0 Jun 1 03:51 file [root@xuzhichao test]# chmod a+x file [root@xuzhichao test]# ll file -rwxr-xr-x 1 root root 0 Jun 1 03:51 file [root@xuzhichao test]# chmod -x file [root@xuzhichao test]# ll file -rw-r--r-- 1 root root 0 Jun 1 03:51 file -
chmod还可以将一个文件的权限设置成和另一个文件的权限相同
[root@xuzhichao test]# ll file -rwxr-xr-x 1 root root 0 Jun 1 03:51 file [root@xuzhichao test]# touch file1 [root@xuzhichao test]# ll file1 -rw-r--r-- 1 root root 0 Jun 1 04:00 file1 [root@xuzhichao test]# chmod --reference=file file1 [root@xuzhichao test]# ll file1 -rwxr-xr-x 1 root root 0 Jun 1 04:00 file1 -
chmod -R可以修改目录和目录下文件的权限
[root@xuzhichao data]# ll test/
total 0
-rw-r--r-- 1 root root 0 Jun  1 03:51 file
-rw-r--r-- 1 root root 0 Jun  1 04:00 file1
[root@xuzhichao data]# ll test/ -d
drwxr-xr-x 2 root root 31 Jun  1 04:00 test/
[root@xuzhichao data]# chmod -R 755 test/
[root@xuzhichao data]# ll test/ -d
drwxr-xr-x 2 root root 31 Jun  1 04:00 test/
[root@xuzhichao data]# ll test/
total 0
-rwxr-xr-x 1 root root 0 Jun  1 03:51 file
-rwxr-xr-x 1 root root 0 Jun  1 04:00 file1
1.1.2 chmod命令:修改文件的属组和属组
chmod命令用于修改文件的属组和属组,语法格式为:
Usage: chown [OPTION]... [OWNER][:[GROUP]] FILE...
  or:  chown [OPTION]... --reference=RFILE FILE...
chmod命令的主要选项:
| 选项 | 说明 |
|---|---|
| -R | 递归修改目录和目录下所有文件的属主属组 |
| --reference=RFILE | 把RFILE文件的属主属组赋予指定的文件 |
| -h | 后面的文件如果是链接文件,则修改是链接文件的属主属组,默认修改的是真实文件的属主属组 |
-
chmod命令修改文件的属主:
[root@xuzhichao test]# ll file -rwxr-xr-x 1 root root 0 Jun 1 03:51 file [root@xuzhichao test]# chown xu file [root@xuzhichao test]# ll file -rwxr-xr-x 1 xu root 0 Jun 1 03:51 file -
chmod命令修改文件的属组:
[root@xuzhichao test]# ll file -rwxr-xr-x 1 xu root 0 Jun 1 03:51 file [root@xuzhichao test]# chown :xu file [root@xuzhichao test]# ll file -rwxr-xr-x 1 xu xu 0 Jun 1 03:51 file -
chmod命令修改文件的属主和属组:
[root@xuzhichao test]# ll file -rwxr-xr-x 1 xu xu 0 Jun 1 03:51 file [root@xuzhichao test]# chown root:root file [root@xuzhichao test]# ll file -rwxr-xr-x 1 root root 0 Jun 1 03:51 file -
chmod -R 递归修改目录和目录下的文件
[root@xuzhichao data]# ll -d test/ drwxr-xr-x 2 root root 31 Jun 1 04:00 test/ [root@xuzhichao data]# ll test/ total 0 -rwxr-xr-x 1 root root 0 Jun 1 03:51 file -rwxr-xr-x 1 root root 0 Jun 1 04:00 file1 [root@xuzhichao data]# chown -R xu:xu test/ [root@xuzhichao data]# ll -d test/ drwxr-xr-x 2 xu xu 31 Jun 1 04:00 test/ [root@xuzhichao data]# ll test/ total 0 -rwxr-xr-x 1 xu xu 0 Jun 1 03:51 file -rwxr-xr-x 1 xu xu 0 Jun 1 04:00 file1 -
chmod修改链接文件的属主属组
[root@xuzhichao test]# ll file_link file
-rwxr-xr-x 1 root root 0 Jun  1 03:51 file
lrwxrwxrwx 1 root root 4 Jun  1 04:58 file_link -> file
[root@xuzhichao test]# chown xu:xu file_link
[root@xuzhichao test]# ll file_link file
-rwxr-xr-x 1 xu   xu   0 Jun  1 03:51 file
lrwxrwxrwx 1 root root 4 Jun  1 04:58 file_link -> file

[root@xuzhichao test]# chown -h xu:xu file_link
[root@xuzhichao test]# ll file_link file
-rwxr-xr-x 1 xu xu 0 Jun  1 03:51 file
lrwxrwxrwx 1 xu xu 4 Jun  1 04:58 file_link -> file
1.1.3 chgrp命令:修改文件属组
chgrp命令专门用于修改文件的属组,也支持-R选项进行递归修改。使用示例如下:
[root@xuzhichao test]# ll file
-rwxr-xr-x 1 xu xu 0 Jun  1 03:51 file
[root@xuzhichao test]# chgrp root file
[root@xuzhichao test]# ll file
-rwxr-xr-x 1 xu root 0 Jun  1 03:51 file
1.2 umask设定文件的默认权限
当我们创建一个文件或目录时,文件或目录的默认权限是多少呢,这个是由umask进行控制的。
umask命令的语法格式为:
umask [-p] [-S] [mode]
umask命令的常用选项如下:
| 选项 | 说明 |
|---|---|
| -p | 打印umask值,可以作为输入 |
| -S | 以模式形式显示 |
| mode | 为对应的权限 |
[root@xuzhichao test]# umask
0022
[root@xuzhichao test]# umask -p
umask 0022
[root@xuzhichao test]# umask -S  <==会直接显示出来文件或目录的默认权限
u=rwx,g=rx,o=rx
直接输入umask可以显示当前的umask值,下面来具体说明umask各个值的意义。
umask的0222中四个数字分别为特殊权限,属主权限,属组权限,other权限的mask值,使用基准权限的值减去umask的值即为文件的默认权限。
-
基准权限
文件的基准权限为666,基于安全考虑,没有执行权限;
目录的基准权限为777
-
默认权限的计算方法
把基准权限和umask转换成二进制,基准权限中去掉umask中的权限即为默认权限
110 110 110    <==文件的基准权限666
000 010 010    <==文件的基准权限022
110 100 100    <==文件的默认权限644
111 111 111 <==目录的基准权限777 000 010 010 <==目录的基准权限022 111 101 101 <==目录的默认权限755简单的计算公式为:
目录的默认权限=777-umask值
文件的默认权限=666-umask值,所得结果中,如果有奇数就加1,偶数不变
-
umask的示例如下
[root@xuzhichao test]# umask 026 [root@xuzhichao test]# touch file2 [root@xuzhichao test]# ll file2 -rw-r----- 1 root root 0 Jun 1 05:32 file2 [root@xuzhichao test]# mkdir dir1 [root@xuzhichao test]# ll dir1 -d drwxr-x--x 2 root root 6 Jun 1 05:33 dir1 [root@xuzhichao test]# umask 123 [root@xuzhichao test]# touch file3 [root@xuzhichao test]# mkdir dir2 [root@xuzhichao test]# ll file3 -rw-r--r-- 1 root root 0 Jun 1 05:33 file3 [root@xuzhichao test]# ll -d dir2 drw-r-xr-- 2 root root 6 Jun 1 05:33 dir2 -
umask命令只是针对当前shell生效,如果要永久生效,需要保存到/.bashrc或/etc/bashrc中,其中/.bashrc只影响当前用户,/etc/bashrc会影响所有用户。
[root@xuzhichao test]# umask 077
[root@xuzhichao test]# umask -p >> ~/.bashrc
[root@xuzhichao test]# cat ~/.bashrc
alias rm='rm -i'
alias cp='cp -i'
alias mv='mv -i'

if [ -f /etc/bashrc ]; then
	. /etc/bashrc
fi
umask 0077
1.3 权限对文件和目录的意义(重要)
| 权限 | 对文件的影响 | 对目录的影响 |
|---|---|---|
| r | 查看文件内容 | 浏览目录下的文件 |
| w | 修改文件内容 | 增加和删除目录下的文件 |
| x | 执行文件 | 具有进入目录的权限 |
1.3.1 权限对文件的意义
-
r权限:具有查看文件内容的权限,可以使用cat,more,less,head,tail等命令
[xu@xuzhichao test]# ll -d /data/test/ drwxr-xr-x 2 root root 18 Jun 1 06:11 /data/test/ [root@xuzhichao test]# chmod 444 file [root@xuzhichao test]# ll file -r--r--r-- 1 root root 5 Jun 1 06:11 file #可以查看文件内容 [root@xuzhichao test]# echo "momo" > file [root@xuzhichao test]# cat file momo #普通用户也可以查看文件内容 [root@xuzhichao test]# su - xu Last login: Tue Jun 1 06:10:24 EDT 2021 on pts/0 [xu@xuzhichao ~]$ cd /data/test/ [xu@xuzhichao test]$ cat file momo #无法删除文件 [xu@xuzhichao test]$ rm -f file rm: cannot remove ‘file’: Permission denied -
w权限:
[root@xuzhichao test]# chmod 662 file [root@xuzhichao test]# su - xu Last login: Tue Jun 1 06:12:04 EDT 2021 on pts/0 [xu@xuzhichao ~]$ cd /data/test/ #无法查看文件 [xu@xuzhichao test]$ cat file cat: file: Permission denied #vim会提示权限不足,强制保存会覆盖文件内容 [xu@xuzhichao test]$ vim file #可追加文件内容 [xu@xuzhichao test]$ echo "abc" >> file -
x权限:
[root@xuzhichao test]# chmod 661 file [root@xuzhichao test]# su - xu Last login: Tue Jun 1 06:17:44 EDT 2021 on pts/0 [xu@xuzhichao ~]$ cd /data/test/ #无法查看文件内容 [xu@xuzhichao test]$ cat file cat: file: Permission denied #无法写入文件 [xu@xuzhichao test]$ echo "123" >> file -bash: file: Permission denied #无法执行,因为无法查看文件内容 [xu@xuzhichao test]$ /data/test/file bash: /data/test/file: Permission denied -
文件权限总结
- r权限为文件的基础权限,可以使用查看类命令查看文件内容,无法删除文件
- w权限有新增,修改文件内容的权限
- 使用vim无法显示文件中的内容,保存时提示权限拒绝,可以强制保存,会覆盖文件中的内容
- 使用>> 追加可以向文件中追加内容
- 无法删除文件
- x权限,只有x权限时什么都做不了,需要执行文件需要配合r权限
1.3.2 权限对目录的意义
-
r权限:具有浏览目录和子目录的权限
[root@xuzhichao data]# chmod 744 test/ [root@xuzhichao data]# ll -d test/ drwxr--r-- 2 root root 6 Jun 1 09:23 test/ [root@xuzhichao data]# touch test/file [root@xuzhichao data]# echo "123" > test/file [root@xuzhichao data]# su - xu Last login: Tue Jun 1 09:23:42 EDT 2021 on pts/0 [xu@xuzhichao ~]$ cd /data/ #只能查看目录下的文件名,不能查看文件属性 [xu@xuzhichao data]$ ll test/ ls: cannot access test/file: Permission denied total 0 -????????? ? ? ? ? ? file #无法进入目录 [xu@xuzhichao data]$ cd test/ -bash: cd: test/: Permission denied #不能查看目录下的文件内容 [xu@xuzhichao data]$ cat test/file cat: test/file: Permission denied -
w权限:
#修改权限 [root@xuzhichao data]# chmod 772 test/ [root@xuzhichao data]# ll -d test/ drwxrwx-w- 2 root root 18 Jun 1 09:24 test/ [root@xuzhichao data]# su - xu Last login: Tue Jun 1 09:29:39 EDT 2021 on pts/0 [xu@xuzhichao ~]$ cd /data/ #无法查看目录下的文件 [xu@xuzhichao data]$ ls test/ ls: cannot open directory test/: Permission denied #无法进入目录 [xu@xuzhichao data]$ cd test/ -bash: cd: test/: Permission denied #无法删除目录下的文件 [xu@xuzhichao data]$ rm -f test/file rm: cannot remove ‘test/file’: Permission denied -
x权限:
#修改权限 [root@xuzhichao data]# chmod 771 test/ [root@xuzhichao data]# su - xu Last login: Tue Jun 1 09:32:29 EDT 2021 on pts/0 [xu@xuzhichao ~]$ cd /data/ #无法查看目录下的文件 [xu@xuzhichao data]$ ls test/ ls: cannot open directory test/: Permission denied #无法删除目录下的文件 [xu@xuzhichao data]$ rm -f test/file rm: cannot remove ‘test/file’: Permission denied #可以进入目录下 [xu@xuzhichao data]$ cd test/ [xu@xuzhichao test]$ ls ls: cannot open directory .: Permission denied -
目录权限总结
- 读权限:具有浏览目录及其子目录下的文件的权限,但是无法查看文件属性信息,r权限为目录的基本权限
- 写权限:具有增加,删除,修改目录内文件名的权限,但是需要x权限的配合才可以实现
- 执行权限:目录的基础权限,具有进入目录下的权限,若没有x权限,则目录下的文件无法浏览,复制,移动,删除。
-
例如:让用户可以执行cp /dir1/file1 dir2,则至少dir1需要有x权限,file1至少要有r权限,dir2至少要有wx权限。
1.3.3 文件权限和程序的关系
-
当一个用户访问文件时获取的权限如下
- 判断用户是否为文件属主,如果是则用户按照属主权限访问文件
- 若用户不是文件属主,判断用户是否属于文件属组,如果是则用户按照文件属组权限访问文件
- 若用户不是文件属主和属组,则按照other的权限访问文件
-
进程和文件权限的关系
进程能够以何种方式去访问文件,取决于运行这个进程的用户身份对该文件拥有怎样的权限。
1.4 文件的特殊权限
文件除了具有rwx三种基本权限外,还有三种特殊权限SUID,SGID,SBIT。
1.4.1 SUID权限
SUID权限的意义:
-
仅对二进制程序有效,对文件,脚本,目录不生效。
-
执行者对于该程序需要具有x的可执行权限。
-
本权限仅在执行该程序的过程中有效。
-
执行者在执行该程序时将具有该程序所有者的权限。
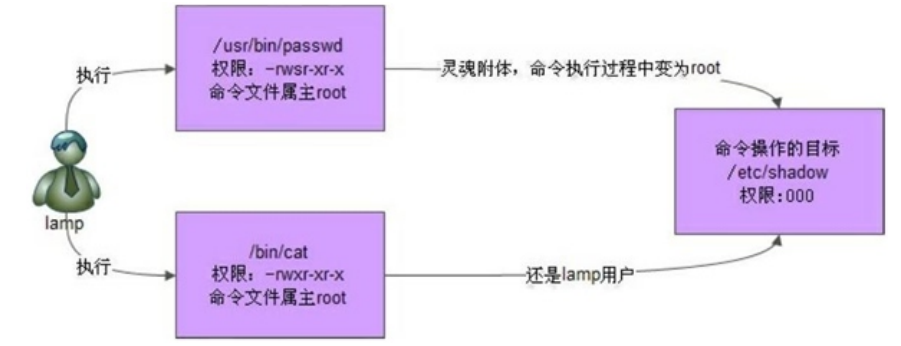
SUID权限在属主权限位表示为s,passwd程序就具有SUID权限:
[root@xuzhichao data]# ll `which passwd`
-rwsr-xr-x. 1 root root 27856 Mar 31  2020 /usr/bin/passwd
[root@xuzhichao data]# ll /etc/shadow
----------. 1 root root 996 Jun  1 01:44 /etc/shadow
/etc/shadow文件时只有root用户可以读取写入的,那为什么普通用户可以使用passwd命令修改自身密码呢?原因就是passwd命令具有了SUID的权限。
普通用户可以执行passwd命令,而passwd命令又具有SUID权限,那么普通用户执行passwd命令时就会拥有/usr/bin/passwd文件属主的权限,也就是root的权限,这样普通用户就可修改/etc/shadow文件,进而修改自身的密码了。
注意:SUID是一个比较危险的权限,例如对cat命令授予SUID权限后,普通用户就可以使用cat命令查看系统的任意文件了。
#普通用户默认没有查看系统日志的权限
[xu@xuzhichao ~]$ ll /var/log/messages
-rw-------. 1 root root 831882 Jun  1 10:14 /var/log/messages
[xu@xuzhichao ~]$ cat /var/log/messages
cat: /var/log/messages: Permission denied

#对cat命令增加SUID权限,则普通用户可以使用cat查看系统日志文件
[root@xuzhichao data]# chmod u+s /bin/cat
[root@xuzhichao data]# su - xu
Last login: Tue Jun  1 10:14:29 EDT 2021 on pts/0
[xu@xuzhichao ~]$ cat /var/log/messages
......
Jun  1 09:32:29 xuzhichao su: (to xu) root on pts/0
Jun  1 09:35:19 xuzhichao su: (to xu) root on pts/0
Jun  1 10:01:01 xuzhichao systemd: Started Session 10 of user root.
Jun  1 10:14:29 xuzhichao su: (to xu) root on pts/0
Jun  1 10:16:02 xuzhichao systemd-logind: Removed session 4.
Jun  1 10:16:32 xuzhichao su: (to xu) root on pts/0
当一个程序没有执行权限而具有SUID的权限时,SUID权限没有作用,此时在属主权限为表示为S(大写)。
[root@xuzhichao test]# ll file
-rw-r--r-- 1 root root 4 Jun  1 09:24 file
[root@xuzhichao test]# chmod u+s file
[root@xuzhichao test]# ll file
-rwSr--r-- 1 root root 4 Jun  1 09:24 file
1.4.2 SGID权限
当s权限设置在属组的权限中,那么文件就拥有了SGID的权限,SGID权限可以对文件或目录设置。
-
当SGID作用在文件上时,与SUID权限类似
-
仅对二进制程序有效,对文件,脚本不生效。
-
执行者对于该程序需要具有x的可执行权限。
-
本权限仅在执行该程序的过程中有效。
-
执行者在执行该程序时将具有该程序属组的权限。
#用户通过获取
[root@xuzhichao test]# ll /usr/bin/locate /var/lib/mlocate/mlocate.db
-rwx--s--x 1 root slocate  40520 Apr 10  2018 /usr/bin/locate
-rw-r----- 1 root slocate 685518 Jun  1 10:25 /var/lib/mlocate/mlocate.db
当一个程序没有执行权限而具有SGID的权限时,SGID权限没有作用,此时在属组权限为表示为S(大写)。
-
-
当SGID作用在目录上时,具有如下意义:
- 用户需要对此目录具有rx权限,即可以进入该目录。
- 用户在此目录下的有效用户组将会变成该目录的用户组。
- 若用户对于此目录具有w权限(新建文件),则用户新建的文件的用户组与此目录的用户组相同。
-
SGID使用场景
xu1和xu2用户有各自的主组xu1和xu2,他们有一个共同的附加组project,这两个用户需要拥有/data/project目录的开发权,即两个用户互相之间可以修改彼此创建的文件,其他用户不能进入该目录查看。
#创建两个用户和project组,并作为附加组加入
[root@xuzhichao test]# useradd xu1
[root@xuzhichao test]# useradd xu2
[root@xuzhichao test]# groupadd project
[root@xuzhichao test]# usermod -G project xu1
[root@xuzhichao test]# usermod -G project xu2
[root@xuzhichao test]# id xu1
uid=1001(xu1) gid=1001(xu1) groups=1001(xu1),1009(project)
[root@xuzhichao test]# id xu2
uid=1008(xu2) gid=1008(xu2) groups=1008(xu2),1009(project)

#创建目录,属组修改为project,权限修改为2770
[root@xuzhichao test]# cd ..
[root@xuzhichao data]# mkdir project
[root@xuzhichao data]# chown :project project/
[root@xuzhichao data]# chmod 2770 project/
[root@xuzhichao data]# ll -d project/
drwxrws--- 2 root project 6 Jun  1 10:39 project/

#测试
[root@xuzhichao data]# su - xu1
[xu1@xuzhichao ~]$ cd /data/project/
[xu1@xuzhichao project]$ echo "abc" > file1
[xu1@xuzhichao project]$ ll file1
-rw-rw-r-- 1 xu1 project 4 Jun  1 10:43 file1
[xu1@xuzhichao project]$ exit
logout
[root@xuzhichao data]# su - xu2
[xu2@xuzhichao ~]$ cd /data/project/
[xu2@xuzhichao project]$ cat file1
abc
[xu2@xuzhichao project]$ echo "123" >> file1
[xu2@xuzhichao project]$ cat file1
abc
123
1.4.3 SBIT权限
SBIT(sticky bit) 只针对目录有效,其作用为:
当用户对此目录具有wx权限,即可以进入目录写入文件时,该用户在目录下创建的文件或目录只有root和用户自身可以删除该文件,其他用户不能删除。
SBIT在other的执行权限位上表示为t,/tmp目录就具有SBIT权限
[xu2@xuzhichao project]$ ll -d /tmp/
drwxrwxrwt. 15 root root 4096 Jun  1 10:51 /tmp/
此时xu1用户在/tmp下创建的文件xu2用户则不能删除
[root@xuzhichao data]# su - xu1
Last login: Tue Jun  1 10:42:45 EDT 2021 on pts/0
[xu1@xuzhichao ~]$ cd /tmp/
[xu1@xuzhichao tmp]$ echo "123" > file1
[xu1@xuzhichao tmp]$ exit
logout
[root@xuzhichao data]# su - xu2
Last login: Tue Jun  1 10:43:23 EDT 2021 on pts/0
[xu2@xuzhichao ~]$ cd /tmp/
[xu2@xuzhichao tmp]$ ll file1
-rw-rw-r-- 1 xu1 xu1 4 Jun  1 10:53 file1
[xu2@xuzhichao tmp]$ cat file1
123
[xu2@xuzhichao tmp]$ rm -f file1
rm: cannot remove ‘file1’: Operation not permitted
1.4.4 特殊权限的设置
SUID,SGID,SBIT三个特殊权限可以使用数字或模式进行设置:
| 特殊权限 | 数字 | 模式 |
|---|---|---|
| SUID | 4 | u+s |
| SGID | 2 | g+s |
| SBIT | 1 | o+t |
特殊权限的设置示例如下:
[root@xuzhichao data]# cp /bin/cat .
[root@xuzhichao data]# ll cat
-rwxr-xr-x 1 root root 54080 Jun  1 10:57 cat
[root@xuzhichao data]# chmod 4755 cat     <==增加SUID权限
[root@xuzhichao data]# ll cat
-rwsr-xr-x 1 root root 54080 Jun  1 10:57 cat
[root@xuzhichao data]# chmod 6755 cat     <==增加SUID,SGID权限
[root@xuzhichao data]# ll cat
-rwsr-sr-x 1 root root 54080 Jun  1 10:57 cat
[root@xuzhichao data]# chmod g-s cat      <==取消SGID权限
[root@xuzhichao data]# ll cat
-rwsr-xr-x 1 root root 54080 Jun  1 10:57 cat

[root@xuzhichao data]# ll -d test/
drwxrwx--x 2 root root 18 Jun  1 09:24 test/
[root@xuzhichao data]# chmod 1771 test/   <==增加SBIT权限
[root@xuzhichao data]# ll -d test/
drwxrwx--t 2 root root 18 Jun  1 09:24 test/
当文件或目录没有执行x权限而具有特殊权限,特殊权限不生效,会显示为大写的S和T
[root@xuzhichao data]# chmod 7666 cat
[root@xuzhichao data]# ll cat
-rwSrwSrwT 1 root root 54080 Jun  1 10:57 cat

[root@xuzhichao data]# chmod 7776 cat
[root@xuzhichao data]# ll cat
-rwsrwsrwT 1 root root 54080 Jun  1 10:57 cat
1.5 文件的隐藏属性
前面说到的权限只是针对普通用户的,对root用户没有限制,要想实现对root用户进行限制,可以使用隐藏属性实现。
chattr命令用户设置文件的隐藏属性,语法格式为:
chattr [-RVf] [-+=aAcCdDeijsStTu] [-v version] files...
chattr命令的常用选项和隐藏属性说明如下:
| 选项 | 说明 |
|---|---|
| -R | 递归处理,将目录及目录下的文件一并处理 |
| -V | 显示版本和权限的设置 |
| -f | 隐藏大部分的错误信息 |
| - | 去掉隐藏属性 |
| + | 设置隐藏属性 |
| = | 设置为隐藏属性 |
| i | 该隐藏属性表示文件不能删除,修改,重命名,创建硬链接 |
| a | 该隐藏属性表示文件不能删除,重命名,创建硬链接,单可以追加内容,多用于日志文件 |
注意:对于a权限,可以使用echo a >> root1的方式追加内容,但是不能通过vim,nano等方式写入内容,因为系统无法判断是否为追加内容,系统认为是修改文件内容,不允许操作。
lsattr命令用于查看文件的隐藏属性
常用选项如下:
| 选项 | 说明 |
|---|---|
| -R | 递归处理,将目录及目录下的文件一并处理 |
| -V | 显示版本信息 |
| -v | 显示文件或目录的版本 |
| -a | 显示所有文件和目录的隐藏属性,包括隐藏文件 |
| -d | 显示目录本身,而非其下的内容 |
隐藏属性的使用示例如下:
#示例一:i属性使用
[root@xuzhichao test]# cat file
123
[root@xuzhichao test]# chattr +i file
[root@xuzhichao test]# lsattr file
----i----------- file

#不能移动文件
[root@xuzhichao test]# mv file file1
mv: cannot move ‘file’ to ‘file1’: Operation not permitted

#不能删除文件
[root@xuzhichao test]# rm -f file
rm: cannot remove ‘file’: Operation not permitted

#不能创建硬链接
[root@xuzhichao test]# ln file file_link
ln: failed to create hard link ‘file_link’ => ‘file’: Operation not permitted

#不能追加内容
[root@xuzhichao test]# echo "456" >> file
-bash: file: Permission denied
[root@xuzhichao test]# chattr -i file
[root@xuzhichao test]# lsattr file
---------------- file

#示例二:a属性的使用
[root@xuzhichao test]# chattr +a file
[root@xuzhichao test]# lsattr file
-----a---------- file

#不能移动文件
[root@xuzhichao test]# mv file file1
mv: cannot move ‘file’ to ‘file1’: Operation not permitted

#不能删除文件
[root@xuzhichao test]# rm -f file
rm: cannot remove ‘file’: Operation not permitted

#可以追加内容
[root@xuzhichao test]# echo "456" >> file
[root@xuzhichao test]# cat file
123
456
[root@xuzhichao test]# chattr -a file
-
特殊属性的使用场景:
一个web服务被病毒入侵,病毒脚本如下,每个20s对web站点主页进行篡改。
[root@xuzhichao ~]#cat	virus.sh
#!/usr/bin/bash

web_site=/var/www/html/index.html

while true
do
echo "我是病毒Code"	> ${web_site}
sleep 20
done
解决思路:首先对重要文件增加i属性,禁止病毒程序修改重要文件,然后查找病毒文件并将其杀死。
[root@xuzhichao ~]#chatttr +i /var/www/html/index.html
[root@xuzhichao ~]#kill	$(ps -ef | grep virus |grep -v grep |awk'{print	$2}')
1.6 文件的FACL
文件的ACL是对属主属组other权限的补充,可以实现更为精细化的权限管理,可以针对单一用户,单一文件或目录进行r,w,x权限的设定。
在centos7上操作系统默认开启了ACL的支持。
在centos6上默认没有开启ACL,开启的方法为:
[root@xuzhichao test]# mount -o remount,acl /

[root@xuzhichao test]# vim /etc/fstab
/dev/sda1	/	ext4	defaults,acl	1 1
setfacl命令用于设置文件和目录的ACL,语法格式为:
setfacl [-bkndRLP] { -m|-M|-x|-X ... } file ...
setfacl命令的常用选项如下:
| 选项 | 说明 |
|---|---|
| -m | 设置文件的ACL属性 |
| -M FILE | 从FILE文件中读取ACL属性并设置 |
| -x | 移除指定的文件ACL属性 |
| -X FILE | 从FILE文件中读取ACL属性并删除 |
| -b | 清空文件的ACL属性 |
| -k | 清除文件默认的ACL属性 |
| -d | 设置默认的ACL属性,仅对目录生效,在目录下新建的文件会继承该默认ACL属性 |
| -R | 递归设置目录和目录下的文件的ACL属性 |
| --set=acl | 设置替换当前文件的ACL属性 |
| --set-file=file | 读取文件file的acl属性,然后设置到指定的文件上 |
setfacl命令用户查看文件或目录的ACL权限,参数与setfacl基本一致。
-
用户权限和ACL生效的顺序如下:ACL一般情况下按照getfacl的顺序进行匹配。
- 判断访问者是否是文件的属主,如果是,取得文件属主的权限,不再继续匹配;
- 判断是否是ACL中自定义的用户,如果是,获取对应用户的权限,不再继续匹配;
- 判断是否是ACL中自定义组的用户,如果是,获取对应用户组的权限,不再继续匹配;
- 获取其他人的权限
-
针对用户设置ACL权限
设定格式为“u:[用户账号]:[rwx0-]”,其中用户账号如果省略,代表设置文件的所有者,0和-都代表空权限。
[root@xuzhichao test]# ll total 4 -rw-r--r-- 1 root root 8 Jun 1 11:23 file #示例一:设置xu用户具有wr权限 [root@xuzhichao test]# setfacl -m u:xu:rw file [root@xuzhichao test]# ll file -rw-rw-r--+ 1 root root 8 Jun 1 11:23 file <==设置完ACL属性的文件会增加一个“+”号 [root@xuzhichao test]# getfacl file # file: file <==文件名 # owner: root <==文件的属主 # group: root <==文件的属组 user::rw- <==用户栏是空的,代表文件属主的权限 user:xu:rw- <==新增加的权限 group::r-- <==用户组栏是空的,代表文件属组的权限 mask::rw- <==此文件的最大有效权限 other::r-- <==other的权限 #此时用户xu具有写权限 [root@xuzhichao test]# su - xu Last login: Tue Jun 1 10:16:32 EDT 2021 on pts/0 [xu@xuzhichao ~]$ echo "123" >> /data/test/file #示例二:设置xu1用户无任何权限 [root@xuzhichao test]# setfacl -m u:xu1:- file [root@xuzhichao test]# getfacl file # file: file # owner: root # group: root user::rw- user:xu:rw- user:xu1:--- <==xu1用户的权限 group::r-- mask::rw- other::r-- #示例三:删除xu用户的ACL权限 [root@xuzhichao test]# setfacl -x u:xu file [root@xuzhichao test]# getfacl file # file: file # owner: root # group: root user::rw- user:xu1:--- group::r-- mask::r-- other::r-- #示例四:清空文件的ACL权限 [root@xuzhichao test]# setfacl -b file [root@xuzhichao test]# getfacl file # file: file # owner: root # group: root user::rw- group::r-- other::r-- -
针对用户组设置ACL权限
设定格式为“g:[用户组账号]:[rwx0-]”,其中用户组如果省略,代表设置文件的所有者,0和-都代表空权限。
#用户xu加入group1和group2附加组 [root@xuzhichao test]# groupadd group1 [root@xuzhichao test]# groupadd group2 [root@xuzhichao test]# usermod -a -G group1,group2 xu [root@xuzhichao test]# id xu uid=1000(xu) gid=1000(xu) groups=1000(xu),1010(group1),1011(group2) #设置用户组的ACL权限 [root@xuzhichao test]# setfacl -m g:group1:r file [root@xuzhichao test]# setfacl -m g:group2:w file [root@xuzhichao test]# getfacl file # file: file # owner: root # group: root user::rw- group::r-- group:group1:r-- group:group2:-w- mask::rw- other::r-- #测试xu用户的权限,具有r和w的权限,xu用户的权限为group1和group2权限的叠加。 [root@xuzhichao test]# ll file -rw-rw-r--+ 1 root root 4 Jun 1 22:03 file [root@xuzhichao test]# su - xu Last login: Tue Jun 1 21:50:50 EDT 2021 on pts/1 [xu@xuzhichao ~]$ cd /data/test/ [xu@xuzhichao test]$ cat file 123 456 123 [xu@xuzhichao test]$ echo "123" > file [xu@xuzhichao test]$ cat file 123 -
mask权限的意义
mask的作用是限制getfacl中文件所有者之外用户和组的最大权限,对文件属主和other的权限没有影响。
[root@xuzhichao test]# setfacl -m u:xu:rwx file
[root@xuzhichao test]# setfacl -m g:group1:rwx file
[root@xuzhichao test]# getfacl file
# file: file
# owner: root
# group: root
user::rw-
user:xu:rwx
group::r--
group:group1:rwx
mask::rwx
other::r--

#设置ACL的mask值为r
[root@xuzhichao test]# setfacl -m mask:r file
[root@xuzhichao test]# getfacl file
# file: file
# owner: root
# group: root
user::rw-
user:xu:rwx			#effective:r--    <==用户xu实际生效的权限就是r
group::r--
group:group1:rwx		#effective:r--   <==用户组实际生效的权限就是r
mask::r--
other::r--
重新修改用户acl权限也会同步修改mask值。
[root@xuzhichao test]# setfacl -m u:xu:rwx file [root@xuzhichao test]# getfacl file # file: file # owner: root # group: root user::rw- user:xu:rwx group::r-- group:group1:rwx mask::rwx other::r-- -
setfacl -d用于设置ACL的继承,对目录设置一个ACL属性,在目录下新建的文件或目录会自动继承父目录的ACL属性。
注意:若目录具有x权限,目录下的文件也不会继承父目录的x权限。
设置方法为“d:[ug]:用户列表:[rwx-]”
[root@xuzhichao data]# ll -d test/ drwxr-xr-x 2 root root 18 Jun 1 09:24 test/ #设置目录的默认ACL属性 [root@xuzhichao data]# setfacl -m d:u:xu:rwx test/ [root@xuzhichao data]# setfacl -m d:g:group1:rwx test/ [root@xuzhichao data]# getfacl test/ # file: test/ # owner: root # group: root user::rwx group::r-x other::r-x default:user::rwx default:user:xu:rwx default:group::r-x default:group:group1:rwx default:mask::rwx default:other::r-x #在目录下创建文件,文件除了x权限都会继承ACL属性 [root@xuzhichao data]# touch test/f1 [root@xuzhichao data]# getfacl test/f1 # file: test/f1 # owner: root # group: root user::rw- user:xu:rwx #effective:rw- group::r-x #effective:r-- group:group1:rwx #effective:rw- mask::rw- other::r-- #在目录下新建的目录会继承父目录所有权限,同时还会具有默认的ACL权限,即子目录下的文件和目录也会继承ACL属性 [root@xuzhichao data]# mkdir test/dir1 [root@xuzhichao data]# getfacl test/dir1 # file: test/dir1 # owner: root # group: root user::rwx user:xu:rwx group::r-x group:group1:rwx mask::rwx other::r-x default:user::rwx default:user:xu:rwx default:group::r-x default:group:group1:rwx default:mask::rwx default:other::r-x [root@xuzhichao data]# touch test/dir1/abc [root@xuzhichao data]# getfacl test/dir1/abc # file: test/dir1/abc # owner: root # group: root user::rw- user:xu:rwx #effective:rw- group::r-x #effective:r-- group:group1:rwx #effective:rw- mask::rw- other::r-- #-k参数用于删除目录的默认ACL权限,不会清除子目录的默认ACL权限 [root@xuzhichao data]# setfacl -k test/ [root@xuzhichao data]# getfacl test/ # file: test/ # owner: root # group: root user::rwx group::r-x other::r-x -
setfacl的-M –X 参数:根据文件内容批量增加和删除acl权限。
[root@xuzhichao test]# setfacl -b file [root@xuzhichao test]# cat > acl.txt user:xu:rwx group:group1:rwx [root@xuzhichao test]# setfacl -M acl.txt file [root@xuzhichao test]# getfacl file # file: file # owner: root # group: root user::rw- user:xu:rwx group::r-- group:group1:rwx mask::rwx other::r-- [root@xuzhichao test]# cat > acl2.txt user:xu group:group1 [root@xuzhichao test]# setfacl -X acl2.txt file [root@xuzhichao test]# getfacl file # file: file # owner: root # group: root user::rw- group::r-- mask::r-- other::r-- -
--set-file选项可以把一个文件的ACL权限赋予另一个文件
#把文件f1的ACL权限赋予f2 [root@xuzhichao test]# getfacl f1 | setfacl --set-file=- f2 -
--set选项会删除原有的ACL,使用新的替代,设置的时候需要把ugo三个选项都写上
[root@xuzhichao test]# setfacl --set u::rw,u:xu:rw,g::rw,g:group1:rw,o::- f1 [root@xuzhichao test]# getfacl f1 # file: f1 # owner: root # group: root user::rw- user:xu:rw- group::rw- group:group1:rw- mask::rw- -
备份和恢复ACL
使用cp和mv等工具在移动文件时会保留文件的ACL权限,cp需要使用-p选项,tar打包文件则不会保留文件的ACL权限。
#备份ACL权限
[root@xuzhichao data]# getfacl -R test/ > acl.bak

#清空ACL权限
[root@xuzhichao data]# setfacl -R -b test/

#恢复ACL权限,方法一(推荐使用)
[root@xuzhichao data]# setfacl --restore acl.bak

#恢复ACL权限,方法二
[root@xuzhichao data]# setfacl -R --set-file acl.bak test/

 浙公网安备 33010602011771号