
kubernetes 配置管理-secret&configmap
Secret
k8s secrets用于存储和管理一些敏感数据,比如密码,token,密钥等敏感信息。它把 Pod 想要访问的加密数据存放到 Etcd 中。然后用户就可以通过在 Pod 的容器里挂载 Volume 的方式或者环境变量的方式访问到这些 Secret 里保存的信息了。
Secret三种类型:
Opaque:base64 编码格式的 Secret,用来存储密码、密钥等;但数据也可以通过base64 –decode解码得到原始数据,所以加密性很弱。
Service Account:用来访问Kubernetes API,由Kubernetes自动创建,并且会自动挂载到Pod的 /run/secrets/kubernetes.io/serviceaccount 目录中。
kubernetes.io/dockerconfigjson : 用来存储私有docker registry的认证信息。
1.Opaque类型
Opaque 类型的数据是一个 map 类型,要求必须value是base64编码。
所以要使用Opaque ,先手动创建base64加密,比如:
[root@master ~]# echo -n 'admin' | base64
YWRtaW4=
解密也很简单:
[root@master ~]# echo 'YWRtaW4=' | base64 --decode
admin
像这样创建的 Secret 对象,它里面的内容仅仅是经过了转码,而并没有真正被加密。在真正的生产环境中,需要在 Kubernetes 中开启 Secret 的加密插件,增强数据的安全性。
2. Service Account类型
Service Account 对象的作用,就是 Kubernetes 系统内置的一种“服务账户”,它是 Kubernetes 进行权限分配的对象。比如,Service Account A,可以只被允许对 Kubernetes API 进行 GET 操作,而 Service Account B,则可以有 Kubernetes API 的所有操作权限。
3. kubernetes.io/dockerconfigjson类型
用来创建用户docker registry认证的Secret,直接使用kubectl create命令创建即可,如下:
kubectl create secret docker-registry myregistry --docker-server=DOCKER_SERVER --docker-username=DOCKER_USER --docker-password=DOCKER_PASSWORD --docker-email=DOCKER_EMAIL
[root@master ~]# kubectl get secret |grep myregistry
myregistry            kubernetes.io/dockerconfigjson        1      41s
如果有pod需要拉取私有仓库中的docker镜像的话就需要使用到上面的myregistry这个Secret:
apiVersion: v1
kind: Pod
metadata:
  name: foo
spec:
  containers:
  - name: foo
    image: 192.168.1.100:5000/test:v1
  imagePullSecrets:
  - name: myregistry
Secret创建方式
方式一:kubectl create secret 命令

generic子命令可以通过本地文件、目录或者literal(键值对),来创建secret
比如本地文件内容如下:
$ cat ./password.txt
1f2d1e2e67df
根据这个文件创建secret:
[root@master secret]# kubectl create secret generic pass --from-file=./password.txt
secret/pass created
[root@master secret]# kubectl get secret |grep pass
pass                  Opaque                                1      91s
默认情况下key为文件名。
也可以不通过文件,直接通过键值对创建:
$ kubectl create secret generic pass --from-literal=password=1f2d1e2e67df
方式二: 通过yaml文件创建
#secret.yaml

apiVersion: v1
kind: Secret
metadata:
  name: mysecret
type: Opaque
data:
  user: YWRtaW4=
  pass: MWYyZDFlMmU2N2Rm
注:通过yaml创建Opaque类型的Secret值需要base64编码
创建secret:
[root@master secret]# kubectl create -f secret.yaml
secret/mysecret created
[root@master secret]# kubectl get secret |grep Opaque
mysecret              Opaque                                2      52s
mysecret中包括了两对key/value:
[root@master secret]# kubectl describe secret mysecret
Name:         mysecret
Namespace:    default
Labels:       <none>
Annotations:  <none>

Type:  Opaque

Data
====
pass:  12 bytes
user:  5 bytes
多数情况下,会使用yaml文件的方式来创建secret。
Secret使用方式
方式一:通过Volume挂载的方式
# secret-volume.yaml

apiVersion: v1
kind: Pod
metadata:
  name: mypod1
spec:
  containers:
  - name: nginx
    image: nginx
    volumeMounts:
    - name: foo
      mountPath: "/etc/foo"
      readOnly: true
  volumes:
  - name: foo
    secret:
      secretName: mysecret
在pod中,挂载卷name为foo,挂载位置为/etc/foo,只读,其挂载内容为之前创建的mysecret。
创建pod:
[root@master secret]# kubectl apply -f secret-volume.yaml
pod/mypod1 created
[root@master secret]# kubectl get pods
NAME     READY   STATUS    RESTARTS   AGE
mypod1   1/1     Running   0          6m37s
验证一下这些 Secret 对象是不是已经在容器里了:
[root@master secret]# kubectl exec -it mypod1 bash
kubectl exec [POD] [COMMAND] is DEPRECATED and will be removed in a future version. Use kubectl kubectl exec [POD] -- [COMMAND] instead.
root@mypod1:/# cd /etc/foo
root@mypod1:/etc/foo# ls
pass  user
root@mypod1:/etc/foo# cat pass
1f2d1e2e67df
root@mypod1:/etc/foo# cat user
admin
方式二:通过环境变量
# secret-var.yaml

apiVersion: v1
kind: Pod
metadata:
  name: mypod2
spec:
  containers:
  - name: nginx
    image: nginx
    env:
      - name: SECRET_USER
        valueFrom:
          secretKeyRef:
            name: mysecret
            key: user
      - name: SECRET_PASS
        valueFrom:
          secretKeyRef:
            name: mysecret
            key: pass
在pod中,声明两个环境变量SECRET_USER与SECRET_PASS,分别对应之前创建的mysecret中的两个key。
创建pod:
[root@master secret]# kubectl apply -f secret-var.yaml
pod/mypod2 created
[root@master secret]# kubectl get pods
NAME     READY   STATUS    RESTARTS   AGE
mypod2   1/1     Running   0          3m44s
验证下,进入容器中查看环境变量:
[root@master secret]# kubectl exec -it mypod2 bash
kubectl exec [POD] [COMMAND] is DEPRECATED and will be removed in a future version. Use kubectl kubectl exec [POD] -- [COMMAND] instead.
root@mypod2:/# env|grep SECRET
SECRET_PASS=1f2d1e2e67df
SECRET_USER=admin
通过volume挂载和环境变量的区别
通过Volume挂载到容器内部时,当该Secret的值发生变化时,容器内部具备自动更新的能力,但是通过环境变量设置到容器内部该值不具备自动更新的能力。
所以一般推荐使用Volume挂载的方式使用Secret。
ConfigMap
ConfigMap是一种API对象,用来将非加密数据保存到键值对中。可以用作环境变量、命令行参数或者存储卷中的配置文件。
ConfigMap可以将环境变量配置信息和容器镜像解耦,便于应用配置的修改。如果需要存储加密信息时可以使用Secret对象。
ConfigMap创建方式
方式一:通过命令行创建configmap
可以使用 kubectl create configmap 从文件、目录或者 key-value 字符串创建等创建 ConfigMap
(1)通过文件创建configmap
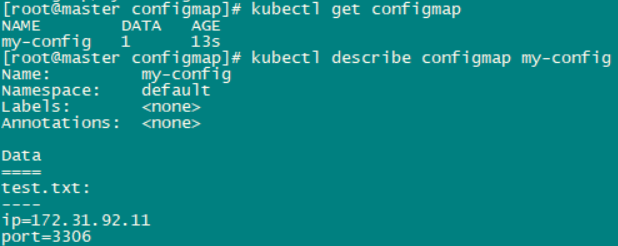
# test.txt
ip=172.31.92.11
port=3306

kubectl create configmap my-config --from-file=./test.txt
查看configmap:
(2)通过文件夹创建configmap
$ mkdir config
$ echo hello > config/test1
$ echo world > config/test2

kubectl create configmap dir-config --from-file=config/
查看configmap:
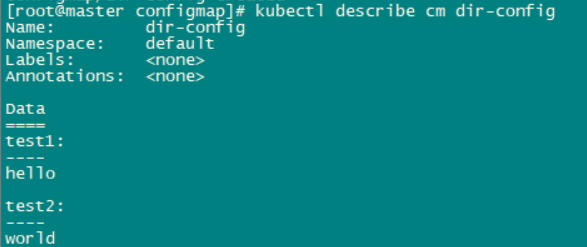
configmap资源中有两个键值对,test1:hello和test2:world,key为文件名,value为文件内容。
(3)直接通过键值对创建configmap
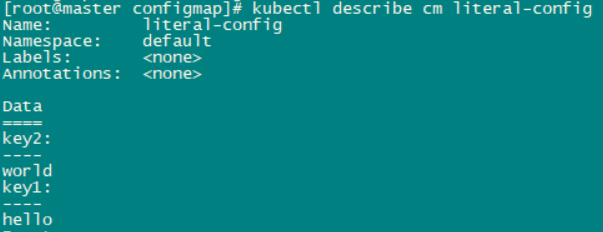
kubectl create configmap literal-config --from-literal=key1=hello --from-literal=key2=world
查看configmap:
方式二:通过yaml文件创建
#config.yaml
apiVersion: v1
kind: ConfigMap
metadata:
 name: my-config
data:
 key1: hello
 key2: world
[root@master configmap]# kubectl apply -f config.yaml
configmap/my-config created
[root@master configmap]# kubectl get cm
NAME        DATA   AGE
my-config   2      10s
[root@master configmap]# kubectl describe cm my-config
Name:         my-config
Namespace:    default
Labels:       <none>
Annotations:
Data
====
key1:
----
hello
key2:
----
world
Events:  <none>
ConfigMap使用方式
方式一:通过Volume挂载的方式
# configmap-volume.yaml

apiVersion: v1
kind: Pod
metadata:
 name: test-pod-configmap-volume
spec:
 containers:
 - name: test-pod-busybox
   image: busybox
   imagePullPolicy: IfNotPresent
   args:
   - sleep
   - "86400"
   volumeMounts:
   - name: config-volume
     mountPath: "/projected-volume"
     readOnly: true
 volumes:
 - name: config-volume
   projected:
    sources:
    - configMap:
       name: my-config
在pod中,挂载卷name为config-volume,挂载位置为/projected-volume,只读,其挂载内容为之前创建的my-config。
创建pod:
[root@master configmap]# kubectl apply -f configmap-volume.yaml
pod/test-pod-configmap-volume created
[root@master configmap]# kubectl get pods
NAME                        READY   STATUS    RESTARTS   AGE
test-pod-configmap-volume   1/1     Running   0          9s
进入容器验证configmap中的对象:
[root@master configmap]# kubectl exec -it test-pod-configmap-volume -- /bin/sh
/ # cd /projected-volume
/projected-volume # ls
key1  key2
方式二:通过环境变量
# configmap-cmd.yaml

apiVersion: v1
kind: Pod
metadata:
 name: test-pod-configmap-cmd
spec:
 containers:
  - name: test-busybox
    image: busybox
    imagePullPolicy: IfNotPresent
    command: [ "/bin/sh","-c","echo $(KEY1) $(KEY2)"]
    env:
    - name: KEY1
      valueFrom:
       configMapKeyRef:
        name: my-config
        key: key1
    - name: KEY2
      valueFrom:
       configMapKeyRef:
        name: my-config
        key: key2
 restartPolicy: Never
在pod中,声明两个环境变量KEY1与KEY2,分别对应之前创建的my-config中的两个key。
创建pod:
[root@master configmap]# kubectl apply -f configmap-cmd.yaml
pod/test-pod-configmap-cmd created
[root@master configmap]# kubectl get pods
NAME                        READY   STATUS      RESTARTS   AGE
test-pod-configmap-cmd      0/1     Completed   0          30s
test-pod-configmap-volume   1/1     Running     0          12m
该pod成功启动后状态为completed,日志中会输出环境变量KEY1和KEY2的值:
[root@master configmap]# kubectl logs test-pod-configmap-cmd
hello world
通过volume挂载和环境变量的区别
通过Volume挂载到容器内部时,当该configmap的值发生变化时,容器内部具备自动更新的能力,但是通过环境变量设置到容器内部该值不具备自动更新的能力。
Secret 与 ConfigMap 对比
最后对比下Secret和ConfigMap这两种资源对象的异同点:
相同点:
key/value的形式
属于某个特定的namespace
可以导出到环境变量
可以通过目录/文件形式挂载
通过 volume 挂载的配置信息均可热更新
不同点:
Secret 可以被 ServerAccount 关联
Secret 可以存储 docker register 的鉴权信息,用在 ImagePullSecret 参数中,用于拉取私有仓库的镜像
Secret 支持 Base64 加密
Secret 分为 kubernetes.io/service-account-token、kubernetes.io/dockerconfigjson、Opaque 三种类型,而 Configmap 不区分类型
参考:
Secret:https://blog.csdn.net/skh2015java/article/details/109228364
ConfigMap:https://skaygo.blog.csdn.net/article/details/109228836

 浙公网安备 33010602011771号