
单机离线部署tidb8.5.1极简版
前言
最近安装测试tidb遇到点问题,卡了两天最后成功安装,现总结一下并记录安装过程。
硬件环境
CPU:8核心
内存:8G
磁盘:128GSSD
操作系统:Kylin Linux Advanced Server release V10
准备工作
安装必要的工具
yum -y install numa*
yum -y install hdparm
下载安装包
官网下载安装包:tidb-community-server-v8.5.1-linux-amd64.tar.gz和tidb-community-toolkit-v8.5.1-linux-amd64.tar.gz
下载地址:https://cn.pingcap.com/product-community/

开始安装
创建目录并上传安装包
创建deploy_dir和data_dir存放目录
mkdir -p /opt/tidb/tidb-deploy
mkdir -p /opt/tidb/tidb-data
将安装包传至/opt/tidb/
部署离线环境tiup组件
cd /opt/tidb
#解压安装包
tar zxvf tidb-community-server-v8.5.1-linux-amd64.tar.gz
tar zxvf tidb-community-toolkit-v8.5.1-linux-amd64.tar.gz
#部署离线环境 TiUP 组件
cd tidb-community-server-v8.5.1-linux-amd64/
sh local_install.sh
#根据提示执行
source /home/tidb/.bash_profile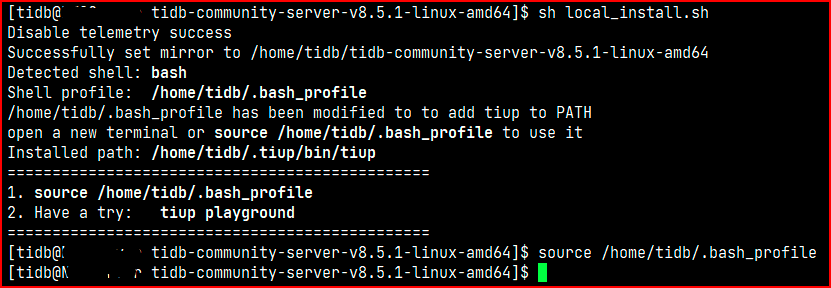
合并离线包
cp -rp keys ~/.tiup/
tiup mirror merge ../tidb-community-toolkit-v8.5.1-linux-amd64
初始化拓扑文件
执行命令,生成集群初始化配置文件:
cd /opt/tidb
tiup cluster template > topology.yaml
topology.yaml修改后如下:
注:这里每个节点的host设置为127.0.0.1表示没有限制,所有IP都可连接,host建议设置为本机IP,不要设置127.0.0.1。
# # Global variables are applied to all deployments and used as the default value of
# # the deployments if a specific deployment value is missing.
global:
  # # The user who runs the tidb cluster.
  user: "tidb"
  # # SSH port of servers in the managed cluster.
  ssh_port: 22
  # # Storage directory for cluster deployment files, startup scripts, and configuration files.
  deploy_dir: "/opt/tidb/tidb-deploy"
  # # TiDB Cluster data storage directory
  data_dir: "/opt/tidb/tidb-data"
  # # default listen_host for all components
  listen_host: 0.0.0.0
  # # Supported values: "amd64", "arm64" (default: "amd64")
  arch: "amd64"

# # Monitored variables are applied to all the machines.
monitored:
  # # The communication port for reporting system information of each node in the TiDB cluster.
  node_exporter_port: 9100
  # # Blackbox_exporter communication port, used for TiDB cluster port monitoring.
  blackbox_exporter_port: 9115

# # Server configs are used to specify the configuration of PD Servers.
pd_servers:
  # # The ip address of the PD Server.
  - host: 127.0.0.1

# # Server configs are used to specify the configuration of TiDB Servers.
tidb_servers:
  # # The ip address of the TiDB Server.
  - host: 127.0.0.1

# # Server configs are used to specify the configuration of TiKV Servers.
tikv_servers:
  # # The ip address of the TiKV Server.
  - host: 127.0.0.1
检查环境
cp /top/tidb
tiup cluster check topology.yaml --user root -p
#发现有很多Fail,执行自修复命令
tiup cluster check topology.yaml --apply --user root -p
#执行完后再次检查
tiup cluster check topology.yaml --user root -p
#可忽略Warn,没有Fail即可执行下一步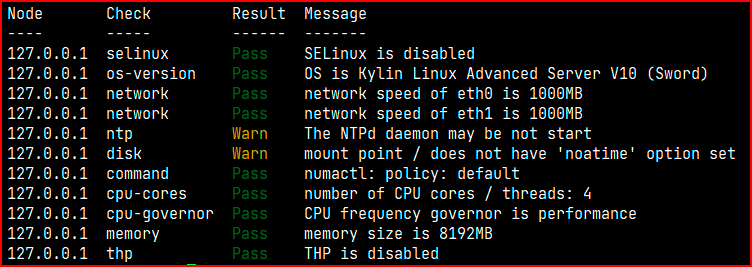
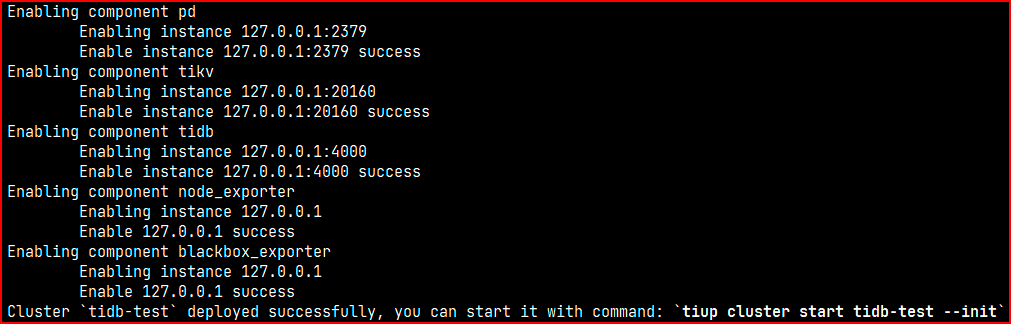
执行部署
cd /opt/tidb
tiup cluster deploy tidb-test v8.5.1 topology.yaml --user tidb -p这里会报错,提示Error: executor.ssh.execute_failed: Failed to execute command over SSH for 'tidb@127.0.0.1:22'......unable to authenticate, attempted methods [none publickey], no supported methods remain
此类问题是互信没有自动配置好,需要手动在配置一下:
1、修改tidb账户密码
执行部署后会自动创建tidb账户,home目录有tidb目录,现在需要root登录修改tidb的密码:passwd tidb
2、配置sudo免密码
执行以下命令,将 tidb ALL=(ALL) NOPASSWD: ALL 添加到文件末尾,即配置好 sudo 免密码
visudo
tidb ALL=(ALL) NOPASSWD: ALL
3、复制公钥
以tidb用户登录设备,执行命令
ssh-keygen -t rsa
ssh-copy-id -i ~/.ssh/id_rsa.pub 127.0.0.1
如果没有ssh-copy-id命令,按照下面执行:
cd /home/tidb/.ssh/
cat id_rsa.pub复制id_rsa.pub的内容,然后以root身份登录系统,在~/.ssh/目录里创建authorized_keys文件,然后把复制的内容粘贴到该文件内并保存。
再次执行部署命令,如果不行,检查sshd_config配置文件中的PubkeyAuthentication的配置,这里应设置为yes是允许公钥认证,修改完后重启sshd服务。
以 tidb 用户登录到部署目标机器后,执行命令:sudo -su root不需要输入密码并切换到 root 用户,表示 tidb 用户 sudo 免密码配置成功。
部署成功后回显如下:
查看TiDB管理的集群
tiup cluster listTiUP 支持管理多个 TiDB 集群,该命令会输出当前通过 TiUP cluster 管理的所有集群信息,包括集群名称、部署用户、版本、密钥信息等。

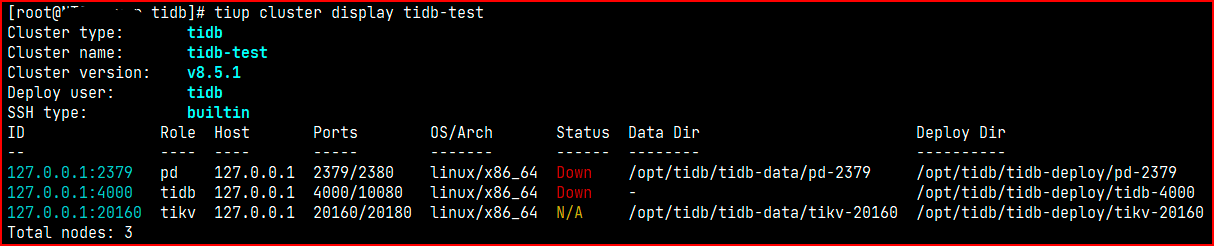
检查部署的TiDB集群情况
tiup cluster display tidb-test预期输出包括 tidb-test 集群中实例 ID、角色、主机、监听端口和状态(由于还未启动,所以状态为 Down/inactive)、目录信息。
初始化安全启动集群
安全启动后,TiUP 会自动生成 TiDB root 用户的密码,并在命令行界面返回密码。
使用安全启动方式后,不能通过无密码的 root 用户登录数据库,你需要记录命令行返回的密码进行后续操作。
tiup cluster start tidb-test --init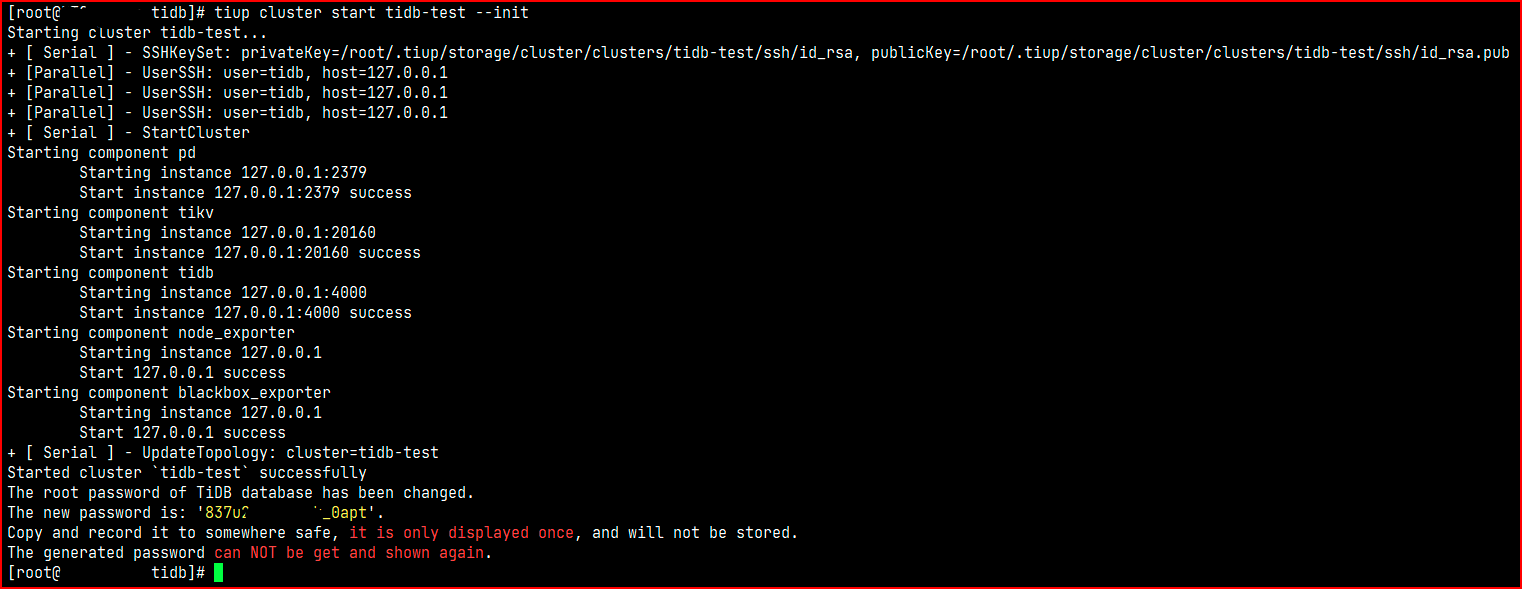
验证集群运行状态
tiup cluster display tidb-test预期结果输出:各节点 Status 状态信息为 Up 说明集群状态正常。

本地连接TiDB
mysql -h127.0.0.1 -uroot -p -P4000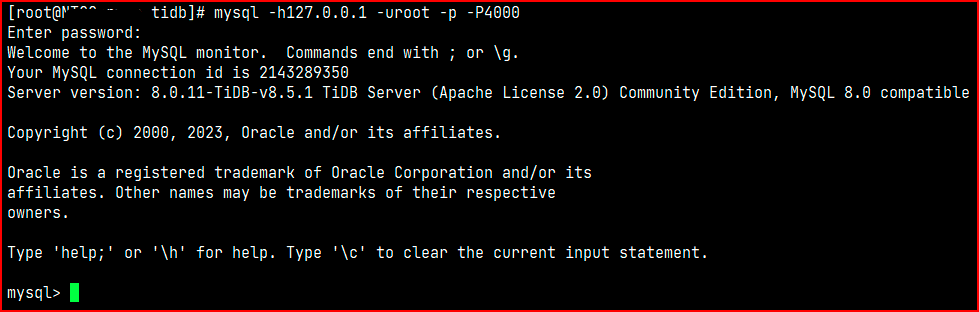
远程连接TiDB
因为host使用的是127.0.0.1,所以任何远程终端都可以连接。
使用可视化工具连接数据库
服务器地址:*.*.*.*
端口:4000
用户名:root
密码:***** (该密码是初始化安全启动集群时输出的密码)
命令行连接
mysql -h*.*.*.* -uroot -p -P4000停止集群
tiup cluster stop tidb-test清理数据
tiup cluster clean tidb-test --all卸载集群
tiup cluster destroy tidb-test删除安装包
rm -rf tidb-community-toolkit-v8.5.1-linux-amd64.tar.gz
rm -rf tidb-community-server-v8.5.1-linux-amd64.tar.gz
#注:解压后的文件夹不要删,否则无法再次创建新的集群

 浙公网安备 33010602011771号