Spring Security实现OAuth2.0授权服务 - 基础版
一、OAuth2.0协议
1、OAuth2.0概述
OAuth2.0是一个关于授权的开放网络协议。
该协议在第三方应用与服务提供平台之间设置了一个授权层。第三方应用需要服务资源时,并不是直接使用用户帐号密码登录服务提供平台,而是通过服务提供平台的授权层获取token令牌,用户可以在授权时指定token的权限范围和有效期。第三方应用获取到token以后,才可以访问用户资源。
OAuth 2.0定义了四种授权方式:
- 授权码模式(authorization code):功能最完整、流程最严密的授权模式。特点是通过第三方应用的后台服务器,与服务提供平台的认证服务器进行互动获取资源。
- 简化模式(implicit):不通过第三方应用服务器,直接在浏览器中向认证服务器申请token令牌,跳过了授权码这个步骤。所有步骤在浏览器中完成,token对用户可见,且第三方应用不需要认证。
- 密码模式(resource owner password credentials):用户向第三方应用提供自己的用户名和密码。第三方应用使用这些信息,向服务提供平台索要授权。在这种模式中,用户必须把自己的密码给第三方应用,但是第三方应用不得储存密码。这通常用在用户对第三方应用高度信任的情况下,比如第三方应用是操作系统的一部分,或者由一个著名公司出品。而认证服务器只有在其他授权模式无法执行的情况下,才能考虑使用这种模式。
- 客户端模式(client credentials):指第三方应用以自己的名义,而不是以用户的名义,向服务提供平台进行认证。严格地说,客户端模式并不属于OAuth框架所要解决的问题。在这种模式中,用户直接向第三方应用注册,第三方应用以自己的名义要求服务提供平台提供服务,其实不存在授权问题。
2、授权码模式
假设有X用户、A系统、B系统,X是A系统中的用户,B系统需要访问A系统获取X用户的信息。
- B系统中放置向A系统申请授权的入口;
- X用户点击进入A系统授权页,如果未登录需要登录;
- X用户允许授权给B系统;
- A系统重定向到B系统,并携带authorization_code授权码;
- B系统使用authorization_code授权码到A系统获取token令牌;
- B系统可以使用token令牌到A系统获取用户资源。
再举个授权码模式的例子:某网站QQ快速登录、账号绑定。
- 用户点击网站的QQ登录图标
- 页面跳转到QQ提供的授权页,如果PC上没有登录QQ账号,需要登录
- 用户允许授权
- 重定向到网站回调地址,携带授权码authorization_code
- 网站使用授权码获取token
- 使用token拉取QQ账号信息
- 使用QQ账号信息登录、账号绑定等
3、文档和例子
百度搜索“oauth2.0”

QQ互联官方文档,http://wiki.connect.qq.com
二、Spring Security概述
Spring Security是一个用于快速实现Web应用安全、认证的框架,可以快速和Spring Boot整合。
开发者可以编写配置类继承WebSecurityConfigurerAdapter类,重写config方法自定义登录页面、登录失败逻辑、权限不足逻辑等,并且可以编写Filter实现更加复杂的图片验证码、短信验证码功能。
Spring Security也可以快速实现OAuth2.0授权服务器和资源服务器。在一个Spring Boot应用中,可以使用@EnableAuthorizationServer注解实现授权服务器,使用@EnableResourceServer注解实现资源服务器。
例如
1 @SpringBootApplication
2 @EnableAuthorizationServer
3 @EnableResourceServer
4 public class BasicOauth2Application {
5
6     public static void main(String[] args) {
7         SpringApplication.run(BasicOauth2Application.class, args);
8     }
9 }
在application.properties文件配置client-id和client-secret参数
security.oauth2.client.client-id=net5ijy
security.oauth2.client.client-secret=123456
三、Spring Security实现OAuth2.0基础
1、引入依赖


 1 <parent>
 2     <groupId>org.springframework.boot</groupId>
 3     <artifactId>spring-boot-starter-parent</artifactId>
 4     <version>1.5.13.RELEASE</version>
 5 </parent>
 6
 7 <dependencies>
 8     <dependency>
 9         <groupId>org.springframework.boot</groupId>
10         <artifactId>spring-boot-starter-web</artifactId>
11     </dependency>
12     <dependency>
13         <groupId>org.springframework.boot</groupId>
14         <artifactId>spring-boot-starter-security</artifactId>
15     </dependency>
16     <dependency>
17         <groupId>org.springframework.security.oauth</groupId>
18         <artifactId>spring-security-oauth2</artifactId>
19     </dependency>
20 </dependencies>
21
22 <build>
23     <plugins>
24         <plugin>
25             <groupId>org.apache.maven.plugins</groupId>
26             <artifactId>maven-compiler-plugin</artifactId>
27             <configuration>
28                 <source>1.8</source>
29                 <target>1.8</target>
30                 <encoding>UTF-8</encoding>
31             </configuration>
32         </plugin>
33     </plugins>
34 </build>
2、Spring Boot启动类配置
加@EnableAuthorizationServer和@EnableResourceServer注解。
1 @SpringBootApplication
2 @EnableAuthorizationServer
3 @EnableResourceServer
4 public class BasicOauth2Application {
5
6     public static void main(String[] args) {
7         SpringApplication.run(BasicOauth2Application.class, args);
8     }
9 }
3、application.properties配置
配置Security登录用户
security.user.name=admin
security.user.password=123456
配置client-id和client-secret参数
security.oauth2.client.client-id=net5ijy
security.oauth2.client.client-secret=123456
4、受保护资源
编写controller
 1 @RestController
 2 @RequestMapping(value = "/")
 3 public class TestController {
 4
 5     Logger log = LoggerFactory.getLogger(TestController.class);
 6
 7     @RequestMapping(value = "order/demo")
 8     public String getDemo() {
 9         Authentication auth = SecurityContextHolder.getContext()
10                 .getAuthentication();
11         log.info(auth.toString());
12         return "Hello world";
13     }
14 }
5、测试授权码模式
1)获取authorization_code授权码
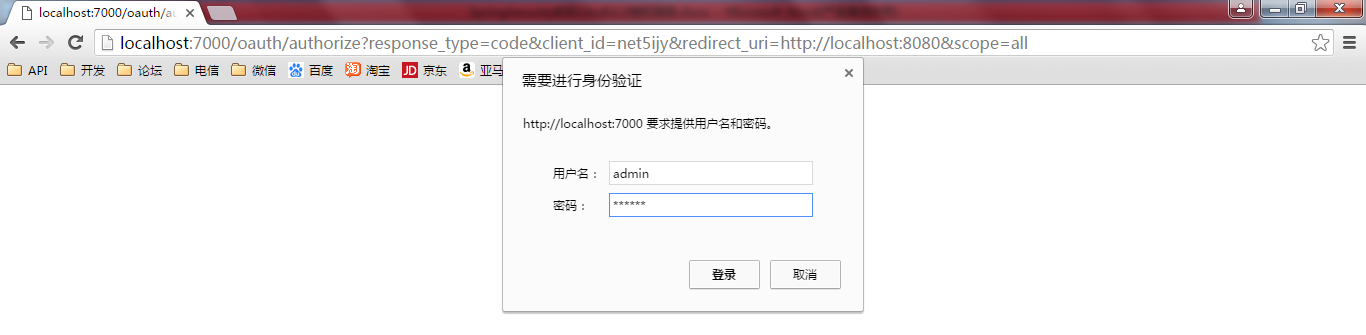
使用浏览器访问:
http://localhost:7000/oauth/authorize?response_type=code&client_id=net5ijy&redirect_uri=http://localhost:8080&scope=all
地址
http://localhost:7000/oauth/authorize
参数
|
response_type |
code |
|
client_id |
根据实际的client-id填写,此处写net5ijy |
|
redirect_uri |
生成code后的回调地址,http://localhost:8080 |
|
scope |
权限范围 |

登录,使用的用户名、密码就是在application.properties中配置的admin和123456
security.user.name=admin
security.user.password=123456
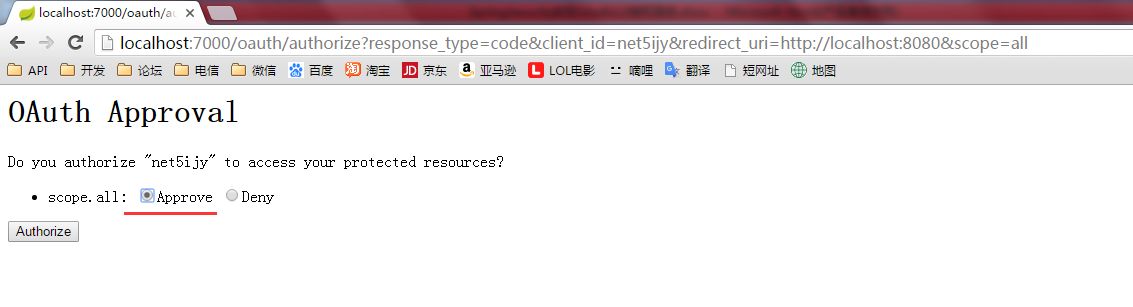
允许授权
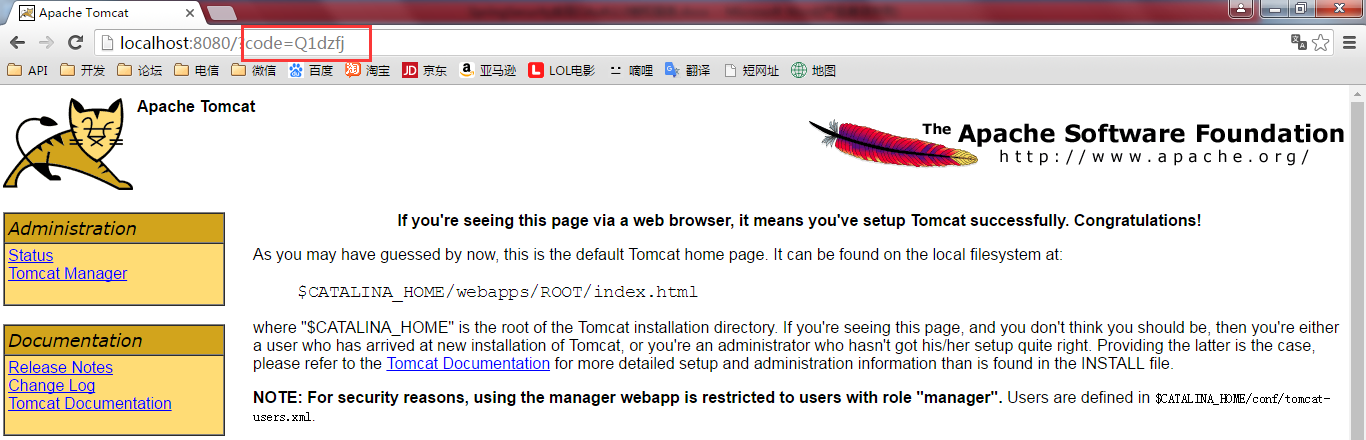
看到浏览器重定向到了http://localhost:8080并携带了code参数,这个code就是授权服务器生成的授权码
2)获取token令牌
使用curl命令获取token令牌
curl --user net5ijy:123456 -X POST -d "grant_type=authorization_code&scope=all&redirect_uri=http%3a%2f%2flocalhost%3a8080&code=Q1dzfj" http://localhost:7000/oauth/token
地址
http://localhost:7000/oauth/token
参数
|
grant_type |
授权码模式,写authorization_code |
|
scope |
权限范围 |
|
redirect_uri |
回调地址,http://localhost:8080需要urlencode |
|
code |
就是上一步生成的授权码 |
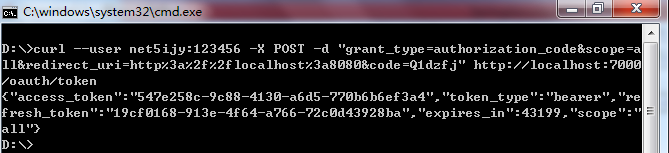
返回值
1 {
2     "access_token": "547e258c-9c88-4130-a6d5-770b6b6ef3a4",
3     "token_type": "bearer",
4     "refresh_token": "19cf0168-913e-4f64-a766-72c0d43928ba",
5     "expires_in": 43199,
6     "scope": "all"
7 }
这样就获取到了token令牌,该token的访问权限范围是all权限,在12小时后失效。
3)使用token访问资源
curl http://localhost:7000/order/demo?access_token=547e258c-9c88-4130-a6d5-770b6b6ef3a4

在资源url后面加上access_token参数。
6、测试密码模式
1)获取token令牌
使用curl命令获取token令牌
curl --user net5ijy:123456 -X POST -d "grant_type=password&username=admin&password=123456&scope=all" http://localhost:7000/oauth/token
地址
http://localhost:7000/oauth/token
参数
|
grant_type |
密码模式,写password |
|
scope |
权限范围 |
|
username |
申请授权用户的用户名 |
|
password |
申请授权用户的密码 |
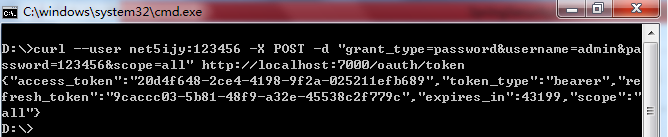
返回值
1 {
2     "access_token": "20d4f648-2ce4-4198-9f2a-025211efb689",
3     "token_type": "bearer",
4     "refresh_token": "9caccc03-5b81-48f9-a32e-45538c2f779c",
5     "expires_in": 43199,
6     "scope": "all"
7 }
这样就获取到了token令牌,该token的访问权限范围是all权限,在12小时后失效。
2)使用token访问资源
curl http://localhost:7000/order/demo?access_token=20d4f648-2ce4-4198-9f2a-025211efb689

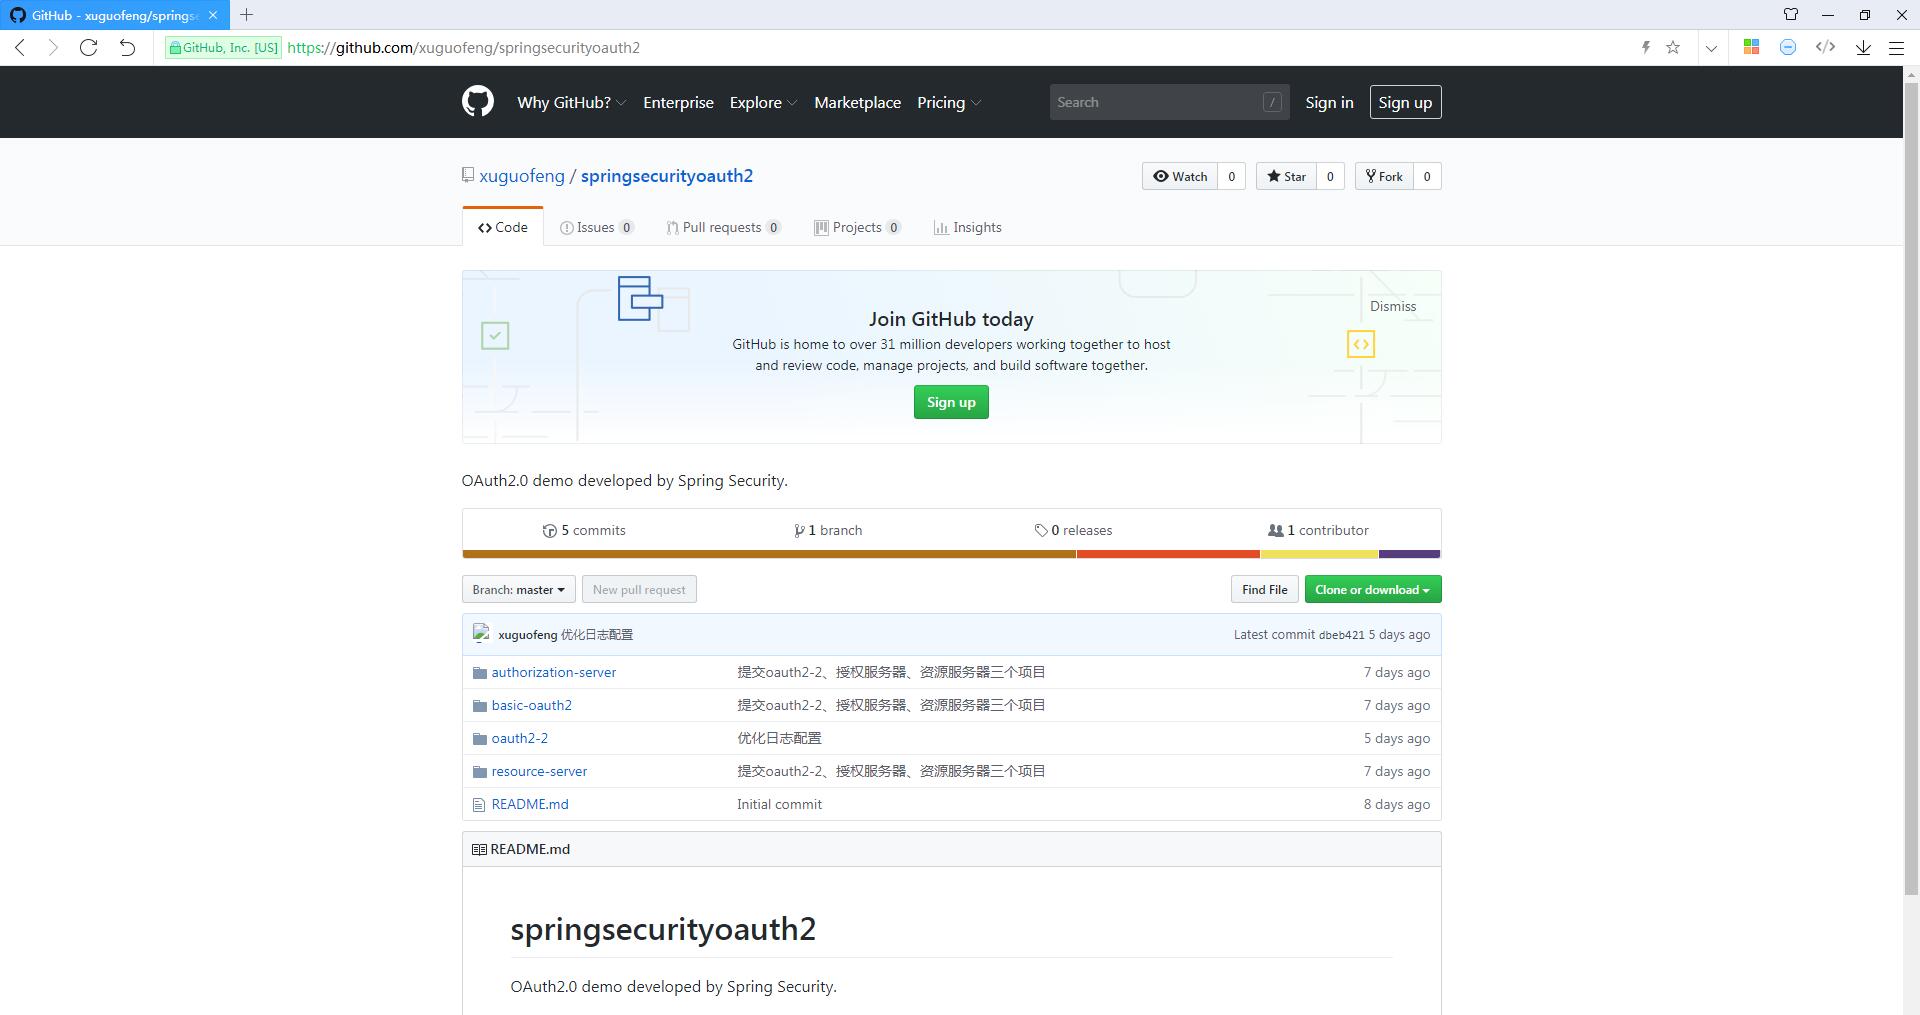
四、Github源码下载
https://github.com/xuguofeng/springsecurityoauth2

 浙公网安备 33010602011771号