python 学习笔记
6.print
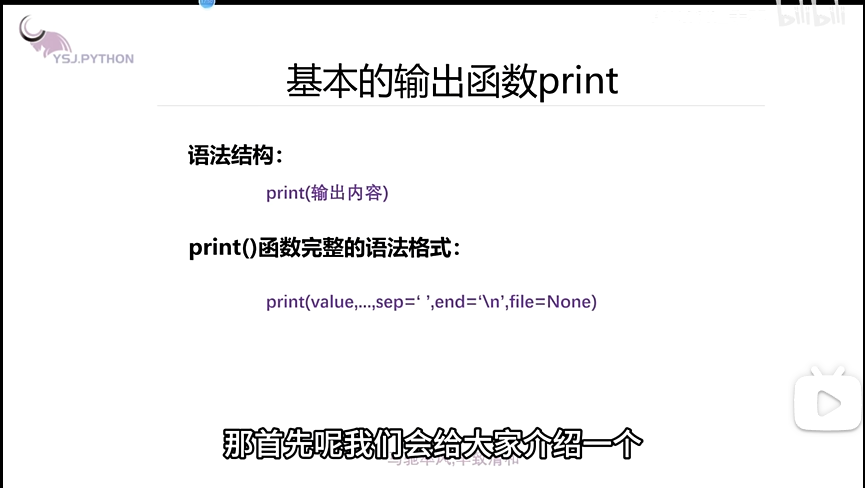
sep 是分隔符,也就是 separate,分开,分隔,默认是空格,可修改。
end 是结束的时候加了啥,默认是换行。
file 是文件指向哪里。
fp=open('note2.txt','w') # 打开文件,w 指的是 write
print('你好',file=fp)
print('你好'+'世界',file=fp) # 连接字符串,用+,没有空格,只有字符串之间才能连接
print('你好','世界') # 用逗号,中间会又分隔符,也就是有空格
fp.close()
用 vsc 打开 note2.txt 时,注意要在下面中更改编码,变成 GBK,不然中文会乱码。
7.input
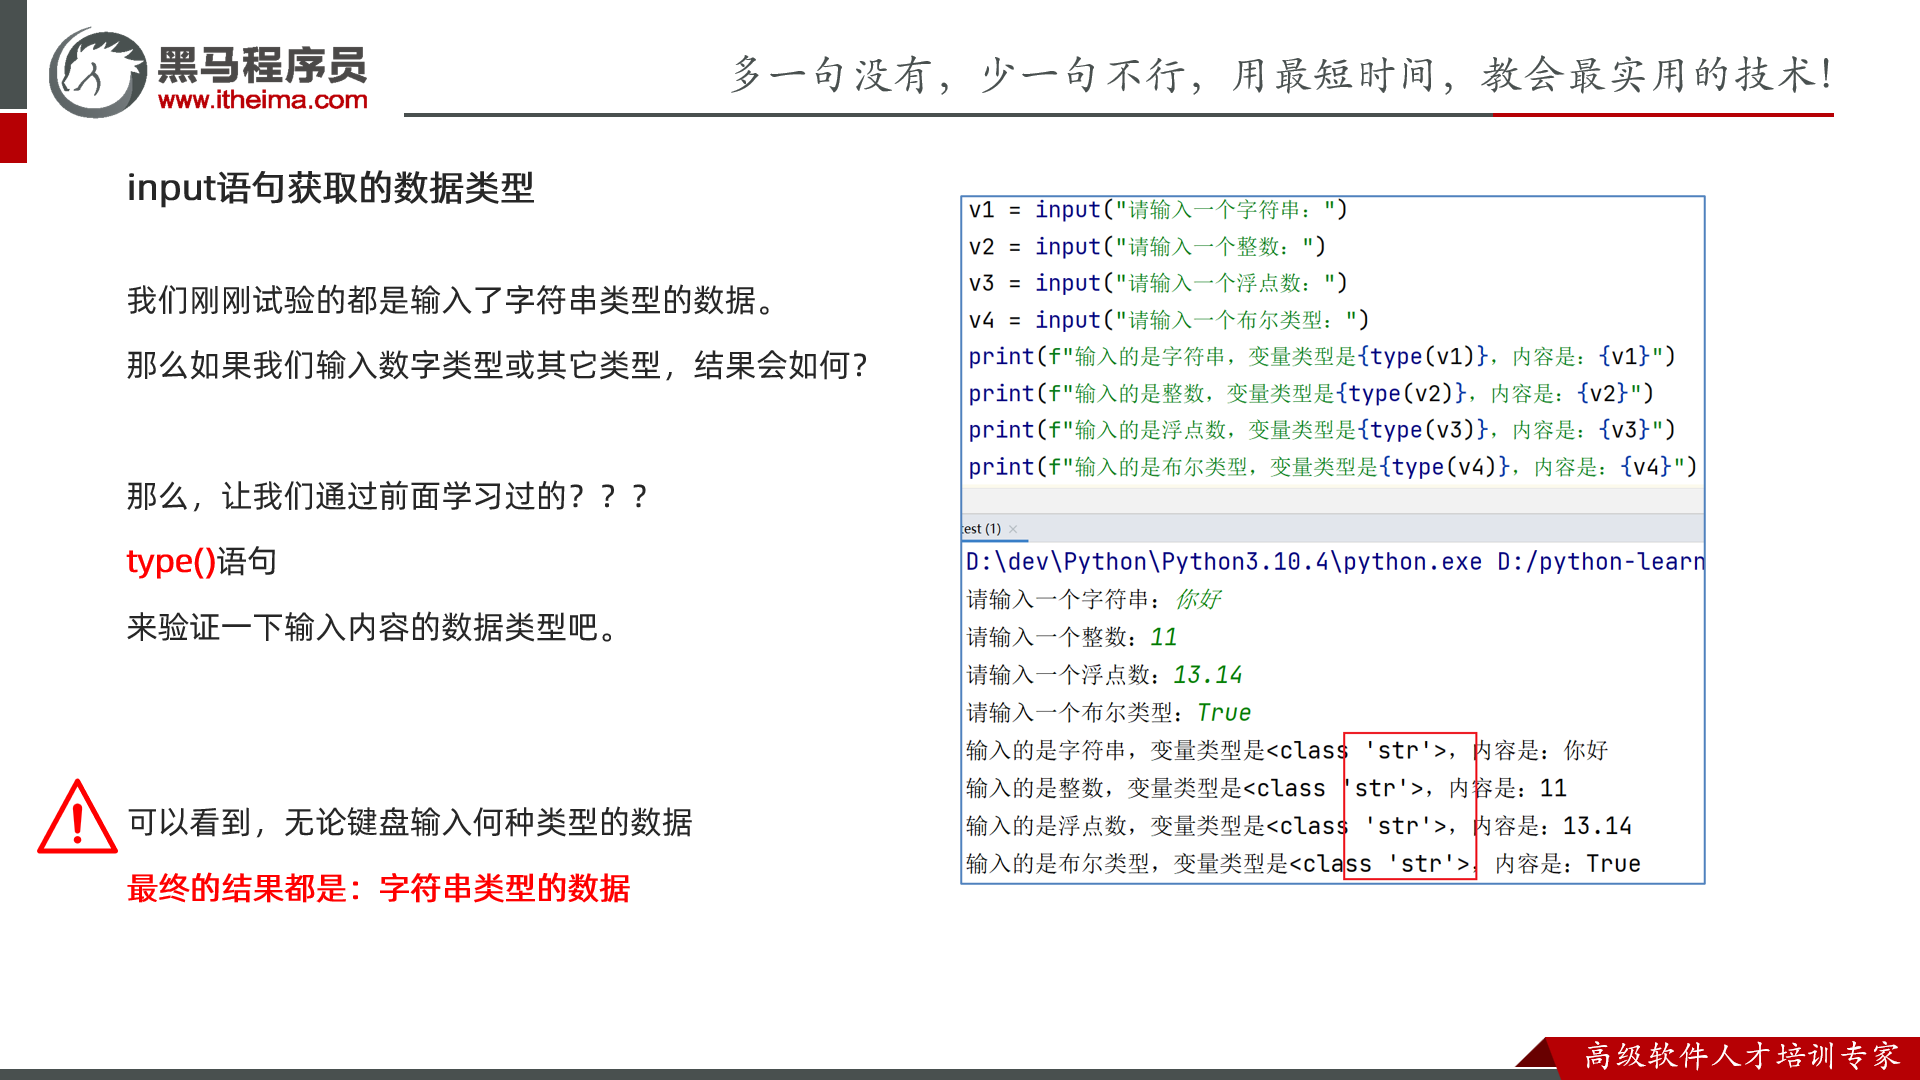
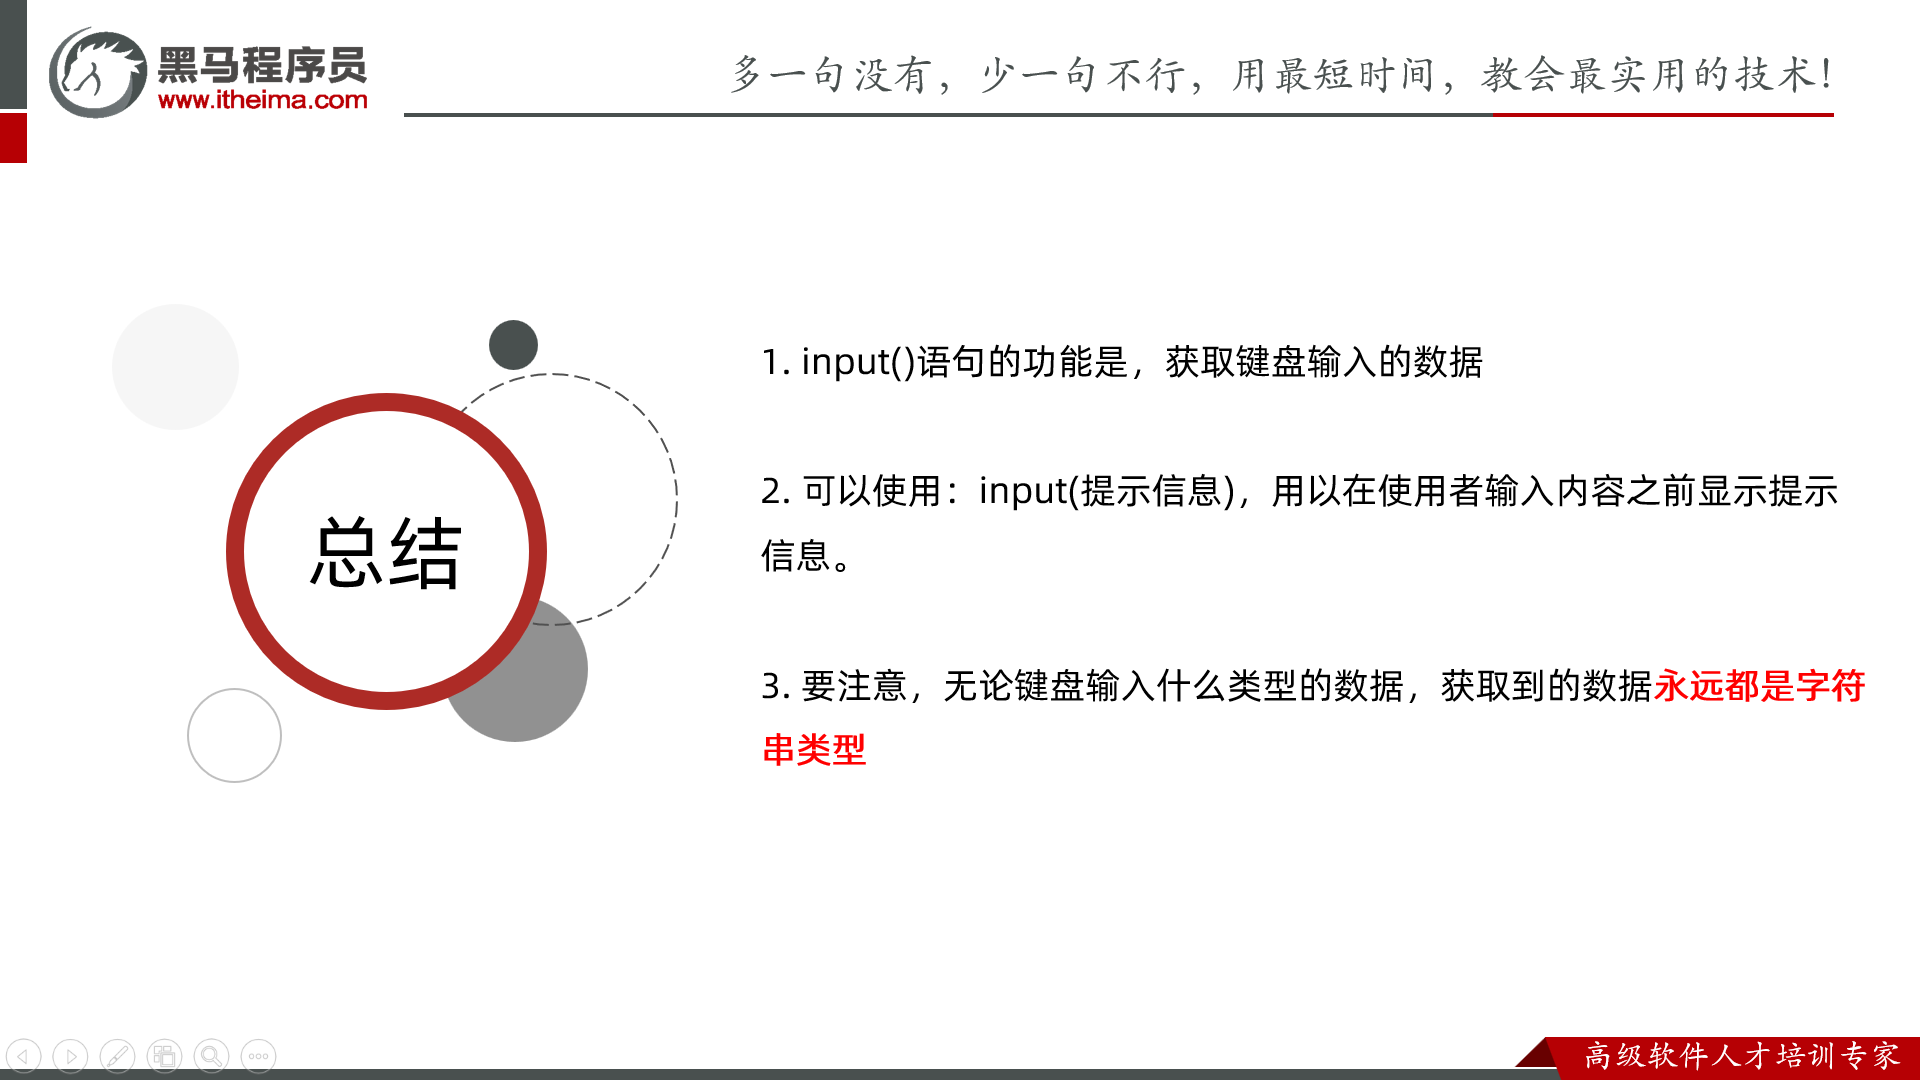
input 函数统一把输入的内容按照字符串处理。
num=input('请输入一个数字') # 此时 num 为字符串
num=int(num) # 强制转换
print(2*num)
8.注释
# coding=gbk
# 中文声明注释, 一定在写在第一行
'''
版权所有:杨淑娟派森信息技术工作室
文件名:示例2-11多行注释
创建人:杨淑娟
'''

"""
版权所有:杨淑娟派森信息技术工作室
文件名:示例2-11多行注释
创建人:杨淑娟
"""
print('hello')
第一行的注释可以声明该 python 代码的编码格式,得用正确的编码打开才能显示正确的信息。
ctrl+/ 跟 dev 一样可以直接帮你注释
9.python 中的缩进与本章总结
11.保留字和标识符
import keyword
print(keyword.kwlist)
print(len(keyword.kwlist)) # 获取保留字的个数
12.变量与常量
python 可以动态修改变量的数据类型。
a=1
print(type(a))
a='你好'
print(type(a))
print(id(a))
用 type(a) 可以输出 a 的类型。id(a) 输出 a 的地址。
python 中没有独立出来定义常量的方式,只是大家默认名称全部大写的量就是常量了。
13.数值类型
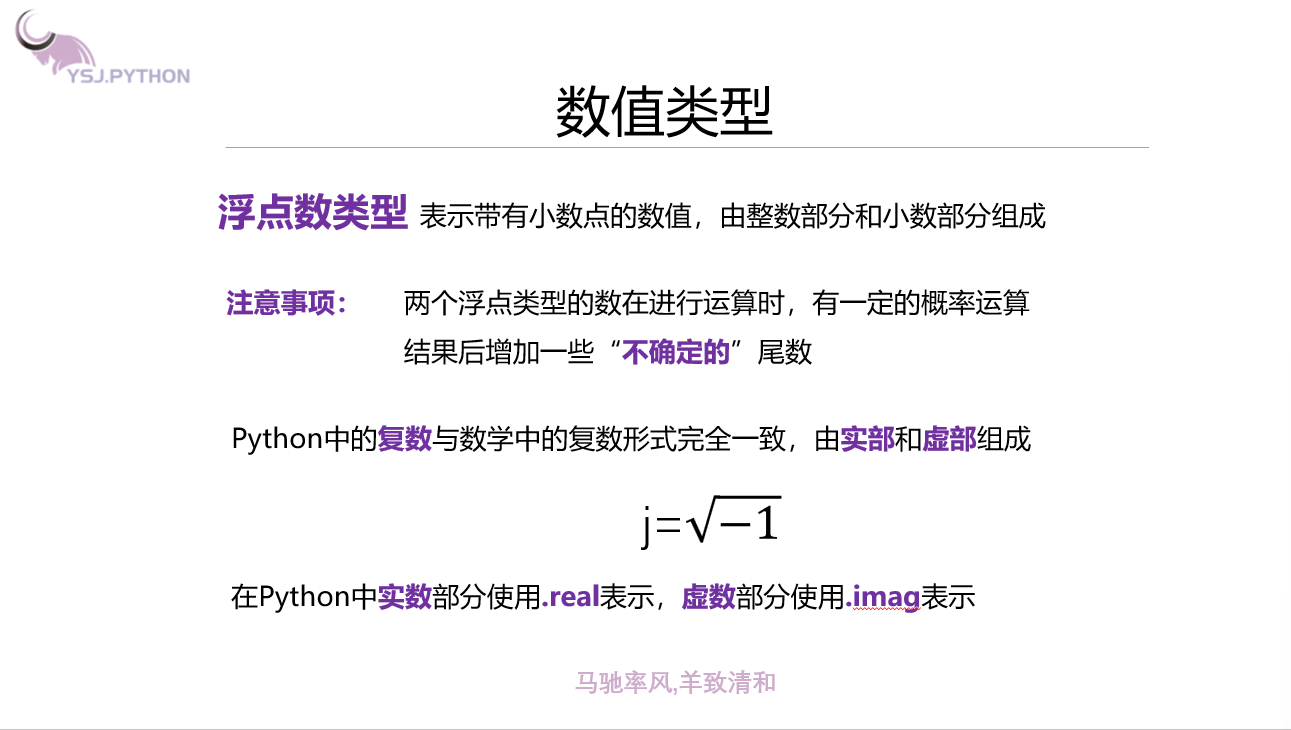
a=123+456j
print(a.real)
print(a.imag)
imag->imaginary
从这里,主播决定换成黑马程序员的网课。
第二章
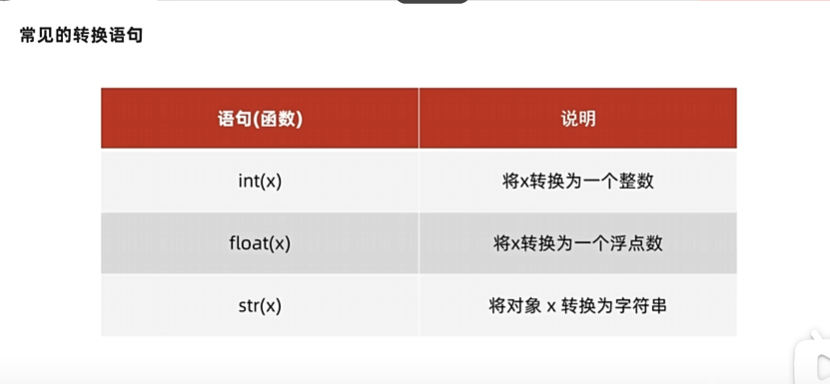
05 数据类型转换

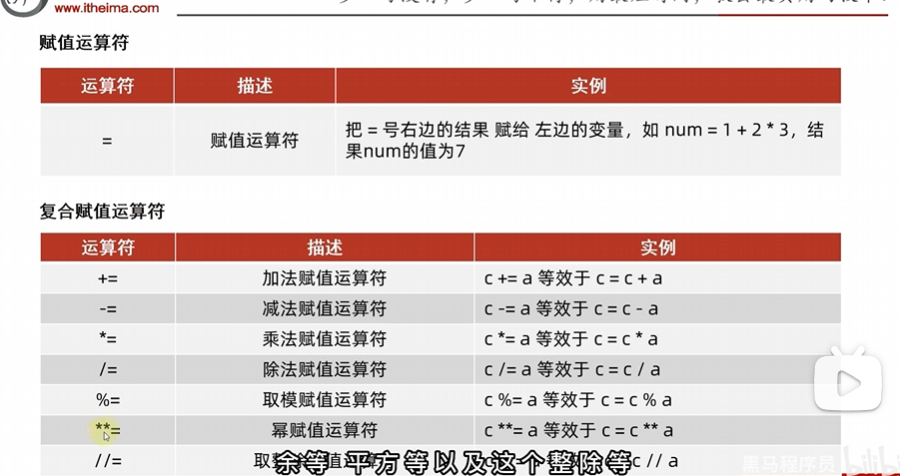
07 运算符

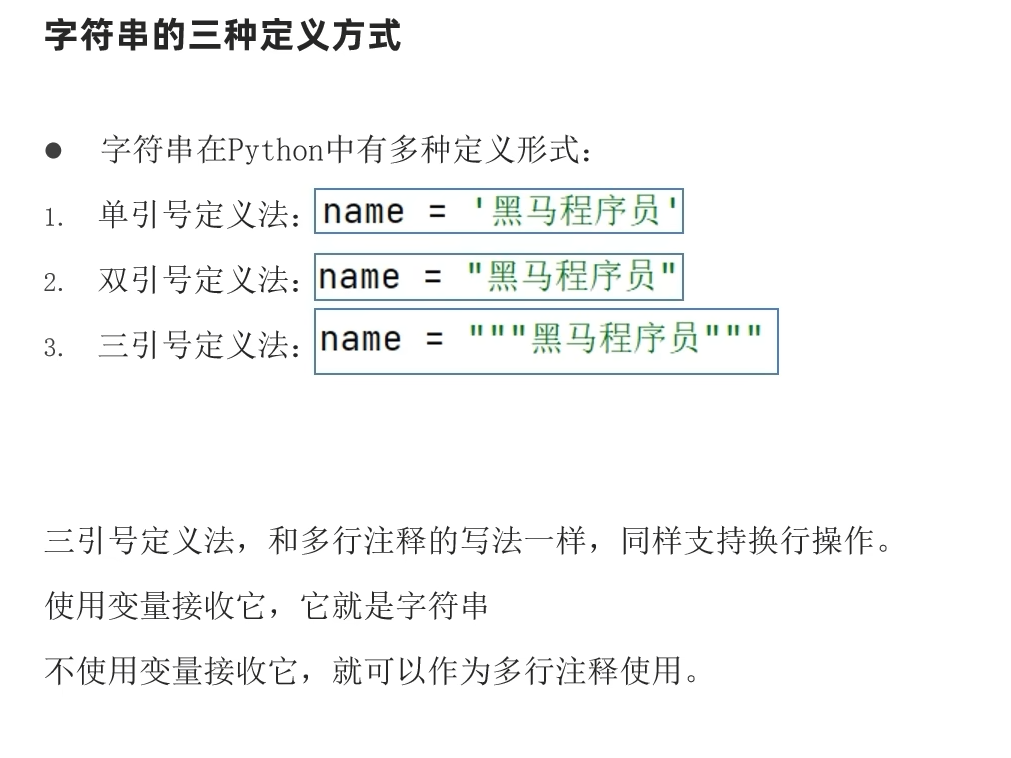
08 字符串的三种定义方式
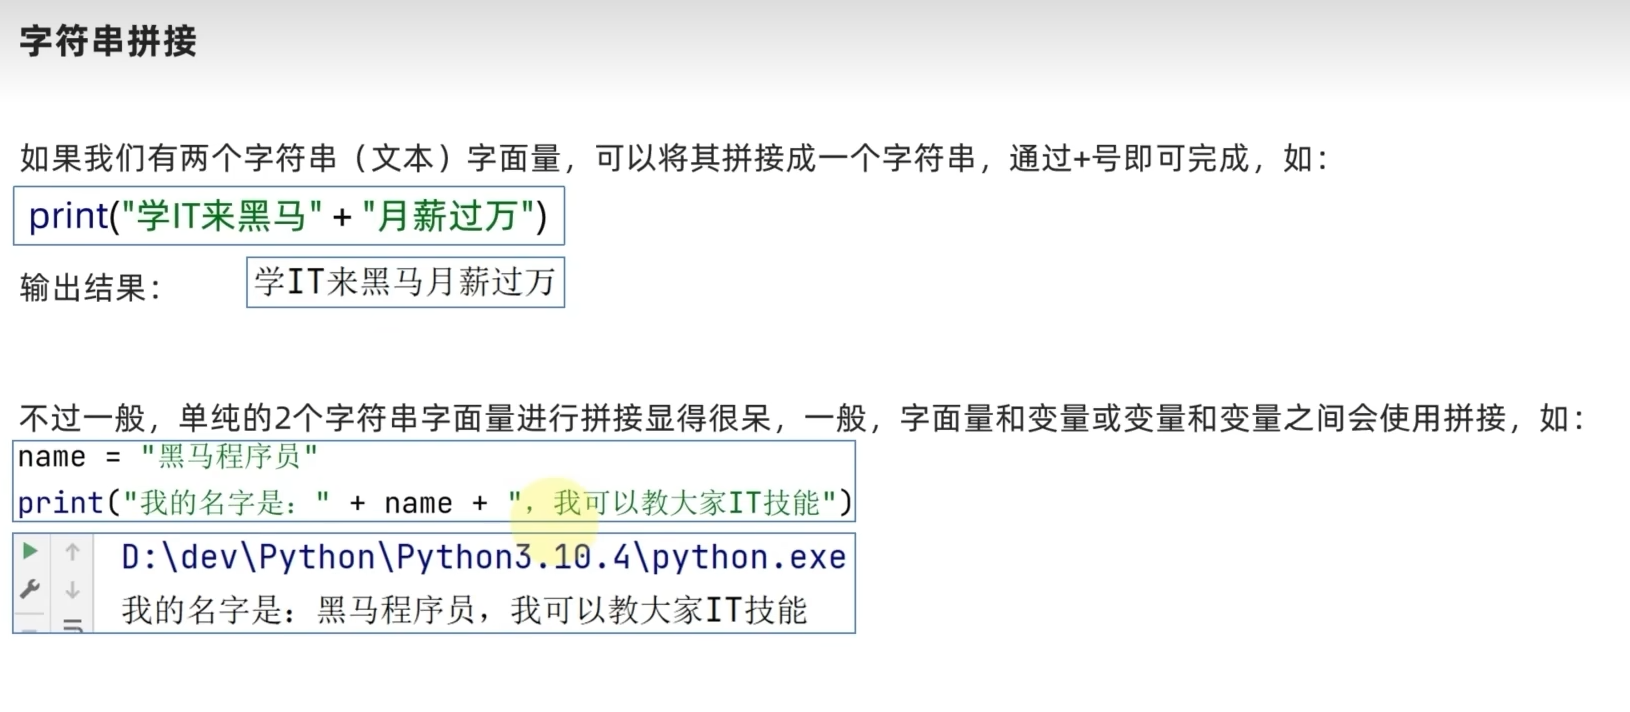
09 字符串的拼接

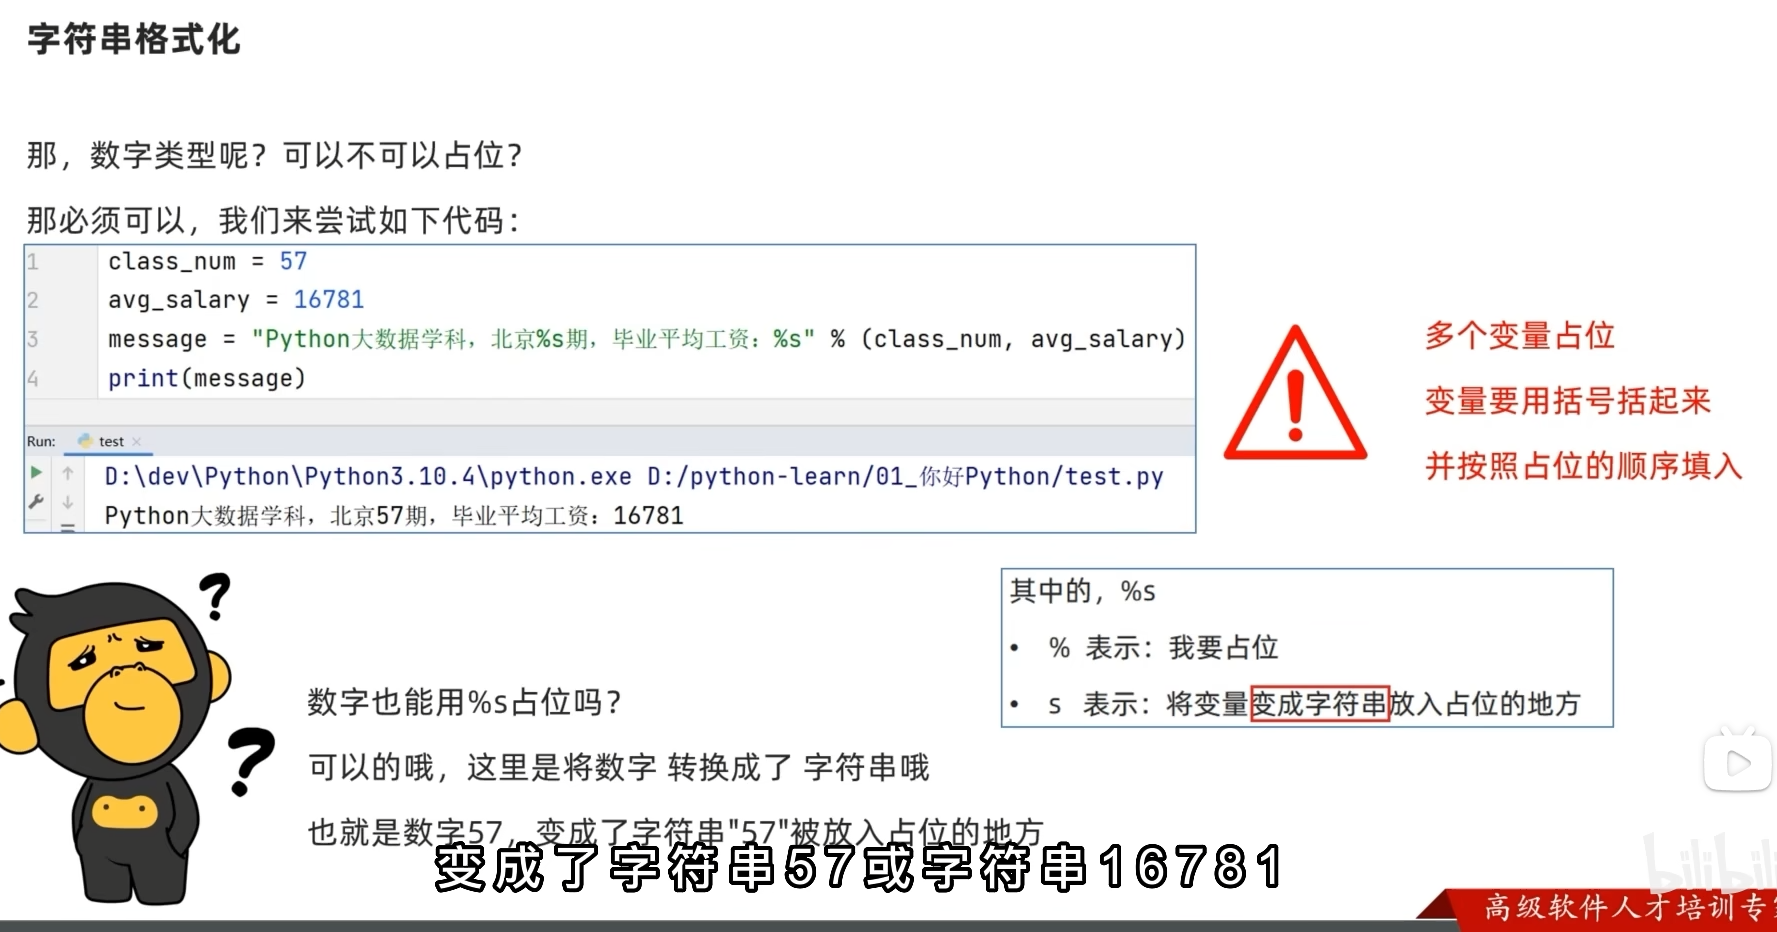
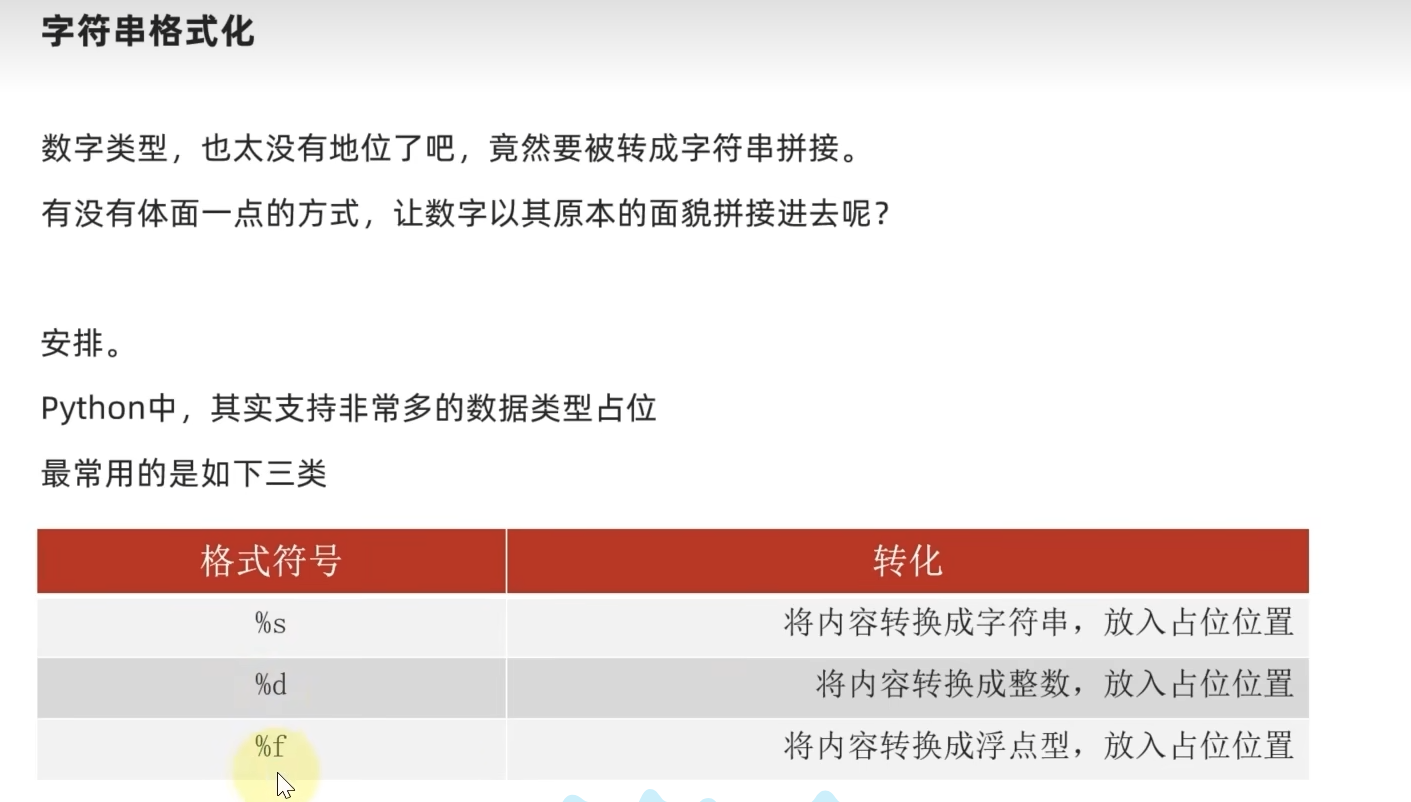
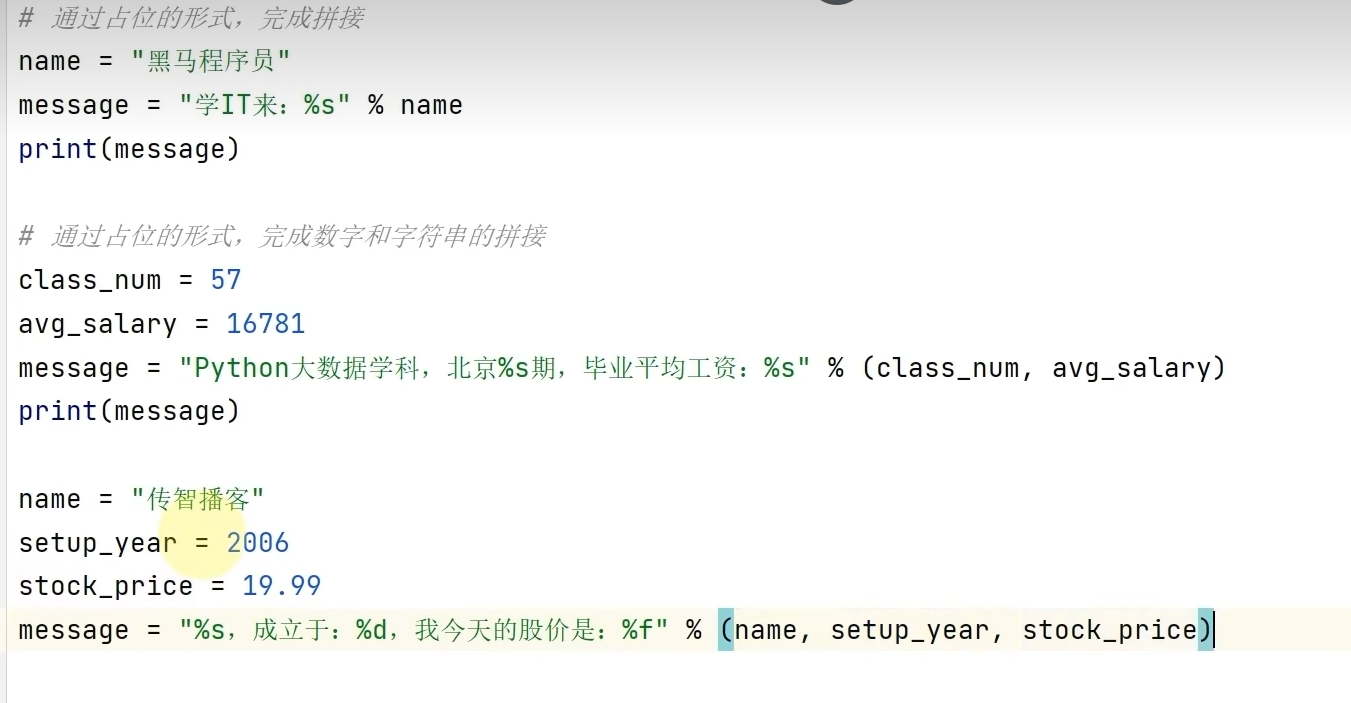
10 字符串格式化
跟 C 里面的 printf 差不多啊

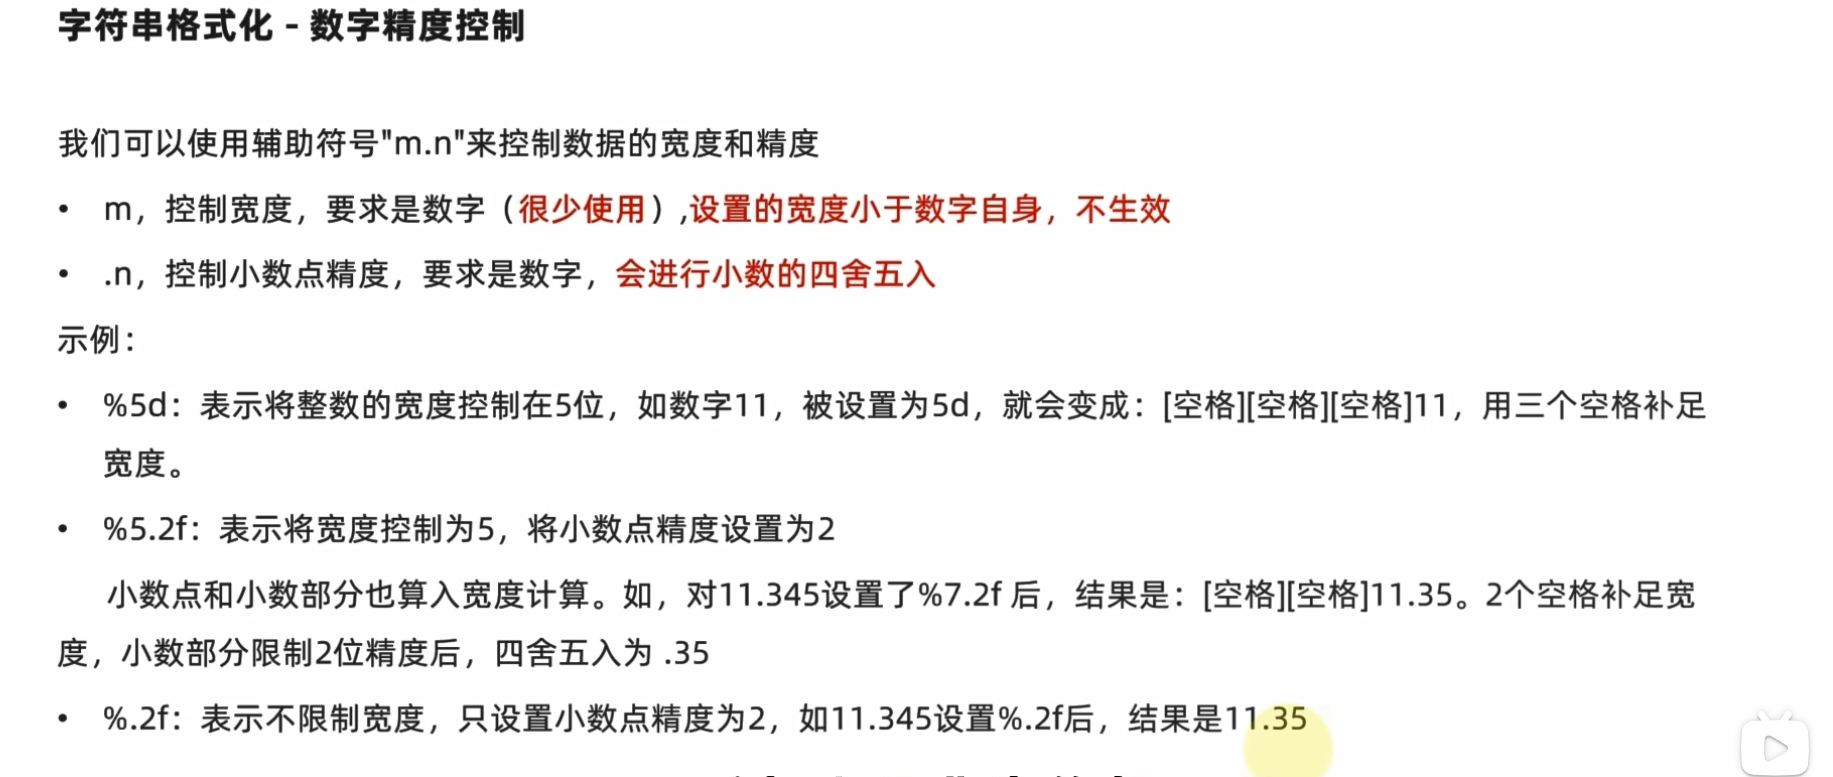
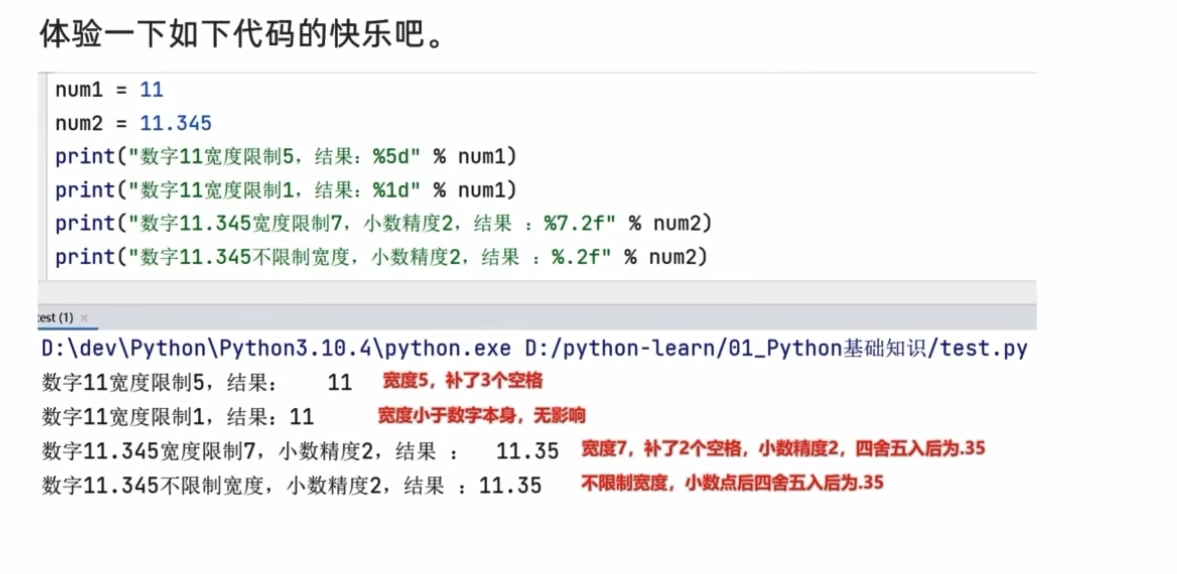
11 字符串格式化的精度控制
12 字符串格式化的方式 2

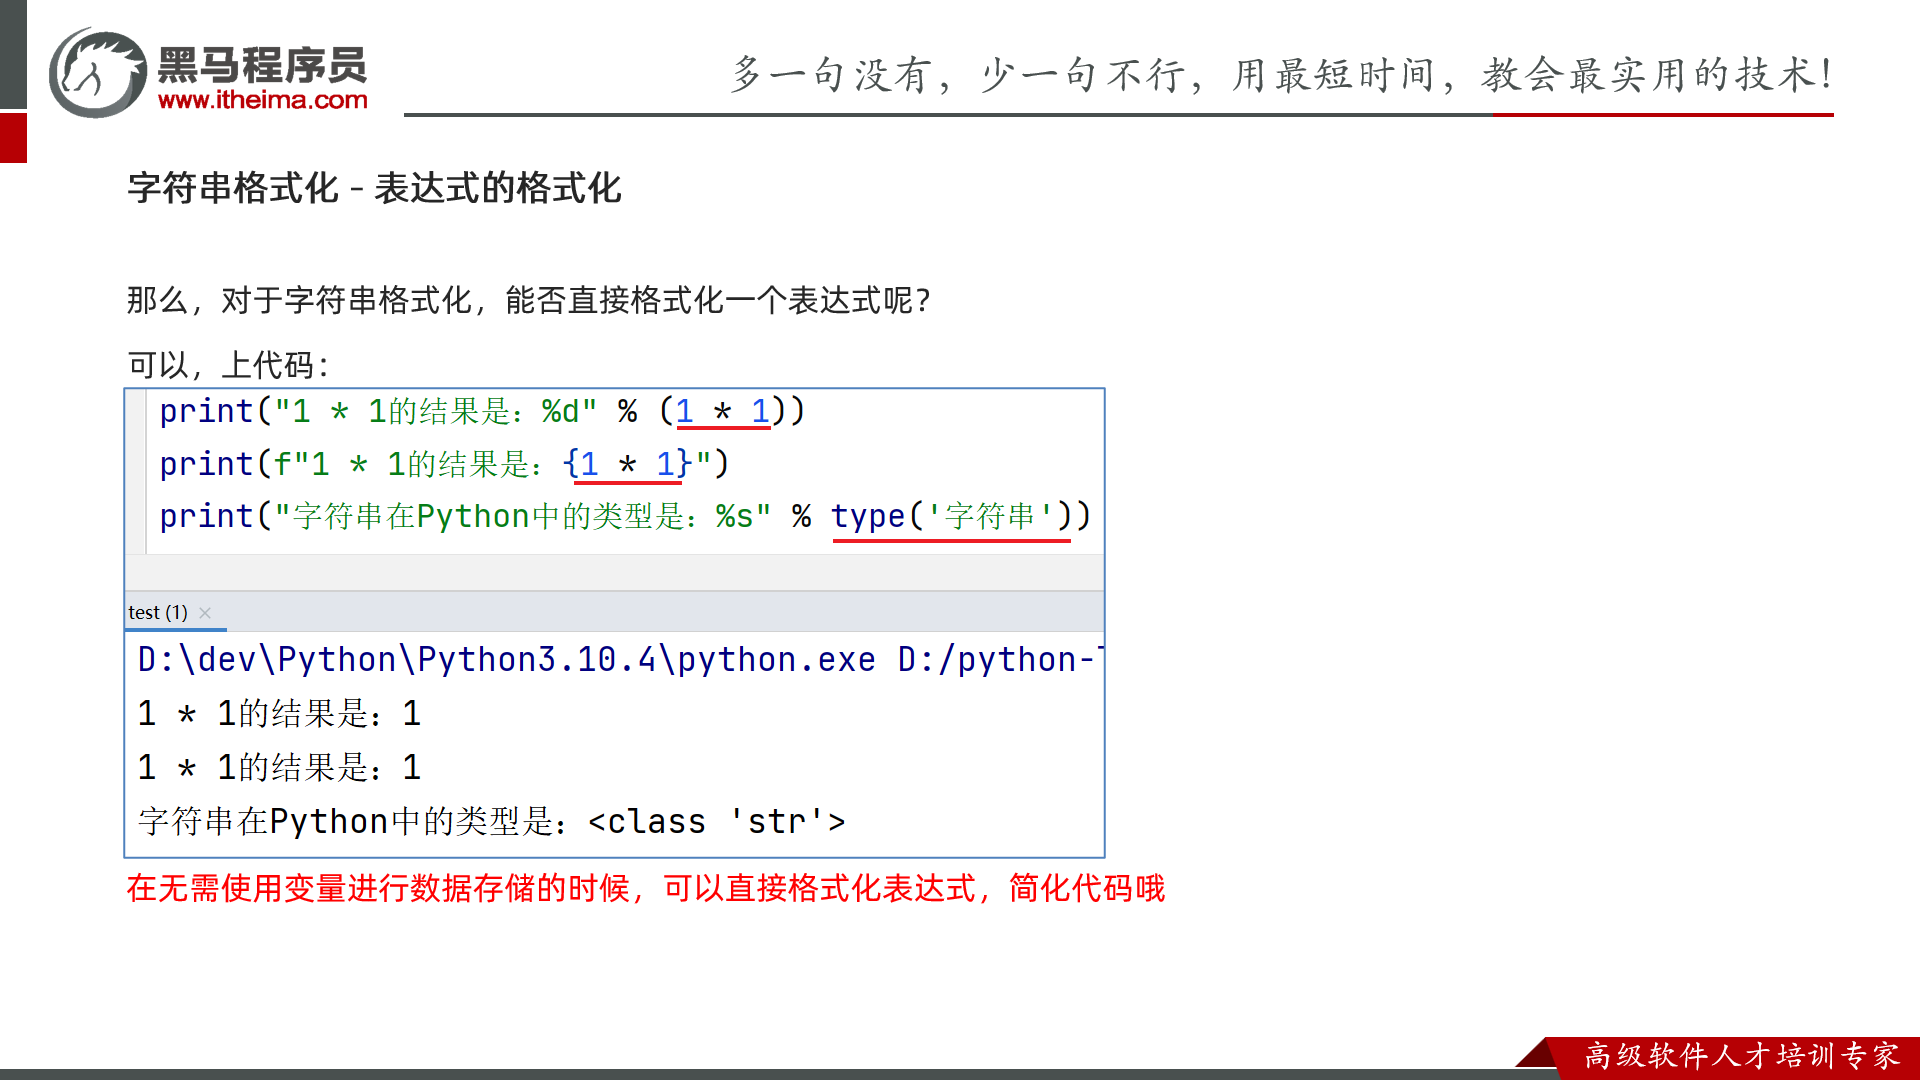
13 对表达式进行格式化
其实就是对于没有必要用变量存的,直接丢进去。
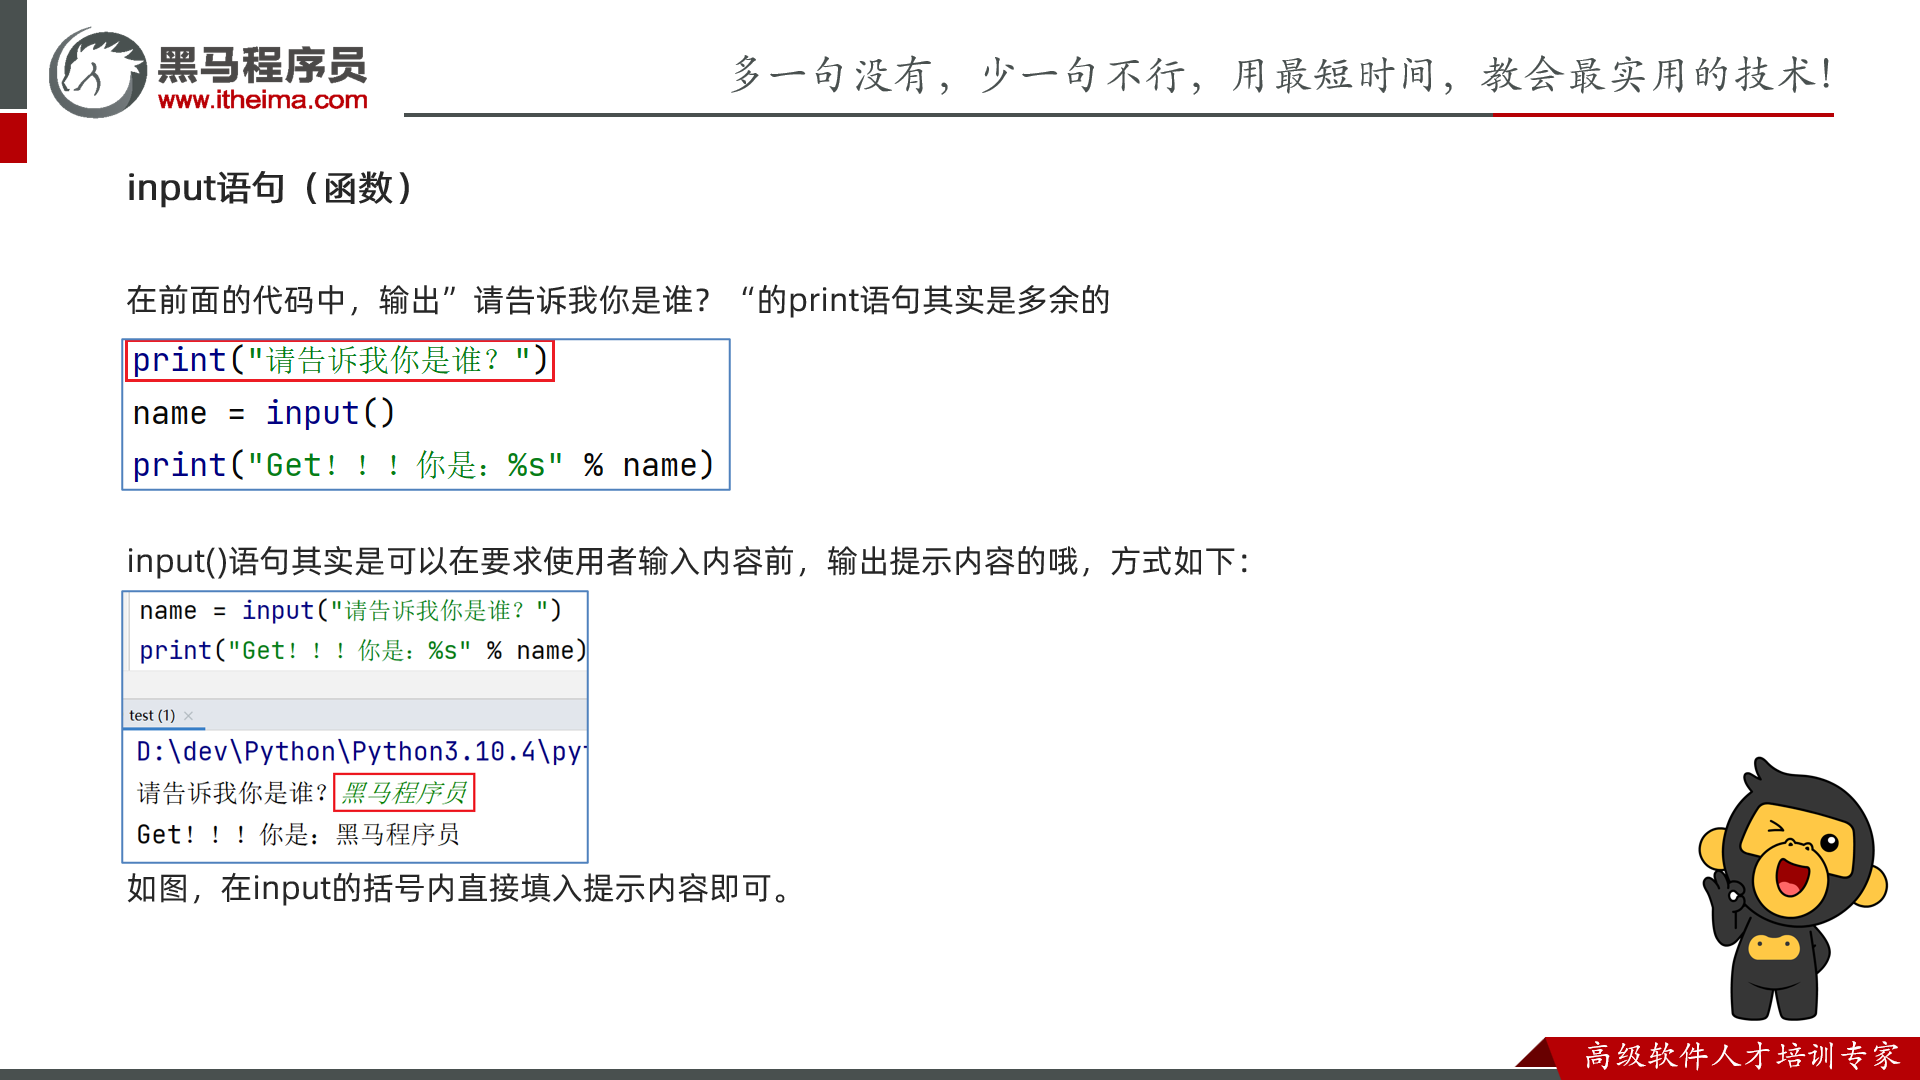
14 input
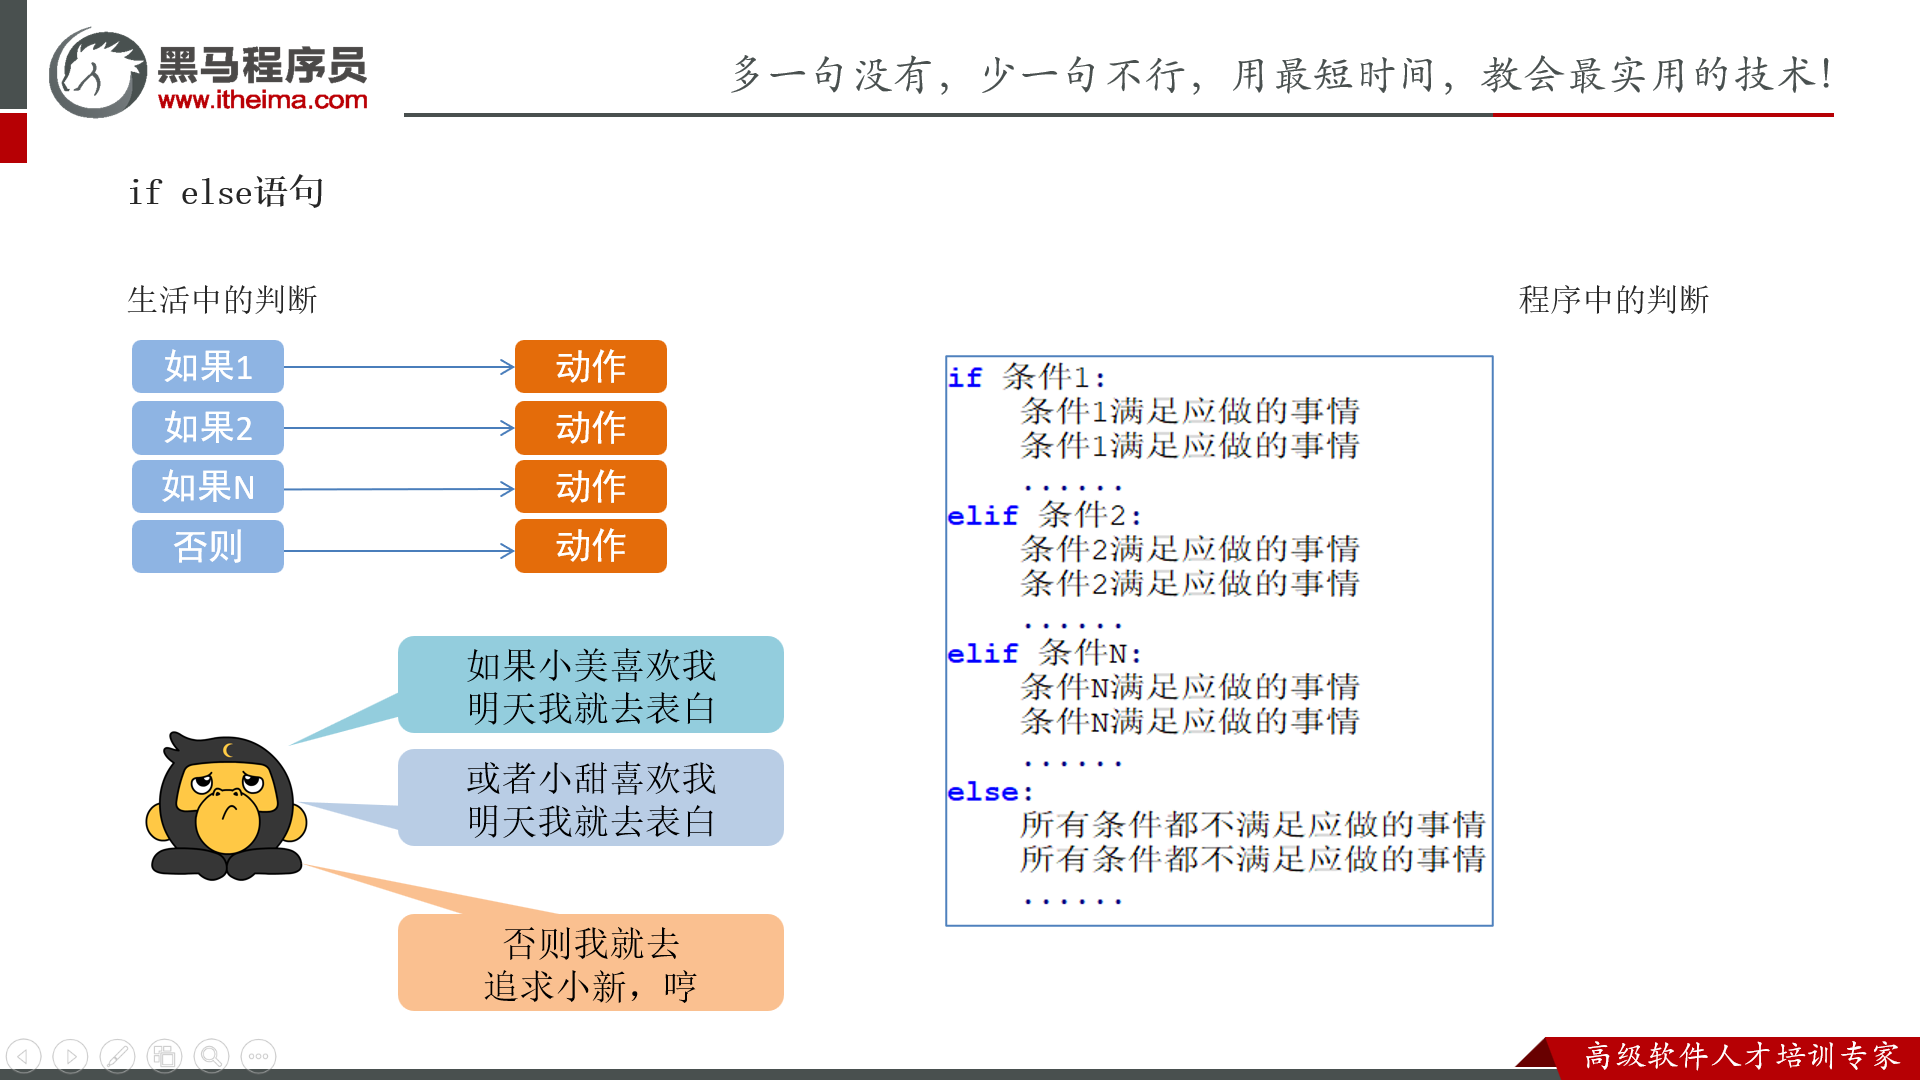
第三章 Python判断语句
这一章是 if elif else 的使用,差不多。
还有就是不需要用括号
大括号变成冒号加缩进了。
第四章 Python循环语句
基本上是 while 和 for,然后有个制表符的东西。
制表符
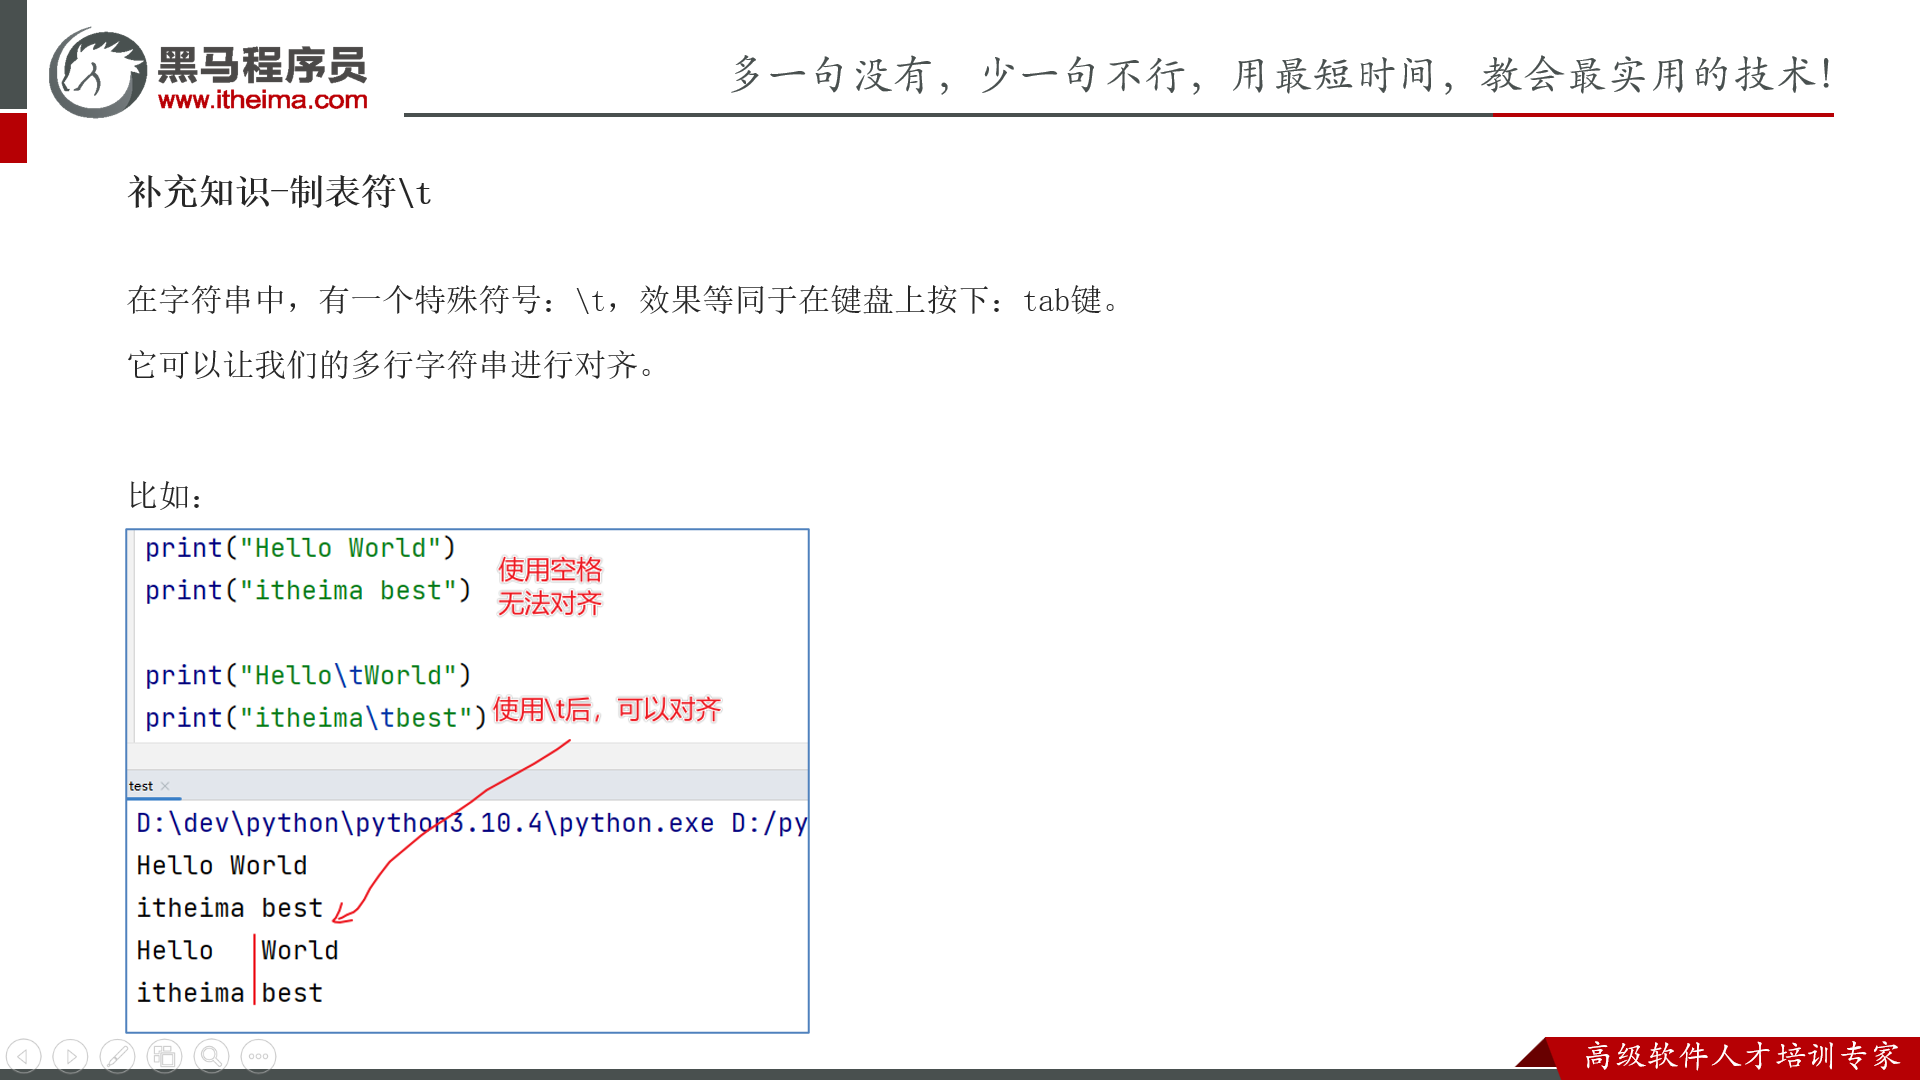
# \t 制表符,是生成空格,将前面的字符长度补到 8个/8 的倍数
print("1234567\t123456789") # 空 1 个空格
print("12345678\t123") # 空 8 个空格
print("123\t123456789") # 空 5 个空格

99 乘法表案例
额,注意这个 print 要加括号,不然会报错,各个 part 给他分开。
然后用制表符代替空格,去分隔开各个东西。
i=1 # 第 i 行
while i<=9 :
    j=1
    while j<=i :
        print((f"{i}*{j}={i*j}\t"),end='')
        j+=1
    print('')
    i+=1
for
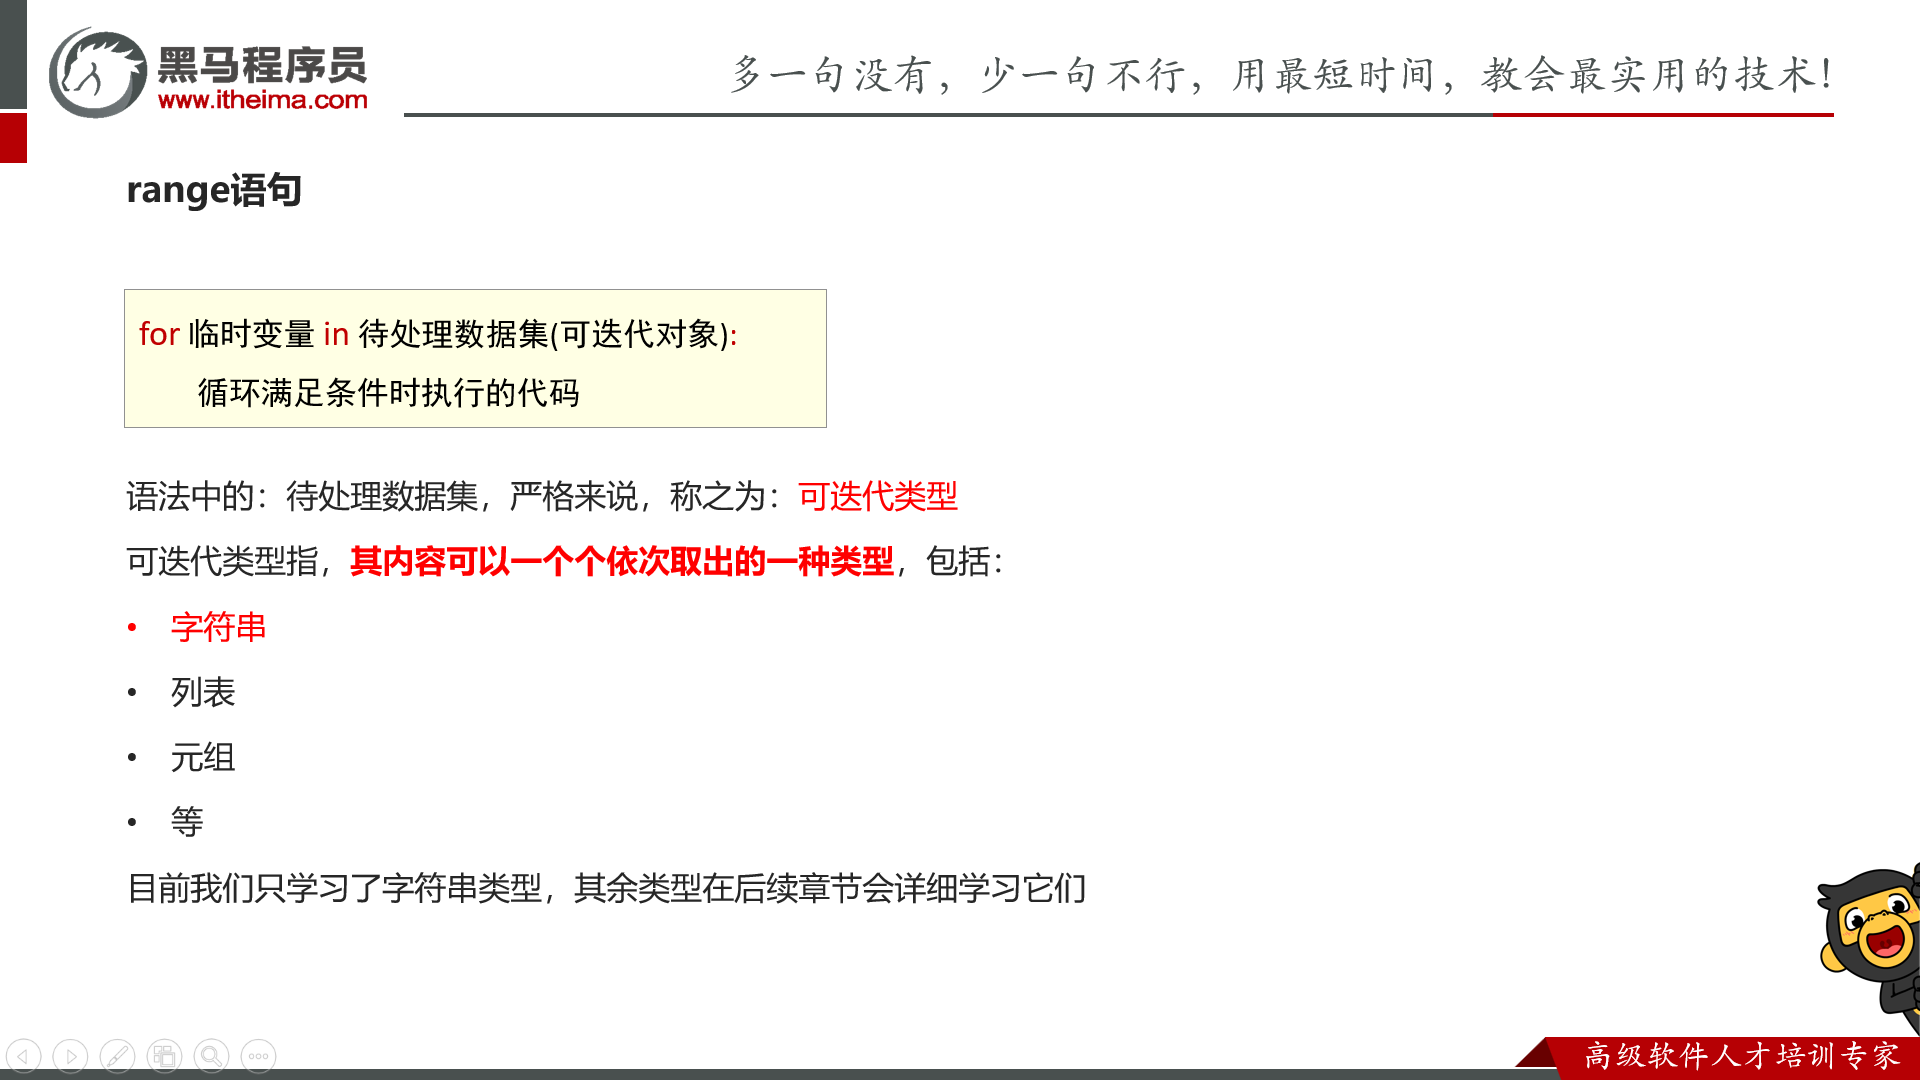
for 的本质是在遍历一个可以迭代的东西,比如字符串,比如一段序列,这跟 C++ 里的 for 是不一样的!
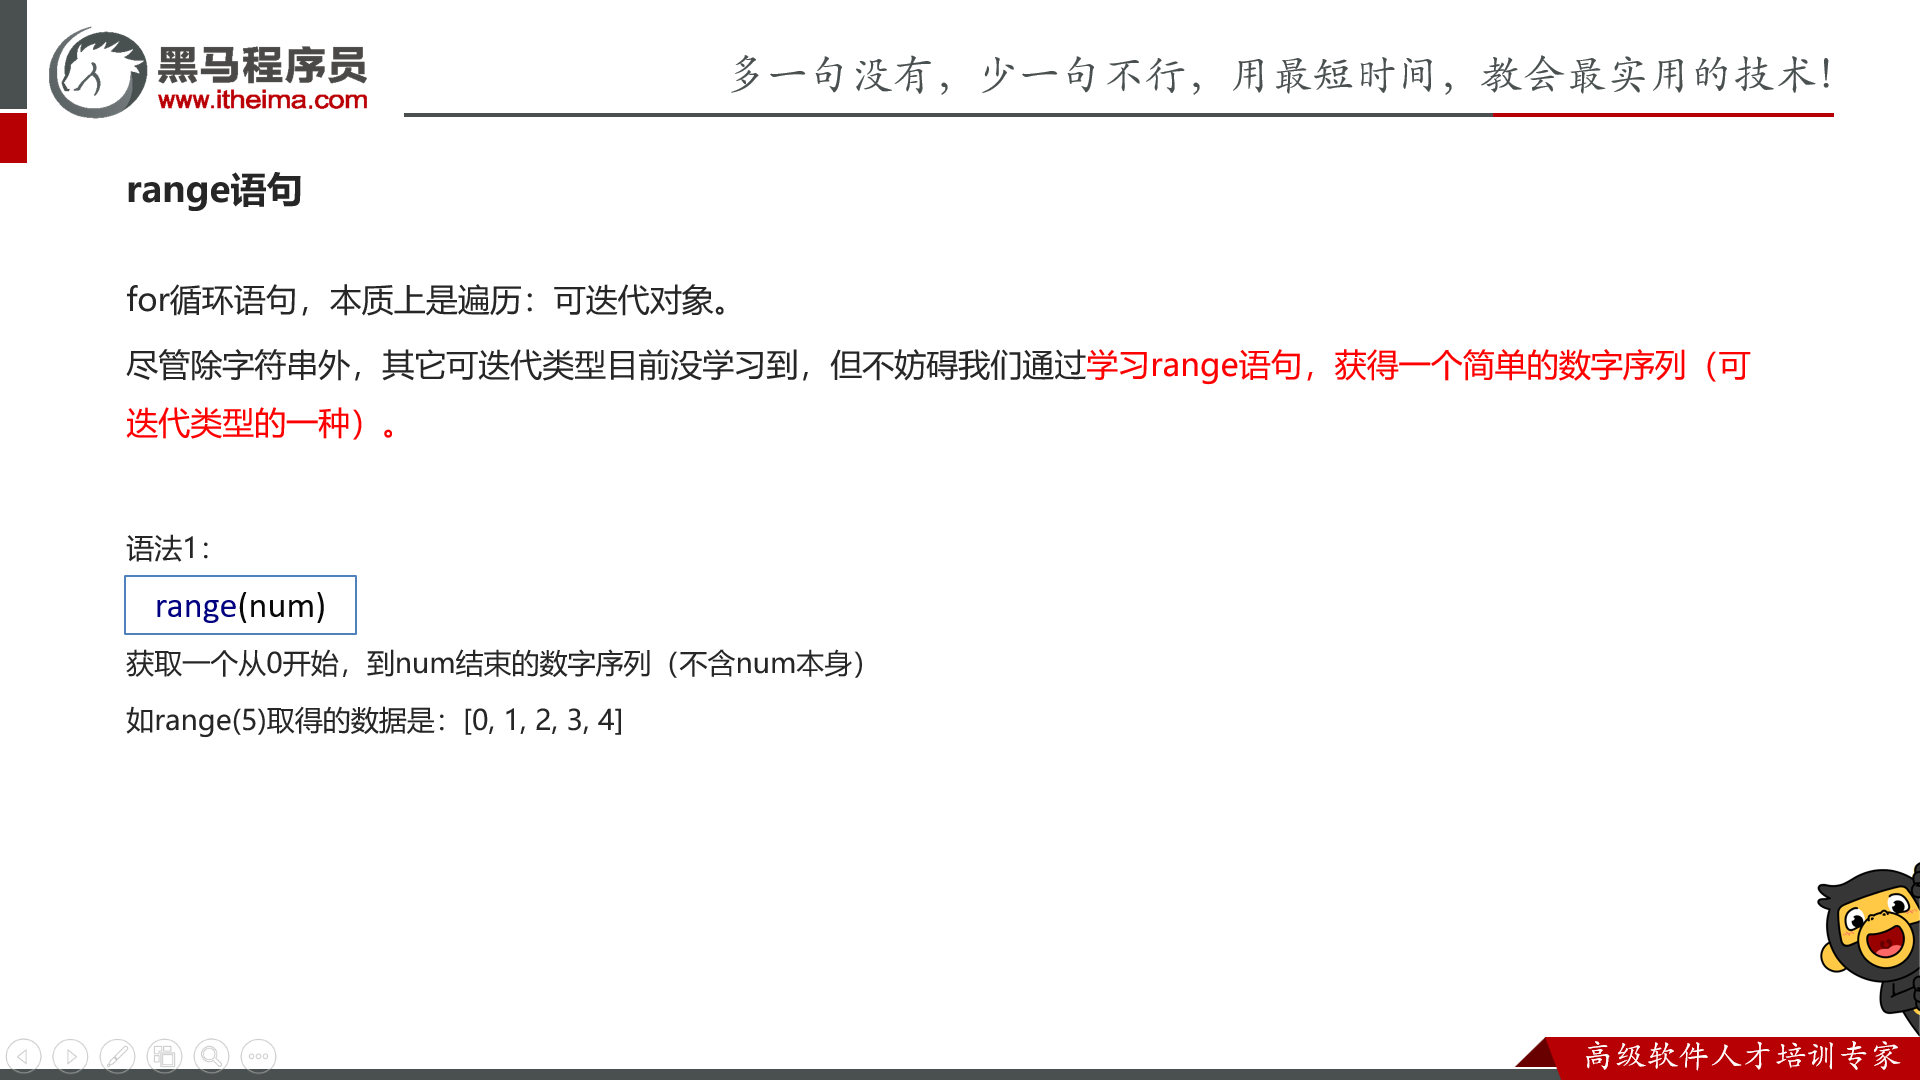
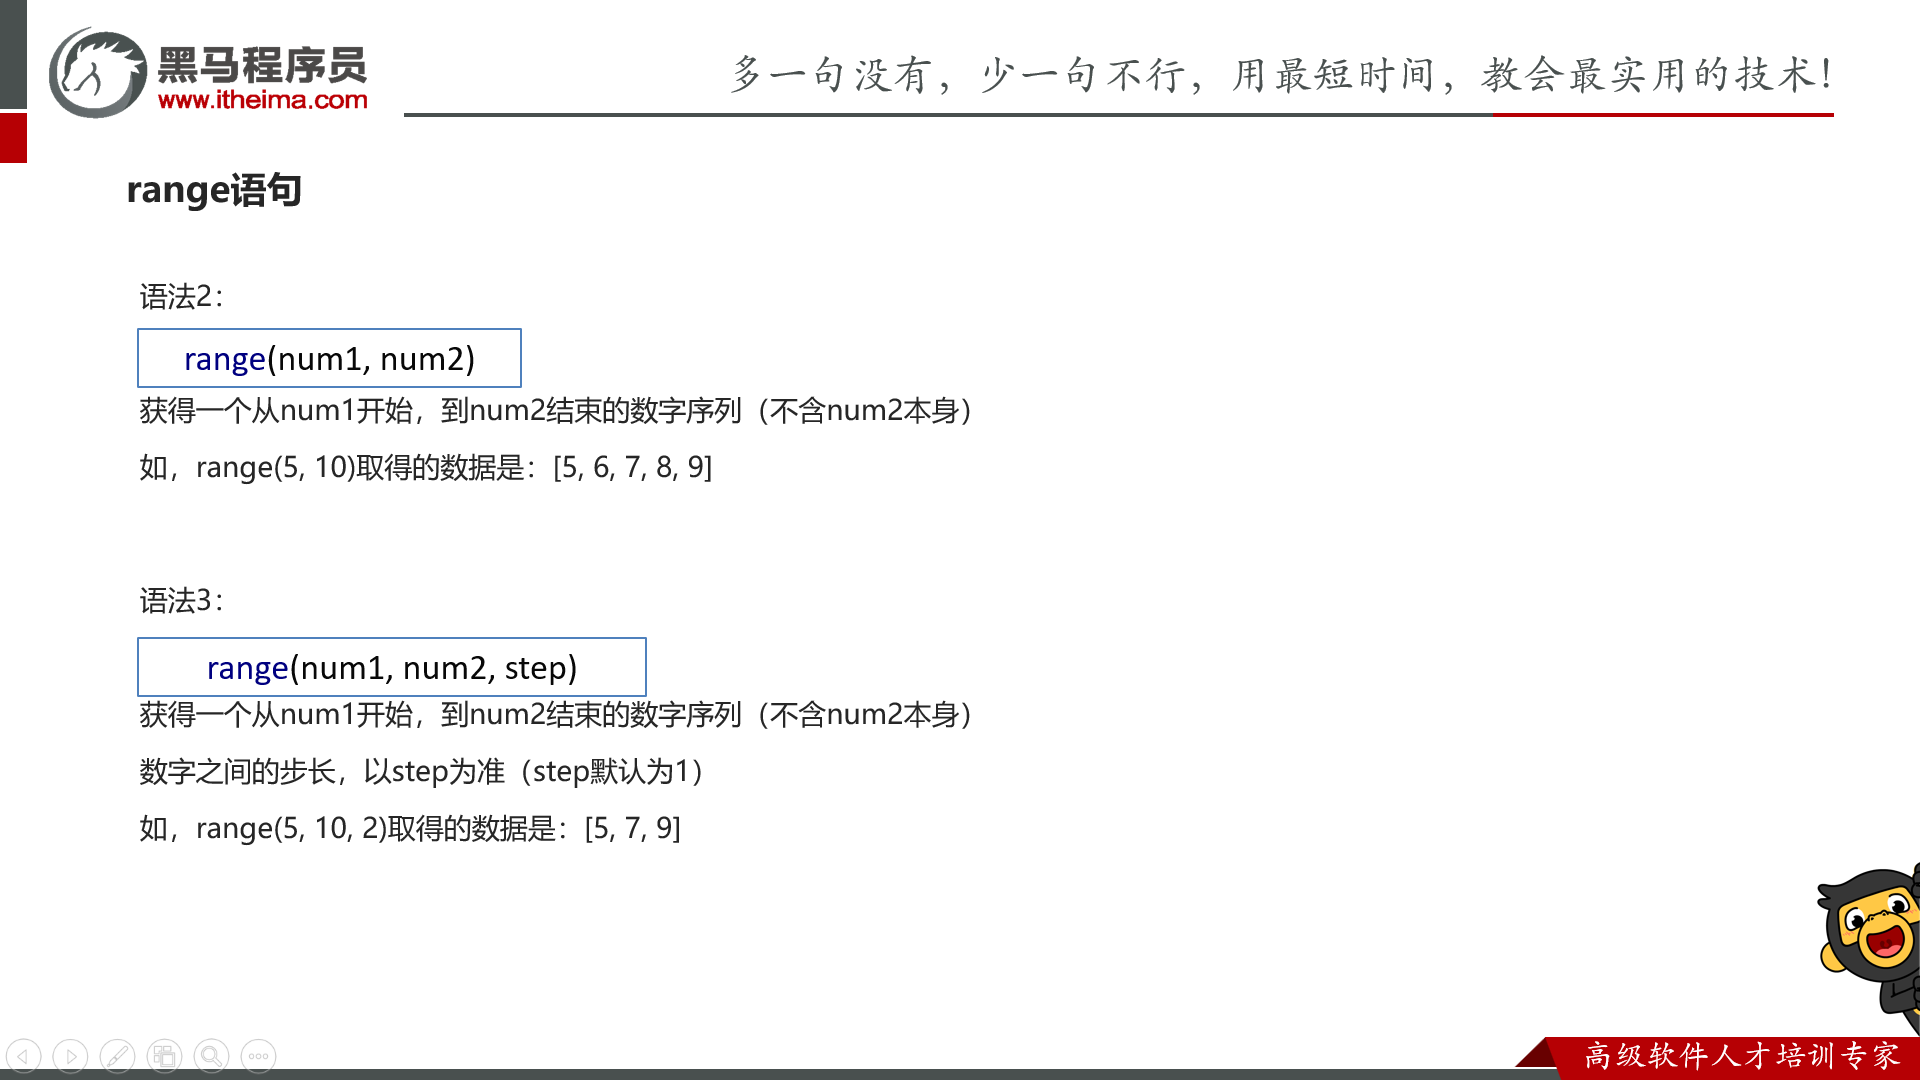
range() 是用来获取一段数字序列,便于我们的 for 来遍历,而且是左闭右开。
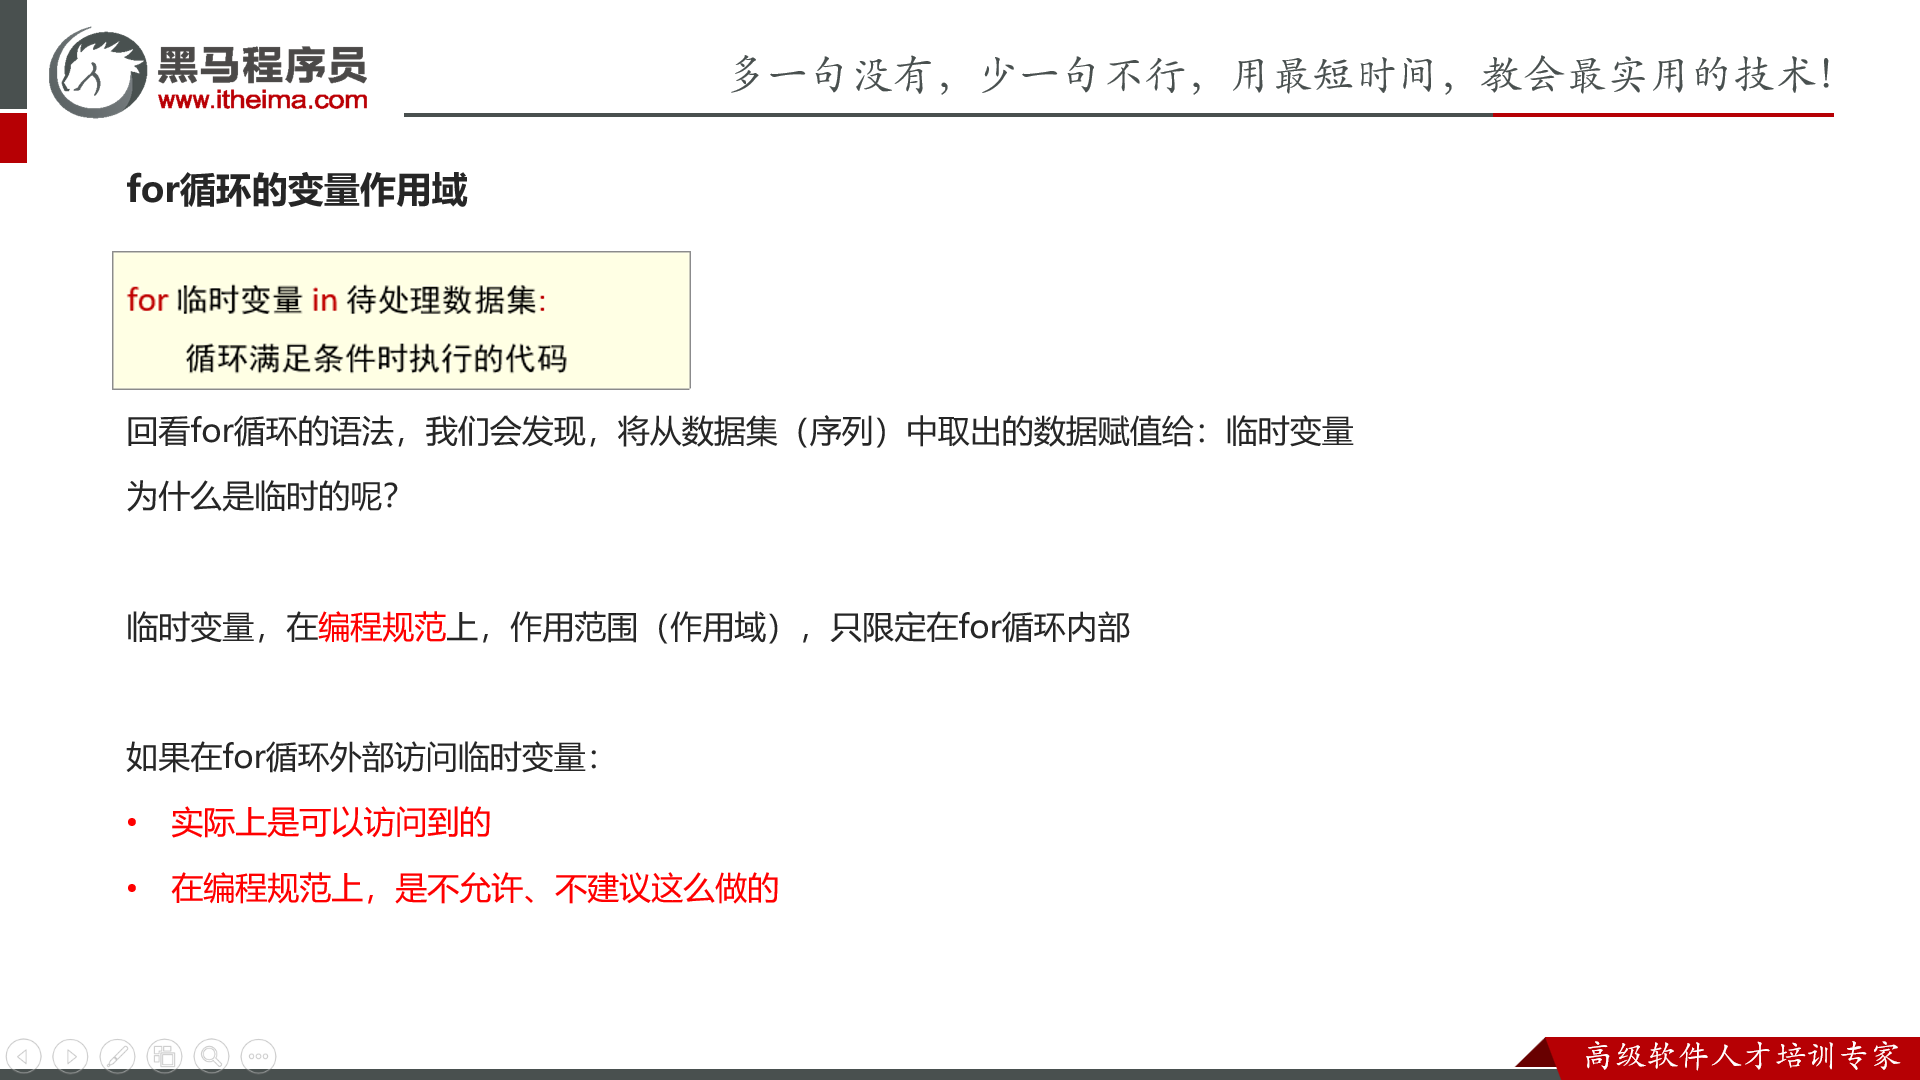
跟 C++ 的一样,这里的 i 我们只在 for 循环内进行使用。
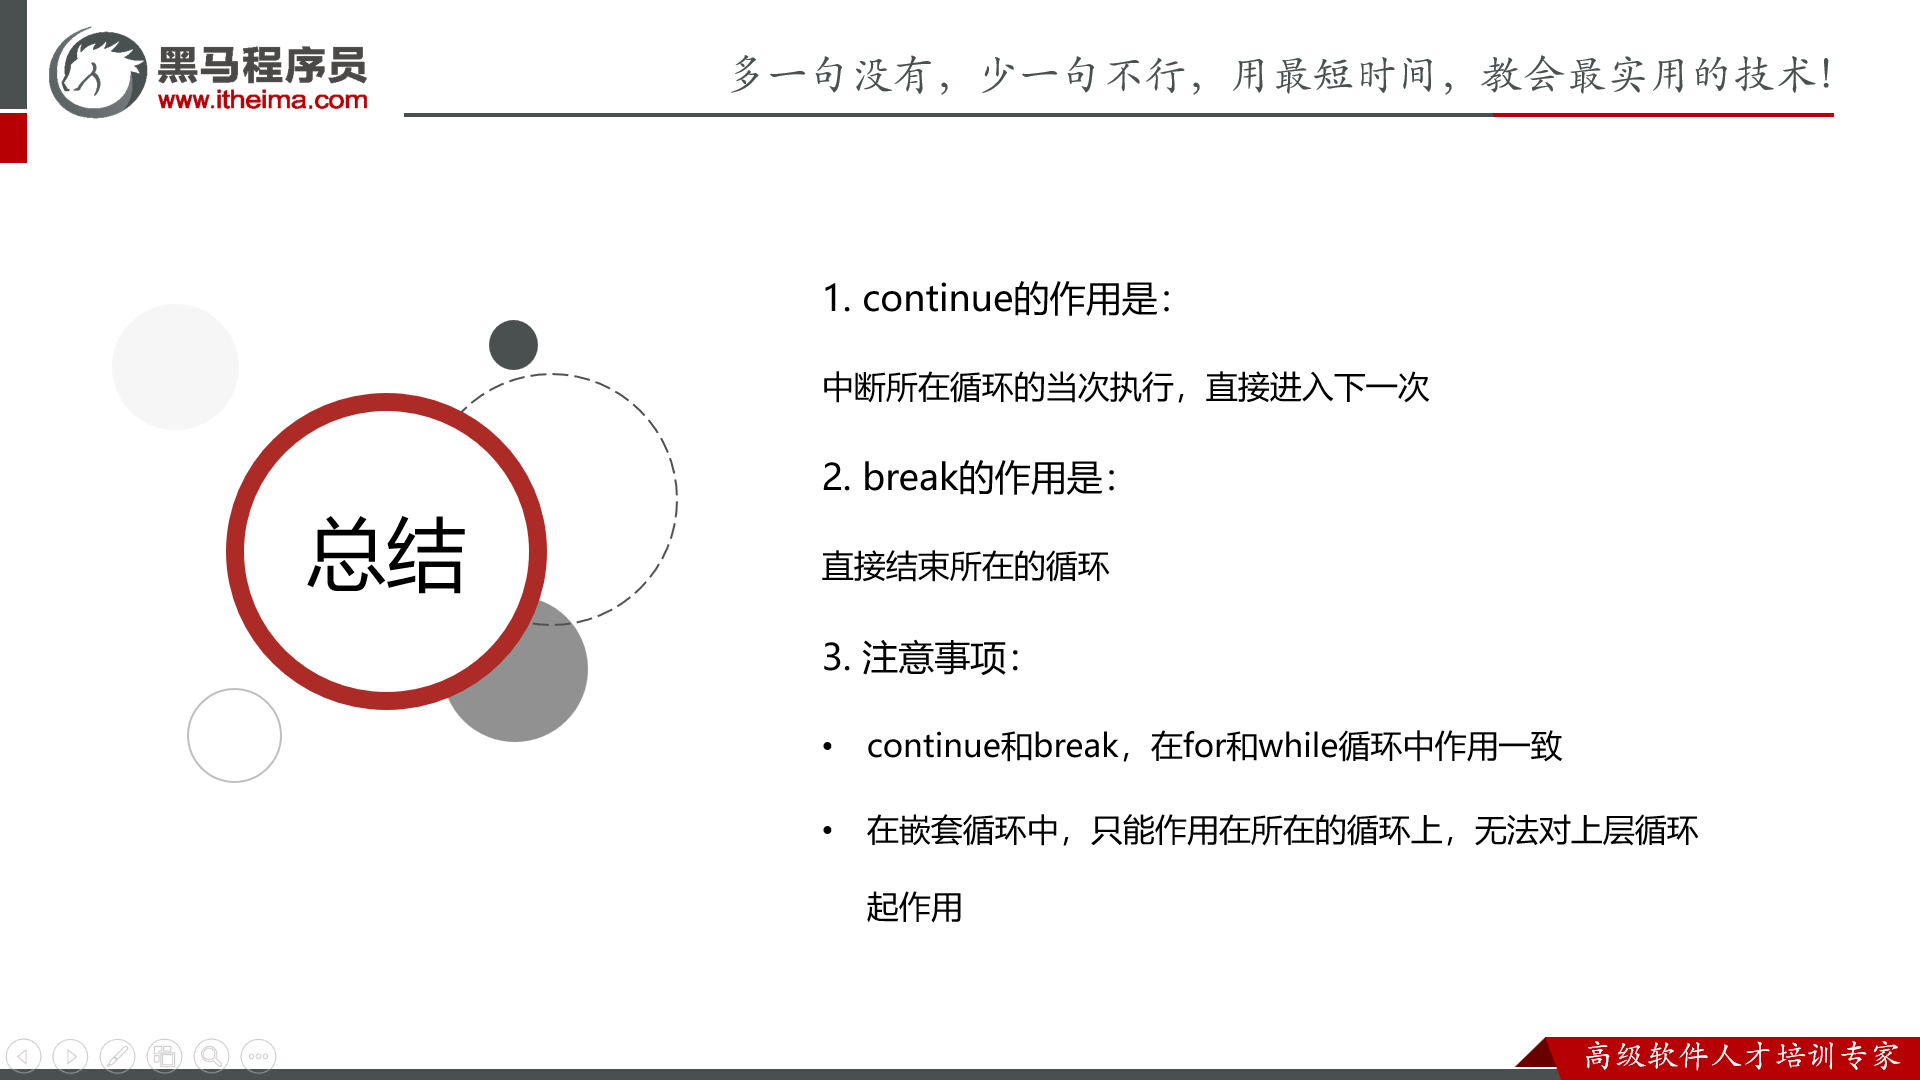
也有 break 和 continue
for i in range(1,10,2) :
    print(i)
    if(i==5) :
        break
要时刻注意缩进,以及冒号的引导,不要跟 C++ 一样!!
随机数
randint 左右都是闭区间。
import random
qwq=random.randint(1,100)
print(qwq)
练习
import random
res=10000
for i in range(1,21) :
    qwq=random.randint(1,10)
    print((f"第{i}位员工的绩效为{qwq},"),end='')
    if qwq<5 :
        print("不发工资")
        continue
    else :
        res-=1000
        print("发工资")
        if res==0 :
            print("没钱了 bye")
            break
第五章 Python 函数
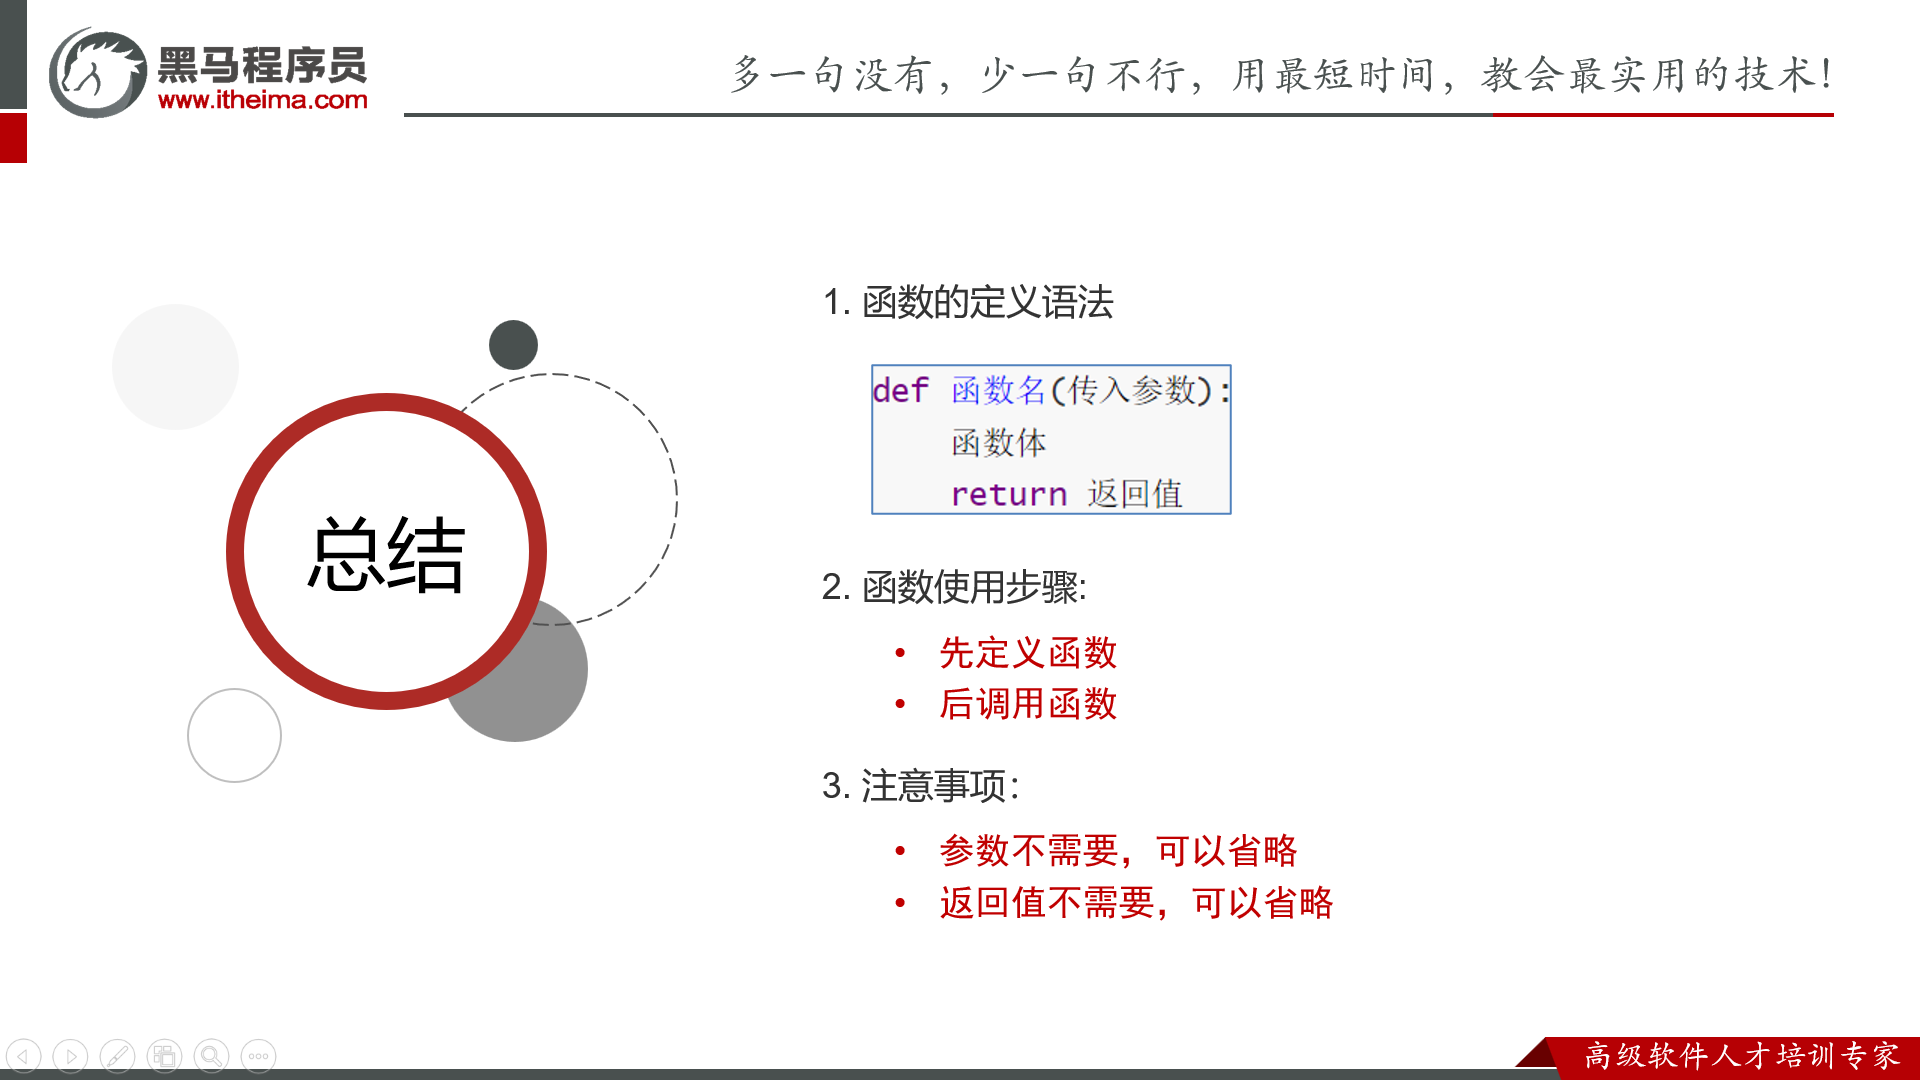
调用就正常写喽。。
def add(a,b) :
    c=a+b
    return c

x=(int)(input())
y=(int)(input())
print(add(x,y))
not
def chk(a) :
    if a>18 :
        return True
    else :
        return False
x=(int)(input())
if not chk(x) :
    print("no")
else :
    print("ok")
注意一下,C++ 中的 ! 来反转 1/0,在 python 中变成了 not。
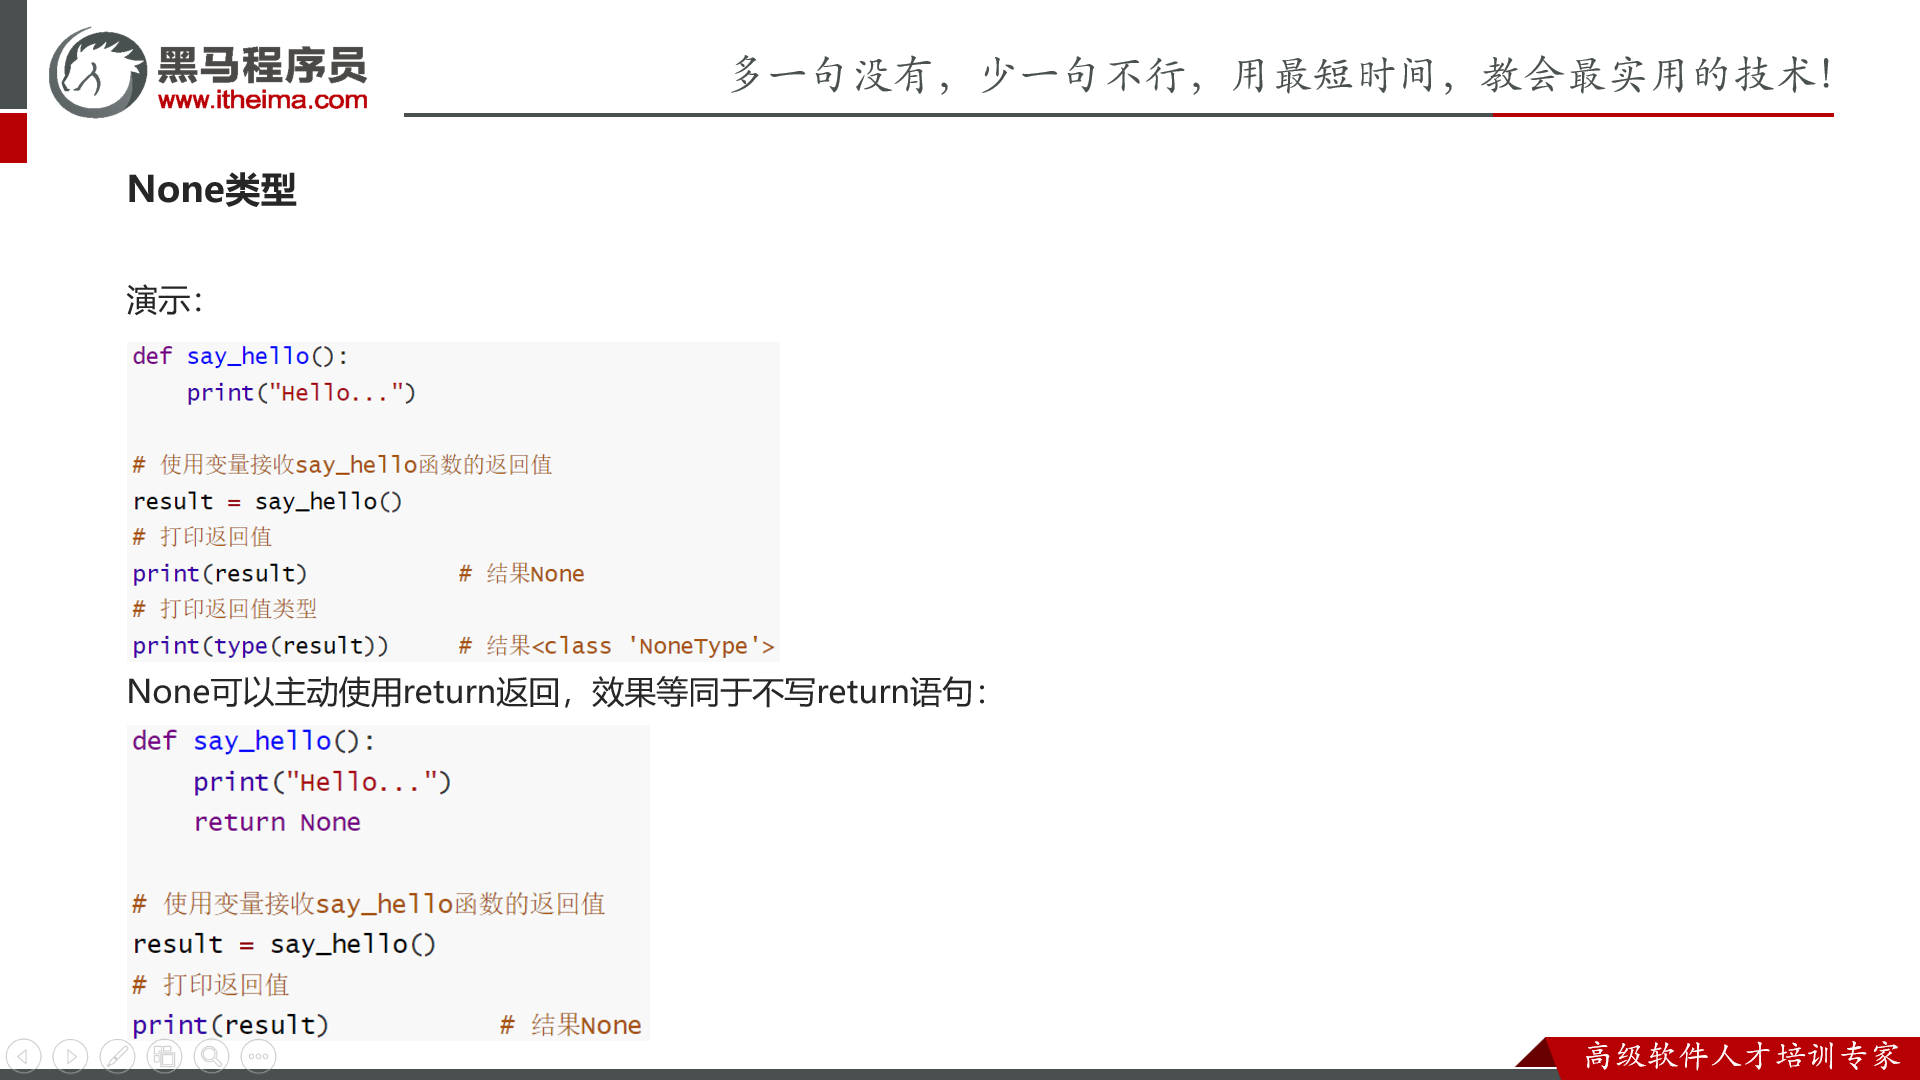
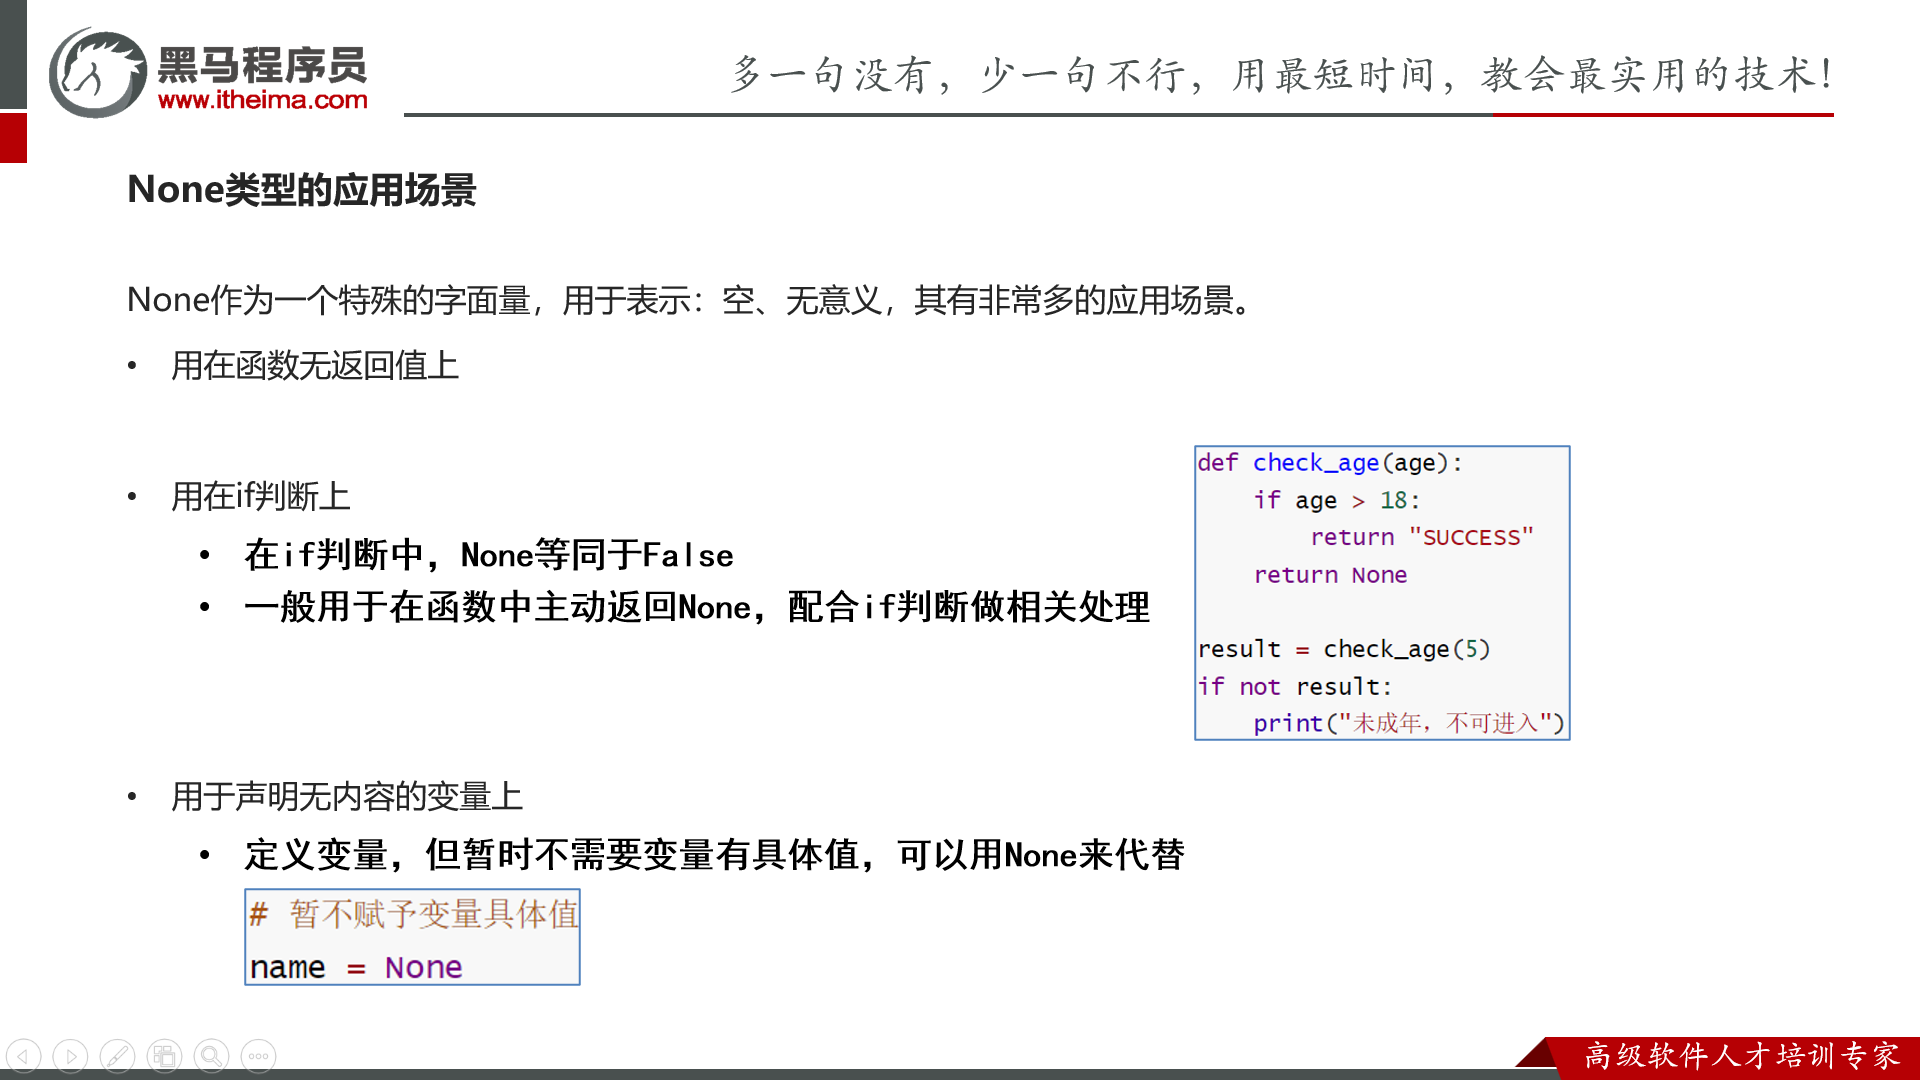
None


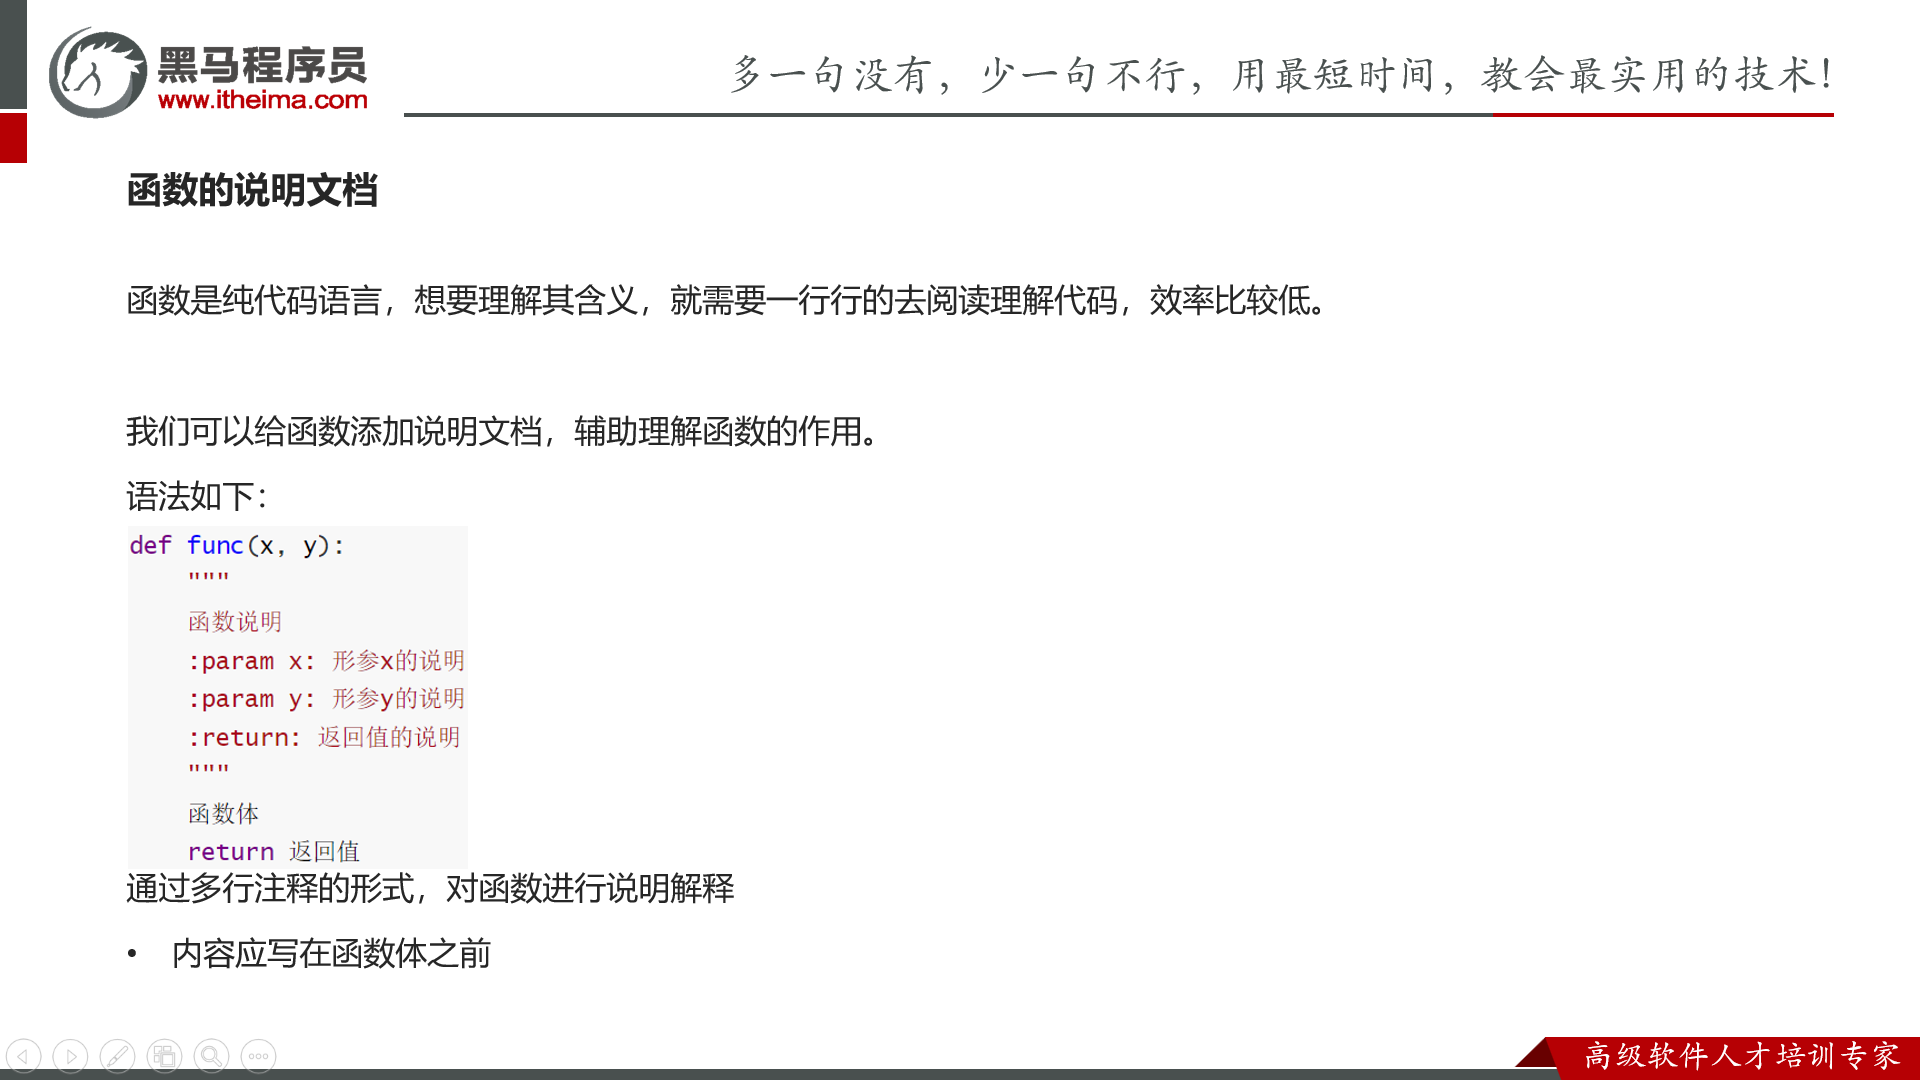
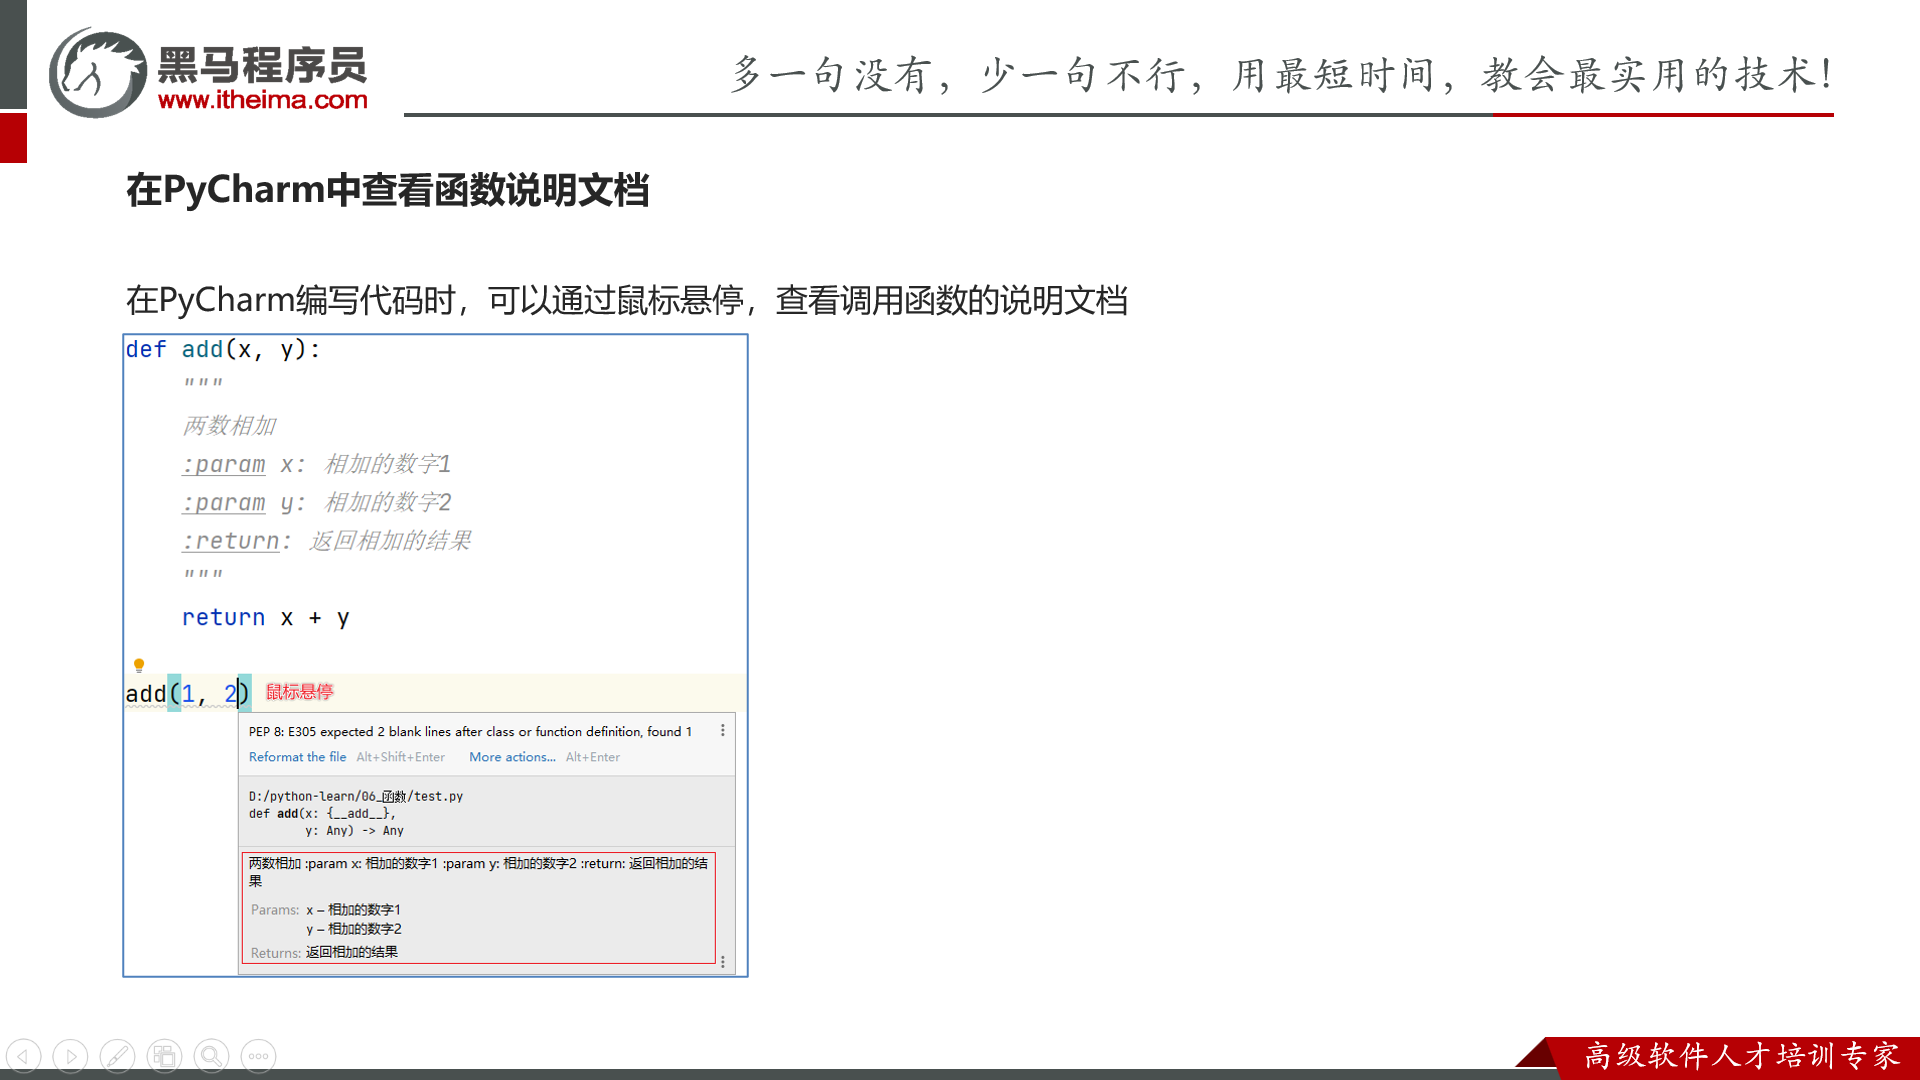
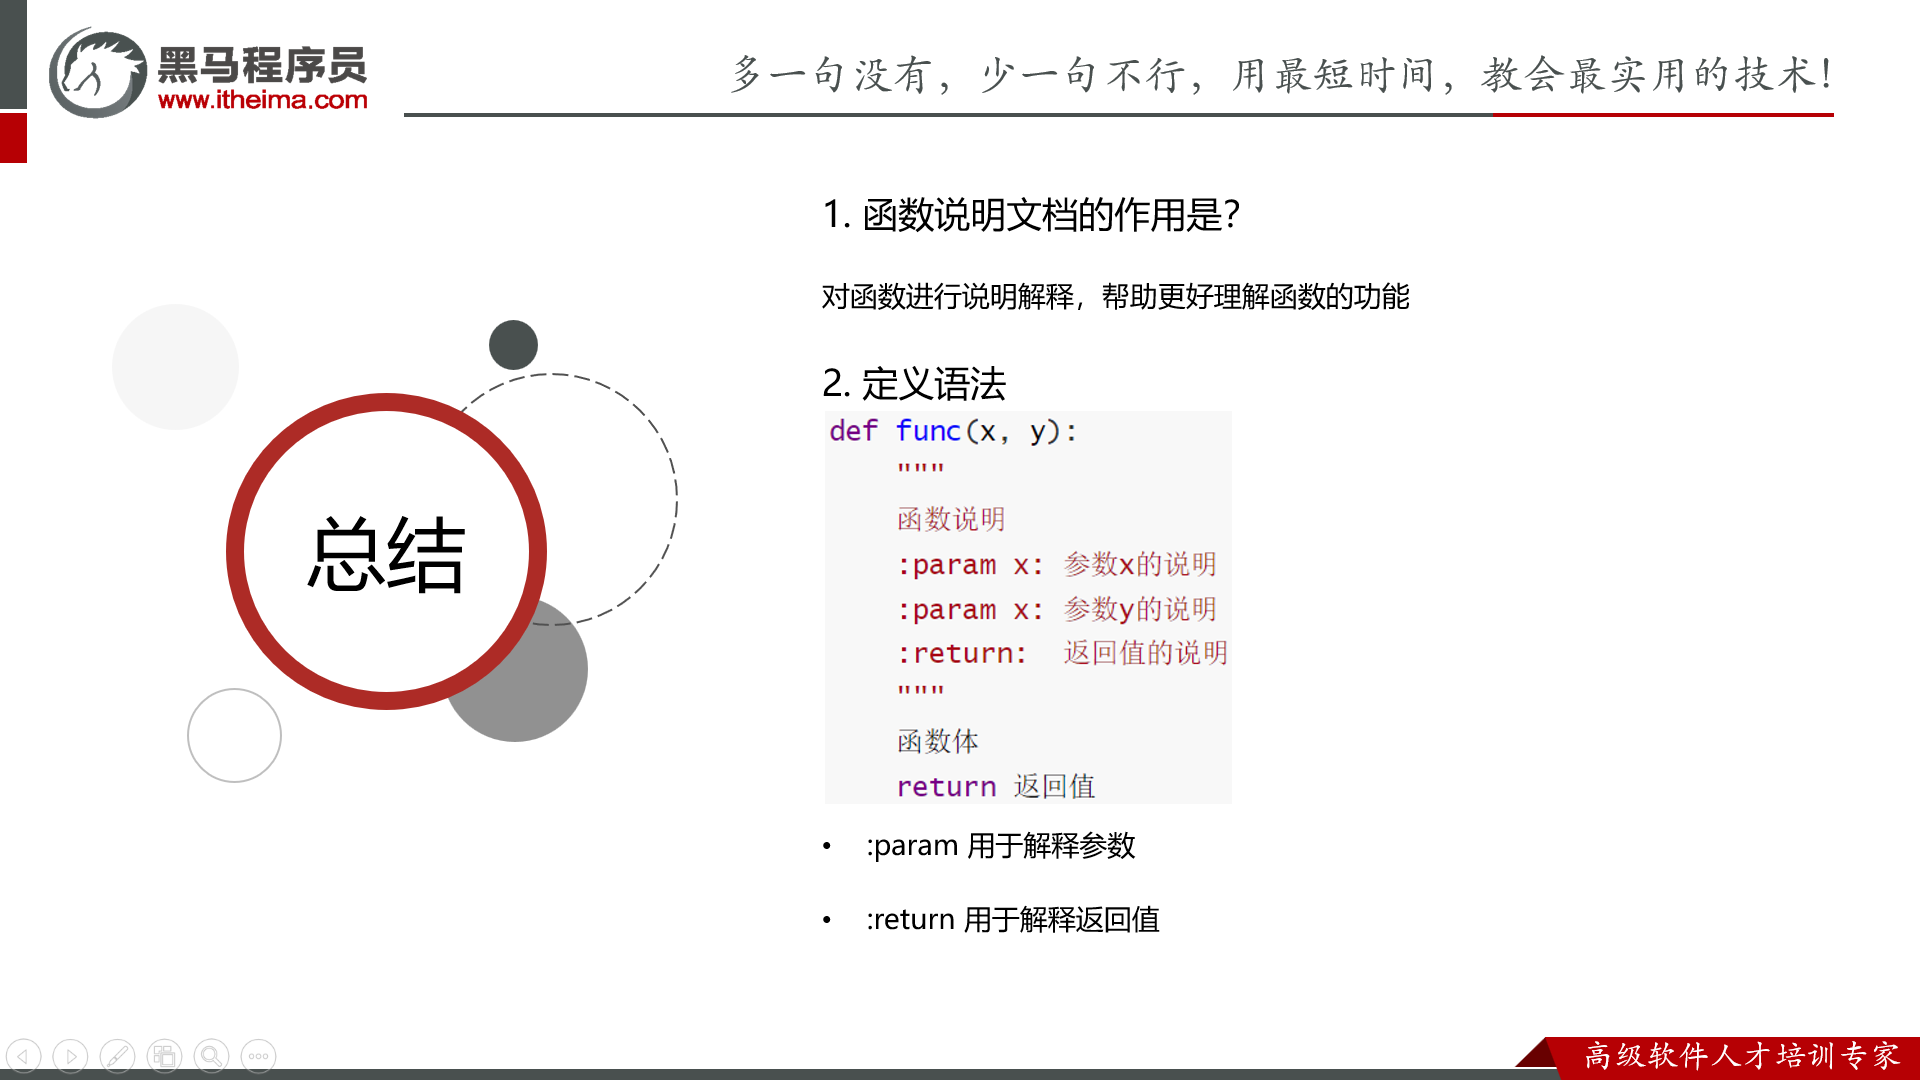
函数的说明文档
param:参数
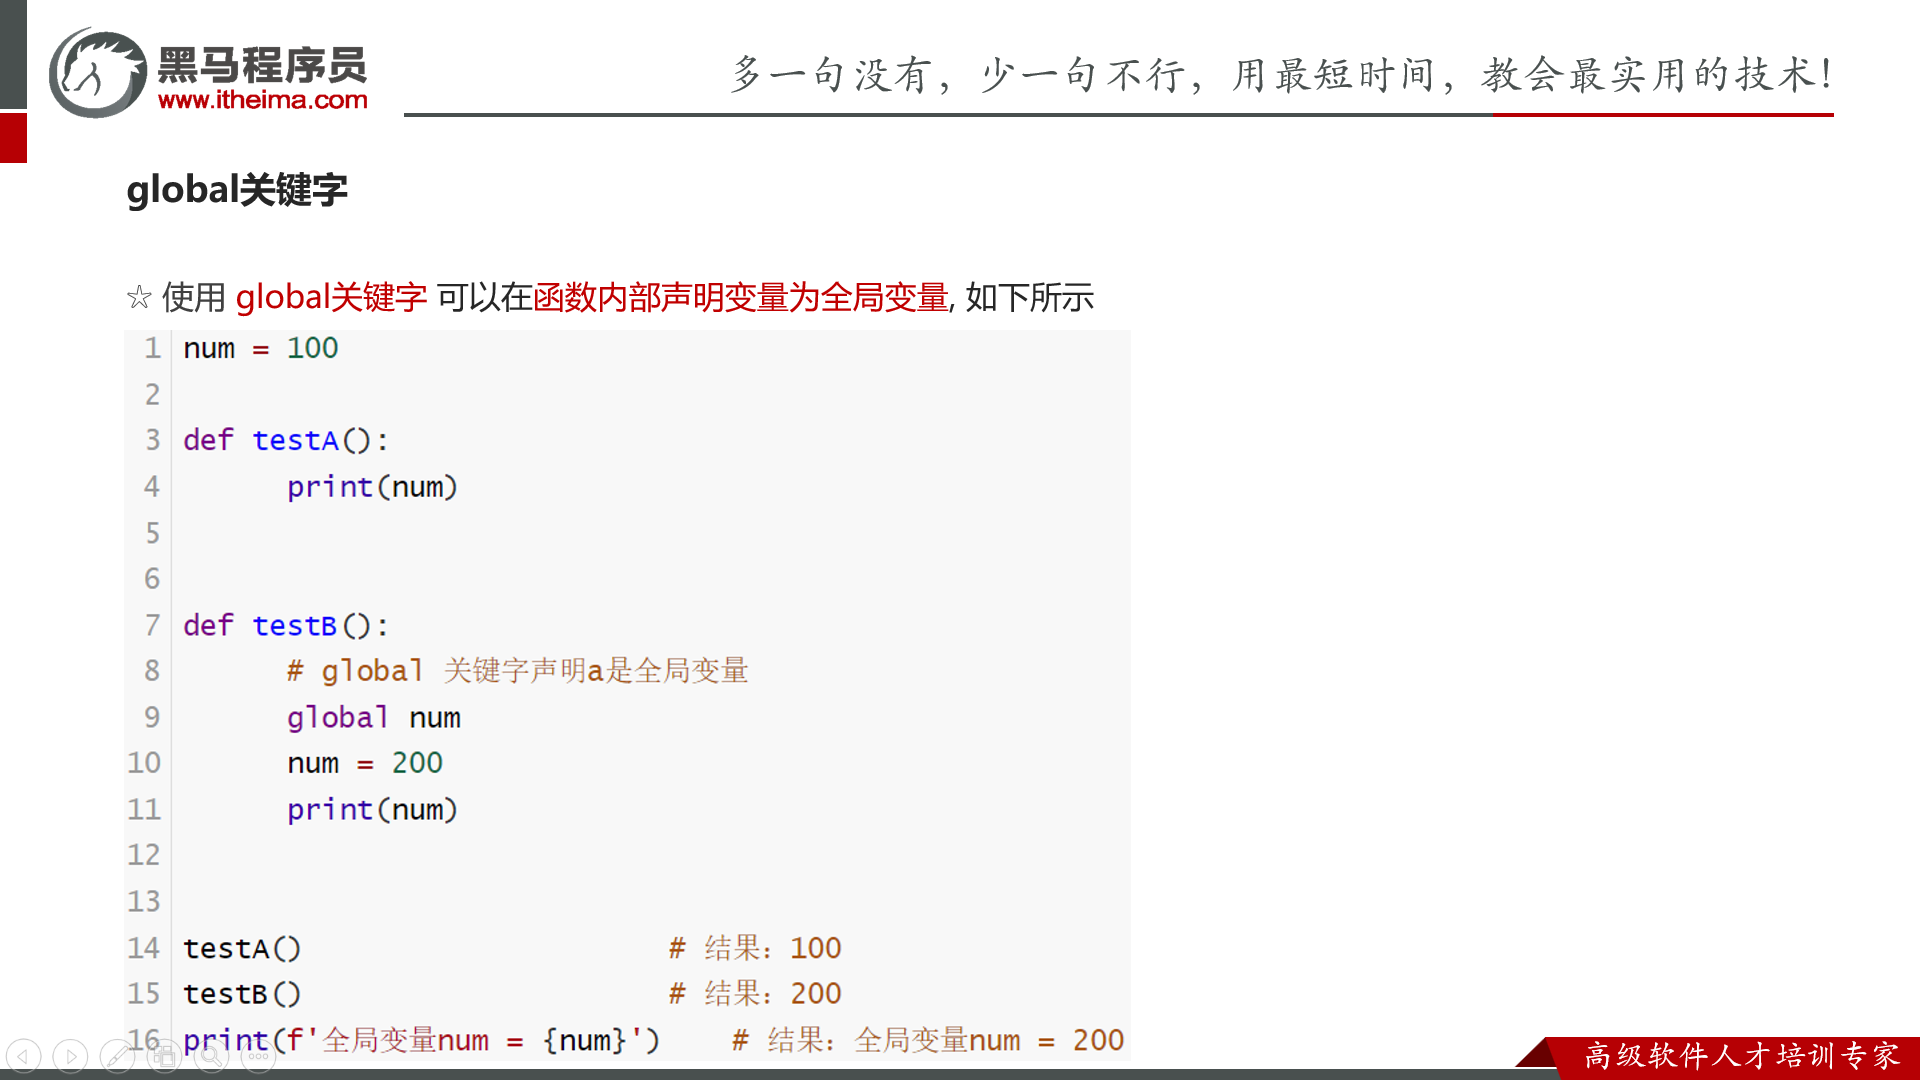
局部变量和全局变量
python 这个东西糖的没边了啊,在函数内部再开了一个,即使同名,他也当成局部变量。。。真要改的话要用 global 去声明这个变量是全局的那个,再去更改它
第六章 Python数据容器
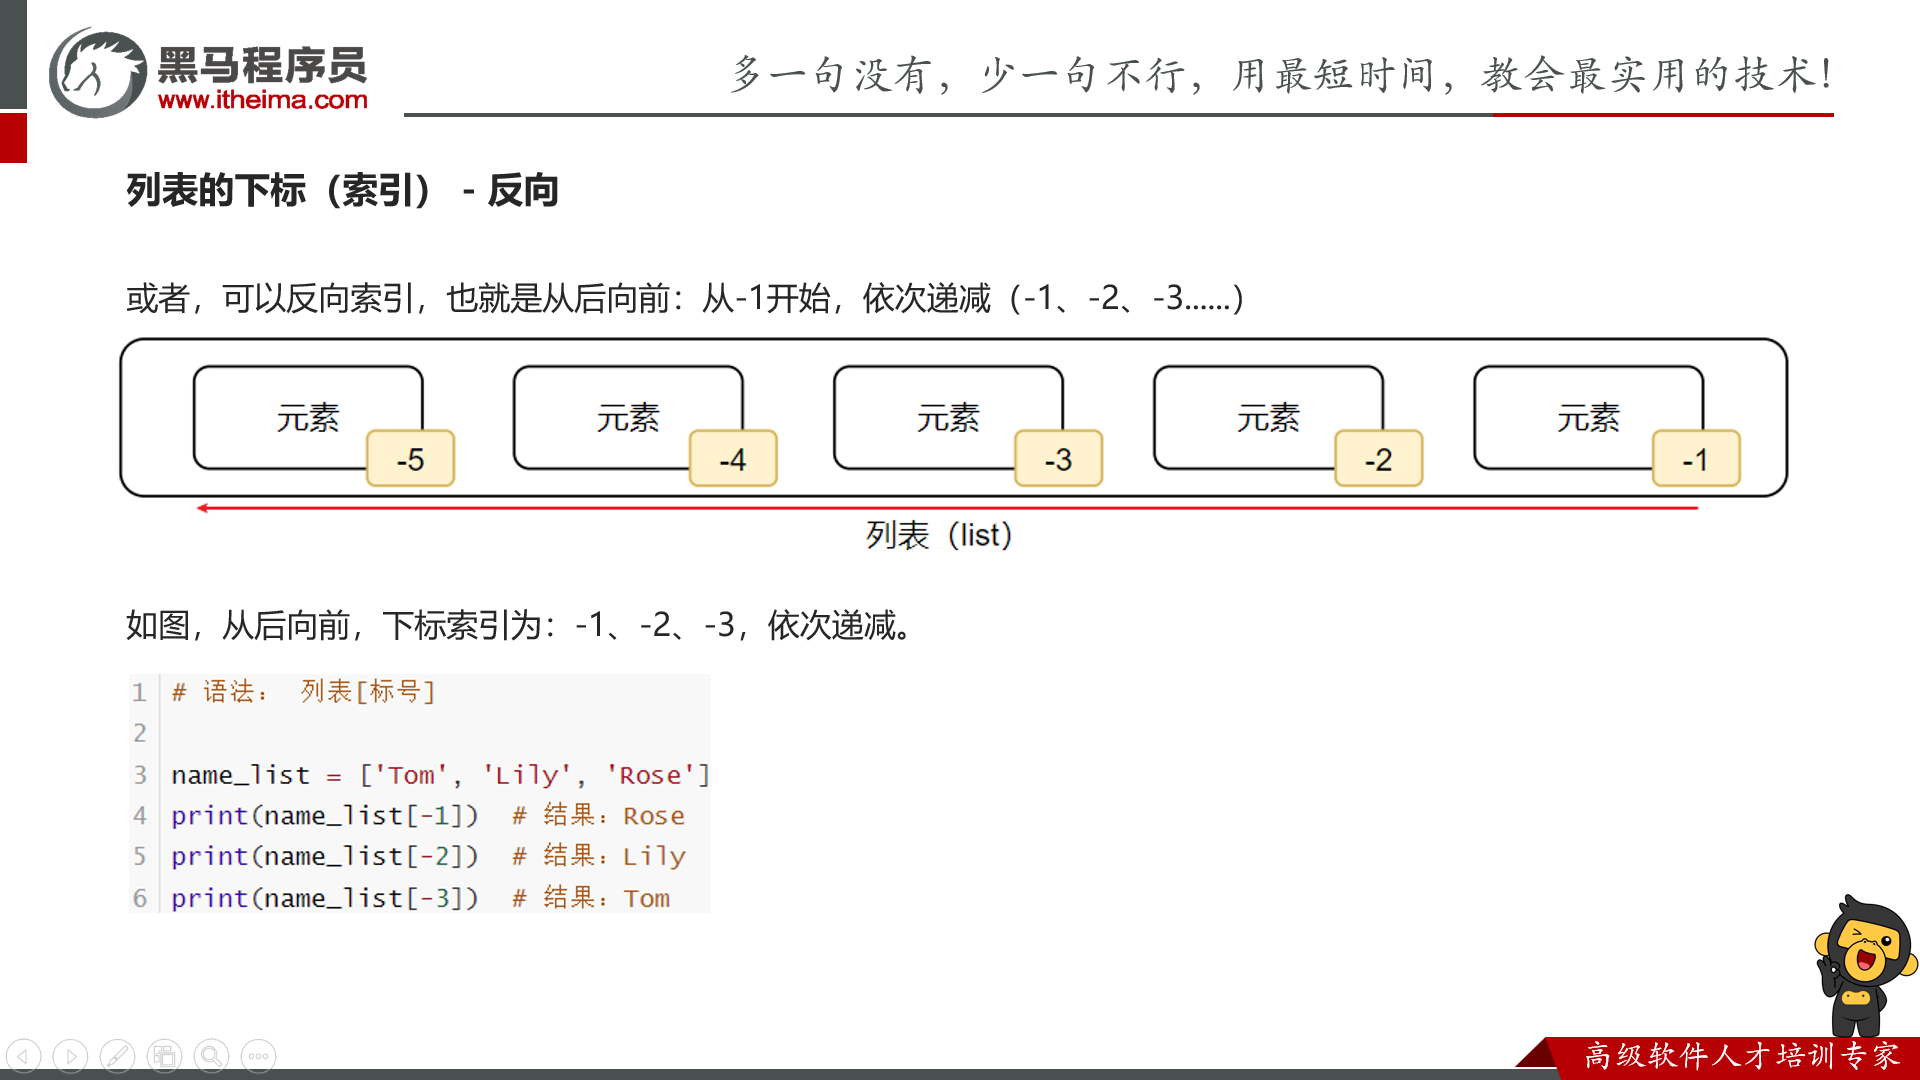
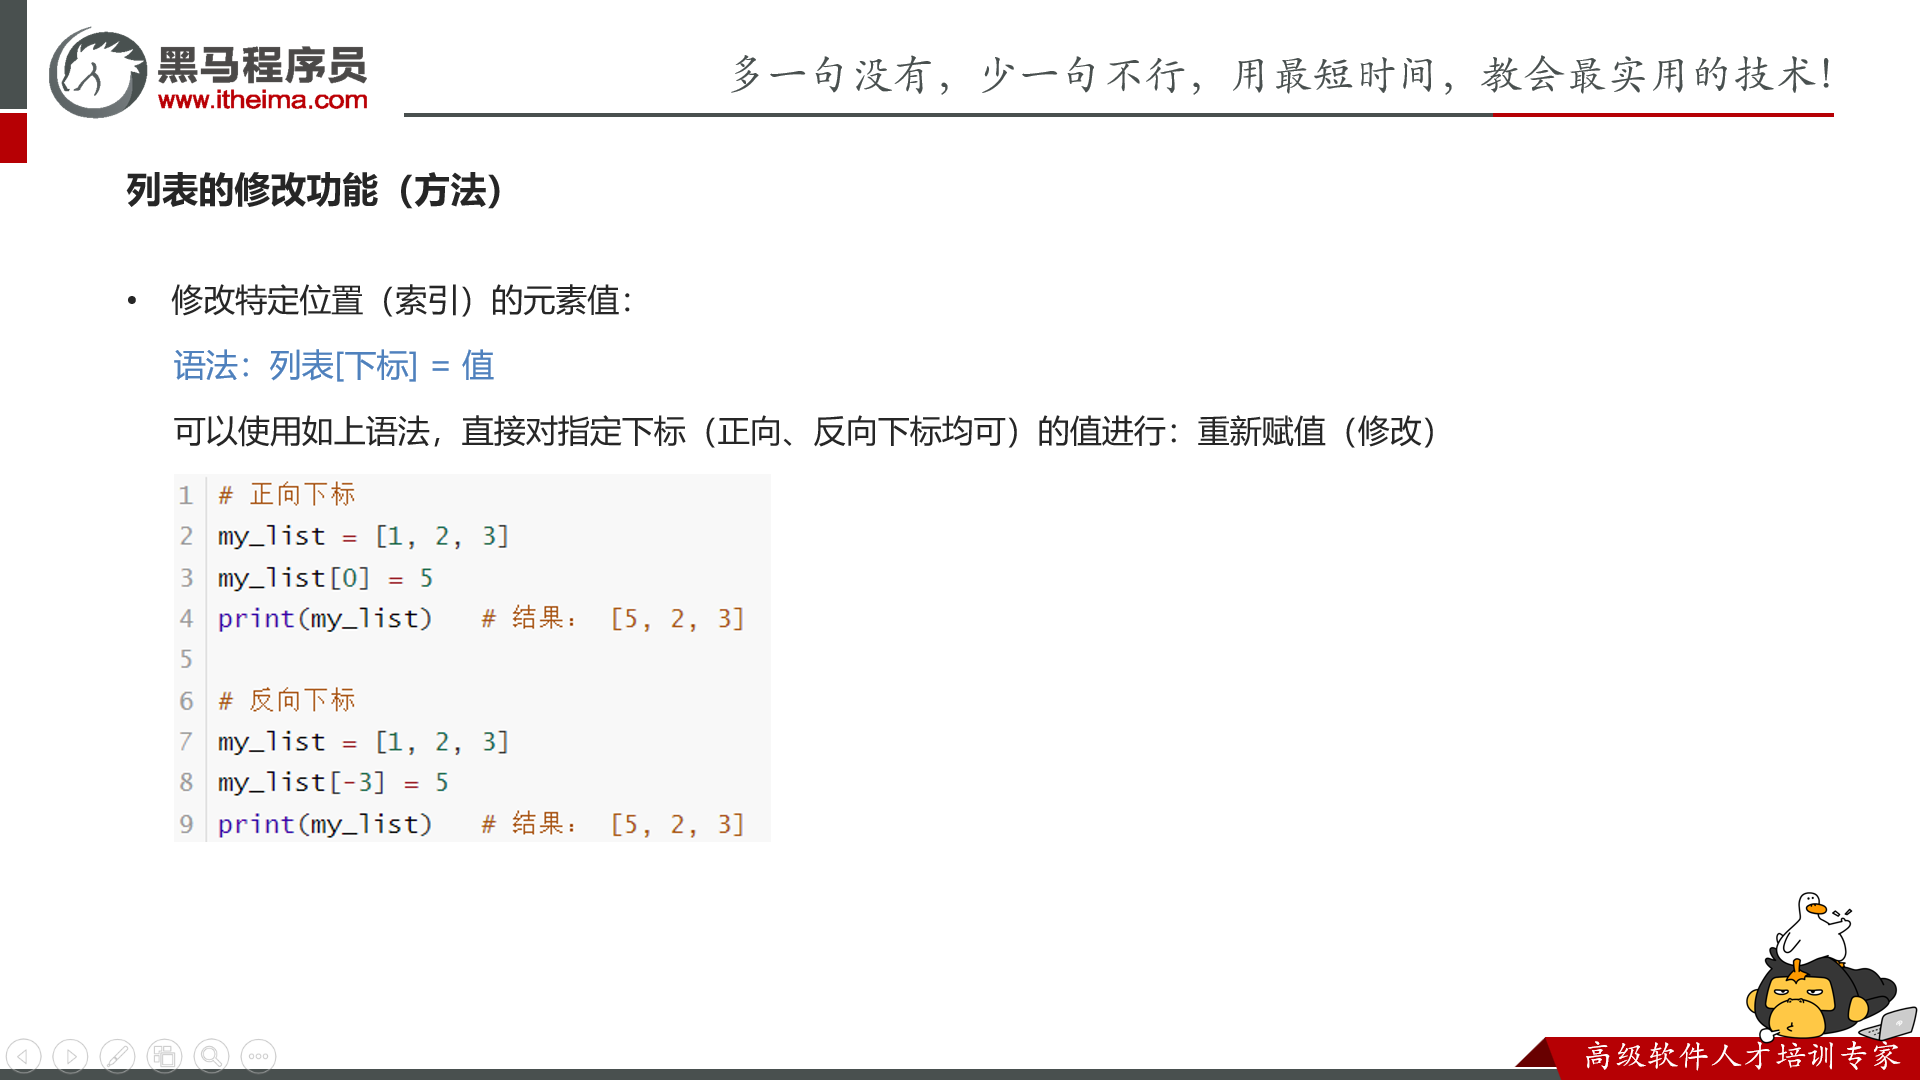
下标都是从 0 开始的。
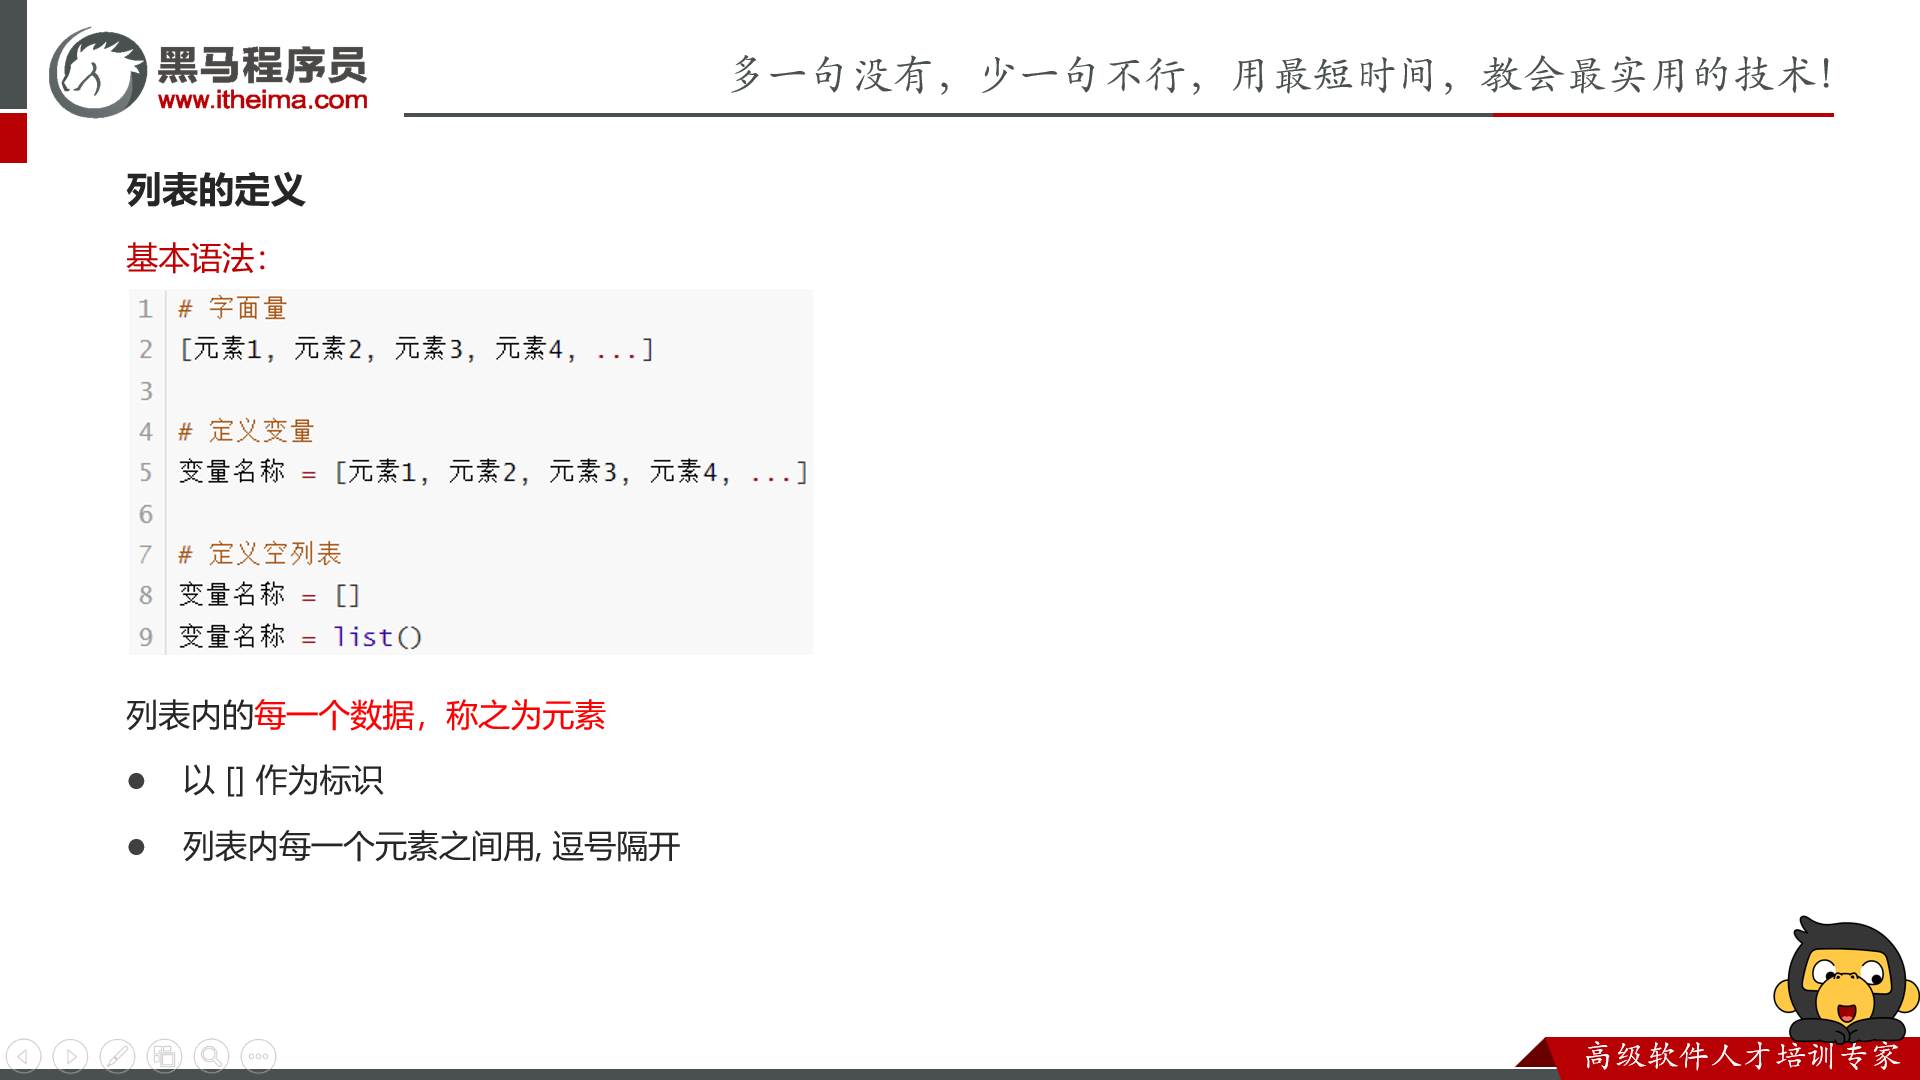
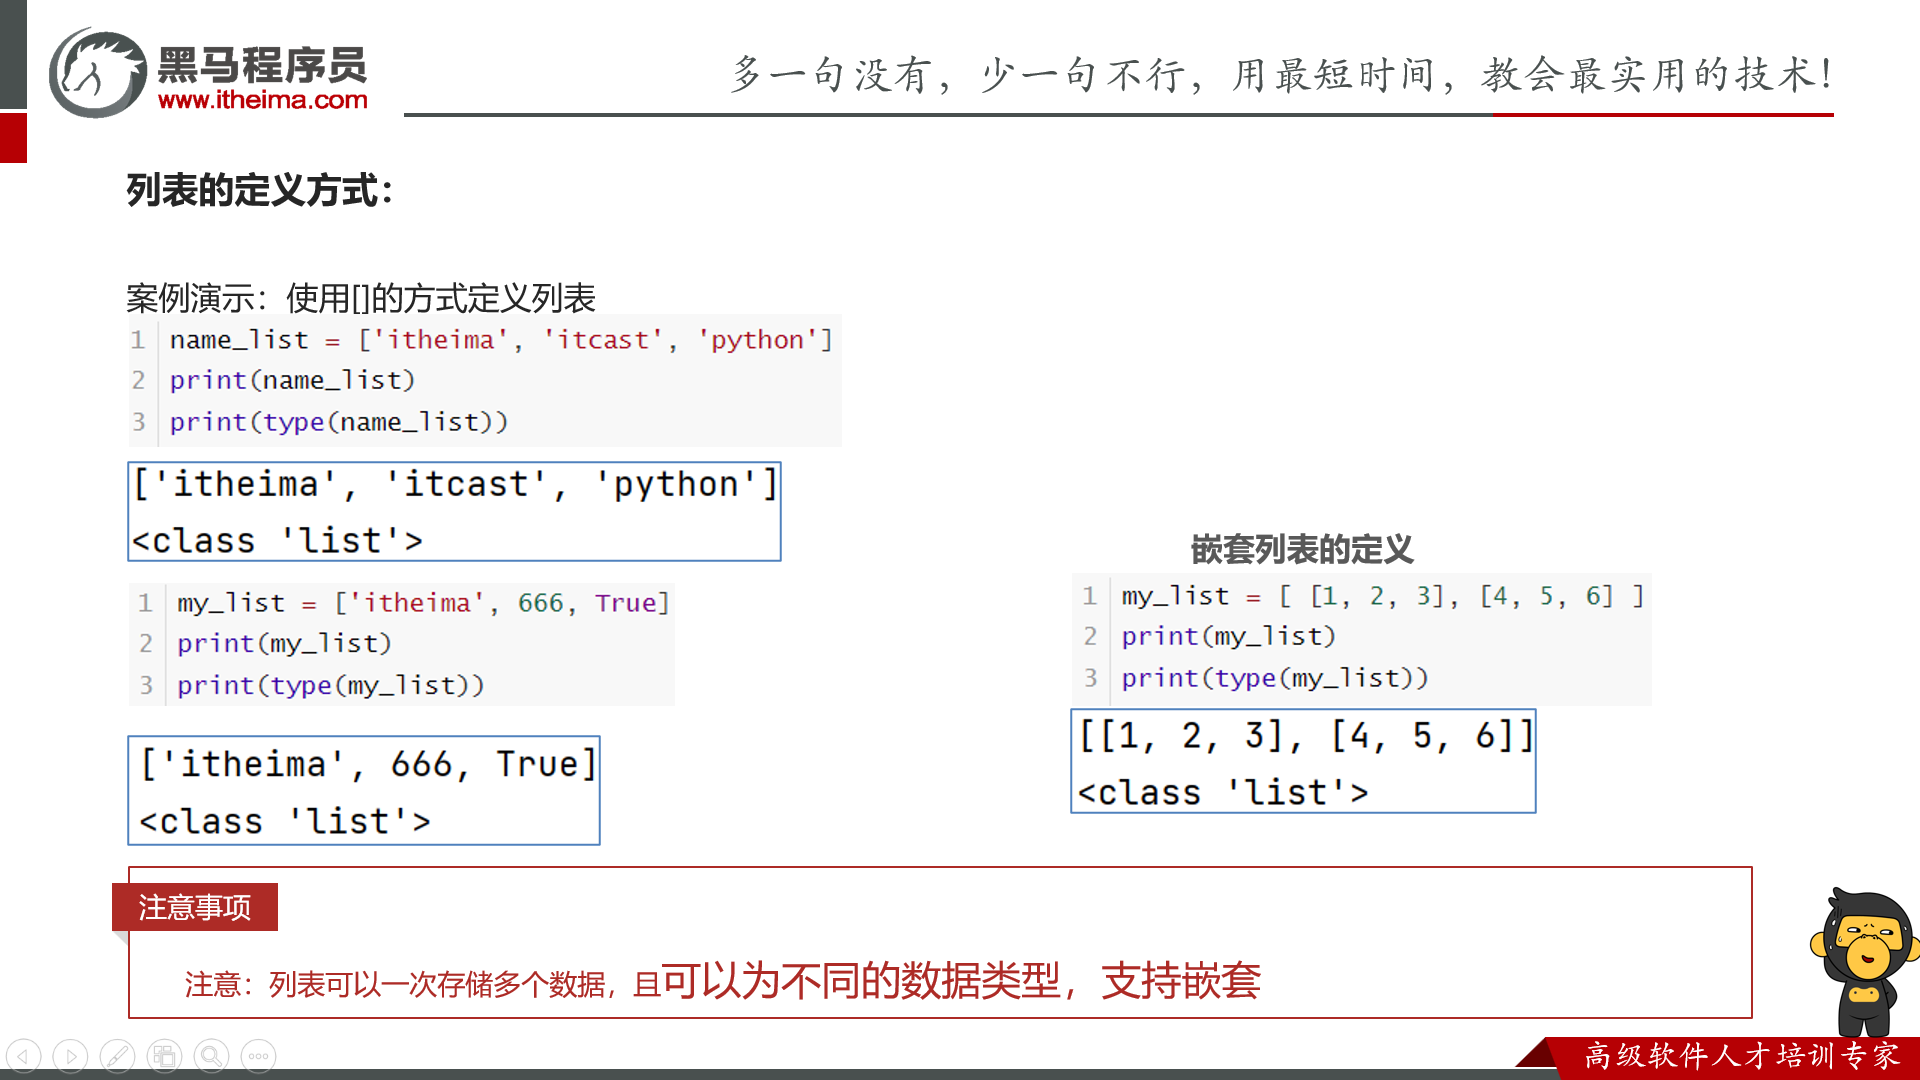
list
定义用中括号括起来,可以先定义一个空列表
可以逆序访问
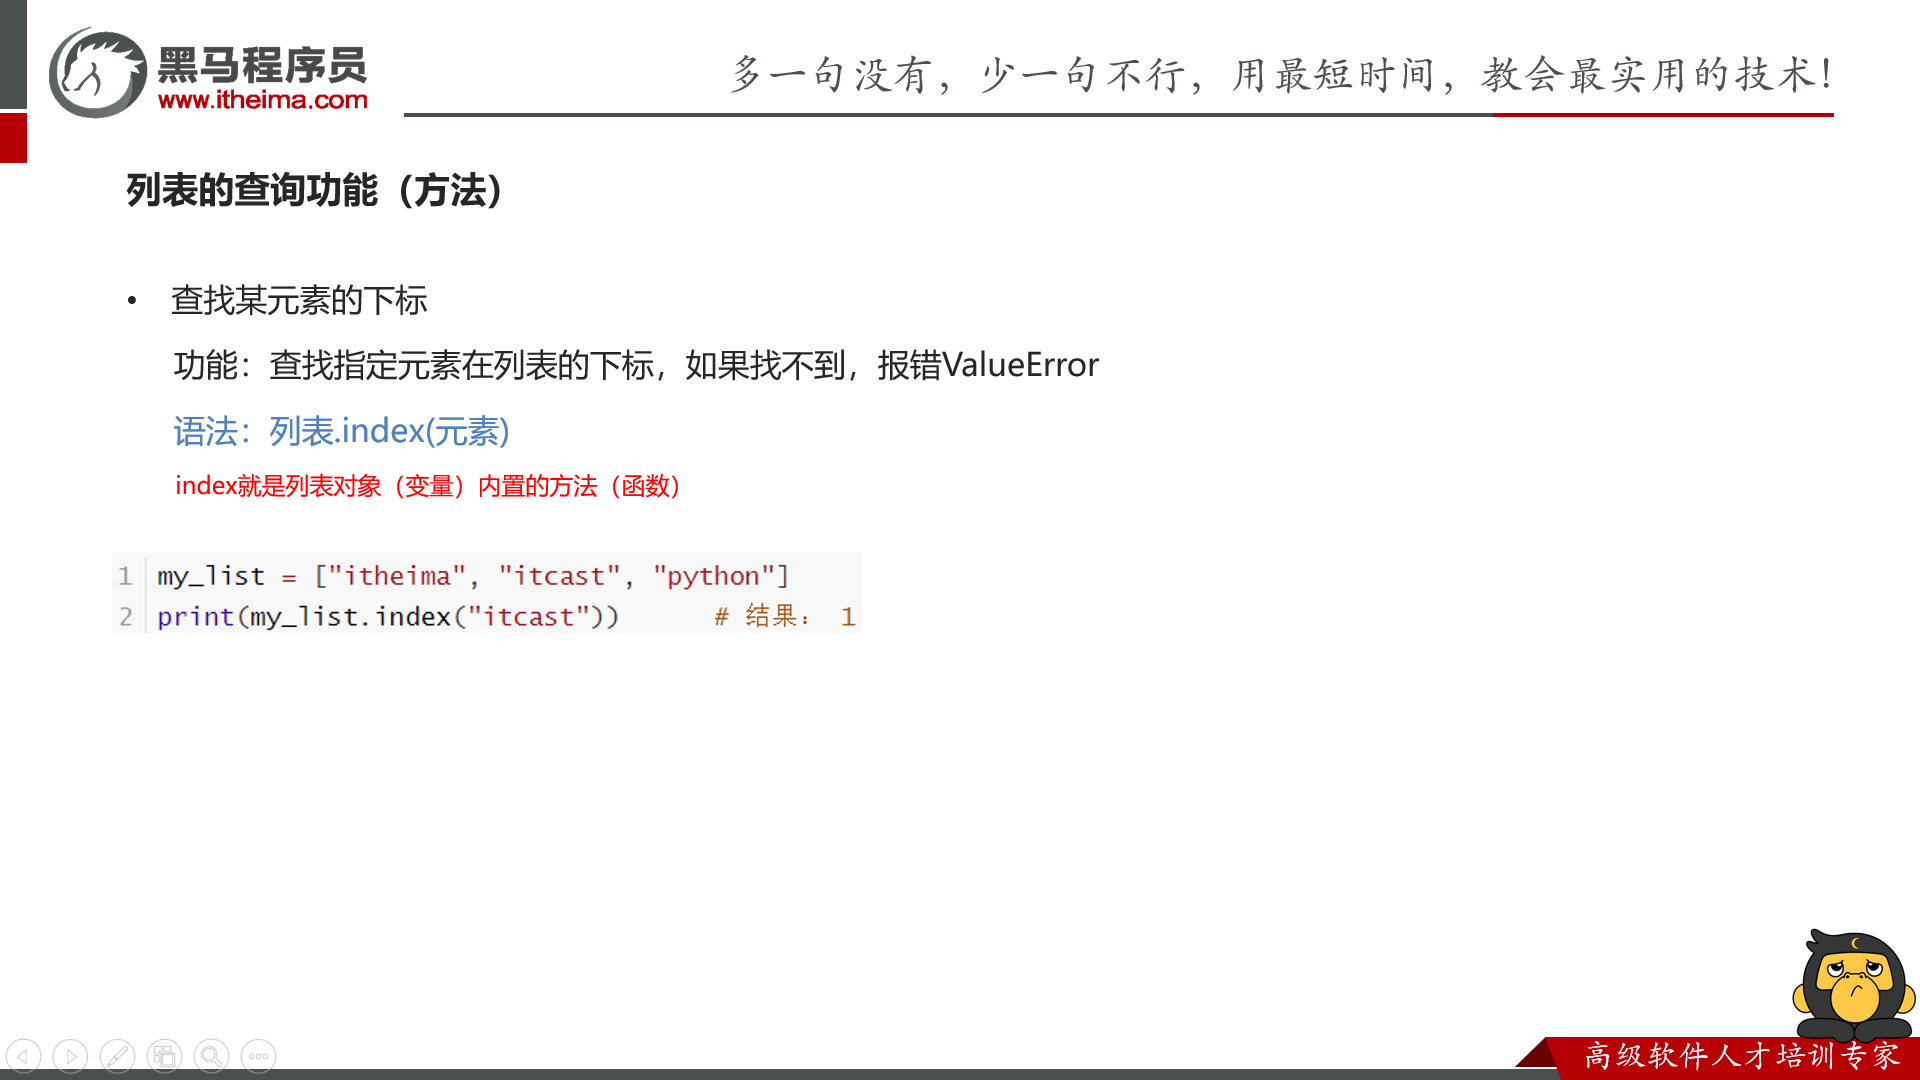
index
下标直接改
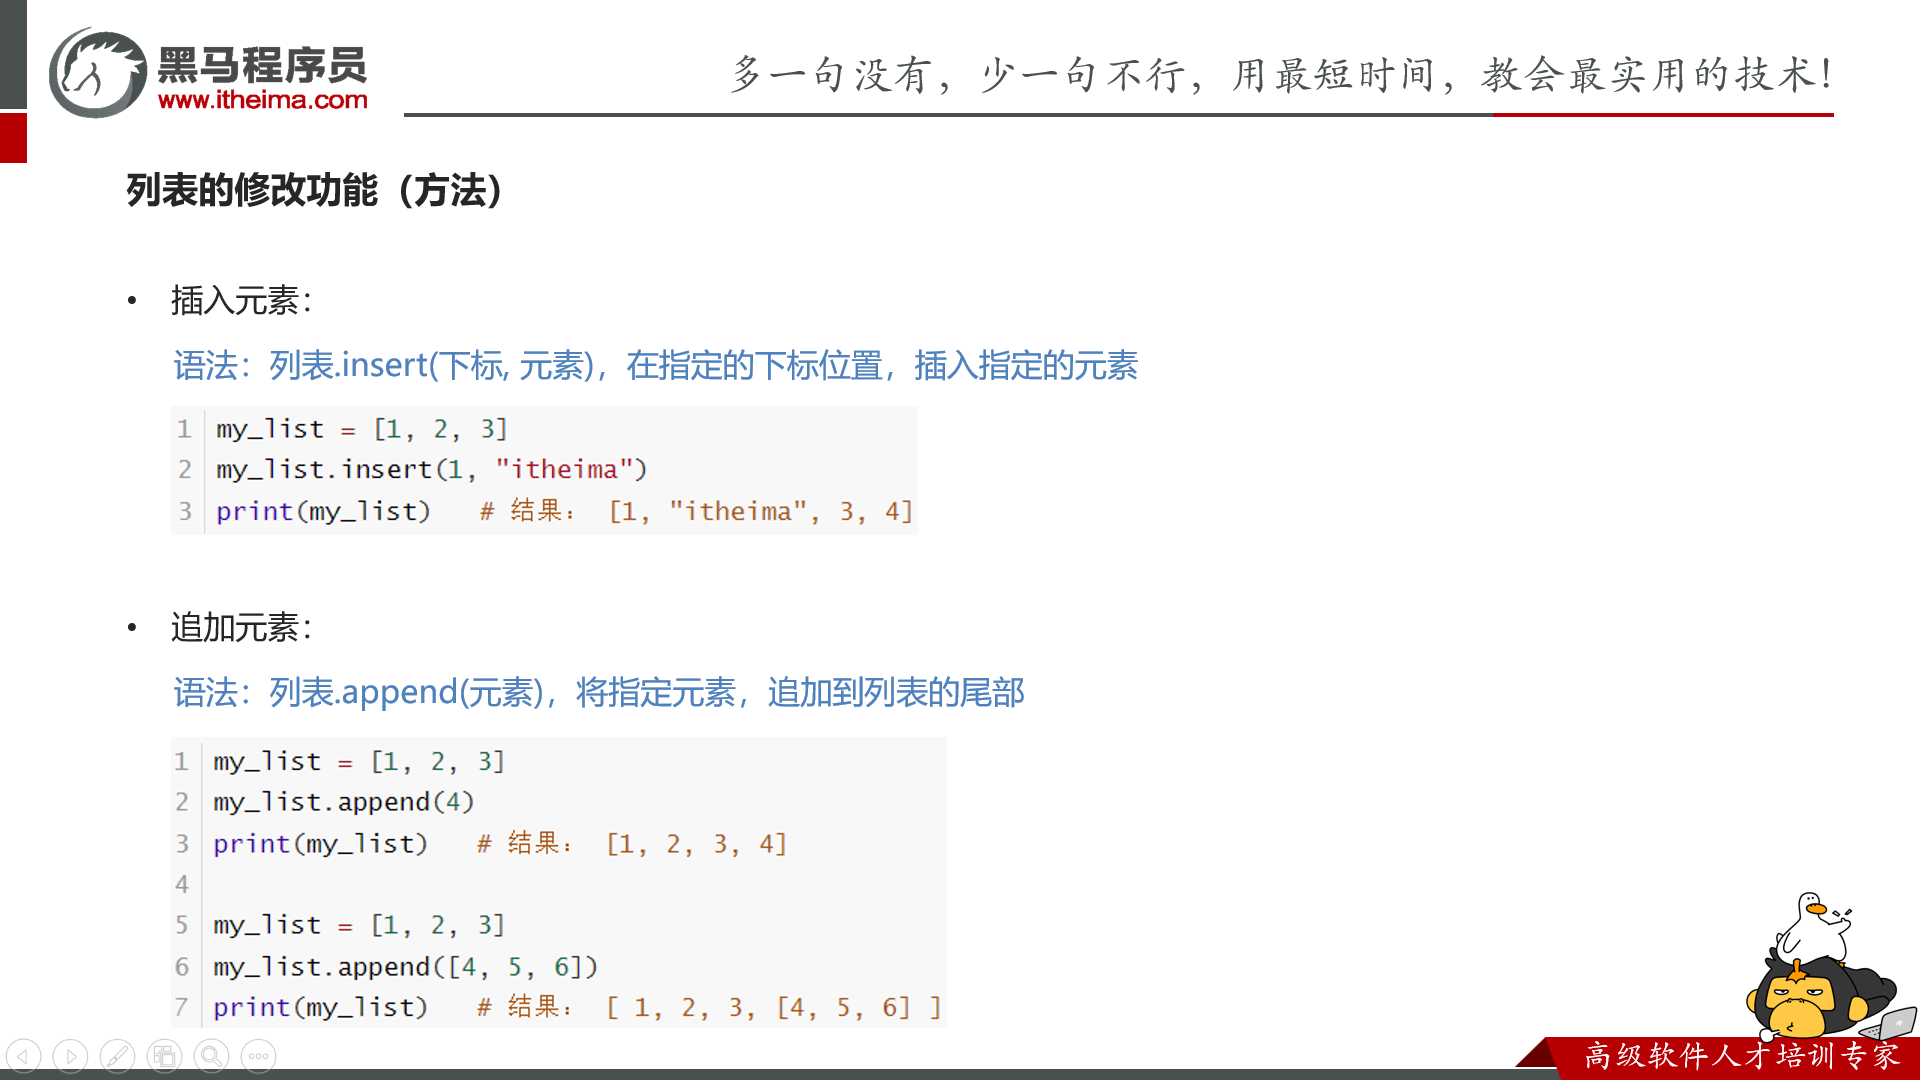
insert 和 append
insert 插完之后,那个元素的下标就是你指定的那个了。
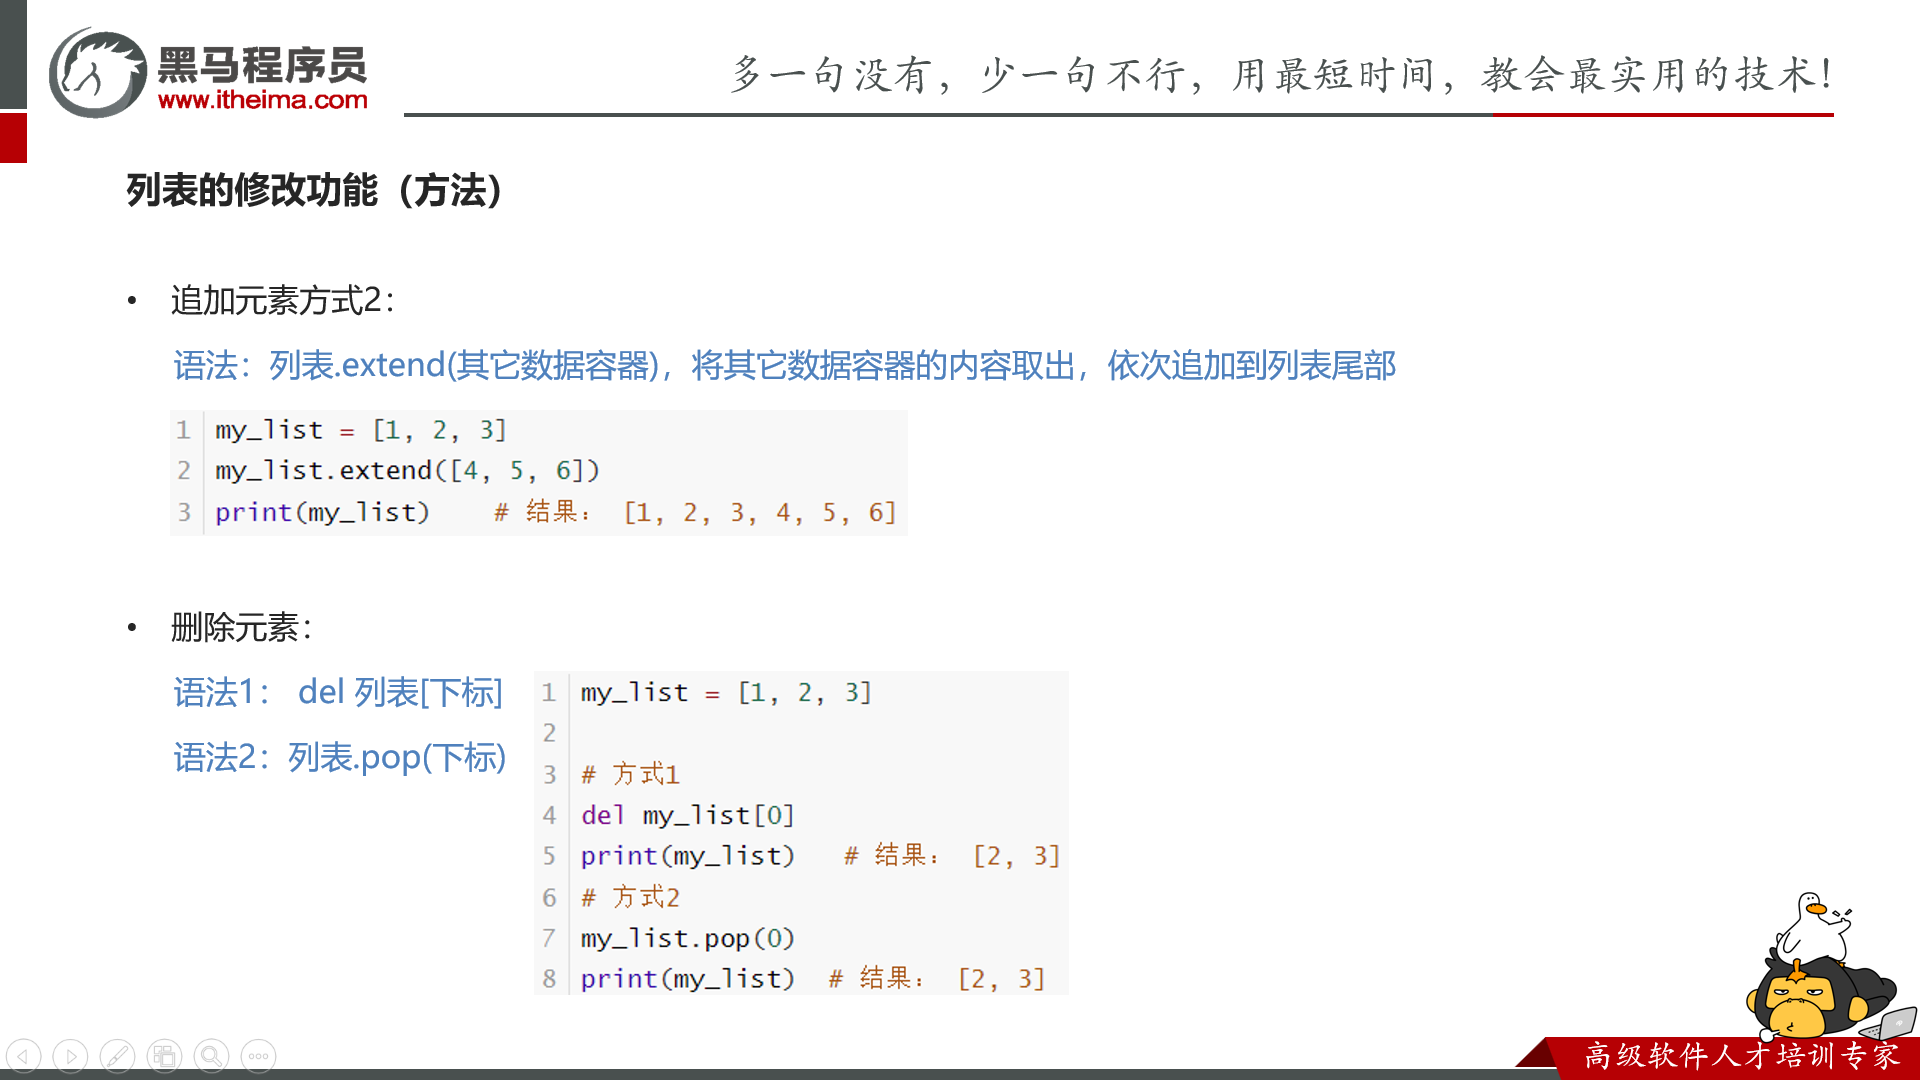
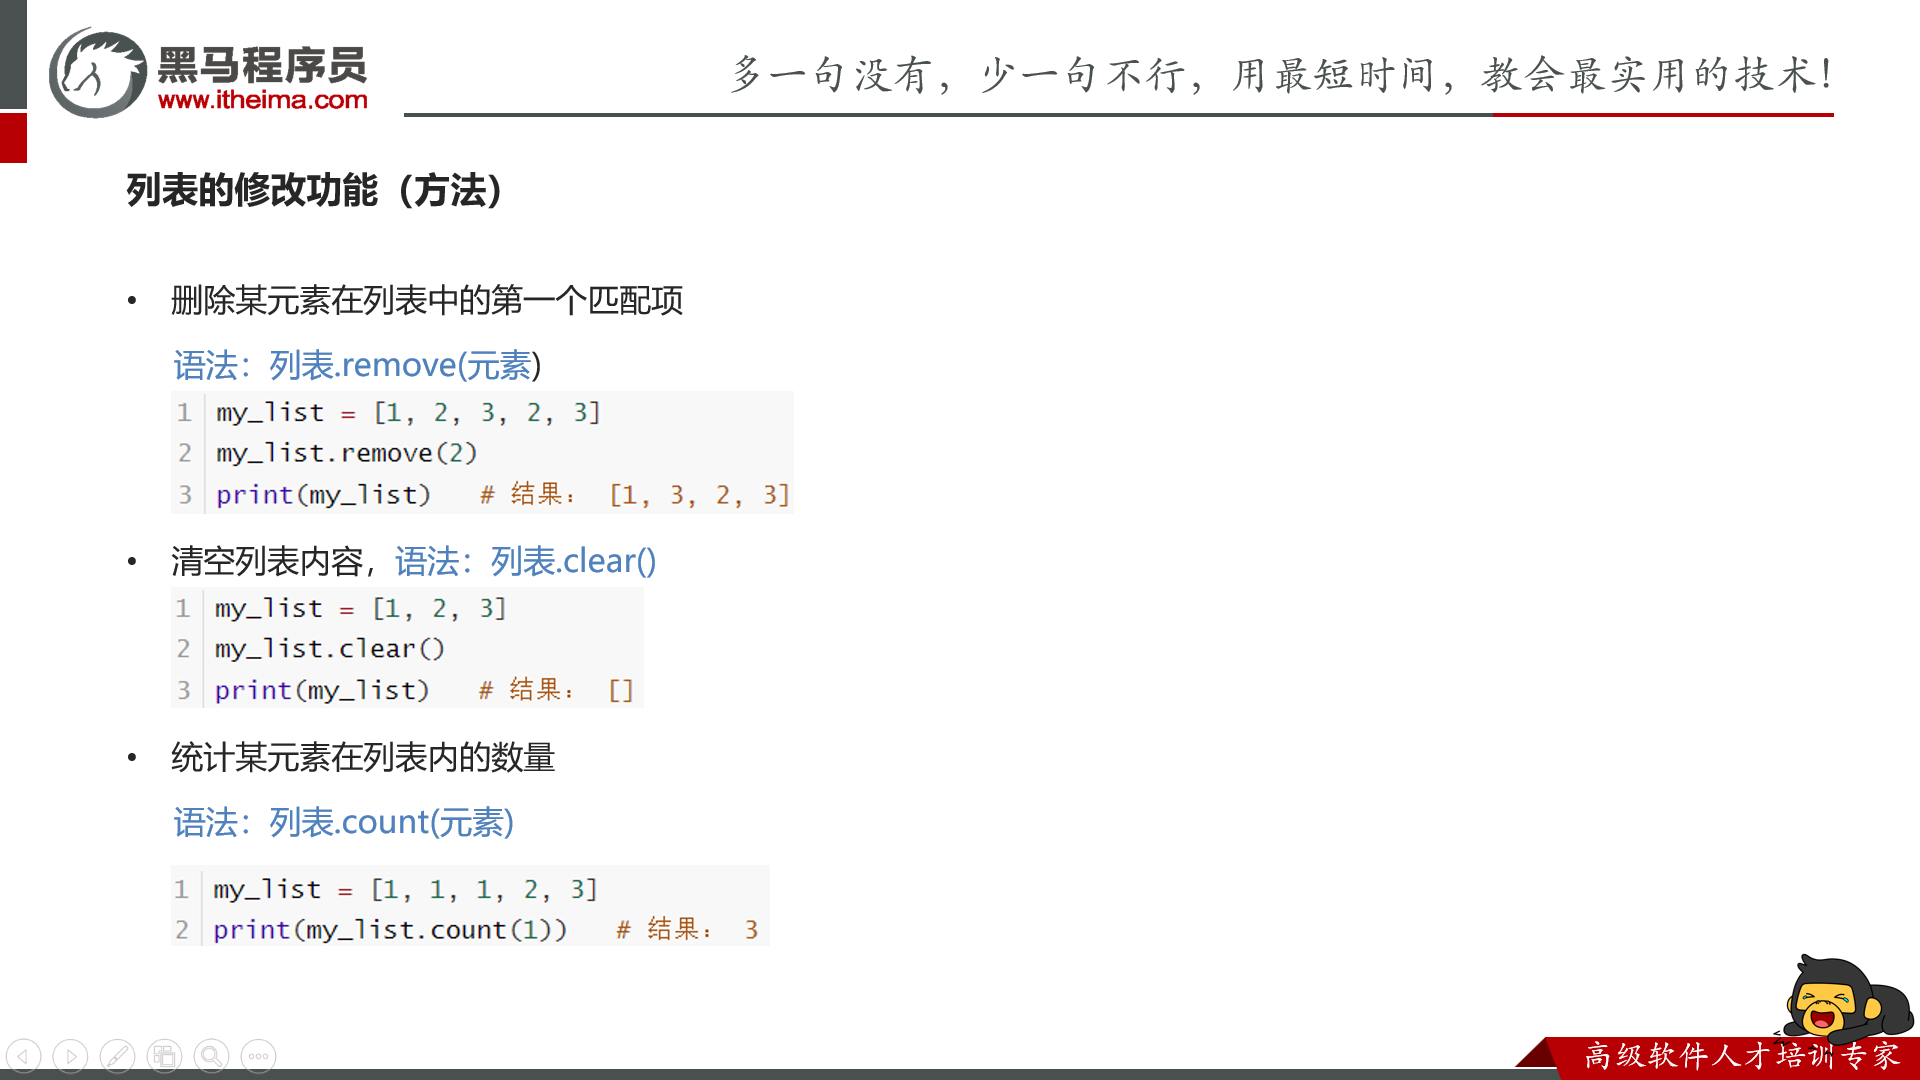
extend 和 删除
count 数数,remove 找完移除
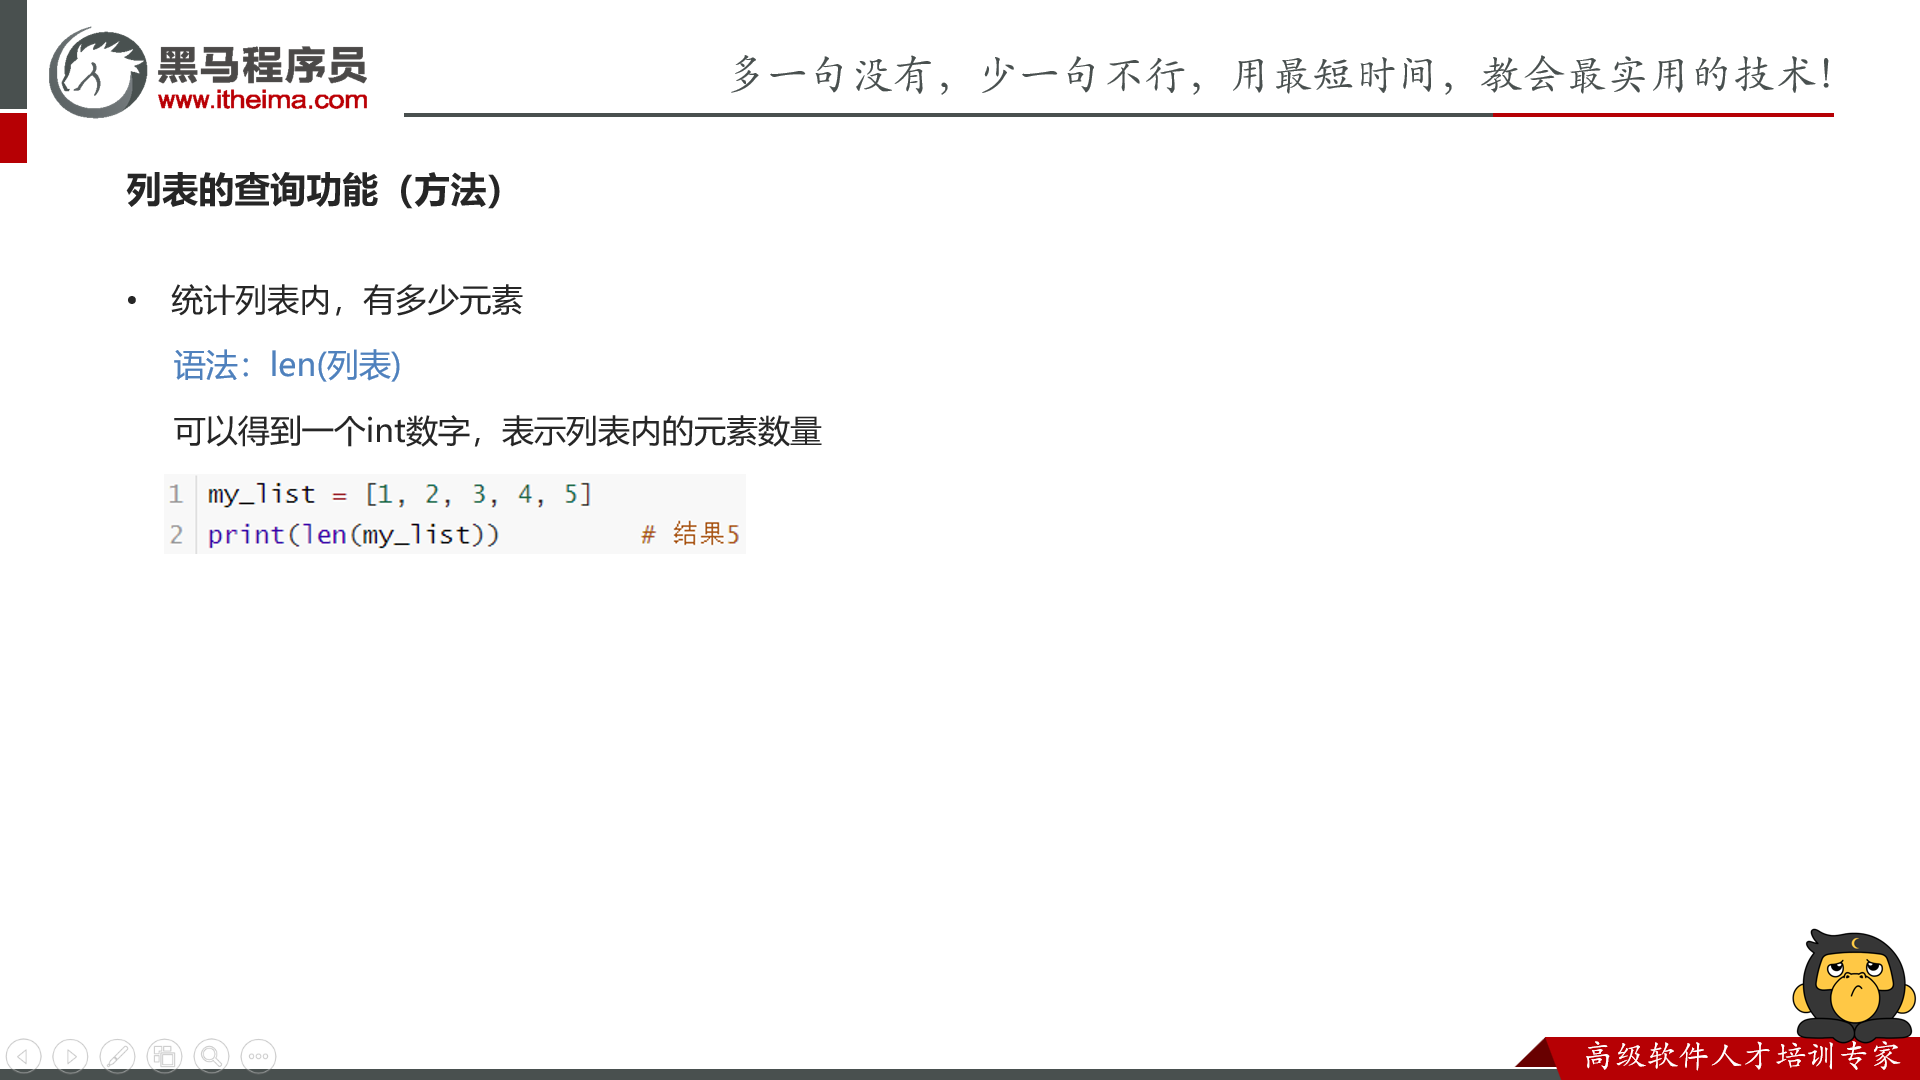
len
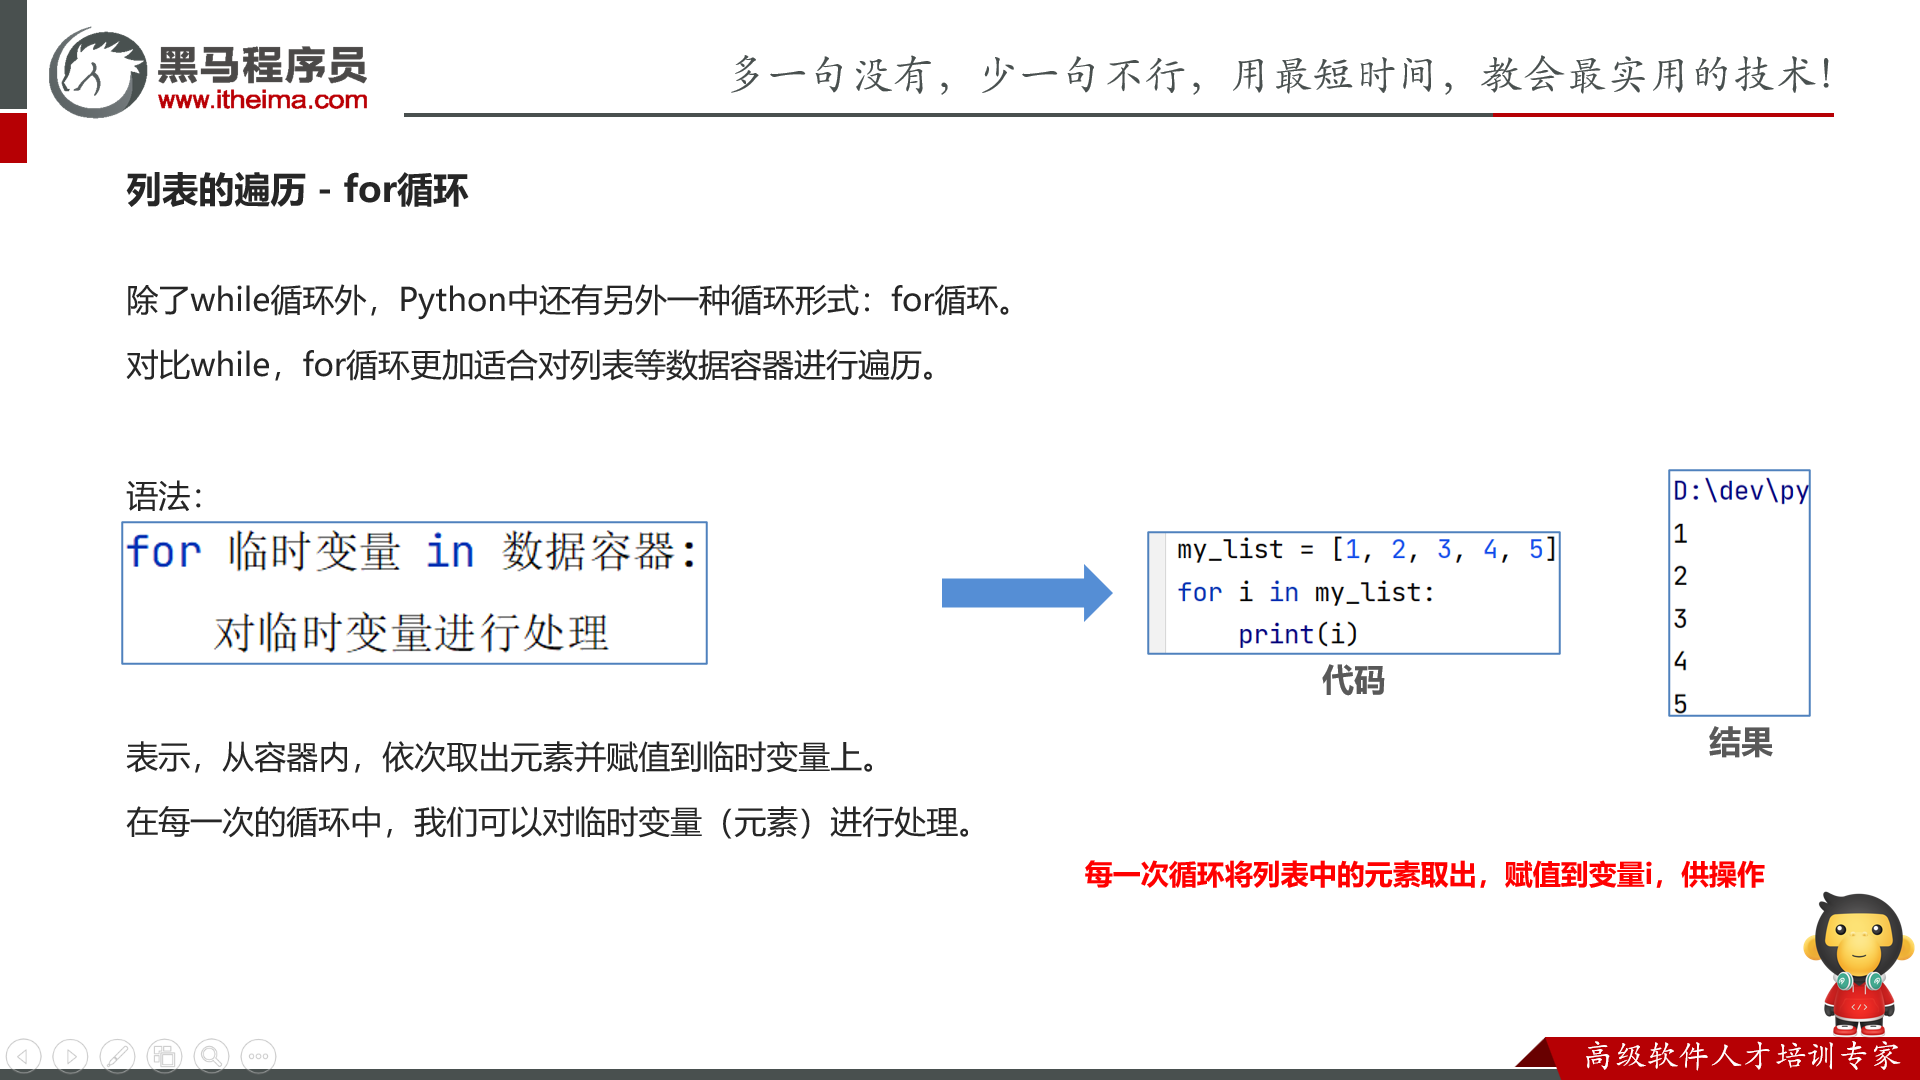
遍历:可以搞个下标 i,然后用 while i++,也可以用 for,直接拿出来。
总结

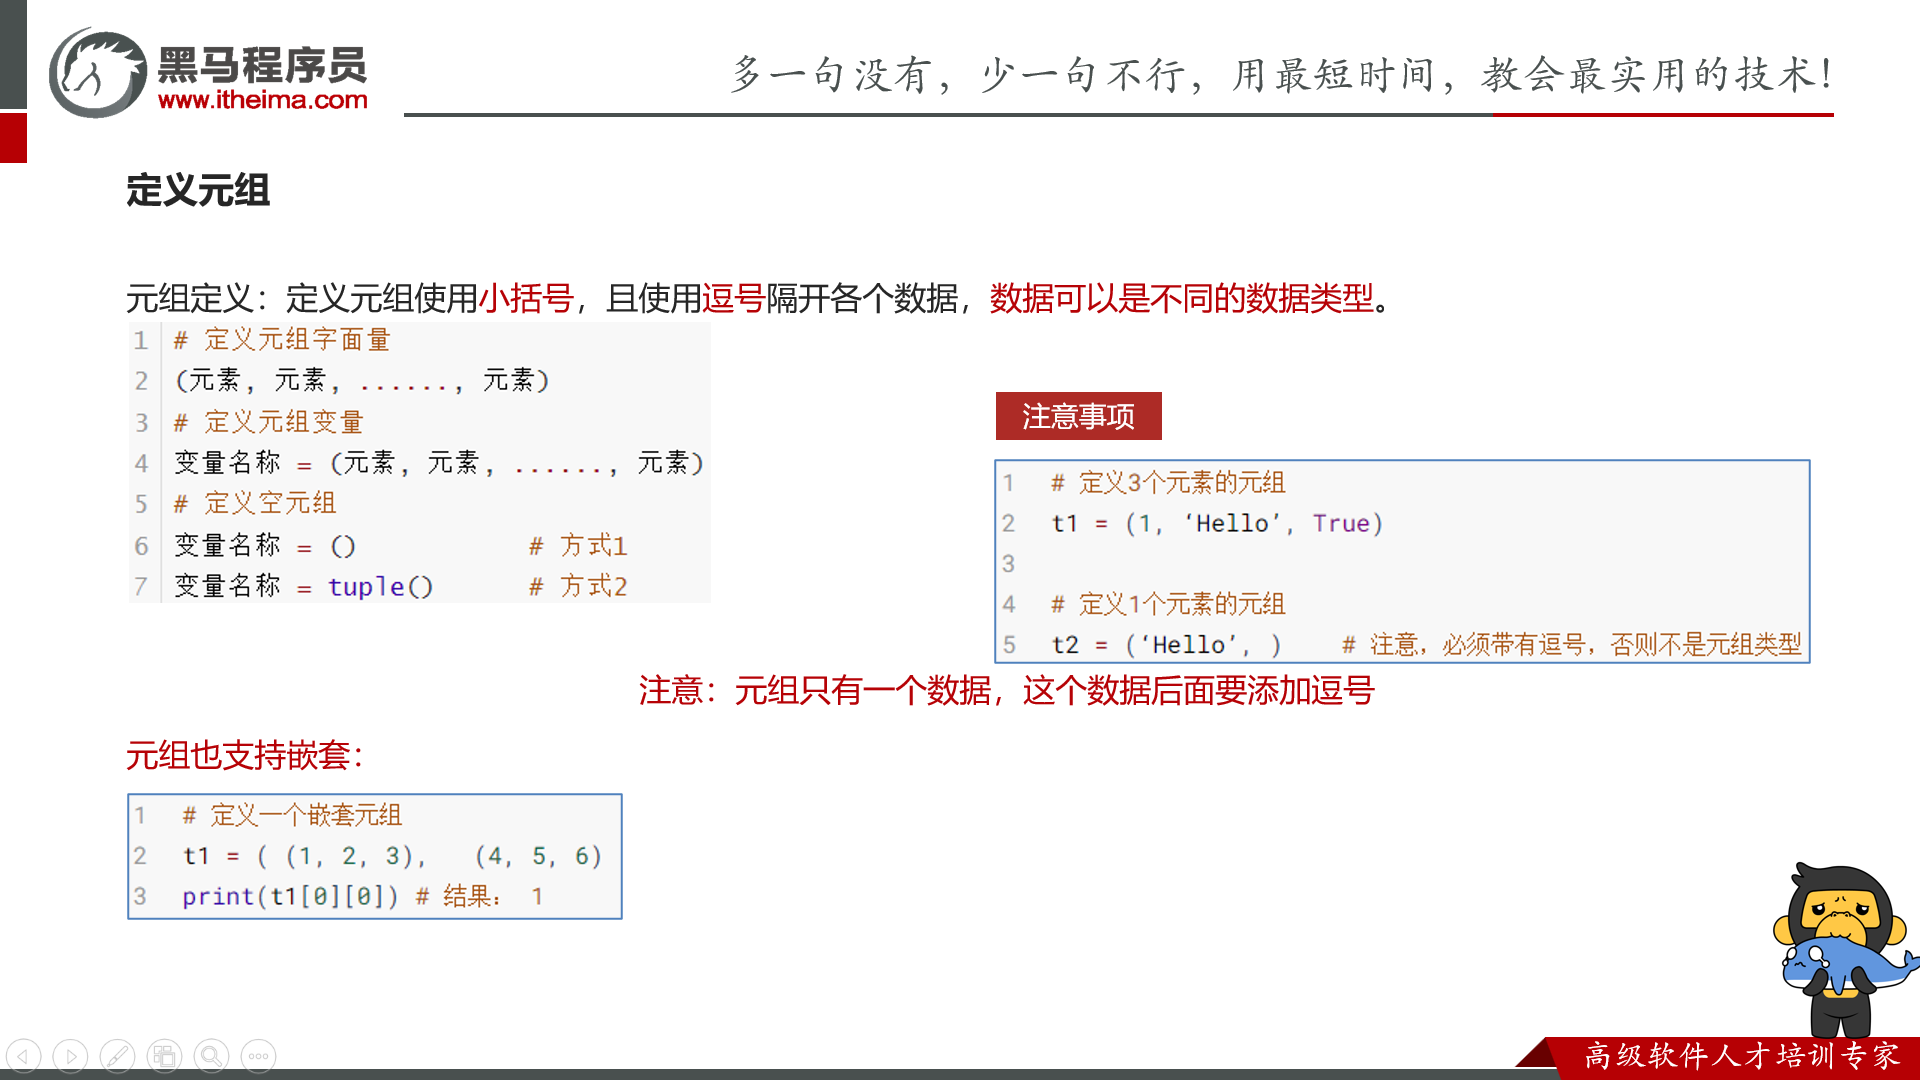
tuple(元组),用小括号定义
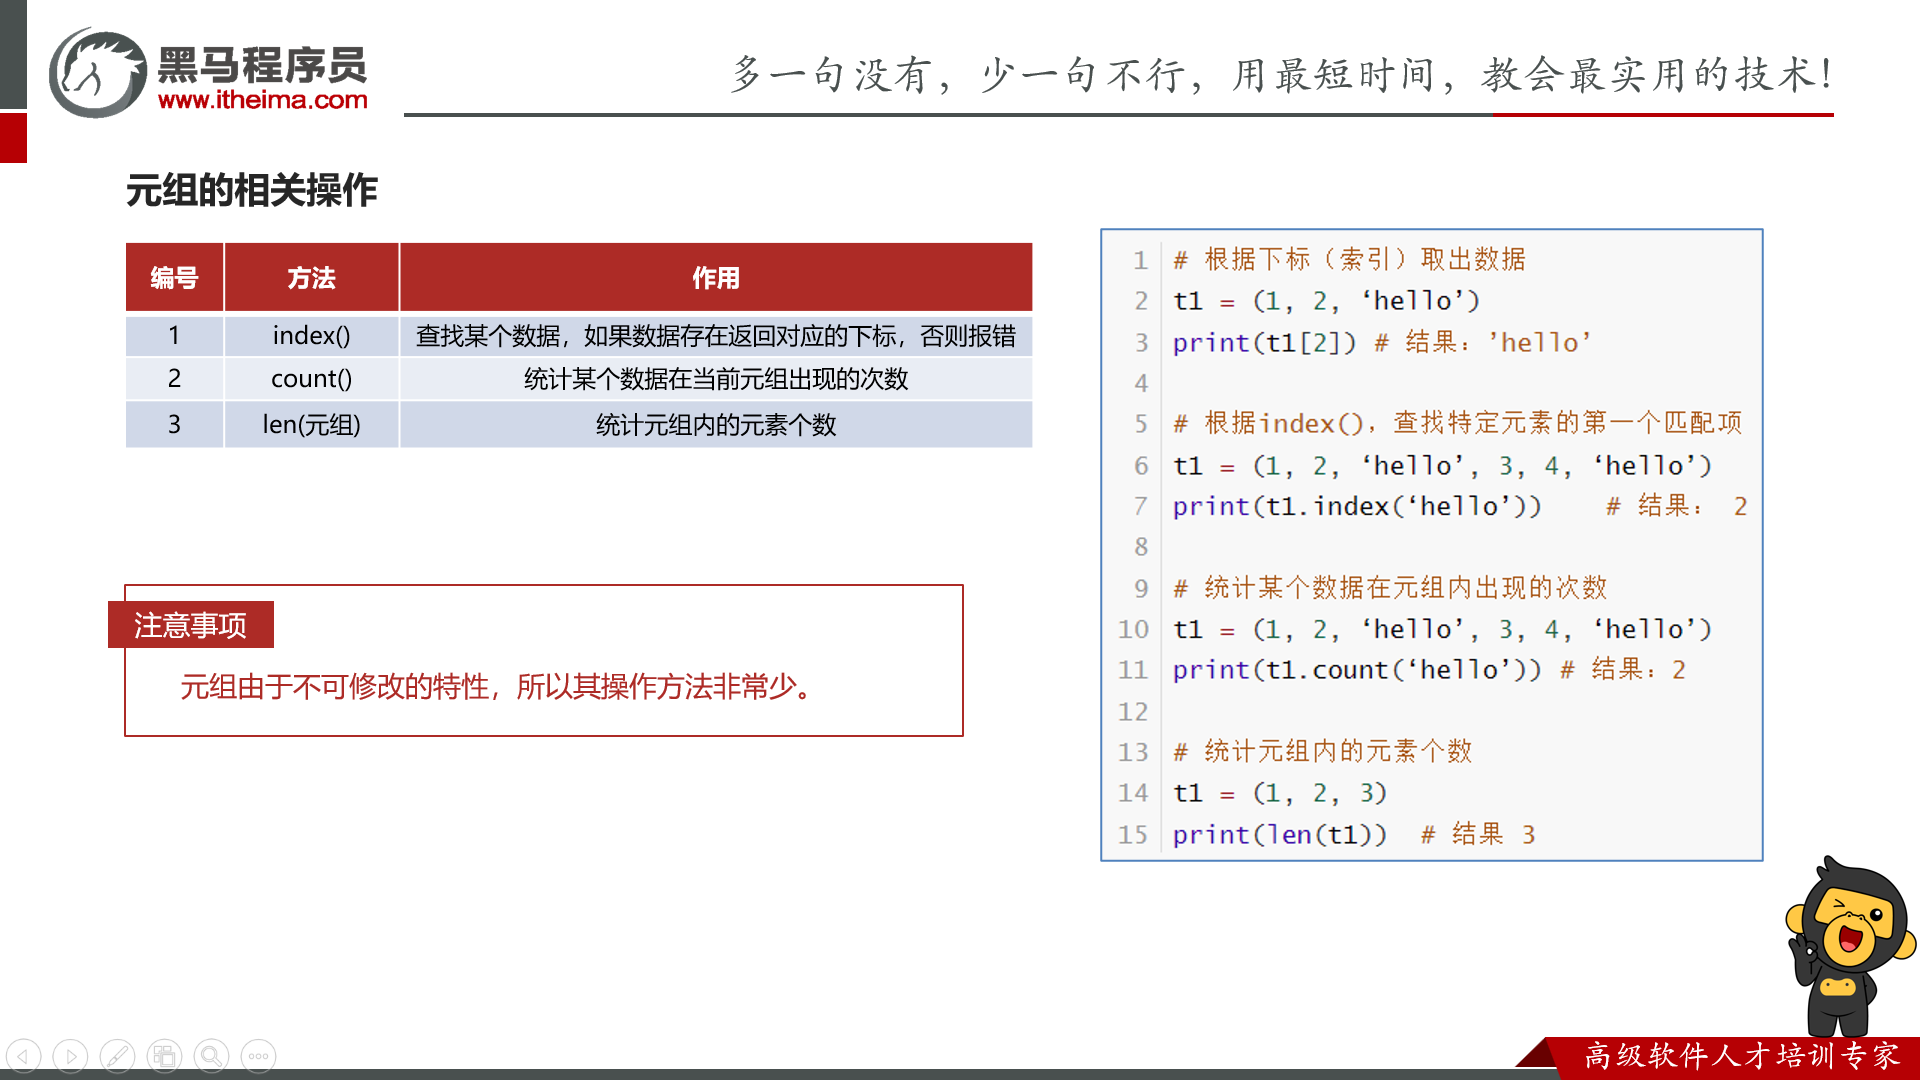
list 的话,还可以加入/删除元素,而 tuple 不支持修改。
str(字符串)
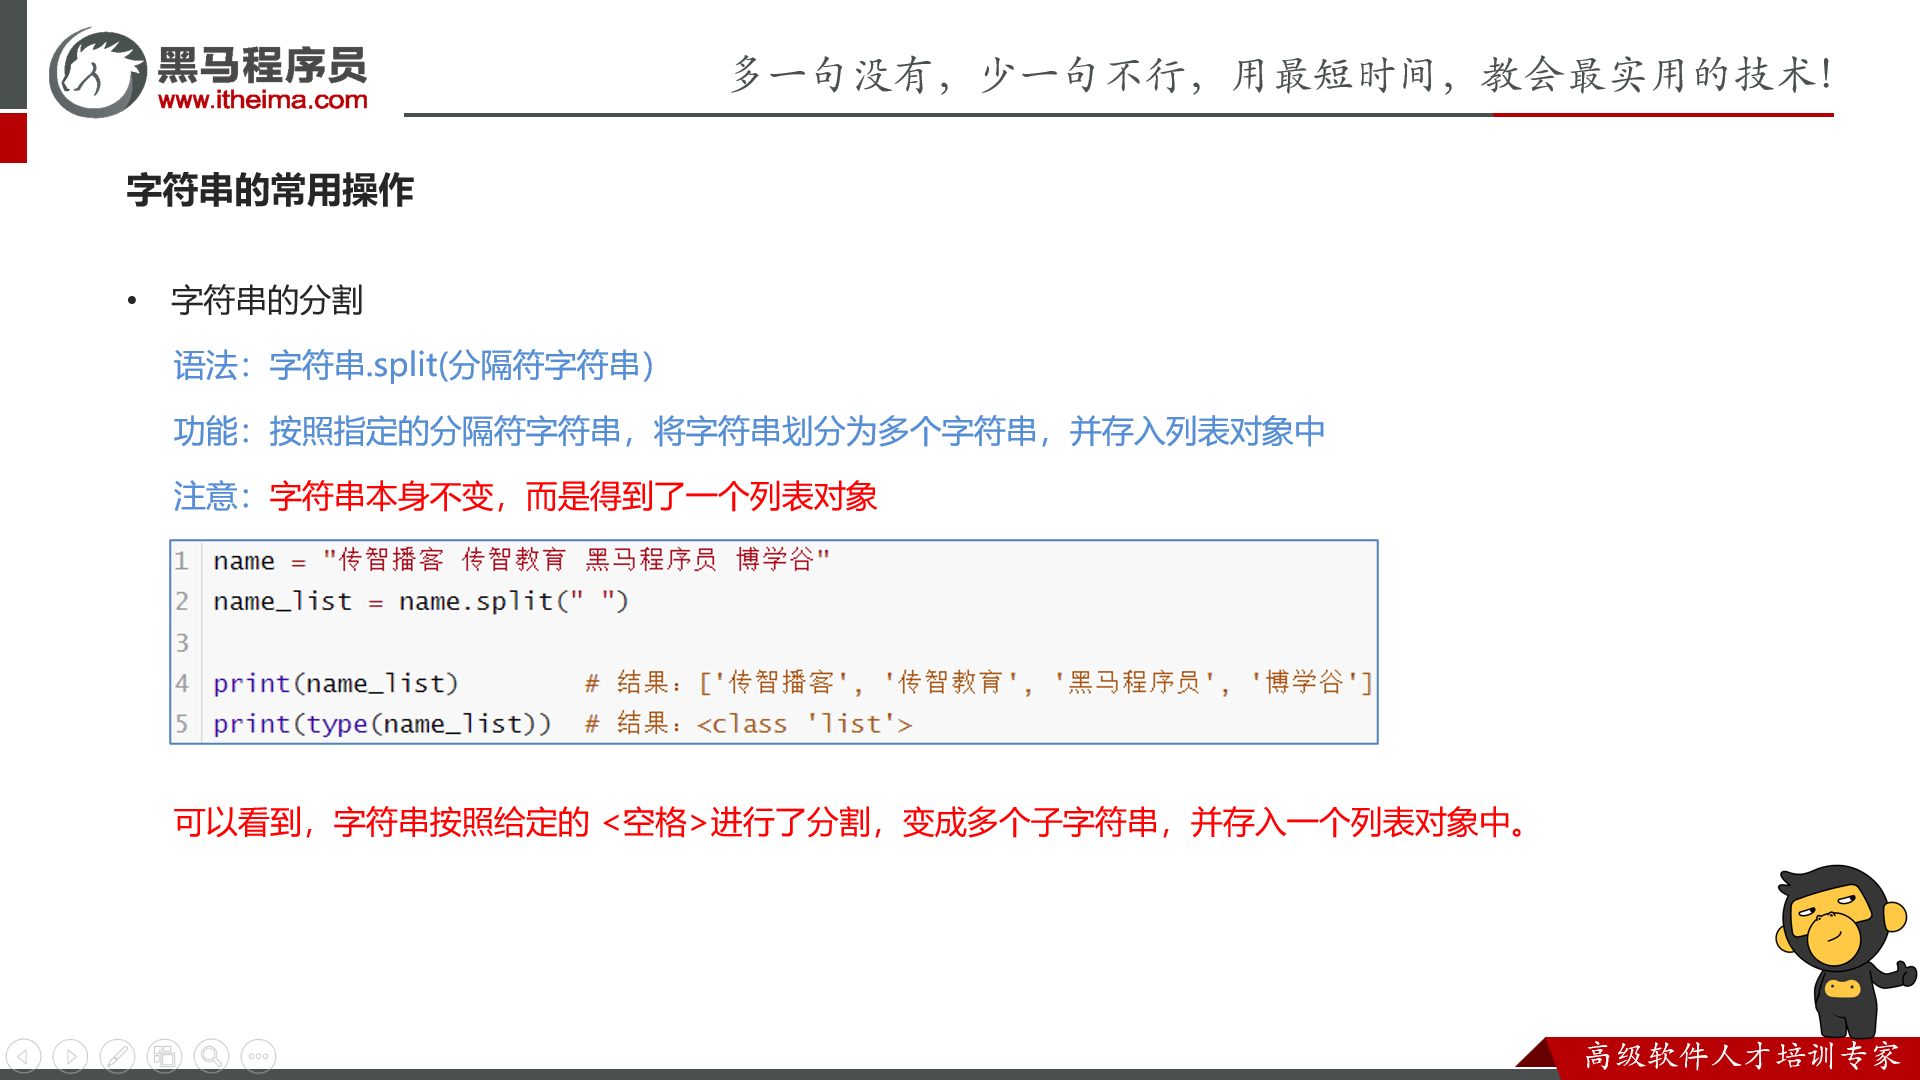
在这里,需要注意的是,python 中的输入都是输入字符串,所以大多都是直接读一整行的(包括空格),因此如果你要分割开,得使用 split。
正常定义一个字符串,相当于一个 char 数组。
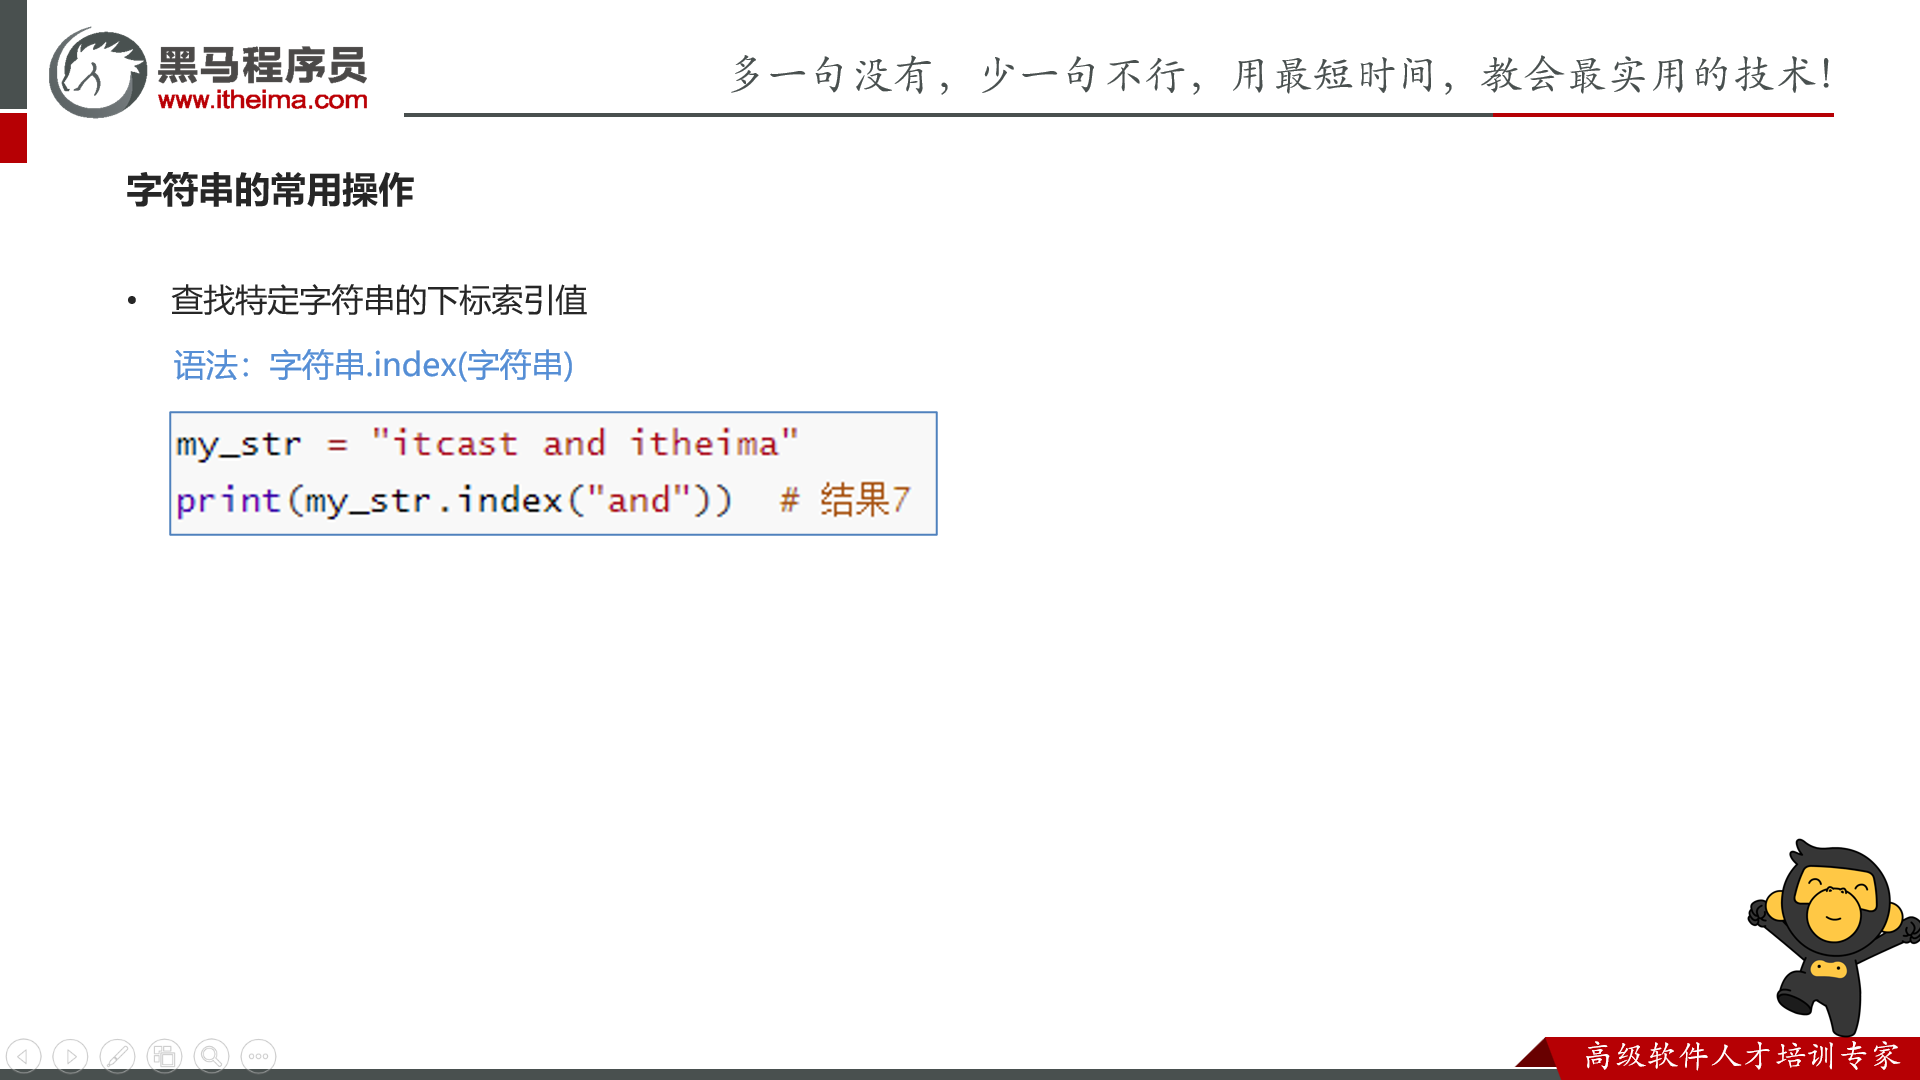
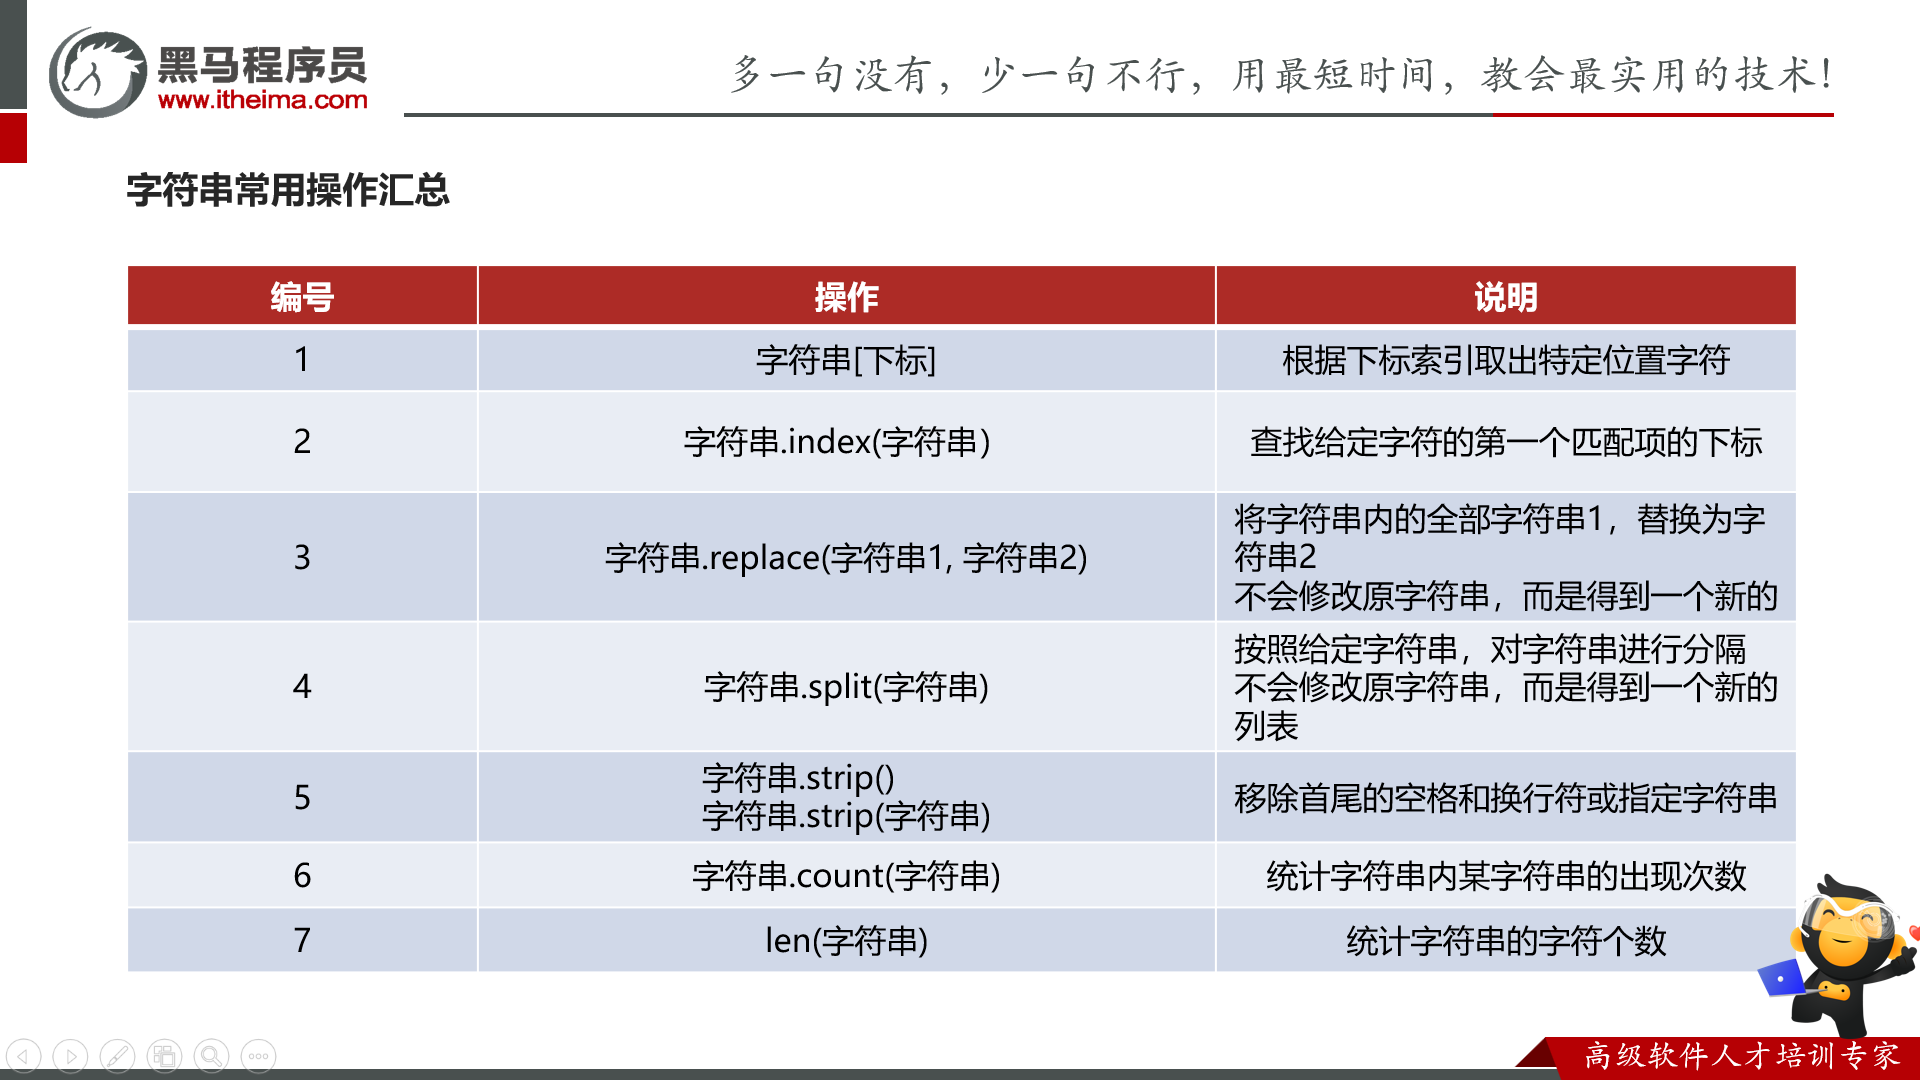
index(找第一个匹配的part的第一个字符的下标)
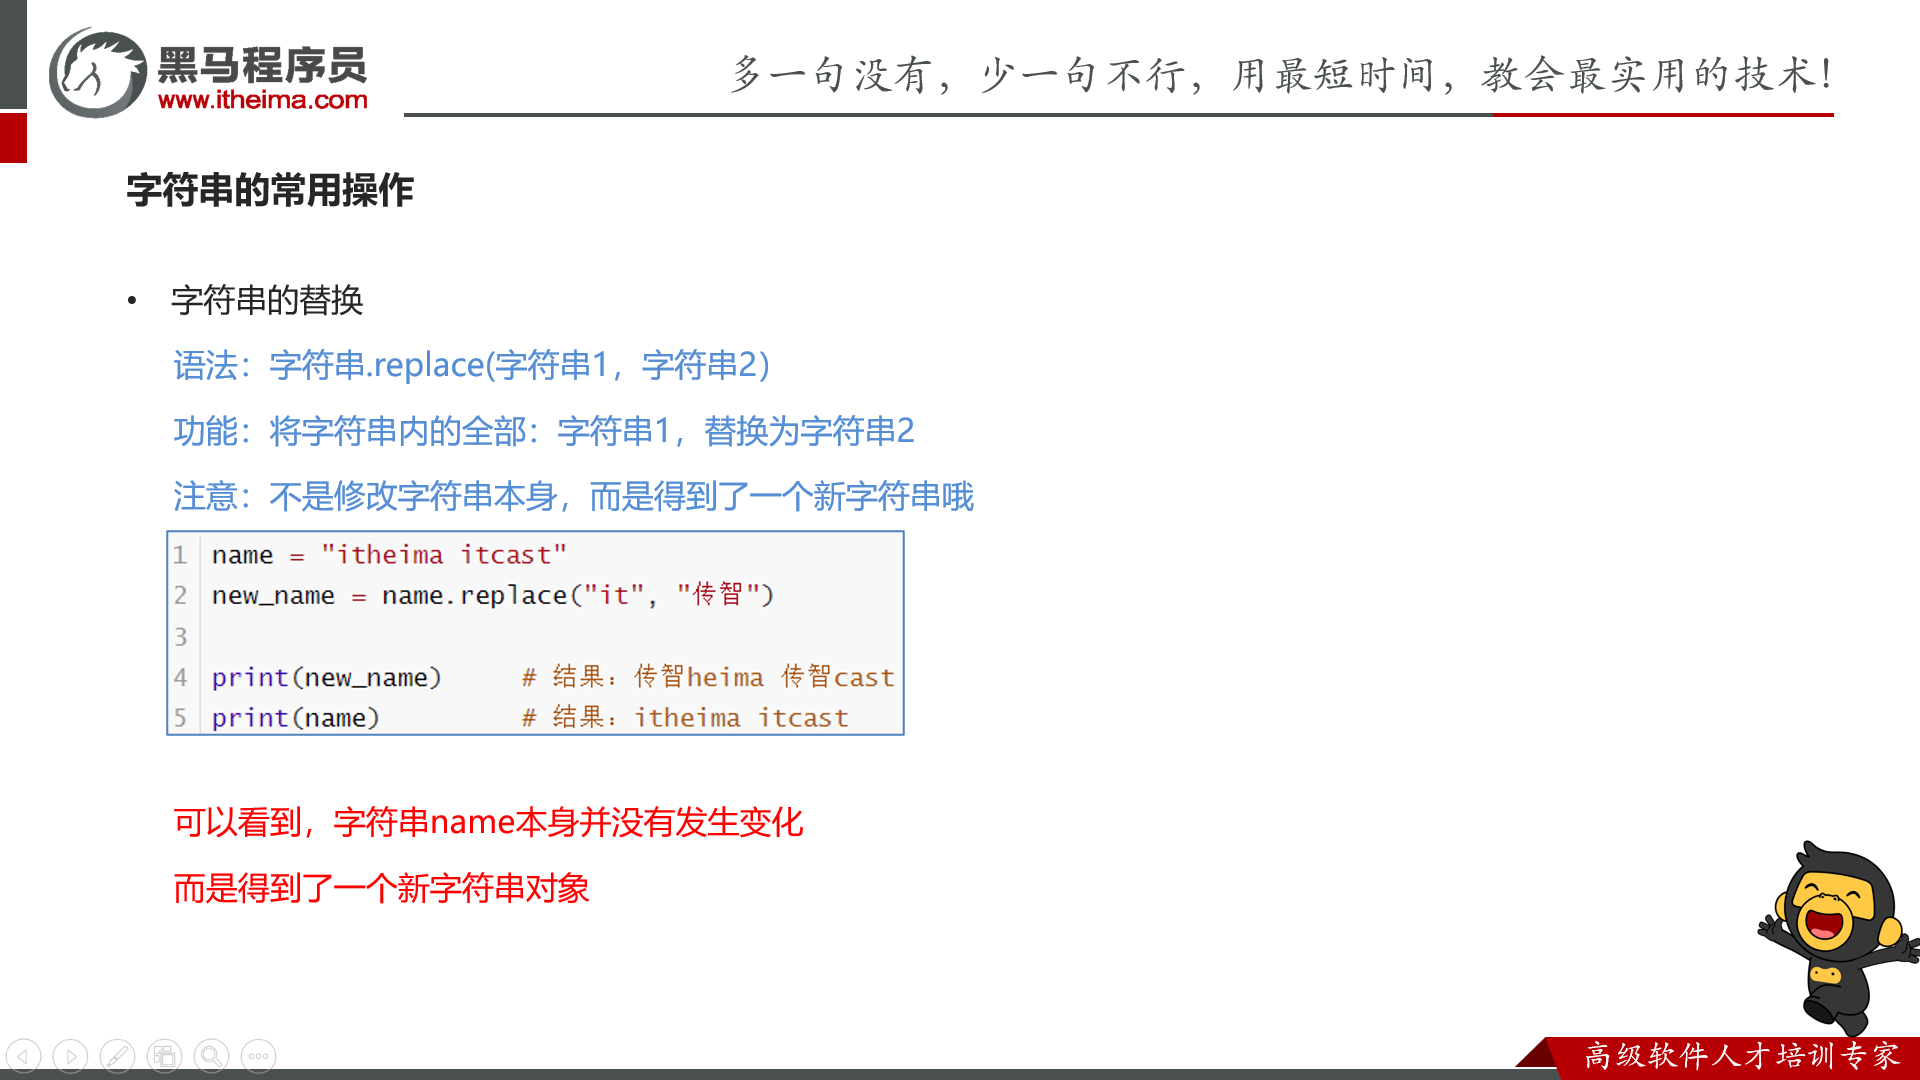
replace
split
strip(剥夺,除去)

count

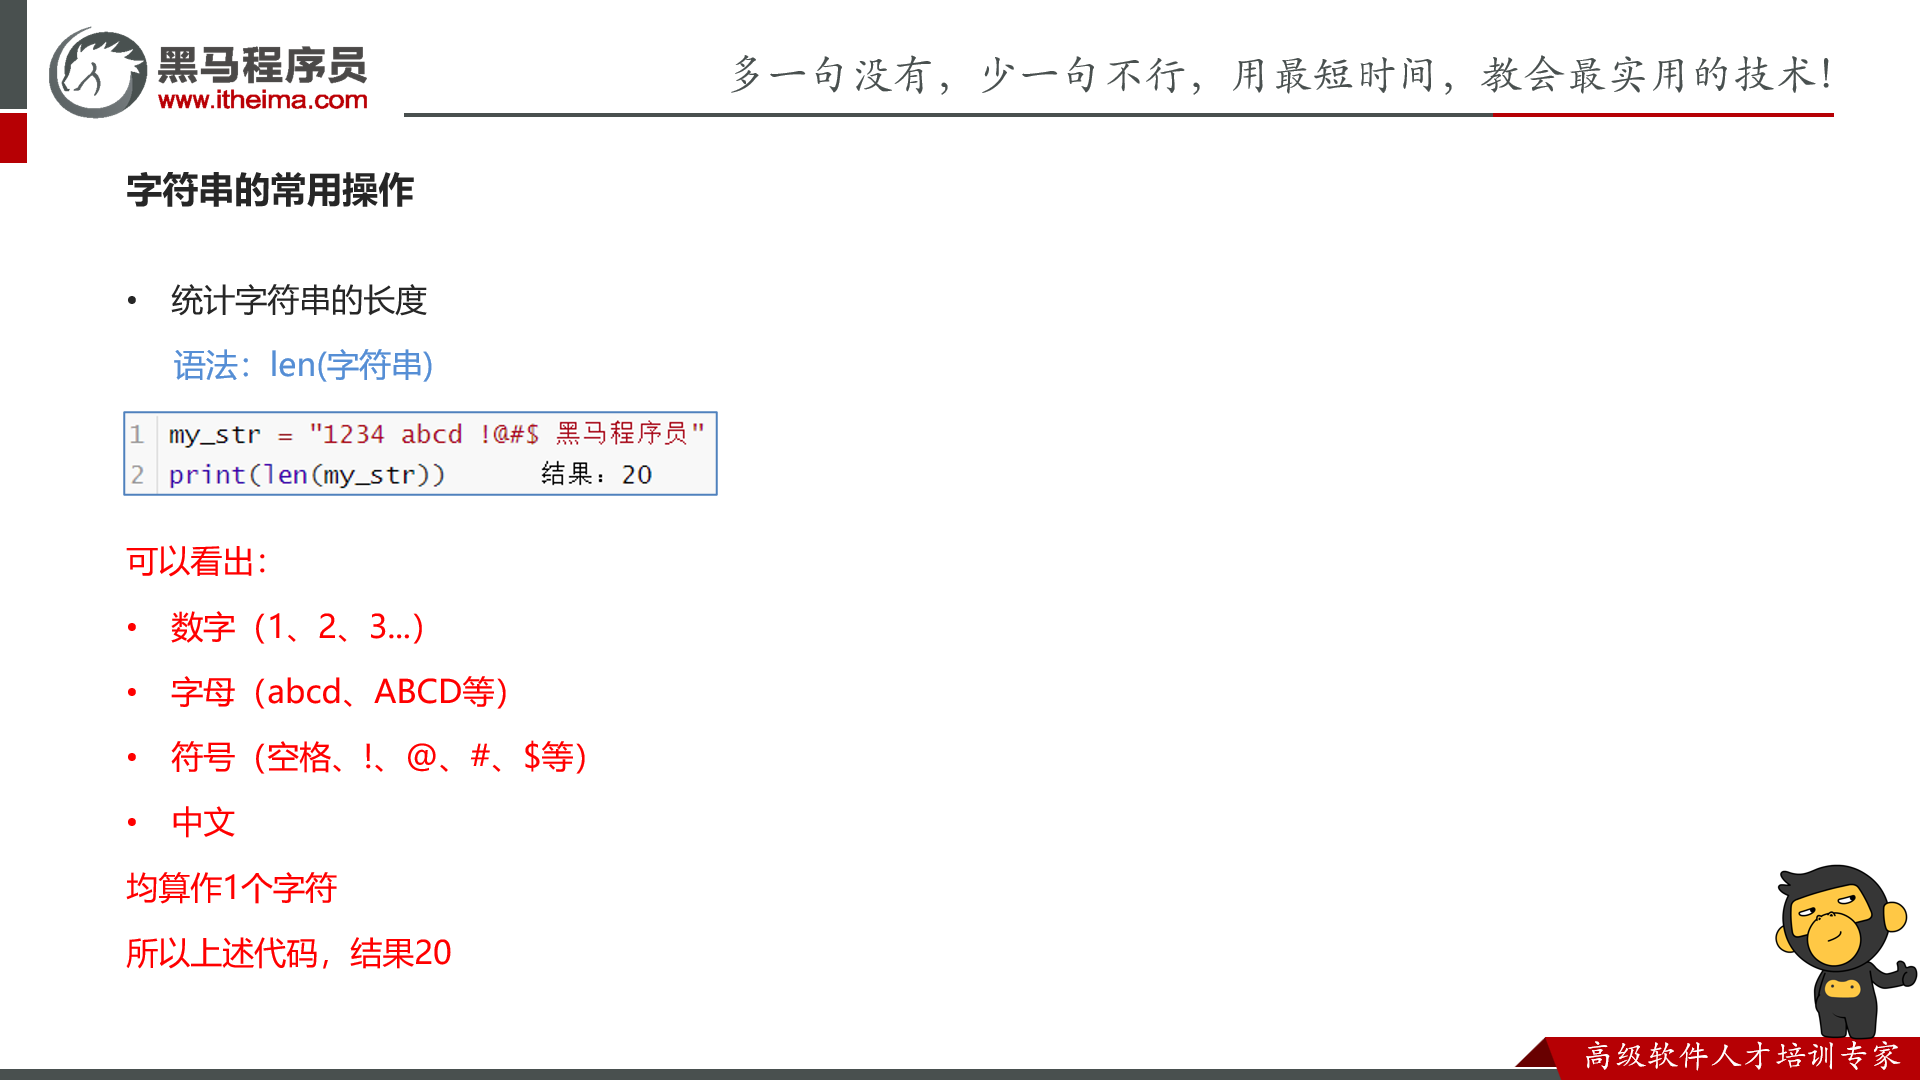
len
总结
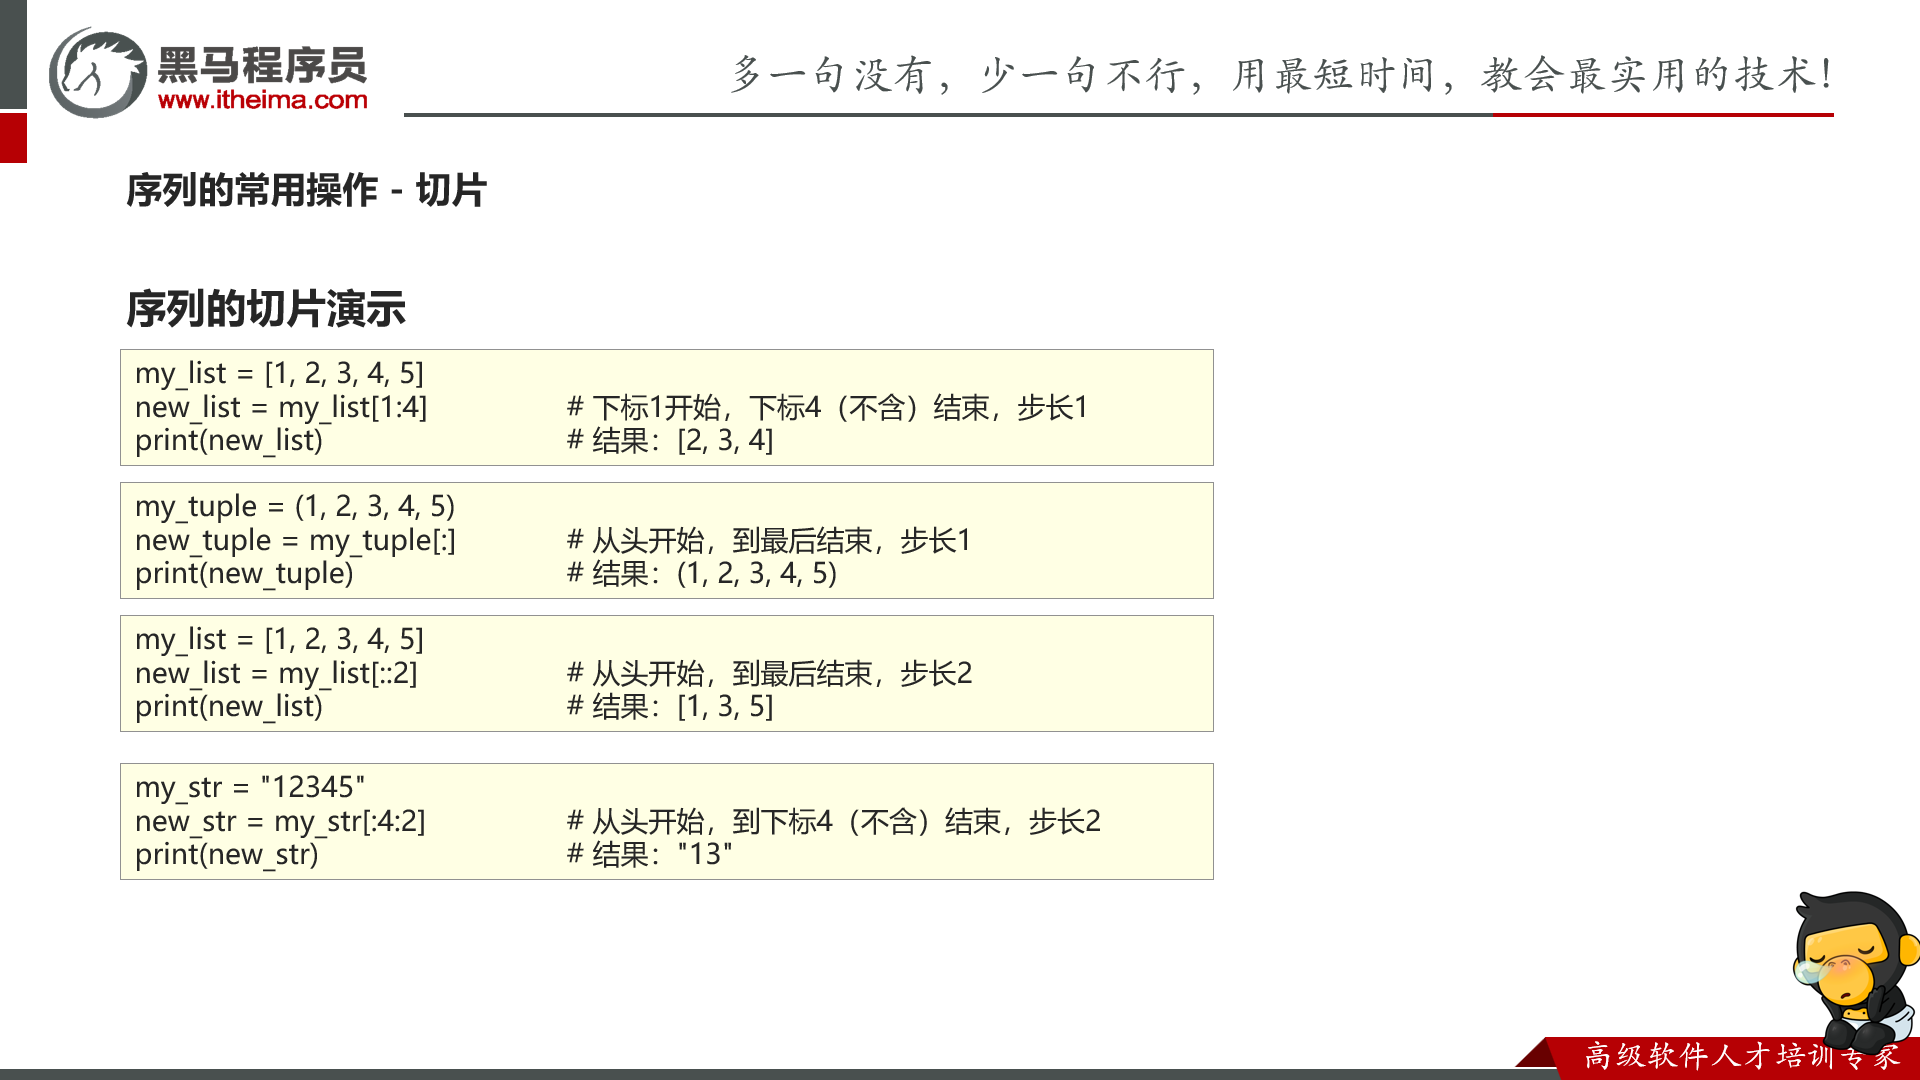
切片
set

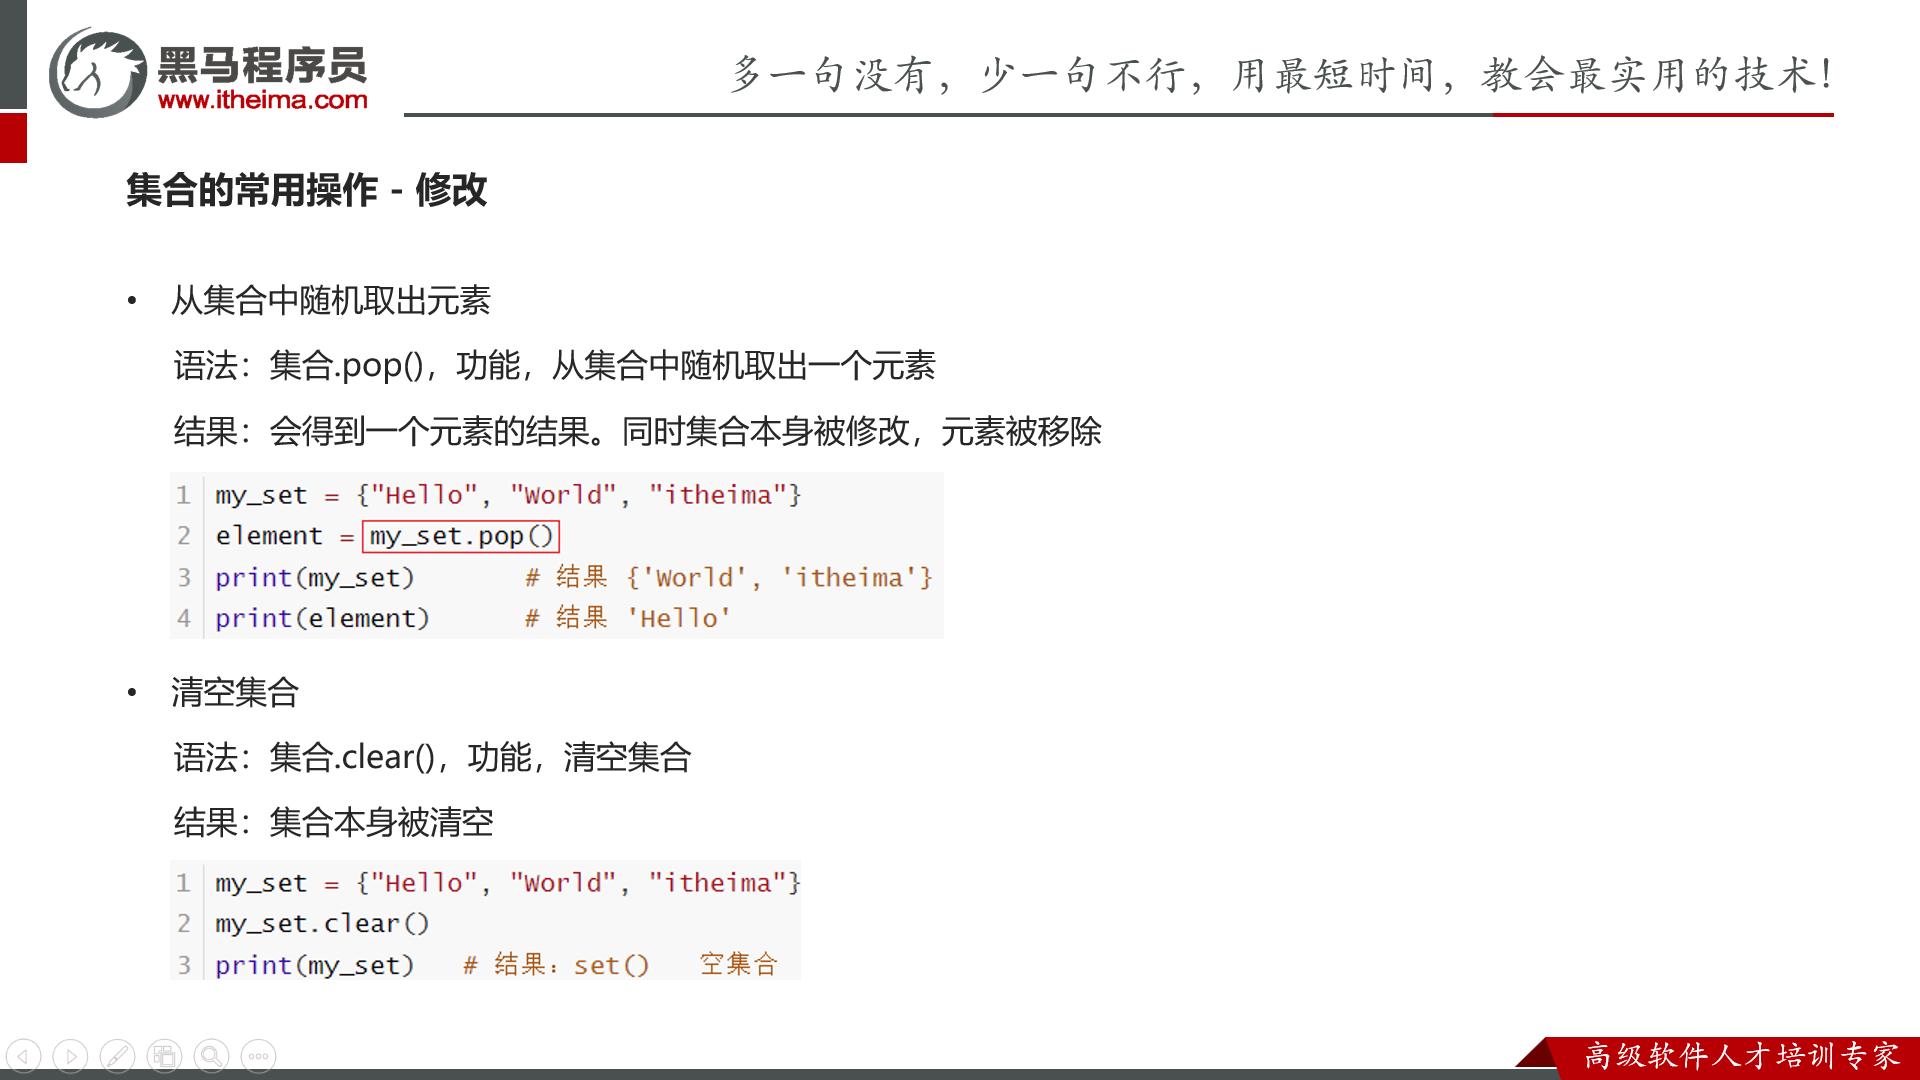
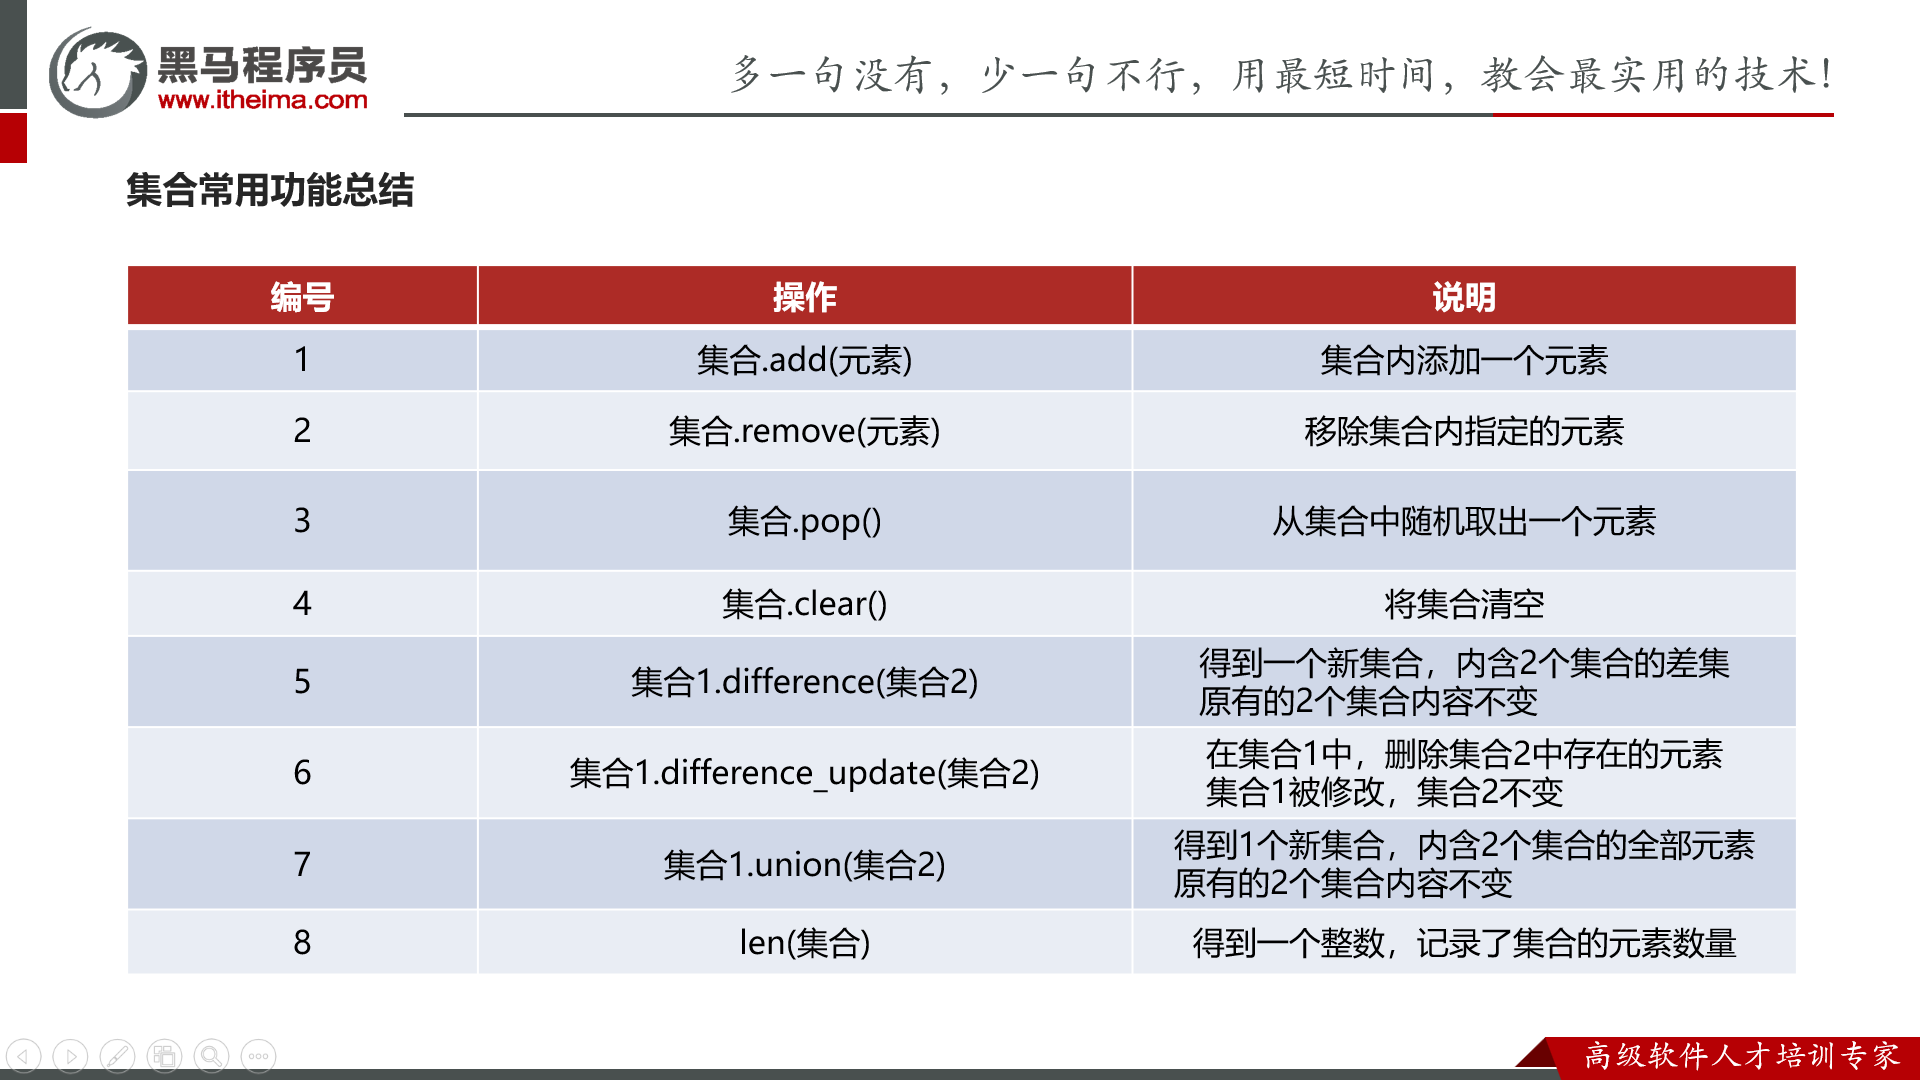
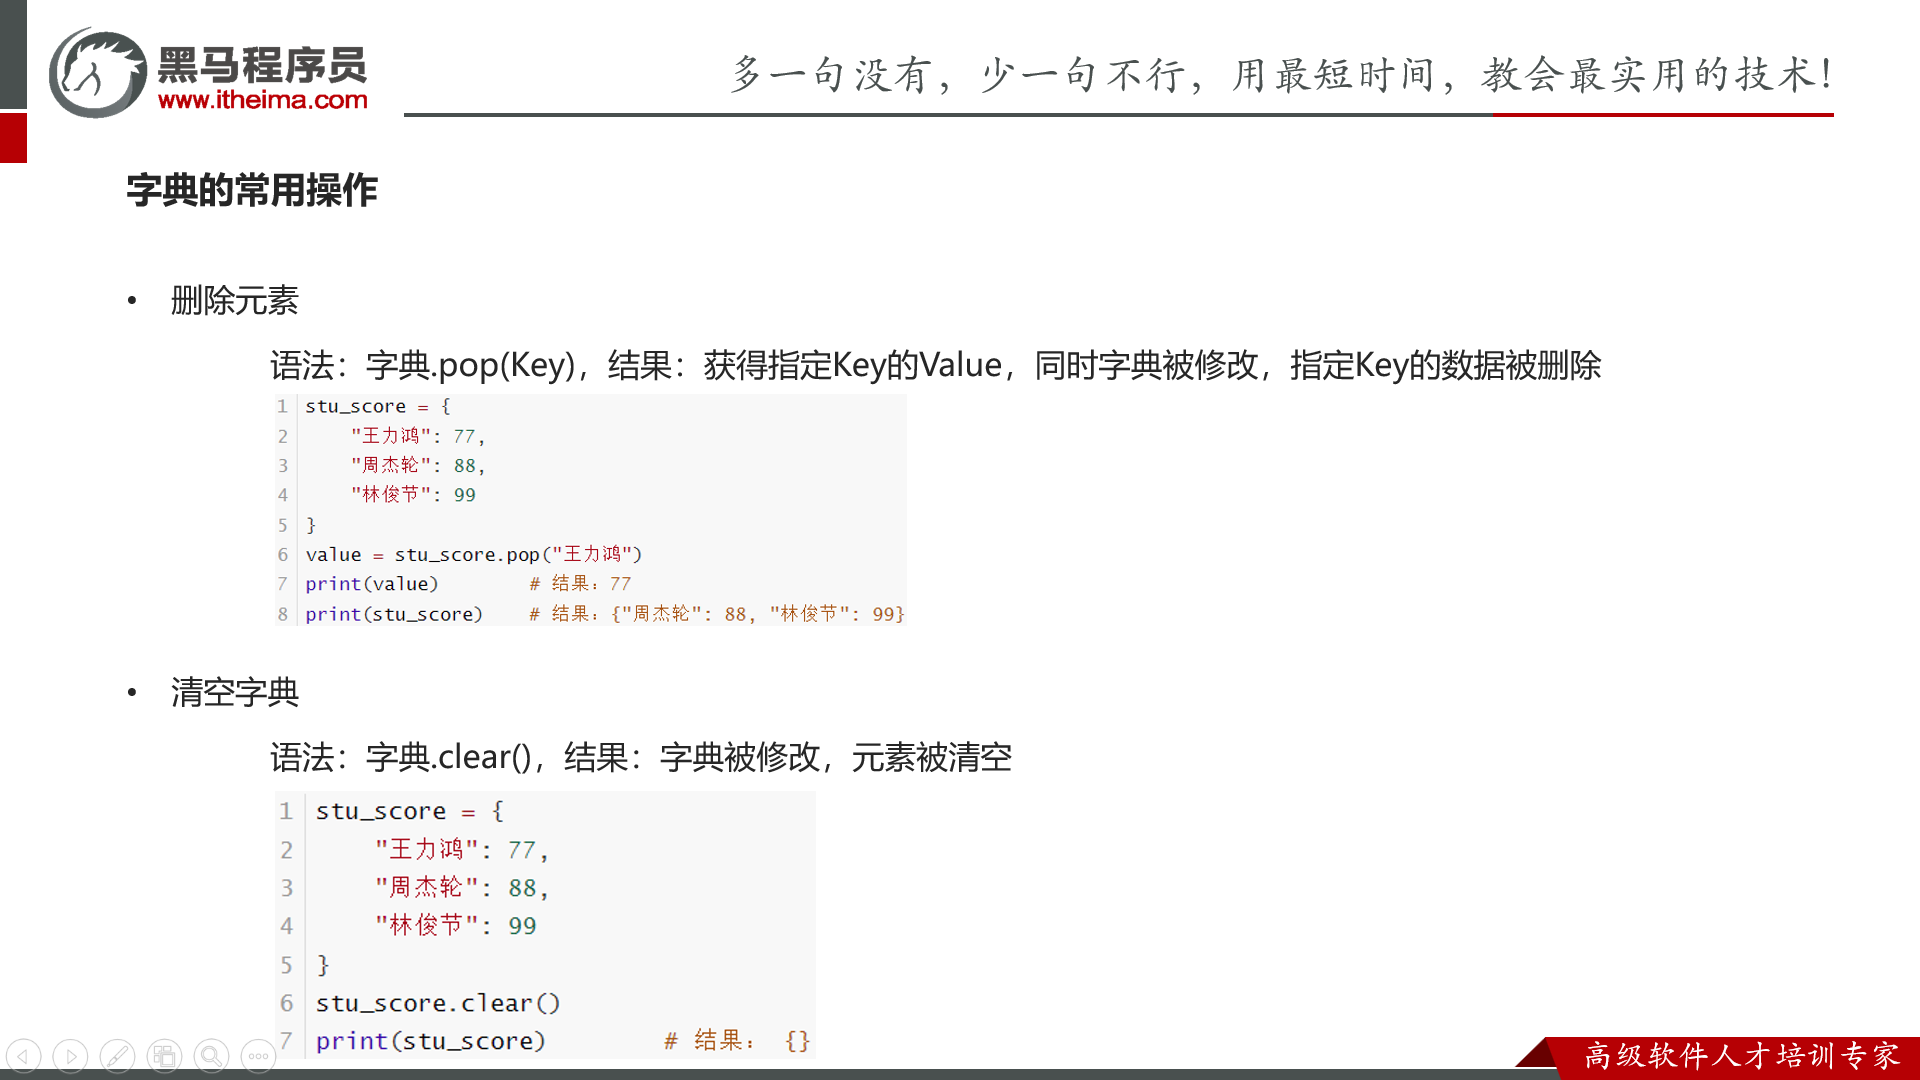
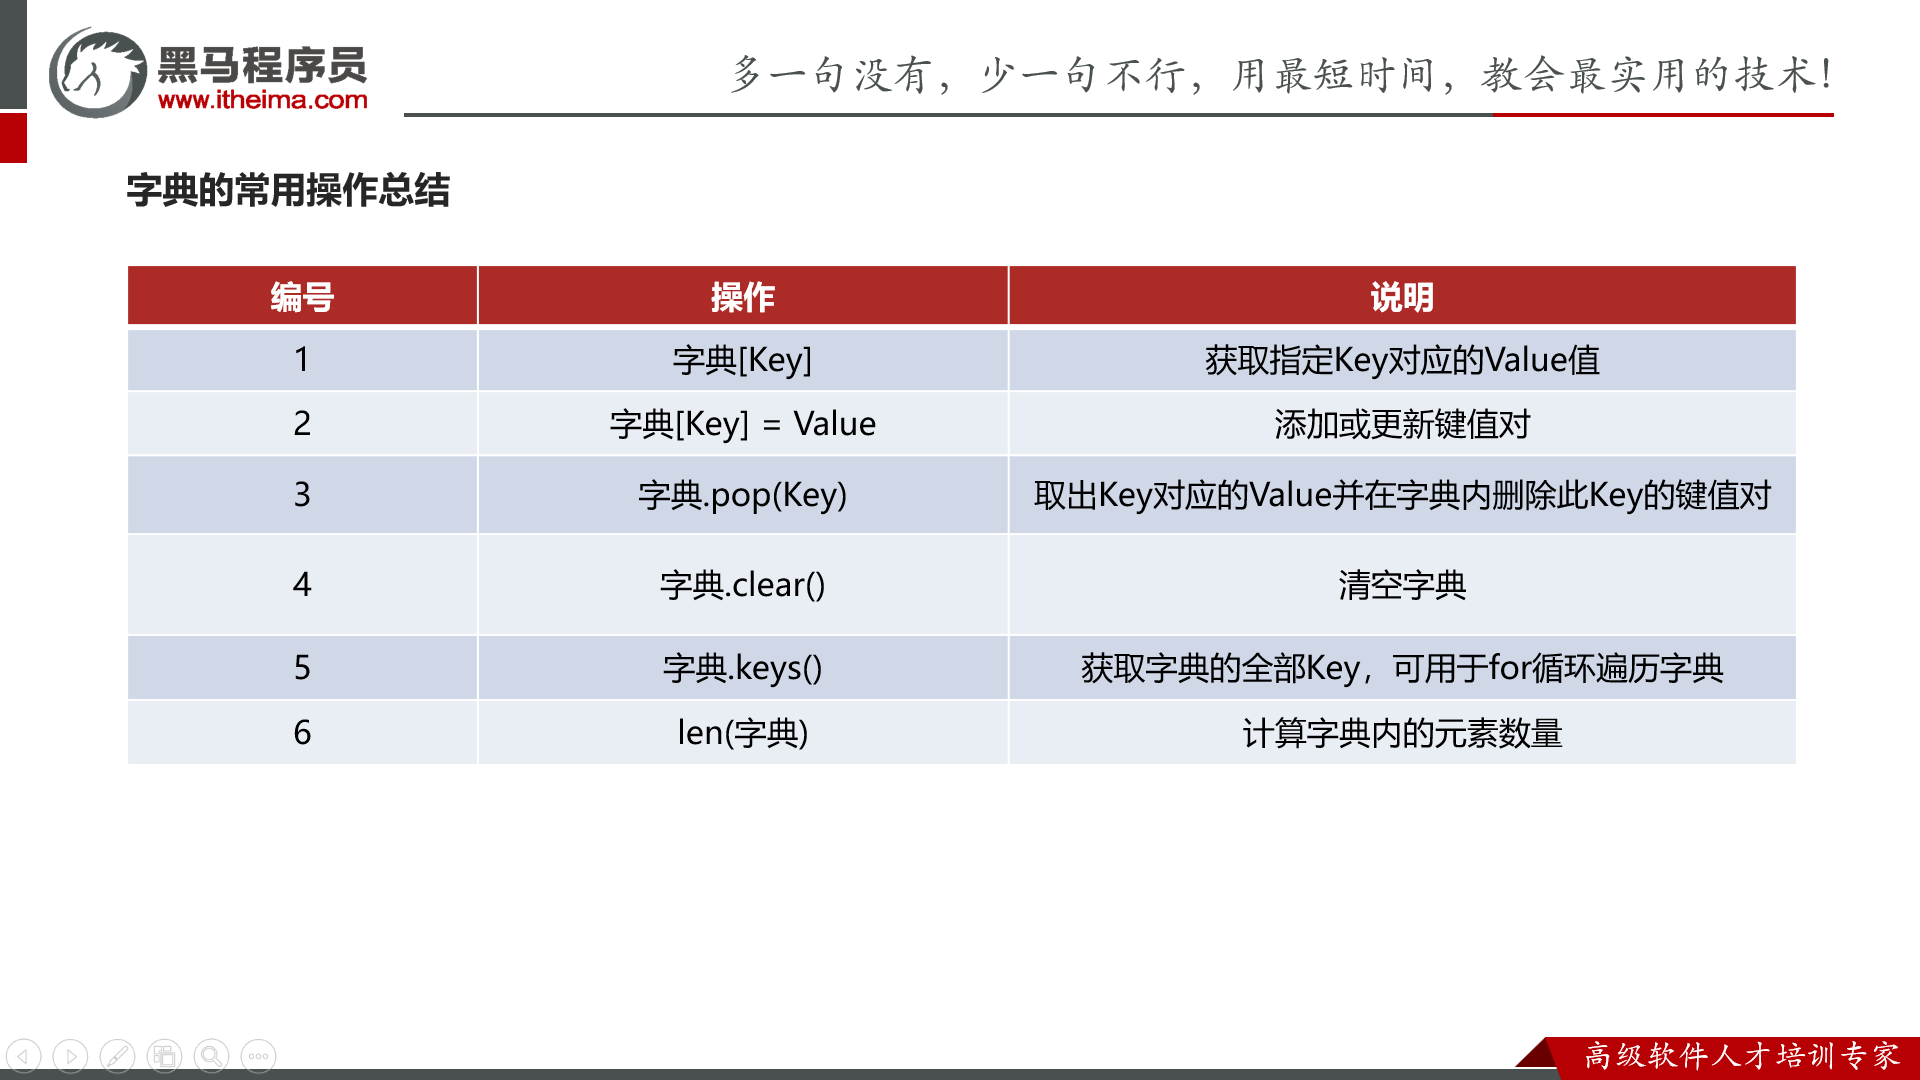
pop,clear
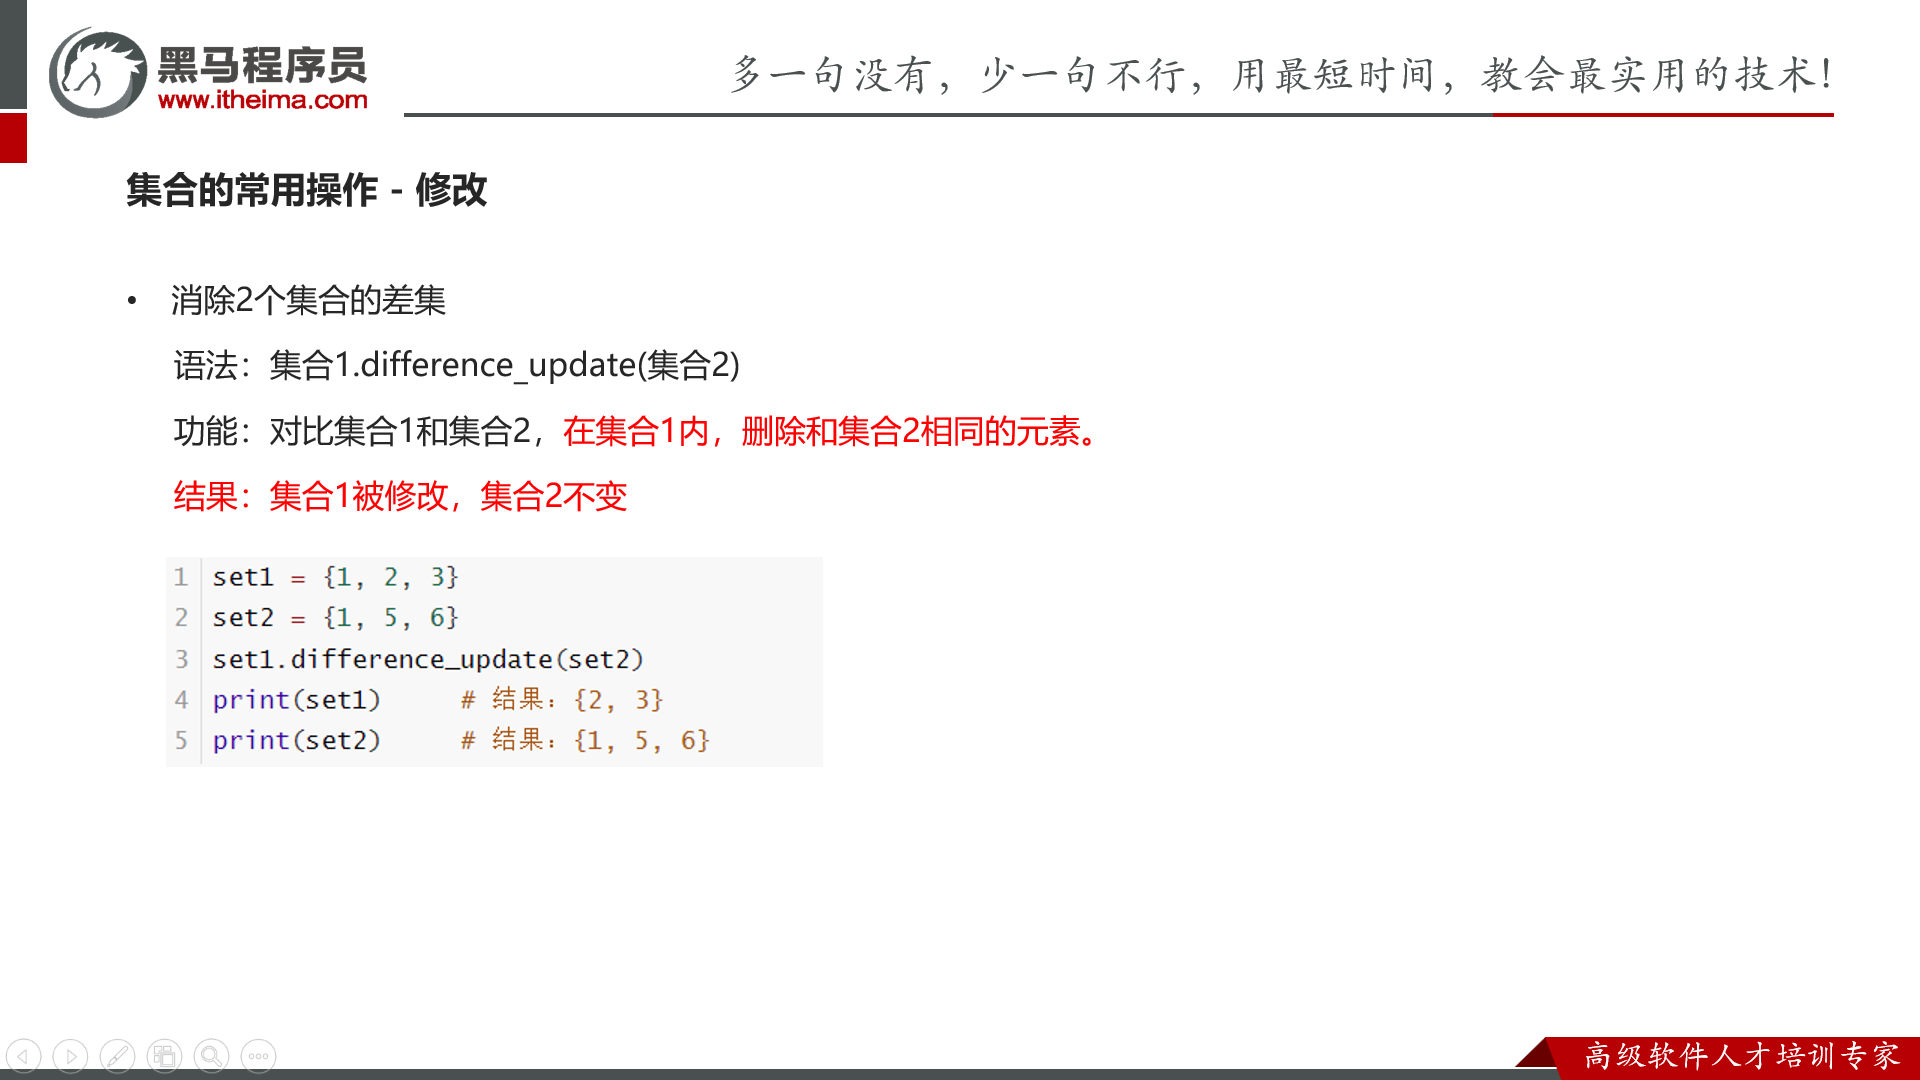
difference

difference_update
union

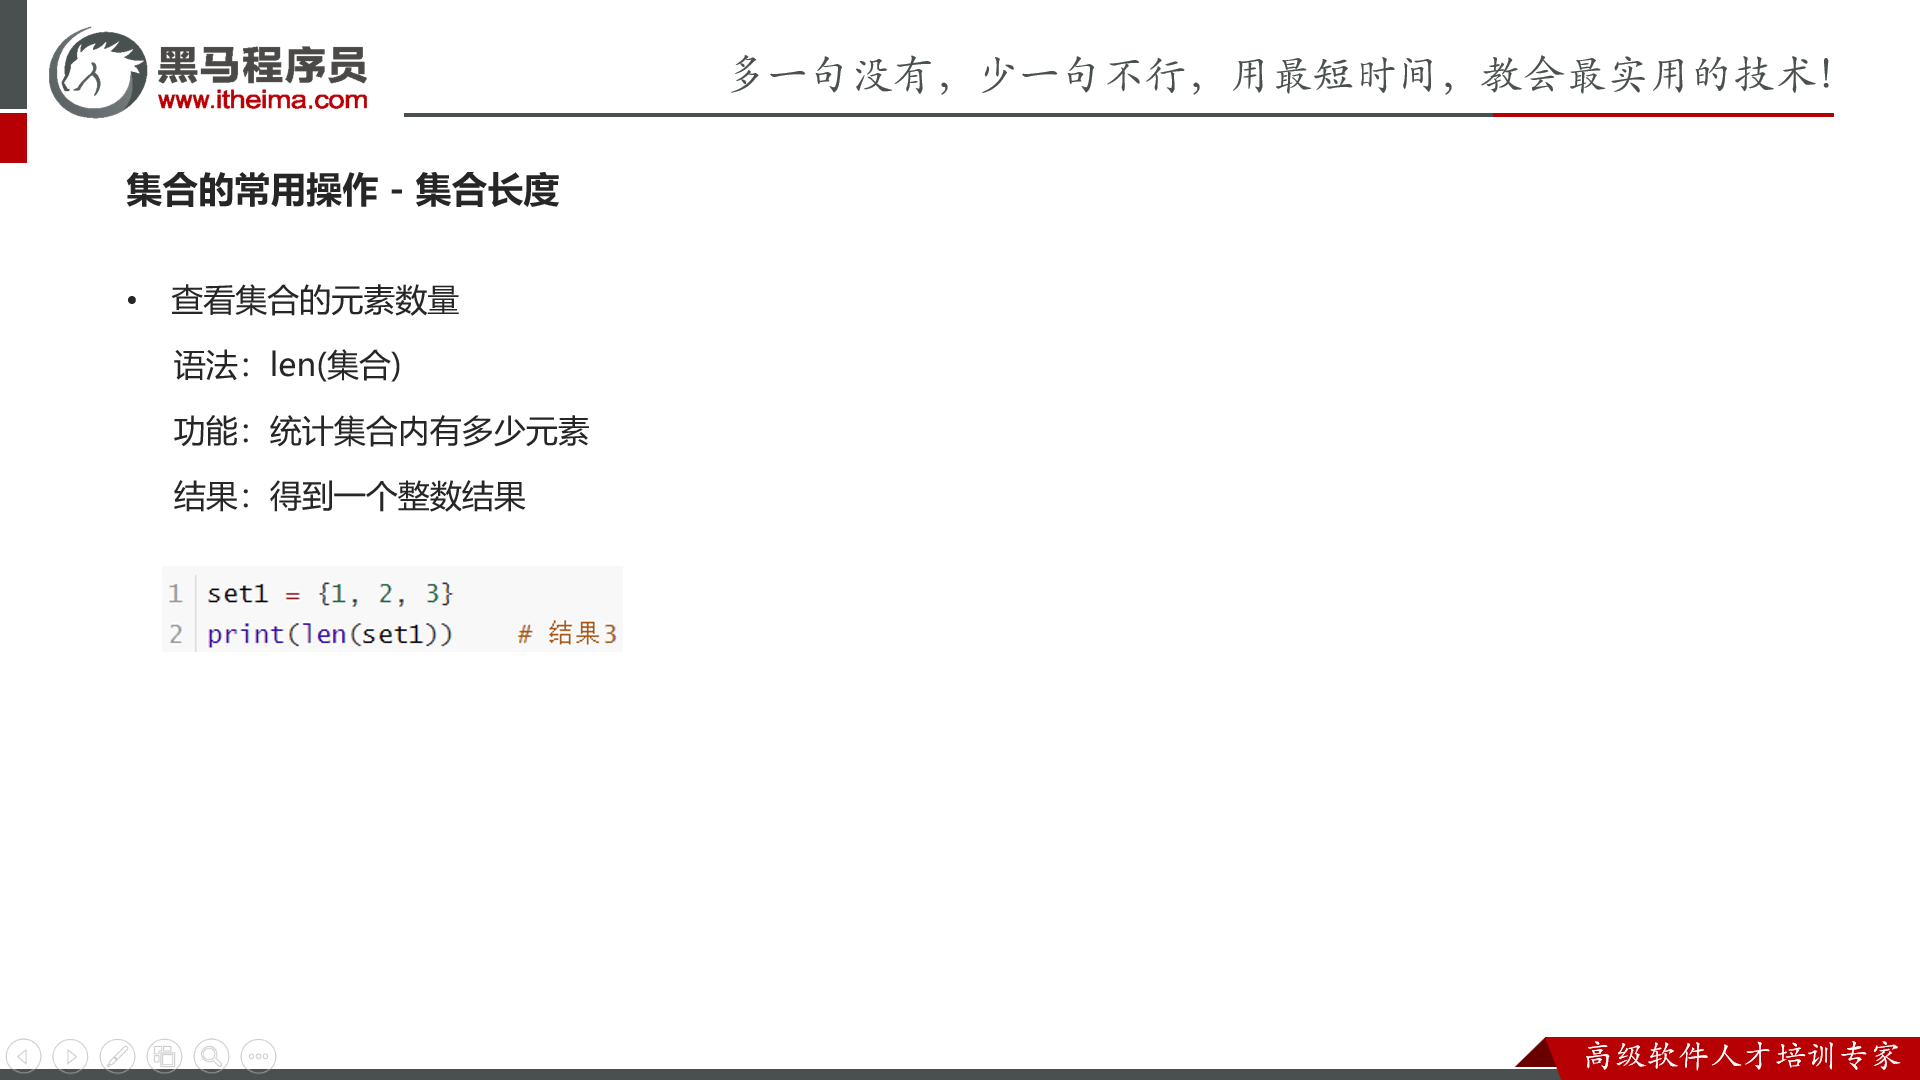
len(set)
总结
字典(其实就是 map),有 key 和 value
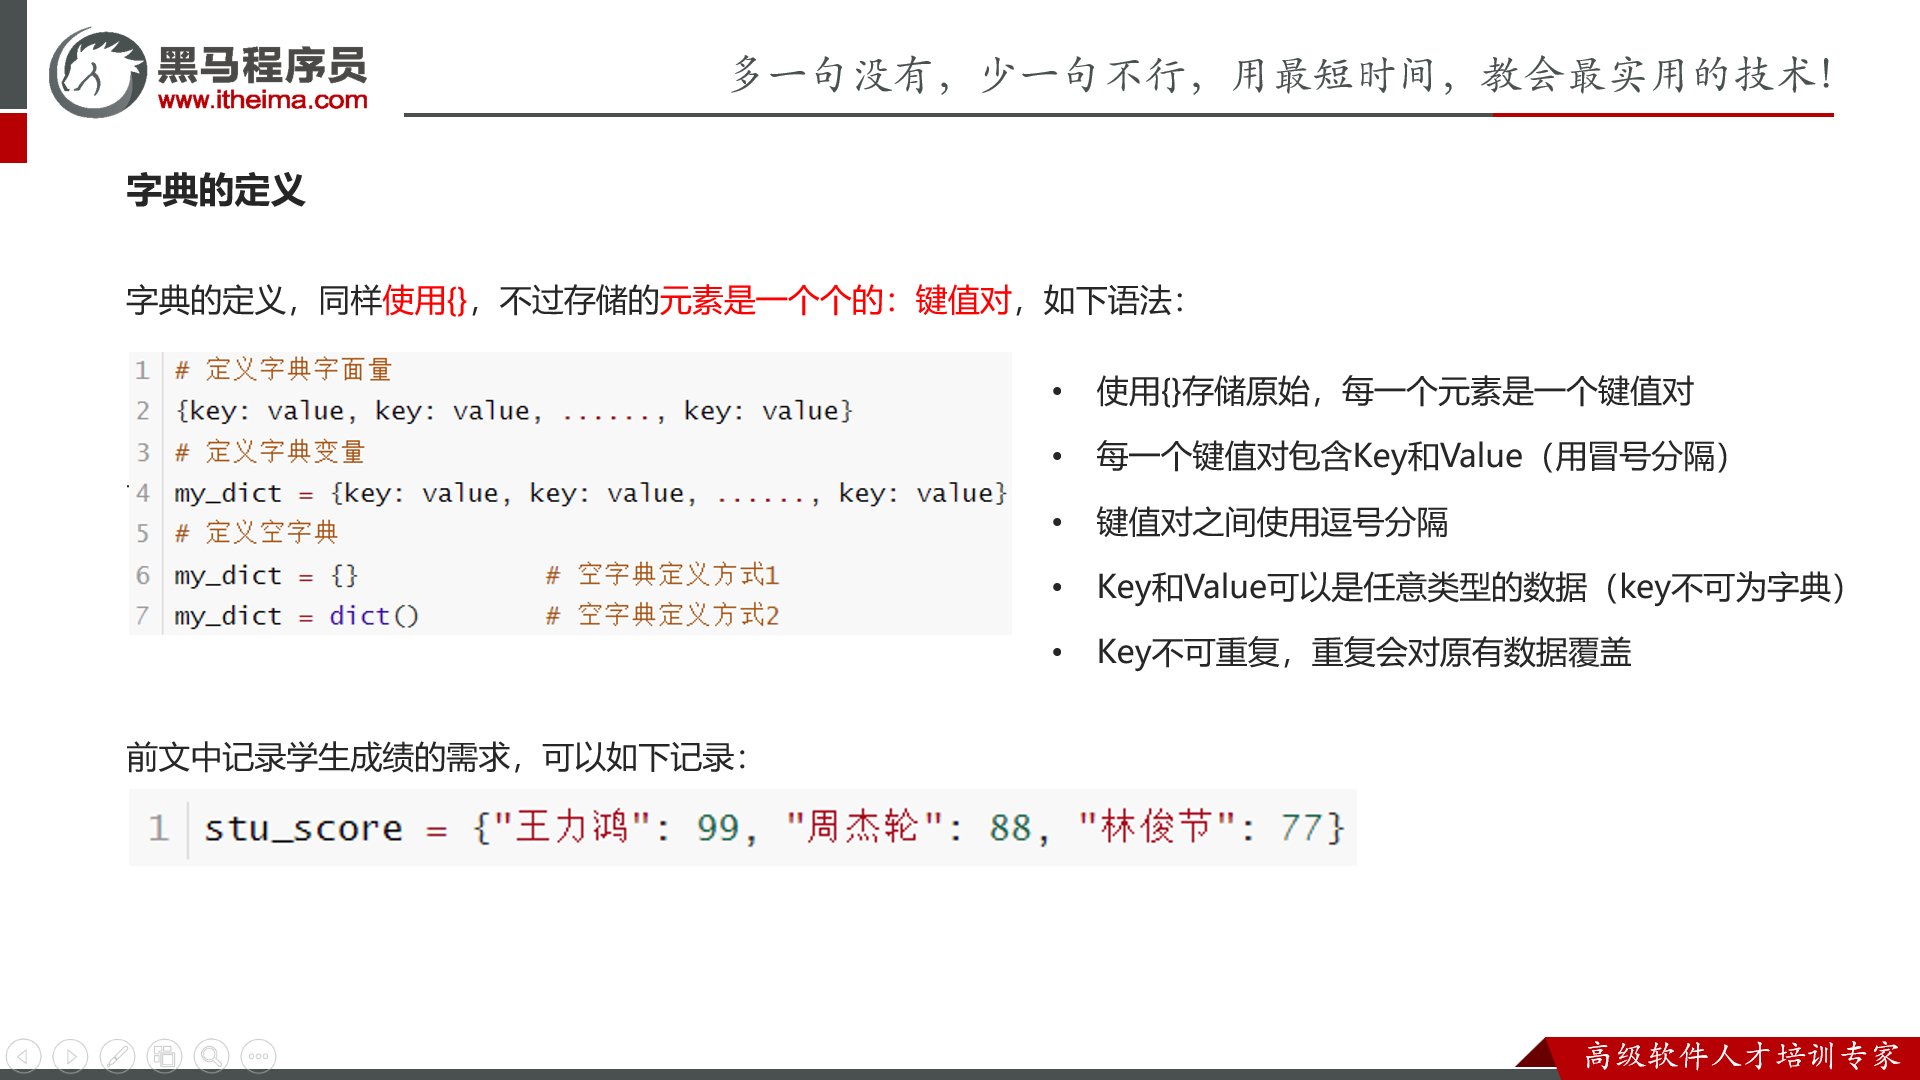

字典是可以嵌套的,也就是二维 map

pop&clear(clear 完你的 len 就是 0 了)
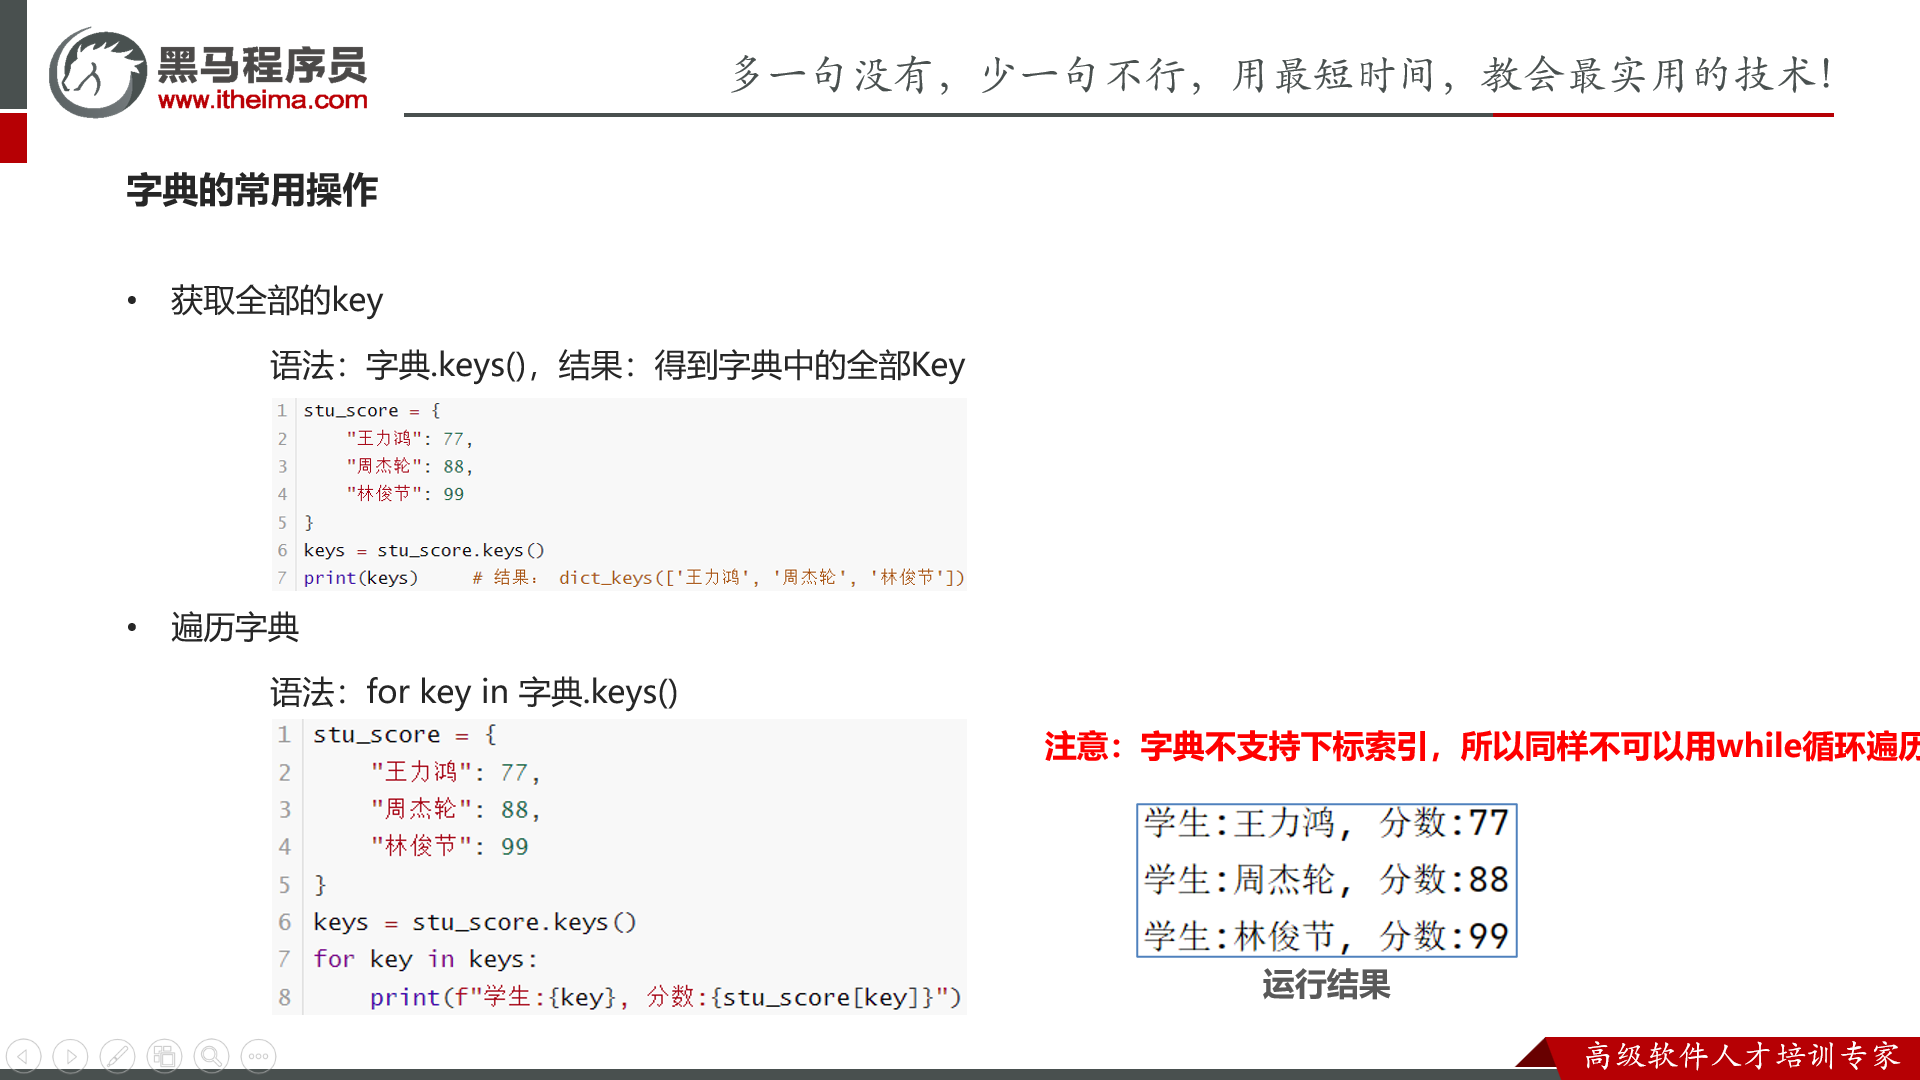
keys
总结
第七章:函数进阶
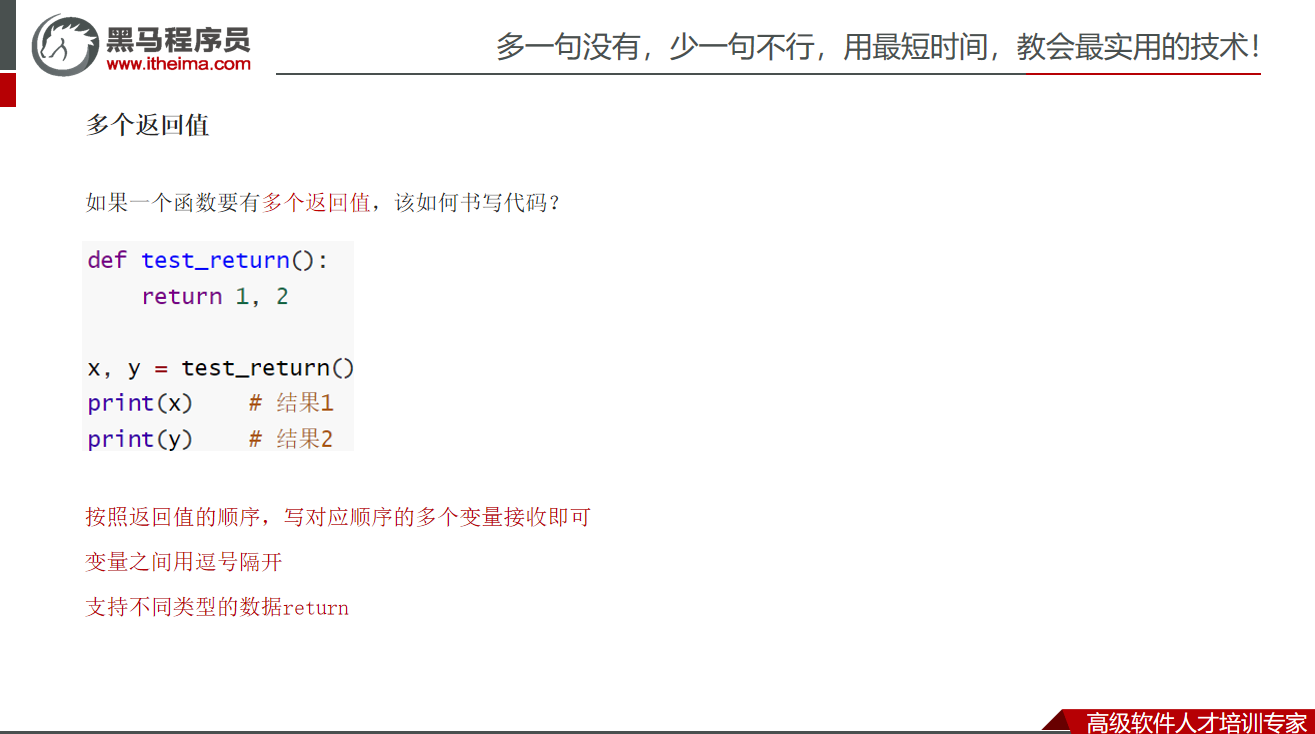
函数多返回值
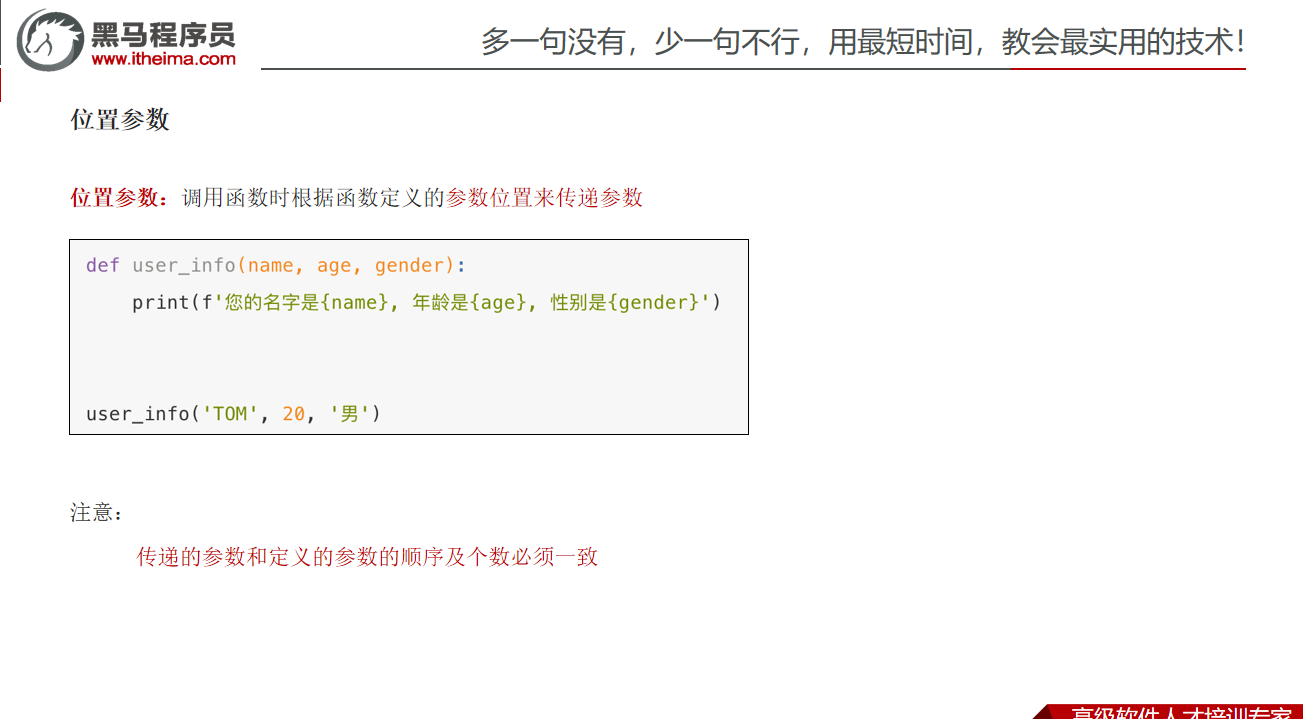
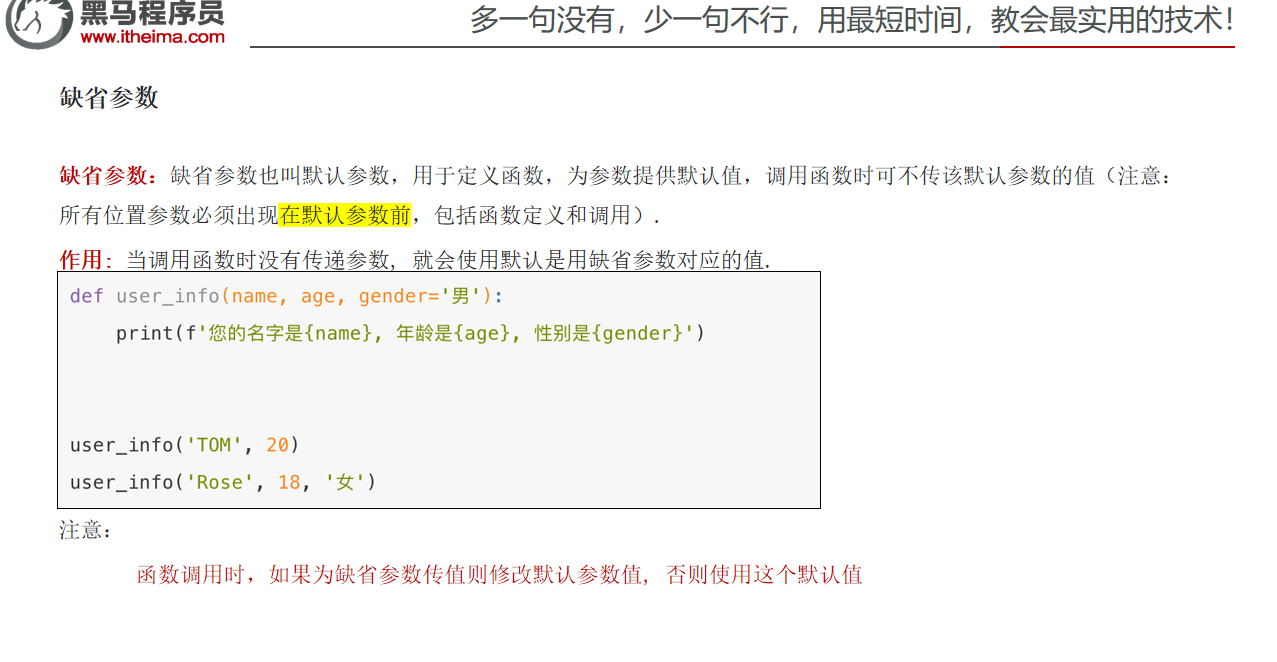
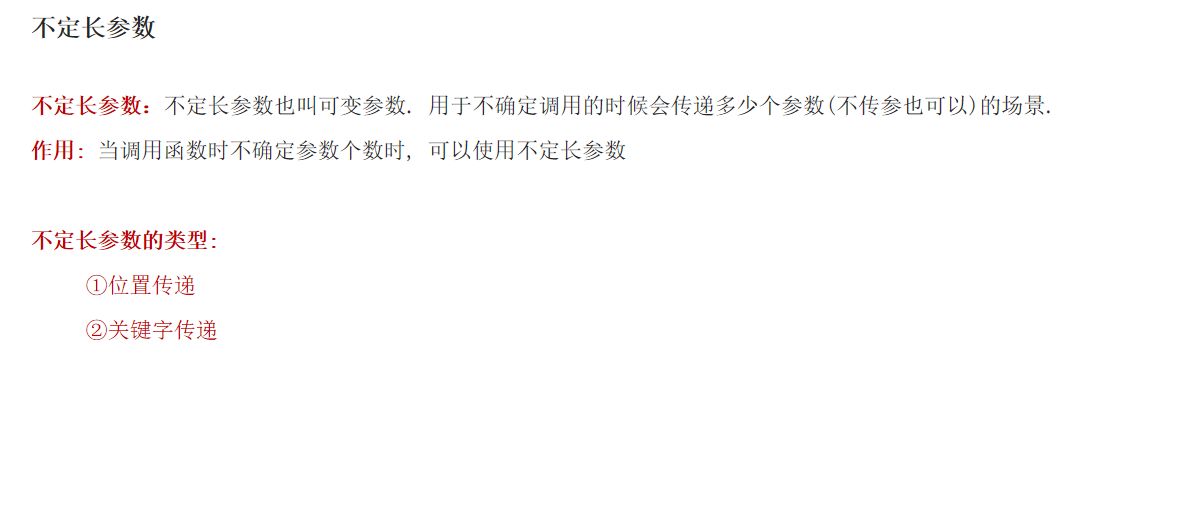
函数多种传参方式

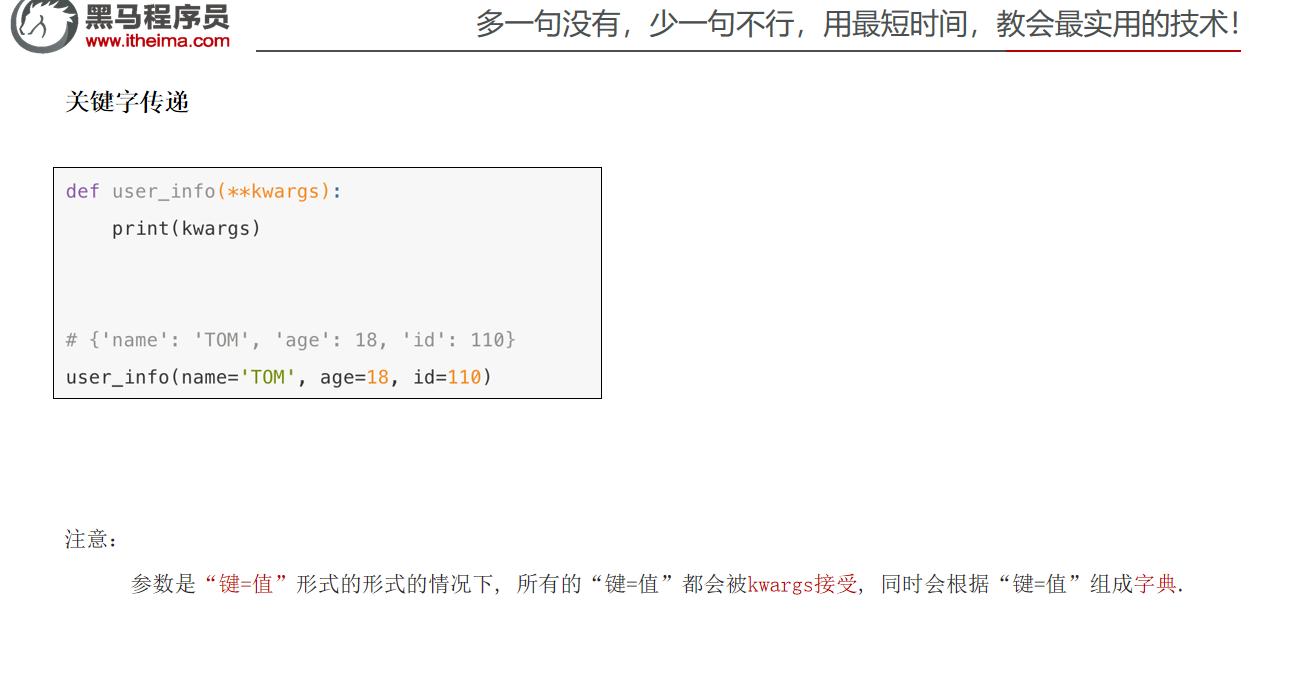
def sol(**mp):
    print(mp["hello"]) # 传进来的 key 是 str
sol(hello=12,tmp="jjj")
匿名函数

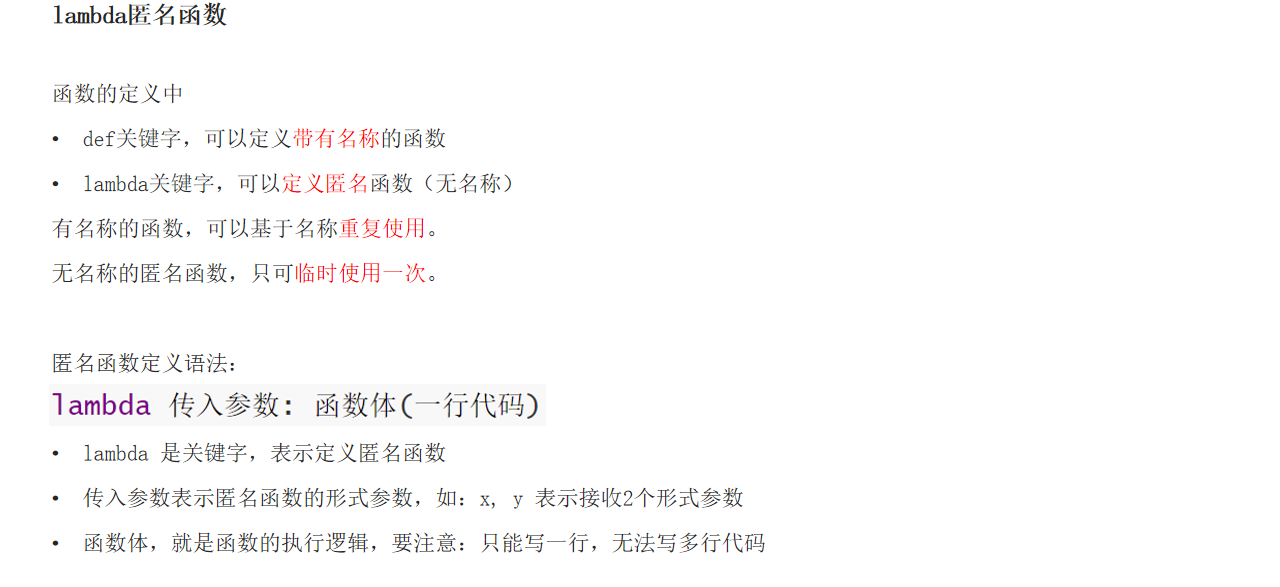
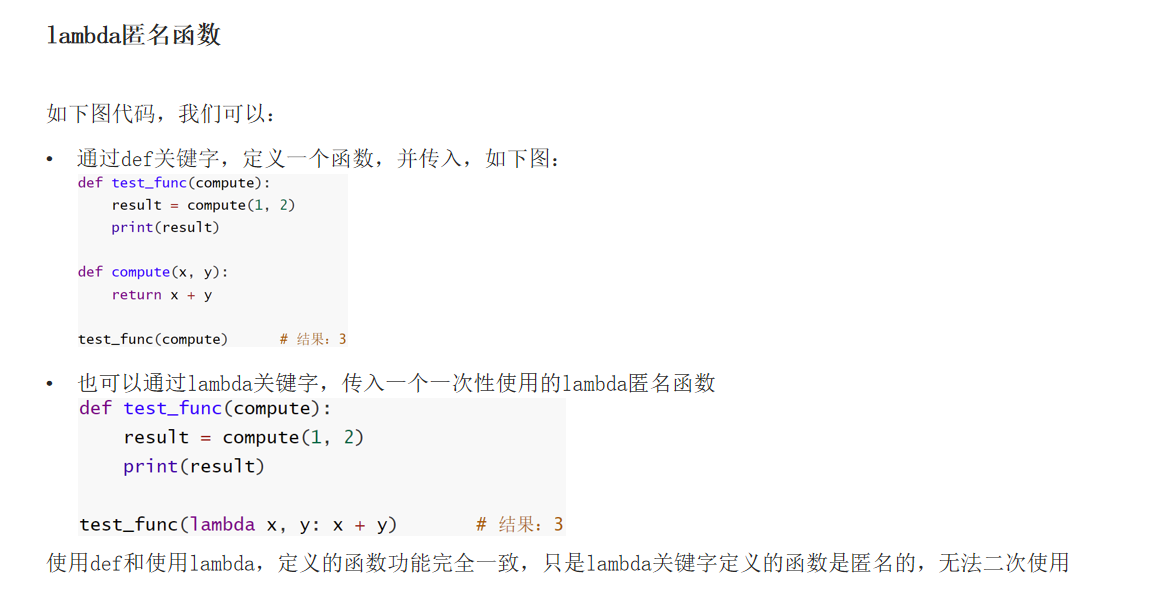
lambda 直接 return 了
def add(x, y):
    return x * y
def sol(add) :
    x=12
    y=3
    print(add(x,y))

sol(lambda x,y:x+y)
第八章:Python 文件操作
文件的读取
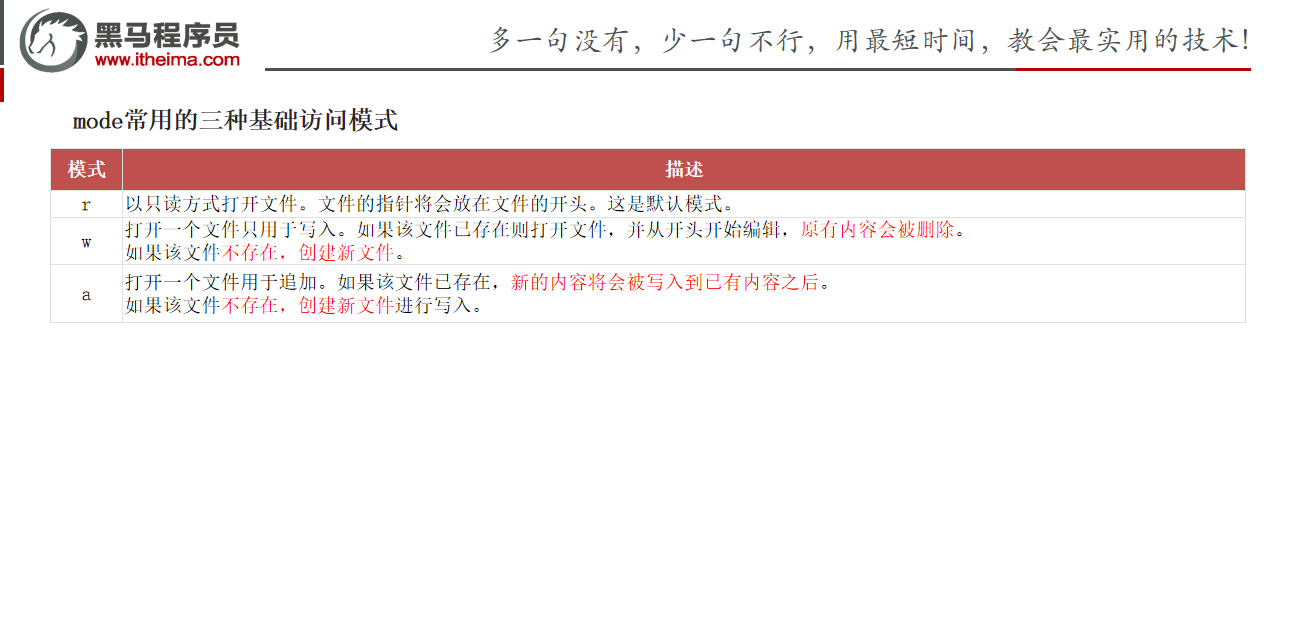
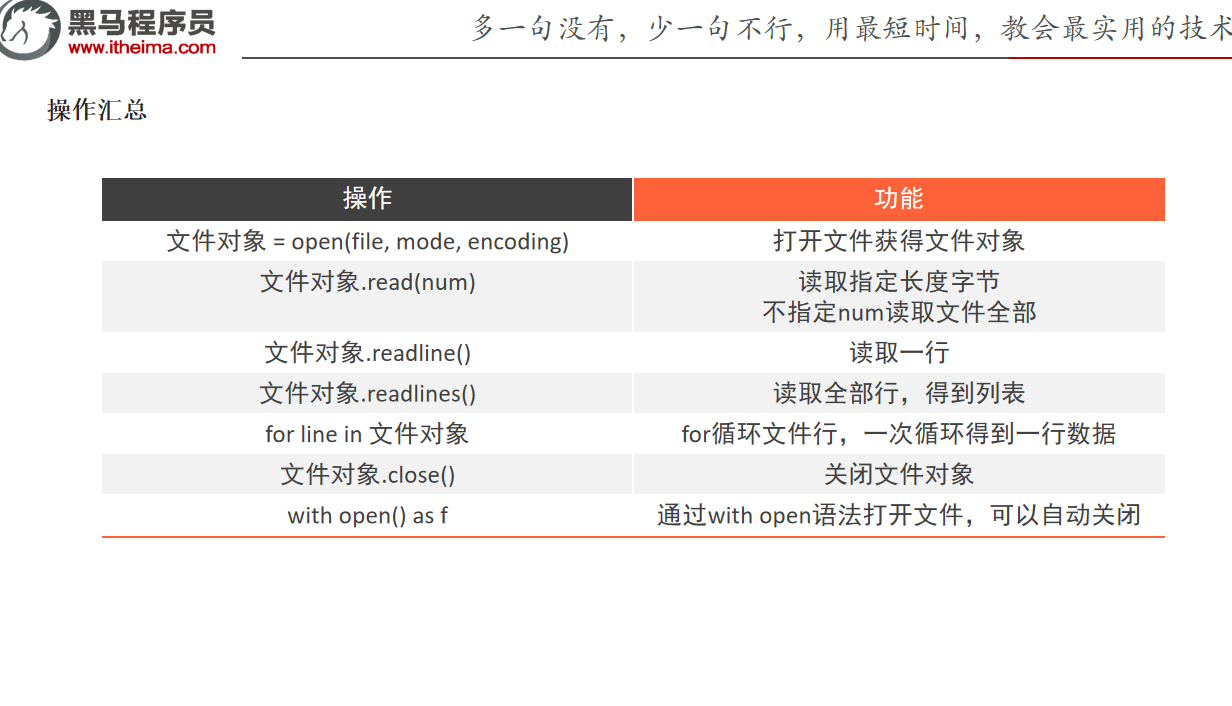
open
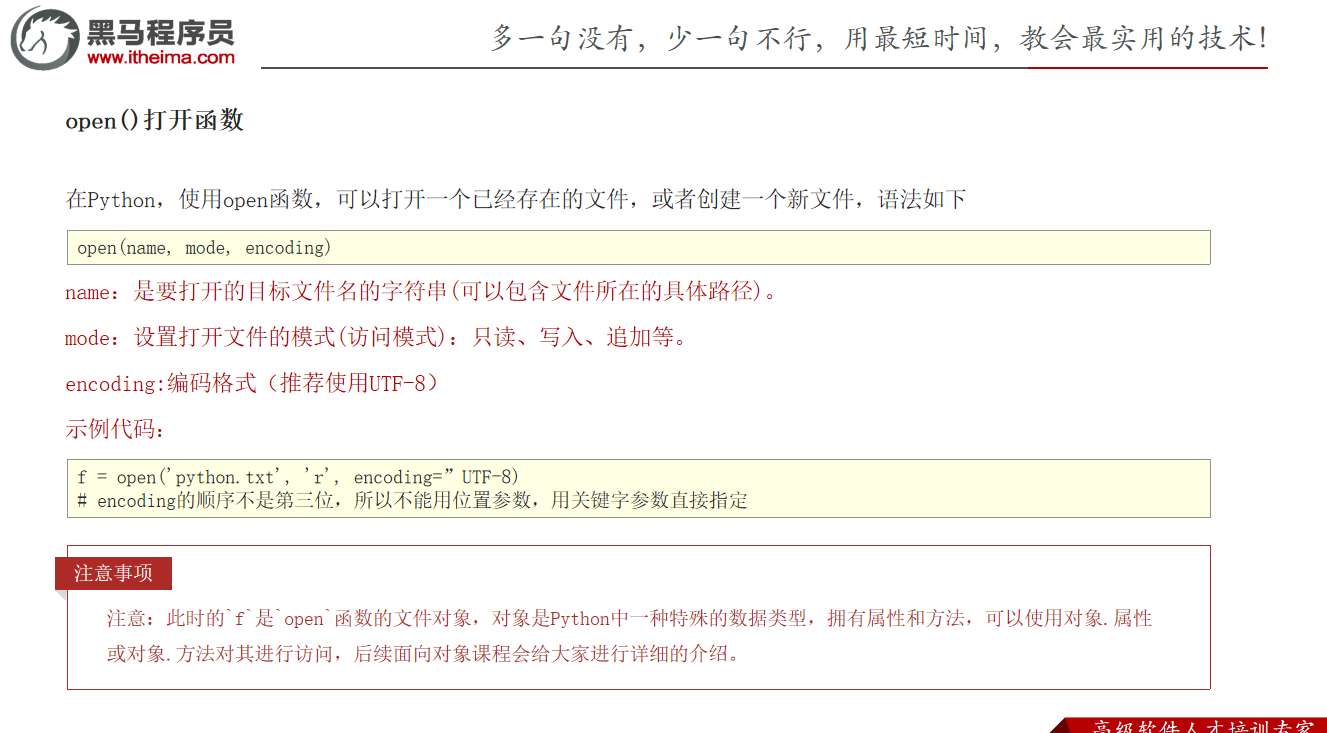
encoding 是要指定 UTF-8 的,因为 python 默认编码不是。
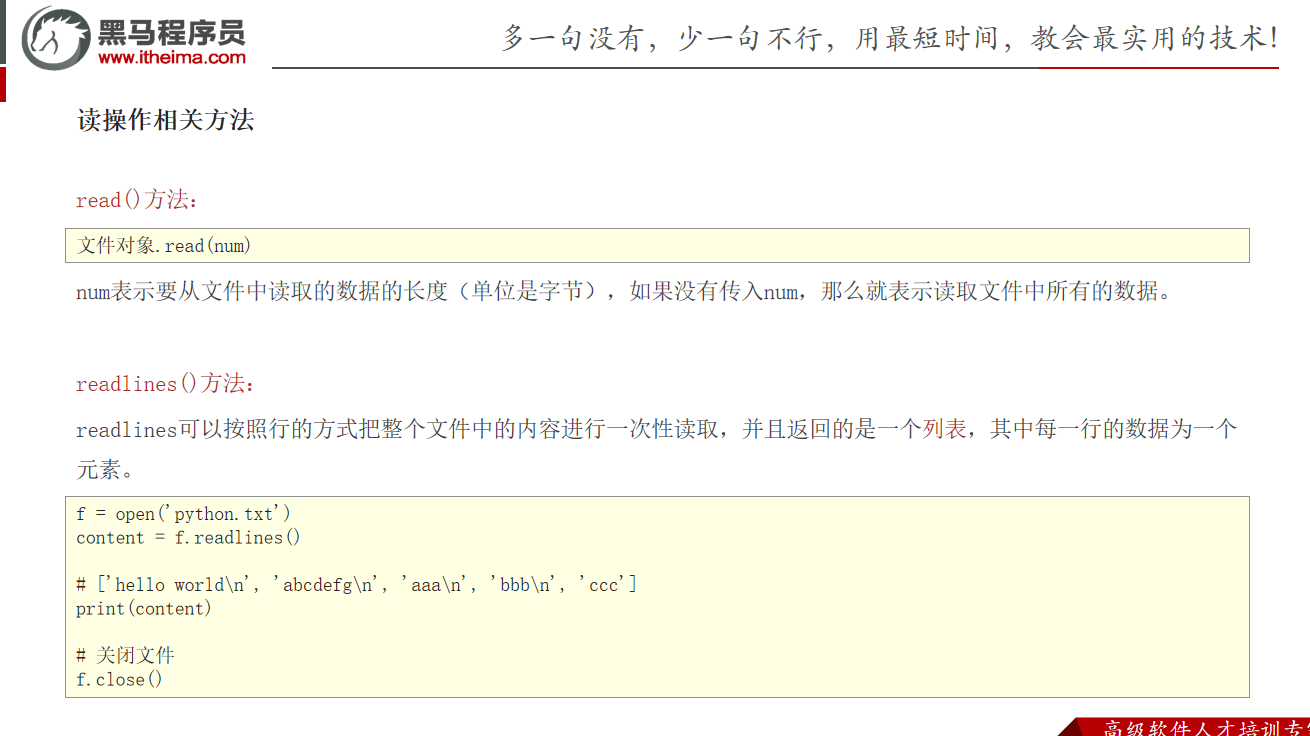
read&readlines
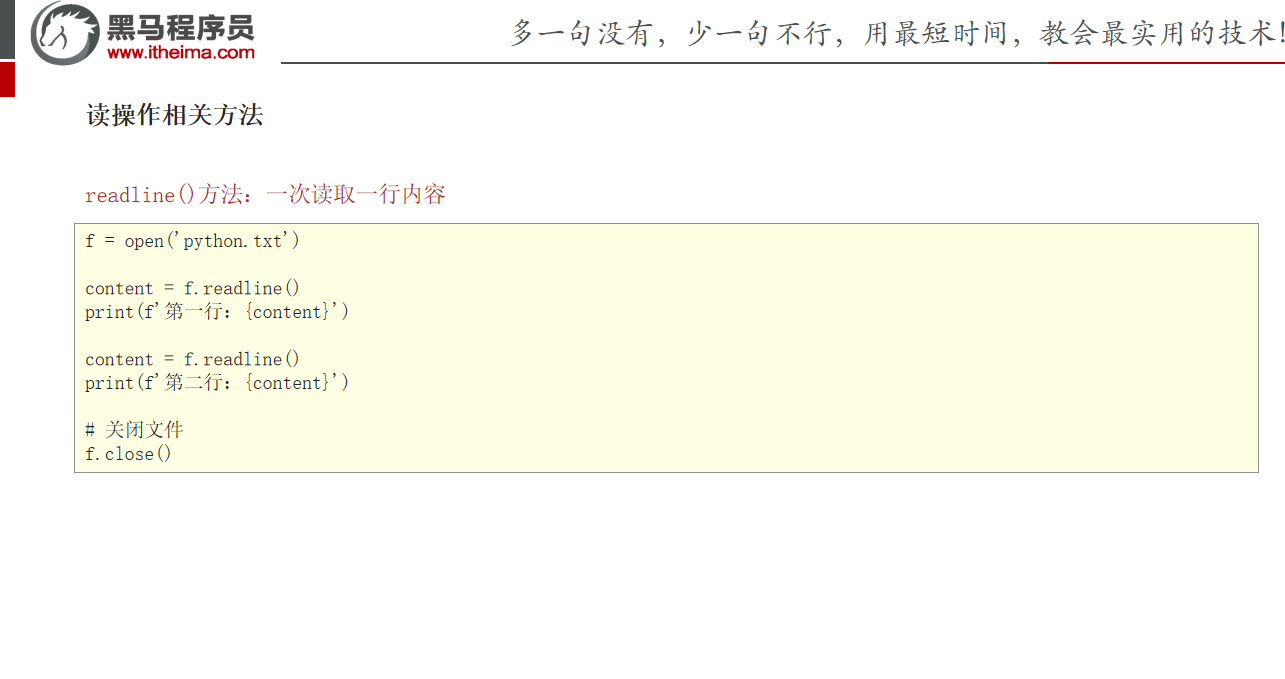
readline
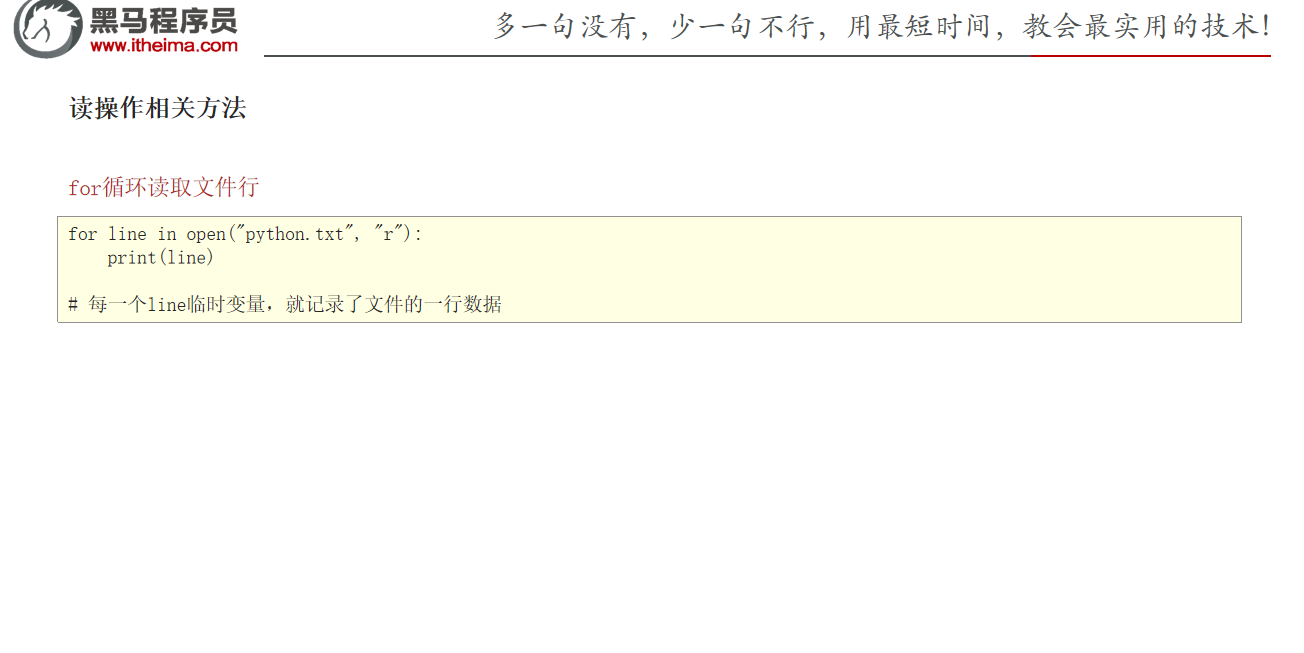
for 循环依次读取每一行
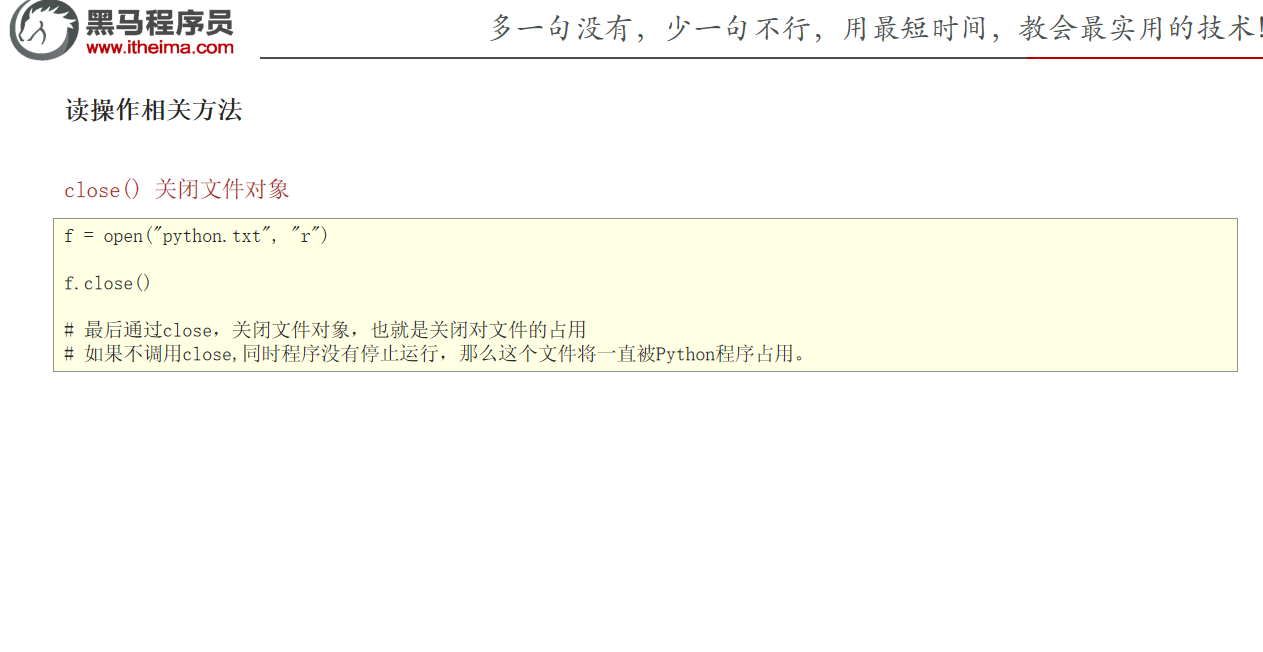
close
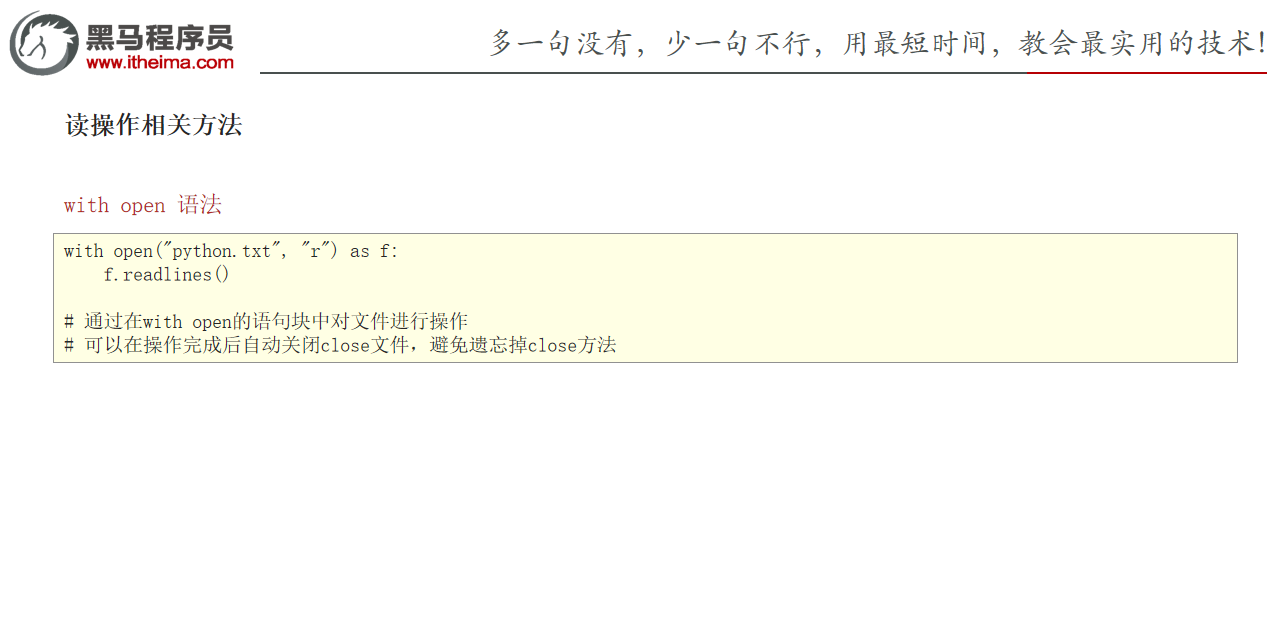
with open(自动 close)
汇总
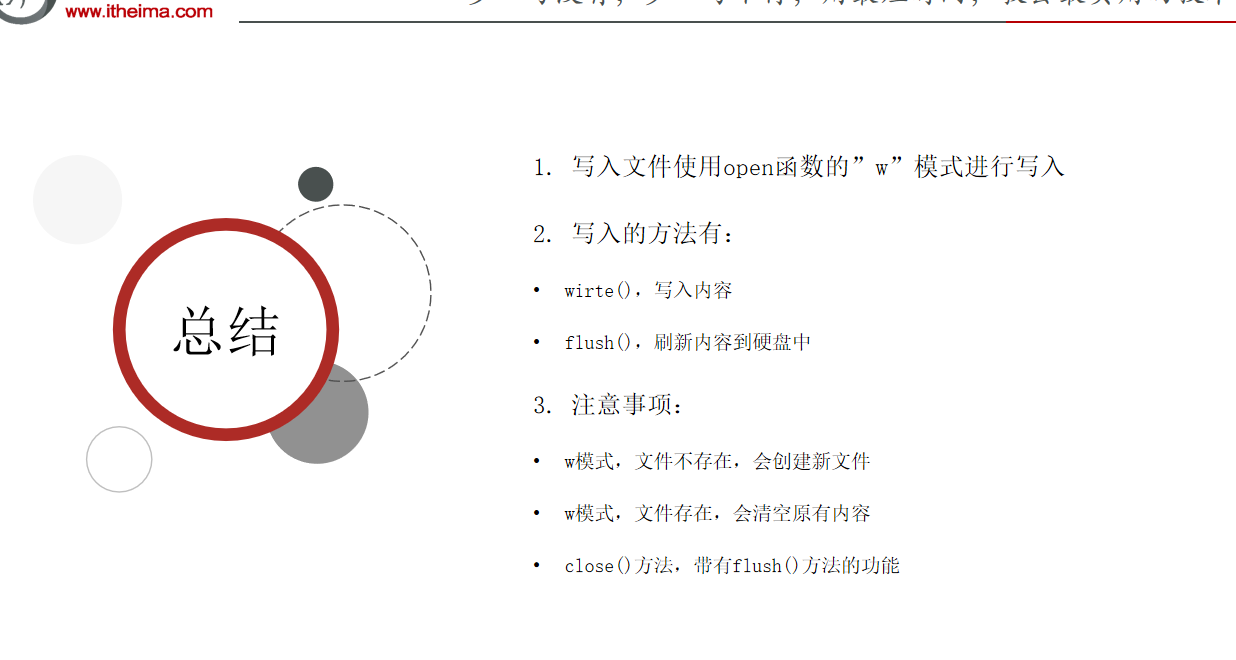
文件的写入
核心
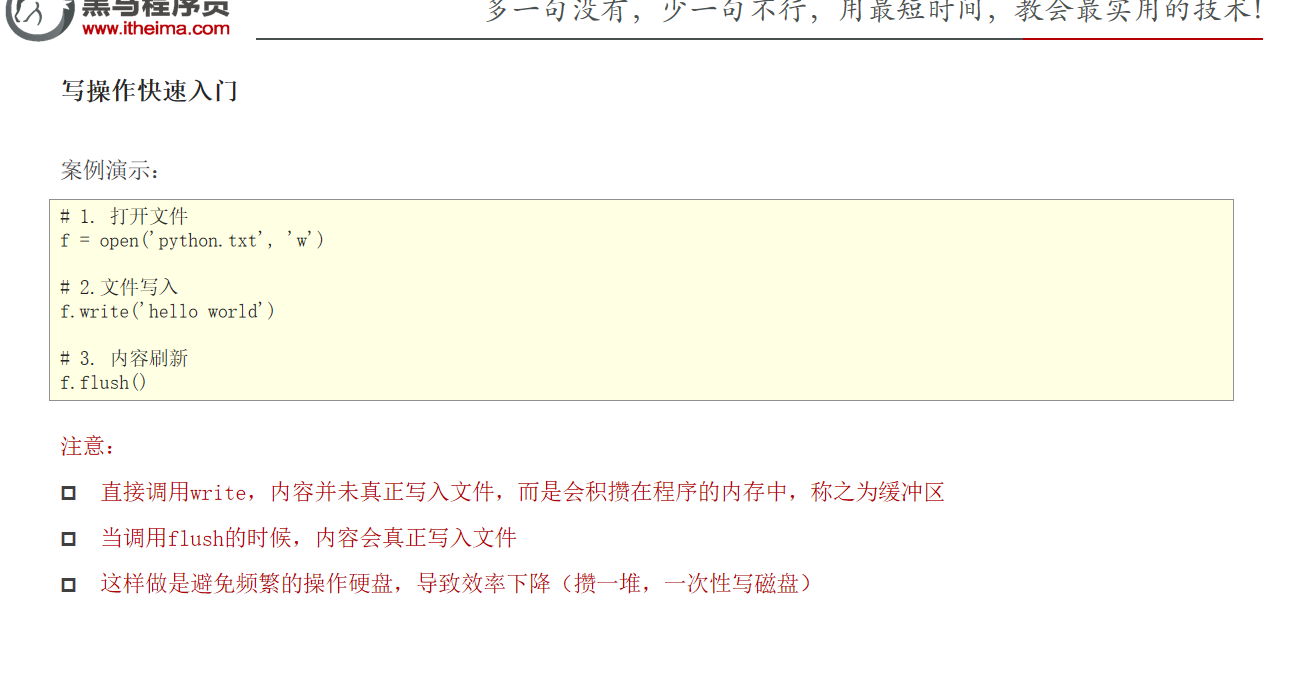
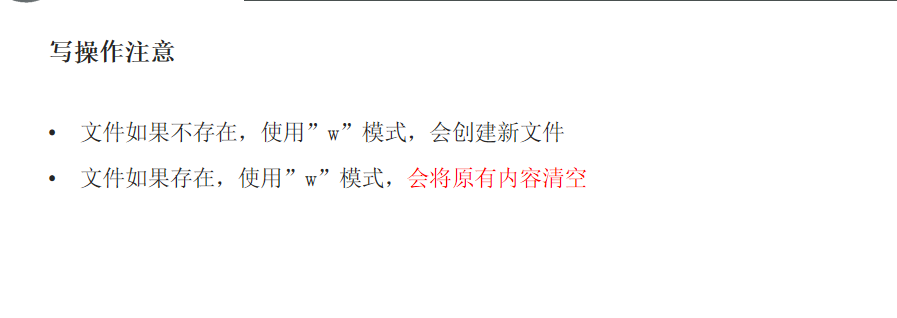
注意
总结
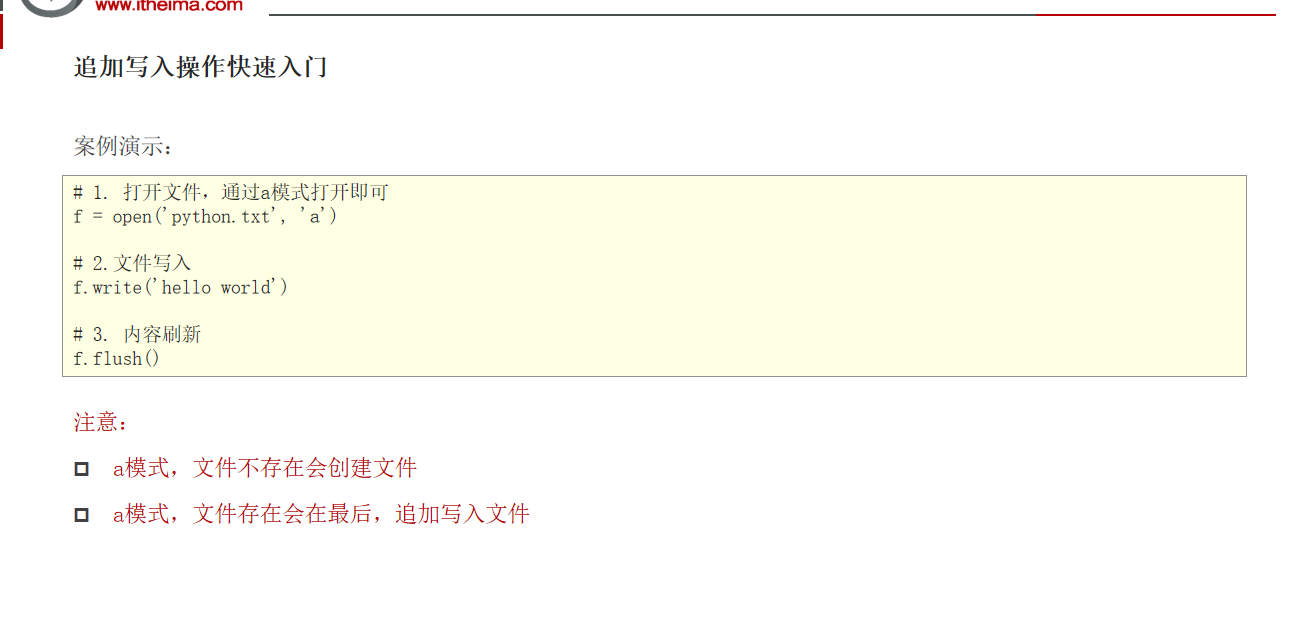
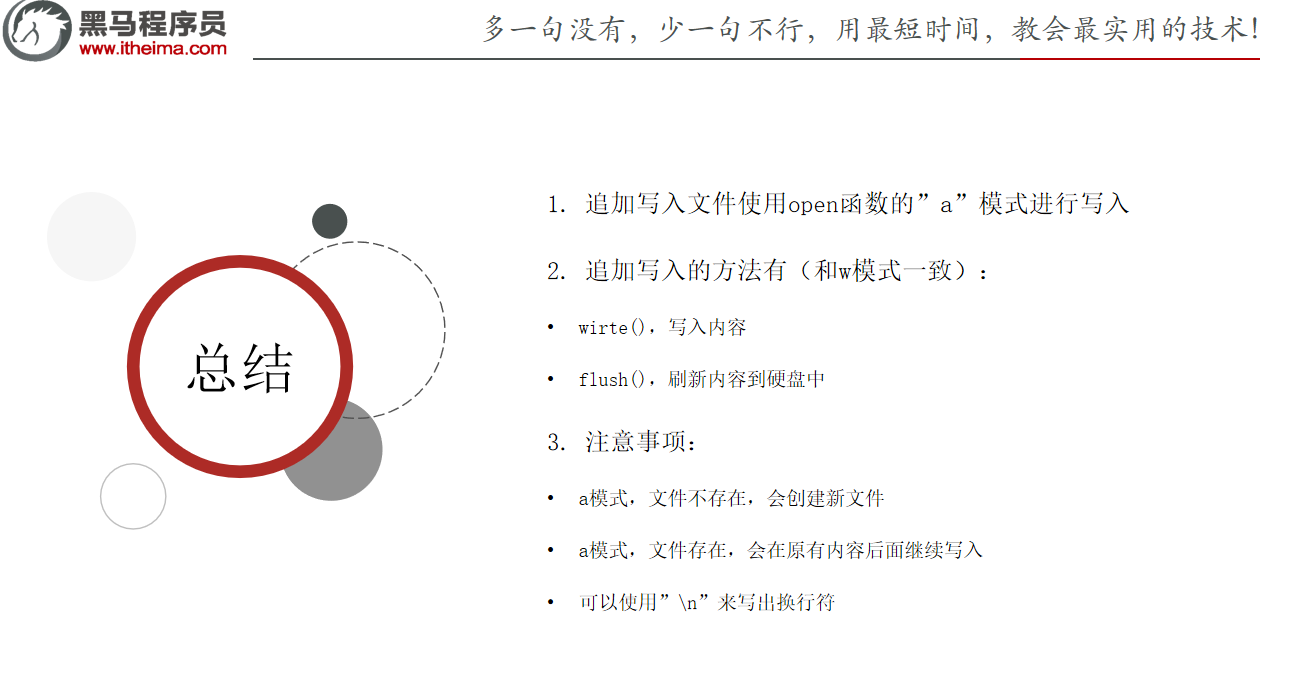
文件的追加(append)
第九章:Python 异常模块与包
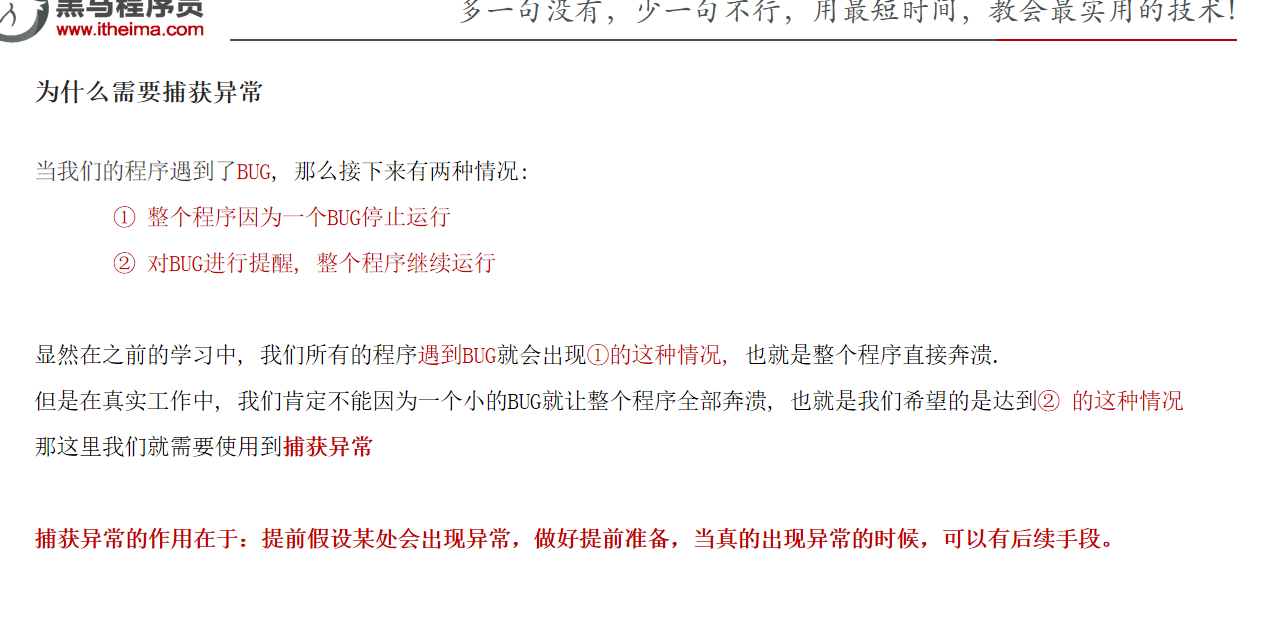
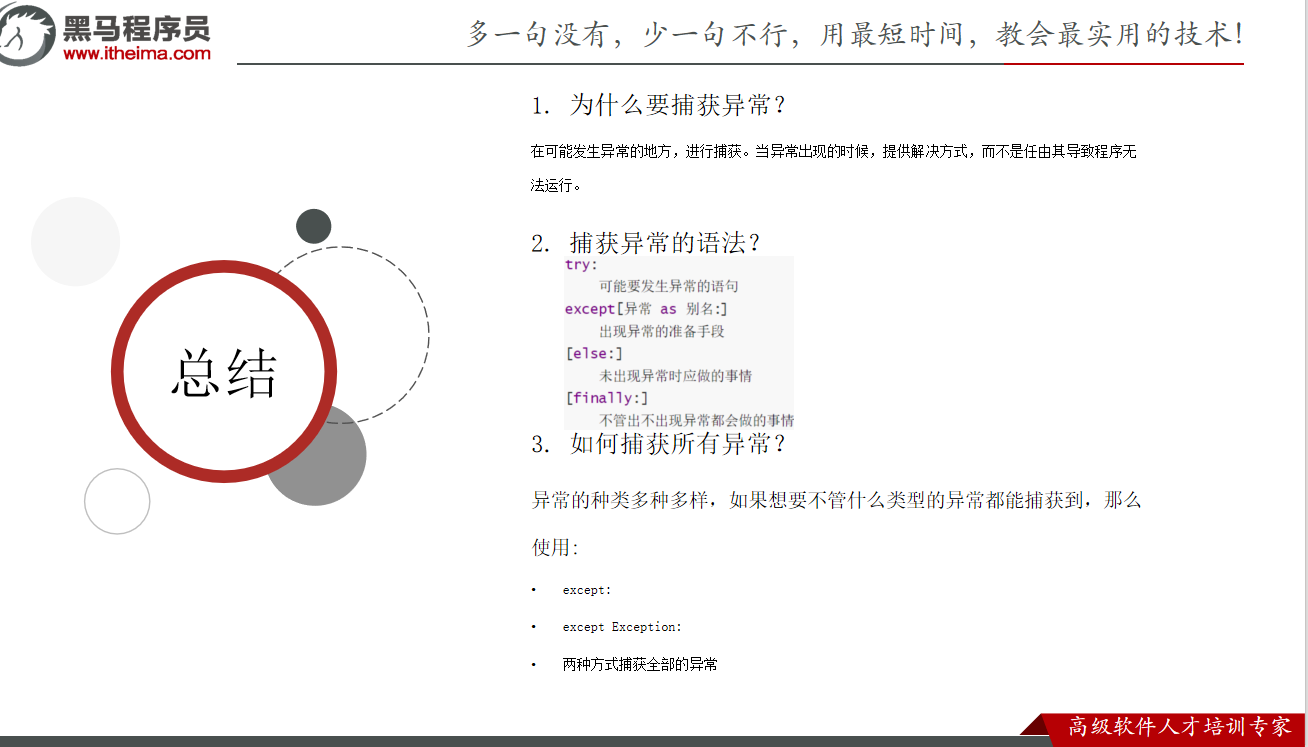
捕获异常
why?
常规异常

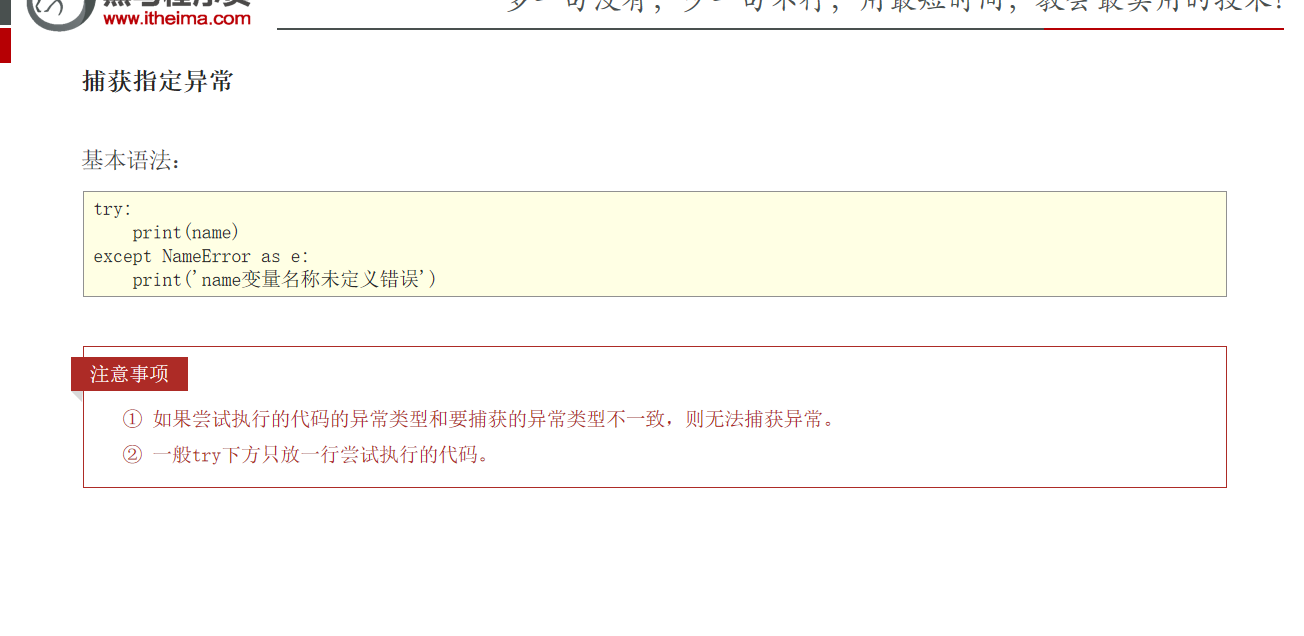
指定异常
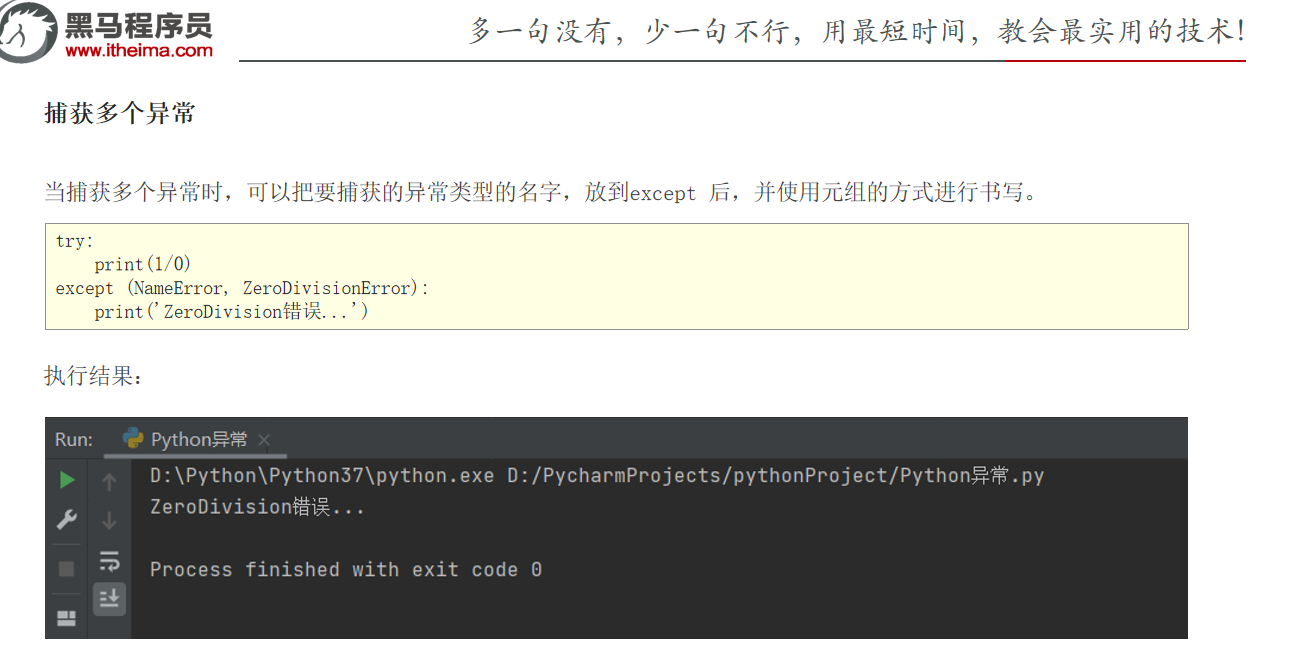
多个异常
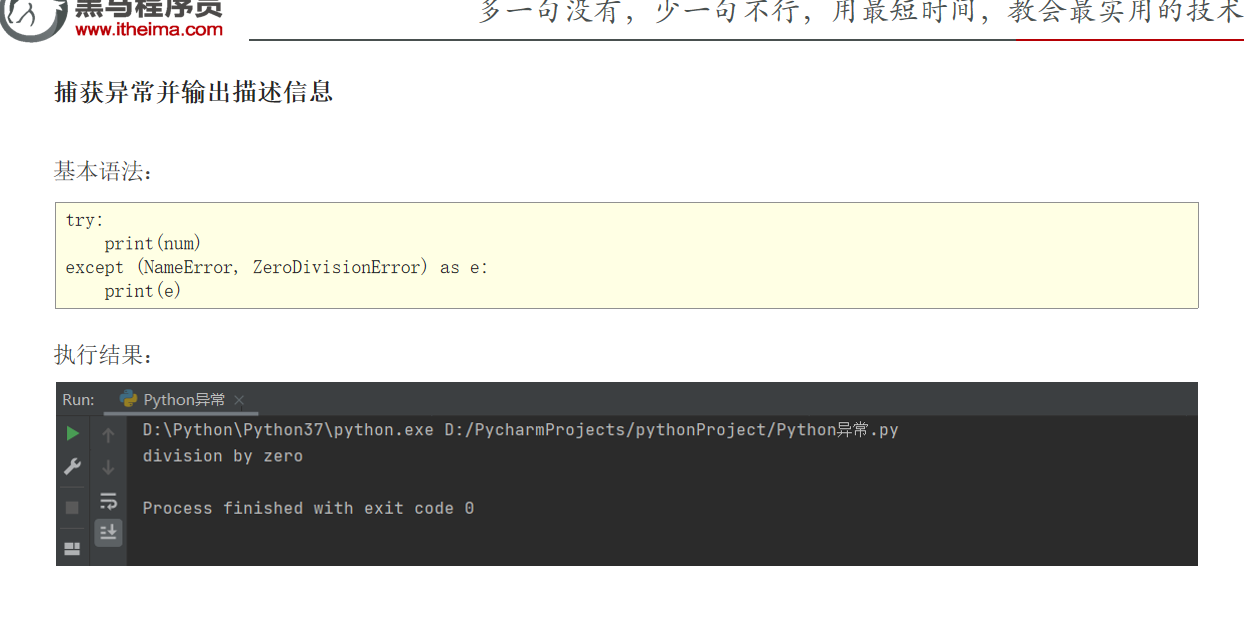
输出异常是啥
捕获所有异常

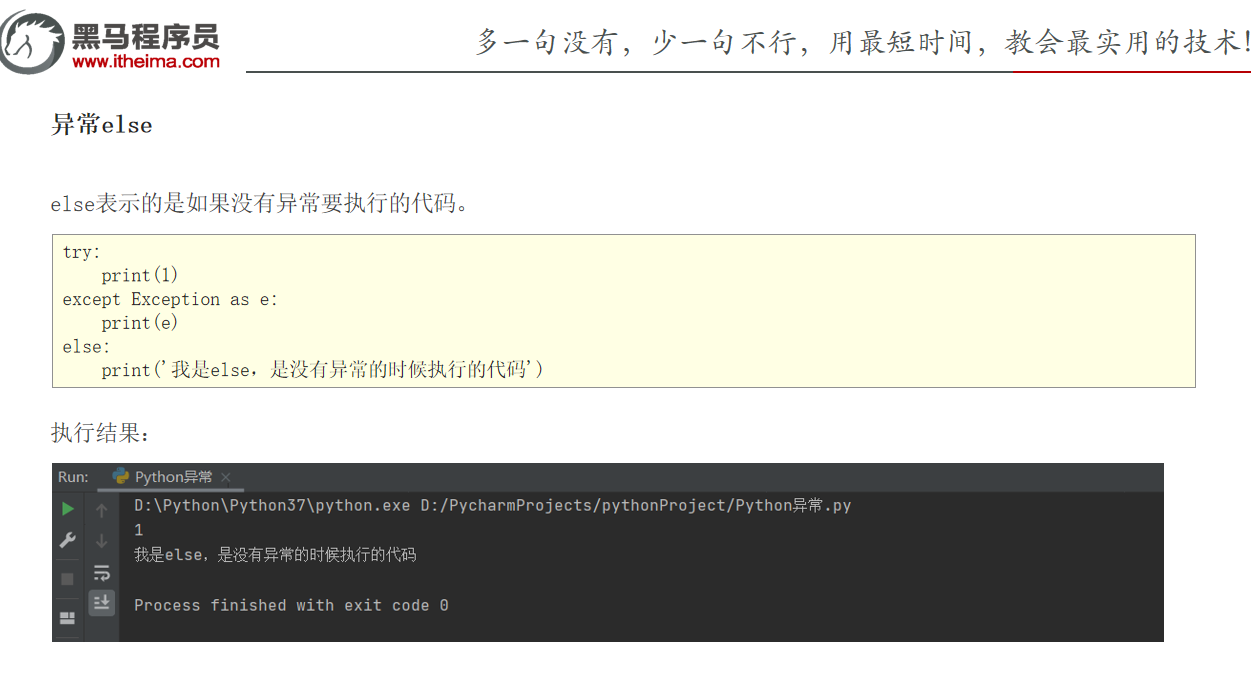
异常else
异常

总结
异常的传递性
异常一层一层向上传递,直到被捕获或者直接中止程序。

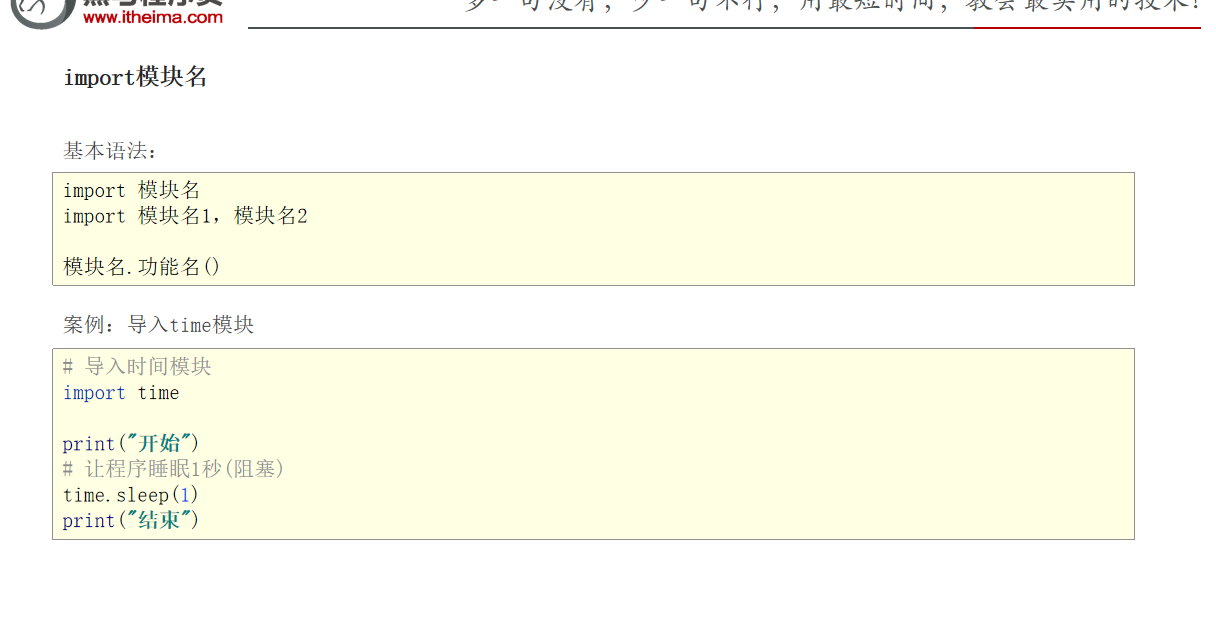
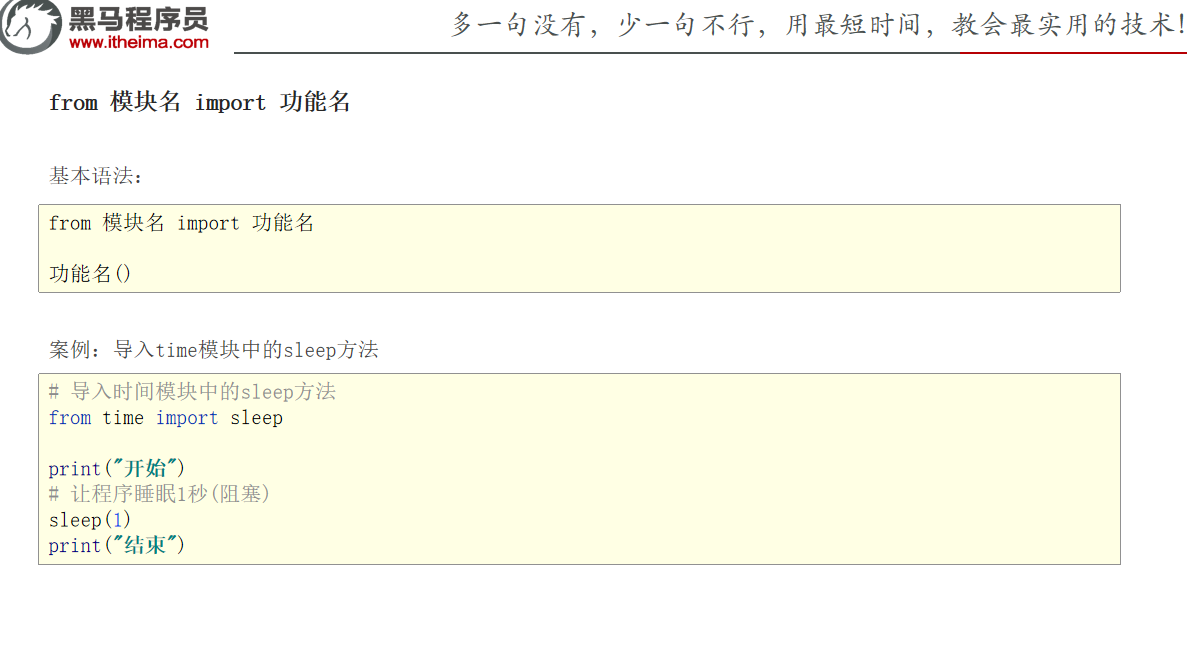
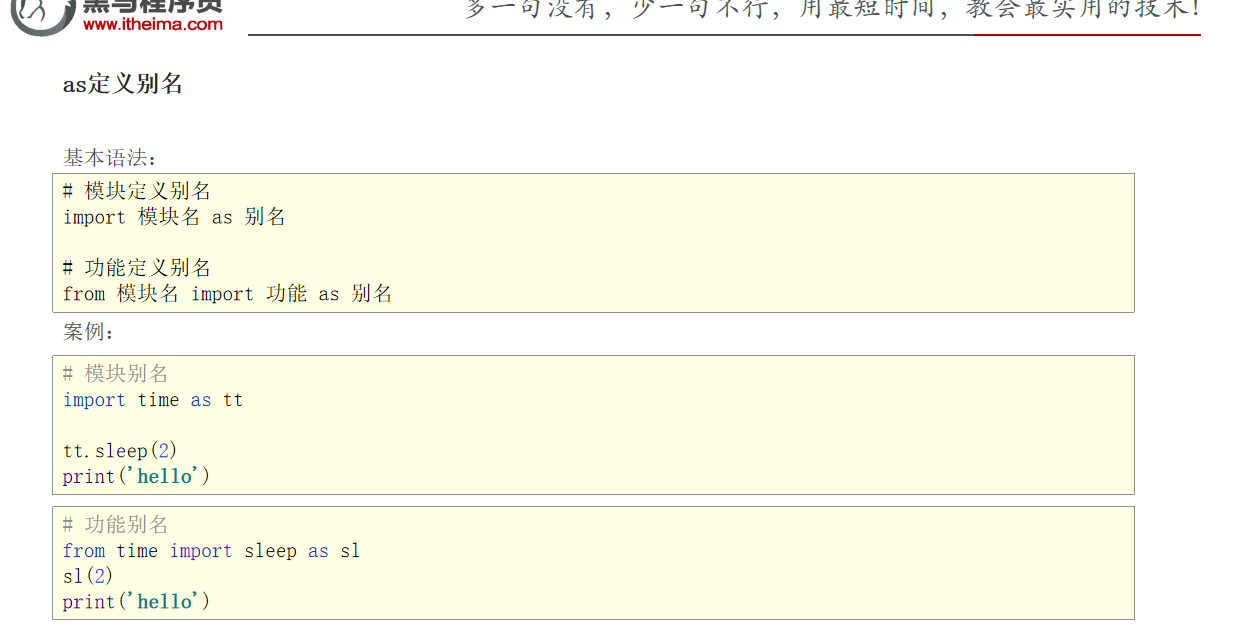
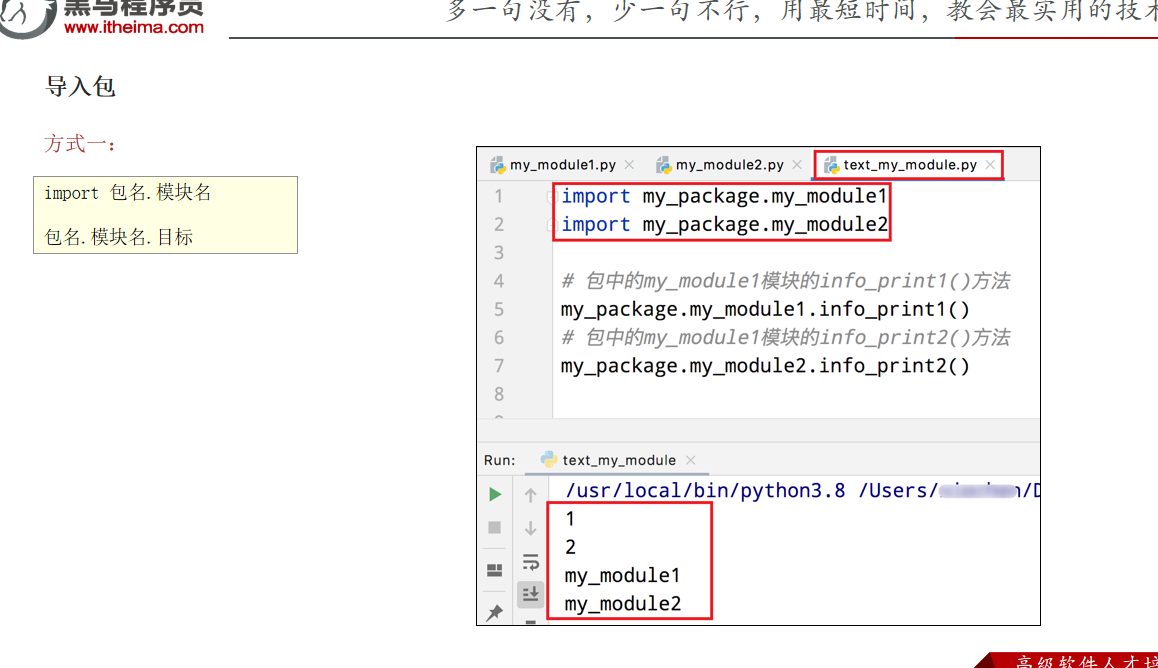
模块的导入
import 进口,意味着你要导入啥
all


总结

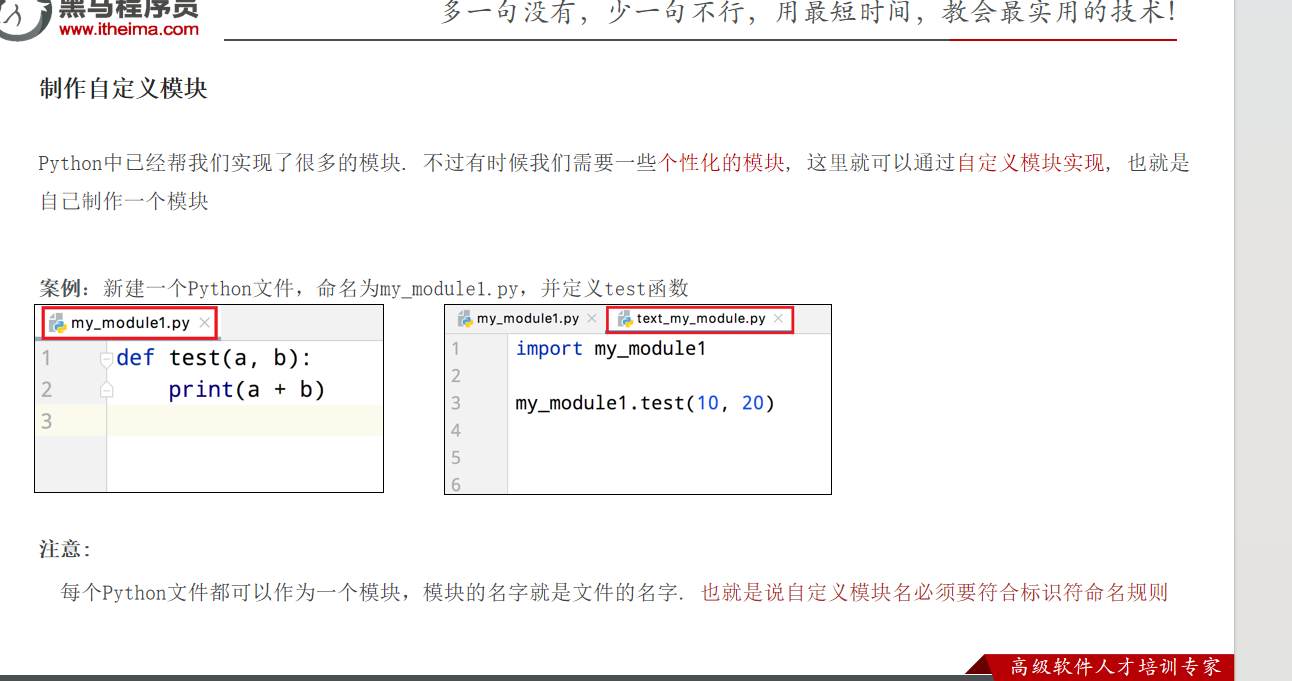
自定义模块
基础
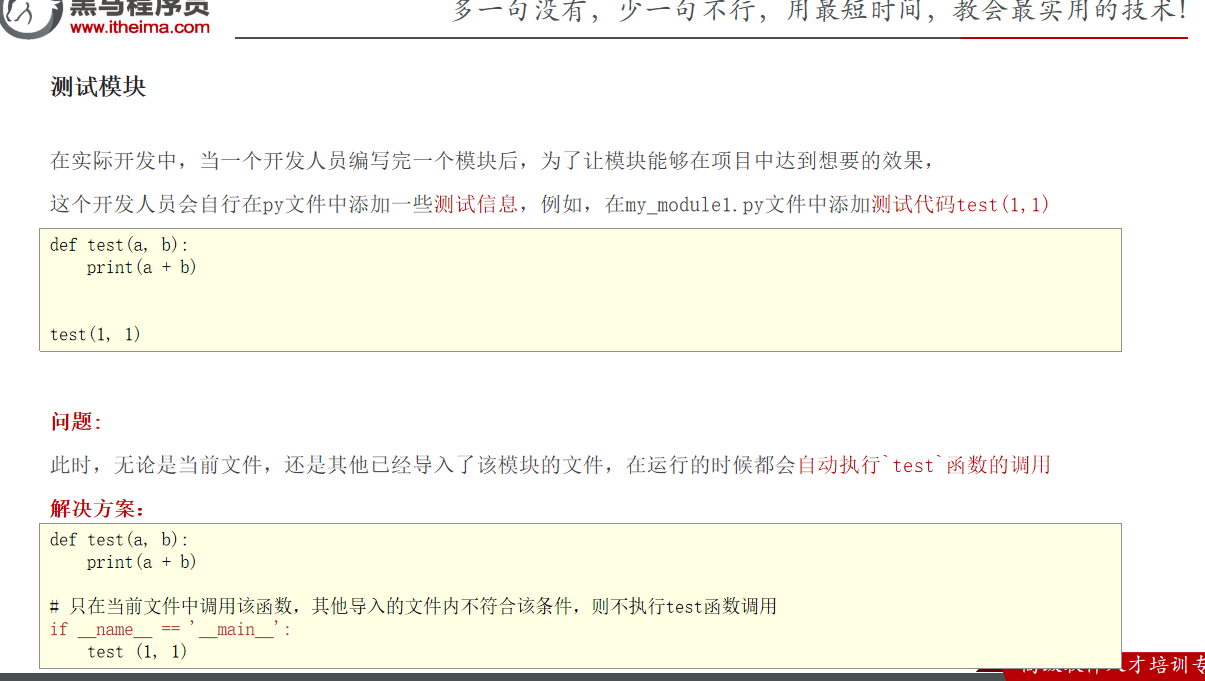
让导入模块不会执行模块中主函数的内容
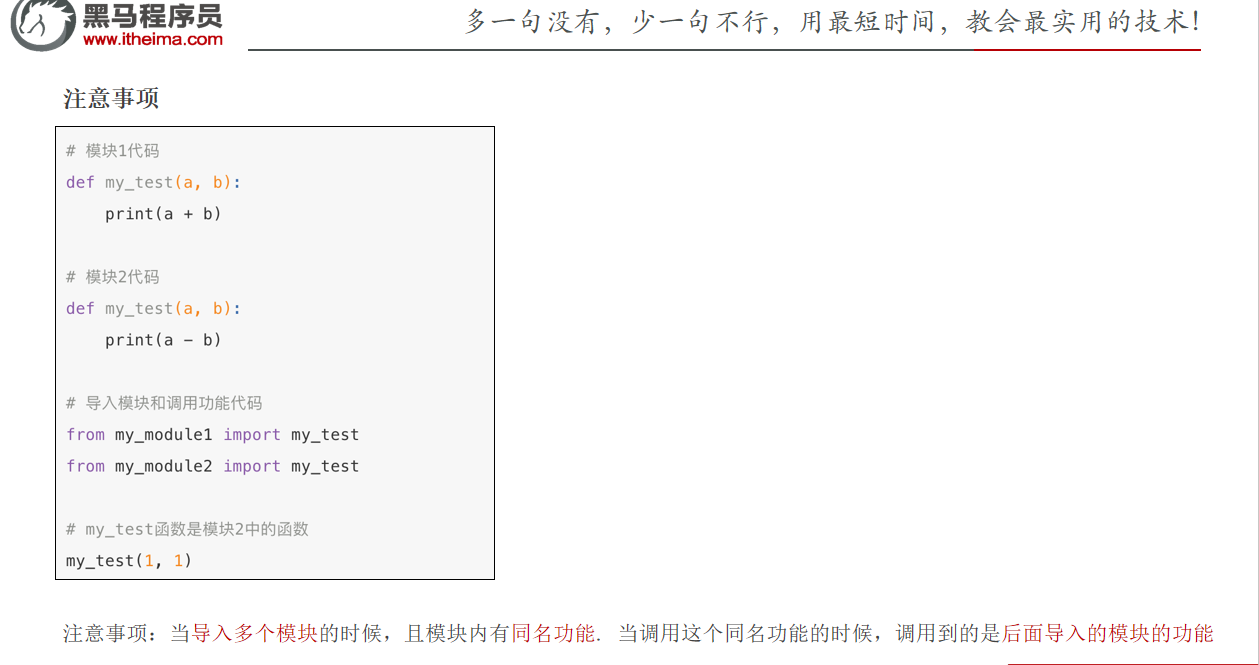
多个模块默认最后的生效
限制一个模块提供的功能

总结

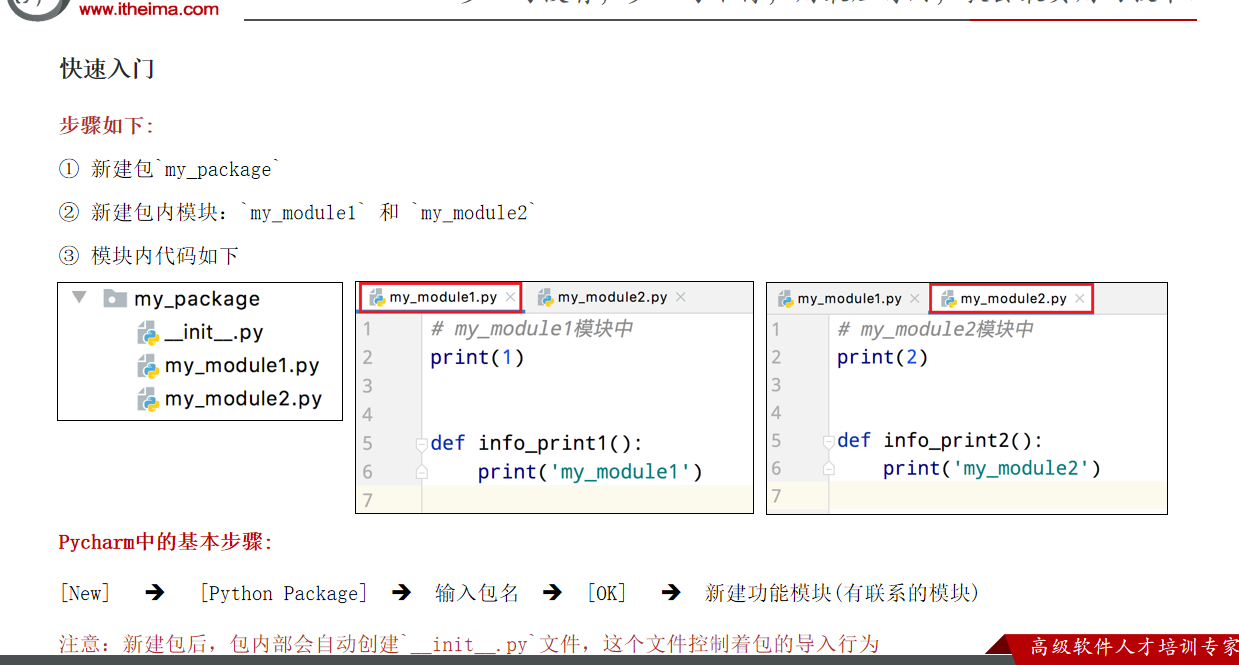
Python 自定义包(拿了一个文件夹来管理一车子模块)

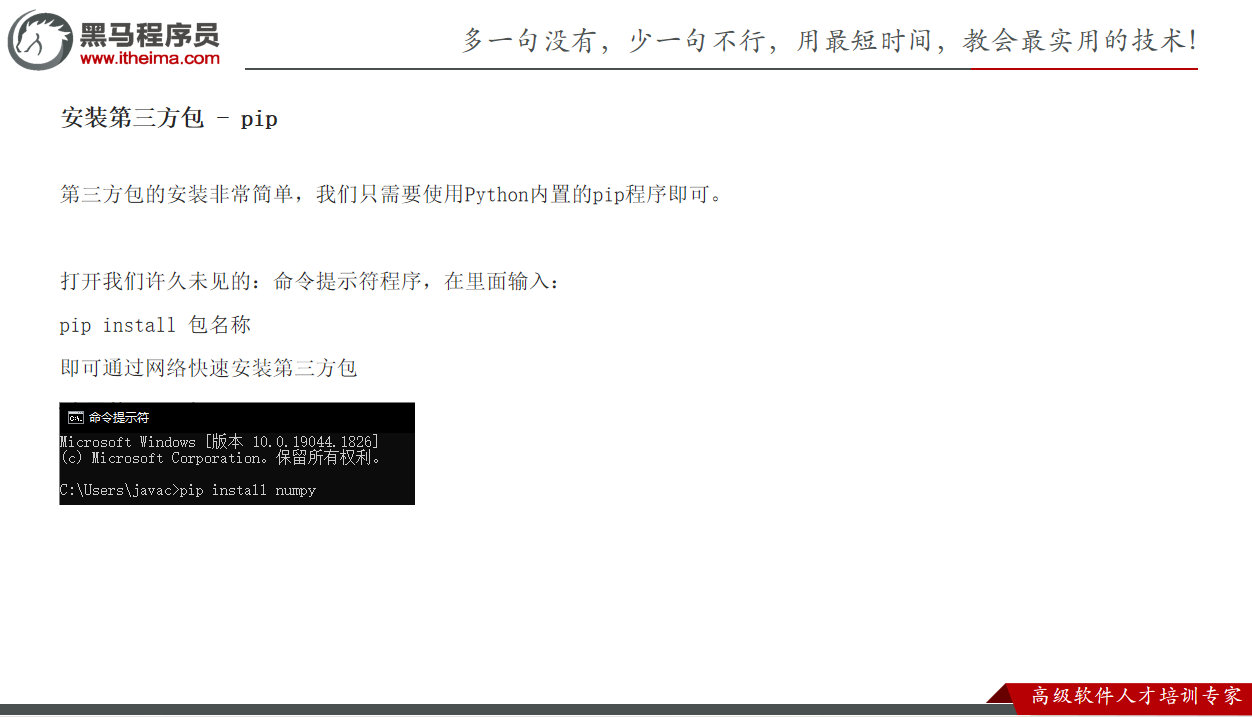
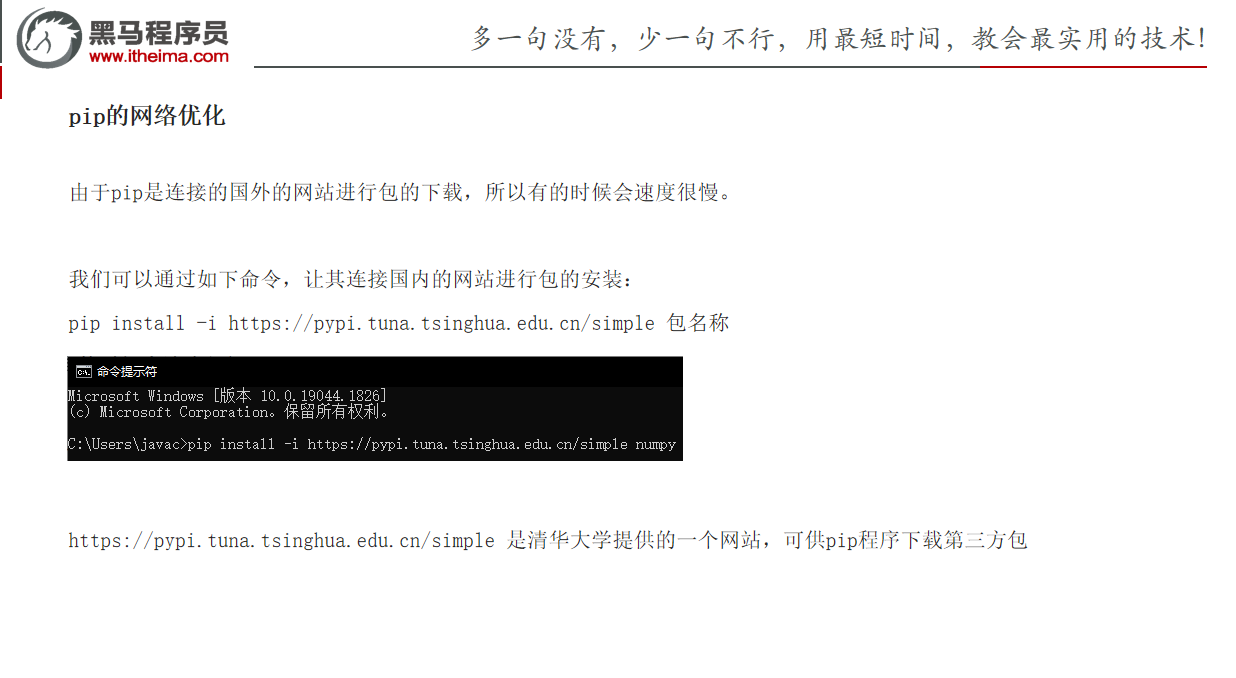
安装包
pip
综合练习

my_util.py
def str_reverse(s) :
    str_len=len(s)
    new_str=""
    for i in range(str_len-1,-1,-1) :
        new_str+=s[i]
    return new_str
def substr(s,x,y) :
    new_str=s[x:y]
    return new_str
file_util.py
def print_file_info(file_name) :
    try :
        f=open(file_name,"r",encoding="UTF-8")
        str=f.readlines()
        for x in str :
            print(x,end="")
        f.close()
    except Exception as e:
        print(f"出现异常:{e}")
def append_to_file(file_name,data) :
    f=open(file_name,"a",encoding="UTF-8")
    f.write(data)
    f.close()
test.py
from my_util import *
from file_util import *
str="abc123"
print(str_reverse(str))
print(substr(str,1,4))
print_file_info("1.txt")
append_to_file("1.txt","这是我追加的东西!")

 浙公网安备 33010602011771号