java基础---->线程
一、进程与线程
进程(process)是一个可并发执行的具有独立功能的程序(program)关于某个数据集合的一次执行过程,也是操作系统进行资源分配和保护的基本单位。
线程(thread)是操作系统进程中能够独立执行的实体(控制流),是处理器调度和分派的基本单位。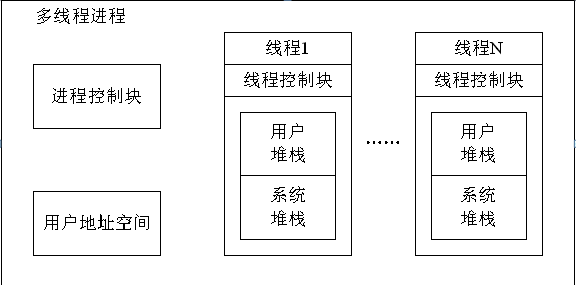
比如word进程中有拼写检查、语法检查很多线程。
二、Java的线程实现
在Java中如果要想进行多线程代码的实现有两种方式:
·继承Thread类
·实现Runnable接口
1.1、继承Thread类
Thread类声明如下
public class Thread extends Object implements Runnable
{
    public Thread()                           	//构造方法
    public Thread(String name)                 	//name指定线程名
    public Thread(Runnable target)         //target指定线程的目标对象
    public Thread(Runnable target, String name)
    public void run()                         	//描述线程操作的线程体
    public final String getName()               //返回线程名
    public final void setName(String name)     //设置线程名
    public static int activeCount()              //返回当前活动线程个数
    public static Thread currentThread()   //返回当前执行线程对象
    public Sting toString() 			//返回线程的字符串信息,包括名字、优先级和线程组
    public synchronized void start()           //启动已创建的线程对象
}
当一个类需要按照多线程的方式处理时,可以让这个类直接继承自Thread类即可,而且继承的时候要覆写好Thread类中提供的run()方法:
//声明自定义线程类继承Thread类实现奇数/偶数序列线程并发执行。

public class NumberThread extends Thread {
	private int k; // 序列初始值

	public NumberThread(String name, int k) {
		super(name);
		this.k = k;
	}

	public NumberThread(String name) {
		this(name, 0);
	}

	public void run() // 覆盖run方法的线程体
	{
		int i = k;
		System.out.print("\n" + this.getName() + ":  ");
		while (i < 50) {
			System.out.print(i + "  ");
			i += 2;
		}
		System.out.println(this.getName() + "结束!");
	}

	public static void main(String args[]) {
		NumberThread thread_odd = new NumberThread("奇数线程", 1); // 创建线程对象
		NumberThread thread_even = new NumberThread("偶数线程", 2);
		// thread_odd.setPriority(10); //设置优先级为最高

		thread_odd.start(); // 启动线程对象
		thread_even.start();

		System.out.println("currentThread=" + Thread.currentThread().getName()); // 获得当前线程对象名
		System.out.println("activeCount=" + thread_even.activeCount());
		System.out.println("main Priority="
				+ Thread.currentThread().getPriority()); // 获得当前线程对象的优先级
	}
}
启动一个线程并不是依靠run()方法而是start()方法。此时通过start()方法执行线程的操作,操作中可以发现,每一个线程间都属于交替的运行状态,即:所有的线程都是交替运行的,且:那个线程抢到了CPU资源,那个线程就执行。
1.2实现Runnable接口
Runnable接口定义如下:
public interfaceRunnable{

         public void run() ;

}
线程实现的第二种手段,实现Runnable接口来实现线程的操作类,
//声明自定义线程类实现Runnable接口实现奇数/偶数序列线程并发执行。

public class NumberRunnable implements Runnable {
	private int k;

	public NumberRunnable(int k) {
		this.k = k;
	}

	public NumberRunnable() {
		this(0);
	}

	public void run() {
		int i = k;
		System.out.println();
		while (i < 50) {
			System.out.print(i + "  ");
			i += 2;
		}
		System.out.println("结束!");
	}

	public static void main(String args[]) {
		NumberRunnable odd = new NumberRunnable(1); // 创建具有线程体的目标对象
		Thread thread_odd = new Thread(odd, "奇数线程"); // 以目标对象创建线程对象
		thread_odd.start();

		new Thread(new NumberRunnable(2), "偶数线程").start();

		System.out.println("currentThread=" + Thread.currentThread().getName());// 获得当前线程对象名
		System.out.println("activeCount=" + Thread.activeCount());
	}
}
线程确实已经实现了,但是需要注意的是,如果要想启动一个线程肯定是Thread类中的start()方法完成,观察Thread类中提供的构造方法:public Thread(Runnable target)通过构造发现,Thread类可以接收Runnable子类的对象,所以一切的线程都可以通过Thread类进行启动。此时,通过Thread类进行了线程的启动。
1.3、两种实现方式的区别
对于Thread类和Runnable接口本身都是可以进行多线程的实现,那么两者到底该使用谁更好呢?
1、 继承局限:使用Runnable接口可以避免单继承的局限,而Thread类则有此局限;
2、 资源共享:使用Runnable接口实现多线程,可以实现资源(对象属性)的共享,而Thread类却无法实现。
|-此点只是相对而言,因为两者的此种区别是有其应用范围的。
范例:观察资源共享
class MyThreadextends Thread {

         private int count = 5 ;

         public void run(){

                   for(int x=0;x<50;x++){

                            if(this.count>0){

                                     System.out.println("count= " + this.count--) ;

                            }

                   }

         }

};

public classThreadDemo03 {

         public static void main(String args[]){

                   new MyThread().start() ;

                   new MyThread().start() ;

                   new MyThread().start() ;

         }

};
现在的程序中每一个线程都各自占有各自的count属性,所以并没有达到资源共享的目的,如果换成Runnable呢?
class MyThread implements Runnable {

         private int count = 5 ;

         public void run(){

                   for(int x=0;x<50;x++){

                            if(this.count>0){

                                     System.out.println("count= " + this.count--) ;

                            }

                   }

         }

};

public classThreadDemo04 {

         public static void main(String args[]){

                   MyThreadmt = new MyThread() ;

                   new Thread(mt).start() ;

                   new Thread(mt).start() ;

                   new Thread(mt).start() ;

         }

};
现在的代码中可以发现,count属性已经被所有的线程对象所共同拥有了。
class MyThread implements Runnable {

         private int count = 5 ;

         public void run(){

                   for(int x=0;x<50;x++){

                            if(this.count>0){

                                     System.out.println("count= " + this.count--) ;

                            }

                   }

         }

};

public classThreadDemo04 {

         public static void main(String args[]){

                   MyThreadmt1= new MyThread() ;

             MyThread mt2 = new MyThread() ;

             MyThread mt3 = new MyThread() ;

                   new Thread(mt1).start() ;

                   new Thread(mt2).start() ;

                   new Thread(mt3).start() ;

         }

};
现在的程序中每一个线程都各自占有各自的count属性,
1.4、两种实现方式的联系
从Thread类和Runnable接口中都可以发现,都必须同时覆写run()方法,两者的关系如何呢?观察Thread类的定义:
public class Thread extends Object implements Runnable
其中有个Runable类型的变量
/* What will be run. */
    private Runnable target;
其中的run方法定义如下:
 public void run() // 描述线程操作的线程体
 {
  if (target != null)
   target.run(); // 执行目标对象的run()方法}
 }
发现Thread类实际上是Runnable的子类。而且Thread类也要去接收Runnable其他子类的对象,而且所有的线程中,通过Runnable接口实现的线程类里面都是编写的具体功能,而并没有所谓的CPU调度,而真正意义上的CPU调度由操作系统完成(通过Thread类的start()方法调用的)。
Thread类要去协调操作系统,并且最终还要执行具体的线程主体的方法,而线程的主体呢,现在只专著于具体的功能实现,至于如何调度根本不管。Thread代理自定义的线程类的对象,如图所示: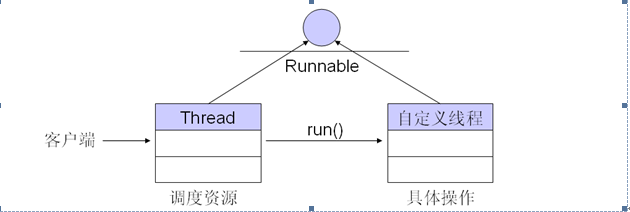
从图的关系上可以清楚的发现,现在在线程中应用的设计思路就是代理设计模式。
三、线程的状态
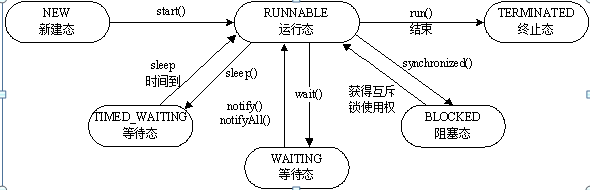
1、当执行new Thread(Runnable r)后,新创建出来的线程处于new状态,这种线程不可能执行
2、当执行thread.start()后,线程处于runnable状态,这种情况下只要得到CPU,就可以开始执行了。runnable状态的线程,会接受JVM的调度,进入running状态,但是具体何时会进入这个状态,是随机不可知的
3、running状态中的线程最为复杂,可能会进入runnable、waiting、timed_waiting、blocked、dead状态
如果CPU调度给了别的线程,或者执行了Thread.yield()方法,则进入runnable状态,但是也有可能立刻又进入running状态
如果执行了Thread.sleep(long),或者thread.join(long),或者在锁对象上调用object.wait(long)方法,则会进入timed_waiting状态
如果执行了thread.join(),或者在锁对象上调用了object.wait()方法,则会进入waiting状态
如果进入了同步方法或者同步代码块,没有获取锁对象的话,则会进入blocked状态
4、处于waiting状态中的线程,如果是因为thread.join()方法进入等待的话,在目标thread执行完毕之后,会回到runnable状态;如果是因为object.wait()方法进入等待的话,在锁对象执行object.notify()或者object.notifyAll()之后会回到runnable状态
处于timed_waiting状态中的线程,和waiting状态中的差不多,只不过是设定时间到了,就会回到runnable状态
5、处于blocked状态中的线程,只有获取了锁之后,才会脱离阻塞状态
6、当线程执行完毕,或者抛出了未捕获的异常之后,会进入dead状态,该线程结束
四、线程的操作方法
4.1、命名和取得
每一个线程实际上都可以为其设置名字,而且也可以取得每一个线程的名字:
·设置线程名称:public final void setName(String name)
·取得线程名称:public final String getName()
·取得当前线程:public static Thread currentThread()
返回当前活动线程个数 public static int activeCount()
除了以上的设置名称的方法外,在Thread类中也提供了两个构造方法:
·public Thread(String name)
·public Thread(Runnable target,String name)
每次java运行的时候,实际上都会启动一个JVM的进程。那么既然是多线程的处理机制,实际上主方法是在一个JVM上产生的一个线程而已。
4.2、线程的休眠
所谓的休眠就是指减缓程序的运行速度,如果要休眠使用如下的方法:
·休眠:public static void sleep(long millis) throwsInterruptedException,指定休眠时间
比如Thread.sleep(1000),当前线程睡眠1秒。需要知道的是,1秒后,线程是回到可执行状态,并不是执行状态,什么时候执行那是由虚拟机来决定的。所以sleep(1000)并不是在睡眠1秒后立即执行。
4.3、线程的优先级
实际上所有的线程启动之后并不是立刻运行的,都需要等待CPU进行调度,但是调度的时候本身也是存在“优先”级的,如果优先级高则有可能最先被执行。
如果要想设置优先级可以使用:publicfinal void setPriority(int newPriority)
这个优先级需要接收一个整型的数字,这个数字只能设置三个内容:
·最高优先级:public static final int MAX_PRIORITY 1
·中等优先级:public static final int NORM_PRIORITY 5
·最低优先级:public static final int MIN_PRIORITY 10
问题:主方法的优先级是什么?
public classMainDemo {

         public static void main(String args[]){

                   System.out.println(Thread.currentThread().getPriority());   //5

                   System.out.println("MAX_PRIORITY" + Thread.MAX_PRIORITY) ;//10

                   System.out.println("MIN_PRIORITY" + Thread.MIN_PRIORITY) ;//1

                   System.out.println("NORM_PRIORITY" + Thread.NORM_PRIORITY) ;//5

         }

};
主方法属于中等优先级。
4.4、 join方法
线程有join方法,当线程1调用线程2的join方法时,线程1必须等待线程2执行完毕,线程1才能继续往下执行。join方法主要用来将大问题分解成小问题,当小问题计算完成时,大问题才能继续往下执行,这时候我们就可以利用join方法了。下面演示了一下线程的join方法。
public class TestJoin {


	public static void main(String[] args) {

		for(int i =0;i<10;i++)
		{
			System.out.println(Thread.currentThread().getName()+"  "+i);
			if(i==2)
			{
				JoinThread jt=new JoinThread();
				jt.start();
				//主线程调用jt的join方法,主线程必须等待jt线程执行完才能继续执行
				try {
					jt.join();
				} catch (InterruptedException e) {
					e.printStackTrace();
				}
			}
		}

	}

}

class  JoinThread extends Thread
{

	@Override
	public void run() {
	   for(int i = 0;i<10;i++)
	   {
		   System.out.println(this.getName()+"  "+i);
	   }
	}

}
运行结果如下:
main 0
main 1
main 2
Thread-0 0
Thread-0 1
Thread-0 2
Thread-0 3
Thread-0 4
Thread-0 5
Thread-0 6
Thread-0 7
Thread-0 8
Thread-0 9
main 3
main 4
main 5
main 6
main 7
main 8
main 9
4.5、yield方法
暂停当前正在执行的线程对象。
yield()只是使当前线程重新回到可执行状态,所以执行yield()的线程有可能在进入到可执行状态后马上又被执行。yield()只能使同优先级或更高优先级的线程有执行的机会。
4.6、interrupt方法
interrupt()只是为线程设置一个中断标记,一个线程对象被设置了中断标记只有仍然可以运行,isAlive()返回true。实例方法isInterrupted()测试线程对象中的中断标记,并不清除标记。静态的interrupted()方法会测试当前执行的线程是否被中断,并且在肯定的情况下,清除当前对象中断标记,并返回true。
interrupt()不会中断一个正在运行的线程.就是指线程如果正在运行的过程中, 去调用此方法是没有任何反应的.为什么呢, 因为这个方法只是提供给被阻塞的线程, 即当线程调用了Object.wait, Thread.join, Thread.sleep三种方法之一的时候, 再调用interrupt方法, 才可以中断刚才的阻塞而继续去执行线程.
class ThreadDemo134 extends Thread {
	int count = 0;

	public void run() {
		System.out.println(getName() + " 将要运行...");
		while (!this.isInterrupted()) {
			System.out.println(getName() + " 运行中 " + count++);
			try {
				Thread.sleep(400); // 休眠400毫秒
			} catch (InterruptedException e) { // 退出阻塞态时将捕获异常
				System.out.println(getName() + "从阻塞态中退出...");
				this.interrupt(); // 改变线程状态,使循环结束
			}
		}
		System.out.println(getName() + " 已经终止!");
	}

	public static void main(String argv[]) throws InterruptedException {
		ThreadDemo134 ta = new ThreadDemo134();
		ta.setName("ThreadA");
		ta.start();
		Thread.sleep(2000);// 主线程休眠2000毫秒,等待其他线程执行
		System.out.println(ta.getName() + " 正在被中断.....");// 2000毫秒过去后,main拿到cpu控制权。
		ta.interrupt(); // 中断线程ThreadA
	}
}
运行结果:
ThreadA 将要运行...
ThreadA 运行中 0
ThreadA 运行中 1
ThreadA 运行中 2
ThreadA 运行中 3
ThreadA 运行中 4
ThreadA 正在被中断.....
ThreadA从阻塞态中退出...
ThreadA 已经终止!
五、线程的竞争关系与线程互斥
// 银行账户的存取款线程设计。

public class Account // 账户类
{
	private String name; // 储户姓名
	private double balance; // 账户余额

	public Account(String name) {
		this.name = name;
		this.balance = 0;
	}

	public String getName() // 返回账户名
	{
		return name;
	}

	public double balance() // 查看账户余额
	{
		return balance;
	}

	public void put(double value) // 存款操作,参数为存入金额
	{
		if (value > 0)
			this.balance += value; // 存款操作使余额值增加
	}

	public double get(double value) // 取款操作,参数为取款金额,返回实际取到金额
	{
		if (value > 0) {
			if (value <= this.balance)
				this.balance -= value; // 取款操作使余额值减少
			else // 账户余额不够所取时
			{
				value = this.balance; // 取走全部余额
				this.balance = 0;
			}
			return value; // 返回实际取款额
		}
		return 0;
	}
}

class Save extends Thread // 存款线程类
{
	private Account account; // 账户
	private double value; // 存款金额

	public Save(Account a1, double value) {
		this.account = a1;
		this.value = value;
	}

	public void run() {
		double howmatch = this.account.balance();// 查看账户余额

		try {
			sleep(1); // 花费时间,线程执行被打断
		} catch (InterruptedException e) {
		}

		this.account.put(this.value);
		System.out.println(this.account.getName() + "账户:现有" + howmatch + ", 存入"
				+ this.value + ", 余额" + this.account.balance());
	}
}

class Fetch extends Thread // 取款线程类
{
	private Account account; // 账户
	private double value; // 取款金额

	public Fetch(Account a1, double value) {
		this.account = a1;
		this.value = value;
	}

	public void run() {
		double howmatch = this.account.balance();// 查看账户余额

		try {
			sleep(1); // 花费时间,线程执行被打断
		} catch (InterruptedException e) {
		}

		System.out.println(this.account.getName() + "账户:现有" + howmatch + ", 取走"
				+ this.account.get(this.value) + ", 余额"
				+ this.account.balance());
	}

	public static void main(String args[]) {
		Account wang = new Account("Wang");
		(new Save(wang, 100)).start();
		(new Save(wang, 200)).start();
		(new Fetch(wang, 300)).start();

		(new Save(new Account("Li"), 100)).start();
	}

}
错误结果:
Wang账户:现有0.0, 取走300.0, 余额0.0
Wang账户:现有0.0, 存入100.0, 余额0.0
Wang账户:现有0.0, 存入200.0, 余额0.0
Li账户:现有0.0, 存入100.0, 余额100.0
5.1、线程间的竞争关系
如果两个线程要访问同一资源,则线程间存在资源竞争关系。一个线程通过操作系统得到该资源,另一个将得不到。这时候一个线程的执行可能影响到同其竞争资源的其他线程。在极端情况下,被阻塞的线程永远得不到访问权,从而不能成功终止。资源竞争会出现两个问题:
死锁(deadlock) :一组进程获得了部分资源,还想获得其他进程占用的资源,最终所有的进程陷入死锁。
饥饿(starvation):一个进程由于其他进程优先级总是优于它而被无限期拖延。
5.2、临界区管理
每个进程中访问临界资源的那段程序称为临界区(Critical Section)(临界资源是一次仅允许一个进程使用的共享资源)。每次只准许一个进程进入临界区,进入后不允许其他进程进入。不论是硬件临界资源,还是软件临界资源,多个进程必须互斥地对它进行访问。
多个进程中涉及到同一个临界资源的临界区称为相关临界区。
进程进入临界区的调度原则是: ①如果有若干进程要求进入空闲的临界区,一次仅允许一个进程进入。②任何时候,处于临界区内的进程不可多于一个。如已有进程进入自己的临界区,则其它所有试图进入临界区的进程必须等待。③进入临界区的进程要在有限时间内退出,以便其它进程能及时进入自己的临界区。④如果进程不能进入自己的临界区,则应让出CPU,避免进程出现“忙等”现象。
5.3、Java线程互斥实现
Java采用synchronized关键字声明一段程序为临界区。synchronized有两种用法:同步语句(代码块)、同步方法。
synchronized(对象)
语句
synchronized 方法声明
范例:使用同步代码块完成进程互斥
//互斥的存取款线程设计。

public class SaveLock extends Thread // 带互斥锁的存款线程类
{
	private Account account; // 账户
	private double value; // 存款金额

	public SaveLock(Account a1, double value) {
		this.account = a1;
		this.value = value;
	}

	public void run() {
		synchronized (this.account) // 声明临界区,锁定账户对象
		{
			double howmatch = this.account.balance();
			try {
				sleep(1); // 花费时间
			} catch (InterruptedException e) {
			}
			account.put(this.value);
			System.out.println(this.account.getName() + "账户:现有" + howmatch
					+ ", 存入" + this.value + ", 余额" + this.account.balance());
		}
	}
}

class FetchLock extends Thread // 带互斥锁的取款线程类
{
	private Account account;
	private double value;

	public FetchLock(Account a1, double value) {
		this.account = a1;
		this.value = value;
	}

	public void run() {
		synchronized (this.account) // 声明临界区,锁定账户对象
		{
			double howmatch = this.account.balance();
			try {
				sleep(1); // 花费时间
			} catch (InterruptedException e) {
			}
			System.out.println(this.account.getName() + "账户:现有" + howmatch
					+ ", 取走" + this.account.get(this.value) + ", 余额"
					+ this.account.balance());
		}
	}

	public static void main(String args[]) {
		Account wang = new Account("Wang");
		(new SaveLock(wang, 100)).start();
		(new SaveLock(wang, 200)).start();
		(new FetchLock(wang, 300)).start();
	}

}

/*
 * 程序运行结果如下: Wang账户:现有0.0, 存入100.0, 余额100.0 Wang账户:现有100.0, 存入200.0, 余额300.0
 * Wang账户:现有300.0, 取走300.0, 余额0.0
 */
除了可以使用同步代码块之外还可以使用同步方法完成以上的操作。
5.4、一个方法的完整定义格式
[public | protected | private ][static] [final] [synchronized]
返回值类型方法名称(参数列表) [throws异常1,异常2,…]{
[return返回值 ;]
}
六、线程间的协作关系与线程同步
6.1、线程间的协作关系
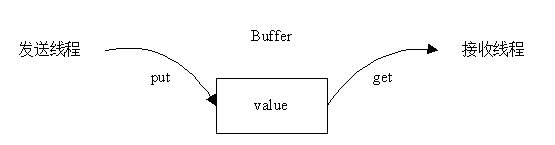
// 发送线程与接收线程。

public class Buffer // 缓冲区
{
	private int value; // 共享变量

	public void put(int i) {
		value = i;
	}

	public int get() {
		return value;
	}
}

class Sender extends Thread // 发送线程类
{
	private Buffer buffer; // 用于交换数据的共享变量

	public Sender(Buffer buffer) // 指定缓冲区
	{
		this.buffer = buffer;
	}

	public void run() {
		for (int i = 1; i < 6; i++) // 连续向缓冲区发送若干数据
		{
			buffer.put(i);
			System.out.println("Sender  put : " + i);

			try {
				sleep(1);
			} catch (InterruptedException e) {
			}
		}
	}
}

class Receiver extends Thread // 接收线程类
{
	private Buffer buffer;

	public Receiver(Buffer buffer) // 指定缓冲区
	{
		this.buffer = buffer;
	}

	public void run() {
		for (int i = 1; i < 6; i++) // 连续从缓冲区接收若干数据
		{
			System.out.println("\t\t\tReceiver get : " + buffer.get());

			try {
				sleep(1);
			} catch (InterruptedException e) {
			}
		}
	}

	public static void main(String args[]) {
		Buffer buffer = new Buffer();
		(new Sender(buffer)).start();
		(new Receiver(buffer)).start();
	}

}

/*
 * 没有sleep(1)语句时,程序运行结果如下: Sender put : 1 Sender put : 2 Sender put : 3 Sender
 * put : 4 Sender put : 5
 *
 * Receiver get : 5 Receiver get : 5 Receiver get : 5 Receiver get : 5 Receiver
 * get : 5
 *
 *
 * 有sleep(1)方法时,每次运行结果不确定,交替执行,间隔输出,一种可能的运行结果如下: Sender put : 1 Receiver get : 1
 * Sender put : 2 Receiver get : 2 Sender put : 3 Sender put : 4 Receiver get :
 * 4 Sender put : 5 Receiver get : 5 Receiver get : 5
 */
6.2、线程同步
线程同步是解决协作关系的手段。线程同步是指两个以上线程基于摸个条件来协调他们的活动。一个线程的执行依赖于另一个协作线程的消息或者信号,当一个线程没有得到另一个线程的消息或者信号时,这需要等待。知道消息或者信号到达才能被唤醒。可理解线程A和B一块配合,A执行到一定程度时要依靠B的某个结果,于是停下来,示意B运行;B依言执行,再将结果给A;A再继续操作。
6.3、java 线程通信方法
Object类对线程的支持:在Object类中提供了以下的方法可以实现对线程的等待及唤醒的处理:
·等待:public final void wait() throws InterruptedException
·等待:public final void wait(long timeout) throws InterruptedException
·唤醒:public final void notify(),唤醒第一个等待的线程
·唤醒:public final void notifyAll(),唤醒全部等待的线程
6.4、采用信号量和同步方法实现线程同步
//采用信号量和同步方法使发送线程与接收线程同步运行。

public class BufferLock // 加互斥锁的缓冲区
{
	private int value; // 共享变量
	private boolean isEmpty = true; // value是否为空的信号量

	public synchronized void put(int i) // 同步方法
	{
		while (!isEmpty) // 当value不空时,等待
		{
			try {
				this.wait(); // 使调用该方法的当前线程等待,即阻塞自己
			} catch (InterruptedException e) {
			}
		}

		value = i; // 当value空时,value获得值
		System.out.println("Sender  put : " + i);
		isEmpty = false; // 设置value为不空状态
		notify(); // 唤醒其他等待线程
	}

	public synchronized int get() // 同步方法
	{
		while (isEmpty) // 当value空时,等待
		{
			try {
				this.wait();
			} catch (InterruptedException e) {
			}
		}

		isEmpty = true; // 设置value为空状态,并返回值
		System.out.println("\t\t\tReceiver get : " + value);
		notify();
		return value;
	}

	public static void main(String args[]) {
		BufferLock buffer = new BufferLock();
		(new Sender(buffer)).start();
		(new Receiver(buffer)).start();
	}

}

class Sender extends Thread // 发送线程类
{
	private BufferLock buffer;

	public Sender(BufferLock buffer) {
		this.buffer = buffer;
	}

	public void run() {
		for (int i = 1; i < 6; i++) {
			buffer.put(i);

		}
	}
}

class Receiver extends Thread // 接收线程类
{
	private BufferLock buffer;

	public Receiver(BufferLock buffer) {
		this.buffer = buffer;
	}

	public void run() {
		for (int i = 1; i < 6; i++)
			buffer.get();
	}

}
运行结果:
|
Sender put : 1 |


 浙公网安备 33010602011771号