


序言
什么是Consul
Consul是HashiCorp公司推出的开源软件,提供了微服务系统中的服务治理、配置中心、控制总线等功能。这些功能中的每一个都可以根据需要单独使用,也可以一起使用以构建全方位的服务网格,总之Consul提供了一种完整的服务网格解决方案。
Consul特性
服务发现(Service Discovery):Consul提供了通过DNS或者HTTP接口的方式来注册服务和发现服务。一些外部的服务通过Consul很容易的找到它所依赖的服务。
健康检查(Health Checking):Consul的Client可以提供任意数量的健康检查,既可以与给定的服务相关联(“webserver是否返回200 OK”),也可以与本地节点相关联(“内存利用率是否低于90%”)。操作员可以使用这些信息来监视集群的健康状况,服务发现组件可以使用这些信息将流量从不健康的主机路由出去。
Key/Value存储:应用程序可以根据自己的需要使用Consul提供的Key/Value存储。 Consul提供了简单易用的HTTP接口,结合其他工具可以实现动态配置、功能标记、领袖选举等等功能。
安全服务通信:Consul可以为服务生成和分发TLS证书,以建立相互的TLS连接。意图可用于定义允许哪些服务通信。服务分割可以很容易地进行管理,其目的是可以实时更改的,而不是使用复杂的网络拓扑和静态防火墙规则。
多数据中心:Consul支持开箱即用的多数据中心,这意味着用户不需要担心需要建立额外的抽象层让业务扩展到多个区域。
Ocelot在API网关实现上有什么优点呢?
Ocelot是一个用.NET Core技术实现并且开源的API网关技术。
它的功能包括了:路由、请求聚合、服务发现、认证、鉴权、限流熔断、并内置了负载均衡器、Service Fabric、Butterfly Tracing等的集成。
Ocelot就是一系列按特定顺序排列的中间件,通过配置将HttpRequest对象保存到一个指定的状态直到它到达用来创建HttpRequestMessage对象
并将创建的HttpRequestMessage对象发送到下游服务中的请求构造中间件。 它不会再调用下一个中间件
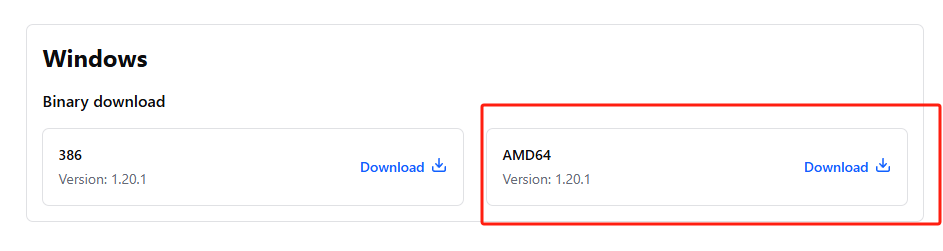
1.Consul的下载
下载地址:https://developer.hashicorp.com/consul/install
consul的官网:Service - Agent - HTTP API | Consul | HashiCorp Developer
相关配置参考地址 :https://www.cnblogs.com/lcyhjx/p/12687152.html
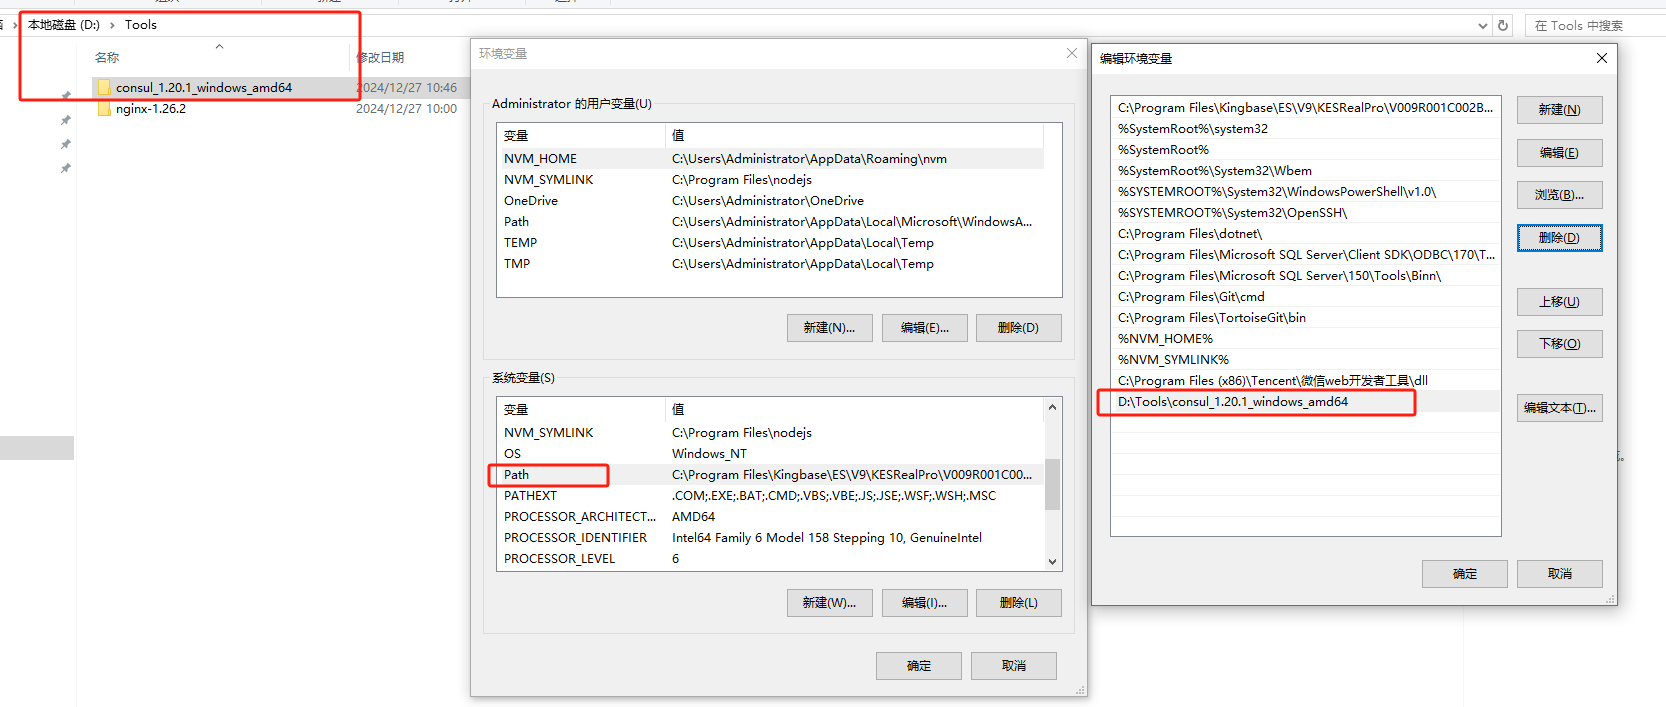
2.解压之后配置环境变量
3.启动Consul
第一种:consul agent -dev
第二种:在启动consul的时候,node参数可以写成 -node=127.0.0.1
consul agent -server -ui -bootstrap-expect=1 -data-dir=D:\\Tools\\consul_1.20.1_windows_amd64 -node=127.0.0.1 -client=0.0.0.0 -bind=127.0.0.1 -datacenter=dc1 -join 127.0.0.1
consul agent -server -ui -bootstrap-expect=1 -data-dir ./data -config-file ./conf -node=127.0.0.1 -client=0.0.0.0 -bind=127.0.0.1 -datacenter=dc1 -join 127.0.0.1
第三种:在启动consul的时候,node参数可写成"-node=hostname",在Hosts文件中对,node参数添加dns解析.
consul agent -server -ui -bootstrap-expect=1 -data-dir=D:\\Tools\\consul_1.20.1_windows_amd64 -node=hostname -client=0.0.0.0 -bind=127.0.0.1 -datacenter=dc1 -retry-join 127.0.0.1
window hosts文件位置:C:\Windows\System32\drivers\etc
在hosts文件中添加一行"127.0.0.1 hostname",即可
停止服务:consul.exe leave

4.实现
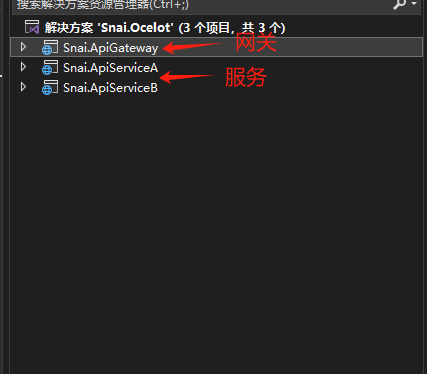

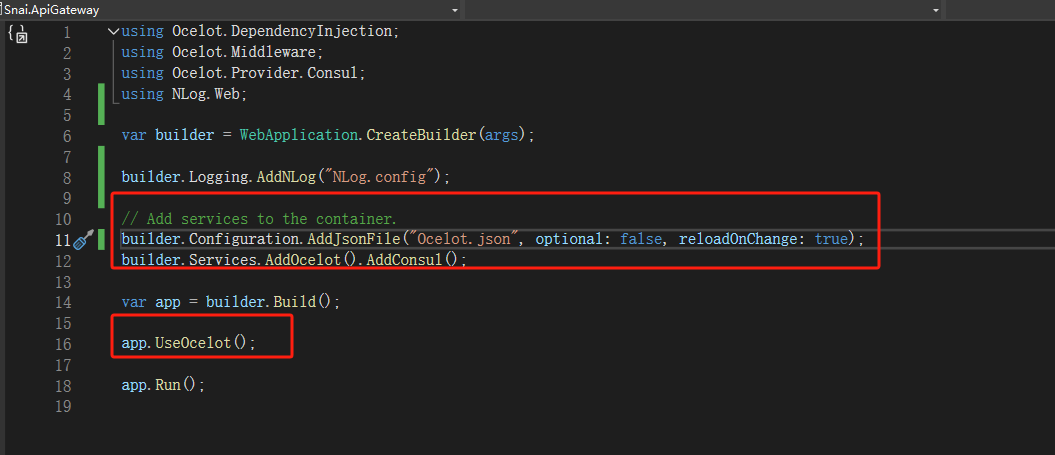
4.1 Snai.ApiGateway 配置
Ocelot.json { "Routes": [ { "UpstreamPathTemplate": "{url}", //上游请求地址,网关地址--url变量 "UpstreamHttpMethod": [ "Get" ], "DownstreamPathTemplate": "/ApiService/{url}", //下游服务地址--url变量 "DownstreamScheme": "http", "LoadBalancerOptions": { "Type": "RoundRobin" //RoundRobin:轮询 ; LeastConnection:最少连接数的服务器; NoLoadBalance:不负载均衡 }, "ServiceName": "consul_test", //consul服务名称 "UseServiceDiscovery": true //使用服务发现 } ], "GlobalConfiguration": { "BaseUrl": "http://localhost:5000", "ServiceDiscoveryProvider": { "Scheme": "http", "Host": "localhost", "Port": 8500, "Type": "Consul" } } }
4.2 Snai.ApiServiceA
ConsulHelper
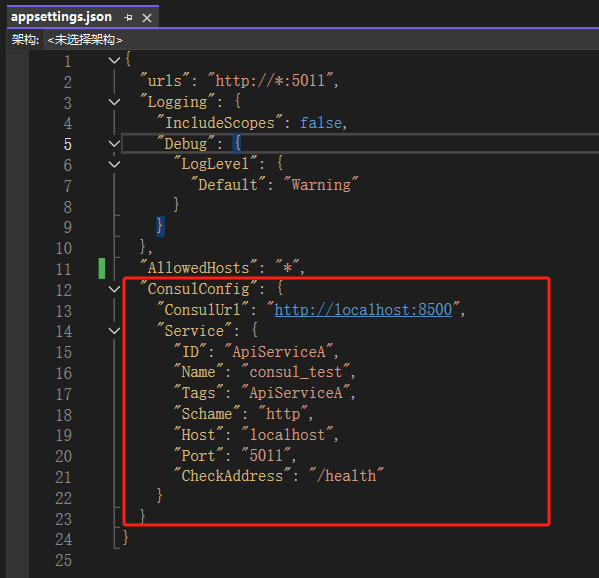
  public static class ConsulHelper
 {
     /// <summary>
     /// 将当前站点注入到Consul
     /// </summary>
     /// <param name="configuration"></param>
     public static void ConsulRegister(this IConfiguration configuration)
     {
         string consulUrl = configuration["ConsulConfig:ConsulUrl"];
         string serviceHost = configuration["ConsulConfig:Service:Host"];
         string serviceSchame = configuration["ConsulConfig:Service:Schame"];
         int servicePort = int.Parse(configuration["ConsulConfig:Service:Port"]);
         ConsulClient client = new ConsulClient(c => {
             c.Address = new Uri(consulUrl);
             c.Datacenter = "dc1";
         });
         client.Agent.ServiceRegister(new AgentServiceRegistration
         {
             ID = configuration["ConsulConfig:Service:ID"], //注册进Consul后给个唯一id,
             Name = configuration["ConsulConfig:Service:Name"], //站点做集群时,Name作为该集群的群名,
             Address = serviceHost,
             Port = servicePort,
             Tags = configuration["ConsulConfig:Service:Tags"].Split(",").ToArray(), //标签
             Check = new AgentServiceCheck
             {
                 HTTP = $"{serviceSchame}://{serviceHost}:{servicePort}{configuration["ConsulConfig:Service:CheckAddress"]}",//这是你要让他定期访问的地址 返回一个ok就行
                 TLSSkipVerify = false,
                 Interval = TimeSpan.FromSeconds(10),//间隔10秒一次
                 Timeout = TimeSpan.FromSeconds(5),//检测等待时间
                 DeregisterCriticalServiceAfter = TimeSpan.FromSeconds(60)//失败多久后移除,最小值60秒
             }
         });
     }
 }

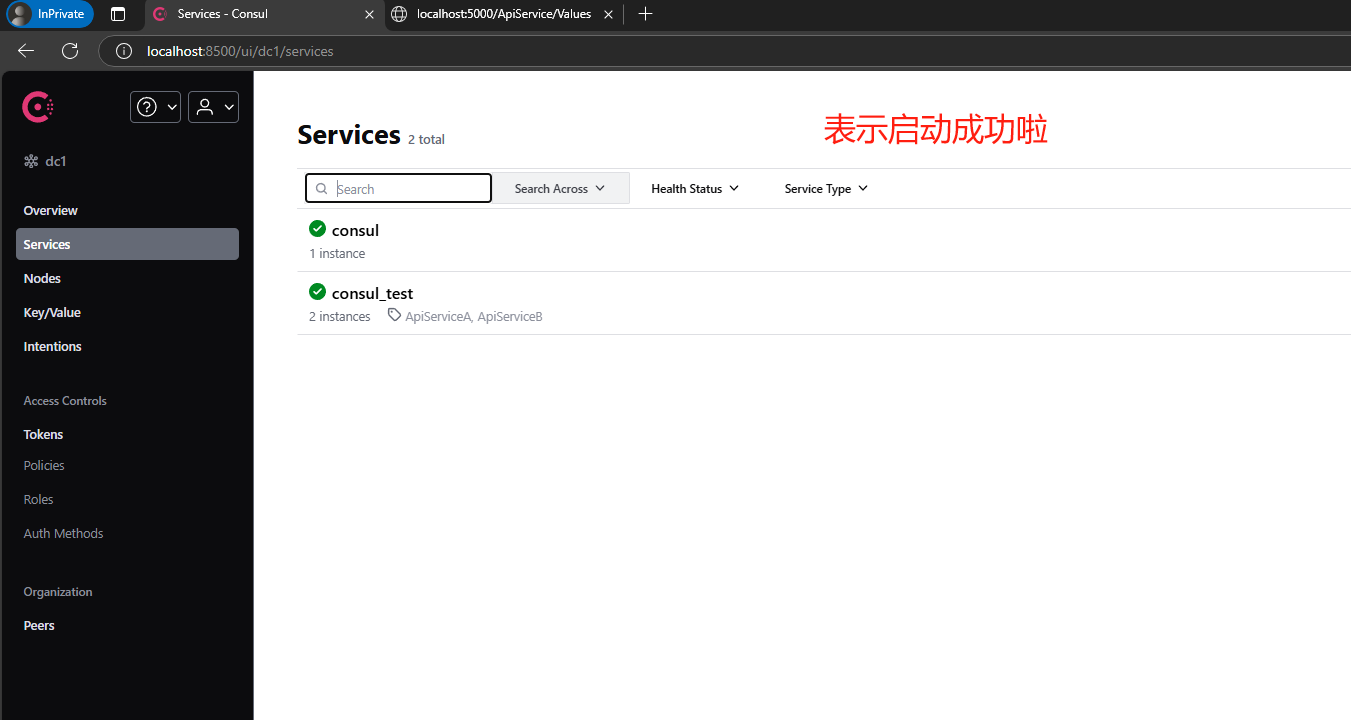
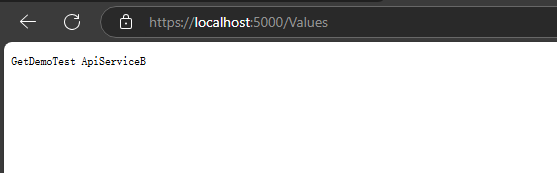
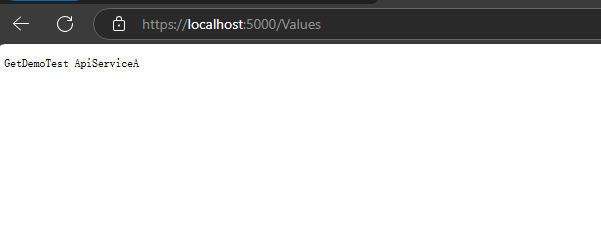
5.运行结果
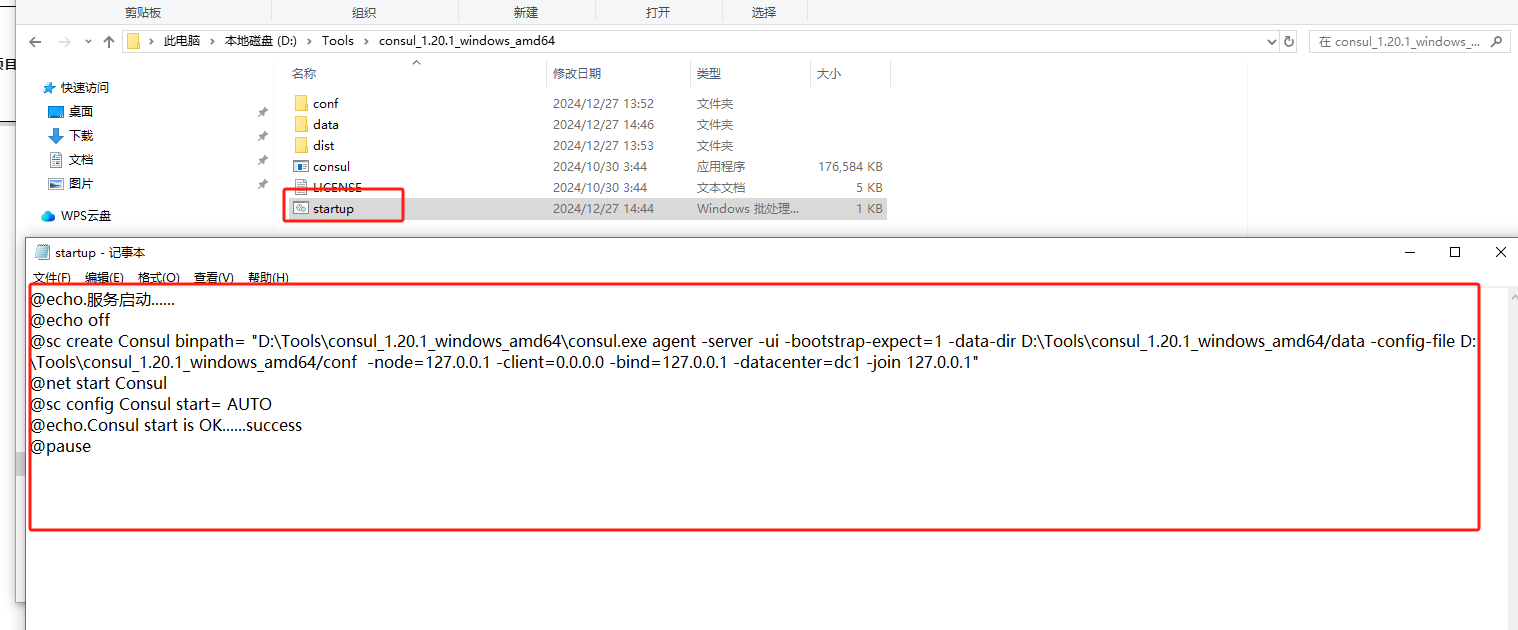
6.Consul持久化配置并注册为Windows服务
参考地址:Consul持久化配置并注册为Windows服务_consul windows-CSDN博客
执行命令:sc.exe start "Consul"
删除命令:sc delete "Consul"
@echo.服务启动......
@echo off
@sc create Consul binpath= "D:\Tools\consul_1.20.1_windows_amd64\consul.exe agent -server -ui -bootstrap-expect=1 -data-dir D:\Tools\consul_1.20.1_windows_amd64/data -config-file D:\Tools\consul_1.20.1_windows_amd64/conf -node=127.0.0.1 -client=0.0.0.0 -bind=127.0.0.1 -datacenter=dc1 -join 127.0.0.1"
@net start Consul
@sc config Consul start= AUTO
@echo.Consul start is OK......success
@pause
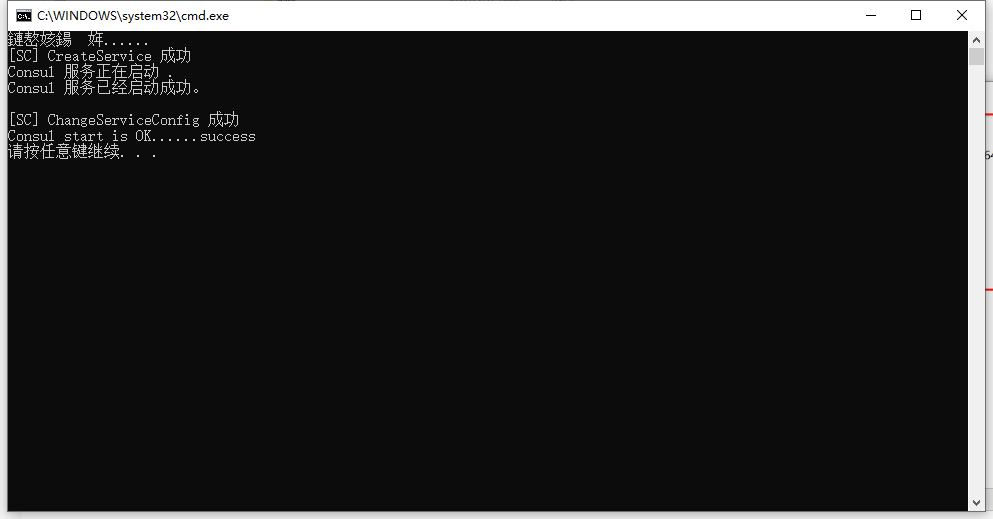
双击startup,运行结果

 浙公网安备 33010602011771号