【自找苦吃】云服务器从零开始的CentOS 7配置记录
1 初始情况
1.1 基本参数
这次选择了腾讯云
- 服务器:2核+4GB内存+5Mbps带宽+60GB存储,$ 208 / (12+3) = 13.87$ RMB/month
- 操作系统:CentOS 7.6 \(\to\) CentOS 7.9
- 手动修改了root口令
- 添加了本地Desktop的访问密钥
用惯了Ubuntu,也该试试其他的。我在 CentOS 7.6 和 OpenCloudOS 8 之间犹豫良久,最终还是倾向于选择了经典原始的CentOS 7.6。这波估计就是没苦硬吃了...反正之后要是吃不下去了就换系统XD
机器信息lscpu
Architecture:          x86_64
CPU op-mode(s):        32-bit, 64-bit
Byte Order:            Little Endian
CPU(s):                2
On-line CPU(s) list:   0,1
Thread(s) per core:    2
Core(s) per socket:    1
Socket(s):             1
NUMA node(s):          1
Vendor ID:             AuthenticAMD
CPU family:            25
Model:                 1
Model name:            AMD EPYC 7K83 64-Core Processor
Stepping:              0
CPU MHz:               2545.218
BogoMIPS:              5090.43
Hypervisor vendor:     KVM
Virtualization type:   full
L1d cache:             32K
L1i cache:             32K
L2 cache:              512K
L3 cache:              32768K
NUMA node0 CPU(s):     0,1
1.2 系统快照
默认以root登录,会帮我们生成一个lighthouse用户。文件系统基本如下,可能并非最初始的情况
[root@VM-16-6-centos ~]# ll -al
total 64
dr-xr-x---.  8 root root 4096 May 31 01:02 .
dr-xr-xr-x. 19 root root 4096 May 31 01:02 ..
-rw-------   1 root root  596 May 31 01:02 .bash_history
-rw-r--r--.  1 root root   18 Dec 29  2013 .bash_logout
-rw-r--r--.  1 root root  176 Dec 29  2013 .bash_profile
-rw-r--r--.  1 root root  176 Dec 29  2013 .bashrc
drwxr-xr-x   3 root root 4096 Mar  7  2019 .cache
drwxr-xr-x   3 root root 4096 Mar  7  2019 .config
-rw-r--r--.  1 root root  100 Dec 29  2013 .cshrc
-rw-r--r--.  1 root root  129 Dec 29  2013 .tcshrc

[root@VM-16-6-centos ~]# ll ../home/lighthouse/ -al
total 32
drwx------  4 lighthouse lighthouse 4096 May 31 00:14 .
drwxr-xr-x. 3 root       root       4096 May 30 23:15 ..
-rw-------  1 lighthouse lighthouse   85 May 31 01:03 .bash_history
-rw-r--r--  1 lighthouse lighthouse   18 Apr  1  2020 .bash_logout
-rw-r--r--  1 lighthouse lighthouse  193 Apr  1  2020 .bash_profile
-rw-r--r--  1 lighthouse lighthouse  231 Apr  1  2020 .bashrc
drwxrwxr-x  3 lighthouse lighthouse 4096 May 31 00:13 .cache
drwxrwxr-x  3 lighthouse lighthouse 4096 May 31 00:13 .config
注意这里要用 ls 要加 -a 参数,此处老系统默认并没有将-a加入到ll别名中
小知识:
ll等ls别名初始定义在/etc/profile.d/colorls.sh中
2 统一配置
2.1 Bash配置
Shell的基本概念
交互与非交互:交互式即正常使用的终端,非交互式一般为运行的Shell脚本的方式。
登录与非登录
- 登录式:需要用户名+密码登录后才能使用的,如ssh、tty、
bash --login - 非登录式:无需用户名+密码登录就能使用的,如图形终端、
bash
Bash Shell启动时的配置文件调用关系
#[登录Shell]
/etc/profile
  └── /etc/profile.d/*.sh
  └── ~/.profile (Ubuntu) 或 ~/.bash_profile (CentOS)
         └── ~/.bashrc
                └── /etc/bash.bashrc (Ubuntu) 或 /etc/bashrc (CentOS)

#[非登录Shell]
~/.bashrc
  └── /etc/bash.bashrc (Ubuntu) 或 /etc/bashrc (CentOS)
         └── /etc/profile.d/*.sh

## 其实语义上也好理解,登录Shell会多配置profile相关内容,非登录则仅关心bashrc
## Ubuntu和CentOS异同
## /etc/bash.bashrc =~= /etc/bashrc
##    ~/.profile    =~=    ~/.bash_profile
自定义配置
自定义内容仅关乎流畅使用,不妨加在两种Shell都能访问的地方。其实我更想改/etc/bashrc中,但想来太不规范还是算了,分别在root和非root中的~/.bashrc中修改吧。
(抄自Ubuntu自带的.bashrc)
# some more ls alias
alias ll='ls -alF'
alias la='ls -A'
alias l='ls -CF'
2.2 工具链更新
yum包管理器配置
更新源:盲猜更新源后把系统也更新了,cat /etc/centos-release 后发现是 CentOS Linux release 7.9.2009 (Core),而非最初的7.6了。
sudo yum update -y
启用常用仓库源
- 启用SCL仓库源:Software Collections,主要用于提供新版本的开发工具链,且不破坏系统原有环境,有两个版本, sclo-rh 由 Red Hat 官方打包和维护, sclo-sclo 由社区打包和维护;
- 启用EPEL仓库源:主要提供 RHEL/CentOS 默认仓库没有的高质量第三方软件包,Fedora 项目维护
sudo yum install centos-release-scl
sudo yum install epel-release
# 出现报错"Could not resolve host: mirrorlist.centos.org; Unknown error"
【错误修复】Could not resolve host: mirrorlist.centos.org
前一秒好好的,后一秒就"Could not resolve host: mirrorlist.centos.org; Unknown error" 错误
Loaded plugins: fastestmirror, langpacks
Loading mirror speeds from cached hostfile
Could not retrieve mirrorlist http://mirrorlist.centos.org?arch=x86_64&release=7&repo=sclo-rh error was
14: curl#6 - "Could not resolve host: mirrorlist.centos.org; Unknown error"


 One of the configured repositories failed (Unknown),
 and yum doesn't have enough cached data to continue. At this point the only
 safe thing yum can do is fail. There are a few ways to work "fix" this:

     1. Contact the upstream for the repository and get them to fix the problem.

     2. Reconfigure the baseurl/etc. for the repository, to point to a working
        upstream. This is most often useful if you are using a newer
        distribution release than is supported by the repository (and the
        packages for the previous distribution release still work).

     3. Run the command with the repository temporarily disabled
            yum --disablerepo=<repoid> ...

     4. Disable the repository permanently, so yum won't use it by default. Yum
        will then just ignore the repository until you permanently enable it
        again or use --enablerepo for temporary usage:

            yum-config-manager --disable <repoid>
        or
            subscription-manager repos --disable=<repoid>

     5. Configure the failing repository to be skipped, if it is unavailable.
        Note that yum will try to contact the repo. when it runs most commands,
        so will have to try and fail each time (and thus. yum will be be much
        slower). If it is a very temporary problem though, this is often a nice
        compromise:

            yum-config-manager --save --setopt=<repoid>.skip_if_unavailable=true

Cannot find a valid baseurl for repo: centos-sclo-rh/x86_64
原因分析:显然很快可以排除域名解析的问题。应该还是CentOS 7太老了,官方于2024年6月30日就停止了维护,原始仓库被归档,移至归档库中,所以当前的镜像地址mirrorlist.centos.org就失效。
同时从报错信息可知,是我们加入的SCL库 centos-sclo-rh 依赖了 mirrorlist.centos.org 这一过时镜像地址(而并非网上大多数问题描述的基础库CentOS-Base.repo,毕竟这么常用腾讯云自己肯定会处理好的),查看 /etc/yum.repos.d/ 中的 CentOS-SCLo-scl-rh.repo 内容即可验证,部分内容见下。
[centos-sclo-rh]
name=CentOS-7 - SCLo rh
#baseurl=http://mirror.centos.org/centos/7/sclo/$basearch/rh/
mirrorlist=http://mirrorlist.centos.org?arch=$basearch&release=7&repo=sclo-rh
gpgcheck=1
enabled=1
gpgkey=file:///etc/pki/rpm-gpg/RPM-GPG-KEY-CentOS-SIG-SCLo
当我们执行 yum-config-manager --disable centos-sclo-rh 时,效果即等同于将上述内容的 enable 项的值设为0;反之则改参数为 --enable。
解决办法:既然CentOS-7已经归档,那么就该源全部替换为CentOS-Vault归档源。其实因为租的是腾讯云服务器,起始的repo配置都已经经过必要的替换,比如CentOS-Base.repo。要改的其实是新加入的SCL库,顺便也可以换一下其他未修改的库。
鼓捣过程
按腾讯软件源镜像站中的说法,应当将所有YUM仓库配置文件中的镜像地址从 mirrorlist 切回到 baseurl ,然后统一将其中 原始源 mirror.centos.org/centos/ 切换到目标 归档源 mirrors.tencent.com/centos-vault/。
# 命令备注
# 1. 将 mirrorlist= 开头的行注释掉
# 2. 启用原先被注释的 #baseurl= 并替换源centos为centos-vault
# 3. 另一种形式的 #baseurl= 使用了 $contentdir 也启用并替换掉
# 4. 修改文件之前,先备份输入文件为 .bak
sed -e "s|^mirrorlist=|#mirrorlist=|g" \
    -e "s|^#baseurl=http://mirror.centos.org/centos/\$releasever|baseurl=https://mirrors.tencent.com/centos-vault/\$releasever|g" \
    -e "s|^#baseurl=http://mirror.centos.org/\$contentdir/\$releasever|baseurl=https://mirrors.tencent.com/centos-vault/\$releasever|g" \
    -i.bak \
    /etc/yum.repos.d/CentOS-*.repo
但可以发现,这里的匹配并不完整,至少并不适配我这边的 CentOS-SCLo-scl-rh.repo。所以最终我还是直接手动修改了更新后的该文件,将baseurl指向腾讯源的Vault。
#修改前:(由于没被sed匹配到,此处baseurl还是被注释的状态)
#baseurl=http://mirror.centos.org/centos/7/sclo/$basearch/rh/
#修改后:
baseurl=http://mirrors.tencent.com/centos-vault/7.9.2009/sclo/$basearch/rh/
可以再查找下,yum.repos.d中配置文件到底有哪些未注释行用到了失效的mirror.centos.org
grep -r '^[^#]*mirror.centos.org' /etc/yum.repos.d/
结果如下:
/etc/yum.repos.d/CentOS-CR.repo:baseurl=http://mirror.centos.org/centos/$releasever/cr/$basearch/
/etc/yum.repos.d/CentOS-CR.repo.bak:baseurl=http://mirror.centos.org/centos/$releasever/cr/$basearch/
发现仍存在匹配不全的现象,在 CentOS-CR.repo 中;不过由于 enable=0 未启用所以并未引起报错。然而如果我们再稍仔细分析,便可以发现, 腾讯软件源镜像站提供的命令其实是完全无效的!
- 在镜像站官方提供的
http://mirrors.tencent.com/centos-vault/归档库地址中,并不存在7这一目录,只有更加细分的7.9.2009,而yum中$releasever变量仅记录大版本号,此处即7,因此当我们将http://mirror.centos.org/centos/$releasever替换为http://mirrors.tencent.com/centos-vault/$releasever后将得到无效地址 - 在yum中似乎无法直接得到7.9.2009这个完整的版本,目前最佳的方案似乎就是写死为硬编码的7.9.2009。可以发现腾讯云服务器初始配置的
CentOS-Base.repo就是这么处理的,我这里的CentOS-SCLo-scl-rh.repo也做了同样的处理
所以似乎最佳方式不如自己手改...目前我给腾讯软件源发了邮件说明了此事,不知道会不会管这件事。
方案总结:将所有生效的 http://mirror.centos.org/centos/ 替换到有效的镜像站点地址,我这里选用了腾讯源 http://mirrors.tencent.com/centos-vault/。同时记得,将 $releasever 改为存在的对应centos版本的目录名(通过 cat /etc/centos-release 查看,我这里是7.9.2009)。一键式的命令似乎很难写,不如手动修改极少的刚需内容,enable为0的就懒得改以后用到再说,此处mark一下。
修改仓库配置后,记得清理yum缓存并重新生成cache。修正后makecache命令就不会报错了。
sudo yum clean all
sudo yum makecache
替换前记录
常用软件镜像源地址
- 腾讯源:
https://mirrors.tencent.com/ - 阿里源:
https://mirrors.aliyun.com/- 预设repo配置:
https://mirrors.aliyun.com/repos
- 预设repo配置:
- 清华源:
https://mirrors.tuna.tsinghua.edu.cn/ - 科大源:
https://mirrors.ustc.edu.cn/
使用高版本GCC
安装GCC-9/10/11
yum list devtoolset-11\* # 查找当前软件源中是否存在
sudo yum install devtoolset-11 # GCC-11

# 临时启用
scl enable devtoolset-11 bash
# 永久启用:下列命令加入两个~/.bashrc中
source /opt/rh/devtoolset-11/enable

# 之后gcc -v查看下即可
devtoolset在SCL仓库源中,如果找不到说明其未启用,这就涉及到了上一节 yum包管理器配置 了。
3 远程访问
在服务器端完成root用户密码设置和ssh公钥添加和绑定后,便通过使用 ssh root@<ipv4_address> 访问了,见官方使用本地自带 SSH 终端登录 Linux 实例。不过想使用其他方式则还需进一步配置
3.1 支持普通用户的ssh连接
此时若想通过 ssh lighthouse@<ipv4_address> 登录ligthouse普通用户,会发现仍行不通,返回信息 Permission denied (publickey,gssapi-keyex,gssapi-with-mic)。
查看文件,可以发现在/root/.ssh中已然存在authorized_keys,其中便是我们通过腾讯云官方控制面版中绑定的ssh公钥信息。不过注意到该公钥串尾部内容被修改,本应该是我本地机器生成时用的邮箱,此处却被修改为一串 skey-xxxx,其他则一点没变。了解到SSH公钥的结构是<key-type> <base64-encoded-key> [<comment>],可知修改了腾讯云修改了注释部分,理论上应该不会影响验证。
su lighthouse # 担心创建文件的所有权问题,所以切到目标用户再操作
cd ~
mkdir .ssh
chmod 700 .ssh # 权限似乎是敏感的,ll结果应该是 drwx------  2 lighthouse lighthouse ... .ssh

cd .ssh
touch authorized_keys
cat /root/.ssh/authorized_keys > authorized_keys
chmod 600 authorized_keys # 权限似乎是敏感的,ll结果应该是 drw-------  2 lighthouse lighthouse ... authorized_keys
然而如此操作后仍无法成功ssh登录。于是我又将不同的尾部comment改回了本地原始的邮箱内容,然后就通了...说好的注释不影响呢,还是说腾讯云又做了什么配置?搞不懂了。猜测是又做了一次映射? \(\to\) 搞笑的是,我又试了下,将尾部comment改成其他随意内容/原先的skey-xxx,结果这回又是通的,所以之前只是什么奇怪的缓存没更新??
3.2 支持VSCode插件ssh连接
远程主机没有 meet the prerequisites for running VS Code Server
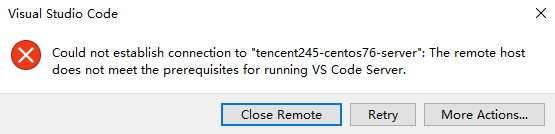
具体信息为
The remote host may not meet VS Code Server's prerequisites for glibc and libstdc++ (The remote host does
not meet the prerequisites for running VS Code Server)
还是CentOS 7.6太老了,默认使用 glibc 2.17 和 gcc 4.8.5 ,已经满足不了现在高版本的VSCode。官方说明 显示已经不支持 CentOS 7了,要求 glibc >= 2.28 和 libstdc++ >= 3.4.25。
查看glibc版本的方式
getconf GNU_LIBC_VERSION
ldd --version
devtoolset-11更新GCC版本似乎只能解决 libstdc++ 库。glibc还是没法解决,于是姑且打算自己编译一版。
# 打算在lighthouse用户下进行
cd ~
mkdir glibc && cd glibc
wget http://ftp.gnu.org/gnu/libc/glibc-2.28.tar.gz
tar -zxvf glibc-2.28.tar.gz
cd glibc-2.28
mkdir build && cd build
../configure --prefix=$HOME/glibc/2.28 --disable-werror # 打算将其装在~/glibc/2.28中,并禁用 -Werror
make -j$(nproc)  # 忘记时,不过至多5min
make install
# 我改主意了,打算装在/opt/glibc/2.28中, mv移了一下 XD
之后手动先下载了.vscode-server中内容,打算再欺骗插件使用新版glibc
# 先本地查看<commit_hash>,替换内容
# 查看方式:失败的ssh remote建立过程的output;也可参考WSL中的.vscode-server内容
mkdir -p ~/.vscode-server/bin/<commit_hash>/
cd ~/.vscode-server/
wget -O vscode-server.tar.gz "https://update.code.visualstudio.com/commit:<commit_hash>/server-linux-x64/stable"
tar -zxvf vscode-server.tar.gz
mv vscode-server-linux-x64/* ./bin/<commit_hash>/
rmdir vscode-server-linux-x64
不过手动启动vscode-server似乎失败
export LD_LIBRARY_PATH=/opt/glibc/2.28/lib:$LD_LIBRARY_PATH
export PATH="$HOME/.vscode-server/bin/<commit-hash>/bin:$PATH" # commit-hash 替换
~/.vscode-server/bin/<commit-hash>/bin/code-server --host=127.0.0.1 --without-browser-env --accept-server-license-terms --start-server

# 结果:Segmentation fault。这是指添加覆盖 LD_LIBRARY_PATH 的后果,想来这么底层的库,这么简单替换出错倒也合理
# 猜测可能时一些ld工具链还用的时旧版glibc的?
/opt/glibc/2.28/lib/ld-2.28.so \   # 使用指定的ld
    --library-path /opt/glibc/2.28/lib \
    ~/.vscode-server/bin/<commit-hash>/bin/code-server \
    --host=127.0.0.1 \
    --accept-server-license-terms \
    --start-server
不对的,code-server是sh脚本,似乎真正依赖glibc的是node,这个脚本里面内容才是关键。似乎可以替换其中的链接路径,todo
另外打算直接试试emacs了(
3.3 延长断连时间
Windows终端ssh直连时,隔一小会儿不去动终端就会断连卡死,体验不佳。平时咱不需要太安全,所以进行相关调整,方案来自这篇。但实际似乎仅调整服务器端并不一定会生效,因为断连也可能来自客户端,因而两侧都需要配置比较好
服务器配置
修改/etc/ssh/sshd_config,解注释并修改其中两个配置项
ClientAliveInterval 30    # 即 服务端每隔30秒向客户端发送一个心跳包
ClientAliveCountMax 2880  # 即 客户端2880次没有响应则服务器自动断掉连接
# 30 * 2880 = 86400s,我觉得设置1天还挺合理
修改后需重启sshd服务(参考方案中的命令可能权限不足)
sudo systemctl restart sshd
sudo sshd -T | grep clientalive # 验证参数情况
本地客户端配置
在使用ssh命令时同样增加一些参数,比如 ssh -o ServerAliveInterval=30 -o ServerAliveCountMax=2880 user@your-server-ip 。不过最方便的还是添加在ssh配置中,即修改 ~\.ssh\config 文件。
Host <server-alias>
    HostName <server-ip>
    User lighthouse
    ServerAliveInterval 30
    ServerAliveCountMax 2880
这之后运行 ssh <server-alias> 即可。
4 其他配置
感觉基本同 WSL2使用记录 中的常用配置了,比如加.vimrc等。
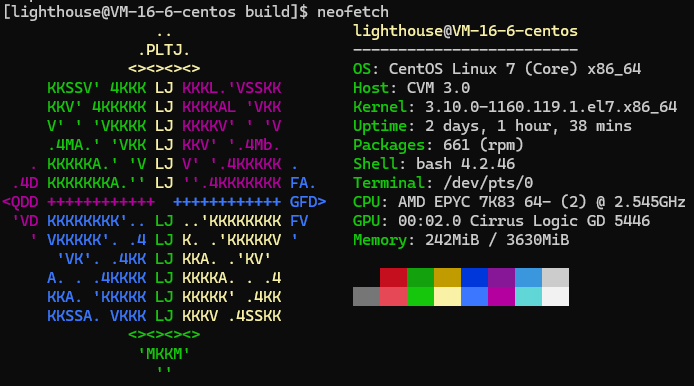
4.1 安装neofetch
还是基础仓库中没有的软件,得继续加软件源(晕)
sudo yum install epel-release  # 才发现之前这个没启用成功,正常成功后会/etc/yum.repo.d/中会出现 epel.repo 和 epel-testing.repo
sudo curl -o /etc/yum.repos.d/konimex-neofetch-epel-7.repo https://copr.fedorainfracloud.org/coprs/konimex/neofetch/repo/epel-7/konimex-neofetch-epel-7.repo

sudo yum install neofetch
4.2 安装Emacs
对于高版本Emacs,需要自行编译。
下载源码
网上说是推荐 28+ 版本,那本来自行编译就是想用高版本,所以从 http://ftp.gnu.org/gnu/emacs/ 搜寻最高版本的就行。毕竟没开代理也没用镜像源,所以有些慢,可以后台运行wget,查看同目录下 wget-log 即可。
wget -b http://ftp.gnu.org/gnu/emacs/emacs-30.1.tar.gz
tar -zxvf emacs-30.1.tar.gz
cd emacs-30.1
依赖检查
可以在 ./configure --without-selinux 配置时进行检查。
我本地已有 gcc 和 make,剩余还需 sudo yum install ncurses-devel giflib-devel libjpeg-devel libtiff-devel gnutls-devel texinfo。
而对于 Emacs 28+ 还需要 libgccjit 以支持 Native Compilation (native-comp) 功能依赖项,用于让 Emacs 把 Elisp 编译为原生代码以提升性能。
# 没有libgccjit时进行configure,警告如下:
configure: WARNING: Elisp native compiler can't be enabled as libgccjit header files
were not found.
Please try installing libgccjit-dev or a similar package if you want to have it
enabled.
原以为CentOS 7中得自己编译GCC JIT了,结果尝试sudo yum install libgccgit*时惊喜发现 devtoolset 中是有的,于是进行安装
sudo yum install devtoolset-11-libgccjit
# 这会自动安装 libgccjit.so 和 libgccjit.h 对应的文件
不过光这样configure时还是会警告说找不到,得配置必要的环境变量让其找到
export C_INCLUDE_PATH=/opt/rh/devtoolset-11/root/usr/include
export LIBRARY_PATH=/opt/rh/devtoolset-11/root/usr/lib64
export LD_LIBRARY_PATH=/opt/rh/devtoolset-11/root/usr/lib64:$LD_LIBRARY_PATH
这之后再次检查发现还有warning
configure: WARNING: This configuration installs a 'movemail' program
that does not retrieve POP3 email.  By default, Emacs 25 and earlier
installed a 'movemail' program that retrieved POP3 email via only
insecure channels, a practice that is no longer recommended but that
you can continue to support by using './configure --with-pop'.
configure: You might want to install GNU Mailutils
<https://mailutils.org> and use './configure --with-mailutils'.
其实就是旧版使用 movemail 为明文传输不安全,所以新版禁用了,所以推荐 POP3 或 mailutils 拉邮件,我选择无视。
编译源码
之后进行编译即可,如果有报错可以增加 V=1 参数查看详细信息。
这里贴出完整指令
# 安装依赖
sudo yum install ncurses-devel giflib-devel libjpeg-devel libtiff-devel gnutls-devel texinfo devtoolset-11-libgccjit
export C_INCLUDE_PATH=/opt/rh/devtoolset-11/root/usr/include
export LIBRARY_PATH=/opt/rh/devtoolset-11/root/usr/lib64
export LD_LIBRARY_PATH=/opt/rh/devtoolset-11/root/usr/lib64:$LD_LIBRARY_PATH
# 编译配置
./configure  --without-selinux
# 编译与安装
make V=1 -j$(nproc)
sudo make install
# 检查
emacs --version
which emacs  # 默认就是/usr/local/bin/emacs
其他问题:缺少libxml2支持
在安装完counsel和ivy插件时觉察到的,不过其实问题不大可忽略
Warning (bytecomp): the function ‘libxml-parse-xml-region’ is not known to be defined
执行 M-x describe-variable RET system-configuration-features 检查结果如下:

没有libxml2的支持可能是安装时并没有相应的库,之后编译前可以sudo yum install libxml2-dev,编译选项可以加上 --with-xml2,之后有需求了再说
4.3 支持远程桌面图形界面访问
选择了使用xrdp访问xfce桌面的方案,其实和wsl的配置一样。以下给出完成步骤
在服务器中
# 1.安装依赖
sudo yum groupinstall "Xfce" -y  # xfce桌面
sudo yum install xrdp -y # xrdp服务

# 2.配置xrdp启动xfce会话
## 普通用户
echo "startxfce4" > ~/.Xclients
chmod +x ~/.Xclients
## root用户
echo "startxfce4" | sudo tee /root/.Xclients
sudo chmod +x /root/.Xclients

# 3.启动xrdp
sudo systemctl enable xrdp # 设置开机自启
sudo systemctl start xrdp  # 启动
sudo systemctl status xrdp # 检查一下

# 4.检查防火墙
sudo firewall-cmd --state # 不过似乎服务器内一般是不启用防火墙的
# 查看腾讯云控制台,不过3389端口一般也是开着的
然后从Windows的Remote Desktop访问即可。公网ip在termincal中查看的方式是 curl ifconfig.me
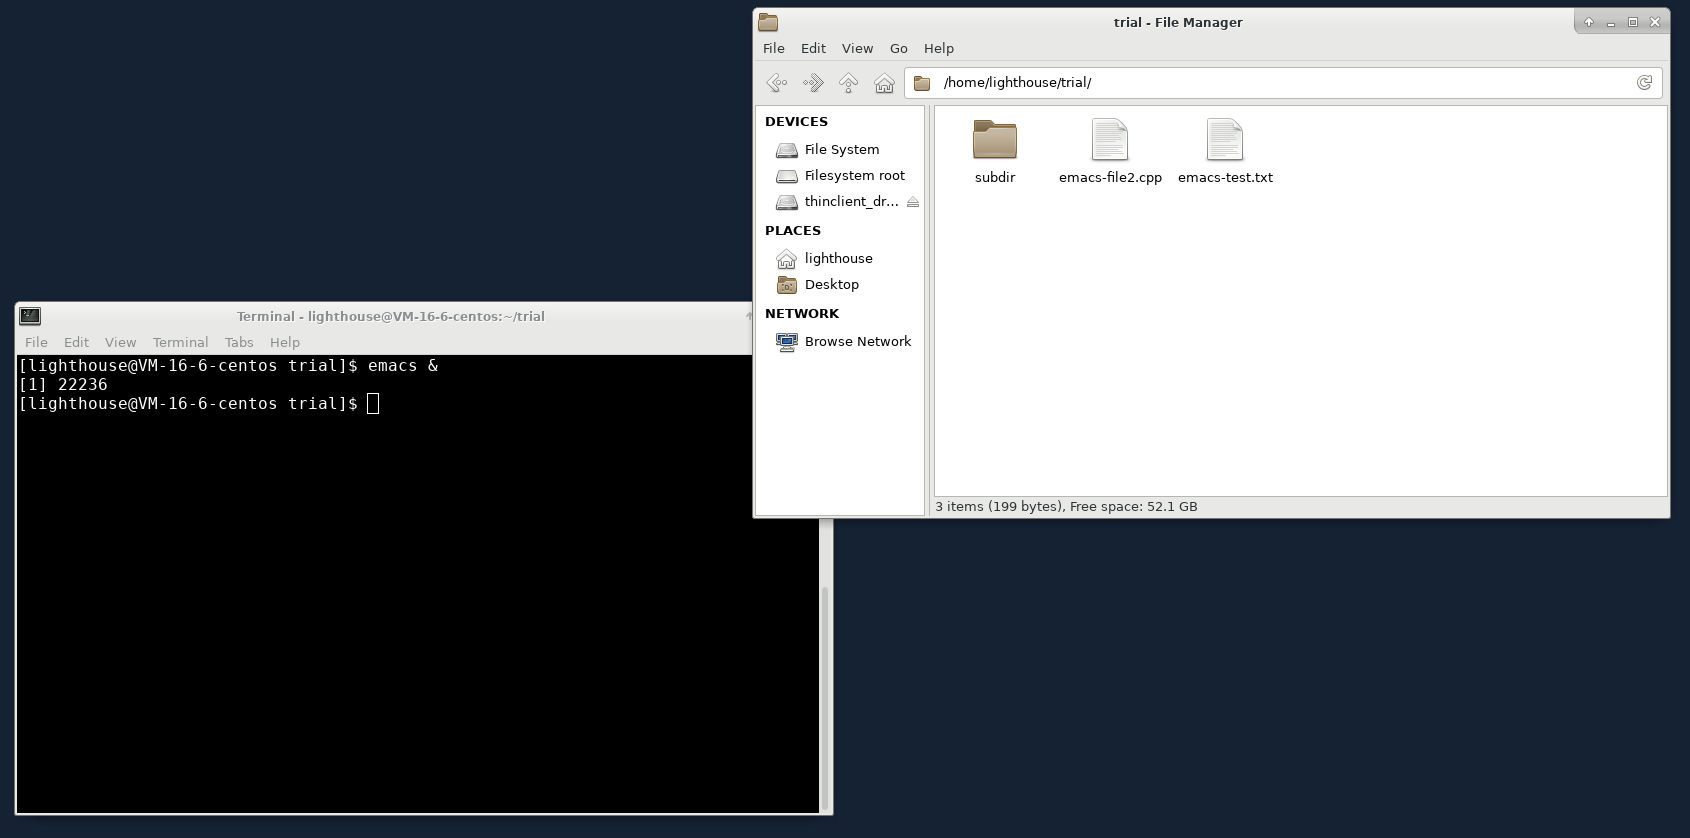
*之前编译的emacs没有带图形界面,配置默认是关闭的。
4.4 避免ssh中断影响
使用tmux再虚拟一层终端,这样进程运行时ssh终端连接意外中断后,仍可以通过新ssh终端进行连接。否则原进程变为孤儿进程后,只能强行kill重新开始。
但是tmux中emacs的颜色模式和外部不一样,有些难受,尚未解决。

 浙公网安备 33010602011771号