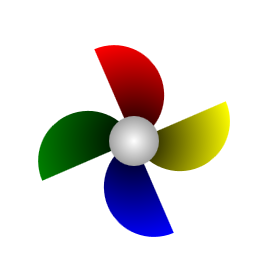
HTML5 canvas制作童年的回忆大风车
2014-04-20 16:38 那时候的我 阅读(2969) 评论(0) 收藏 举报今天看到一篇CSS3写的大风车http://www.cnblogs.com/yaojaa/archive/2013/01/30/2882521.html,感觉CSS3太神奇了,这在以前用CSS是想都不敢想的。记得去年自己用canvas也写过这样的大风车,今天我打算用canvas制作一个一模一样的,连速度都一致的大风车。
大家请看下面两张图,你们看得出这两张图有什么区别吗?哪张是CSS3写的哪张是canvas写的?


下面就来介绍制作风车的过程。先上代码吧:

<!DOCTYPE html>
<html>
<head>
    <title></title>
</head>
<body>
    <canvas id = "canvas" width="300" height="300"></canvas>

    <script>
        (function () {
            var Pinwheel = function (canvas, options) {
                this.canvas = document.getElementById(canvas);
                this.options = options;
            };
            Pinwheel.prototype = {
                constructor: Pinwheel,
                show: function () {
                    var canvas = this.canvas,//取得canvas元素
                            width = canvas.width,//canvas元素的宽度
                            height = canvas.height,//canvas元素的高度
                            color = this.options.color,//风车叶子的颜色
                            radius = this.options.radius,//整个风车的半径
                            wheelRadius = this.options.wheelRadius,//风车叶子的半径
                            part = this.options.part,//PI/2分成几份
                            ctx = canvas.getContext("2d"),//获取上下文
                            num = this.options.num,//叶子数量
                            center = {x: width / 2, y: height / 2},//绘图区域的中心
                            point, //叶子圆心位置
                            start = 0,//绘制叶子的开始角
                            angle = 0,//start = angle
                            end = Math.PI,//绘制叶子的结束角
                            offset = Math.PI * (360 / num) / 180,//两个相邻叶子之间的角度
                            rotateAngle = offset / part;//每次旋转的角度
//                    window.timer = setInterval(function () {
                        ctx.clearRect(0, 0, width, height);
                        for (var i = 0; i < num; i += 1) {
                            ctx.beginPath();//开始绘制叶子
                            var wheelGradient = ctx.createRadialGradient(center.x, center.y, 100, center.x, center.y, 0);//创建径向渐变
                            wheelGradient.addColorStop(0, color[i]);//起始颜色
                            wheelGradient.addColorStop(1, "#000");//结束颜色
                            ctx.fillStyle = wheelGradient;//填充渐变样式
                            point = {x: center.x + Math.cos(offset * i + angle) * radius, y: center.y + Math.sin(offset * i + angle) * radius};//叶子圆心位置
                            var x = start + offset * i;//绘制叶子的开始角
                            var y = end + offset * i;//绘制叶子的结束角
                            ctx.arc(point.x, point.y, wheelRadius, x, y, false);//绘制
                            ctx.fill();//填充
                            ctx.closePath();//结束绘制
                        }
                        ctx.beginPath();
                        var dotGradient = ctx.createRadialGradient(center.x, center.y, 0, center.x, center.y, 40);
                        dotGradient.addColorStop(0, "#fff");
                        dotGradient.addColorStop(1, "#666");
                        ctx.fillStyle = dotGradient;
                        ctx.arc(center.x, center.y, 25, 0, 2 * Math.PI, false);
                        ctx.fill();
                        ctx.closePath();
                        angle += rotateAngle;
                        start = angle;
                        end = Math.PI + angle;
//                    }, 20)
                },
                hide: function () {
                    clearInterval(window.timer);
                }
            };

            var options = {
                num: 4,
                color: ["red", "yellow", "blue", "green"],
                radius: 50,
                wheelRadius: 50,
                part: 50
            };

            var a = new Pinwheel("canvas", options);
            a.show();
        }());
    </script>
</body>
</html>
首先,确定需要的各项参数:
var canvas = this.canvas,//取得canvas元素
width = canvas.width,//canvas元素的宽度
height = canvas.height,//canvas元素的高度
color = this.options.color,//风车叶子的颜色
radius = this.options.radius,//整个风车的半径
wheelRadius = this.options.wheelRadius,//风车叶子的半径
part = this.options.part,//PI/2分成几份
ctx = canvas.getContext("2d"),//获取上下文
num = this.options.num,//叶子数量
center = {x: width / 2, y: height / 2},//绘图区域的中心
point, //叶子圆心位置
start = 0,//绘制叶子的开始角
angle = 0,//start = angle
end = Math.PI,//绘制叶子的结束角
offset = Math.PI * (360 / num) / 180,//两个相邻叶子之间的角度
rotateAngle = offset / part;//每次旋转的角度
循环绘制每个叶子:
for (var i = 0; i < num; i += 1) {
  ctx.beginPath();//开始绘制叶子
  var wheelGradient = ctx.createRadialGradient(center.x, center.y, 100, center.x, center.y, 0);//创建径向渐变
  wheelGradient.addColorStop(0, color[i]);//起始颜色
  wheelGradient.addColorStop(1, "#000");//结束颜色
  ctx.fillStyle = wheelGradient;//填充渐变样式
  point = {x: center.x + Math.cos(offset * i + angle) * radius, y: center.y + Math.sin(offset * i + angle) * radius};//叶子圆心位置
  var x = start + offset * i;//绘制叶子的开始角
  var y = end + offset * i;//绘制叶子的结束角
  ctx.arc(point.x, point.y, wheelRadius, x, y, false);//绘制
  ctx.fill();//填充
  ctx.closePath();//结束绘制
}
绘制中间的大圆点:
ctx.beginPath();
var dotGradient = ctx.createRadialGradient(center.x, center.y, 0, center.x, center.y, 40);
dotGradient.addColorStop(0, "#fff");
dotGradient.addColorStop(1, "#666");
ctx.fillStyle = dotGradient;
ctx.arc(center.x, center.y, 25, 0, 2 * Math.PI, false);
ctx.fill();
ctx.closePath();
上面的代码已经可以制作静态的风车了,但是我们要做的是动态的,于是我们需要一个计时器。下面是计时器代码:
  window.timer = setInterval(function () {
    ctx.clearRect(0, 0, width, height);//每次调用计时器需要重绘
    for (var i = 0; i < num; i += 1) {
      ctx.beginPath();//开始绘制叶子
      var wheelGradient = ctx.createRadialGradient(center.x, center.y, 100, center.x, center.y, 0);//创建径向渐变
      wheelGradient.addColorStop(0, color[i]);//起始颜色
      wheelGradient.addColorStop(1, "#000");//结束颜色
      ctx.fillStyle = wheelGradient;//填充渐变样式
      point = {x: center.x + Math.cos(offset * i + angle) * radius, y: center.y + Math.sin(offset * i + angle) * radius};//叶子圆心位置
      var x = start + offset * i;//绘制叶子的开始角
      var y = end + offset * i;//绘制叶子的结束角
      ctx.arc(point.x, point.y, wheelRadius, x, y, false);//绘制
      ctx.fill();//填充
      ctx.closePath();//结束绘制
    }
    ctx.beginPath();
    var dotGradient = ctx.createRadialGradient(center.x, center.y, 0, center.x, center.y, 40);
    dotGradient.addColorStop(0, "#fff");
    dotGradient.addColorStop(1, "#666");
    ctx.fillStyle = dotGradient;
    ctx.arc(center.x, center.y, 25, 0, 2 * Math.PI, false);
    ctx.fill();
    ctx.closePath();
    angle += rotateAngle;
    start = angle;
    end = Math.PI + angle;
  }, 20)
动态的风车基本上就做完了,这是运行大风车代码:
var options = {
  num: 4,
  color: ["red", "yellow", "blue", "green"],
  radius: 50,
  wheelRadius: 50,
  part: 50
  };
var a = new Pinwheel("canvas", options);
a.show();
修改options对象的属性就会改变风车的状态。
需要停止风车运转调用这个函数:
hide: function () {
  clearInterval(window.timer);
}
下面是展示结果的时候了:
以前写这些代码是没有注释的,今天花了好大功夫加上注释,然后在原有基础上做了一些修改,做成了和CSS3写的一模一样的风车。


 浙公网安备 33010602011771号