Prism框架
1.搭建
(1)通过NuGet安装程序包Prism.DryIoc。
(2)在App.xaml中引用Prism命名空间,项目应用对象改为PrismApplication,并且删除StartupUri。
<prism:PrismApplication x:Class="WpfApp1.App"
             xmlns="http://schemas.microsoft.com/winfx/2006/xaml/presentation"
             xmlns:x="http://schemas.microsoft.com/winfx/2006/xaml"
             xmlns:local="clr-namespace:WpfApp1"
             xmlns:prism="http://prismlibrary.com/">
</prism:PrismApplication>
(3)App.xaml.cs 实现接口由Application-->PrismApplication,并实现接口方法。
public partial class App : PrismApplication
{
    // 关系:PrismApplication 继承于 PrismApplicationBase 继承于 Application
    // CreateShell()主要负责启动一个主页面。
    protected override Window CreateShell()
    {
        return Container.Resolve<Main>();
    }

    protected override void RegisterTypes(IContainerRegistry containerRegistry)
    {
    }
}
(4)结构
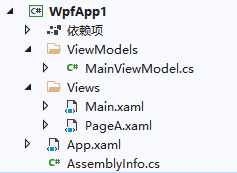

满足以下三条,不需要XXX.xaml.cs中添加DataContext=New ViewModel(),实现上下文动态绑定。
窗体|页面|用户控件必须放到Views文件夹下
模型必须放到ViewModels文件夹下
模型l的名称,必须是窗体名称开头,且以ViewModel结尾
自动绑定设置
prism:ViewModelLocator.AutoWireViewModel="True"(可省略)
2.区域化(同一项目)
(1)添加ContentControl 用来存放区域
<Window x:Class="WpfApp1.Views.Main"
        xmlns="http://schemas.microsoft.com/winfx/2006/xaml/presentation"
        xmlns:x="http://schemas.microsoft.com/winfx/2006/xaml"
        xmlns:d="http://schemas.microsoft.com/expression/blend/2008"
        xmlns:mc="http://schemas.openxmlformats.org/markup-compatibility/2006"
        xmlns:local="clr-namespace:WpfApp1"
        xmlns:prism="http://prismlibrary.com/"
        prism:ViewModelLocator.AutoWireViewModel="True"
        mc:Ignorable="d"
        Title="MainWindow" Height="450" Width="800">
    <Grid>
        <Grid.RowDefinitions>
            <RowDefinition Height="50"/>
            <RowDefinition />
        </Grid.RowDefinitions>
        <StackPanel Orientation="Horizontal">
            <!--命令绑定,传入参数CommandParameter-->
            <Button Command="{Binding OpenCommand}" CommandParameter="PageA" Content="打开模块A" Margin="5"/>
        </StackPanel>
        <ContentControl Grid.Row="1" prism:RegionManager.RegionName="ContentRegion"></ContentControl>
    </Grid>
</Window>(2)新建UserControl
<UserControl x:Class="WpfApp1.Views.PageA"
             xmlns="http://schemas.microsoft.com/winfx/2006/xaml/presentation"
             xmlns:x="http://schemas.microsoft.com/winfx/2006/xaml"
             xmlns:mc="http://schemas.openxmlformats.org/markup-compatibility/2006"
             xmlns:d="http://schemas.microsoft.com/expression/blend/2008"
             xmlns:local="clr-namespace:WpfApp1.Views"
             mc:Ignorable="d"
             d:DesignHeight="450" d:DesignWidth="800">
    <Grid>
        <TextBlock Text="我是PageA" FontSize="70"/>
    </Grid>
</UserControl>
在App.xaml.cs中注册用户控件
protected override void RegisterTypes(IContainerRegistry containerRegistry)
{
    //一定是RegisterForNavigation才能导航
    containerRegistry.RegisterForNavigation<PageA>();
}(3)通过RegionManager向区域中注入用户控件
namespace WpfApp1.ViewModels
{
    public class MainViewModel:BindableBase
    {
        private readonly IRegionManager regionManager;
        public DelegateCommand<string> OpenCommand { get; private set; }
        //把接口 IRegionManager 注入
        public MainViewModel(IRegionManager regionManager)
        {
            OpenCommand = new DelegateCommand<string>(Open);
            this.regionManager = regionManager;
        }

        void Open(string name)
        {
            //通过regionManager接口获取当前全局定义的可用区域
            //通过依赖注入的方式动态的往这个区域注入内容
            this.regionManager.Regions["ContentRegion"].RequestNavigate(name);
        }
    }
}
4.模块化(不同项目)
模块化功能和区域相似,但模块化范围更广,它是将项目当作模块来充当跳转页面(因此项目中的view需要是用户控件)。而区域只是把用户控件当作跳转界面。
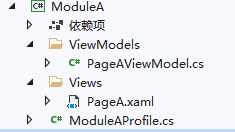
(1)新建模块类库项目
(2)添加用户控件PageA
(3)添加XXXProfile类,并实现IMoudle接口
注意:区域注册是在App.xaml.cs中,而模块是在此文件中注册
class ModuleProfile : IModule
{
    public void OnInitialized(IContainerProvider containerProvider)
    {

    }

    public void RegisterTypes(IContainerRegistry containerRegistry)
    {
        //<视图,视图模型>上下文绑定
        containerRegistry.RegisterForNavigation<PageA,PageAViewModel>();
    }
}(4)在主程序App.xaml.cs中管理注册的模块
ConfigureModuleCatalog方法protected override void ConfigureModuleCatalog(IModuleCatalog moduleCatalog)
{
//ConfigureModuleCatalog()主要负责把依赖的模块添加到Prism框架中进行管理.
moduleCatalog.AddModule<ModuleProfile>();
base.ConfigureModuleCatalog(moduleCatalog);
}CreateModuleCatalog方法,不需要引用模块dll(推荐)protected override IModuleCatalog CreateModuleCatalog()
{
//查找目录中所有符合约定的程序集,添加到Prism框架中
return new DirectoryModuleCatalog() { ModulePath = @".\Modules" };
}app.config实现模块化,将模块dll放置到主项目输出路径下。 protected override IModuleCatalog CreateModuleCatalog()
{
return new ConfigurationModuleCatalog();
}配置文件:
<?xml version="1.0" encoding="utf-8" ?>
<configuration>
	<configSections>
		<section name="modules" type="Prism.Modularity.ModulesConfigurationSection, Prism.Wpf"/>
	</configSections>
	<startup>
		<supportedRuntime version="v5.0" sku=".NETFramework,Version=v4.7.2" />
	</startup>
	<modules>
		<module assemblyFile="ModuleA.dll"
				moduleType="ModuleA.ModuleProfile, ModuleA, Version=1.0.0.0, Culture=neutral, PublicKeyToken=null"
				moduleName="ModuleProfile" startupLoaded="True" />
	</modules>
</configuration>
5.导航
导航实在区域的基础上实现的,除了可以区域页面跳转外还可以实现传参, 导航确认,导航拦截,导航日志等。
(1)传参
NavigationParameters设置参数,并通过RequestNavigate传递给导航窗体。void Open(string name)
{
//定义参数
NavigationParameters parameters = new NavigationParameters();
parameters.Add("Title", "我是导航A");
//像目标 name 传递参数
this.regionManager.Regions["ContentRegion"].RequestNavigate(name,parameters);
}(4)导航日志
声明一个IRegionNavigationJournal,它包含导航日志相关的API。
public class MainViewModel : BindableBase
{
    private readonly IRegionManager regionManager;
    private IRegionNavigationJournal journal;
    public DelegateCommand<string> OpenCommand { get; private set; }
    public DelegateCommand BackCommand { get; private set; }
    public DelegateCommand NextCommand { get; private set; }
    public MainViewModel(IRegionManager regionManager)
    {
        OpenCommand = new DelegateCommand<string>(Open);
        BackCommand = new DelegateCommand(Back);
        NextCommand = new DelegateCommand(Next);
        this.regionManager = regionManager;
    }

    //GoBack返回(),GoForward()前进,Clear()清空日志
    private void Back()
    {
        if (journal.CanGoBack)
            journal.GoBack();
    }

    private void Go()
    {
        if (journal.CanGoForward)
        {
            journal.GoForward();
        }
     }

    void Open(string name)
    {
        NavigationParameters parameters = new NavigationParameters();
        parameters.Add("Title", name);
        //通过regionManager接口获取当前全局定义的可用区域
        //通过依赖注入的方式动态的往这个区域注入内容
        this.regionManager.Regions["ContentRegion"].RequestNavigate(name, callback =>
        {
            if ((bool)callback.Result)//导航成功
            {
                journal = callback.Context.NavigationService.Journal;//存储导航请求记录
            }
        }, parameters);
    }
}
(3)处理导航请求
INavigationAware接口。class PageAViewModel : BindableBase, INavigationAware
{
public PageAViewModel()
{
}
private string title;
public string Title
{
get { return title; }
set { title = value; RaisePropertyChanged(); }
}
//是否重用当前实例
public bool IsNavigationTarget(NavigationContext navigationContext)
{
return false;
}
//在当前的页面导航到其他页面的时候发生,可以用于拦截导航。
public void OnNavigatedFrom(NavigationContext navigationContext)
{
}
//导航完成前, 此处可以处理传递过来的参数以及是否允许导航等。
public void OnNavigatedTo(NavigationContext navigationContext)
{
//三种方式
if (navigationContext.Parameters.ContainsKey("Title"))
Title = navigationContext.Parameters.GetValue<string>("Title");
}
}PageA页面:<TextBlock Text="{Binding Title}" FontSize="60"/>
(4)导航确认和拦截
IConfirmNavigationRequest(其派生于INavigationAware,有委托类型的回调函数),并实现ConfirmNavigationRequest方法class PageAViewModel : BindableBase, IConfirmNavigationRequest
{
//导航确认,
public void ConfirmNavigationRequest(NavigationContext navigationContext, Action<bool> continuationCallback)
{
bool result = true;
if (MessageBox.Show("是否允许进入此页面?", "确认", MessageBoxButton.YesNo, MessageBoxImage.Question) == MessageBoxResult.No)
{
result = false;
}
// 是否允许下一步进入某个页面**********
continuationCallback(result);
}
......
实现INavigationAware方法
......
}(5)导航请求执行顺序

(导航请求执行顺序)
(A)RequestNavigate->ConfirmNavigationRequest->OnNavigatedFrom->(B)IsNavigationTarget->PageBViewModel(若重用实列)->OnNavigatedTo
6.对话服务
(1)主窗体注入IDialogService
主窗体的构造函数中注入IDialogService,并使用服务。
public class MainViewModel : BindableBase
{
    private readonly IDialogService dialogService;

    public DelegateCommand<string> OpenCommand { get; private set; }
    public MainViewModel(IDialogService dialogService)
    {
        OpenCommand = new DelegateCommand<string>(Open);
        this.dialogService = dialogService;
    }

    private void Open(string obj)
    {
        //像弹框传递参数
        DialogParameters keys = new DialogParameters();
        keys.Add("Title", "我是弹窗");
        dialogService.ShowDialog(obj, keys, callback =>
        {
            if(callback.Result==ButtonResult.OK)
            {
                //获取弹框返回值
                string result = callback.Parameters.GetValue<string> ("Value");
            }
        });
    }
}
(2)新增对话框组件
<Grid Background="White">
    <Grid.RowDefinitions>
        <RowDefinition />
        <RowDefinition Height="auto"/>
    </Grid.RowDefinitions>
    <TextBlock Text="Hello~" FontSize="60"/>
    <StackPanel Orientation="Horizontal" Grid.Row="1" HorizontalAlignment="Right">
        <Button Content="确定" Command="{Binding OkCommand}" Height="50" Width="100" Margin="10"/>
        <Button Content="取消" Command="{Binding CancelCommand}" Height="50" Width="100" Margin="10"/>
    </StackPanel>
</Grid>在对话框组件的ViewModel中实现IDialogAware接口。
public class DialogViewModel :BindableBase, IDialogAware
{
    public string Title { get; set; }

    public event Action<IDialogResult> RequestClose;
    public DelegateCommand OkCommand { get; set; }
    public DelegateCommand CancelCommand { get; set; }
    public DialogViewModel()
    {
        OkCommand = new DelegateCommand(Ok);
        CancelCommand = new DelegateCommand(Cancel);
    }

    private void Ok()
    {
        OnDialogClosed();
    }

    private void Cancel()
    {
        RequestClose?.Invoke(new DialogResult(ButtonResult.No));
    }

    //RequestClose后
    public bool CanCloseDialog()
    {
        return true;
    }

    public void OnDialogClosed()
    {
        DialogParameters keys = new DialogParameters();
        keys.Add("Value", "我是弹框返回的值");
        RequestClose?.Invoke(new DialogResult(ButtonResult.OK,keys));
    }

    //打开弹框时
    public void OnDialogOpened(IDialogParameters parameters)
    {
        Title = parameters.GetValue<string>("Title");
    }
(3)注册组件
同一项目中,在App中RegisterTypes注册组件;不同项目中,ConfigureModuleCatalog配置组件模块。其他步骤操作执行即可。
此处我们注册组件。
protected override void RegisterTypes(IContainerRegistry containerRegistry)
{
    containerRegistry.RegisterDialog<Dialog, DialogViewModel>();
}
7.发布订阅
(1)新建消息类
新建一个类,实现PubSubEvent的接口,<string>表示传递什么类型的消息
public class EventMessage : PubSubEvent<string>
{
}
(2)发布消息
在 ViewModel 的构造函数中注入IEventAggregator的属性参数,并发布消息
private readonly IEventAggregator aggregator;
public DelegateCommand OkCommand { get; set; }

public DialogViewModel(IEventAggregator aggregator)
{
    OkCommand = new DelegateCommand(Ok);
    this.aggregator = aggregator;
}

private void Ok()
{
    //发布消息 hello
    aggregator.GetEvent<EventMessage>().Publish("hello");
}
(3)订阅和取消订阅
public partial class Dialog : UserControl
{
    private readonly IEventAggregator aggregator;

    public Dialog(IEventAggregator aggregator)
    {
        InitializeComponent();
        this.aggregator = aggregator;
        //订阅消息
        aggregator.GetEvent<EventMessage>().Subscribe(SubMessage);
    }

    private void SubMessage(string obj)
    {
        MessageBox.Show($"订阅的消息{obj}");
        //取消订阅
        aggregator.GetEvent<EventMessage>().Unsubscribe(SubMessage);
    }
}
 浙公网安备 33010602011771号