《SpringMVC从入门到放肆》四、SpringMVC配置式开发(处理器映射器)
上一篇我们讲解了DispatcherServlet的url-pattern配置详解,今天我们来真正对SpringMVC进行配置式开发。
所谓配置式开发是指“处理器类是程序员自己定义的、实现了特定接口的类,然后在SpringMVC配置文件中对该类进行显式的,明确的注册”的开发方式。今天我们的开发还是将中央调度器的url-pattern配置成*.do。然后将springmvc.xml的静态资源访问先取消。
一、处理器映射器(BeanNameUrlHandlerMapping)
handlerMapping接口负责根据request请求找到对应的Handler处理器及Interceptor拦截器,并将它们封装在HandlerExecutionChain对象中,返回给中央调度器。其常用的实现类有两种:
1、BeanNameUrlHandlerMapping
2、SimpleUrlHandlerMapping
这里着重说明SimpleUrlHandlerMapping。BeanNameUrlHandlerMapping我们简单来看一下源码:
public class BeanNameUrlHandlerMapping extends AbstractDetectingUrlHandlerMapping {

    /**
     * Checks name and aliases of the given bean for URLs, starting with "/".
     */
    @Override
    protected String[] determineUrlsForHandler(String beanName) {
        List<String> urls = new ArrayList<String>();
        if (beanName.startsWith("/")) {
            urls.add(beanName);
        }
        String[] aliases = getApplicationContext().getAliases(beanName);
        for (String alias : aliases) {
            if (alias.startsWith("/")) {
                urls.add(alias);
            }
        }
        return StringUtils.toStringArray(urls);
    }

}
上方BeanNameUrlHandlerMapping类中只有一个方法determineUrlsForHandler()。该方法中把所有以斜杠开头的请求的BeanName都放到了一个名叫urls的List中。然后返回给了中央调度器。但是有一个弊端,比如我有两个请求都由一个Controller来处理,这时我们的springmvc.xml文件的配置方式如下:
<!-- 注册SpringMVC处理器 -->
<bean id="/my.do" class="cn.wechatbao.controller.MyController"></bean>
<bean id="/you.do" class="cn.wechatbao.controller.MyController"></bean>
这样Spring容器在创建MyController实例的时候,一次性创建了两个,而对于我们来说,其实一个实例就可以对两个或多个请求进行处理。所以我们继续来讲解SimpleUrlHandlerMapping方法。
二、处理器映射器(SimpleUrlHandlerMapping)
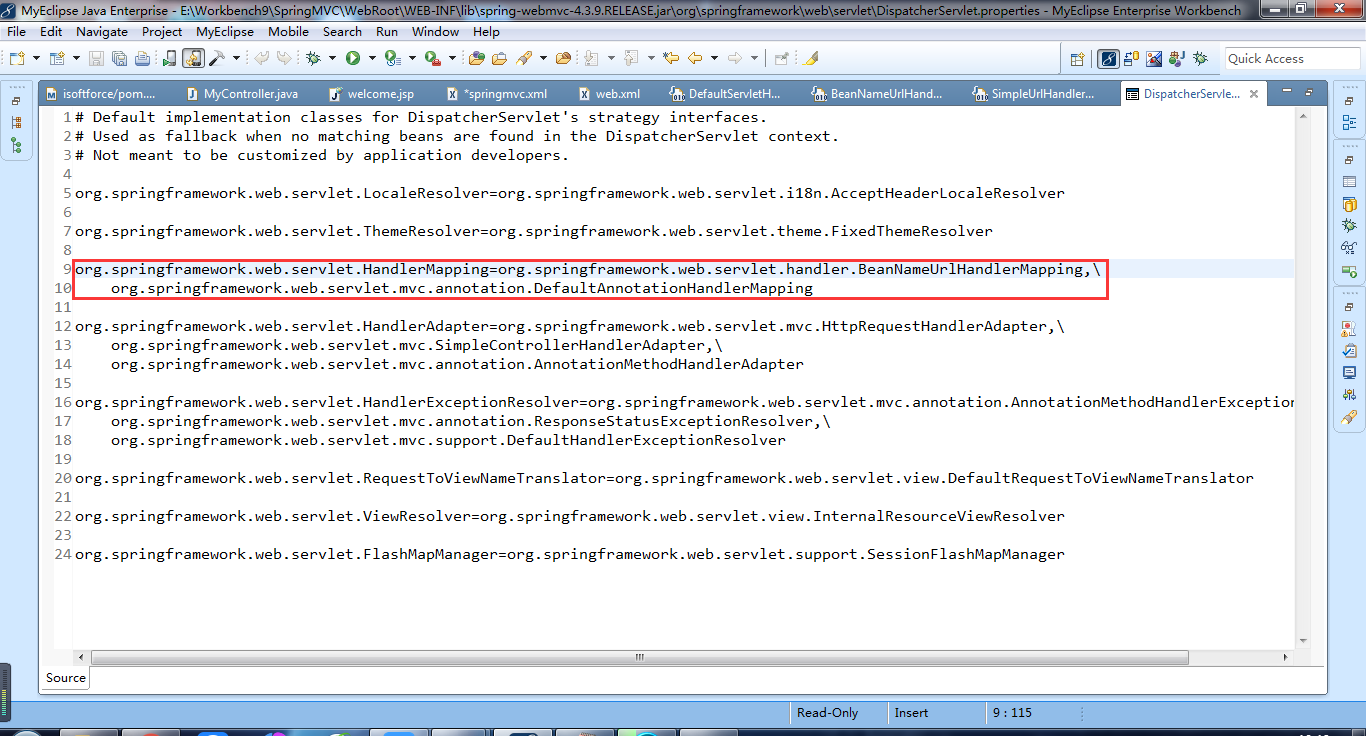
要使用SimpleUrlHandlerMapping我们需要将其注册到SpringMVC中,如图,我们在默认的处理器映射器中并没有发现该实现类。所以需要注册。

注册方式:(springmvc.xml如下)
<?xml version="1.0" encoding="UTF-8"?>
<beans xmlns="http://www.springframework.org/schema/beans"
    xmlns:xsi="http://www.w3.org/2001/XMLSchema-instance"
    xmlns:context="http://www.springframework.org/schema/context"
    xmlns:aop="http://www.springframework.org/schema/aop"
    xmlns:tx="http://www.springframework.org/schema/tx"
    xmlns:mvc="http://www.springframework.org/schema/mvc"
    xsi:schemaLocation="http://www.springframework.org/schema/beans
        http://www.springframework.org/schema/beans/spring-beans.xsd
        http://www.springframework.org/schema/context
        http://www.springframework.org/schema/context/spring-context.xsd
        http://www.springframework.org/schema/aop
        http://www.springframework.org/schema/aop/spring-aop.xsd
        http://www.springframework.org/schema/tx
        http://www.springframework.org/schema/tx/spring-tx.xsd
        http://www.springframework.org/schema/mvc
        http://www.springframework.org/schema/mvc/spring-mvc.xsd">

    <!-- 注册视图解析器 -->
    <bean class="org.springframework.web.servlet.view.InternalResourceViewResolver">
        <property name="prefix" value="/WEB-INF/jsp/" />
        <property name="suffix" value=".jsp" />
    </bean>

    <bean class="org.springframework.web.servlet.handler.SimpleUrlHandlerMapping">
        <property name="mappings">
            <props>
                <prop key="/my.do">myController</prop>
                <prop key="/you.do">myController</prop>
                <prop key="/he.do">myController</prop>
            </props>
        </property>
        <!--
        这种方式也可以实现多个请求交由一个Controller处理的需求
        <property name="urlMap">
            <map>
                <entry key="/my.do" value="myController"></entry>
                <entry key="/you.do" value="myController"></entry>
                <entry key="/he.do" value="myController"></entry>
            </map>
        </property>
         -->
    </bean>

    <!-- 注册SpringMVC处理器 -->
    <bean id="myController" class="cn.wechatbao.controller.MyController"></bean>
</beans>
注意:该种配置方式只针对多个请求用一个Controller处理才使用。
三、处理器映射器源码分析
1、当客户端发送请求到达中央调度器(DispatcherServlet)时,DispatcherServlet首先进入到doService方法在doService()方法里,对request设计一些属性,然后又进入到了doDispatch()方法,在doDispatch()方法里,我们着重来看以下代码:
// Determine handler for the current request.
mappedHandler = getHandler(processedRequest);
2、从doDispatch()方法又进入了一个getHandler()的方法,如下
protected HandlerExecutionChain getHandler(HttpServletRequest request) throws Exception {
    for (HandlerMapping hm : this.handlerMappings) {
        if (logger.isTraceEnabled()) {
            logger.trace(
                        "Testing handler map [" + hm + "] in DispatcherServlet with name '" + getServletName() + "'");
        }
        HandlerExecutionChain handler = hm.getHandler(request);
        if (handler != null) {
            return handler;
        }
    }
    return null;
}
在该方法中,使用了一个forEach循环,来循环所有的处理器映射器,根据每个处理器映射器(HandlerMapping)来获取与之对应的处理器执行链(HandlerExecutionChain)。
进入hm.getHandler(request);方法来看。
3、继续hm.getHandler(request);方法
@Override
public final HandlerExecutionChain getHandler(HttpServletRequest request) throws Exception {
    Object handler = getHandlerInternal(request);
    if (handler == null) {
        handler = getDefaultHandler();
    }
    if (handler == null) {
        return null;
    }
    // Bean name or resolved handler?
    if (handler instanceof String) {
        String handlerName = (String) handler;
        handler = getApplicationContext().getBean(handlerName);
    }

    HandlerExecutionChain executionChain = getHandlerExecutionChain(handler, request);
    if (CorsUtils.isCorsRequest(request)) {
        CorsConfiguration globalConfig = this.corsConfigSource.getCorsConfiguration(request);
        CorsConfiguration handlerConfig = getCorsConfiguration(handler, request);
        CorsConfiguration config = (globalConfig != null ? globalConfig.combine(handlerConfig) : handlerConfig);
        executionChain = getCorsHandlerExecutionChain(request, executionChain, config);
    }
    return executionChain;
}
4、接下来又走到了HandlerExecutionChain executionChain = getHandlerExecutionChain(handler, request);这个方法。我们就不继续深究了。有兴趣的朋友可以自己再研究下去。我们得出的结论是经过了一系列的方法,最终返回给中央调度器一个HandlerExecutionChain对象。明白这个我们的目的就已经达到了。

 上一篇我们讲解了DispatcherServlet的url-pattern配置详解,今天我们来真正对SpringMVC进行配置式开发。
所谓配置式开发是指“处理器类是程序员自己定义的、实现了特定接口的类,然后在SpringMVC配置文件中对该类进行显式的,明确的注册”的开发方式。今天我们的开发还是将中央调度器的url-pattern配置成*.do。然后将springmvc.xml的静态资源访问先取消。handlerMapping接口负责根据request请求找到对应的Handler处理器及Interceptor拦截器,并将它们封装在HandlerExecutionChain对象中,返回给中央调度器。其常用的实现类有两种:
1、BeanNameUrlHandlerMapping
2、SimpleUrlHandlerMapping

 浙公网安备 33010602011771号