JUC阻塞队列之BlockedQueue(七)
一.阻塞队列
阻塞队列是一个队列,它最大的特点就是阻塞的线程满足条件就会被自动唤醒,不需要我们人为的判断。
- 当队列为空时,从队列中获取元素的操作就会被阻塞;
- 当队列为满时,从队列中添加元素的操作就会被阻塞。

二.阻塞队列的好处
之前总结的线程间通信,需要判断对应的值,一个生产者与一个消费者,在判断状态的时候需要加一个标志类,还需要控制线程。而阻塞队列在某些情况会挂起<暂停>线程(阻塞),满足条件,就会被自动的唤起
java中阻塞队列的方法如下:
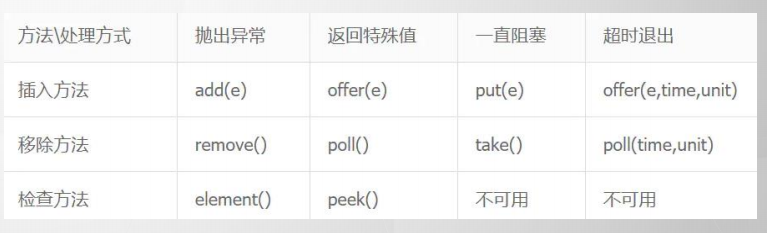
BlockQueue的源码:
public interface BlockingQueue<E> extends Queue<E> {

    //增加一个元索 如果队列已满,则抛出一个IIIegaISlabEepeplian异常
    boolean add(E e);

    //添加一个元素并返回true 如果队列已满,则返回false
    boolean offer(E e);

    //添加一个元素 如果队列满,则阻塞
    void put(E e) throws InterruptedException;

    boolean offer(E e, long timeout, TimeUnit unit)
        throws InterruptedException;

    //移除并返回队列头部的元素 如果队列为空,则阻塞
    E take() throws InterruptedException;

    //移除并返问队列头部的元素 如果队列为空,则返回null
    E poll(long timeout, TimeUnit unit)
        throws InterruptedException;

    //剩余容量
    int remainingCapacity();

    //移除并返回队列头部的元素 如果队列为空,则抛出一个NoSuchElementException异常
    boolean remove(Object o);

    public boolean contains(Object o);

    //一次性从BlockingQueue获取所有可用的数据对象并转移到参数集合中
    int drainTo(Collection<? super E> c);

    int drainTo(Collection<? super E> c, int maxElements);
}
可以看到,BlockQueue提供了很多不同于其他集合的方法。下面是它的子类:
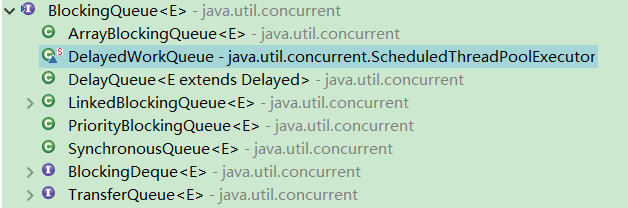
我们随便选一个ArrayBlockQueue来探索一下它是怎么做到阻塞的。先看看它的三个构造方法:
public ArrayBlockingQueue(int capacity) {
        this(capacity, false);
    }

    public ArrayBlockingQueue(int capacity, boolean fair) {
    if (capacity <= 0)
            throw new IllegalArgumentException();
         //初始化一个数组
        this.items = new Object[capacity];
        //重入锁
        lock = new ReentrantLock(fair);
        //下面初始化的是两个队列
        notEmpty = lock.newCondition();
        notFull =  lock.newCondition();
    }
public ArrayBlockingQueue(int capacity, boolean fair, Collection<? extends E> c) { this(capacity, fair); final ReentrantLock lock = this.lock; lock.lock(); // Lock only for visibility, not mutual exclusion try { int i = 0; try { for (E e : c) { checkNotNull(e); items[i++] = e; } } catch (ArrayIndexOutOfBoundsException ex) { throw new IllegalArgumentException(); } count = i; putIndex = (i == capacity) ? 0 : i; } finally { lock.unlock(); } }
我们关注的重点当然是第三个构造方法,此处用到了lock锁来把一个普通的集合转移到ArrayBlockQueue中。ArrayBlockQueue的初始化是在第二个构造方法中完成的。需要注意的是,ArrayBlockQueue内部存储对象的方式是通过Object数组实现的。
不难想象,构造方法就已经用lock锁来达到安全的目的了,那么,其他的阻塞相关方法也肯定离不开lock锁的影子了。我们带着这个flag继续往下走。先来看看offer()方法和put()方法,发现和我们猜想的一样:
该方法在ArrayBlockQueue中有两个重载方法offer(E e, long timeout, TimeUnit unit)和offer(E e)。
将指定的元素插入到此队列的尾部(如果立即可行且不会超过该队列的容量),在成功时返回 true,如果此队列已满,则返回 false。前者与后者的主要区别在于,如果队列中没有可用空间,可以设置一定的等待时间,等待可用空间。
 public boolean offer(E e) {
        checkNotNull(e);
        final ReentrantLock lock = this.lock;
        lock.lock();
        try {
            //如果长度等于数组长度表示已经满了
            if (count == items.length)
                return false;
            else {
                enqueue(e);
                return true;
            }
        } finally {
            lock.unlock();
        }
    }
将指定的元素插入到队列的尾部,如果有可用空间直接插入,如果没有可用空间,调用condition.await()方法等待,直到被唤醒,然后插入元素。
public void put(E e) throws InterruptedException {
        checkNotNull(e);
        final ReentrantLock lock = this.lock;
        //这种锁可以中断
        lock.lockInterruptibly();
        try {
            while (count == items.length)
                notFull.await();
            //可以跟进
            enqueue(e);
        } finally {
            lock.unlock();
        }
    }

    public E take() throws InterruptedException {
        final ReentrantLock lock = this.lock;
        lock.lockInterruptibly();
        try {
            while (count == 0)
                notEmpty.await();
            return dequeue();
        } finally {
            lock.unlock();
        }
    }

    public E poll() {
        final ReentrantLock lock = this.lock;
        lock.lock();
        try {
            return (count == 0) ? null : dequeue();
        } finally {
            lock.unlock();
        }
    }
private void enqueue(E x) {
        // assert lock.getHoldCount() == 1;
        // assert items[putIndex] == null;
        final Object[] items = this.items;
        //此处putIndex可以当成游标
        items[putIndex] = x;
        //当数据满了,游标会恢复为0
        if (++putIndex == items.length)
            putIndex = 0;
        //队列中元素个数
        count++;
        //唤醒
        notEmpty.signal();
    }
如果插入元素成功,返回true,如果插入失败抛出异常IllegalStateException(“Queue full”)。
public boolean add(E e) {
        if (offer(e))
            return true;
        else
            throw new IllegalStateException("Queue full");
    }
出队列方法:
该方法也有两个重载方法poll(long timeout, TimeUnit unit)和poll(),从队列头部移除一个元素,前者与后者的区别在于,如果队列中没有可以移除的元素,前者会等待一定时间,然后执行移除方法。
public E poll() {
        final ReentrantLock lock = this.lock;
        lock.lock();
        try {
            return (count == 0) ? null : dequeue();//如果没有可以移出元素,返回null,否则执行dequeue()方法
        } finally {
            lock.unlock();
        }
    }
public E poll(long timeout, TimeUnit unit) throws InterruptedException {
        long nanos = unit.toNanos(timeout);
        final ReentrantLock lock = this.lock;
        lock.lockInterruptibly();
        try {
            while (count == 0) {
                if (nanos <= 0)
                    return null;
                nanos = notEmpty.awaitNanos(nanos);//如果没有可以移出元素,调用condition的线程等待的方法,等待一定时间
            }
            return dequeue();
        } finally {
            lock.unlock();//最后释放锁lock
        }
    }
private E dequeue() {
        // assert lock.getHoldCount() == 1;
        // assert items[takeIndex] != null;
        final Object[] items = this.items;
        @SuppressWarnings("unchecked")
        E x = (E) items[takeIndex];
        items[takeIndex] = null;
        if (++takeIndex == items.length)
            takeIndex = 0;
        count--;
        if (itrs != null)
            itrs.elementDequeued();
        notFull.signal();//最后唤醒其他等待的线程
        return x;
    }
获取并移除此队列的头部。take()和poll()的区别在于,如果队列中没有可移除元素,take()会一直等待,而poll()可设置直接返回null或者等待一定时间。
public E take() throws InterruptedException {
        final ReentrantLock lock = this.lock;
        lock.lockInterruptibly();
        try {
            while (count == 0)
                notEmpty.await();//如果队列中没有元素,该线程一直处于阻塞状态
            return dequeue();
        } finally {
            lock.unlock();
        }
      }
分析完了上面的源码,我们以一个小Demo来结束上面的话题,我们以积分分发和消费为例来随便搞个例子
public class User {
    private String name;

    public User(String name) {
        this.name = name;
    }

    @Override
    public String toString() {
        return "User{" +
                "name='" + name + '\'' +
                '}';
    }
}
public class UserService {

    private final ExecutorService executorService= Executors.newSingleThreadExecutor();

    ArrayBlockingQueue<User> arrayBlockingQueue=new ArrayBlockingQueue(10);
    {
        init();
    }
    public void init(){ //不断消费队列的线程
        executorService.execute(()->{
            while(true){
                try {
                    User user=arrayBlockingQueue.take(); //阻塞式
                    System.out.println("发送优惠券给:"+user);
                } catch (InterruptedException e) {
                    e.printStackTrace();
                }
            }
        });
    }

    public boolean register(){
        User user=new User("用户A");
        addUser(user);
        //发送积分.
        try {
            arrayBlockingQueue.put(user);
        } catch (InterruptedException e) {
            e.printStackTrace();
        }
        return true;
    }
    private void addUser(User user){
        System.out.println("添加用户:"+user);
    }

    public static void main(String[] args) {
        new UserService().register();
    }
}
二.CountDownLatch
CountDownLatch一般用作多线程倒计时计数器,强制它们等待其他一组(CountDownLatch的初始化决定)任务执行完成。- 有一点要说明的是
CountDownLatch初始化后计数器值递减到0的时候,不能再复原的,这一点区别于Semaphore,Semaphore是可以通过release操作恢复信号量的。
g下面场景,我们阻塞主线程,每运行一个子线程CountDownLatch就会减1,只有减到0时主线程才会运行
public class CountDownLatchDemo {

    public static void main(String[] args) throws InterruptedException {
        CountDownLatch countDownLatch=new CountDownLatch(3);
        new Thread(()->{
            System.out.println(Thread.currentThread().getName()+"->begin");
            countDownLatch.countDown(); //初始值-1 =3-1=2;
            System.out.println(Thread.currentThread().getName()+"->end");
        },"t1").start();
        new Thread(()->{
            System.out.println(Thread.currentThread().getName()+"->begin");
            countDownLatch.countDown(); //2-1=1;
            System.out.println(Thread.currentThread().getName()+"->end");
        },"t2").start();
        new Thread(()->{
            System.out.println(Thread.currentThread().getName()+"->begin");
            countDownLatch.countDown(); //1-1=1;
            System.out.println(Thread.currentThread().getName()+"->end");
        },"t3").start();

        countDownLatch.await(); //阻塞Main线程
        System.out.println("当CoutDownLatch计算为0时主线程唤醒");
    }
}
CountDownLatch和ReentrantLock一样,内部使用Sync继承AQS。构造函数很简单地传递计数值给Sync,并且设置了state。
Sync(int count) {
    setState(count);
}
AQS的state,这是一个由子类决定含义的“状态”。对于ReentrantLock来说,state是线程获取锁的次数;对于CountDownLatch来说,则表示计数值的大小。
1.阻塞线程
接着来看await方法,直接调用了AQS的acquireSharedInterruptibly。
public void await() throws InterruptedException {
    sync.acquireSharedInterruptibly(1);
}
public final void acquireSharedInterruptibly(int arg)
        throws InterruptedException {
    if (Thread.interrupted())
        throw new InterruptedException();
    if (tryAcquireShared(arg) < 0)
        doAcquireSharedInterruptibly(arg);
}
首先尝试获取共享锁,实现方式和独占锁类似,由CountDownLatch实现判断逻辑。
protected int tryAcquireShared(int acquires) {
   // 此时的getState我们已经初始值了不为0,返回-1
   return (getState() == 0) ? 1 : -1;
}
返回1代表获取成功,返回-1代表获取失败。如果获取失败,需要调用doAcquireSharedInterruptibly:
private void doAcquireSharedInterruptibly(int arg)
    throws InterruptedException {
    //和以前的一样创建AQS共享队列,有了前几篇幅的积累看这里已经很简单了
    final Node node = addWaiter(Node.SHARED);
    boolean failed = true;
    try {
        //又是自旋
        for (;;) {
            final Node p = node.predecessor();
            if (p == head) {
                //抢占共享锁
                int r = tryAcquireShared(arg);
                if (r >= 0) {
                    //抢到了被唤醒走这里
                    setHeadAndPropagate(node, r);
                    p.next = null; // help GC
                    failed = false;
                    return;
                }
            }
             //这个判断在以前篇幅有讲过这里就不讲了,就是将节点设置成SIGNAL节点,表示可以正常唤醒的节点
            if (shouldParkAfterFailedAcquire(p, node) &&
               //这里是挂起操作
                parkAndCheckInterrupt())
                throw new InterruptedException();
        }
    } finally {
        if (failed)
            cancelAcquire(node);
    }
}
doAcquireSharedInterruptibly的逻辑和独占功能的acquireQueued基本相同,阻塞线程的过程是一样的。不同之处:
- 创建的Node是定义成共享的(Node.SHARED);
- 被唤醒后重新尝试获取锁,不只设置自己为head,还需要通知其他等待的线程。(重点看后文释放操作里的setHeadAndPropagate)
2.释放操作
看countDownLatch.countDown();
public void countDown() {
    sync.releaseShared(1);
}
countDown操作实际就是释放锁的操作,每调用一次,计数值减少1:
public final boolean releaseShared(int arg) {
    if (tryReleaseShared(arg)) {
        //成立表示释放锁了,可以走唤醒操作喽
        doReleaseShared();
        return true;
    }
    return false;
}
同样是首先尝试释放锁,具体实现在CountDownLatch中:
protected boolean tryReleaseShared(int releases) {
    // Decrement count; signal when transition to zero
    for (;;) {
         //每调一次线程就会减1
        int c = getState();
        if (c == 0)
            return false;
        int nextc = c-1;
        //CAS是防止多线程访问,所以直接跟内存交互
        if (compareAndSetState(c, nextc))
            return nextc == 0;
    }
}
死循环加上cas的方式保证state的减1操作,当计数值等于0,代表所有子线程都执行完毕,被await阻塞的线程可以唤醒了,下一步调用doReleaseShared:
private void doReleaseShared() {
   for (;;) {
       Node h = head;
       if (h != null && h != tail) {
           int ws = h.waitStatus;
           if (ws == Node.SIGNAL) {
             //1
               if (!compareAndSetWaitStatus(h, Node.SIGNAL, 0))
                   continue;            // loop to recheck cases
               unparkSuccessor(h);
           }
           //2
           else if (ws == 0 &&
                    !compareAndSetWaitStatus(h, 0, Node.PROPAGATE))
               continue;                // loop on failed CAS
       }
       if (h == head)                   // loop if head changed
           break;
   }
}
标记1里,头节点状态如果SIGNAL,则状态重置为0,并调用unparkSuccessor唤醒下个节点。
标记2里,被唤醒的节点状态会重置成0,在下一次循环中被设置成PROPAGATE状态,代表状态要向后传播。
private void unparkSuccessor(Node node) {
    int ws = node.waitStatus;
    if (ws < 0)
        compareAndSetWaitStatus(node, ws, 0);

    Node s = node.next;
    if (s == null || s.waitStatus > 0) {
        s = null;
        //无效节点就跳过去
        for (Node t = tail; t != null && t != node; t = t.prev)
            if (t.waitStatus <= 0)
                s = t;
    }
    if (s != null)
         //唤醒当前头节点
        LockSupport.unpark(s.thread);
}
在唤醒线程的操作里,分成三步:
- 处理当前节点:非CANCELLED状态重置为0;
- 寻找下个节点:如果是CANCELLED状态,说 明节点中途溜了,从队列尾开始寻找排在最前还在等着的节点
- 唤醒:利用LockSupport.unpark唤醒下个节点里的线程。
线程是在doAcquireSharedInterruptibly里被阻塞的,唤醒后调用到setHeadAndPropagate。
private void setHeadAndPropagate(Node node, int propagate) {
    //将当前节点变成头节点,前置节点设为空
    Node h = head;
    setHead(node);

    if (propagate > 0 || h == null || h.waitStatus < 0 ||
        (h = head) == null || h.waitStatus < 0) {
        Node s = node.next;
        if (s == null || s.isShared())
            doReleaseShared();
    }
}
setHead设置头节点后,再判断一堆条件,取出下一个节点,如果也是共享类型,进行doReleaseShared释放操作。下个节点被唤醒后,重复上面的步骤,达到共享状态向后传播。
要注意,await操作看着好像是独占操作,但它可以在多个线程中调用。当计数值等于0的时候,调用await的线程都需要知道,所以使用共享锁。
限定时间的await
CountDownLatch的await方法还有个限定阻塞时间的版本.
public boolean await(long timeout, TimeUnit unit)
    throws InterruptedException {
    return sync.tryAcquireSharedNanos(1, unit.toNanos(timeout));
}
跟踪代码,最后来看doAcquireSharedNanos方法,和上文介绍的doAcquireShared逻辑基本一样,不同之处是加了time字眼的处理。
private boolean doAcquireSharedNanos(int arg, long nanosTimeout)
        throws InterruptedException {
    if (nanosTimeout <= 0L)
        return false;
    final long deadline = System.nanoTime() + nanosTimeout;
    final Node node = addWaiter(Node.SHARED);
    boolean failed = true;
    try {
        for (;;) {
            final Node p = node.predecessor();
            if (p == head) {
                int r = tryAcquireShared(arg);
                if (r >= 0) {
                    setHeadAndPropagate(node, r);
                    p.next = null; // help GC
                    failed = false;
                    return true;
                }
            }
            nanosTimeout = deadline - System.nanoTime();
            if (nanosTimeout <= 0L)
                return false;
            if (shouldParkAfterFailedAcquire(p, node) &&
                nanosTimeout > spinForTimeoutThreshold)
                LockSupport.parkNanos(this, nanosTimeout);
            if (Thread.interrupted())
                throw new InterruptedException();
        }
    } finally {
        if (failed)
            cancelAcquire(node);
    }
}
进入方法时,算出能够执行多久的deadline,然后在循环中判断时间。注意到代码中间有句:
nanosTimeout > spinForTimeoutThreshold
static final long spinForTimeoutThreshold = 1000L;
spinForTimeoutThreshold写死了1000ns,这就是所谓的自旋操作。当超时在1000ns内,让线程在循环中自旋,否则阻塞线程。
三. semaphore(信号灯)
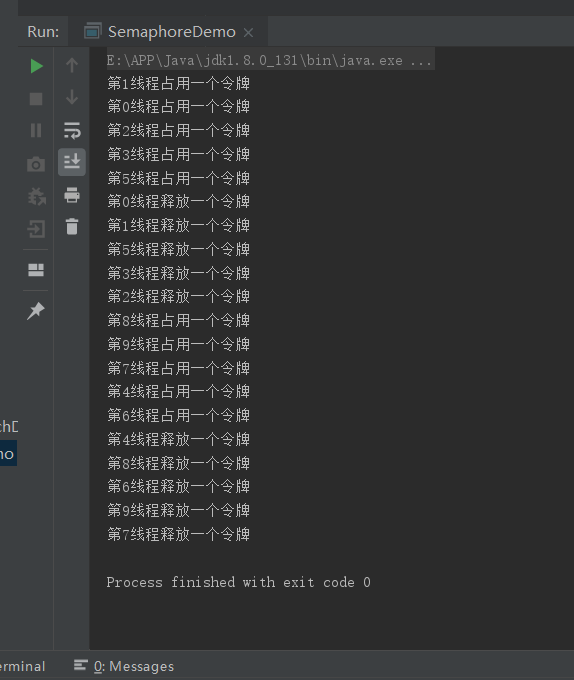
Semaphore是一种基于计数的信号量。它可以设定一个阈值,基于此,多个线程竞争获取许可信号,做完自己的申请后归还,超过阈值后,线程申请许可信号将会被阻塞。Semaphore可以用来构建一些对象池,资源池之类的,比如数据库连接池,我们也可以创建计数为1的Semaphore,将其作为一种类似互斥锁的机制,这也叫二元信号量,表示两种互斥状态。它的用法如下:
public class SemaphoreDemo {

    public static void main(String[] args) {
        Semaphore semaphore=new Semaphore(5); //令牌数 state=5
        for(int i=0;i<10;i++){
            new Car(semaphore,i).start();
        }
    }
    static class Car extends Thread{
        Semaphore semaphore;
        int num;

        public Car(Semaphore semaphore, int num) {
            this.semaphore = semaphore;
            this.num = num;
        }
        @Override
        public void run() {
            try {
                semaphore.acquire(); //5-1 获得令牌.(没拿到令牌,会阻塞,拿到了就可以往下执行)
                System.out.println("第"+num+"线程占用一个令牌");
                Thread.sleep(3000);
                System.out.println("第"+num+"线程释放一个令牌");
                semaphore.release(); //释放令牌
            } catch (InterruptedException e) {
                e.printStackTrace();
            }

        }
    }
}
同ReentrantLock一样,Semaphore内部也是依靠一个继承自AbstractQueuedSynchronizer的Sync抽象类型的类成员变量sync来实现主要功能的,如下:
 /** All mechanics via AbstractQueuedSynchronizer subclass */
    private final Sync sync;
同时,Semaphore也是由公平性和非公平性两种实现模式,对应Sync的两个实现类FairSync和NonfairSync。而acquire()方法实现的主要逻辑为:

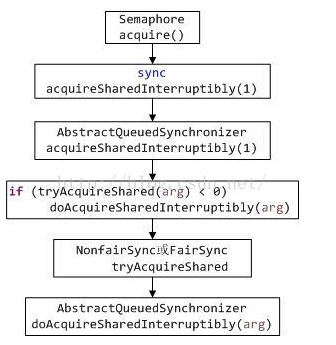
它的主要处理流程是:
1、通过Semaphore的acquire()方法申请许可;
2、调用类成员变量sync的acquireSharedInterruptibly(1)方法处理,实际上是父类AbstractQueuedSynchronizer的acquireSharedInterruptibly()方法处理;
3、AbstractQueuedSynchronizer的acquireSharedInterruptibly()方法会先在当前线程未中断的情况下先调用tryAcquireShared()方法尝试获取许可,未获取到则调用doAcquireSharedInterruptibly()方法将当前线程加入等待队列。acquireSharedInterruptibly()代码如下:
public final void acquireSharedInterruptibly(int arg)
            throws InterruptedException {
        if (Thread.interrupted())
            throw new InterruptedException();
         //前面的文章中有说明过
        if (tryAcquireShared(arg) < 0)
            doAcquireSharedInterruptibly(arg);
    }

 浙公网安备 33010602011771号