


JAVAEE——宜立方商城03:商品类目选择、Nginx端口或域名区分虚拟机、Nginx反向代理、负载均衡、keepalived实现高可用
1. 学习计划
第三天:
1、商品类目选择(EasyUI的tree实现)
2、图片上传
a) 图片服务器FastDFS(Nainx部分)
2. 商品类目选择
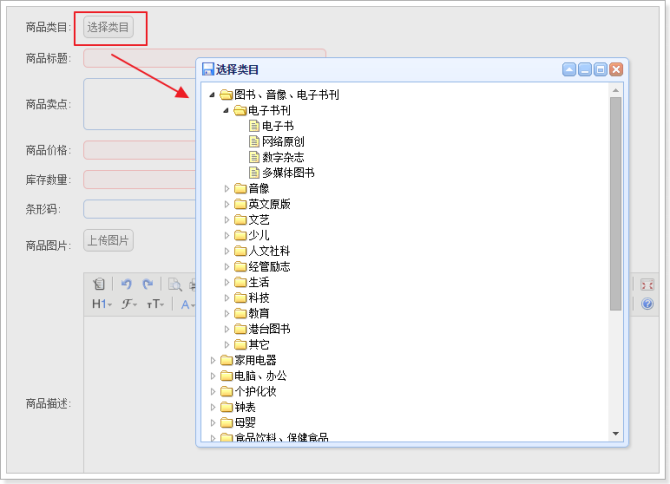
2.1. 原型
2.2. 功能分析
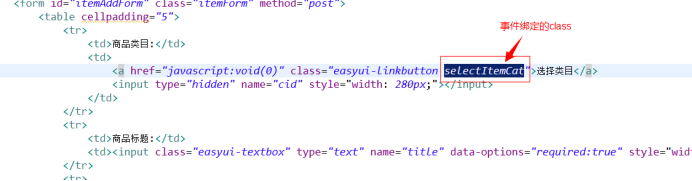

展示商品分类列表,使用EasyUI的tree控件展示。

初始化tree请求的url:/item/cat/list
参数:
初始化tree时只需要把第一级节点展示,子节点异步加载。
long id(父节点id)
返回值:json。数据格式
[{
"id": 1,
"text": "Node 1",
"state": "closed"
},{
"id": 2,
"text": "Node 2",
"state": "closed"
}]
state:如果节点下有子节点“closed”,如果没有子节点“open”
创建一个pojo来描述tree的节点信息,包含三个属性id、text、state。放到e3-common工程中。
public class EasyUITreeNode implements Serializable{

    private long id;
    private String text;
    private String state;
    public long getId() {
        return id;
    }
    public void setId(long id) {
        this.id = id;
    }
    public String getText() {
        return text;
    }
    public void setText(String text) {
        this.text = text;
    }
    public String getState() {
        return state;
    }
    public void setState(String state) {
        this.state = state;
    }

}
查询的表:
tb_item_cat
查询列:
Id、name、isparent
查询条件parentId
2.3. Dao层
tb_item_cat
可以使用逆向工程生成的代码
2.4. Service层
参数:long parentId
业务逻辑:
1、根据parentId查询节点列表
2、转换成EasyUITreeNode列表。
3、返回。
返回值:List<EasyUITreeNode>
@Service
public class ItemCatServiceImpl implements ItemCatService {

    @Autowired
    private TbItemCatMapper itemCatMapper;


    @Override
    public List<EasyUITreeNode> getCatList(long parentId) {
        // 1、根据parentId查询节点列表
        TbItemCatExample example = new TbItemCatExample();
        //设置查询条件
        Criteria criteria = example.createCriteria();
        criteria.andParentIdEqualTo(parentId);
        List<TbItemCat> list = itemCatMapper.selectByExample(example);
        // 2、转换成EasyUITreeNode列表。
        List<EasyUITreeNode> resultList = new ArrayList<>();
        for (TbItemCat tbItemCat : list) {
            EasyUITreeNode node = new EasyUITreeNode();
            node.setId(tbItemCat.getId());
            node.setText(tbItemCat.getName());
            node.setState(tbItemCat.getIsParent()?"closed":"open");
            //添加到列表
            resultList.add(node);
        }
        // 3、返回。
        return resultList;
    }

}
2.4.1. 发布服务
2.5. 表现层
2.5.1. 引用服务
2.5.2. Controller
初始化tree请求的url:/item/cat/list
参数:
long id(父节点id)
返回值:json。数据格式
List<EasyUITreeNode>
@Controller
public class ItemCatController {

    @Autowired
    private ItemCatService itemCatService;
    @RequestMapping("/item/cat/list")
    @ResponseBody
    public List<EasyUITreeNode> getItemCatList(@RequestParam(value="id", defaultValue="0")Long parentId) {

        List<EasyUITreeNode> list = itemCatService.getCatList(parentId);
        return list;
    }
}
3.图片上传分析
传统方式:

集群环境:

解决方案:
搭建一个图片服务器,专门保存图片。可以使用分布式文件系统FastDFS。
4. 什么是nginx
Nginx是一款高性能的http 服务器/反向代理服务器及电子邮件(IMAP/POP3)代理服务器。由俄罗斯的程序设计师Igor Sysoev所开发,官方测试nginx能够支支撑5万并发链接,并且cpu、内存等资源消耗却非常低,运行非常稳定。
5. 应用场景
1、http服务器。Nginx是一个http服务可以独立提供http服务。可以做网页静态服务器。
2、虚拟主机。可以实现在一台服务器虚拟出多个网站。例如个人网站使用的虚拟主机。
3、反向代理,负载均衡。当网站的访问量达到一定程度后,单台服务器不能满足用户的请求时,需要用多台服务器集群可以使用nginx做反向代理。并且多台服务器可以平均分担负载,不会因为某台服务器负载高宕机而某台服务器闲置的情况。
6. nginx安装
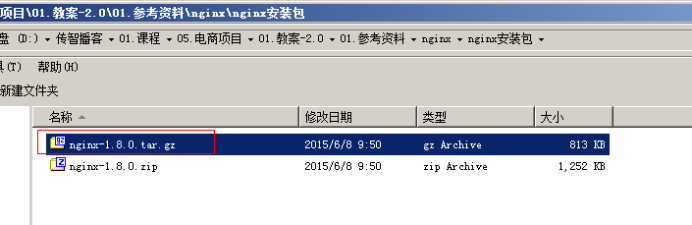
下载nginx:
官方网站:
使用的版本是1.8.0版本。
Nginx提供的源码。
6.1. 要求的安装环境
1、需要安装gcc的环境。yum install gcc-c++
2、第三方的开发包。
n PCRE
PCRE(Perl Compatible Regular Expressions)是一个Perl库,包括 perl 兼容的正则表达式库。nginx的http模块使用pcre来解析正则表达式,所以需要在linux上安装pcre库。
yum install -y pcre pcre-devel
注:pcre-devel是使用pcre开发的一个二次开发库。nginx也需要此库。
n zlib
zlib库提供了很多种压缩和解压缩的方式,nginx使用zlib对http包的内容进行gzip,所以需要在linux上安装zlib库。
yum install -y zlib zlib-devel
n openssl
OpenSSL 是一个强大的安全套接字层密码库,囊括主要的密码算法、常用的密钥和证书封装管理功能及SSL协议,并提供丰富的应用程序供测试或其它目的使用。
nginx不仅支持http协议,还支持https(即在ssl协议上传输http),所以需要在linux安装openssl库。
yum install -y openssl openssl-devel
6.2. 安装步骤
第一步:把nginx的源码包上传到linux系统
第二步:解压缩
[root@localhost ~]# tar zxf nginx-1.8.0.tar.gz
第三步:使用configure命令创建一makeFile文件。
./configure \
--prefix=/usr/local/nginx \
--pid-path=/var/run/nginx/nginx.pid \
--lock-path=/var/lock/nginx.lock \
--error-log-path=/var/log/nginx/error.log \
--http-log-path=/var/log/nginx/access.log \
--with-http_gzip_static_module \
--http-client-body-temp-path=/var/temp/nginx/client \
--http-proxy-temp-path=/var/temp/nginx/proxy \
--http-fastcgi-temp-path=/var/temp/nginx/fastcgi \
--http-uwsgi-temp-path=/var/temp/nginx/uwsgi \
--http-scgi-temp-path=/var/temp/nginx/scgi
注意:启动nginx之前,上边将临时文件目录指定为/var/temp/nginx,需要在/var下创建temp及nginx目录
[root@localhost sbin]# mkdir /var/temp/nginx/client -p
第四步:make
第五步:make install
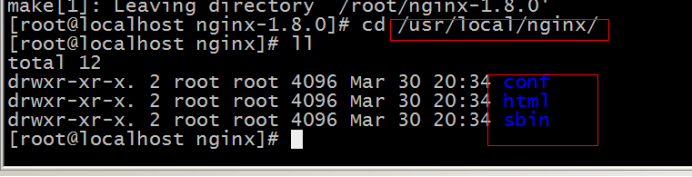
6.3. 启动nginx
进入sbin目录
[root@localhost sbin]# ./nginx

关闭nginx:
[root@localhost sbin]# ./nginx -s stop
推荐使用:
[root@localhost sbin]# ./nginx -s quit
重启nginx:
1、先关闭后启动。
2、刷新配置文件:
[root@localhost sbin]# ./nginx -s reload
6.4. 访问nginx
默认是80端口。
注意:是否关闭防火墙。
7. 配置虚拟主机
就是在一台服务器启动多个网站。
如何区分不同的网站:
1、域名不同
2、端口不同
7.1. 通过端口区分不同虚拟机
Nginx的配置文件:
/usr/local/nginx/conf/nginx.conf
|
#user nobody; worker_processes 1;
#error_log logs/error.log; #error_log logs/error.log notice; #error_log logs/error.log info;
#pid logs/nginx.pid;
events { worker_connections 1024; }
http { include mime.types; default_type application/octet-stream;
#log_format main '$remote_addr - $remote_user [$time_local] "$request" ' # '$status $body_bytes_sent "$http_referer" ' # '"$http_user_agent" "$http_x_forwarded_for"';
#access_log logs/access.log main;
sendfile on; #tcp_nopush on;
#keepalive_timeout 0; keepalive_timeout 65;
#gzip on;
server { listen 80; server_name localhost;
#charset koi8-r;
#access_log logs/host.access.log main;
location / { root html; index index.html index.htm; } } }
|
可以配置多个server,配置了多个虚拟主机。
添加虚拟主机:
|
#user nobody; worker_processes 1;
#error_log logs/error.log; #error_log logs/error.log notice; #error_log logs/error.log info;
#pid logs/nginx.pid;
events { worker_connections 1024; }
http { include mime.types; default_type application/octet-stream;
#log_format main '$remote_addr - $remote_user [$time_local] "$request" ' # '$status $body_bytes_sent "$http_referer" ' # '"$http_user_agent" "$http_x_forwarded_for"';
#access_log logs/access.log main;
sendfile on; #tcp_nopush on;
#keepalive_timeout 0; keepalive_timeout 65;
#gzip on;
server { listen 80; server_name localhost;
#charset koi8-r;
#access_log logs/host.access.log main;
location / { root html; index index.html index.htm; } } server { listen 81; server_name localhost;
#charset koi8-r;
#access_log logs/host.access.log main;
location / { root html-81; index index.html index.htm; } } }
|
重新加载配置文件
[root@localhost nginx]# sbin/nginx -s reload
7.2. 通过域名区分虚拟主机
7.2.1. 什么是域名
域名就是网站。
Tcp/ip
Dns服务器:把域名解析为ip地址。保存的就是域名和ip的映射关系。
一级域名:
Baidu.com
Taobao.com
Jd.com
二级域名:
Image.baidu.com
Item.baidu.com
三级域名:
1.Image.baidu.com
Aaa.image.baidu.com
一个域名对应一个ip地址,一个ip地址可以被多个域名绑定。
本地测试可以修改hosts文件。
修改window的hosts文件:(C:\Windows\System32\drivers\etc)
可以配置域名和ip的映射关系,如果hosts文件中配置了域名和ip的对应关系,不需要走dns服务器。

7.2.2. Nginx的配置
|
#user nobody; worker_processes 1;
#error_log logs/error.log; #error_log logs/error.log notice; #error_log logs/error.log info;
#pid logs/nginx.pid;
events { worker_connections 1024; }
http { include mime.types; default_type application/octet-stream;
#log_format main '$remote_addr - $remote_user [$time_local] "$request" ' # '$status $body_bytes_sent "$http_referer" ' # '"$http_user_agent" "$http_x_forwarded_for"';
#access_log logs/access.log main;
sendfile on; #tcp_nopush on;
#keepalive_timeout 0; keepalive_timeout 65;
#gzip on;
server { listen 80; server_name localhost;
#charset koi8-r;
#access_log logs/host.access.log main;
location / { root html; index index.html index.htm; } } server { listen 81; server_name localhost;
#charset koi8-r;
#access_log logs/host.access.log main;
location / { root html-81; index index.html index.htm; } } server { listen 80; server_name www.taobao.com;
#charset koi8-r;
#access_log logs/host.access.log main;
location / { root html-taobao; index index.html index.htm; } } server { listen 80; server_name www.baidu.com;
#charset koi8-r;
#access_log logs/host.access.log main;
location / { root html-baidu; index index.html index.htm; } } }
|
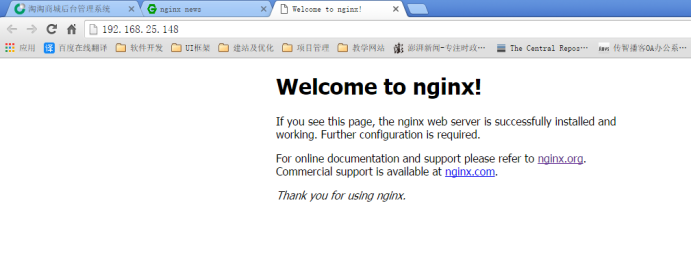
域名的配置:
192.168.25.148 www.taobao.com
192.168.25.148 www.baidu.com
8. 反向代理
8.1. 什么是反向代理
正向代理
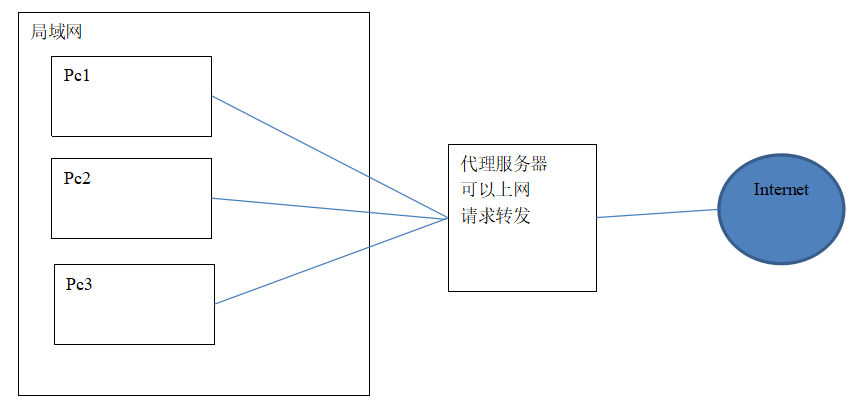
反向代理:

反向代理服务器决定哪台服务器提供服务。
返回代理服务器不提供服务器。也是请求的转发。
8.2. Nginx实现反向代理
两个域名指向同一台nginx服务器,用户访问不同的域名显示不同的网页内容。
两个域名是www.sian.com.cn和www.sohu.com
nginx服务器使用虚拟机192.168.101.3

第一步:安装两个tomcat,分别运行在8080和8081端口。
第二步:启动两个tomcat。
第三步:反向代理服务器的配置
|
upstream tomcat1 { server 192.168.25.148:8080; } server { listen 80; server_name www.sina.com.cn;
#charset koi8-r;
#access_log logs/host.access.log main;
location / { proxy_pass http://tomcat1; index index.html index.htm; } } upstream tomcat2 { server 192.168.25.148:8081; } server { listen 80; server_name www.sohu.com;
#charset koi8-r;
#access_log logs/host.access.log main;
location / { proxy_pass http://tomcat2; index index.html index.htm; } } |
第四步:nginx重新加载配置文件
第五步:配置域名
在hosts文件中添加域名和ip的映射关系
192.168.25.148 www.sina.com.cn
192.168.25.148 www.sohu.com
9. 负载均衡
如果一个服务由多条服务器提供,需要把负载分配到不同的服务器处理,需要负载均衡。
upstream tomcat2 {
server 192.168.25.148:8081;
server 192.168.25.148:8082;
}
可以根据服务器的实际情况调整服务器权重。权重越高分配的请求越多,权重越低,请求越少。默认是都是1
|
upstream tomcat2 { server 192.168.25.148:8081; server 192.168.25.148:8082 weight=2; } |
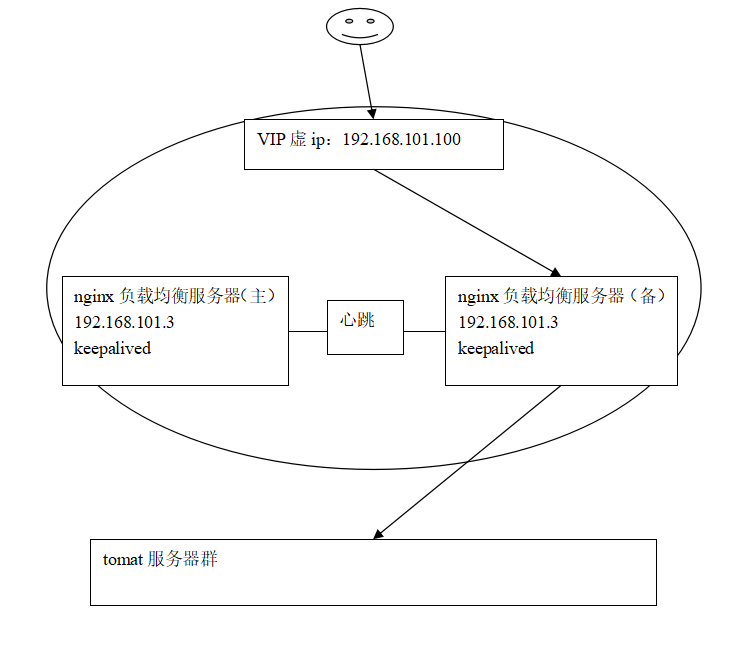
10. Nginx的高可用(了解)
要实现nginx的高可用,需要实现备份机。
10.1. 什么是负载均衡高可用
nginx作为负载均衡器,所有请求都到了nginx,可见nginx处于非常重点的位置,如果nginx服务器宕机后端web服务将无法提供服务,影响严重。
为了屏蔽负载均衡服务器的宕机,需要建立一个备份机。主服务器和备份机上都运行高可用(High Availability)监控程序,通过传送诸如“I am alive”这样的信息来监控对方的运行状况。当备份机不能在一定的时间内收到这样的信息时,它就接管主服务器的服务IP并继续提供负载均衡服务;当备份管理器又从主管理器收到“I am alive”这样的信息时,它就释放服务IP地址,这样的主服务器就开始再次提供负载均衡服务。
10.2. keepalived+nginx实现主备(了解)
10.2.1. 什么是keepalived
keepalived是集群管理中保证集群高可用的一个服务软件,用来防止单点故障。
Keepalived的作用是检测web服务器的状态,如果有一台web服务器死机,或工作出现故障,Keepalived将检测到,并将有故障的web服务器从系统中剔除,当web服务器工作正常后Keepalived自动将web服务器加入到服务器群中,这些工作全部自动完成,不需要人工干涉,需要人工做的只是修复故障的web服务器。
10.2.2. keepalived工作原理
keepalived是以VRRP协议为实现基础的,VRRP全称Virtual Router Redundancy Protocol,即虚拟路由冗余协议。
虚拟路由冗余协议,可以认为是实现路由器高可用的协议,即将N台提供相同功能的路由器组成一个路由器组,这个组里面有一个master和多个backup,master上面有一个对外提供服务的vip(VIP = Virtual IP Address,虚拟IP地址,该路由器所在局域网内其他机器的默认路由为该vip),master会发组播,当backup收不到VRRP包时就认为master宕掉了,这时就需要根据VRRP的优先级来选举一个backup当master。这样的话就可以保证路由器的高可用了。
keepalived主要有三个模块,分别是core、check和VRRP。core模块为keepalived的核心,负责主进程的启动、维护以及全局配置文件的加载和解析。check负责健康检查,包括常见的各种检查方式。VRRP模块是来实现VRRP协议的。
详细参考:Keepalived权威指南中文.pdf
10.2.3. keepalived+nginx实现主备过程
初始状态

主机宕机
主机恢复

10.2.4. 高可用环境
两台nginx,一主一备:192.168.101.3和192.168.101.4
两台tomcat服务器:192.168.101.5、192.168.101.6
10.2.5. 安装keepalived
分别在主备nginx上安装keepalived,参考“安装手册”进行安装:
具体实现:https://www.cnblogs.com/xieyupeng/p/9349307.html
硬件负载均衡:F5、lvs
作者: kent鹏
出处: http://www.cnblogs.com/xieyupeng/
关于作者:专注JAVAEE领域,请多多赐教!
本文版权归作者和博客园共有,欢迎转载,但未经作者同意必须保留此段声明,且在文章页面明显位置给出原文链接。

 浙公网安备 33010602011771号