

Android学习笔记---布局方式(一)(LinearLayout,AbsoluteLayout,FrameLayout布局)
Android 布局方式学习
一.LinearLayout线性布局:
线性布局是程序中最常见的一种布局方式,线性布局可以分为水平线性布局和垂直线性布局两种, 通过android:orientation属性可以设置线性布局的方向
1.在LinearLayout中设置排列方式为水平时只有垂直方向的设置是有效的,水平方向的设置是无效的:即left,right,center_horizontal 是不生效的
2.在LinearLayout中设置排列方式为垂直时只有水平方向设置是有效的,垂直方向的设置是无效的是无效的:即top,bottom,center_vertical 是无效的;
布局一源码:
android:orientation="vertical" 表示竖直方式对齐
     android:orientation="horizontal"表示水平方式对齐
LinearLayout布局方式一布局源码:
<LinearLayout xmlns:android="http://schemas.android.com/apk/res/android"
    xmlns:tools="http://schemas.android.com/tools"
    android:layout_width="match_parent"
    android:layout_height="match_parent"
    android:orientation="vertical"
    tools:context=".LinearLayoutOneActivity" >
    <EditText android:layout_width="fill_parent"
        android:layout_height="wrap_content"/>
    <LinearLayout android:layout_width="fill_parent"
        android:layout_height="wrap_content"
        android:orientation="horizontal">
         <Button android:layout_width="wrap_content"
             android:layout_height="wrap_content"
             android:text="登陆"/>
         <Button android:layout_width="wrap_content"
              android:layout_height="wrap_content"
              android:text="退出"/>
    </LinearLayout>
</LinearLayout>
效果图:

3.LinearLayout 布局中 android:gravity:
   该属性用于控制布局中控件的对齐方式。如果是没有子控件的控件设置此属性,表示其内容的对齐方式,比如说TextView里面文字的对齐方式;若是有子控件的控件设置此属性,则表示其子控件的对齐方式。

4.android: layout_weight
    通过设置控件的layout_weight属性以控制各个控件在布局中的相对大小。layout_weight属性是一个非负整数值。线性布局会根据该控件layout_weight值与其所处布局中所有控件layout_weight值之和的比值为该控件分配占用的区域。例如,在水平布局的LinearLayout中有两个Button,这两个Button的layout_weight属性值都为1,那么这两个按钮都会被拉伸到整个屏幕宽度的一半。如果layout_weight指为0,控件会按原大小显示,不会被拉伸;对于其余layout_weight属性值大于0的控件,系统将会减去layout_weight属性值为0的控件的宽度或者高度,再用剩余的宽度或高度按相应的比例来分配每一个控件显示的宽度或高度

LinearLayoutSecond布局显示图

布局源码:
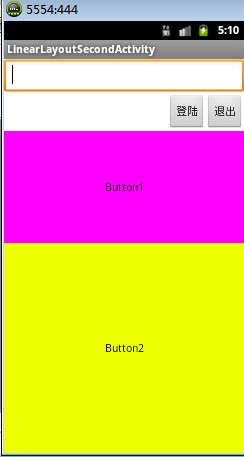
<LinearLayout xmlns:android="http://schemas.android.com/apk/res/android"
    xmlns:tools="http://schemas.android.com/tools"
    android:layout_width="match_parent"
    android:layout_height="match_parent"
    android:orientation="vertical"
    tools:context=".LinearLayoutOneActivity" >
    <EditText android:layout_width="fill_parent"
        android:layout_height="wrap_content"/>
    <LinearLayout android:layout_width="fill_parent"
        android:layout_height="wrap_content"
        android:orientation="horizontal"
        android:gravity="right">
         <Button android:layout_width="wrap_content"
             android:layout_height="wrap_content"
             android:text="登陆"/>
         <Button android:layout_width="wrap_content"
              android:layout_height="wrap_content"
              android:text="退出"/>
    </LinearLayout>
    <Button android:layout_width="fill_parent"
        android:layout_height="wrap_content"
        android:background="#ff00ff"
        android:layout_weight="1"
        android:text="Button1"/>
    <Button android:layout_width="fill_parent"
        android:layout_height="wrap_content"
        android:background="#eeff00"
        android:layout_weight="2"
        android:text="Button2"/>
</LinearLayout>
5.LinearLayout综合应用 效果图

布局源码:
<LinearLayout xmlns:android="http://schemas.android.com/apk/res/android"
    xmlns:tools="http://schemas.android.com/tools"
    android:layout_width="match_parent"
    android:layout_height="match_parent"
    android:orientation="vertical"
    tools:context=".LinearLayoutThirdActivity" >
   <LinearLayout android:layout_width="fill_parent"
        android:layout_height="wrap_content"
        android:orientation="horizontal"
        android:layout_weight="1">
      <!-- 文本水平垂直居中 -->
      <TextView android:layout_width="wrap_content"
          android:layout_height="fill_parent"
          android:layout_weight="1"
          android:gravity="center_horizontal|center_vertical"
          android:background="#aa0000"
          android:text="红色"/>
         <!-- 水平居中 顶部对齐 -->
       <TextView android:layout_width="wrap_content"
           android:layout_height="fill_parent"
           android:layout_weight="1"
           android:gravity="top|center_horizontal"
           android:background="#00aa00"
           android:text="绿色"/>
       <!-- 水平居中顶部对齐 -->
       <TextView android:layout_width="wrap_content"
           android:layout_height="fill_parent"
           android:layout_weight="1"
           android:background="#0000aa"
           android:gravity="center_horizontal|bottom"
           android:text="蓝色"/>
       <!-- 垂直居中 水平靠左 -->
       <TextView android:layout_width="wrap_content"
           android:layout_height="fill_parent"
           android:background="#aaaa00"
           android:layout_weight="1"
           android:gravity="center_vertical|left"
           android:text="黄色"/>
    </LinearLayout>
    <LinearLayout android:orientation="vertical"
        android:layout_width="fill_parent"
        android:layout_height="wrap_content"
        android:layout_weight="1">

        <Button android:layout_width="fill_parent"
            android:layout_height="wrap_content"
            android:layout_weight="1"
            android:gravity="left"
            android:text="第一行"/>
        <Button android:layout_width="fill_parent"
            android:layout_height="wrap_content"
            android:layout_weight="1"
            android:text="第二行"/>
        <Button android:layout_width="fill_parent"
            android:layout_height="wrap_content"
            android:layout_weight="1"
            android:text="第三行"/>
        <Button android:layout_width="fill_parent"
            android:layout_height="wrap_content"
            android:layout_weight="1"
            android:text="第四行"/>
    </LinearLayout>
</LinearLayout>
二.AbsoluteLayout绝对位置布局:
指定子控件的xy精确坐标的布局。绝对布局缺乏灵活性,在没有绝对定位的情况下相比其他类型的布局更难维护。
布局效果图:
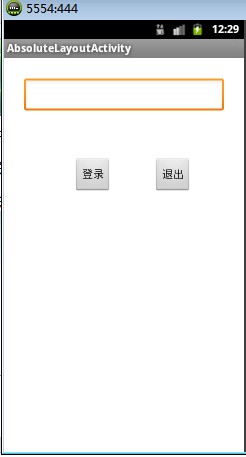
布局源码:
<AbsoluteLayout xmlns:android="http://schemas.android.com/apk/res/android"
    xmlns:tools="http://schemas.android.com/tools"
    android:layout_width="match_parent"
    android:layout_height="match_parent"
    tools:context=".AbsoluteLayoutActivity" >
    <EditText android:layout_width="200px"
        android:layout_x="20px"
        android:layout_y="20px"
        android:layout_height="wrap_content"/>
    <Button android:layout_width="wrap_content"
        android:layout_height="wrap_content"
        android:layout_x="70px"
        android:layout_y="100px"
        android:text="登录"/>
    <Button android:layout_width="wrap_content"
        android:layout_height="wrap_content"
        android:layout_x="150px"
        android:layout_y="100px"
        android:text="退出"/>
</AbsoluteLayout>
三.FrameLayout布局:
    所有添加到这个布局中的视图都以层叠的方式显示。第一个添加的组件放到最底层,最后添加到框架中的视图显示在最上面。上一层的会覆盖下一层的控件
java.lang.Object
↳ android.view.View
↳ android.view.ViewGroup
↳ android.widget.FrameLayout
布局效果一:

布局源码:
<FrameLayout xmlns:android="http://schemas.android.com/apk/res/android"
    xmlns:tools="http://schemas.android.com/tools"
    android:layout_width="match_parent"
    android:layout_height="match_parent"
    tools:context=".FrameLayoutOneActivity" >
    <TextView
        android:layout_width="fill_parent"
        android:layout_height="fill_parent"
        android:background="#aa0000"
        android:gravity="right"
        android:text="布局一" />
    <TextView android:layout_width="150px"
        android:layout_height="fill_parent"
        android:background="#00aa00"
        android:gravity="bottom"
        android:text="布局二"/>
    <TextView android:layout_width="190px"
        android:layout_height="300px"
        android:gravity="bottom"
        android:background="#0000aa"
        android:text="布局三"/>

</FrameLayout>
android:gravity / android:layout_gravity区别:
android:gravity 是设置该view里面的内容相对于该view的位置,例如设置button里面的text相对于view的靠左,居中等位置。(也可以在Layout布局属性中添加,设置Layout中组件的位置)
android:layout_gravity 是用来设置该view相对与父view的位置,例如设置button在layout里面的相对位置:屏幕居中,水平居中等。 即android:gravity用于设置View中内容相对于View组件的对齐方式,而android:layout_gravity用于设置View组件相对于Container的对齐方式。 说的再直白点,就是android:gravity只对该组件内的东西有效,android:layout_gravity只对组件自身有效
布局效果二:
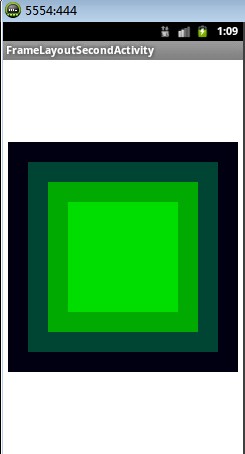
布局源码:
<FrameLayout xmlns:android="http://schemas.android.com/apk/res/android"
    xmlns:tools="http://schemas.android.com/tools"
    android:layout_width="match_parent"
    android:layout_height="match_parent"
    tools:context=".FrameLayoutSecondActivity" >

    <TextView
        android:layout_gravity="center"
        android:layout_width="230px"
        android:layout_height="230px"
        android:background="#000011" />

   <TextView android:layout_gravity="center"
       android:layout_width="190px"
       android:layout_height="190px"
       android:background="#004433"/>
     <TextView android:layout_gravity="center"
       android:layout_width="150px"
       android:layout_height="150px"
       android:background="#00aa00"/>
     <TextView android:layout_gravity="center"
       android:layout_width="110px"
       android:layout_height="110px"
       android:background="#00dd00"/>
</FrameLayout>
本文写到这里,本人是刚开始写博客文件,欢迎指出不足之处。
RelativeLayout 和 TableLayout布局方式学习 及其源码 会在下一篇随笔中继续。

 浙公网安备 33010602011771号