openstack 手动部署
1.初始化环境,配置网卡,互信。
2.部署基础服务:mariadb rabbitmq, memcache, etcd.
3.部署核心服务:keystone,ganlance,placement,nova,neutron,horizon(dashbord)
一、环境
vmware:
controller节点:
配置:
内存:6G
处理器:四核
硬盘:60G
网卡:1、NAT(外部网卡)ens33:192.168.200.10
2、仅主机(管理网络)ens34:192.168.100.10
镜像:CentOS-7-x86_64-Minimal-2009
compute节点:
配置:
内存:4G
处理器:4核
硬盘:60G
网卡:1、NAT(外部网卡)ens33:192.168.200.20
2、仅主机(管理网络)ens34:192.168.100.20
镜像:CentOS-7-x86_64-Minimal-2009
| 服务 | 用户 | 密码 |
| mysql | root | 000000 |
| keystone | KEYSTONE_DBPASS | |
| glance | GLANCE_DBPASS | |
| placement | PLACEMENT_DBPASS | |
| nova | NOVA_DBPASS | |
| neutron | NEUTRON_DBPASS | |
| rabbitmq | openstack | 000000 |
| openstack用户(keystone) | admin | ADMIN_PASS |
| myuser | myuser | |
| glance | glance | |
| placement | placement | |
| nova | nova | |
| metadata | metadata_secret | METADATA_SECRET |
通过用keepalived和haproxy实现高可用
二、基本环境配置步骤
1、初始化环境配置
(以下controller、compute节点配置)
#####controller和compute节点#####
#安装基础工具包
yum install wget net-tools vim -y


#修改对应的主机名称,改完之后需要exit后重新进入终端,才显示
hostnamectl set-hostname compute
hostnamectl set-hostname controller

#关闭seliux、防火墙
sed -i 's\SELINUX=enforcing\SELINUX=disable\' /etc/selinux/config				//替换config文件中的enforcing为disable          (enforcing:强制执行)
setenforce 0
systemctl stop firewalld && systemctl disable firewalld
#查看防火墙规则iptables -L,若没有则关掉

#测试网络连通性,若没问题则继续
ping www.baidu.com

#配置名称解析(更改自己对应的管理网络onlyhost)
sed -i '$a\192.168.100.10 controller\' /etc/hosts
sed -i '$a\192.168.100.20 compute\' /etc/hosts
2、时间同步服务器的安装与配置
#####controller节点安装时间同步服务器chrony,删除已有的无用server,配置阿里云服务器,设置允许本地所有网段#####
#安装chrony包
yum install chrony -y

#编辑配置文件
sed -i '3,6d' /etc/chrony.conf
sed -i '3a\server ntp3.aliyun.com iburst\' /etc/chrony.conf
sed -i 's\#allow 192.168.0.0/16\allow all\' /etc/chrony.conf
sed -i 's\#local stratum 10\local stratum 10\' /etc/chrony.conf

#启动服务
systemctl enable chronyd.service
systemctl restart chronyd.service


#####compute和其他节点也安装服务器,删除已有的无用server,配置服务器为controller节点#####
#安装chrony包
yum install chrony -y

#编辑配置文件
sed -i '3,6d' /etc/chrony.conf
sed -i '3a\server controller iburst\' /etc/chrony.conf

#启动服务
systemctl enable chronyd.service
systemctl restart chronyd.service

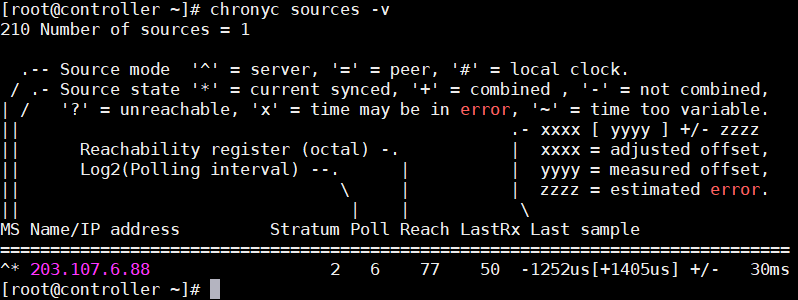
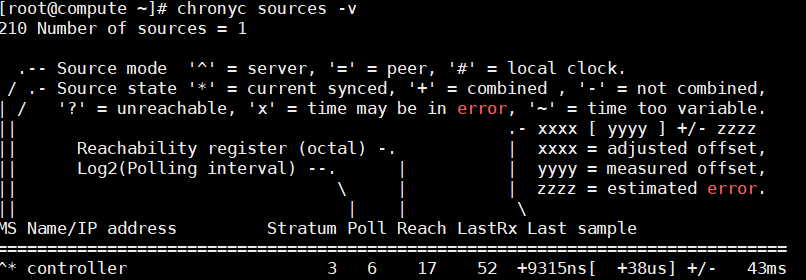
#查看同步情况,显示controller即为成功
chronyc sources -v
3、安装openstack源
#####controller和compute安装train的yum源#####
yum install centos-release-openstack-train -y
yum upgrade
yum install python-openstackclient  -y
yum install openstack-utils -y
openstack-selinux(暂时未装)
4、安装SQL数据库
#####controller节点#####
#安装数据库包
yum install mariadb mariadb-server python2-PyMySQL -y
#创建并编辑配置文件
touch /etc/my.cnf.d/openstack.cnf

cat > /etc/my.cnf.d/openstack.cnf << EOF
[mysqld]
bind-address = 192.168.100.10
default-storage-engine = innodb
innodb_file_per_table = on
max_connections = 4096
collation-server = utf8_general_ci
character-set-server = utf8
EOF

#启动服务
systemctl enable mariadb.service
systemctl restart mariadb.service

#初始化数据库,并设置root密码
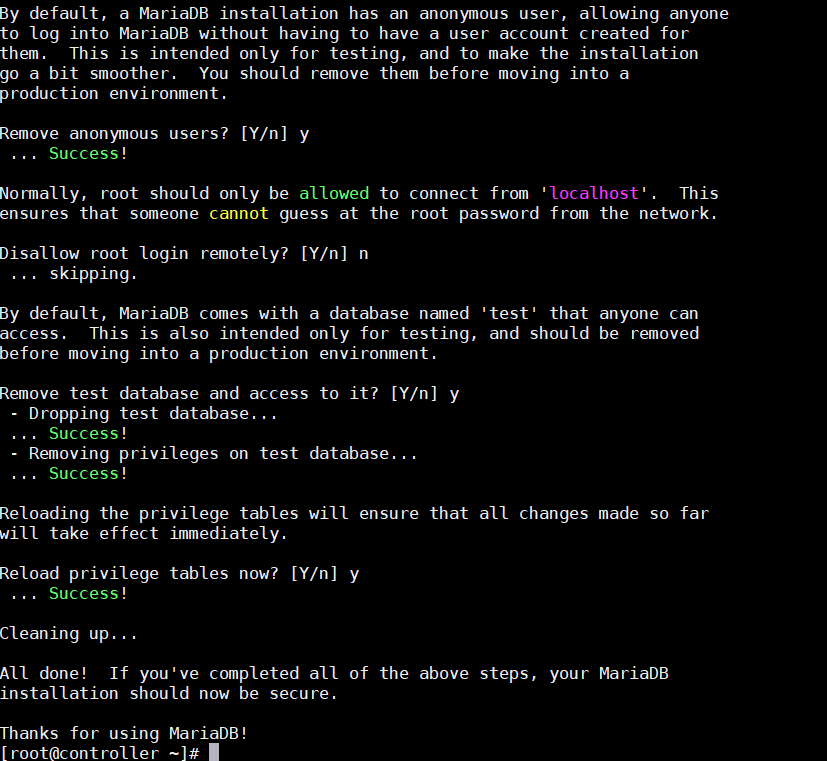
mysql_secure_installation
Remove anonymous users? [Y/n] y
Disallow root login remotely? [Y/n] n
Remove test database and access to it? [Y/n] y
Reload privilege tables now? [Y/n] y
5、安装消息队列
#####controller#####
#安装rabbitmq-server包
yum install rabbitmq-server -y
#启动服务
systemctl enable rabbitmq-server.service
systemctl start rabbitmq-server.service
#添加rabbitmq用户并配置权限
rabbitmqctl add_user openstack 000000						//RABBIT_PASS改为密码
rabbitmqctl set_permissions openstack ".*" ".*" ".*"			//允许openstack用户进行配置、写入和读取访问
# 查看需要启动的服务
rabbitmq-plugins list
# 开启图形化界面
rabbitmq-plugins enable rabbitmq_management rabbitmq_management_agent

ss -tnl						//查询监听端口
					    	//-t, –tcp 显示 TCP 协议的 sockets
 							//-n, –numeric 不解析服务的名称,如 “22” 端口不会显示成 “ssh”
 							//-l, –listening 只显示处于监听状态的端口
# 访问
http://192.168.100.10:15672/				//账号:guest	密码:guest


#rabbitmqctl常用命令:
rabbitmqctl list_users				//查询用户
6、缓存Memcached
#####controller节点#####
#安装memcached包
yum install memcached python-memcached -y
#编辑配置文件
sed -i 's\OPTIONS="-l 127.0.0.1,::1"\OPTIONS="-l 127.0.0.1,::1,controller"\' /etc/sysconfig/memcached
sed -i 's\CACHESIZE="64"\CACHESIZE="1024"\' /etc/sysconfig/memcached
#启动服务
systemctl enable memcached.service
systemctl restart memcached.service
7、Etcd
#####controller#####
#安装etcd包
yum install etcd -y
cp /etc/etcd/etcd.conf /etc/etcd/etcd.conf.bak		//备份一下配置文件

#编辑配置文件
sed -i 's\#ETCD_LISTEN_PEER_URLS="http://localhost:2380"\ETCD_LISTEN_PEER_URLS="http://192.168.100.10:2380"\' /etc/etcd/etcd.conf
sed -i 's\ETCD_LISTEN_CLIENT_URLS="http://localhost:2379"\ETCD_LISTEN_CLIENT_URLS="http://192.168.100.10:2379"\' /etc/etcd/etcd.conf
sed -i 's\ETCD_NAME="default"\ETCD_NAME="controller"\' /etc/etcd/etcd.conf
sed -i 's\#ETCD_INITIAL_ADVERTISE_PEER_URLS="http://localhost:2380"\ETCD_INITIAL_ADVERTISE_PEER_URLS="http://192.168.100.10:2380"\' /etc/etcd/etcd.conf
sed -i 's\ETCD_ADVERTISE_CLIENT_URLS="http://localhost:2379"\ETCD_ADVERTISE_CLIENT_URLS="http://192.168.100.10:2379"\' /etc/etcd/etcd.conf
sed -i 's\#ETCD_INITIAL_CLUSTER="default=http://localhost:2380"\ETCD_INITIAL_CLUSTER="controller=http://192.168.100.10:2380"\' /etc/etcd/etcd.conf
sed -i 's\#ETCD_INITIAL_CLUSTER_TOKEN="etcd-cluster"\ETCD_INITIAL_CLUSTER_TOKEN="etcd-cluster-01"\' /etc/etcd/etcd.conf
sed -i 's\#ETCD_INITIAL_CLUSTER_STATE="new"\ETCD_INITIAL_CLUSTER_STATE="new"\' /etc/etcd/etcd.conf

#启动
systemctl enable etcd
systemctl restart etcd
三、Openstack Train版各个组件配置步骤
1、keystone组件部署
#####controller节点#####
#创建数据库、并配置密码和权限
mysql -uroot -p
CREATE DATABASE keystone;
GRANT ALL PRIVILEGES ON keystone.* TO 'keystone'@'localhost' IDENTIFIED BY 'KEYSTONE_DBPASS';
GRANT ALL PRIVILEGES ON keystone.* TO 'keystone'@'%' IDENTIFIED BY 'KEYSTONE_DBPASS';

#安装软件包
yum install openstack-keystone httpd mod_wsgi -y

#编辑配置文件
	//修改配置文件/etc/keystone/keystone.conf,在相应位置添加如下:

    [database]
	# ...
	connection = mysql+pymysql://keystone:KEYSTONE_DBPASS@controller/keystone

    [token]
	# ...
	provider = fernet

(或使用如下命令)
sed -i 's\#connection = <None>\connection = mysql+pymysql://keystone:KEYSTONE_DBPASS@controller/keystone\' /etc/keystone/keystone.conf
sed -i '2475a\provider = fernet\' /etc/keystone/keystone.conf

#同步keystone数据库
su -s /bin/sh -c "keystone-manage db_sync" keystone
//可使用查询命令show tables from keystone;有表即为成功。

#创建令牌
keystone-manage fernet_setup --keystone-user keystone --keystone-group keystone
keystone-manage credential_setup --keystone-user keystone --keystone-group keystone

keystone-manage bootstrap --bootstrap-password ADMIN_PASS --bootstrap-admin-url http://controller:5000/v3/ \
--bootstrap-internal-url http://controller:5000/v3/ --bootstrap-public-url http://controller:5000/v3/ --bootstrap-region-id RegionOne

#配置Apache HTTP服务器
sed -i '/#ServerName www.example.com:80/a\ServerName controller:80\' /etc/httpd/conf/httpd.conf
ln -s /usr/share/keystone/wsgi-keystone.conf /etc/httpd/conf.d/

#开启HTTP服务
systemctl enable httpd.service
systemctl restart httpd.service

#编写临时环境变量脚本
touch ~/temp_admin.sh

cat >~/temp_admin.sh << EOF
export OS_USERNAME=admin
export OS_PASSWORD=ADMIN_PASS
export OS_PROJECT_NAME=admin
export OS_USER_DOMAIN_NAME=Default
export OS_PROJECT_DOMAIN_NAME=Default export OS_AUTH_URL=http://controller:5000/v3
export OS_IDENTITY_API_VERSION=3
EOF
//此处显示的指是由keystone-manage bootstrap创建


source ~/temp_admin.sh				//添加包含openstack密码的临时环境变量
#####controller节点######
#创建域、项目、用户和角色
openstack project create --domain default --description "Service Project" service //使用默认域创建service项目
openstack project create --domain default --description "Demo Project" myproject //使用默认域创建myproject项目(no-admin使用)
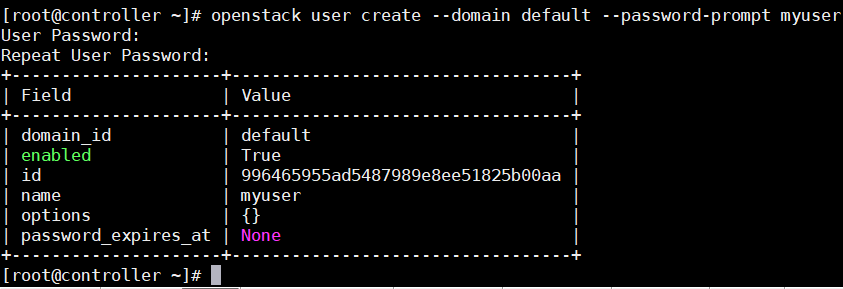
openstack user create --domain default --password-prompt myuser //创建myuser用户,需要设置密码,可设置为myuser
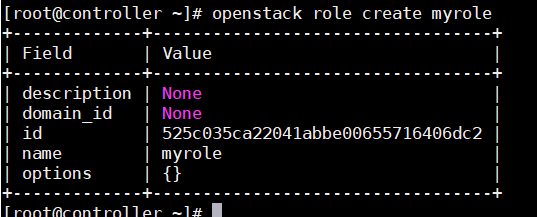
openstack role create myrole //创建myrole角色
openstack role add --project myproject --user myuser myrole //添加myrole至myproject的myuser用户,此项无输出#####controller#####
(跳过验证步骤)
##配置环境变量脚本(临时弃用)
unset OS_AUTH_URL OS_PASSWORD //清楚临时脚本
#admin(管理员)
touch ~/admin-openrc.sh
cat > ~/admin-openrc.sh << EOF
#!/bin/bash
export OS_PROJECT_DOMAIN_NAME=Default
export OS_USER_DOMAIN_NAME=Default
export OS_PROJECT_NAME=admin
export OS_USERNAME=admin
export OS_PASSWORD=ADMIN_PASS
export OS_AUTH_URL=http://controller:5000/v3
export OS_IDENTITY_API_VERSION=3
export OS_IMAGE_API_VERSION=2
EOF
//PASSWORD设置成自己设置的密码
#myuser(非管理员)(!可选配置,搭建环境主要使用admin!)
touch ~/myuser-openrc.sh
cat > ~/myuser-openrc.sh << EOF
#!/bin/bash
export OS_PROJECT_DOMAIN_NAME=Default
export OS_USER_DOMAIN_NAME=Default
export OS_PROJECT_NAME=myproject
export OS_USERNAME=myuser
export OS_PASSWORD=myuser
export OS_AUTH_URL=http://controller:5000/v3
export OS_IDENTITY_API_VERSION=3
export OS_IMAGE_API_VERSION=2
EOF
//PASSWORD设置成自己设置的密码
#执行环境变量
source admin-openrc.sh
#验证
openstack user list
//若有内容即为成功2、搭建Glance镜像服务
#####controller
#创建glance数据库
mysql -u root -p000000
CREATE DATABASE glance;
GRANT ALL PRIVILEGES ON glance.* TO 'glance'@'localhost' IDENTIFIED BY 'GLANCE_DBPASS';
GRANT ALL PRIVILEGES ON glance.* TO 'glance'@'%' IDENTIFIED BY 'GLANCE_DBPASS';

#若这之前关过机器或重开了终端,则需再加载一次环境变量口令
source ~/admin-openrc.sh

#创建用户、角色
openstack user create --domain default --password glance glance							//创建glance用户,密码glance
openstack role add --project service --user glance admin
openstack service create --name glance --description "OpenStack Image" image

#创建glance endpoint
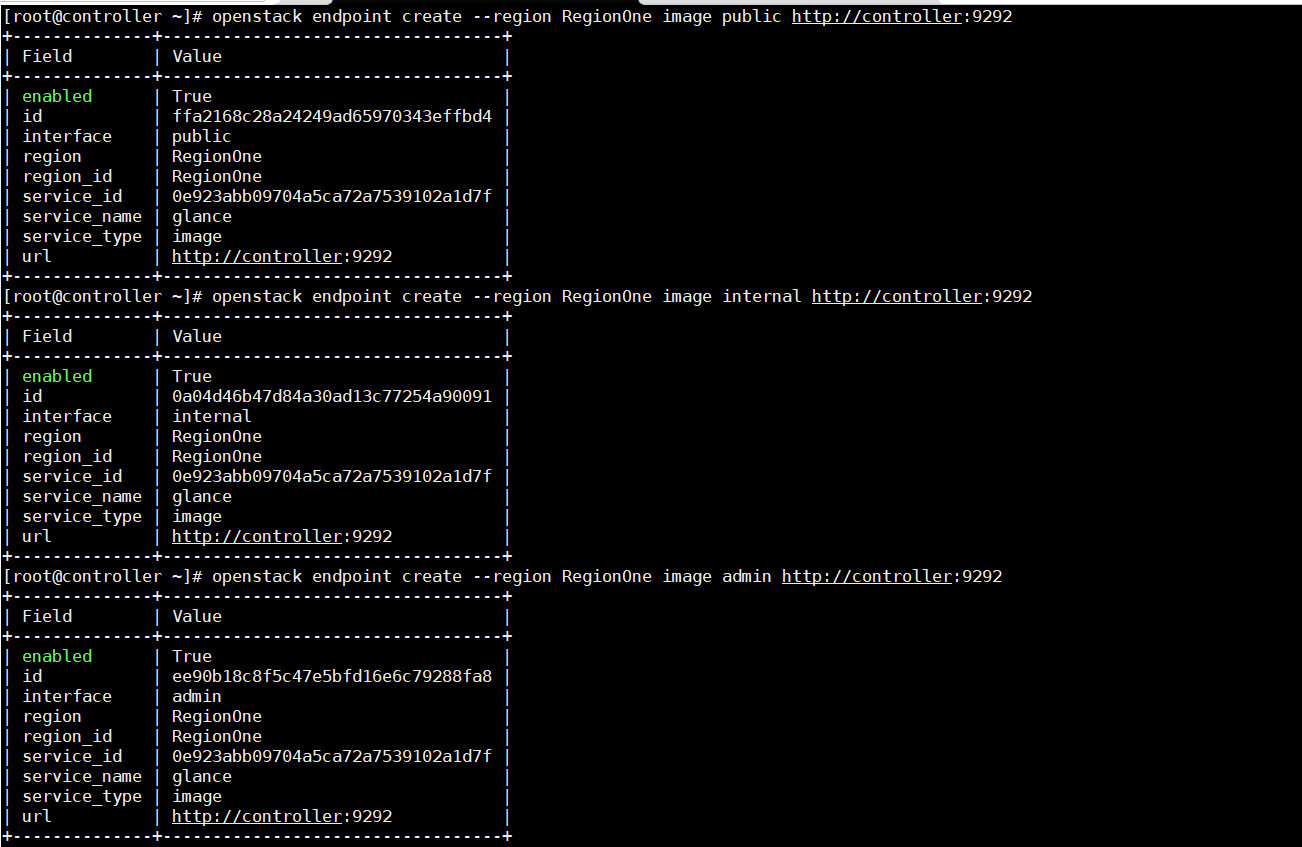
openstack endpoint create --region RegionOne image public http://controller:9292
openstack endpoint create --region RegionOne image internal http://controller:9292
openstack endpoint create --region RegionOne image admin http://controller:9292
#####controller#####
#安装服务
yum install openstack-glance -y
#配置glance服务
cp /etc/glance/glance-api.conf /etc/glance/glance-api.conf.bak
sed -i '2072a\connection = mysql+pymysql://glance:GLANCE_DBPASS@controller/glance\' /etc/glance/glance-api.conf
sed -i '4859a\www_authenticate_uri = http://controller:5000\' /etc/glance/glance-api.conf
sed -i '4860a\memcached_servers = controller:11211\' /etc/glance/glance-api.conf
sed -i '4861a\auth_type = password\' /etc/glance/glance-api.conf
sed -i '4862a\project_domain_name = Default\' /etc/glance/glance-api.conf
sed -i '4863a\user_domain_name = Default\' /etc/glance/glance-api.conf
sed -i '4864a\project_name = service\' /etc/glance/glance-api.conf
sed -i '4865a\username = glance\' /etc/glance/glance-api.conf
sed -i '4866a\password = glance\' /etc/glance/glance-api.conf
sed -i '4867a\auth_url = http://controller:5000\' /etc/glance/glance-api.conf
sed -i '5503a\flavor = keystone\' /etc/glance/glance-api.conf
sed -i '3350a\stores = file,http\' /etc/glance/glance-api.conf
sed -i '3350a\default_store = file\' /etc/glance/glance-api.conf
#存储位置
sed -i '3350a\filesystem_store_datadir = /var/lib/glance/images/\' /etc/glance/glance-api.conf
#
#同步数据库
su -s /bin/sh -c "glance-manage db_sync" glance
#启动glance服务
systemctl enable openstack-glance-api.service
systemctl restart openstack-glance-api.service
*查看日志命令
tail -f /var/log/glance/api.log日志没问题
#####controller#####
##验证操作上传镜像
#下载镜像
wget http://download.cirros-cloud.net/0.4.0/cirros-0.4.0-x86_64-disk.img

#上传镜像
glance image-create --name "cirros" --file cirros-0.4.0-x86_64-disk.img --disk-format qcow2 --container-format bare --visibility public

#查看镜像列表
openstack image list
3、Placement服务搭建
在Openstack的Stein版本之前,Placement组件是nova组件的一部分,在Stein版本之后Placement组件被独立出来,所以在安装Nova之前需要先安装Placement。
作用:Placement服务可以跟踪服务器资源的使用情况,提供自定义资源的能力,为分配资源提供服务。
#####Controller#####
#创建数据库
mysql -u root -p000000					//这里000000换成自己的数据库root密码
CREATE DATABASE placement;
GRANT ALL PRIVILEGES ON placement.* TO 'placement'@'localhost' IDENTIFIED BY 'PLACEMENT_DBPASS';
GRANT ALL PRIVILEGES ON placement.* TO 'placement'@'%' IDENTIFIED BY 'PLACEMENT_DBPASS';

#创建placement用户,添加角色
openstack user create --domain default --password placement placement				//设置密码为placement
openstack role add --project service --user placement admin
openstack service create --name placement --description "Placement API" placement

#创建endpoint
openstack endpoint create --region RegionOne placement public http://controller:8778
openstack endpoint create --region RegionOne placement internal http://controller:8778
openstack endpoint create --region RegionOne placement admin http://controller:8778
#####controler#####
#安装和配置组件
yum install openstack-placement-api -y
cp /etc/placement/placement.conf /etc/placement/placement.conf.bak
sed -i 's\#connection = <None>\connection = mysql+pymysql://placement:PLACEMENT_DBPASS@controller/placement\' /etc/placement/placement.conf		//设置成自己的密码
sed -i 's\#auth_strategy = keystone\auth_strategy = keystone\' /etc/placement/placement.conf
sed -i 's\#auth_uri = <None>\auth_url = http://controller:5000/v3\' /etc/placement/placement.conf
sed -i 's\#memcached_servers = <None>\memcached_servers = controller:11211\' /etc/placement/placement.conf
sed -i 's\#auth_type = <None>\auth_type = password\' /etc/placement/placement.conf
sed -i '241a\project_domain_name = Default\' /etc/placement/placement.conf
sed -i '242a\user_domain_name = Default\' /etc/placement/placement.conf
sed -i '243a\project_name = service\' /etc/placement/placement.conf
sed -i '244a\username = placement\' /etc/placement/placement.conf
sed -i '245a\password = placement\' /etc/placement/placement.conf							//需要设置自己的密码


#同步数据库
su -s /bin/sh -c "placement-manage db sync" placement

#BUG修复
在此配置文件/etc/httpd/conf.d/00-placement-api.conf的最后添加如下:

<Directory /usr/bin>
   <IfVersion >= 2.4>
      Require all granted
   </IfVersion>
   <IfVersion < 2.4>
      Order allow,deny
      Allow from all
   </IfVersion>
</Directory>


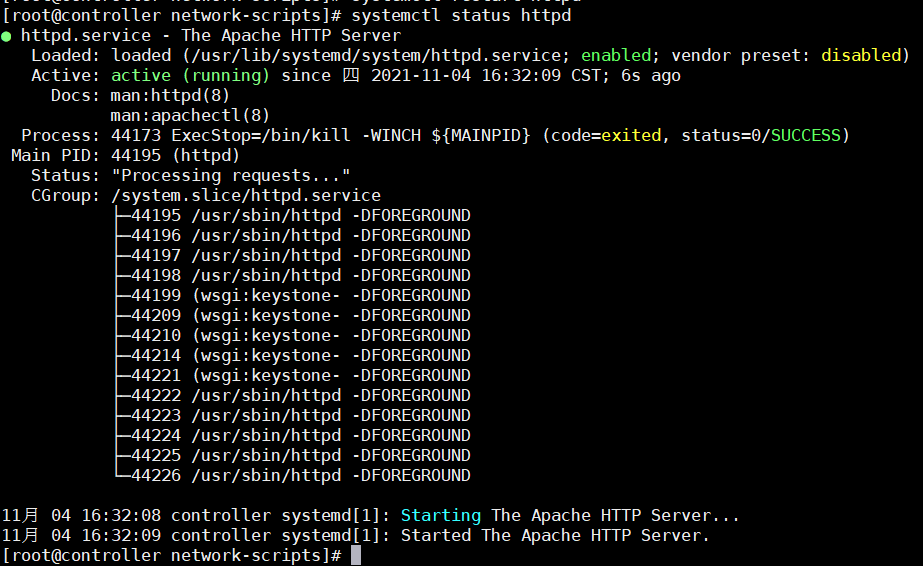
#重启httpd
systemctl restart httpd
官网的BUG修复:
若不添加此修复,在compute部署nova时会有以下报错:
#####controller#####
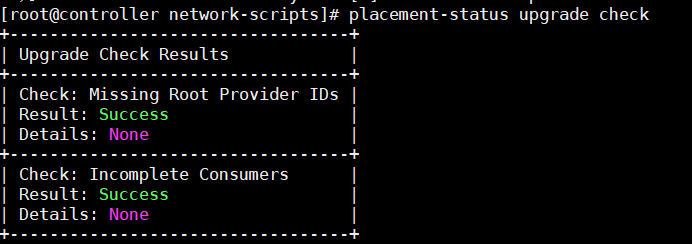
#验证操作
placement-status upgrade check						//状态检查
#####controller#####(可选)
#针对api的验证
pip install osc-placement
openstack --os-placement-api-version 1.2 resource class list --sort-column name
openstack --os-placement-api-version 1.6 trait list --sort-column name4、nova部署
#####controller节点#####
#刷变量
source admin-openrc.sh
#创建数据库并配权限
mysql -u root -p000000
CREATE DATABASE nova_api;
CREATE DATABASE nova;
CREATE DATABASE nova_cell0;
GRANT ALL PRIVILEGES ON nova_api.* TO 'nova'@'localhost' IDENTIFIED BY 'NOVA_DBPASS';
GRANT ALL PRIVILEGES ON nova_api.* TO 'nova'@'%' IDENTIFIED BY 'NOVA_DBPASS';

GRANT ALL PRIVILEGES ON nova.* TO 'nova'@'localhost' IDENTIFIED BY 'NOVA_DBPASS';
GRANT ALL PRIVILEGES ON nova.* TO 'nova'@'%' IDENTIFIED BY 'NOVA_DBPASS';

GRANT ALL PRIVILEGES ON nova_cell0.* TO 'nova'@'localhost' IDENTIFIED BY 'NOVA_DBPASS';
GRANT ALL PRIVILEGES ON nova_cell0.* TO 'nova'@'%' IDENTIFIED BY 'NOVA_DBPASS';

#创建nova用户
openstack user create --domain default --password nova nova							//密码nova

#添加管理员角色给nova
openstack role add --project service --user nova admin

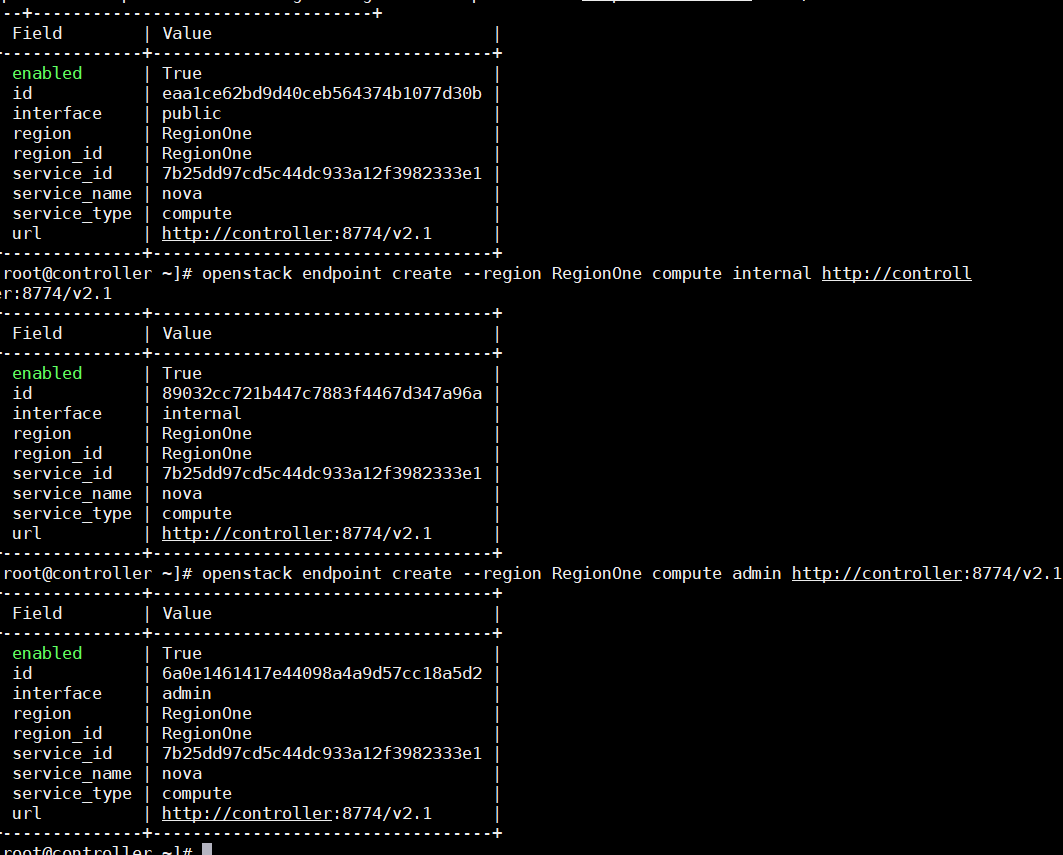
#创建compute服务
openstack service create --name nova  --description "OpenStack Compute" compute

#创建endpoint
openstack endpoint create --region RegionOne compute public http://controller:8774/v2.1
openstack endpoint create --region RegionOne compute internal http://controller:8774/v2.1
openstack endpoint create --region RegionOne compute admin http://controller:8774/v2.1

##安装和配置服务
#安装nova服务
yum install openstack-nova-api openstack-nova-conductor openstack-nova-novncproxy openstack-nova-scheduler -y
//openstack-nova-conductor:提供数据库连接
//openstack-nova-novncproxy:访问云主机的vnc
//openstack-nova-scheduler:提供调度服务

#配置服务
openstack-config --set /etc/nova/nova.conf DEFAULT enabled_apis osapi_compute,metadata
openstack-config --set /etc/nova/nova.conf api_database connection mysql+pymysql://nova:NOVA_DBPASS@controller/nova_api
openstack-config --set /etc/nova/nova.conf database connection mysql+pymysql://nova:NOVA_DBPASS@controller/nova
openstack-config --set /etc/nova/nova.conf DEFAULT transport_url rabbit://openstack:000000@controller:5672/
!!这里需要修改自己rabbitmq的openstack密码

openstack-config --set /etc/nova/nova.conf api auth_strategy keystone
openstack-config --set /etc/nova/nova.conf keystone_authtoken www_authenticate_uri http://controller:5000/
openstack-config --set /etc/nova/nova.conf keystone_authtoken auth_url http://controller:5000/
openstack-config --set /etc/nova/nova.conf keystone_authtoken memcached_servers controller:11211
openstack-config --set /etc/nova/nova.conf keystone_authtoken auth_type password
openstack-config --set /etc/nova/nova.conf keystone_authtoken project_domain_name Default
openstack-config --set /etc/nova/nova.conf keystone_authtoken user_domain_name Default
openstack-config --set /etc/nova/nova.conf keystone_authtoken project_name service
openstack-config --set /etc/nova/nova.conf keystone_authtoken username nova
openstack-config --set /etc/nova/nova.conf keystone_authtoken password nova
!!这里修改自己keystone认证的nova密码。

openstack-config --set /etc/nova/nova.conf DEFAULT my_ip 192.168.100.10
!!这里填自己的管理IP地址

openstack-config --set /etc/nova/nova.conf DEFAULT use_neutron true
openstack-config --set /etc/nova/nova.conf DEFAULT firewall_driver nova.virt.firewall.NoopFirewallDriver

openstack-config --set /etc/nova/nova.conf vnc enabled true
openstack-config --set /etc/nova/nova.conf vnc server_listen 192.168.100.10
openstack-config --set /etc/nova/nova.conf vnc server_proxyclient_address 192.168.100.10
!!填自己的IP

openstack-config --set /etc/nova/nova.conf glance api_servers http://controller:9292
openstack-config --set /etc/nova/nova.conf oslo_concurrency lock_path /var/lib/nova/tmp

openstack-config --set /etc/nova/nova.conf placement region_name RegionOne
openstack-config --set /etc/nova/nova.conf placement project_domain_name Default
openstack-config --set /etc/nova/nova.conf placement project_name service
openstack-config --set /etc/nova/nova.conf placement auth_type password
openstack-config --set /etc/nova/nova.conf placement user_domain_name Default
openstack-config --set /etc/nova/nova.conf placement auth_url http://controller:5000/v3
openstack-config --set /etc/nova/nova.conf placement username placement
openstack-config --set /etc/nova/nova.conf placement password placement
!!这里换成自己keystone中placement的密码

#同步nova-api的数据库
su -s /bin/sh -c "nova-manage api_db sync" nova

#注册cell0数据库:
su -s /bin/sh -c "nova-manage cell_v2 map_cell0" nova

#创建cell1单元格:
su -s /bin/sh -c "nova-manage cell_v2 create_cell --name=cell1 --verbose" nova

#同步nova数据库
su -s /bin/sh -c "nova-manage db sync" nova

#验证nova cell0和cell1已正确注册
su -s /bin/sh -c "nova-manage cell_v2 list_cells" nova

#开启服务完成安装
systemctl enable openstack-nova-api.service openstack-nova-scheduler.service \
    openstack-nova-conductor.service openstack-nova-novncproxy.service
systemctl restart openstack-nova-api.service openstack-nova-scheduler.service \
    openstack-nova-conductor.service openstack-nova-novncproxy.service
#####compute节点#####
#安装服务
yum install openstack-nova-compute -y
#编辑配置文件
openstack-config --set /etc/nova/nova.conf DEFAULT enabled_apis osapi_compute,metadata
openstack-config --set /etc/nova/nova.conf DEFAULT transport_url rabbit://openstack:000000@controller
openstack-config --set /etc/nova/nova.conf DEFAULT my_ip 192.168.100.20
!!填自己计算节点的管理IP
openstack-config --set /etc/nova/nova.conf DEFAULT use_neutron true
openstack-config --set /etc/nova/nova.conf DEFAULT firewall_driver nova.virt.firewall.NoopFirewallDriver
openstack-config --set /etc/nova/nova.conf api auth_strategy keystone
openstack-config --set /etc/nova/nova.conf keystone_authtoken www_authenticate_uri http://controller:5000/
openstack-config --set /etc/nova/nova.conf keystone_authtoken auth_url http://controller:5000/
openstack-config --set /etc/nova/nova.conf keystone_authtoken memcached_servers controller:11211
openstack-config --set /etc/nova/nova.conf keystone_authtoken auth_type password
openstack-config --set /etc/nova/nova.conf keystone_authtoken project_domain_name Default
openstack-config --set /etc/nova/nova.conf keystone_authtoken user_domain_name Default
openstack-config --set /etc/nova/nova.conf keystone_authtoken project_name service
openstack-config --set /etc/nova/nova.conf keystone_authtoken username nova
openstack-config --set /etc/nova/nova.conf keystone_authtoken password nova
openstack-config --set /etc/nova/nova.conf vnc enabled true
openstack-config --set /etc/nova/nova.conf vnc server_listen 0.0.0.0
openstack-config --set /etc/nova/nova.conf vnc server_proxyclient_address 192.168.100.20
openstack-config --set /etc/nova/nova.conf novncproxy_base_url http://controller:6080/vnc_auto.html
openstack-config --set /etc/nova/nova.conf glance api_servers http://controller:9292
openstack-config --set /etc/nova/nova.conf oslo_concurrency lock_path /var/lib/nova/tmp
openstack-config --set /etc/nova/nova.conf placement region_name RegionOne
openstack-config --set /etc/nova/nova.conf placement project_domain_name Default
openstack-config --set /etc/nova/nova.conf placement project_name service
openstack-config --set /etc/nova/nova.conf placement auth_type password
openstack-config --set /etc/nova/nova.conf placement user_domain_name Default
openstack-config --set /etc/nova/nova.conf placement auth_url http://controller:5000/v3
openstack-config --set /etc/nova/nova.conf placement password placement
openstack-config --set /etc/nova/nova.conf placement username placement
#使用以下命令确定计算节点是否支持虚拟机的硬件加速:
egrep -c '(vmx|svm)' /proc/cpuinfo
(如果此命令返回1或更大的值,则计算节点支持硬件加速,通常不需要额外配置)
(如果此命令返回的值为0,则计算节点不支持硬件加速,必须将libvirt配置为使用QEMU而不是KVM。)
#(可选)将libvirt配置为QEMU
openstack-config --set /etc/nova/nova.conf libvirt virt_type qemu
#启动计算服务(包括其依赖项),并将其配置为在系统引导时自动启动
systemctl enable libvirtd.service openstack-nova-compute.service
systemctl start libvirtd.service openstack-nova-compute.service
#####controller#####
#验证
openstack compute service list --service nova-compute
#####controller#####
#主机发现
每添加主机就需要执行主机发现:
命令:
su -s /bin/sh -c "nova-manage cell_v2 discover_hosts --verbose" nova
或者配置自动发现:
openstack-config --set /etc/nova/nova.conf scheduler discover_hosts_in_cells_interval 3005、neutron部署
#####controller#####
#建库授权
mysql -u root -p000000
CREATE DATABASE neutron;
GRANT ALL PRIVILEGES ON neutron.* TO 'neutron'@'localhost' IDENTIFIED BY 'NEUTRON_DBPASS';
GRANT ALL PRIVILEGES ON neutron.* TO 'neutron'@'%' IDENTIFIED BY 'NEUTRON_DBPASS';

source admin-openrc.sh
#创建服务凭据:
openstack user create --domain default --password neutron neutron
openstack role add --project service --user neutron admin
openstack service create --name neutron --description "OpenStack Networking" network

#创建API endpoint
openstack endpoint create --region RegionOne network public http://controller:9696
openstack endpoint create --region RegionOne network internal http://controller:9696
openstack endpoint create --region RegionOne network admin http://controller:9696
neutron服务有两种网络:
网络选项1:提供商网络
网络选项2:自助服务网络
选项1部署了最简单的架构,只支持将实例连接到提供程序(外部)网络。没有自助(专用)网络、路由器或浮动IP地址。只有管理员或其他特权用户才能管理提供商网络。
选项2使用支持将实例连接到自助服务网络的第3层服务来增强选项1。演示或其他非特权用户可以管理自助服务网络,包括在自助服务网络和提供商网络之间提供连接的路由器。此外,浮动IP地址使用来自外部网络(如Internet)的自助服务网络提供到实例的连接。
自助服务网络通常使用覆盖网络。覆盖网络协议(如VXLAN)包括额外的报头,这些报头会增加开销并减少有效负载或用户数据的可用空间。在不了解虚拟网络基础设施的情况下,实例尝试使用1500字节的默认以太网最大传输单元(MTU)发送数据包。网络服务通过DHCP自动向实例提供正确的MTU值。但是,有些云映像不使用DHCP或忽略DHCP MTU选项,需要使用元数据或脚本进行配置。
本篇选择选项2自服务网络(需要部署提供者网络的可点击上面链接查看官方文档)
Networking Option 2: Self-service networks
#####controller#####
##安装服务
yum install openstack-neutron openstack-neutron-ml2 openstack-neutron-linuxbridge ebtables -y

##配置服务
#在[database]部分,配置数据库访问:
openstack-config --set /etc/neutron/neutron.conf database connection mysql+pymysql://neutron:NEUTRON_DBPASS@controller/neutron

#在[DEFAULT]部分,启用模块化第2层(ML2)插件、路由器服务和重叠IP地址:
openstack-config --set /etc/neutron/neutron.conf DEFAULT core_plugin ml2
openstack-config --set /etc/neutron/neutron.conf DEFAULT service_plugins router
openstack-config --set /etc/neutron/neutron.conf DEFAULT allow_overlapping_ips true

#在[DEFAULT]部分中,配置Rabbit MQ消息队列访问:
openstack-config --set /etc/neutron/neutron.conf DEFAULT transport_url rabbit://openstack:000000@controller
!!此项000000密码改为自己rabbitmq的密码

#在[DEFAULT]和[keystone_authtoken]部分中,配置身份服务访问:
openstack-config --set /etc/neutron/neutron.conf DEFAULT auth_strategy keystone
openstack-config --set /etc/neutron/neutron.conf keystone_authtoken www_authenticate_uri http://controller:5000
openstack-config --set /etc/neutron/neutron.conf keystone_authtoken auth_url http://controller:5000
openstack-config --set /etc/neutron/neutron.conf keystone_authtoken memcached_servers controller:11211
openstack-config --set /etc/neutron/neutron.conf keystone_authtoken auth_type password
openstack-config --set /etc/neutron/neutron.conf keystone_authtoken project_domain_name default
openstack-config --set /etc/neutron/neutron.conf keystone_authtoken user_domain_name default
openstack-config --set /etc/neutron/neutron.conf keystone_authtoken project_name service
openstack-config --set /etc/neutron/neutron.conf keystone_authtoken username neutron
openstack-config --set /etc/neutron/neutron.conf keystone_authtoken password neutron
!!此项密码改为自己keystone的neutron密码


#在[DEFAULT]和[nova]部分中,配置网络以通知Compute网络拓扑更改:
openstack-config --set /etc/neutron/neutron.conf DEFAULT notify_nova_on_port_status_changes true
openstack-config --set /etc/neutron/neutron.conf DEFAULT notify_nova_on_port_data_changes true
openstack-config --set /etc/neutron/neutron.conf nova auth_url http://controller:5000
openstack-config --set /etc/neutron/neutron.conf nova auth_type password
openstack-config --set /etc/neutron/neutron.conf nova project_domain_name default
openstack-config --set /etc/neutron/neutron.conf nova user_domain_name default
openstack-config --set /etc/neutron/neutron.conf nova region_name RegionOne
openstack-config --set /etc/neutron/neutron.conf nova project_name service
openstack-config --set /etc/neutron/neutron.conf nova username nova
openstack-config --set /etc/neutron/neutron.conf nova password nova
!!替换自己keyston中的nova的密码

#在[oslo_concurrency]部分,配置lock_path:
openstack-config --set /etc/neutron/neutron.conf oslo_concurrency lock_path /var/lib/neutron/tmp


##配置模块化第2层(ML2)插件
#在[ml2]部分中,启用flat、VLAN和VXLAN网络:
openstack-config --set /etc/neutron/plugins/ml2/ml2_conf.ini ml2 type_drivers flat,vlan,vxlan

#在[ml2]部分中,启用VXLAN自助服务网络:
openstack-config --set /etc/neutron/plugins/ml2/ml2_conf.ini ml2 tenant_network_types vxlan

#在[ml2]部分中,启用Linux网桥和第2层填充机制:
openstack-config --set /etc/neutron/plugins/ml2/ml2_conf.ini ml2 mechanism_drivers linuxbridge,l2population

#在[ml2]部分中,启用端口安全扩展驱动程序:
openstack-config --set /etc/neutron/plugins/ml2/ml2_conf.ini ml2 extension_drivers port_security

#在[ml2_type_flat]部分中,将提供商虚拟网络配置为平面网络:
openstack-config --set /etc/neutron/plugins/ml2/ml2_conf.ini ml2_type_flat flat_networks provider

#在[ml2_type_vxlan]部分,为自助服务网络配置vxlan网络标识符范围:
openstack-config --set /etc/neutron/plugins/ml2/ml2_conf.ini ml2_type_vxlan vni_ranges 1:1000

#在[securitygroup]部分,启用ipset以提高安全组规则的效率:
openstack-config --set /etc/neutron/plugins/ml2/ml2_conf.ini securitygroup enable_ipset true

##配置Linux网桥代理
#在[linux_bridge]部分,将提供商虚拟网络映射到提供商物理网络接口:
openstack-config --set /etc/neutron/plugins/ml2/linuxbridge_agent.ini linux_bridge physical_interface_mappings provider:ens33
!!将最后的网卡名换成自己的提供商物理网络接口名

#在[vxlan]部分,启用vxlan覆盖网络,配置处理覆盖网络的物理网络接口的IP地址,并启用第2层填充:
openstack-config --set /etc/neutron/plugins/ml2/linuxbridge_agent.ini vxlan enable_vxlan true
openstack-config --set /etc/neutron/plugins/ml2/linuxbridge_agent.ini vxlan l2_population true
openstack-config --set /etc/neutron/plugins/ml2/linuxbridge_agent.ini vxlan local_ip 192.168.100.10
!!将IP地址换成管理网络的接口IP地址


#在[securitygroup]部分,启用安全组并配置Linux桥iptables防火墙驱动程序:
openstack-config --set /etc/neutron/plugins/ml2/linuxbridge_agent.ini securitygroup enable_security_group true
openstack-config --set /etc/neutron/plugins/ml2/linuxbridge_agent.ini securitygroup firewall_driver neutron.agent.linux.iptables_firewall.IptablesFirewallDriver

#
#验证网络网桥是否支持,若不支持则加载br_netfilter内核模块。
使用如下命令验证,如返回结果为1则支持,否则需要加载br_netfilter内核模块
sysctl net.bridge.bridge-nf-call-iptables
sysctl net.bridge.bridge-nf-call-ip6tables


#加载br_netfilter内核模块
modprobe br_netfilter

touch cat /etc/rc.sysinit
cat > /etc/rc.sysinit <<EOF
#!/bin/bash
for file in /etc/sysconfig/modules/*.modules ; do
[ -x $file ] && $file
done
EOF

touch /etc/sysconfig/modules/br_netfilter.modules
cat > /etc/sysconfig/modules/br_netfilter.modules <<EOF
modprobe br_netfilter
EOF

chmod 755 /etc/sysconfig/modules/br_netfilter.modules

sed -i '$a\net.bridge.bridge-nf-call-iptables=1\' /etc/sysctl.conf
sed -i '$a\net.bridge.bridge-nf-call-ip6tables=1\' /etc/sysctl.conf
sysctl -p


##配置第3层代理»
编辑/etc/中子/l3_agent.ini文件并完成以下操作:
#在[DEFAULT]部分,配置Linux网桥接口驱动程序:
openstack-config --set /etc/neutron/l3_agent.ini DEFAULT interface_driver linuxbridge

##配置DHCP代理»
编辑/etc/neutron/dhcp_agent.ini文件并完成以下操作:
#在[DEFAULT]部分,配置Linux网桥接口驱动程序、Dnsmasq DHCP驱动程序,并启用隔离元数据,以便提供商网络上的实例可以通过网络访问元数据:
openstack-config --set /etc/neutron/dhcp_agent.ini DEFAULT interface_driver linuxbridge
openstack-config --set /etc/neutron/dhcp_agent.ini DEFAULT dhcp_driver neutron.agent.linux.dhcp.Dnsmasq
openstack-config --set /etc/neutron/dhcp_agent.ini DEFAULT enable_isolated_metadata true
#####controller#####

###配置元数据代理
##编辑/etc/neutron/metadata_agent.ini 文件并完成以下操作:
#在[DEFAULT]部分,配置元数据主机和共享密钥
openstack-config --set /etc/neutron/metadata_agent.ini DEFAULT nova_metadata_host controller
openstack-config --set /etc/neutron/metadata_agent.ini DEFAULT metadata_proxy_shared_secret METADATA_SECRET

###将计算服务配置为使用网络服务
##编辑/etc/nova/nova.conf文件并执行以下操作:
#在[neutron]部分,配置访问参数,启用元数据代理,并配置密码:
openstack-config --set /etc/nova/nova.conf neutron auth_url http://controller:5000
openstack-config --set /etc/nova/nova.conf neutron auth_type password
openstack-config --set /etc/nova/nova.conf neutron project_domain_name default
openstack-config --set /etc/nova/nova.conf neutron user_domain_name default
openstack-config --set /etc/nova/nova.conf neutron region_name RegionOne
openstack-config --set /etc/nova/nova.conf neutron project_name service
openstack-config --set /etc/nova/nova.conf neutron username neutron
openstack-config --set /etc/nova/nova.conf neutron password neutron
openstack-config --set /etc/nova/nova.conf neutron service_metadata_proxy true
openstack-config --set /etc/nova/nova.conf neutron metadata_proxy_shared_secret METADATA_SECRET
!!此处的metadata密码是上一步设置的默认的

###完成安装
#配置软连接
ln -s /etc/neutron/plugins/ml2/ml2_conf.ini /etc/neutron/plugin.ini


#同步数据库
su -s /bin/sh -c "neutron-db-manage --config-file /etc/neutron/neutron.conf \
  --config-file /etc/neutron/plugins/ml2/ml2_conf.ini upgrade head" neutron

#重启
systemctl restart openstack-nova-api.service

systemctl enable neutron-server.service neutron-linuxbridge-agent.service neutron-dhcp-agent.service neutron-metadata-agent.service
systemctl start neutron-server.service neutron-linuxbridge-agent.service neutron-dhcp-agent.service neutron-metadata-agent.service

systemctl enable neutron-l3-agent.service
systemctl start neutron-l3-agent.service
配置计算节点的neutron服务
#####compute节点#####
##安装组件
yum install openstack-neutron-linuxbridge ebtables ipset -y
##编辑配置文件 /etc/neutron/neutron.conf
#在[database]部分,注释掉所有连接选项,因为计算节点不直接访问数据库。
#在[DEFAULT]部分中,配置Rabbit MQ消息队列访问
openstack-config --set /etc/neutron/neutron.conf DEFAULT transport_url rabbit://openstack:000000@controller
!!注意此处密码,替换成自己所设密码

#在[DEFAULT]和[keystone_authtoken]部分中,配置身份服务访问:
openstack-config --set /etc/neutron/neutron.conf DEFAULT auth_strategy keystone
openstack-config --set /etc/neutron/neutron.conf keystone_authtoken www_authenticate_uri http://controller:5000
openstack-config --set /etc/neutron/neutron.conf keystone_authtoken auth_url http://controller:5000
openstack-config --set /etc/neutron/neutron.conf keystone_authtoken memcached_servers controller:11211
openstack-config --set /etc/neutron/neutron.conf keystone_authtoken auth_type password
openstack-config --set /etc/neutron/neutron.conf keystone_authtoken project_domain_name default
openstack-config --set /etc/neutron/neutron.conf keystone_authtoken user_domain_name default
openstack-config --set /etc/neutron/neutron.conf keystone_authtoken project_name service
openstack-config --set /etc/neutron/neutron.conf keystone_authtoken username neutron
openstack-config --set /etc/neutron/neutron.conf keystone_authtoken password neutron

# 在[oslo_concurrency]部分,配置lock_path
openstack-config --set /etc/neutron/neutron.conf oslo_concurrency lock_path /var/lib/neutron/tmp
接下来配置compute节点的自服务网络,若需要配置提供者网络,可参考以下链接:
#####compute#####
###配置自服务网络
##配置Linux网桥代理
/etc/neutron/plugins/ml2/linuxbridge_agent.ini
#在[linux_bridge]部分,将提供商虚拟网络映射到提供商物理网络接口
openstack-config --set /etc/neutron/plugins/ml2/linuxbridge_agent.ini linux_bridge physical_interface_mappings provider:ens33


#在[vxlan]部分,启用vxlan覆盖网络,配置处理覆盖网络的物理网络接口的IP地址,并启用第2层填充:
openstack-config --set /etc/neutron/plugins/ml2/linuxbridge_agent.ini vxlan enable_vxlan true
openstack-config --set /etc/neutron/plugins/ml2/linuxbridge_agent.ini vxlan l2_population true
openstack-config --set /etc/neutron/plugins/ml2/linuxbridge_agent.ini vxlan local_ip 192.168.100.20
!!计算节点的管理IP地址。


#在[securitygroup]部分,启用安全组并配置Linux桥iptables防火墙驱动程序:
openstack-config --set /etc/neutron/plugins/ml2/linuxbridge_agent.ini securitygroup enable_security_group true
openstack-config --set /etc/neutron/plugins/ml2/linuxbridge_agent.ini securitygroup firewall_driver neutron.agent.linux.iptables_firewall.IptablesFirewallDriver


#通过验证以下所有sysctl值均设置为1,确保Linux操作系统内核支持网桥筛选器:
sysctl net.bridge.bridge-nf-call-iptables
sysctl net.bridge.bridge-nf-call-ip6tables
将计算服务配置为使用网络服务»
#####compute#####
##编辑/etc/nova/nova.conf文件并完成以下操作:
#在[neutron]部分,配置访问参数:
openstack-config --set /etc/nova/nova.conf neutron auth_url http://controller:5000
openstack-config --set /etc/nova/nova.conf neutron auth_type password
openstack-config --set /etc/nova/nova.conf neutron project_domain_name default
openstack-config --set /etc/nova/nova.conf neutron user_domain_name default
openstack-config --set /etc/nova/nova.conf neutron region_name RegionOne
openstack-config --set /etc/nova/nova.conf neutron project_name service
openstack-config --set /etc/nova/nova.conf neutron username neutron
openstack-config --set /etc/nova/nova.conf neutron password neutron
完成安装
#####compute#####
##完成安装
#重新启动计算服务:
systemctl restart openstack-nova-compute.service

#启动Linux网桥代理,并将其配置为在系统引导时启动:
systemctl enable neutron-linuxbridge-agent.service
systemctl restart neutron-linuxbridge-agent.service
没有报错-
#####controller#####
验证操作
openstack network agent list
6、horizon
为openstack集群部署dashboard
#####controller#####
###安装和配置组件
yum install openstack-dashboard -y

##编辑配置文件/etc/openstack-dashboard/local_settings:
#配置在controller上:
sed -i 's\OPENSTACK_HOST = "127.0.0.1"\OPENSTACK_HOST = "controller"\' /etc/openstack-dashboard/local_settings

#允许所有主机访问dashboard
sed -i 's/ALLOWED_HOSTS = [\'horizon.example.com\', \'localhost\']/ALLOWED_HOSTS = [\'*\']/' /etc/openstack-dashboard/local_settings

#配置memcached会话存储服务,在配置文件中添加如下内容:
SESSION_ENGINE = 'django.contrib.sessions.backends.cache'

CACHES = {
    'default': {
         'BACKEND': 'django.core.cache.backends.memcached.MemcachedCache',
         'LOCATION': 'controller:11211',
    }
}
#启用标识API版本3:
OPENSTACK_KEYSTONE_URL = "http://%s:5000/v3" % OPENSTACK_HOST

#启用对域的支持:
sed -i '$a\OPENSTACK_KEYSTONE_MULTIDOMAIN_SUPPORT = True\' /etc/openstack-dashboard/local_settings

#配置API版本,在文件末尾添加如下:
OPENSTACK_API_VERSIONS = {
    "identity": 3,
    "image": 2,
    "volume": 3,
}

#将Default配置为通过仪表板创建的用户的默认域:
sed -i '$a\OPENSTACK_KEYSTONE_DEFAULT_DOMAIN = "Default"\' /etc/openstack-dashboard/local_settings

#将用户配置为通过仪表板创建的用户的默认角色:
sed -i '$a\OPENSTACK_KEYSTONE_DEFAULT_ROLE = "user"\' /etc/openstack-dashboard/local_settings

#(可选)配置时区:
sed -i 's\TIME_ZONE = "UTC"\TIME_ZONE = "Asia/Shanghai"\ /etc/openstack-dashboard/local_settings

#如果未包括,请将以下配置添加到/etc/httpd/conf.d/openstack-dashboard.conf

sed -i '$a\WSGIApplicationGroup %{GLOBAL}\' /etc/httpd/conf.d/openstack-dashboard.conf

###重启服务
systemctl restart httpd.service memcached.service











 浙公网安备 33010602011771号