[转]WPF/MVVM快速开始手册
I will quickly introduce some topics, then show an example that explains or demonstrates each point. Accordingly, I haven't really attempted to make the GUIs pretty, that's not the point of this article (see the bullet points above).
The Basics
- The most important thing about WPF is data binding. In short, you have some data, typically in a collection of some sort, and you want to display it to the user. You can 'bind' your XAML to the data.
- WPF has two parts, the XAML which describes your GUI layout and effects, and the code-behind that is tied to the XAML.
- The neatest and probably most reusable way to organise your code is to use the 'MVVM' pattern: Model, View, ViewModel. This has the aim of ensuring that your View contains minimal (or no) code, and should be XAML-only.
The Key Points You Need to Know
- The collection you should use to hold your data is the
ObservableCollection<>. Not alist, not adictionary, but anObservableCollection. The word 'Observable' is the clue here: the WPF window needs to be able to 'observe' your data collection. This collection class implements certain interfaces that WPF uses. - Every WPF control (including 'Window's) has a '
DataContext' andCollectioncontrols have an 'ItemsSource' attribute to bind to. - The interface '
INotifyPropertyChanged' will be used extensively to communicate any changes in the data between the GUI and your code.
Example 1: INotifyPropertyChanged
public class SongViewModel : INotifyPropertyChanged
    {
        #region Construction
        /// Constructs the default instance of a SongViewModel
        public SongViewModel()
        {
            _song = new Song { ArtistName = "Unknown", SongTitle = "Unknown" };
        }
        #endregion

        #region Members
        Song _song;
        #endregion

        #region Properties
        public Song Song
        {
            get
            {
                return _song;
            }
            set
            {
                _song = value;
            }
        }

        public string ArtistName
        {
            get { return Song.ArtistName; }
            set
            {
                if (Song.ArtistName != value)
                {
                    Song.ArtistName = value;
                    RaisePropertyChanged("ArtistName");
                }
            }
        }
        #endregion

        #region INotifyPropertyChanged Members

        public event PropertyChangedEventHandler PropertyChanged;

        #endregion

        #region Methods

        private void RaisePropertyChanged(string propertyName)
        {
            // take a copy to prevent thread issues
            PropertyChangedEventHandler handler = PropertyChanged;
            if (handler != null)
            {
                handler(this, new PropertyChangedEventArgs(propertyName));
            }
        }
        #endregion
    }
There are several things now happening here. Firstly, we check to see if we are going to really change the property: this improves performance slightly for more complex objects. Secondly, if the value has changed, we raise the PropertyChanged event to any listeners.
So now we have a Model, and a ViewModel. We just need to define our View. This is just our MainWindow:
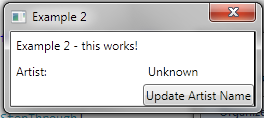
<Window x:Class="Example2.MainWindow"
        xmlns="http://schemas.microsoft.com/winfx/2006/xaml/presentation"
        xmlns:x="http://schemas.microsoft.com/winfx/2006/xaml"
        xmlns:local="clr-namespace:Example2"
        Title="Example 2"  SizeToContent="WidthAndHeight" ResizeMode="NoResize"
        Height="350" Width="525">
    <Window.DataContext>
        <!-- Declaratively create an instance of our SongViewModel -->
        <local:SongViewModel />
    </Window.DataContext>
    <Grid>
        <Grid.RowDefinitions>
            <RowDefinition Height="Auto" />
            <RowDefinition Height="Auto" />
            <RowDefinition Height="Auto" />
        </Grid.RowDefinitions>
        <Grid.ColumnDefinitions>
            <ColumnDefinition Width="Auto" />
            <ColumnDefinition Width="Auto" />
        </Grid.ColumnDefinitions>
        <Label Grid.Column="0" Grid.Row="0" Content="Example 2 - this works!" />
        <Label Grid.Column="0" Grid.Row="1" Content="Artist:  " />
        <Label Grid.Column="1" Grid.Row="1" Content="{Binding ArtistName}" />
        <Button Grid.Column="1" Grid.Row="2" Name="ButtonUpdateArtist"
        Content="Update Artist Name" Click="ButtonUpdateArtist_Click" />
    </Grid>
</Window>
To test the databinding, we can take the traditional approach and create a button and wire to its OnClick event, so the XAML above has a button, and Click event, giving the code behind:
public partial class MainWindow : Window
    {
        #region Members
        SongViewModel _viewModel;
        int _count = 0;
        #endregion

        public MainWindow()
        {
            InitializeComponent();

            //  We have declared the view model instance declaratively in the xaml.
            //  Get the reference to it here, so we can use it in the button click event.
            _viewModel = (SongViewModel)base.DataContext;
        }

        private void ButtonUpdateArtist_Click(object sender, RoutedEventArgs e)
        {
            ++_count;
            _viewModel.ArtistName = string.Format("Elvis ({0})", _count);
        }
    }
Example 2: Commands
Binding to GUI events is problematic. WPF offers you a better way. This is ICommand. Many controls have a Command attribute. These obey binding in the same way as Content and ItemsSource, except you need to bind it to a *property* that returns an ICommand. For the trivial example that we are looking at here, we just implement a trivial class called 'RelayCommand' that implements ICommand.
ICommand requires the user to define two methods: bool CanExecute, and void Execute. The CanExecute method really just says to the user, can I execute this command? This is useful for controlling the context in which you can perform GUI actions. In our example, we don't care, so we return true, meaning that the framework can always call our 'Execute' method. It could be that you have a situation where you have a command bound to button, and it can only execute if you have selected an item in a list. You would implement that logic in the 'CanExecute' method.
Since we want to reuse the ICommand code, we use the RelayCommand class that contains all the repeatable code we do not want to keep writing.
To show how easy it is to reuse the ICommand, we bind the Update Artist command to both a button and a menu item. Notice that we no longer bind to Button specific Click event, or Menu specific Click event.

更多内容在本文转载出处:http://www.codeproject.com/Articles/165368/WPF-MVVM-Quick-Start-Tutorial

 浙公网安备 33010602011771号