
按照通常的套路,首先创建一个空白的解决方案,需要用到.netcore sdk命令:
dotnet new sln -o dotnetcore_tutrorial
这个时候可以看到在目标目录下生成了一个同名的.sln文件,这个和使用vs是一样的,在我们实际开发过程中,通常要建立运行项目(web项目或者console项目),多个类库项目,以及单元测试项目。
首先建立一个类库项目,并将该项目加入到解决方案中:
dotnet new classlib -o DotNetTurorial.Common
dotnet sln add DotNetTurorial.Common/DotNetTurorial.Common.cspro
ps:最好把类库项目创建在dotnetcore_tutrorial目录下,这样可以保证.sln文件和项目文件在同一个目录下
通过同样的方式创建控制台项目和单元测试项目
dotnet new console -o DotNetTurorial.ConsoleApp
dotnet sln add DotNetTurorial.ConsoleApp/DotNetTurorial.ConsoleApp.csproj
dotnet new xunit -o DotNetTurorial.UnitTest
dotnet sln add DotNetTurorial.UnitTest/DotNetTurorial.UnitTest.csproj
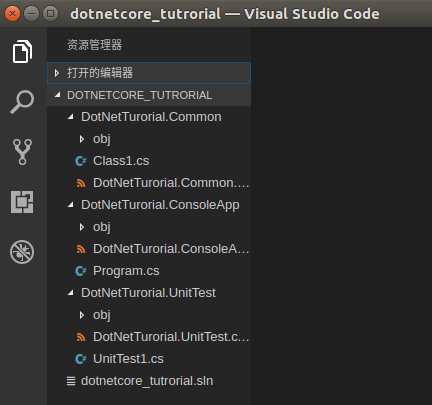
现在整个项目的结构已经建立完成,我们用vscode打开解决方案对应的文件夹,目录结构如下:
接下来需要添加项目引用,也就是console项目需要引用类库项目:
<Project Sdk="Microsoft.NET.Sdk">
  <PropertyGroup>
    <OutputType>Exe</OutputType>
    <TargetFramework>netcoreapp2.0</TargetFramework>
  </PropertyGroup>
  <ItemGroup>
    <ProjectReference Include="..\DotNetTurorial.Common\DotNetTurorial.Common.csproj"/>
  </ItemGroup>
</Project>
同样的方法添加到测试项目:
<Project Sdk="Microsoft.NET.Sdk">

  <PropertyGroup>
    <TargetFramework>netcoreapp2.0</TargetFramework>

    <IsPackable>false</IsPackable>
  </PropertyGroup>

  <ItemGroup>
    <PackageReference Include="Microsoft.NET.Test.Sdk" Version="15.3.0-preview-20170427-09" />
    <PackageReference Include="xunit" Version="2.2.0" />
    <PackageReference Include="xunit.runner.visualstudio" Version="2.2.0" />
  </ItemGroup>
  <ItemGroup>
    <ProjectReference Include="..\DotNetTurorial.Common\DotNetTurorial.Common.csproj"/>
  </ItemGroup>
</Project>
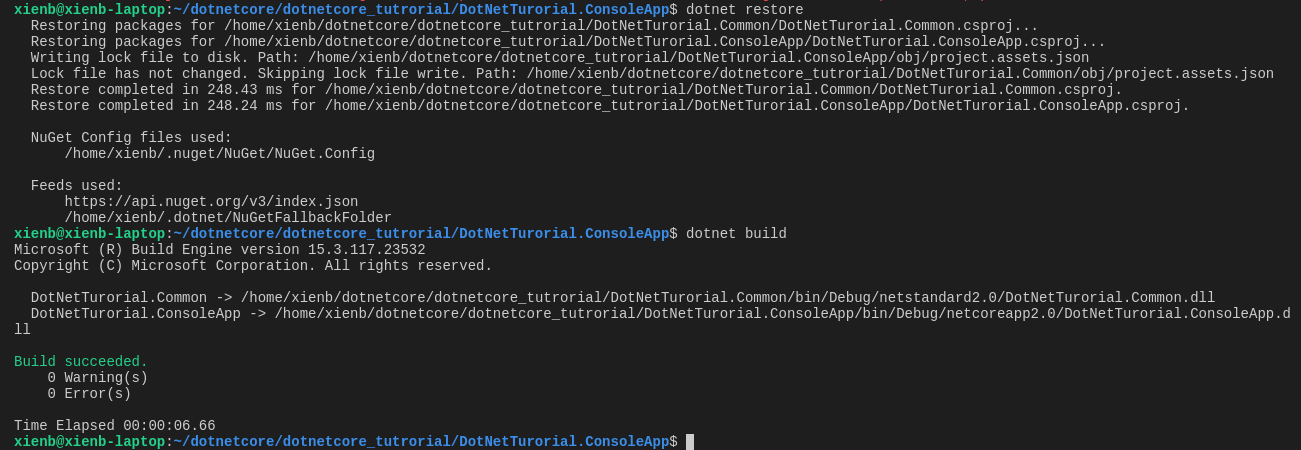
配置好以后,切换到Console项目所在目录,执行dotnet restore 初始化项目,执行dotnet build 编译项目
接下来实现一个简单的业务逻辑,通过console程序添加学生信息,并把数据存入mysql中:
操作数据需要用到几个nuget包,需要在项目文件中手动配置(dotnetcore2.0 不需要再引入NETStandard.Library)。
<?xml version="1.0" encoding="UTF-8" standalone="yes"?>
<Project Sdk="Microsoft.NET.Sdk">
  <PropertyGroup>
    <TargetFramework>netstandard2.0</TargetFramework>
  </PropertyGroup>
  <ItemGroup>
    <PackageReference Include="Dapper" Version="1.50.2"/>
    <PackageReference Include="NETStandard.Library" Version="1.6.0"/>
    <PackageReference Include="SapientGuardian.MySql.Data" Version="6.9.813"/>
  </ItemGroup>
</Project>
这里建议安装一个vscode插件nuget package manager,可以通过该插件快速安装nuget包,安装完成以后在项目文件中右键,选择命令面板

在命令面板中输入nuget,可以根据包名搜索出该包的不同版本,添加以后使用dotnet resotore 命令还原nuget库到依赖
在common项目中增加一个数据库操作类:
using System;
using Dapper;
using MySql.Data.MySqlClient;

namespace DotNetTurorial.Common
{
    public class SQLHelper
    {
        public const string _conStr="server=127.0.0.1;port=3306;user id=root;password=123456;database=dotnetcore;pooling=false";
        public static int AddStudent(string name,int gender,string phone)
        {
            MySqlConnection connect=new MySqlConnection(_conStr);
            var ret = connect.Execute("insert into student(name,gender,phone) values(@name,@gender,@phone)",new {name=name,gender=gender,phone=phone});
            return ret;
        }
    }
}
在console项目中增加输入相关控制代码:
using System;
using DotNetTurorial.Common;

namespace DotNetTurorial.ConsoleApp
{
    class Program
    {
        static void Main(string[] args)
        {
            //Console.OutputEncoding = Encoding.UTF8; // 设置控制台编码
            AddUser();
            while(Console.ReadLine()!="exit"){
                AddUser();
            }
        }
        static void AddUser()
        {
            Console.WriteLine("please enter name:");
            var name=Console.ReadLine();
            Console.WriteLine("please enter gender,1 for male and 0 for female.");
            var gender = Console.ReadLine();
            Console.WriteLine("please enter phone:");
            var phone = Console.ReadLine();

            var ret = SQLHelper.AddStudent(name,Convert.ToInt32(gender),phone);
            if(ret>0)
            {
                 Console.WriteLine("success");
            }
        }
    }
}
在终端中输入dotnet run 运行程序

如果需要调试,需要安装C#扩展:

如果调试有输入到console程序,需要修改下:launch.json,注释掉"Console":"internalConsole", 增加:"externalConsole":true, 否则无法数据
{
   // Use IntelliSense to find out which attributes exist for C# debugging
   // Use hover for the description of the existing attributes
   // For further information visit https://github.com/OmniSharp/omnisharp-vscode/blob/master/debugger-launchjson.md
   "version": "0.2.0",
   "configurations": [
        {
            "name": ".NET Core Launch (console)",
            "type": "coreclr",
            "request": "launch",
            "preLaunchTask": "build",
            // If you have changed target frameworks, make sure to update the program path.
            "program": "${workspaceRoot}/DotNetTurorial.ConsoleApp/bin/Debug/netcoreapp2.0/DotNetTurorial.ConsoleApp.dll",
            "args": [],
            "cwd": "${workspaceRoot}/DotNetTurorial.ConsoleApp",
            // For more information about the 'console' field, see https://github.com/OmniSharp/omnisharp-vscode/blob/master/debugger-launchjson.md#console-terminal-window
            //"console": "internalConsole",
            "externalConsole":true, //使用外置的控制台
            "stopAtEntry": false,
            "internalConsoleOptions": "openOnSessionStart"
        },
        {
            "name": ".NET Core Attach",
            "type": "coreclr",
            "request": "attach",
            "processId": "${command:pickProcess}"
        }
    ]
}

 浙公网安备 33010602011771号