将koa+vue部署到服务器
很久很久以前,就对前后端如何分离,后端如何把代码部署到服务器有浓厚的兴趣,最近在阿里云上申请了一个服务器,试试水吧!
本文参考了文章《基于Node的Koa2项目从创建到打包到云服务器指南》
由于前端要调用后端接口,因此我们先介绍后端接口的开发
1. 后端接口开发
1.1 使用 koa-generator 脚手架开发
npm install koa-generator -g  //安装koa-generator,利用koa-generator快速搭建Node.js服务器
koa2  my-project  //新建一个叫做my-project的koa2项目
cd  my-project    npm  install
npm  start       //启动项目
localhost:3000  //打开
1.2 定义接口
router.get('/getJson', async (ctx, next) => {
  ctx.body = 'json string'
})

router.get('/hello', async (ctx, next) => {
  ctx.body = {
    title: 'koa2 hello'
  }
})
2前端代码开发;
2.1 脚手架的安装
vue较好的脚手架是:vue-cli
具体安装步骤,网上一搜一堆,给个链接:vue-cli(vue脚手架)超详细教程
大概步骤:
确保安装了node webpack
npm install -g vue-cli //全局安装 vue-cli
vue init webpack vue-demo //初始化项目
cd vue-demo //切换到项目目录
npm run dev //启动项目
2.2 连接后端接口
由于要请求后端接口,故要安装 axios
mounted:function(){
    this.getData(); //初始化页面时,请求了两个接口 /getJson 和 /hello
  },
  methods:{
    getData:async function(){
      axios.get('http://localhost:3000/getJson').then((respone)=>{ //这里使用了异步函数 Promise 的then
        this.querydata = respone.data
      })
    let {status,data} = await axios.get('http://localhost:3000/hello');//这里使用了 async 和 await
    this.two = data.title
}
问题一:这样执行后,发现报错: 提示无法跨域的问题。即两个端口不一样。
方法一:修改前端代码:
axios.get('/getJson').then((respone)=>{
        this.querydata = respone.data
})
同时修改config/index文件:
proxyTable: {
      '/': {
        target: 'http://localhost:3000',
        changeOrigin: true,
        pathRewrite: {
          '^/': ''
        }
      }
}
即把每个请求,做一个代理;但是总觉得,处理跨域应该由服务端来做,因此有
方法二:
前端代码:
const domain = 'http://localhost:3000'
getData:async function(){
    axios.get(domain+'/getJson').then((respone)=>{
    this.querydata = respone.data
    })
}
后端代码,在app.js:
const cors = require('koa2-cors');
app.use(cors());
参考文章: node.js 应答跨域请求实现
这样一个最简单的请求后端接口的实例完成了,这时我们在前端执行 npm run build, 把生成的dist文件夹的内容,放入koa项目的public中:
这时一般app.js中有:
app.use(require('koa-static')(__dirname + '/public'))
若没有,自己填写上,此时再次执行npm run dev,则服务端打开的 http://localhost:3000/#/ 自动成为前端的页面。(区分一下,前端的页面打开的是8080端口)
至此,在本地已经可以跑起来 调用后端定义的接口了,那么接下来如何将其部署到服务器上呢?
3.部署到服务器
首先想到的是 本地客户端 执行
ssh root@39.105.97.173
连接服务器,然后使用 scp -r ./* root@39.105.97.173:/root/www/ 但是文件很多的情况下 这样很麻烦有木有?
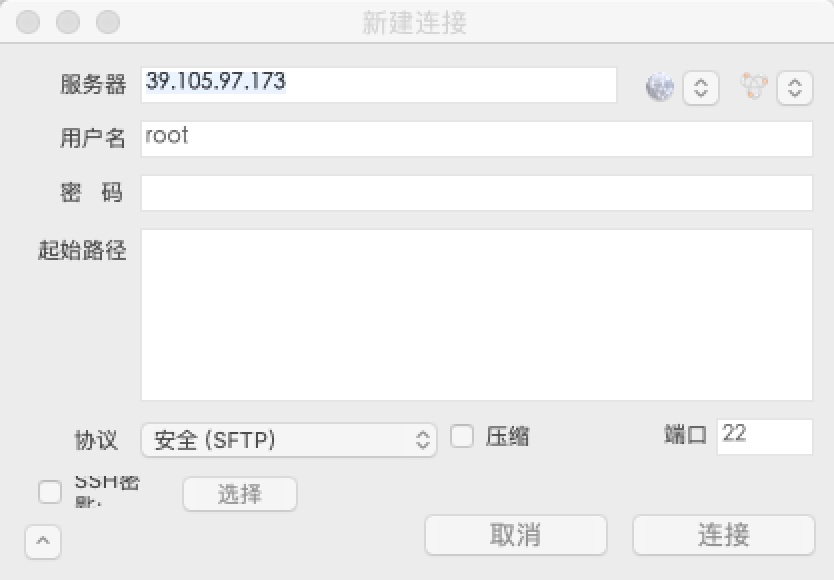
我们可以使用工具:Yummy FTP.app 来连接服务器,但是必须保证以下条件:
1)安装nvm/node环境 ;
2)更新yum源;
[1] 首先备份/etc/yum.repos.d/CentOS-Base.repo
mv /etc/yum.repos.d/CentOS-Base.repo /etc/yum.repos.d/CentOS-Base.repo.backup

[2] 进入yum源配置文件所在文件夹
cd /etc/yum.repos.d/

[3] 下载阿里云的yum源配置文件,放入/etc/yum.repos.d/(操作前请做好相应备份)
centos7
wget -O /etc/yum.repos.d/CentOS-Base.repo http://mirrors.aliyun.com/repo/Centos-7.repo
[4]清理
yum clean all

[5]更新缓存
yum makecache
yum install tree -y
yum update -y
3)安装sshd 在云服务器 ECS Linux CentOS 7 下重启服务不再通过 service 操作,而是通过 systemctl 操作。 操作说明如下:
查看状态:
systemctl status sshd.service
启动服务:
systemctl start sshd.service
重启服务:
systemctl restart sshd.service
开机自启:
systemctl enable sshd.service
关闭服务
systemctl stop sshd.service
下面表示已经开启:

4)开启服务器控制器的 安全组配置 打开22端口
5)
注意下面:端口是22 协议选择SFTP
4 启动服务
通过上述方法,把 除了 node_modules 文件夹部署到服务器上,然后在该文件夹下,npm install,执行npm run dev。然后访问 http://39.105.97.173:3000/#/ (注意这里有端口),即可访问到部署的页面!!!

 浙公网安备 33010602011771号