
Nginx
Nginx
目录
1
下载安装
-
版本:1.8.0
-
安装目录:/usr/local/nginx
启动
- 进入nginx的sbin目录,./nginx启动
- ./nginx -s stop 停止
- ./nginx -s quit 优雅关闭,完成已接收的任务后再关
- ./nginx -s reload 重新加载配置
安装成系统服务
- 报错:E212:无法打开并写入文件
- 解决:换到root,命令前加sudo
- 启动:systemctl start nginx
- 查看状态:systemctl status nginx
- 开机启动:system enable nginx.service
简介
代理
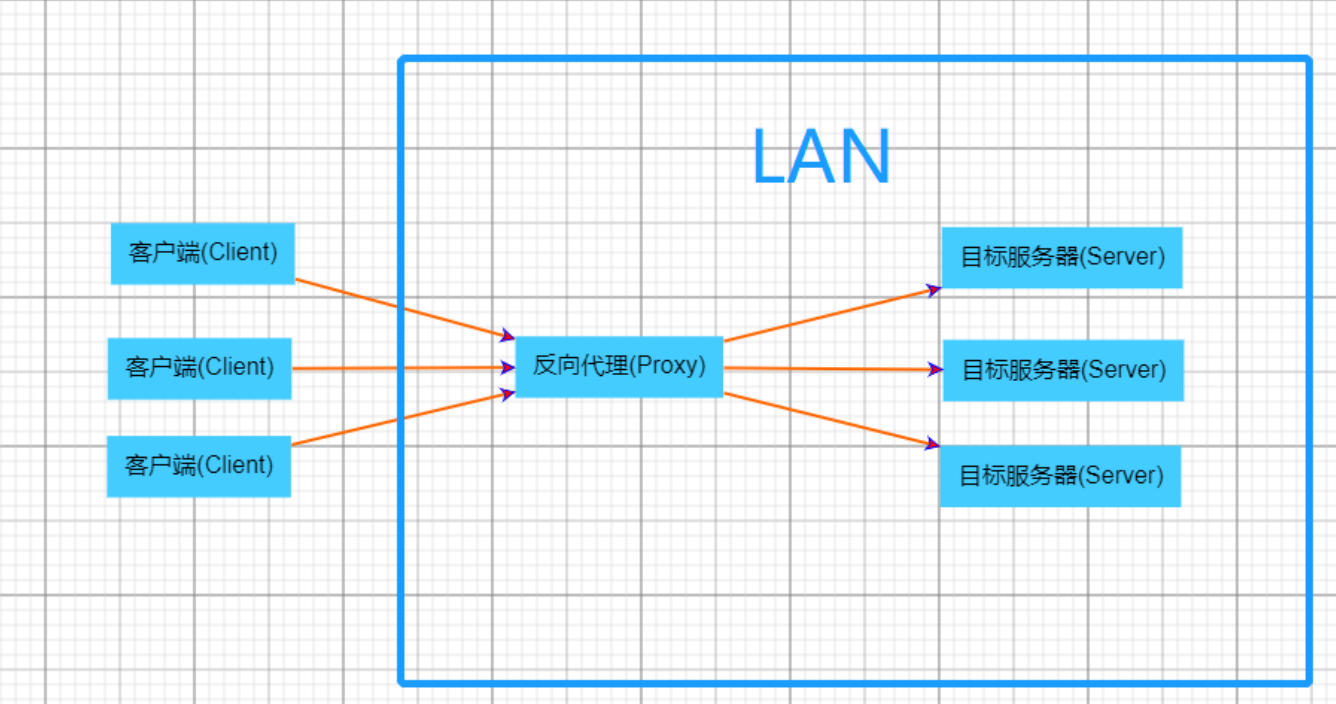
- 反向代理:客户端(Client)不知道目标服务器(Server)的信息,代理服务器就像是原始的目标服务器,客户端不需要特别的设置。
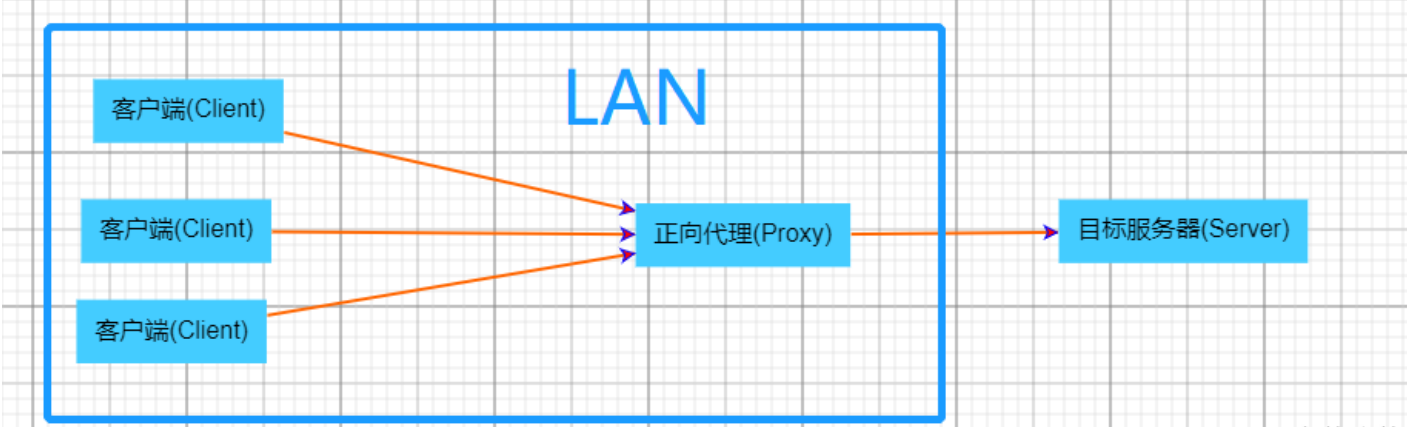
- 正向代理:客户端(Client)非常明确要访问的服务器(Server)地址。客户端的HTTP请求可以转发到之前与客户端网络不通的其它不同的目标服务器(如梯子)
- 区分:
- 正向代理是对客户端的伪装,服务器得到的是伪装过的客户端信息,proxy和client同属一个LAN,对server透明;
反向代理是对目标服务器的伪装,隐藏了目标服务器的IP、头部或者其他信息,客户端得到的是伪装过的目标服务器信息,proxy和server同属一个LAN,对client透明。 - 原文链接:https://blog.csdn.net/weixin_37791679/article/details/126581457
优势
- 速度快,并发高:多进程,IO复用(epoll)
- 配置简单,扩展性强
- 高可靠性:多进程(master管理,worker处理请求)
- 热部署
2
基本使用
配置文件
- 修改后需要重载才生效:systemctl reload nginx
- 简化版配置文件:
- mime.types:定义类型 文件后缀名,在返回的http头里面加定义类型,让浏览器以该方式解析该后缀名的文件;可自己添加内容;
worker_processes  1; # 启动的worker进程数

events {
    worker_connections  1024; #每个worker进程的连接数
}

http {
    include       mime.types; #include是引入关键字,这里引入了mime.types这个配置文件(同在conf目录下,mime.types是用来定义,请求返回的content-type)
    default_type  application/octet-stream; #mime.types未定义的,使用默认格式application/octet-stream

    sendfile        on; #详情,见下文
    keepalive_timeout  65; #长链接超时时间

		#一个nginx可以启用多个server(虚拟服务器)
    server {
        listen       80;#监听端口80
        server_name  localhost;  #接收的域名

        location / {
            root   html; #根目录指向html目录
            index  index.html index.htm; #域名/index 指向 index.html index.htm文件
        }

        error_page   500 502 503 504  /50x.html; # 服务器错误码为500 502 503 504,转到"域名/50x.html"
        location = /50x.html {# 指定到html文件夹下找/50x.htm
            root   html;
        }

    }
}
虚拟主机
- 一个ip地址对应多个域名,nginx服务器端判断你访问哪个域名,指向不同的站点目录,把相应的资源拿出来
域名解析
- 本机:在host文件里加
- 域名解析:阿里云
- 多用户的二级域名:用通配符 *
- 短网址
在虚拟机配置站点
- 在根目录下创建www和vod,里边分别放一个html
- 改配置文件,主机名+端口号需要唯一,不然无法区分
- 要是访问不了记得关闭防火墙!!!
- servername多种匹配:可以两个域名指向同一主机,中间用空格分隔即可
- 先匹配到前面的,就不会再往下了
- 用正则匹配时,后面要加$;结束符
应用
-
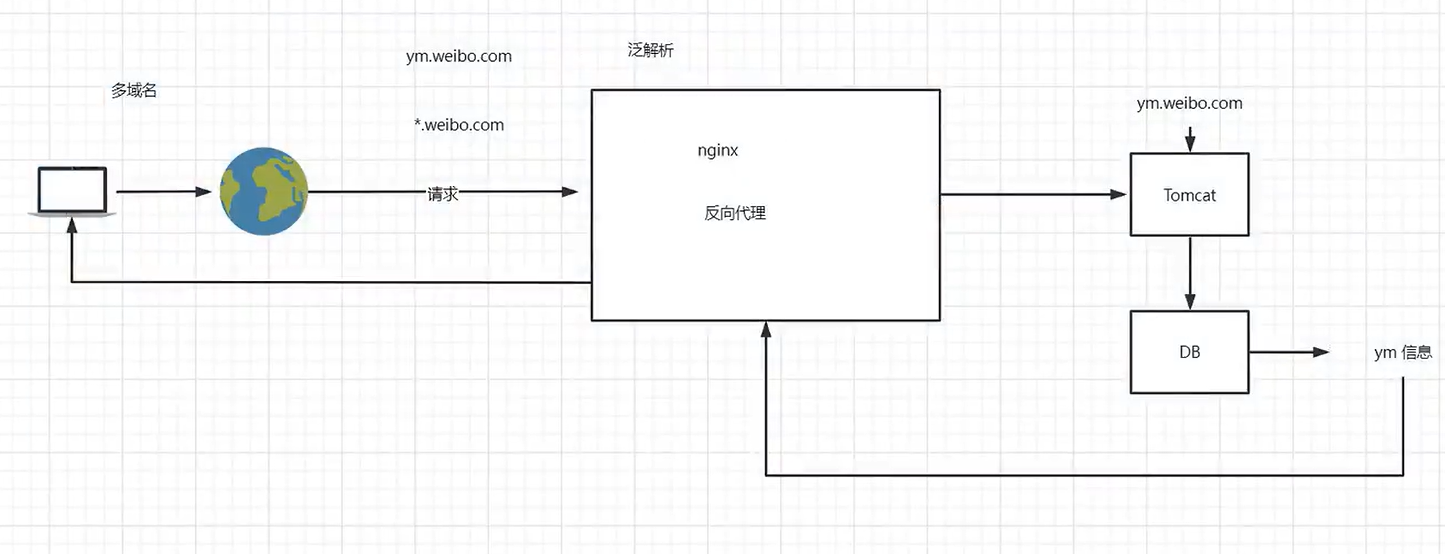
多用户二级域名
- 比如zhangsan.weibo.com, lisi.weibo.com
-
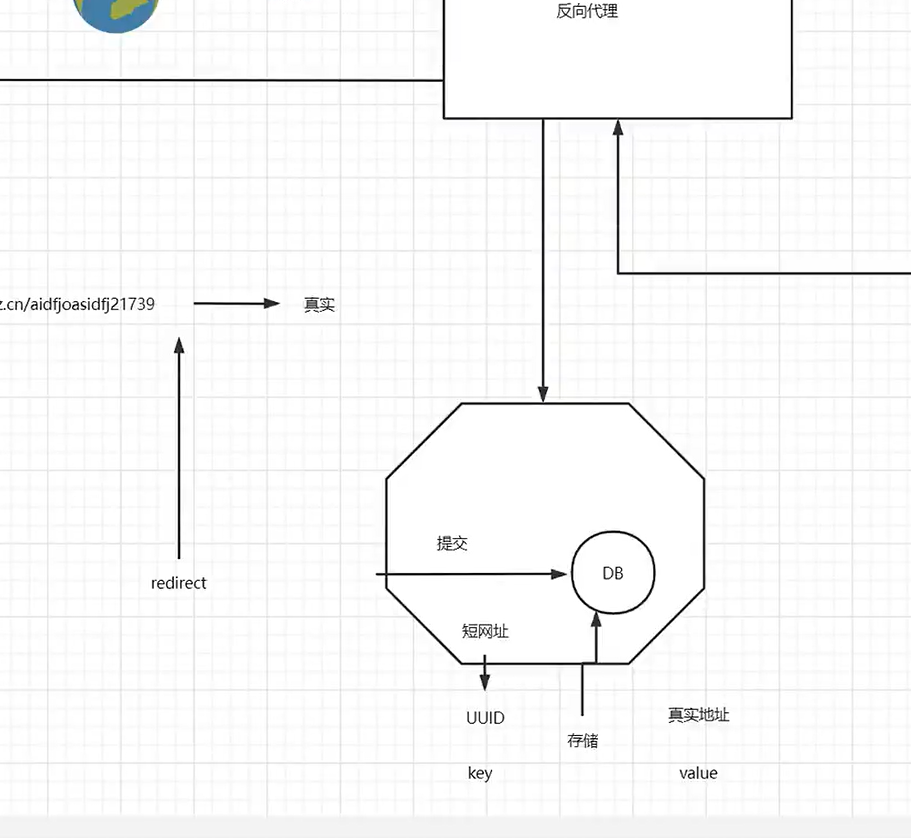
短网址
3
反向代理与负载均衡
网关,代理与反向代理(见上)
配置
- 配置文件的location里加proxy_pass: http://www.lalaal.com (写全)
- 注释掉后面的root和index
- 不支持https的proxy_pass
应用场景
负载均衡
- 集群:服务器提供的服务都一样
配置
-
定义地址别名:【在server字段下】使用upstream定义一组地址
-
然后在location里加proxy_pass: http://xiaoyangii(//后面是别名)
http{ upstream xiaoyangii{ server 192.168.174.133:80; #如果是80端口,可以省略不写 server 192.168.174.134:80; } server { listen 80; server_name localhost; location / { proxy_pass http://xiaoyangii; } error_page 500 502 503 504 /50x.html; location = /50x.html { root html; } } } -
设置权重
upstream httpds{
		server 192.168.174.133:80 weight=10;
		server 192.168.174.134:80 weight=80;
}
- 关闭
upstream httpds{
		server 192.168.174.133:80 weight=10 down;
		server 192.168.174.134:80 weight=80;
}
- 备用机:要是正常的故障了,就用backup
upstream httpds{
		server 192.168.174.133:80 weight=10;
		server 192.168.174.134:80 weight=80 backup;
}
负载策略
-
问题:一下访问a,一下访问b,身份认证信息无法及时共享
-
ip_hash:同一ip发来的转发给同一个服务器(不常用)
-
least_conn
-
fair:需要安装第三方组件,根据响应时间决定转发 -> 流量倾斜
-
url_hash:需要第三方插件,定向流量转发,根据url的哈希值转发,也不能维持回话,适用于固定资源不在统一服务器
-
维持会话:
-
再用一台主机redis存session
-
当用户带着Cookie找session时,去访问redis
-
从而实现状态共享
-
不适用于大范围高并发
无状态(主流):下发token
-
先找到一台下发权限用的服务器
-
然后给它发一个token,记录当前用户信息
-
客户端每次访问都带着token
-
动静分离
- 当用户请求时,动态请求分配到Tomcat业务服务器,静态资源请求放在Nginx服务器中
举例
- (注意到网页调试的时候,把disable cache打开)
- 写多个location
- 如果请求的资源地址是
location/,/的优先级比较低,如果下面的location没匹配到,就会走http://xxx这个地址的机器 - 如果请求的资源地址是
location/css/*,就会被匹配到nginx的html目录下的css文件夹中(我们把css静态资源放在这个位置)
server {
        listen       80;
        server_name  localhost;

				location / { # /的优先级比较低,如果下面的location没匹配到,就会走http://xxx这个地址的机器
        		proxy_pass http://xxx;
        }

        location /css {  # root指的是html,location/css指的是root下的css,所以地址就是html/css
        		root html;
            index  index.html index.htm;
        }

        error_page   500 502 503 504  /50x.html;
        location = /50x.html {
            root   html;
        }
}
- 使用正则
location ~*/(js|css|img){
	root html;
  index  index.html index.htm;
}
URLRewrite
rewrite是URL重写的关键指令,根据regex(正则表达式)部分内容,重定向到replacement,结尾是flag标记。

rewrite    <regex>   <replacement>  [flag];
关键字				正则				替代内容     flag标记

正则:per1兼容正则表达式语句进行规则匹配
替代内容:将正则匹配的内容替换成replacement

flag标记说明:
last  #本条规则匹配完成后,继续向下匹配新的1ocation URI规则
break #本条规则匹配完成即终止,不再匹配后面的任何规则
redirect #返回302临重定向,游览器地址会显示跳转后的URL地址
permanent #返回301永久重定向,测览器地址栏会显示跳转后的URL地址
- 举例:xxx/123.html实际上是访问xxx/index.jsp?pageNum=123
server {
        listen       80;
        server_name  localhost;

				location / {
						rewrite ^/([0-9]+).html$ /index.jsp?pageNum=$1  break;
						//$1这个地方,可以写12345,1表示第一条正则匹配的规则传到这里
        		proxy_pass http://xxx;
        }


        error_page   500 502 503 504  /50x.html;
        location = /50x.html {
            root   html;
        }
}
网关
- 网关:要访问下图中的tomcat,必须经nginx,nginx这块就是网关

- 应用服务器把防火墙打开
- (添加rich规则)应用服务器开放一个仅能够供nginx访问的端口
firewall-cmd --permanent --add-rich-rule="rule family="ipv4" source address="192.168.174.135" port protocol="tcp" port="8080" accept" #这里的192.168.174.135是网关(也就是nginx所在服务器)
- 另:移除rich规则
firewall-cmd --permanent --remove-rich-rule="rule family="ipv4" source address="192.168.174.135" port port="8080" protocol="tcp" accept"
- 移除和添加规则都要重启才能生效
firewall-cmd --reload
- 查看所有规则
firewall-cmd --list-all #所有开启的规则
4
防盗链
- 当我们请求到一个页面后,这个页面一般会再去请求其中的静态资源,这时候请求头中,会有一个refer字段,表示当前这个请求的来源,我们可以限制指定来源的请求才返回,否则就不返回,这样可以节省资源
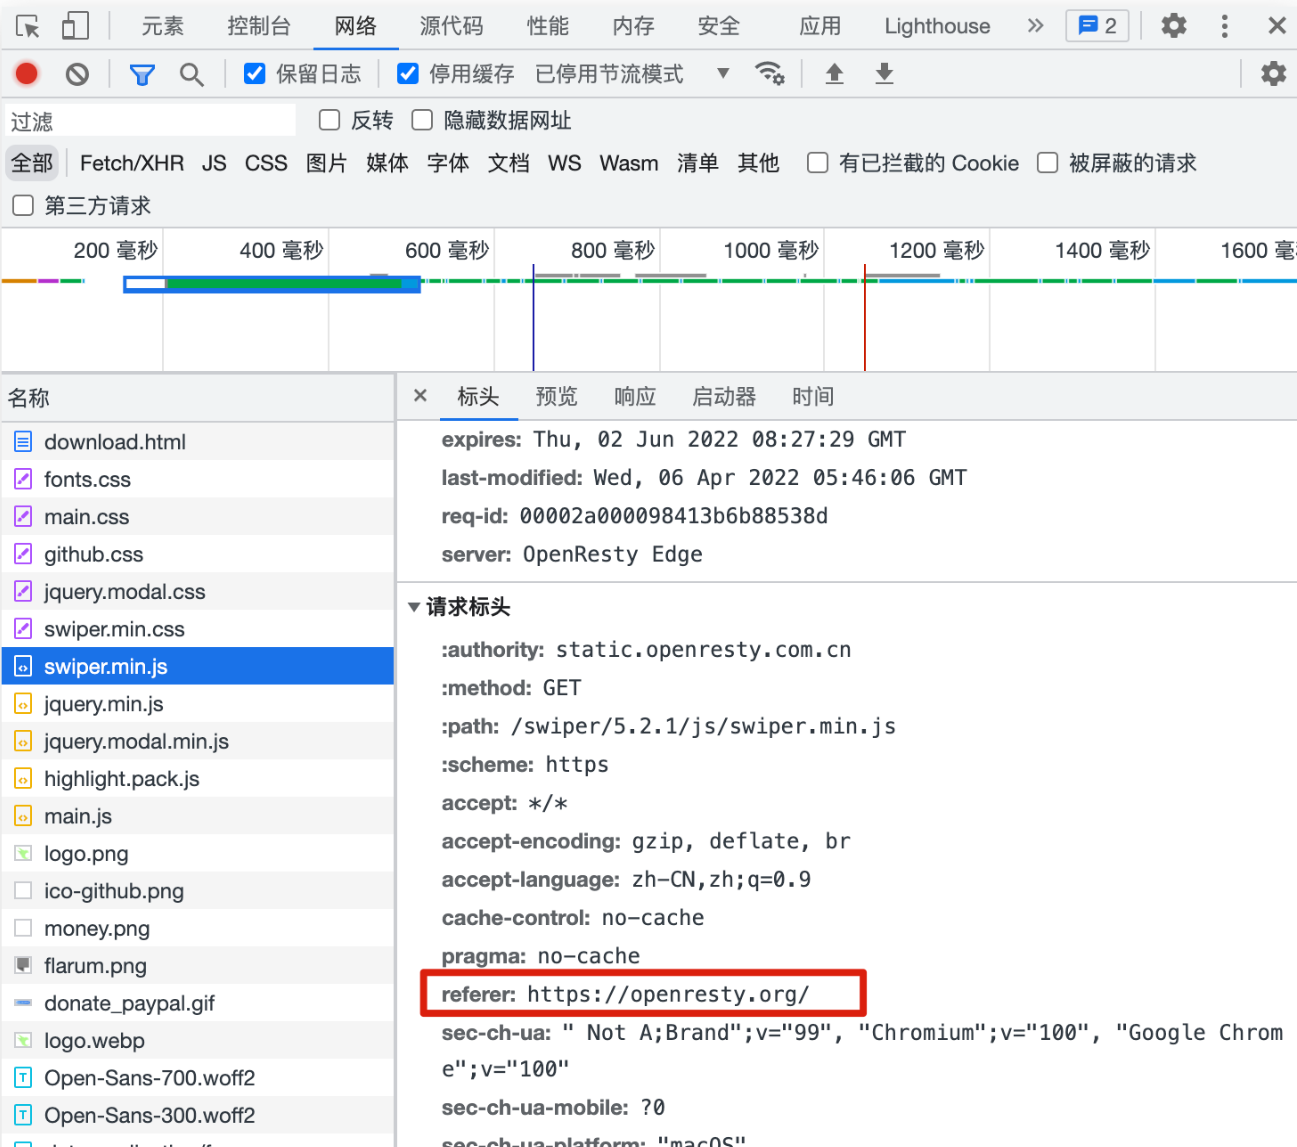
- 举例:设置nginx服务器中的img目录下的图片必须refer为http:192.168.174/133才能访问
- 在网关的配置文件里修改,加vali_referers那段
- 设置有效的refer值
- none:检测地址没有refer,则有效
- server_name:检测主机地址,refer显示是从这个地址来的,则有效(server_name必须是完整的
http://xxxx)
- 注意!!
if ($invalid_referer)中if后有个空格,不写就会报错
server {
        listen       80;
        server_name  localhost;

				location / {
        		proxy_pass http://xxx;
        }

				location /img{
                valid_referers http:192.168.174/133;
                if ($invalid_referer){#无效的
                        return 403;#返回状态码403
                }
                root html;
                index  index.html index.htm;
        }
        error_page   500 502 503 504  /50x.html;
        location = /50x.html {
            root   html;
        }
}
设置盗链图片
-
将提示图片放在html/img/x.png,访问设置防盗链图片时,就返回这x.png张图
-
不用rewrite
server {
        listen       80;
        server_name  localhost;

				location / {
        		proxy_pass http://xxx;
        }

				location /img{
                valid_referers http:192.168.174/133;
                if ($invalid_referer){#无效的
                        return 403;#返回状态码403
                }
                root html;
                index  index.html index.htm;
        }
          //errorpage也可以不用
        error_page 403 /403.html
        location = /403.html {
            root   html;
        }
}
- 用rewrite
location /img{
                valid_referers http:192.168.174/133;
                if ($invalid_referer){#无效的
                     rewrite ^/  /img/x.png break;
                }
                root html;
                index  index.html index.htm;
}
curl测试防盗链
- 测试:返回相应头信息
curl -I http://192.168.44.111/img/logo.png
- 带引用
curl -e "http://baidu.com" -I http://192.168.44.111/img/logo.png
高可用
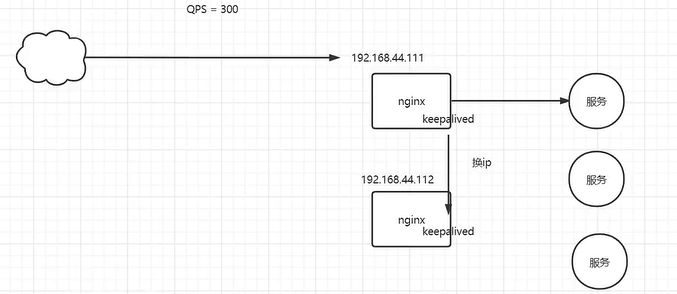
-
keepalived:用户访问虚拟ip,keepalived选择一个主服务器使用这个虚拟ip
- 每台机器上的keepalived会相互通信,根据其他机器上的keepalived进程是否存在,判断服务器状态,如果默认的Master停止了,就会在剩下的Backup机器中,竞选出一台Nginx服务器作为Master
-
安装keepalived
yum install -y keepalived
- 修改keepalived配置
- 配置文件在/etc/keepalived/keepalived.conf
- vrrp_instance、authentication、virtual_router_id、virtual_ipaddress这几个都一样的机器,才算是同一个组里,会从这个组里选出一个作为Master机器
这里我们设置两台机器,分别下载好keepalived,然后进行配置
- 机器一:
! Configuration File for keepalived

global_defs {
   router_id lb1 # 名字与其他配置了keepalive的机器不重复就行
}

vrrp_instance xiaoyangii {#vrrp实例名可以随意取
    state MASTER #只能有一个默认的Master,其他写BACKUP
    interface ens33 # ip addr查看下网卡名,默认时ens33
    virtual_router_id 51
    priority 100 # 多台安装了keepalived的机器竞争成为Master的优先级
    advert_int 1 #通信时间
    authentication {
        auth_type PASS
        auth_pass 1111
    }
    virtual_ipaddress {
        192.168.200.16 #虚拟IP
    }
}
- 机器二:
! Configuration File for keepalived

global_defs {
   router_id lb2
}

vrrp_instance xiaoyangii {
    state BACKUP #只能有一个默认的Master,其他写BACKUP
    interface ens33
    virtual_router_id 51
    priority 50
    advert_int 1
    authentication {
        auth_type PASS
        auth_pass 1111
    }
    virtual_ipaddress {
        192.168.200.16 #虚拟IP
    }
}
Http协议
- 不安全,参与转发的路由器都能监听到传输内容
- https:加密算法
- 对称
- 非对称:先下载公钥;客户端用服务器.公钥加密,服务器端用服务器.私钥解密;服务器私钥加密,客户端公钥解密;公钥加密,公钥解不开
- CA机构:认证公钥,用私钥加密生成证书;第三方可用CA的公钥解开,但无法用私钥再次加密
- 作用:防止公钥被恶意篡改
配置证书
-
购买服务器——>购买域名,并解析到这个主机——>购买证书,绑定到域名上,并且把证书文件安装到服务器,并在Nginx上配置好
-
这时候,这个域名就可以使用https进行访问里(
https://xxxx),浏览器上会有一个小锁

- 下载证书文件
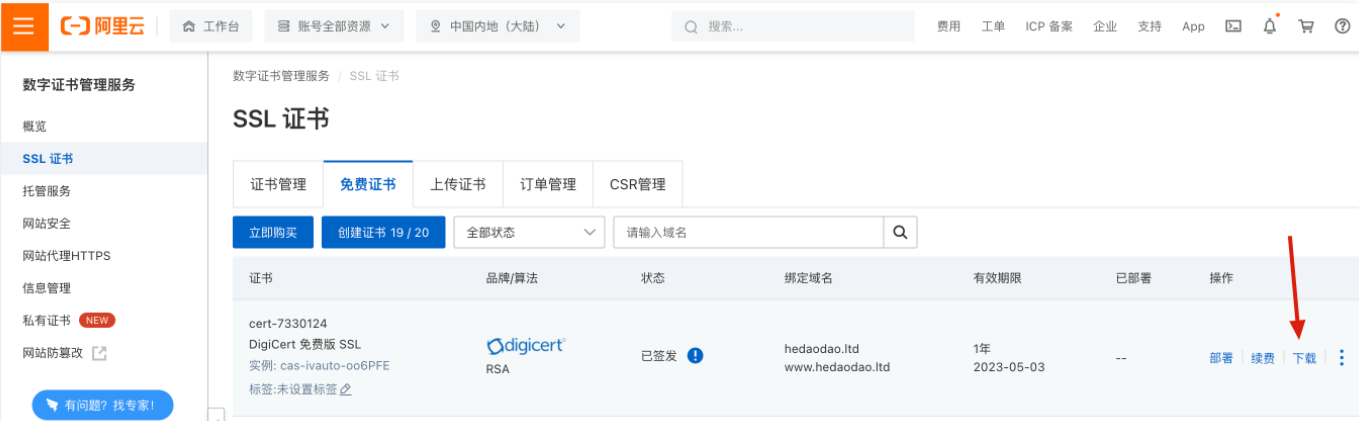
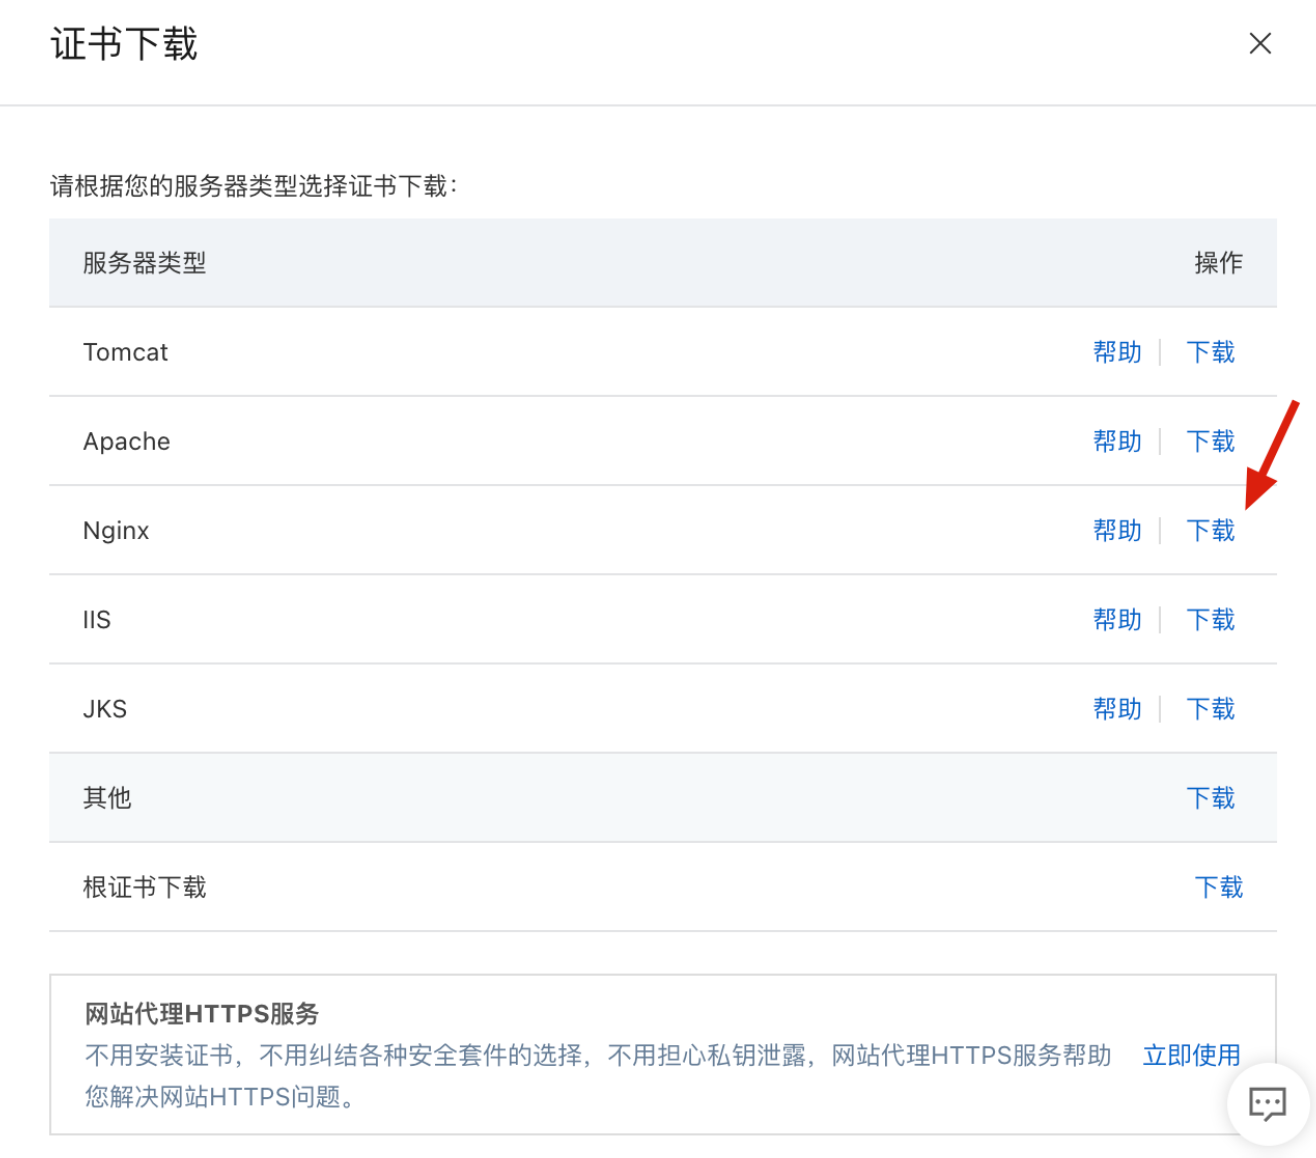
- 下载后,解压压缩包,可以看到两个文件,一个是
xxx.key(私钥)和xxx.pem(证书)
配置
- 将两个文件上传到Nginx目录中,记得放置的位置。我这里直接放在nginx.conf配置文件所在的目录(
/user/local/nginx/conf),所以写的都是相对路径
server {
	listen 443 ss1;

	ss1 certificate  xxx.pem; #这里是证书路径
	ss1_ certificate_key  xxx.key  #这里是私钥路径
}

 浙公网安备 33010602011771号