springBoot快速学习笔记
springBoot快速学习笔记
概述:

springboot快速入门:

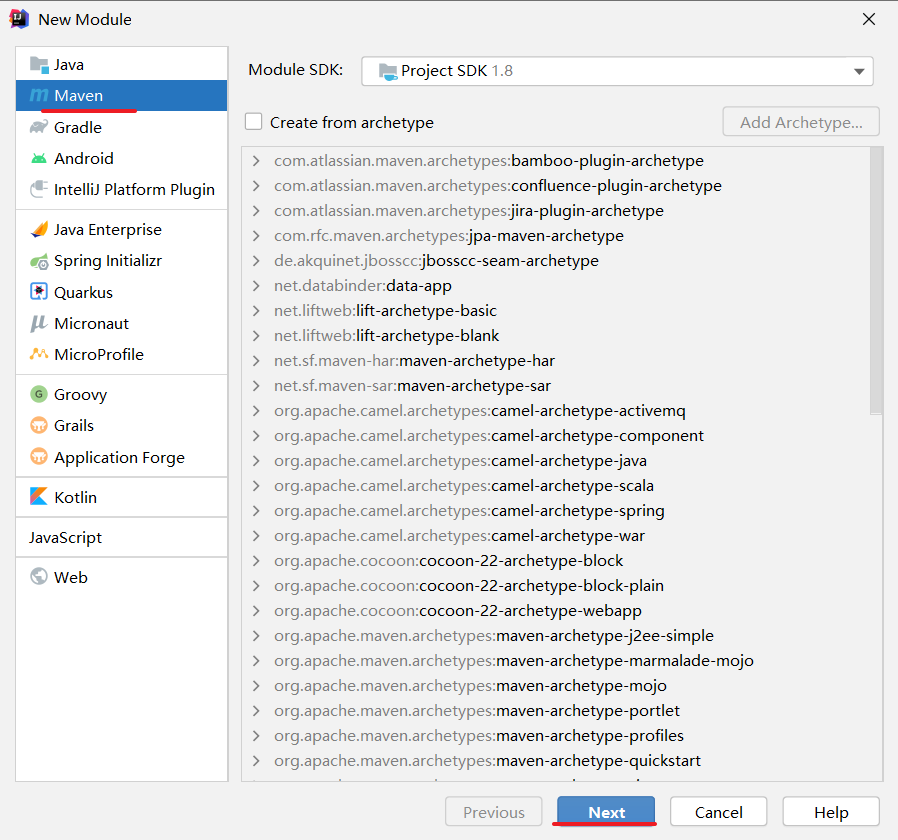
1.新添加一个module
2.通过maven创建项目
在pom.xml中导入依赖等:
<!--springboot巩华城需要继承的父工程-->
<parent>
<groupId>org.springframework.boot</groupId>
<artifactId>spring-boot-starter-parent</artifactId>
<version>2.1.18.RELEASE</version>
</parent>
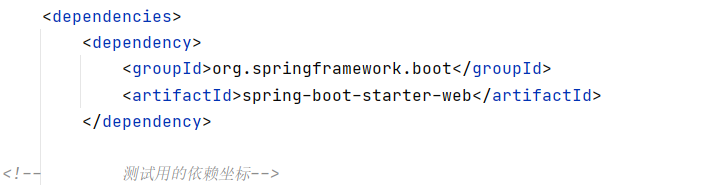
<!-- web开发的起步依赖-->
<dependencies>
<dependency>
<groupId>org.springframework.boot</groupId>
<artifactId>spring-boot-starter-web</artifactId>
</dependency>
</dependencies>
在Java源代码目录下创建controller类:
package com.xiaowei.controller;

import org.springframework.web.bind.annotation.RequestMapping;
import org.springframework.web.bind.annotation.RestController;

/**
 * @author xiaowei
 * @description:
 * @create 2021-09-09-20:56
 */
@RestController
public class HelloController {
    @RequestMapping("/hello")
    public String hello(){
        return "hello Spring Boot!";
    }
}
编写springboot的引导类:
package com.xiaowei;

import org.springframework.boot.SpringApplication;
import org.springframework.boot.autoconfigure.SpringBootApplication;

/**
 * @author xiaowei
 * @description:引导类。SpringBoot项目的入口
 * @create 2021-09-09-21:05
 */
@SpringBootApplication
public class HelloApplication {
    public static void main(String[] args) {
        SpringApplication.run(HelloApplication.class,args);
    }
}
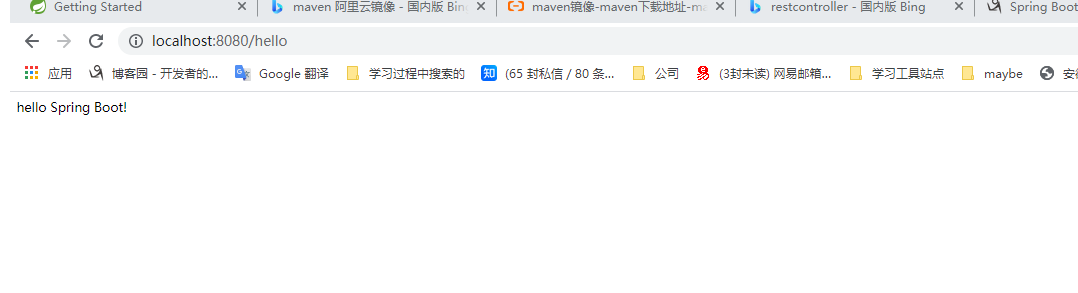
运行引导类,在控制台可以看到:
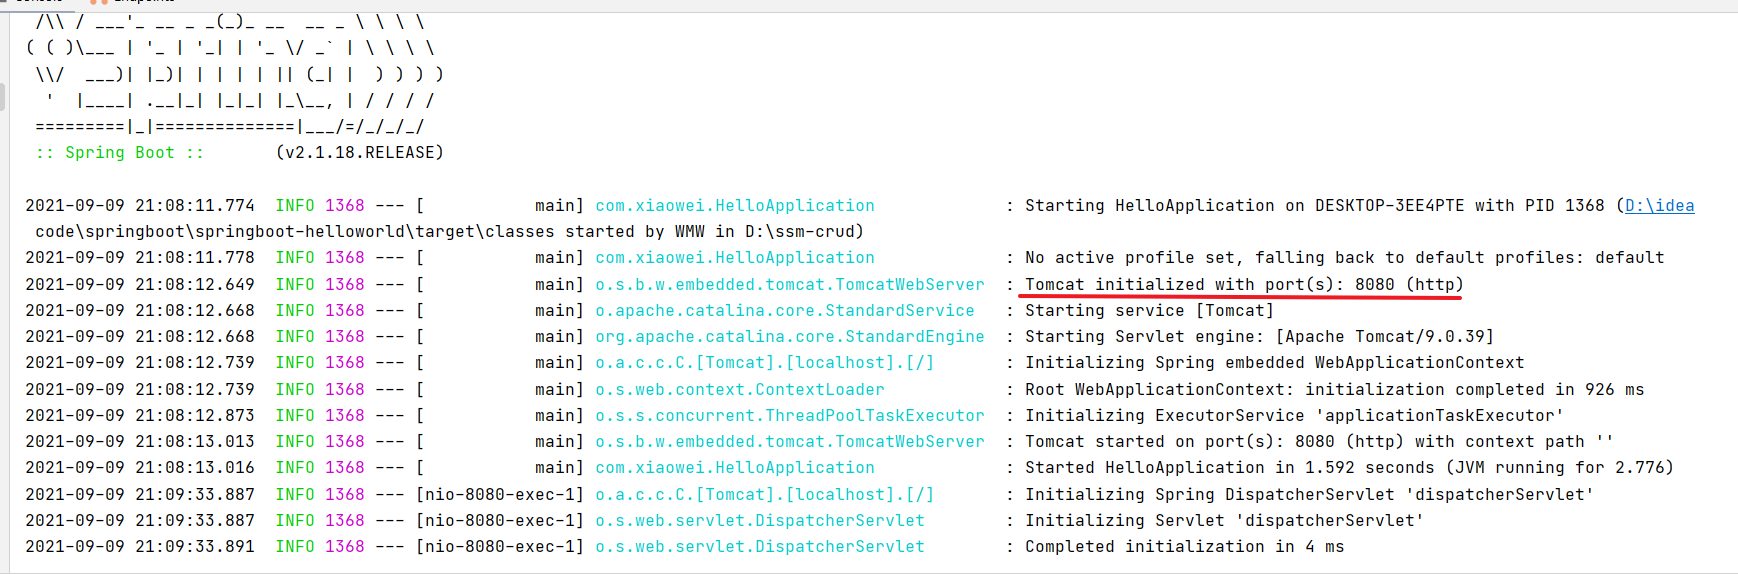
打开浏览器,输入 http:localhost:8080/hello:
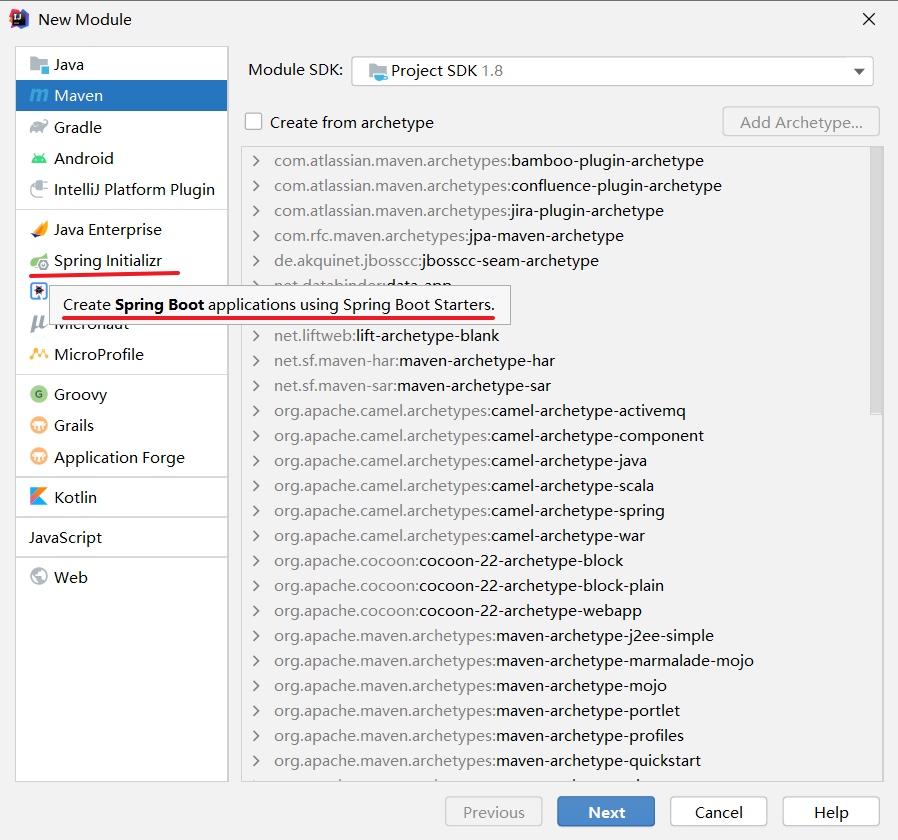
使用idea快速构建springboot工程:
与之前不同的是这一次,我们选择 spring initializr ,可以看到它有提示:
点击选择下一步(这里的网址是springboot构建的默认网址):
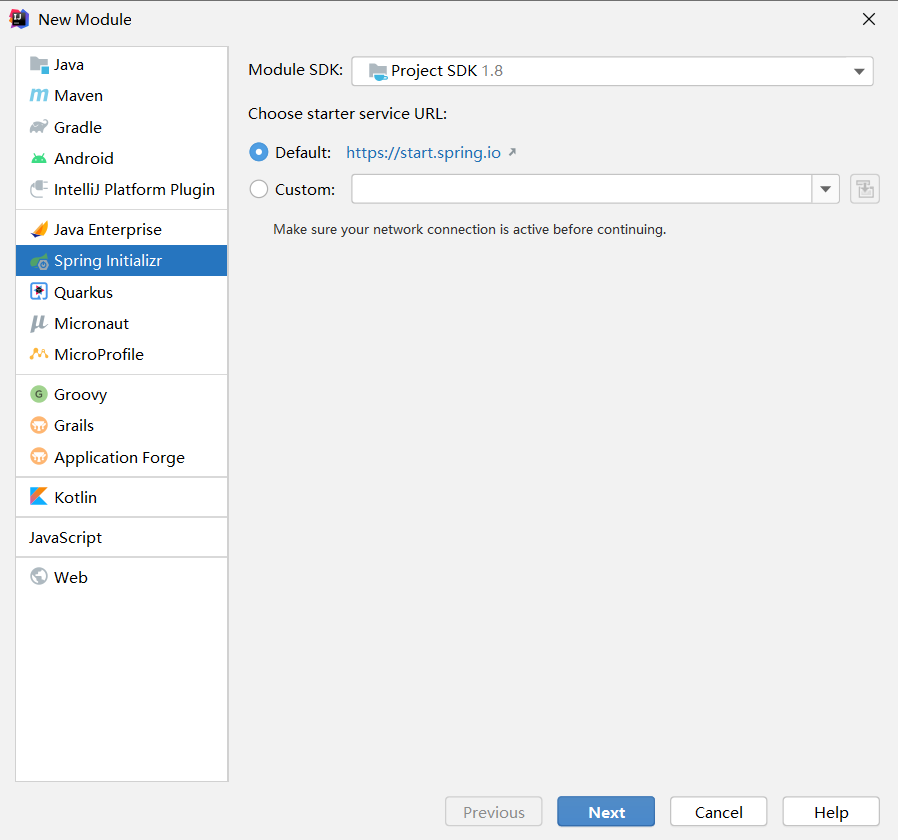
网址如下:

配置:

使用图形化界面配置依赖,可以选择相应的依赖配置:

一路next即可;
等待依赖导入,如果导入有问题,可参考:
导入成功如下:
<?xml version="1.0" encoding="UTF-8"?>
<project xmlns="http://maven.apache.org/POM/4.0.0" xmlns:xsi="http://www.w3.org/2001/XMLSchema-instance"
         xsi:schemaLocation="http://maven.apache.org/POM/4.0.0 https://maven.apache.org/xsd/maven-4.0.0.xsd">
    <modelVersion>4.0.0</modelVersion>
    <parent>
        <groupId>org.springframework.boot</groupId>
        <artifactId>spring-boot-starter-parent</artifactId>
        <version>2.1.18.RELEASE</version>
        <relativePath/> <!-- lookup parent from repository -->
    </parent>
    <groupId>com.xiaowei</groupId>
    <artifactId>springboot-init</artifactId>
    <version>0.0.1-SNAPSHOT</version>
    <name>springboot-init</name>
    <description>Demo project for Spring Boot</description>
    <properties>
        <java.version>1.8</java.version>
    </properties>
    <dependencies>
        <dependency>
            <groupId>org.springframework.boot</groupId>
            <artifactId>spring-boot-starter-web</artifactId>
        </dependency>

<!--        测试用的依赖坐标-->
        <dependency>
            <groupId>org.springframework.boot</groupId>
            <artifactId>spring-boot-starter-test</artifactId>
            <scope>test</scope>
        </dependency>
    </dependencies>

    <build>
        <plugins>
            <plugin>
                <groupId>org.springframework.boot</groupId>
                <artifactId>spring-boot-maven-plugin</artifactId>
                <version>2.1.18.RELEASE</version>
            </plugin>
        </plugins>
    </build>

</project>
可以看到已经自动创建好引导类、测试等,我们只需创建controller类即可:

创建controller类:
package com.xiaowei.springbootinit;

import org.springframework.web.bind.annotation.RequestMapping;
import org.springframework.web.bind.annotation.RestController;

/**
 * @author xiaowei
 * @description:
 * @create 2021-09-09-21:55
 */
@RestController
public class HelloController {
@RequestMapping("/hello")
    public  String Hello(){
        return "hello spring boot1111";
    }
}
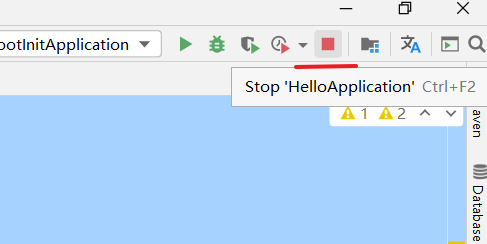
点击运行,发现出错!

根据提示得知原来是端口8080 被占用,原来是之前项目的tomcat并没有关闭,只需关闭tomcat,然后重启当前工程即可。
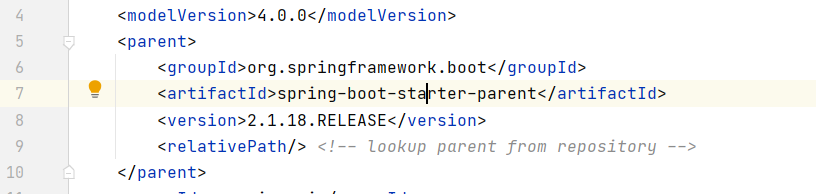
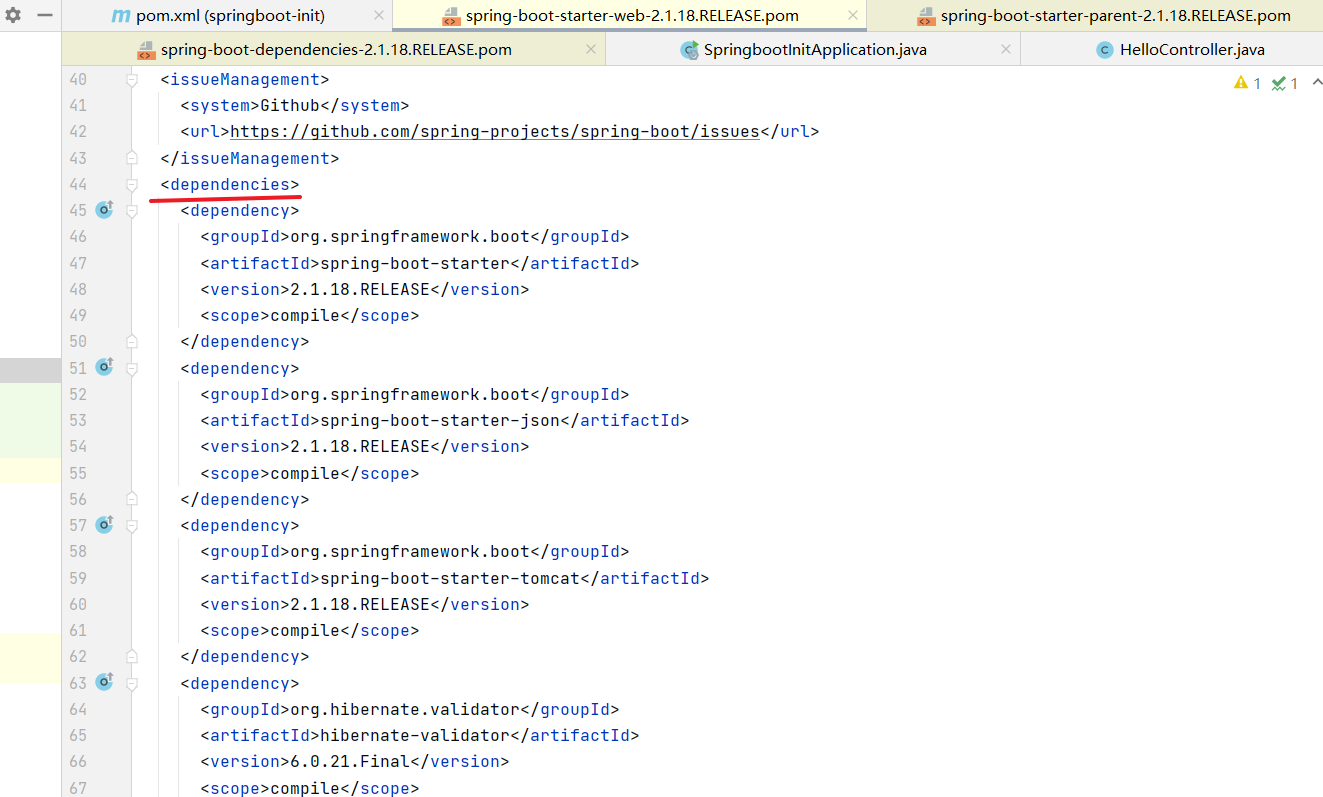
springboot起步依赖原理分析:
首先分析这个parent,ctrl点击进入:
我们可以看它还依赖另一个parent,再次点击进入:
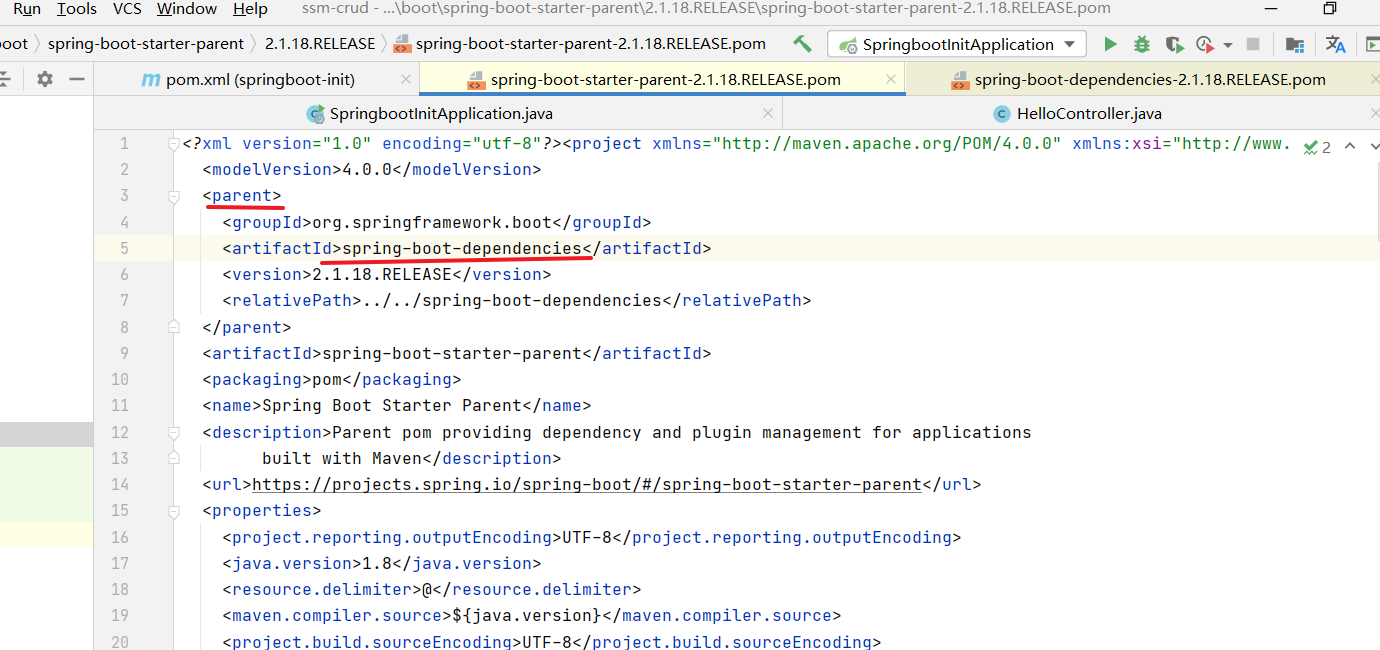
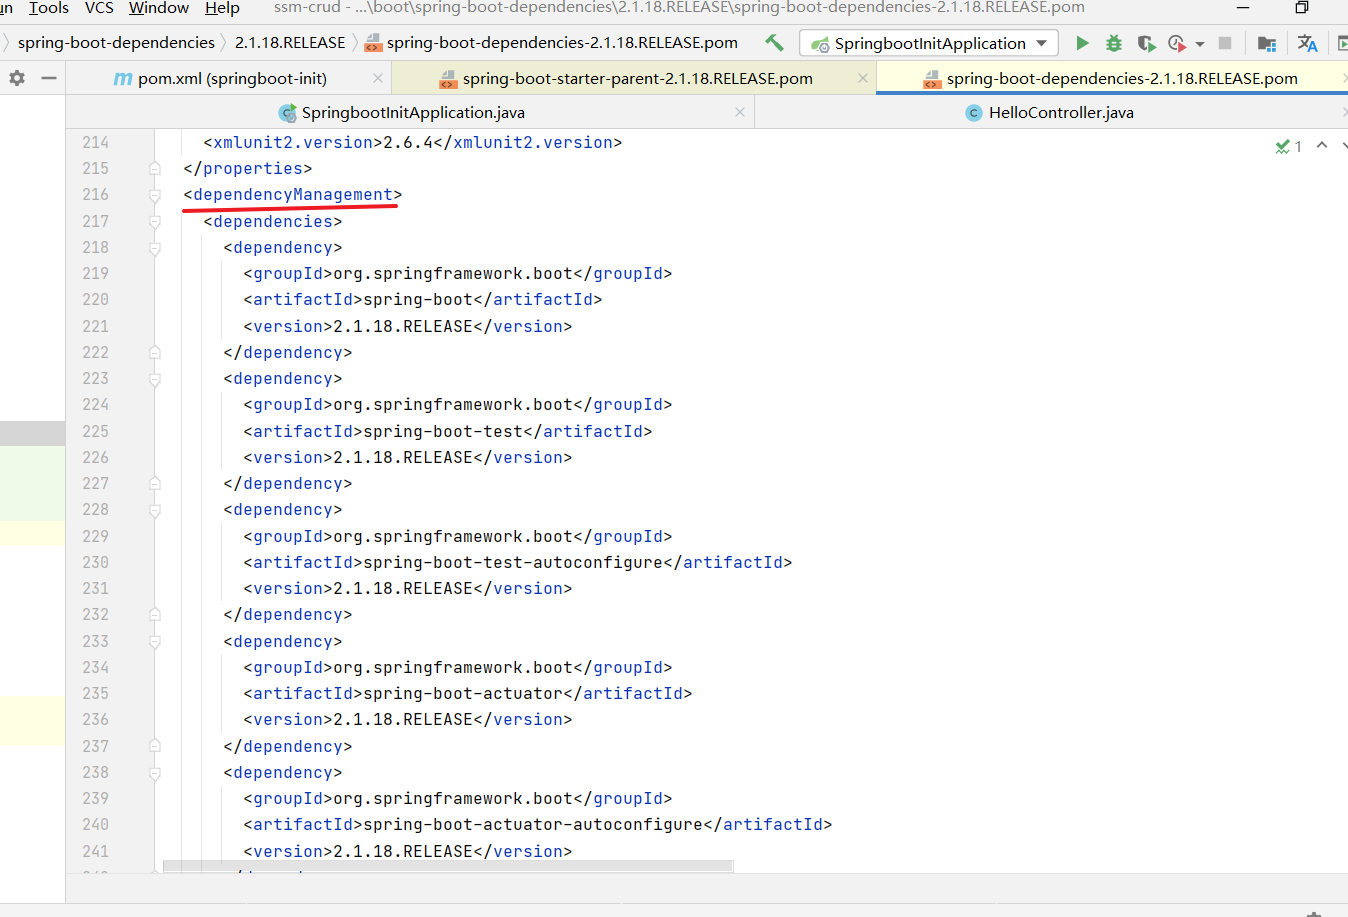
可以看到里面有一个dependencyManagement(版本锁定),里面配置了各个依赖的版本坐标信息,当然也不仅仅是依赖
接下来分析spring-boot-starter-web,点进去查看,发现:
可以看到它的里面仍然引入了很多相关的依赖:(即相当如导入了这一个依赖即导入了以下依赖)
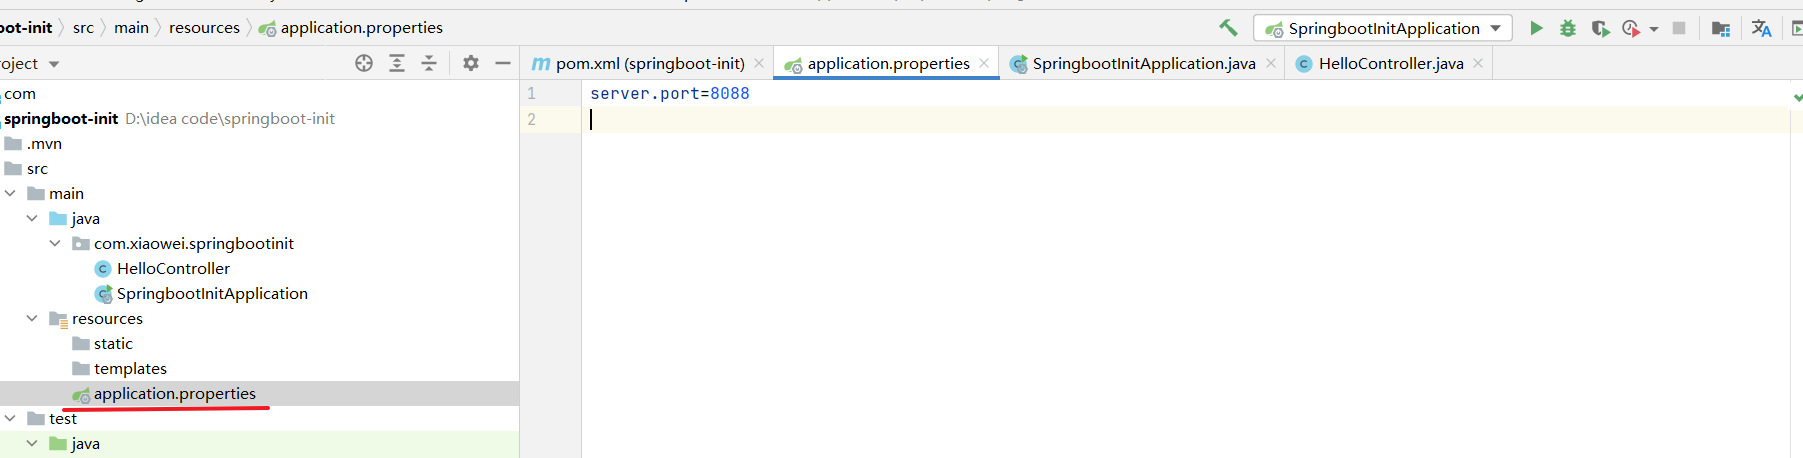
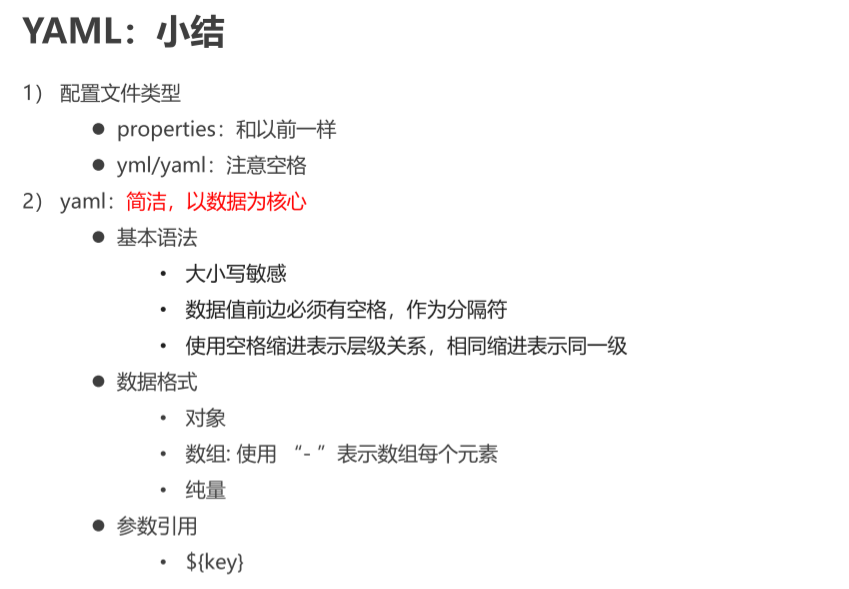
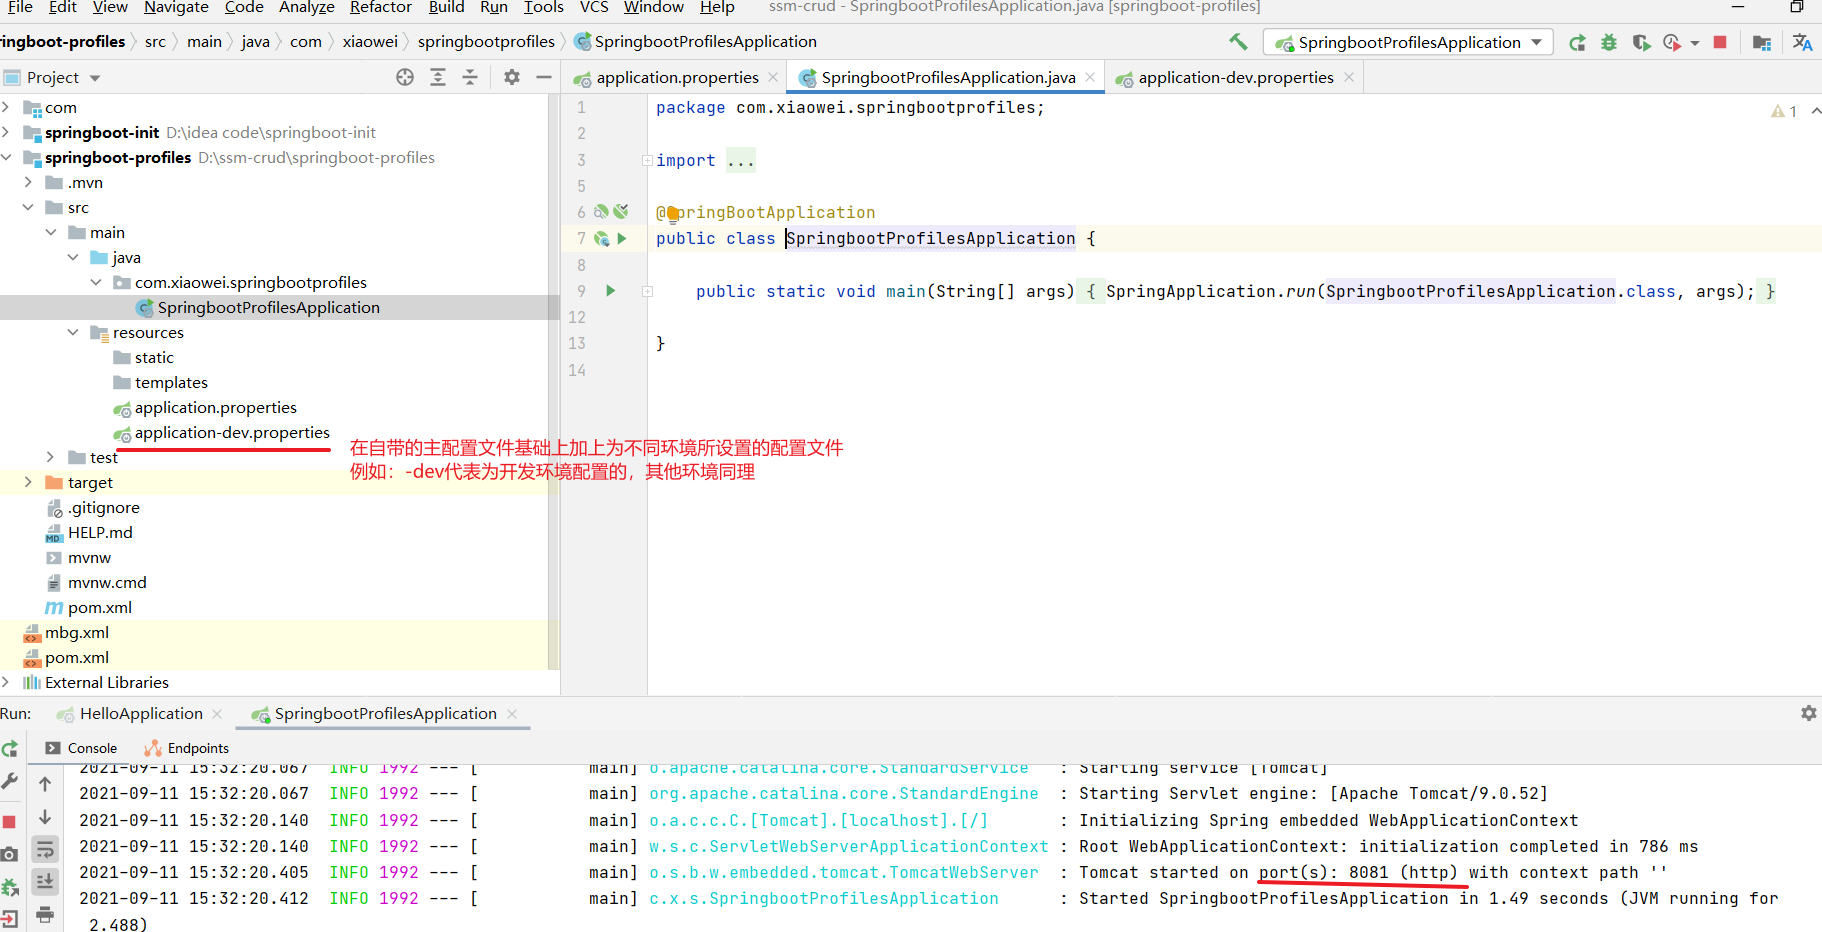
配置文件分类:
springboot是基于约定的,所以很多配置都有默认值,但如果想使用自己的配置替换默认配置的话,可以使用application.properties或者application.yml(application.yaml)进行配置。
- propertie:
server.port=8080
- yaml:
server:
  port: 8080
我们可以看到已经创建好的工程已经有一个已经创建好的配置文件,我们尝试修改一下,并启动工程
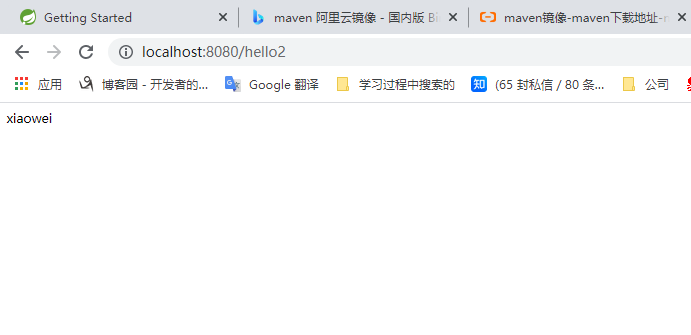
打开浏览器访问:

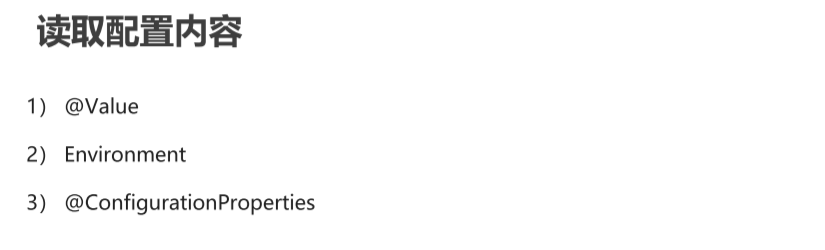
加载配置文件中自定义内容:
如果同时在三个配置文件(application.properties、application.yml、application.yaml)中配置端口号那个会生效呢?
优先级从高到低依次为:application.properties > application.yml > application.yaml
yaml:
备注:使用idea等高级开发工会据时可忽略tab键问题,可直接使用
纯量可直接认为是常量
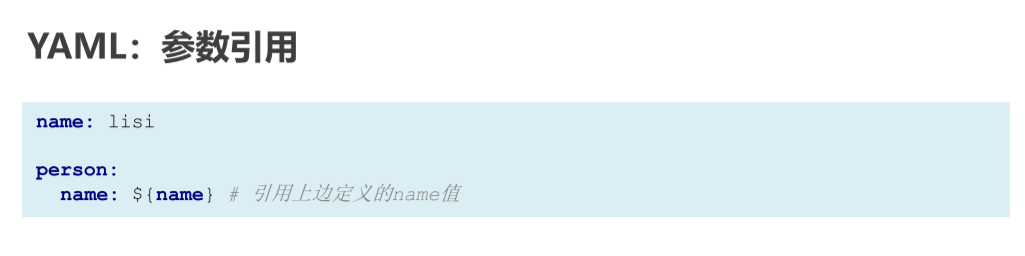
自定义配置文件内容:
name: xiaowei

person:
  name: ${name}
  age: 18

address:
  - beijing
  - shanghai

address1: [hefei,zobo]

msg1: 'hello \n world'
msg2: "hello \n world"
测试第一种方式:
@RestController
public class HelloController {

    @Value("${name}")
    private  String name;
    @RequestMapping("/hello2")
    public  String Hello2(){
        return name;
    }
}
测试结果:
测试数组:
@RestController
public class HelloController {

    @Value("${address[0]}")
    private  String address1;
    @RequestMapping("/hello2")
    public  String Hello2(){
        return "我家在" + address1;
    }
 }

最终总结:配置文件内容一定切记加空格加空格加空格
第二种方式:
注意:在导入environment的时候一定不要导入错了

public class HelloController {

    @Value("${msg1}")
    private  String msg1;

    @Value("${msg2}")
    private  String msg2;

    @Autowired
    private Environment env;

    @RequestMapping("/hello2")
    public  String Hello2(){

        System.out.println(env.getProperty("person.name"));
        System.out.println(env.getProperty("address[0]"));
        return "xinxi" + msg2;
    }
 }

第三种方式:注册对象将对应属性值注入
首先创建对应类:
package com.xiaowei.springbootinit;

import org.springframework.boot.context.properties.ConfigurationProperties;
import org.springframework.stereotype.Component;

/**
 * @author xiaowei
 * @description:
 * @create 2021-09-11-14:43
 */
//@Component 注解用于被spring识别为bean
@Component
@ConfigurationProperties(prefix = "person")
public class Person {
    private int age;
    private  String name;

    public int getAge() {
        return age;
    }

    public void setAge(int age) {
        this.age = age;
    }

    public String getName() {
        return name;
    }

    public void setName(String name) {
        this.name = name;
    }

    @Override
    public String toString() {
        return "Person{" +
                "age=" + age +
                ", name='" + name + '\'' +
                '}';
    }
}
测试:
package com.xiaowei.springbootinit;


import org.springframework.beans.factory.annotation.Autowired;
import org.springframework.beans.factory.annotation.Value;
import org.springframework.core.env.Environment;
import org.springframework.web.bind.annotation.RequestMapping;
import org.springframework.web.bind.annotation.RestController;

/**
 * @author xiaowei
 * @description:
 * @create 2021-09-09-21:55
 */
@RestController
public class HelloController {

    @Value("${msg1}")
    private  String msg1;

    @Value("${msg2}")
    private  String msg2;

    @Autowired
    private Environment env;
    @Autowired
    private Person person;

    @RequestMapping("/hello2")
    public  String Hello2(){

        System.out.println(env.getProperty("person.name"));
        System.out.println(env.getProperty("address[0]"));
        System.out.println(person);
        return "xinxi" + msg2;
    }
}

同时我们注意到在创建person Bean类加入@ConfigurationProperties的时候,有以下提示:

根据文档提示,在pom.xml中加入以下依赖:
<dependency>
	<groupId>org.springframework.boot</groupId>
	<artifactId>spring-boot-configuration-processor</artifactId>
	<optional>true</optional>
</dependency>
可以使得配置文件在添加属性是有相应提示;
profile:
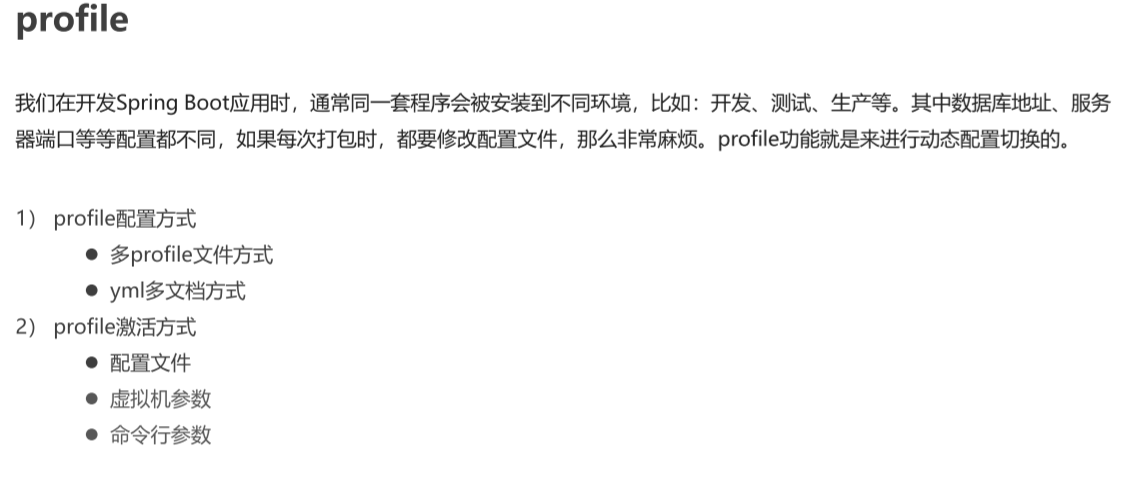
方式一:多profile文件方式
在开发环境配置文件中修改端口号为:8081
在主配置文件添加: spring.profiles.active=dev
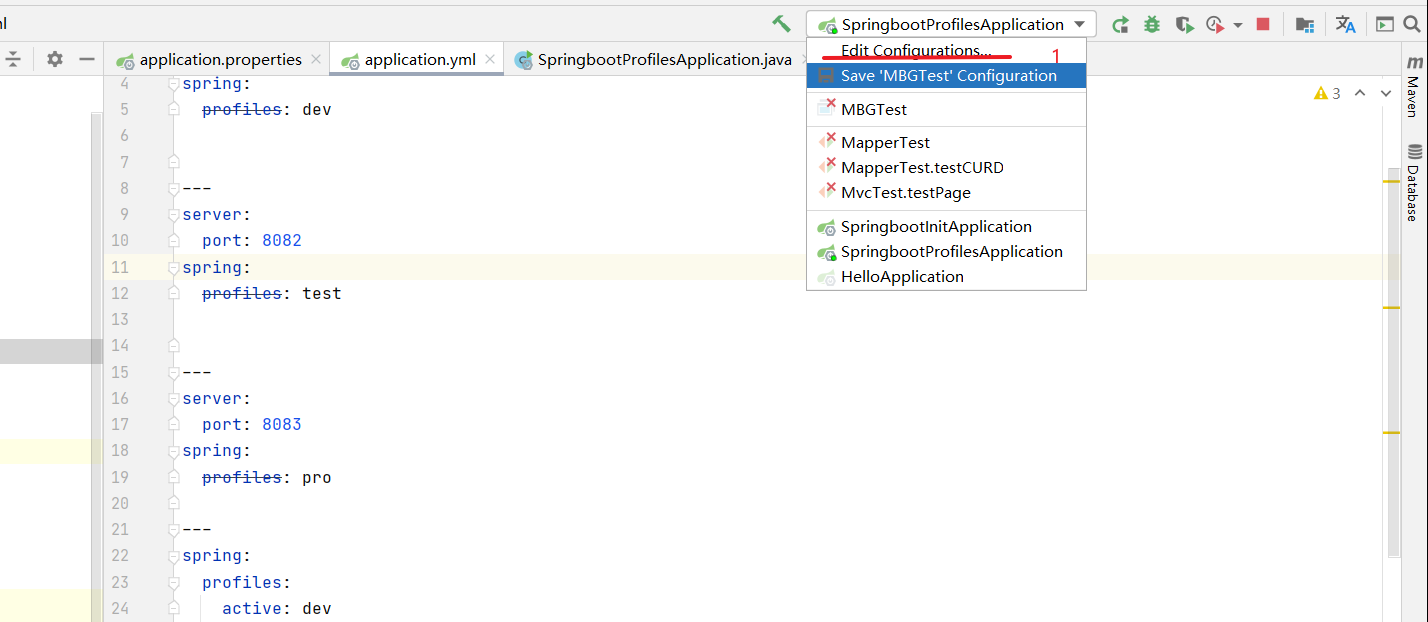
方式二:yml多文档方式
即在一个yml文件中以分隔符分成多个文档,并为每个文档起个名
---
server:
  port: 8081
spring:
  profiles: dev


---
server:
  port: 8082
spring:
  profiles: test


---
server:
  port: 8083

spring:
  profiles: pro

---
spring:
  profiles:
    active: dev
结果:

激活方式:虚拟机参数
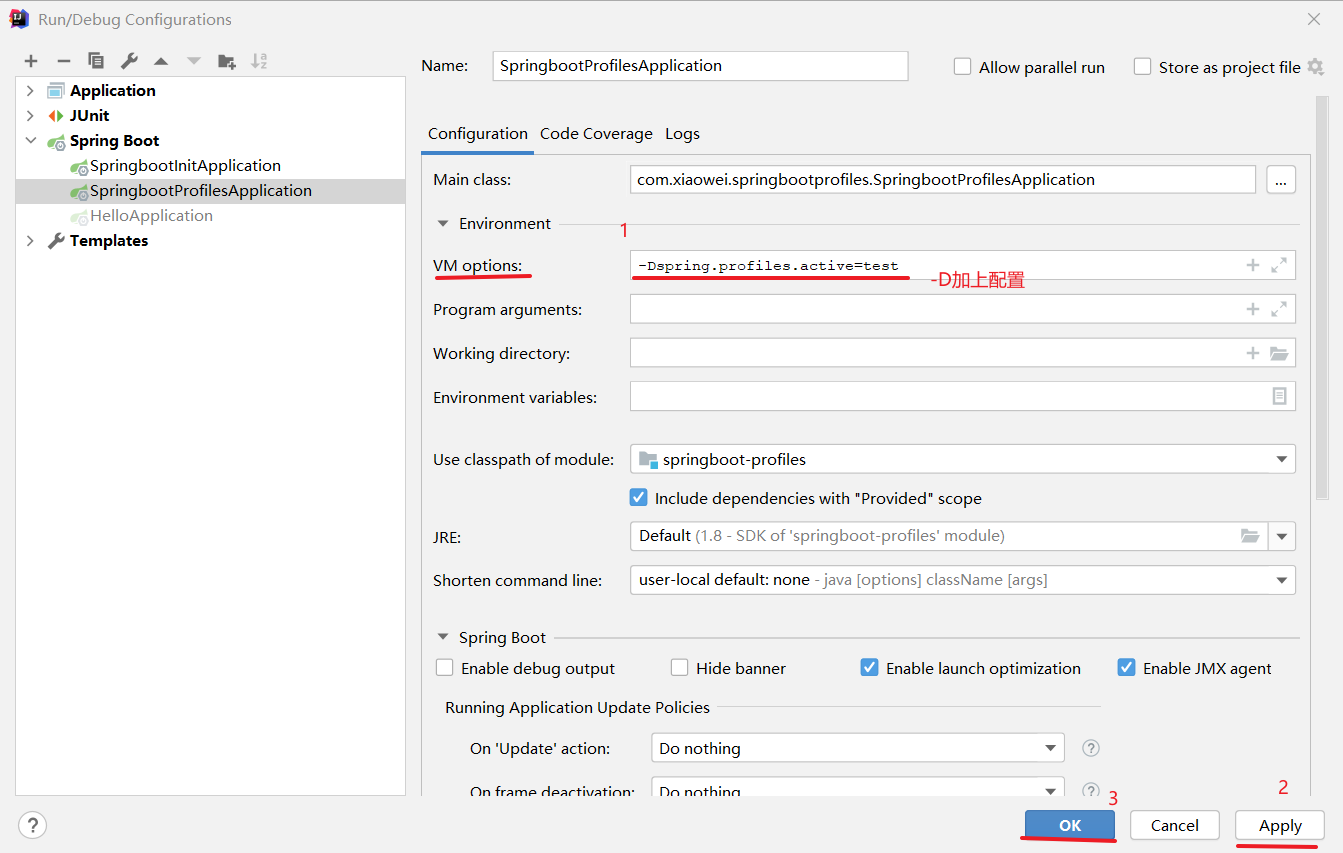
测试结果:

激活方式:命令行参数
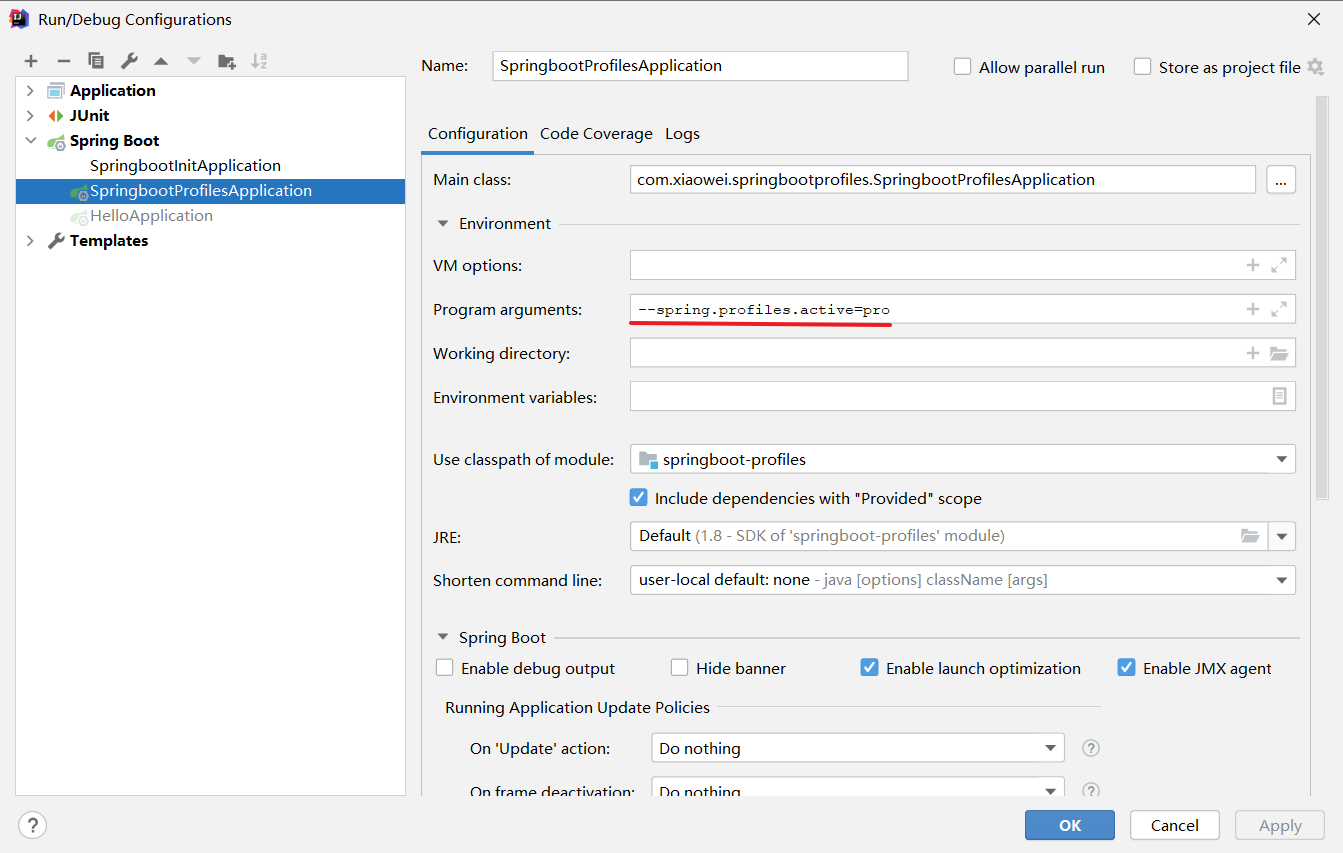
测试结果:

在非idea开发环境下如何传入参数:
使用maven工程将项目打包:
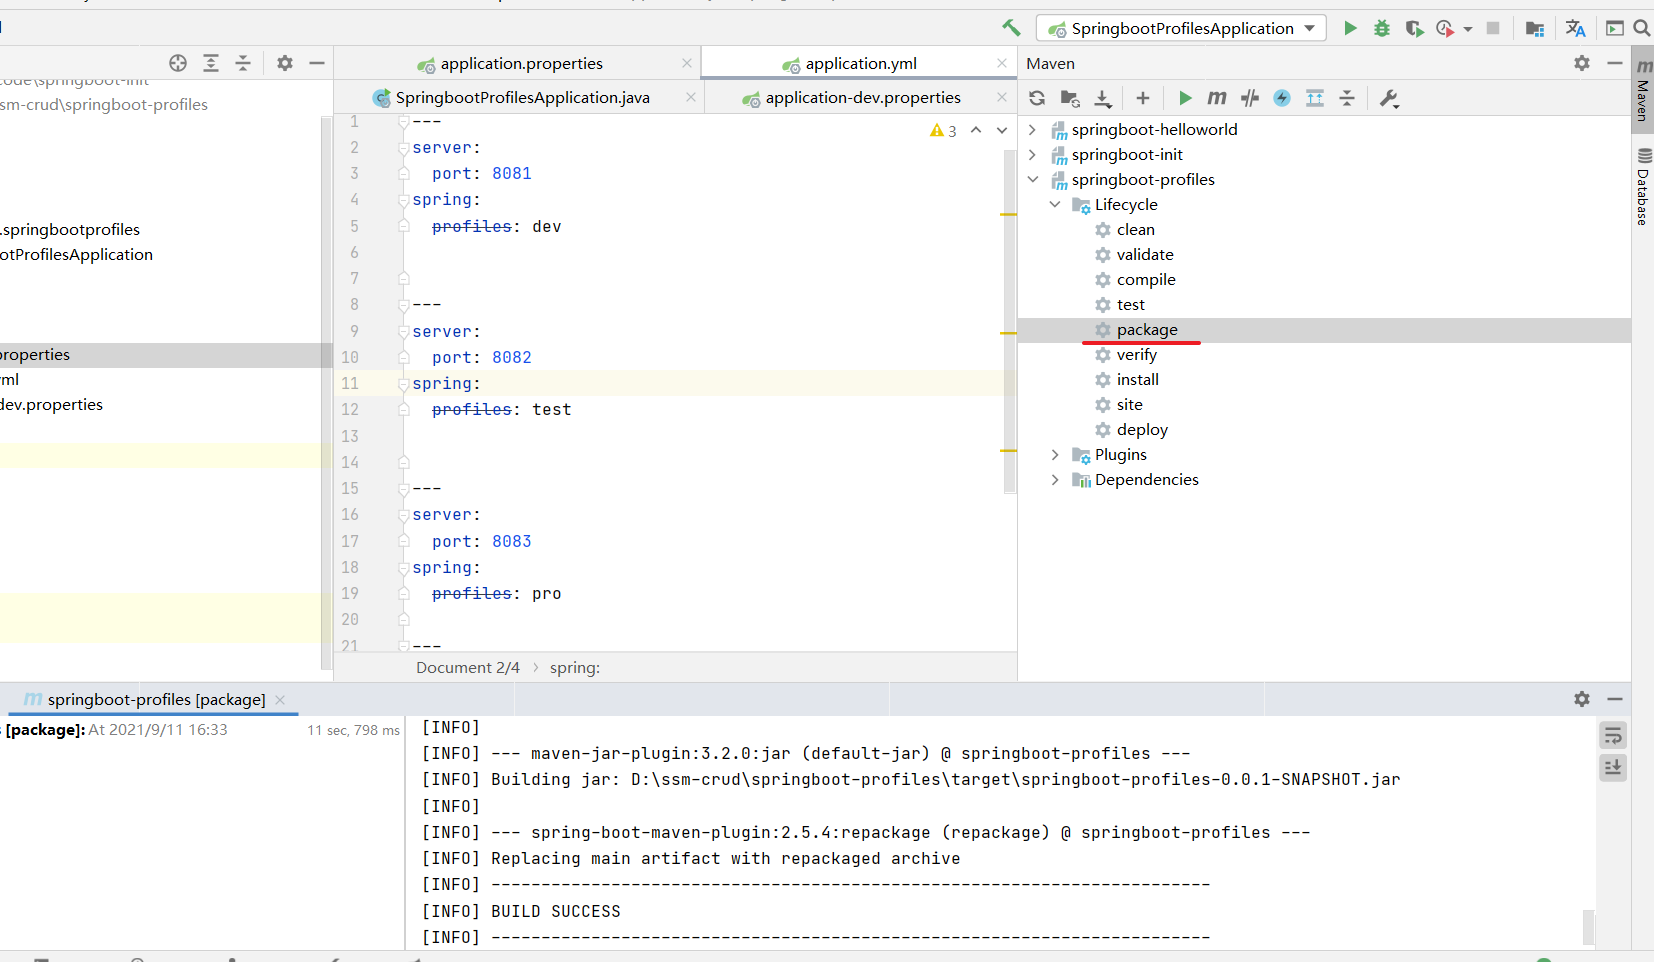
在空白处按 shift 加 鼠标右键 选择 打开Windows PowerShell :

这样即可给它加上参数

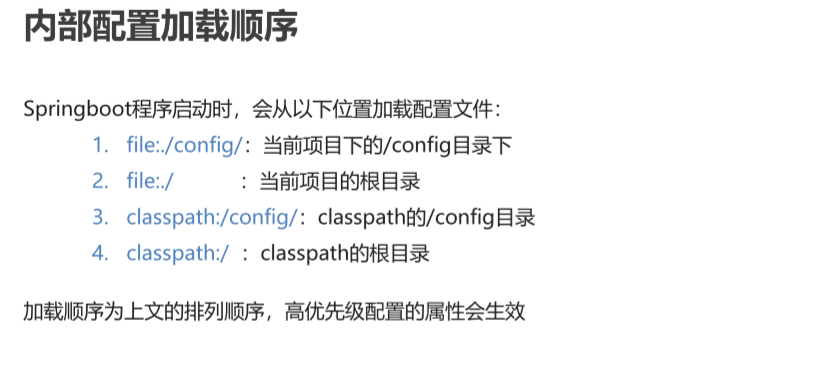
内部配置文件加载顺序:
外部配置加载顺序:
参考官方文档:https://docs.spring.io/spring-boot/docs/current/reference/html/boot-features-external-config.html
springboot整合redis:
1.创建springboot工程
2.选择对应的依赖

redis未学,学完再看
springboot整合junit:
1.创建springboot工程
2.引入junit测试的依赖(一般默认自带)
3.创建对应业务类(service类)
4.创建对应测试类
一个注意事项:
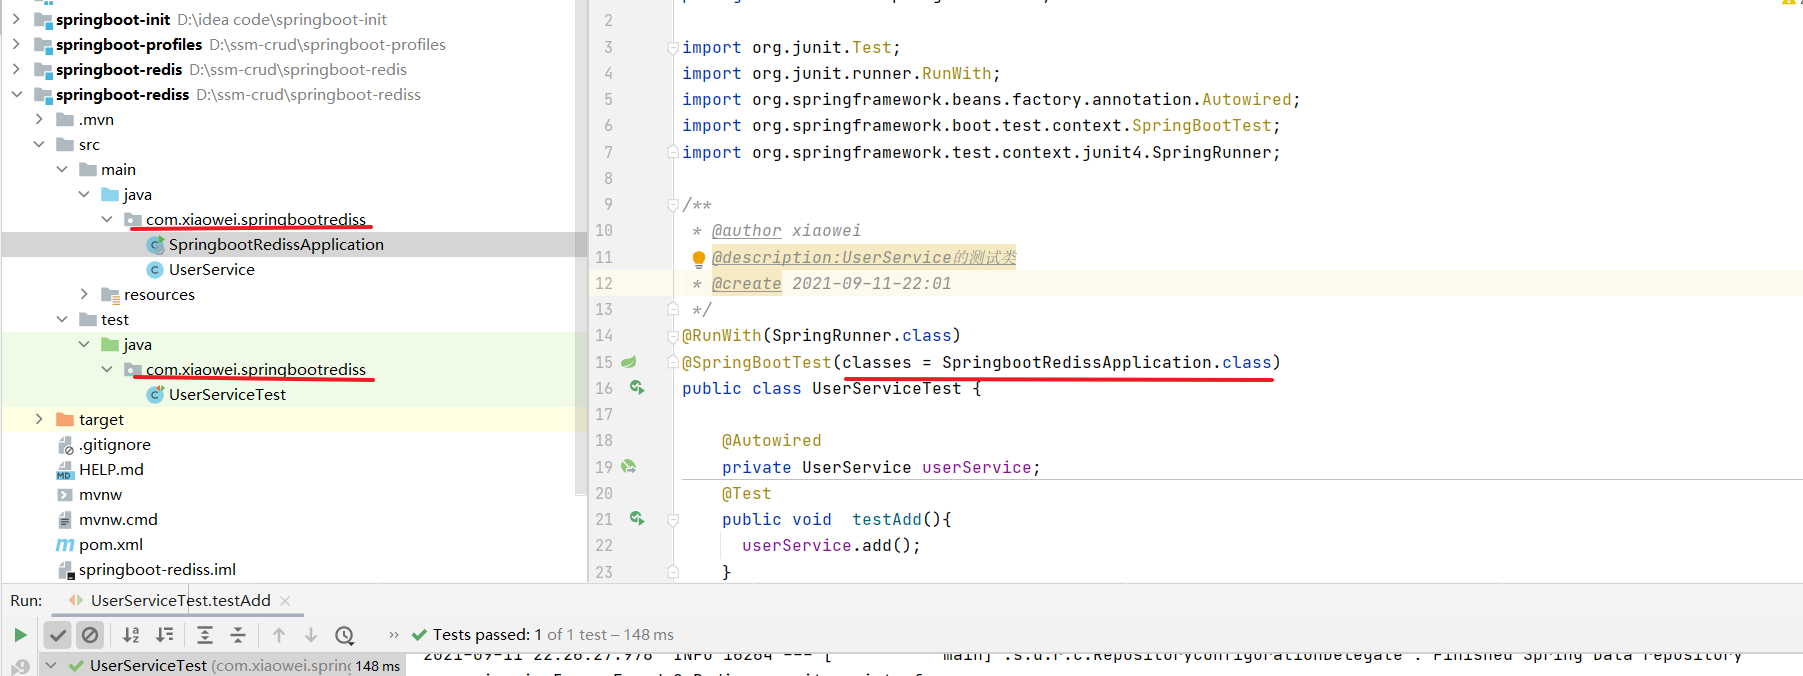
在创建测试类的过程中如果对应service类的包名和test对应测试类的包名相同,则@SpringBootTest注解中不需要添加classes属性
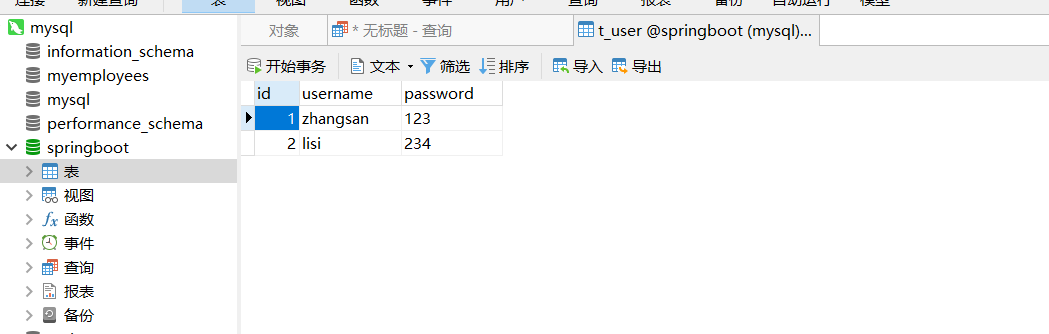
springboot整合mybatis:
1.创建springboot工程
2.引入mybatis依赖,以及mysql驱动:

查看相应pom依赖文件:
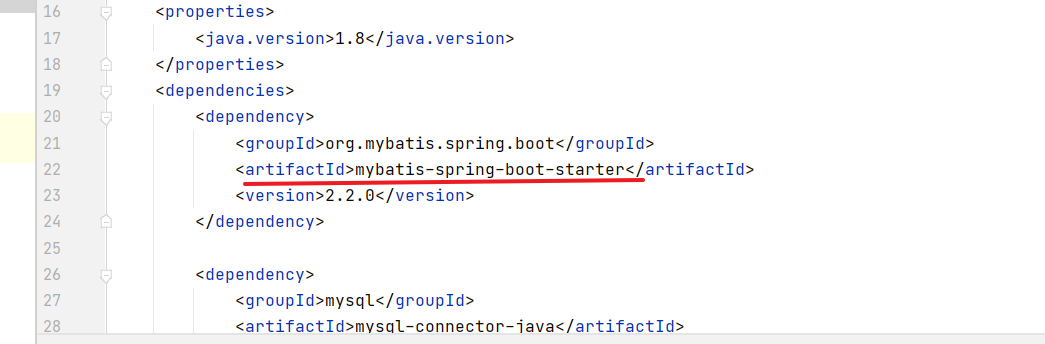
不同于之前的项目的start,这个是以mybatis开头的,不是springboot官方提供的依赖,是mybatis提供的
3.在mybatis中新建一个数据库:
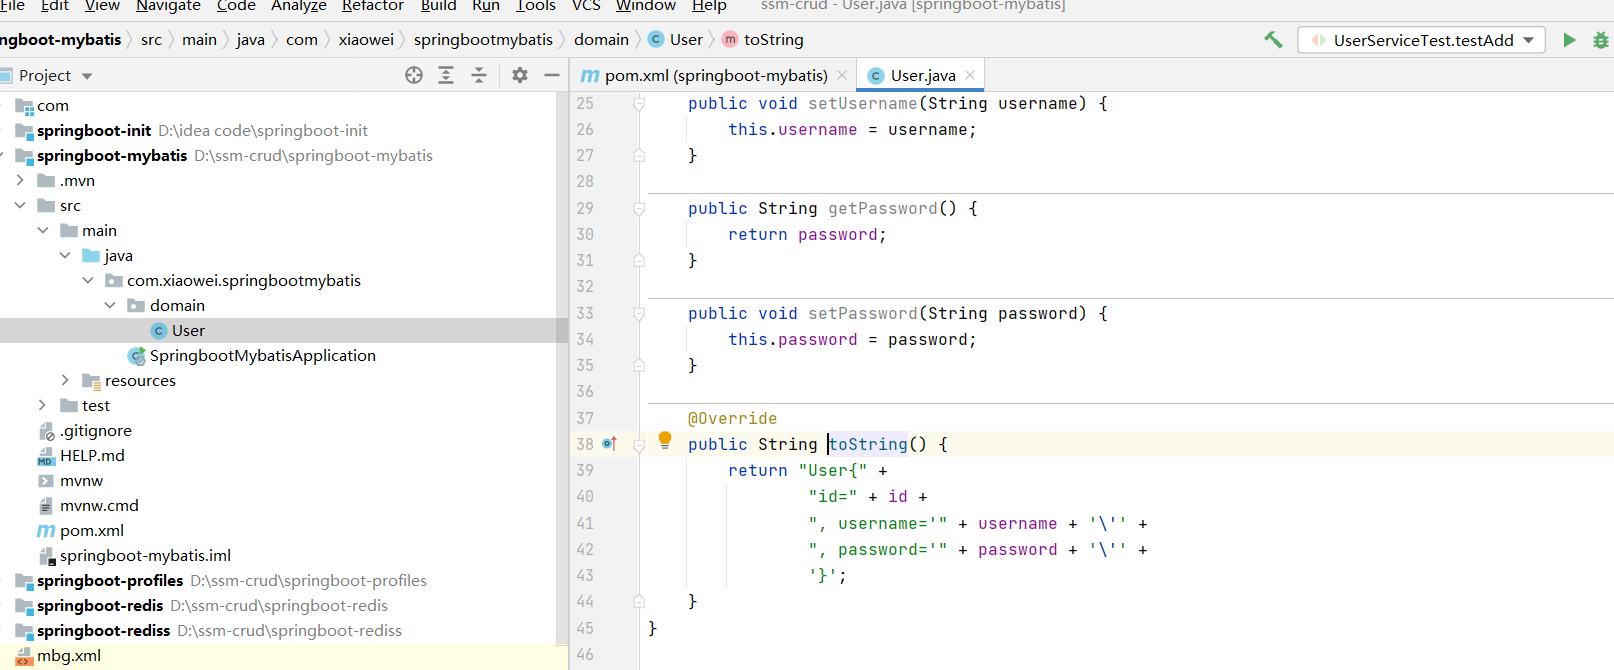
4.创建对应的实体类:
5.创建对应数据库的配置文件:
# datasource

spring:
  datasource:
    url: jdbc:mysql:///springboot
    username: root
    password: 123456
    driver-class-name: com.mysql.jdbc.Driver
6.1创建对应mapper文件(注解方式):
package com.xiaowei.springbootmybatis.mapper;

import com.xiaowei.springbootmybatis.domain.User;
import org.apache.ibatis.annotations.Mapper;
import org.apache.ibatis.annotations.Select;

import java.util.List;

/**
 * @author xiaowei
 * @description:
 * @create 2021-09-12-14:52
 */
@Mapper
public interface UserMapper {
    @Select("select * from t_user")
    public List<User> findAll();
}
6.2创建对应mapper文件(配置文件方式)
package com.xiaowei.springbootmybatis.mapper;

import com.xiaowei.springbootmybatis.domain.User;
import org.apache.ibatis.annotations.Mapper;

import java.util.List;

/**
 * @author xiaowei
 * @description:
 * @create 2021-09-12-15:05
 */
@Mapper
public interface UserXmlMapper {
    public List<User> findAll();
}
7.创建对应的mapper.xml文件
<?xml version="1.0" encoding="UTF-8" ?>
<!DOCTYPE mapper PUBLIC "-//mybatis.org//DTD Mapper 3.0//EN" "http://mybatis.org/dtd/mybatis-3-mapper.dtd">
<mapper namespace="com.xiaowei.springbootmybatis.mapper.UserXmlMapper">
    <select id="findAll" resultType="user">
        select * from t_user
    </select>
</mapper>
8.配置mybatis对应配置文件:
# mybatis
mybatis:
  mapper-locations: classpath:mapper/*Mapper.xml #mapper映射文件路径
  type-aliases-package: com.xiaowei.springbootmybatis.domin
  #config-location: #指定mybatis的核心配置文件
9.创建测试类测试:
package com.xiaowei.springbootmybatis;

import com.xiaowei.springbootmybatis.domain.User;
import com.xiaowei.springbootmybatis.mapper.UserMapper;
import com.xiaowei.springbootmybatis.mapper.UserXmlMapper;
import org.junit.jupiter.api.Test;
import org.springframework.beans.factory.annotation.Autowired;
import org.springframework.boot.test.context.SpringBootTest;

import java.util.List;

@SpringBootTest
class SpringbootMybatisApplicationTests {

    @Autowired
    private UserMapper userMapper;

    @Autowired
    private UserXmlMapper userXmlMapper;
    @Test
   public void testFindAll() {
        List<User> list = userMapper.findAll();
        System.out.println(list);
    }

    @Test
    public void testFindAll1() {
        List<User> list = userXmlMapper.findAll();
        System.out.println(list);
    }

}
springboot自动配置原理分析:
condition:
condition是在spring4.0增加的条件判断功能,通过这个可以实现选择性的创建bean操作
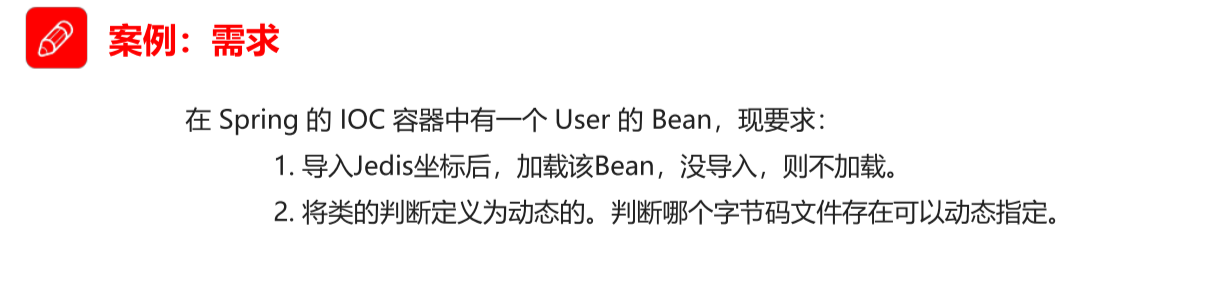
实现需求1:
0.导入jedis坐标:
dependency>
            <groupId>redis.clients</groupId>
            <artifactId>jedis</artifactId>
        </dependency>
1.创建user的bean:
public class User {
}
2.尝试是否能获取这个bean :
package com.itheima.springbootcondition;

import org.springframework.boot.SpringApplication;
import org.springframework.boot.autoconfigure.SpringBootApplication;
import org.springframework.context.ConfigurableApplicationContext;

@SpringBootApplication
public class SpringbootConditionApplication {

    public static void main(String[] args) {
        //启动SpringBoot的应用,返回Spring的IOC容器
        ConfigurableApplicationContext context = SpringApplication.run(SpringbootConditionApplication.class, args);

        //获取Bean
        Object user = context.getBean("user");


        System.out.println(user);

    }

}
3.创建条件判断对应类:
package com.itheima.springbootcondition.condtion;

import org.springframework.context.annotation.Condition;
import org.springframework.context.annotation.ConditionContext;
import org.springframework.core.env.Environment;
import org.springframework.core.type.AnnotatedTypeMetadata;

import java.util.Map;

public class ClassCondition implements Condition {
    /**
     *
     * @param context 上下文对象。用于获取环境,IOC容器,ClassLoader对象
     * @param metadata 注解元对象。 可以用于获取注解定义的属性值
     * @return
     */
    @Override
    //该方法判断决定是否创建对应的bean
    public boolean matches(ConditionContext context, AnnotatedTypeMetadata metadata) {

        //1.需求: 导入Jedis坐标后创建Bean
        //思路:判断redis.clients.jedis.Jedis.class文件是否存在(导入坐标即存在)
        boolean flag = true;
        try {
            Class<?> cls = Class.forName("redis.clients.jedis.Jedis");
        } catch (ClassNotFoundException e) {
            flag = false;
        }
        return flag;

    }
}
4.写user bean对应的J配置类:
package com.itheima.springbootcondition.config;

import com.itheima.springbootcondition.condtion.ClassCondition;
import com.itheima.springbootcondition.condtion.ConditionOnClass;
import com.itheima.springbootcondition.domain.User;
import org.springframework.boot.autoconfigure.condition.ConditionalOnClass;
import org.springframework.boot.autoconfigure.condition.ConditionalOnProperty;
import org.springframework.context.annotation.Bean;
import org.springframework.context.annotation.Conditional;
import org.springframework.context.annotation.Configuration;

@Configuration
public class UserConfig {

    @Bean
    //conditional内部指定创建的条件对象,返回true创建对象,false不创建对象
    //@Conditional(ClassCondition.class)
    public User user(){
        return new User();
    }
}
实现需求2:判断字节码文件可以动态指定
1.创建一个自定义注解:
上面三个注解为参考源码的元注解,第一个代表注解可以添加的范围,第二个代表注解生效的时机,第三个代表生成javadoc的文档
同时还需要加上内部指定创建的条件对象
package condition;

import org.springframework.context.annotation.Conditional;

import java.lang.annotation.*;

/**
 * @author xiaowei
 * @description:
 * @create 2021-09-13-20:09
 */
@Target({ElementType.TYPE, ElementType.METHOD})
@Retention(RetentionPolicy.RUNTIME)
@Documented
@Conditional(ClassCondition.class)
public @interface ConditionOnClass {
String[] value();
}
2.修改config类:
@Configuration
public class UserConfig {
    @Bean
    //改为自己配置的注解,内部指定判断字节码文件
  @ConditionOnClass("redis.clients.jedis.Jedis")
    public User user(){
        return new User();
    }
}
3.修改条件判断类:
public class ClassCondition implements Condition {
    /**
     *
     * @param context 上下文对象。用于获取环境,IOC容器,ClassLoader对象
     * @param metadata 注解元对象。 可以用于获取注解定义的属性值
     * @return
     */
    @Override
    public boolean matches(ConditionContext context, AnnotatedTypeMetadata metadata) {


        //2.需求: 导入通过注解属性值value指定坐标后创建Bean

        //获取注解属性值  value
        Map<String, Object> map = metadata.getAnnotationAttributes(ConditionOnClass.class.getName());
        //System.out.println(map);
        String[] value = (String[]) map.get("value");

        boolean flag = true;
        try {
            for (String className : value) {
                Class<?> cls = Class.forName(className);
            }
        } catch (ClassNotFoundException e) {
            flag = false;
        }
        return flag;

    }
}

切换内置web服务器:
springboot默认使用tomcat作为内置服务器,springboot提供了4种内置服务器供我们选择。
tomcat是在web-start坐标内包含的,我们需要将其祛除,再引入别的web服务器:
按照下图式操作,可查看依赖图示:
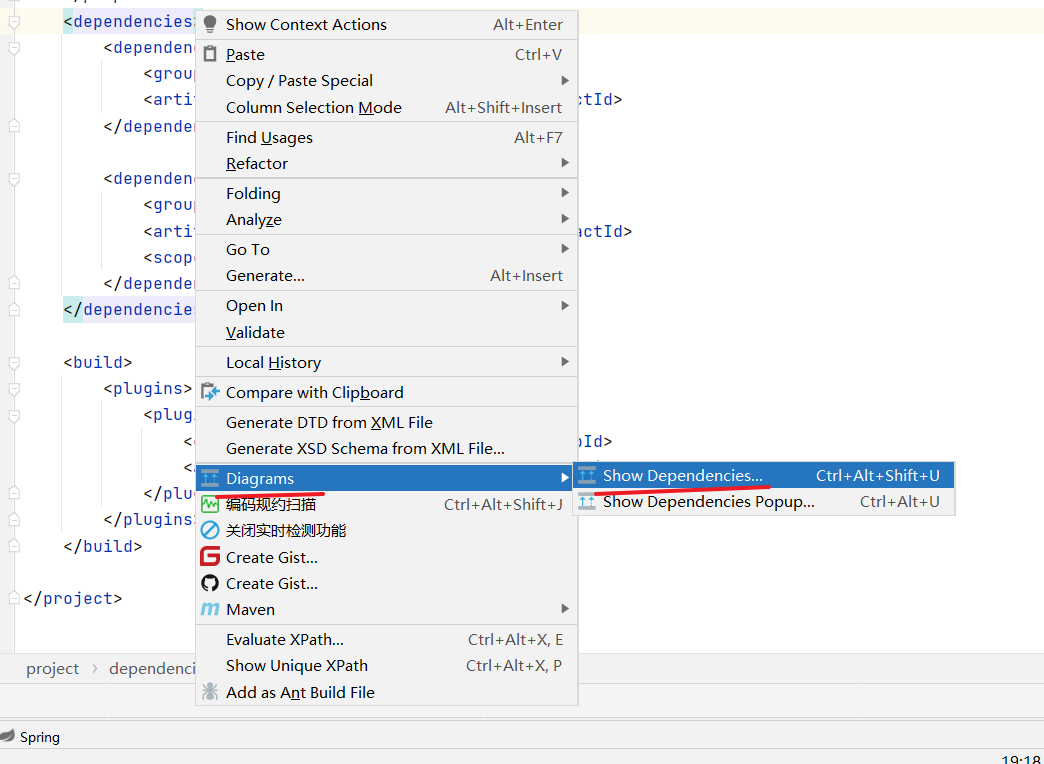
打开如下,找到对应tomcat依赖,右键选择exclude:
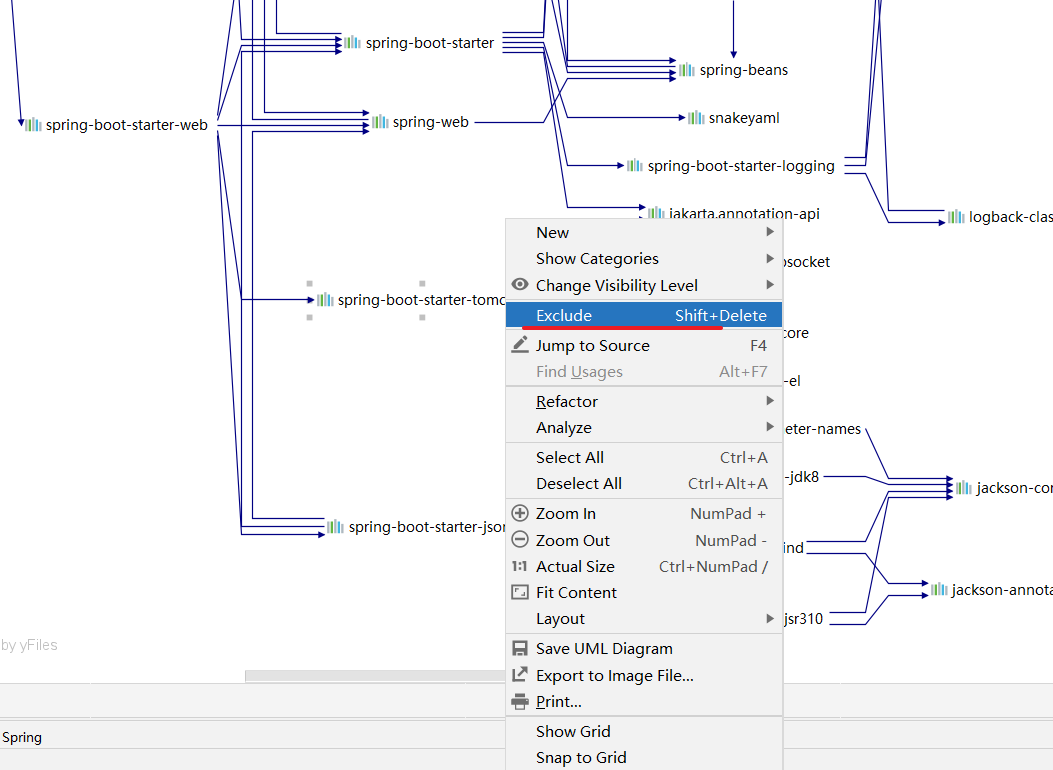
发现pom文件有一些改动:

此时我们再引入需要的web服务器:
<dependency>
            <artifactId>spring-boot-starter-jetty</artifactId>
            <groupId>org.springframework.boot</groupId>
        </dependency>
此时我们重启服务:

@Enable注解:
SpringBoot中提供了很多Enable开头的注解,这些注解都是用于动态启用某些功能的。而其底层原理是使用@Import注 解导入一些配置类,实现Bean的动态加载。
springboot不能直接获取外部包里定义的bean
解决方案:
1.使用@componentScan扫描要引入外部包
eg: @ComponentScan("com.xiaowei.config")
2.可以使用@import注解,加载类,这些类都会被spring创建,并放入IOC容器
eg:@import(UserConfig.class)
3.将@import注解封装
package com.itheima.config;

import org.springframework.context.annotation.Import;

import java.lang.annotation.*;

@Target(ElementType.TYPE)
@Retention(RetentionPolicy.RUNTIME)
@Documented
@Import(UserConfig.class)
public @interface EnableUser {
}
在外部需要使用的地方,直接使用@EnableUser注解即可
@import注解:
@Enable*底层依赖于@Import注解导入一些类,使用@Import导入的类会被Spring加载到IOC容器中。而@Import提供4种用 法:
① 导入Bean
@Import(User.class)
public class SpringbootEnableApplication {

    public static void main(String[] args) {
        ConfigurableApplicationContext context = SpringApplication.run(SpringbootEnableApplication.class, args);
      User user = context.getBean(User.class);
        System.out.println(user);
  }
② 导入配置类 (可以导入配置类中的所有类)
@Import(UserConfig.class)
public class SpringbootEnableApplication {

    public static void main(String[] args) {
        ConfigurableApplicationContext context = SpringApplication.run(SpringbootEnableApplication.class, args);


      	User user = context.getBean(User.class);
        System.out.println(user);

        Role role = context.getBean(Role.class);
        System.out.println(role);
    }
③ 导入 ImportSelector 实现类。一般用于加载配置文件中的类
实现类:
import org.springframework.context.annotation.ImportSelector;
import org.springframework.core.type.AnnotationMetadata;

public class MyImportSelector implements ImportSelector {
    @Override
    public String[] selectImports(AnnotationMetadata importingClassMetadata) {
        return new String[]{"com.itheima.domain.User", "com.itheima.domain.Role"};
    }
}
导入:
@Import(MyImportSelector.class)
public class SpringbootEnableApplication {

    public static void main(String[] args) {
        ConfigurableApplicationContext context = SpringApplication.run(SpringbootEnableApplication.class, args);

        User user = context.getBean(User.class);
        System.out.println(user);

        Role role = context.getBean(Role.class);
        System.out.println(role);
  }
④ 导入 ImportBeanDefinitionRegistrar 实现类。
实现类:
package com.itheima.config;

import com.itheima.domain.User;
import org.springframework.beans.factory.support.AbstractBeanDefinition;
import org.springframework.beans.factory.support.BeanDefinitionBuilder;
import org.springframework.beans.factory.support.BeanDefinitionRegistry;
import org.springframework.context.annotation.ImportBeanDefinitionRegistrar;
import org.springframework.core.type.AnnotationMetadata;

public class MyImportBeanDefinitionRegistrar implements ImportBeanDefinitionRegistrar {
    @Override
    public void registerBeanDefinitions(AnnotationMetadata importingClassMetadata, BeanDefinitionRegistry registry) {
        AbstractBeanDefinition beanDefinition = BeanDefinitionBuilder.rootBeanDefinition(User.class).getBeanDefinition();
        registry.registerBeanDefinition("user", beanDefinition);
    }
}
导入
@Import({MyImportBeanDefinitionRegistrar.class})
@SpringBootApplication
public class SpringbootEnableApplication {

    public static void main(String[] args) {
        ConfigurableApplicationContext context = SpringApplication.run(SpringbootEnableApplication.class, args);

    	User user = context.getBean(User.class);
        System.out.println(user);
 }
@EnableAutoConfiguration注解
⚫ @EnableAutoConfiguration 注解内部使用 @Import(AutoConfigurationImportSelector.class)来加载配置类。
⚫ 配置文件位置:META-INF/spring.factories,该配置文件中定义了大量的配置类,当 SpringBoot 应用启动时,会自动加载 这些配置类,初始化Bean
⚫ 并不是所有的Bean都会被初始化,在配置类中使用Condition来加载满足条件的Bean
自定义starter:
实现步骤:

1.创建模块:
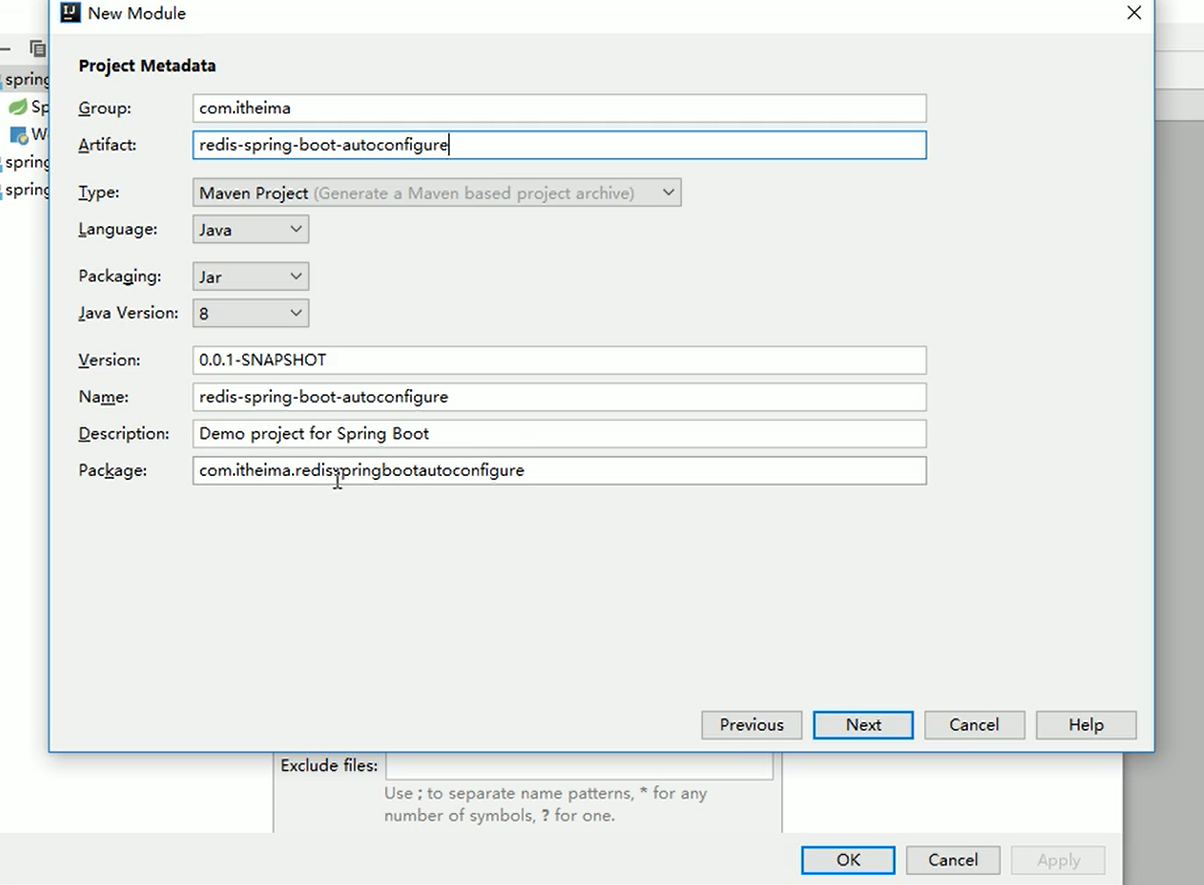
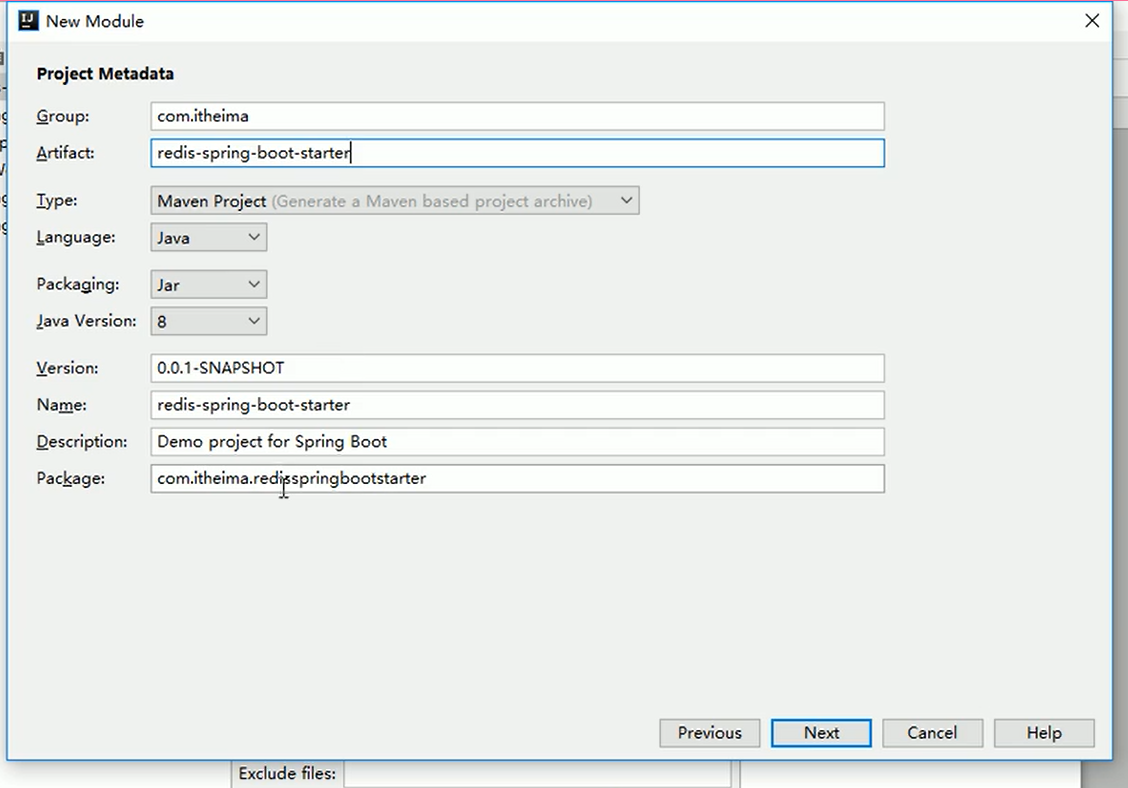
redis-springboot-starter模块添加依赖:

redis-springboot-autoconfigure模块添加依赖:

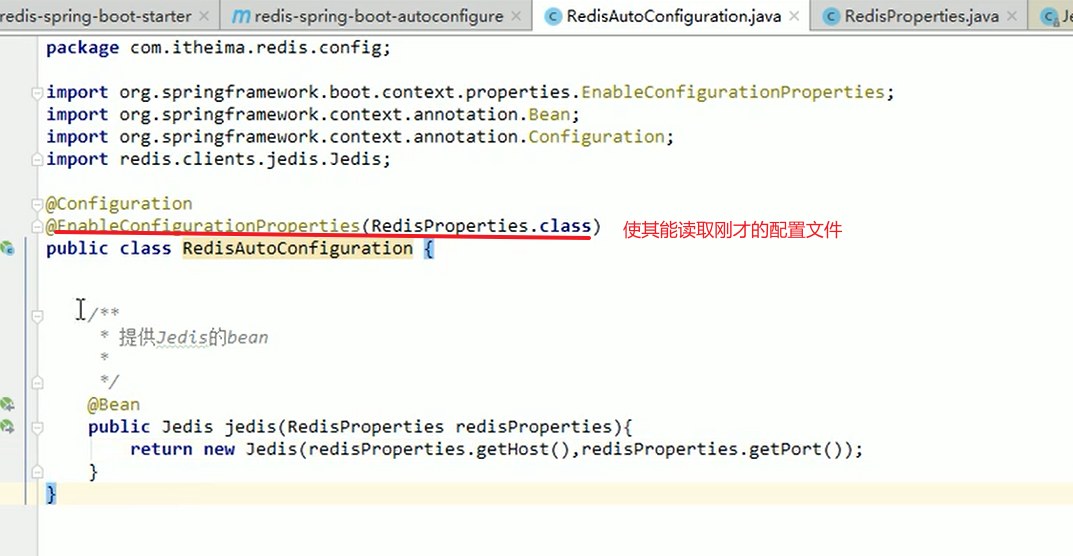
在autoconfigure中配置
配置从用户段获取redis的主机名与端口号:
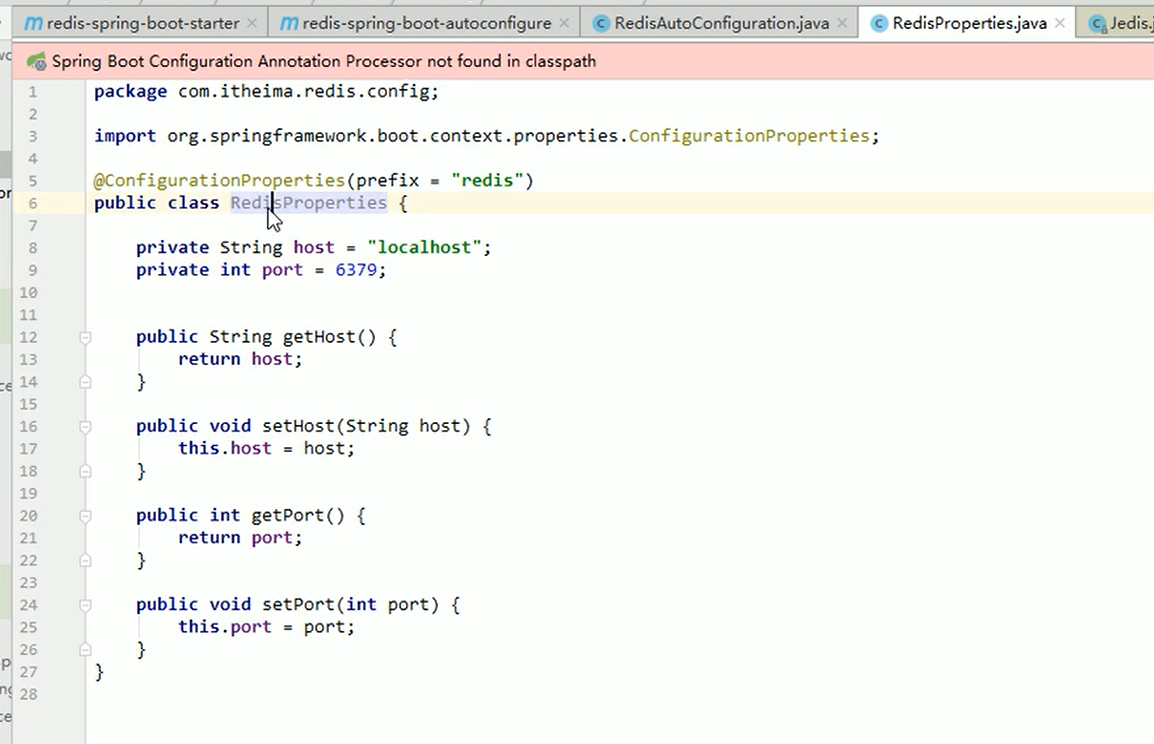
初始化jedis的bean:
创建文件:

复制全名称写入文件:

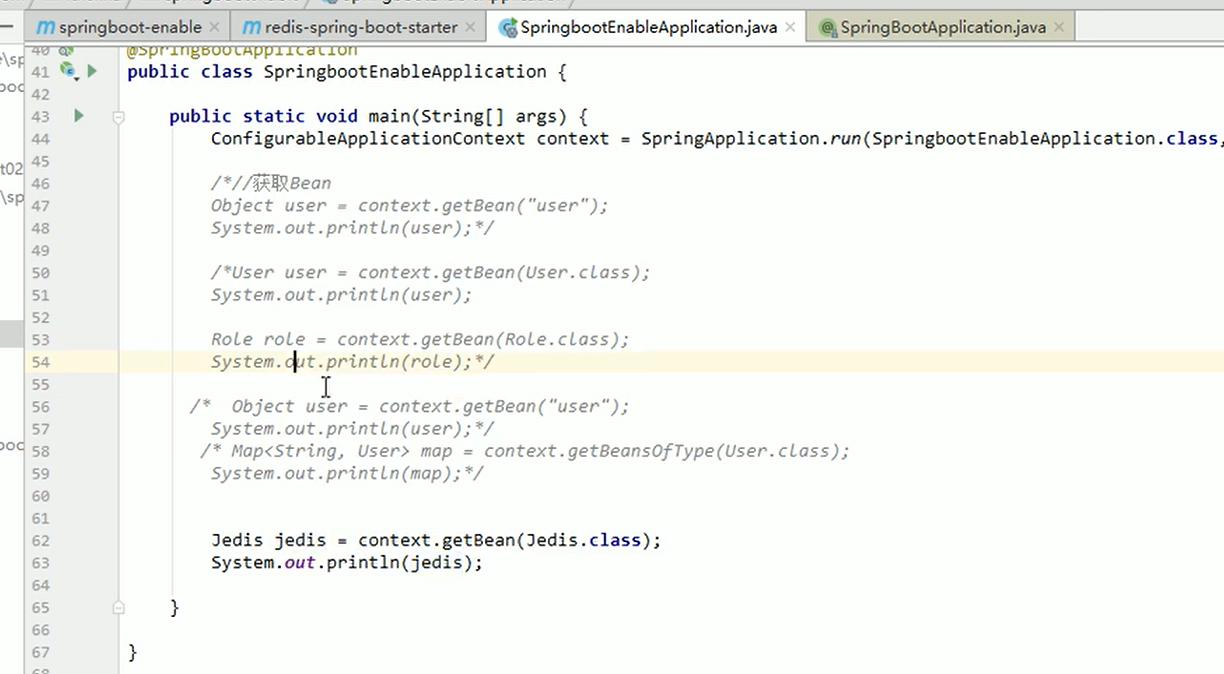
关闭mybatis依赖,启用自定义starter依赖:

测试是否成功:
springboot监听机制:


ApplicationContextInitializer:
@Component
public class MyListenner implements ApplicationContextInitializer {
    @Override
    public void initialize(ConfigurableApplicationContext applicationContext) {
        System.out.println("监听器已生效!!!!!");
    }
}
SpringApplicationRunListener:
package com.xiaowei.springbootlistenner.listenner;

import org.springframework.boot.ConfigurableBootstrapContext;
import org.springframework.boot.SpringApplicationRunListener;
import org.springframework.context.ConfigurableApplicationContext;
import org.springframework.core.env.ConfigurableEnvironment;
import org.springframework.stereotype.Component;

/**
 * @author xiaowei
 * @description:
 * @create 2021-09-15-20:04
 */
@Component
public class MyListenner2 implements SpringApplicationRunListener {
    @Override
    public void starting(ConfigurableBootstrapContext bootstrapContext) {
        System.out.println("项目启动中!");
    }

    @Override
    public void environmentPrepared(ConfigurableBootstrapContext bootstrapContext, ConfigurableEnvironment environment) {
        System.out.println("环境准备中!!!");
    }

    @Override
    public void contextPrepared(ConfigurableApplicationContext context) {
        System.out.println("上下文对象开始准备!!!");
    }

    @Override
    public void contextLoaded(ConfigurableApplicationContext context) {
        System.out.println("上下文对象开始加载!!!");
    }

    @Override
    public void started(ConfigurableApplicationContext context) {
        System.out.println("上下文对象加载完成!!!");
    }

    @Override
    public void running(ConfigurableApplicationContext context) {
        System.out.println("项目开始运行!!!!");
    }

    @Override
    public void failed(ConfigurableApplicationContext context, Throwable exception) {
        System.out.println("项目启动失败!!!");
    }
}
CommandLineRunner:
package com.xiaowei.springbootlistenner.listenner;

import org.springframework.boot.CommandLineRunner;
import org.springframework.stereotype.Component;

/**
 * @author xiaowei
 * @description:
 * @create 2021-09-15-20:12
 */
@Component
public class MyListenner3 implements CommandLineRunner {
    @Override
    public void run(String... args) throws Exception {
        System.out.println("runner!!!!");
    }
}
ApplicationRunner:
package com.xiaowei.springbootlistenner.listenner;

import org.springframework.boot.ApplicationArguments;
import org.springframework.boot.ApplicationRunner;
import org.springframework.stereotype.Component;

/**
 * @author xiaowei
 * @description:
 * @create 2021-09-15-20:14
 */
@Component
public class MyListenner4 implements ApplicationRunner {
    @Override
    public void run(ApplicationArguments args) throws Exception {
        System.out.println("runner!!!!!");
    }
}
尝试启动项目后发现只有后两种方案可以打印出来,前两种需要配置;

如何配置前两种:
在resource文件夹下创建 META-INF/spring.factories,在其中配置 实现接口全类名=实现类的全类名
org.springframework.context.ApplicationContextInitializer=com.xiaowei.springbootlistenner.listenner.MyListenner

org.springframework.boot.SpringApplicationRunListener=com.xiaowei.springbootlistenner.listenner.MyListenner2
第一个实现没有问题,我们发现第二个出错:
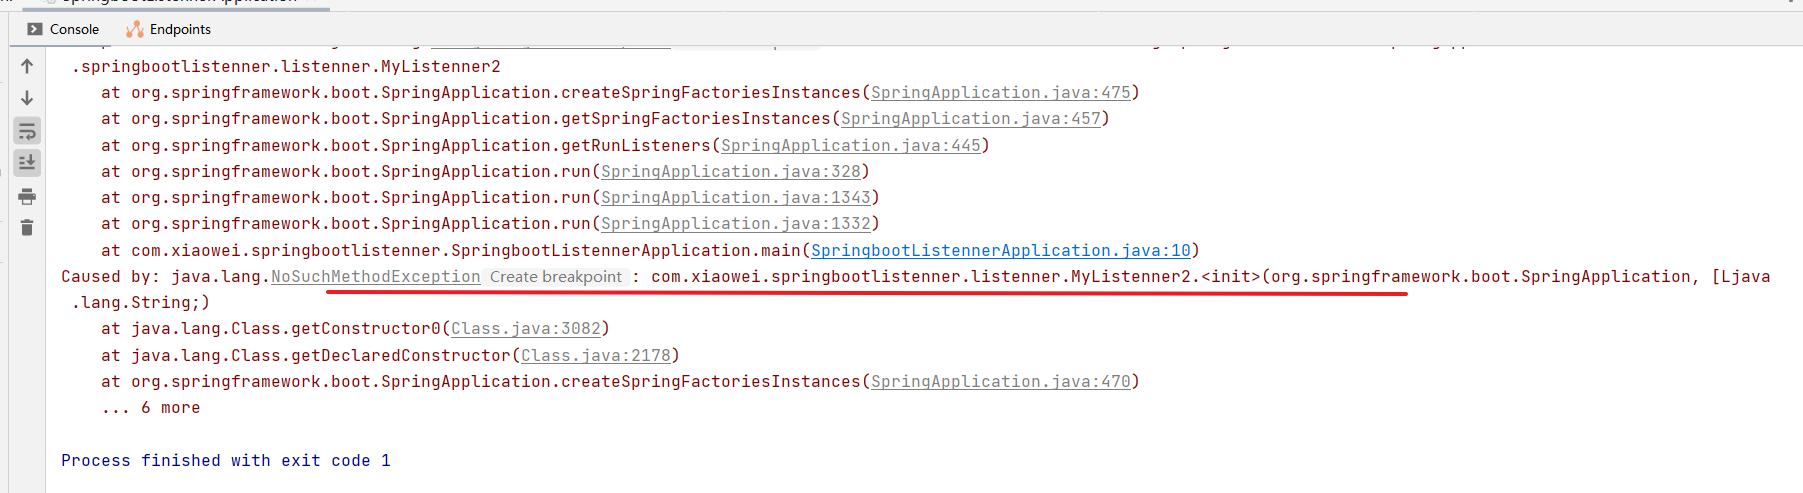
经过分析源码,查看其他实现类得知需要一个初始化的构造器方法(将@component注解去除):
package com.xiaowei.springbootlistenner.listenner;

import org.springframework.boot.ConfigurableBootstrapContext;
import org.springframework.boot.SpringApplication;
import org.springframework.boot.SpringApplicationRunListener;
import org.springframework.context.ConfigurableApplicationContext;
import org.springframework.core.env.ConfigurableEnvironment;

/**
 * @author xiaowei
 * @description:
 * @create 2021-09-15-20:04
 */

public class MyListenner2 implements SpringApplicationRunListener {
    public MyListenner2(SpringApplication application,String[] args) {
    }

    @Override
    public void starting(ConfigurableBootstrapContext bootstrapContext) {
        System.out.println("项目启动中!");
    }

    @Override
    public void environmentPrepared(ConfigurableBootstrapContext bootstrapContext, ConfigurableEnvironment environment) {
        System.out.println("环境准备中!!!");
    }

    @Override
    public void contextPrepared(ConfigurableApplicationContext context) {
        System.out.println("上下文对象开始准备!!!");
    }

    @Override
    public void contextLoaded(ConfigurableApplicationContext context) {
        System.out.println("上下文对象开始加载!!!");
    }

    @Override
    public void started(ConfigurableApplicationContext context) {
        System.out.println("上下文对象加载完成!!!");
    }

    @Override
    public void running(ConfigurableApplicationContext context) {
        System.out.println("项目开始运行!!!!");
    }

    @Override
    public void failed(ConfigurableApplicationContext context, Throwable exception) {
        System.out.println("项目启动失败!!!");
    }
}

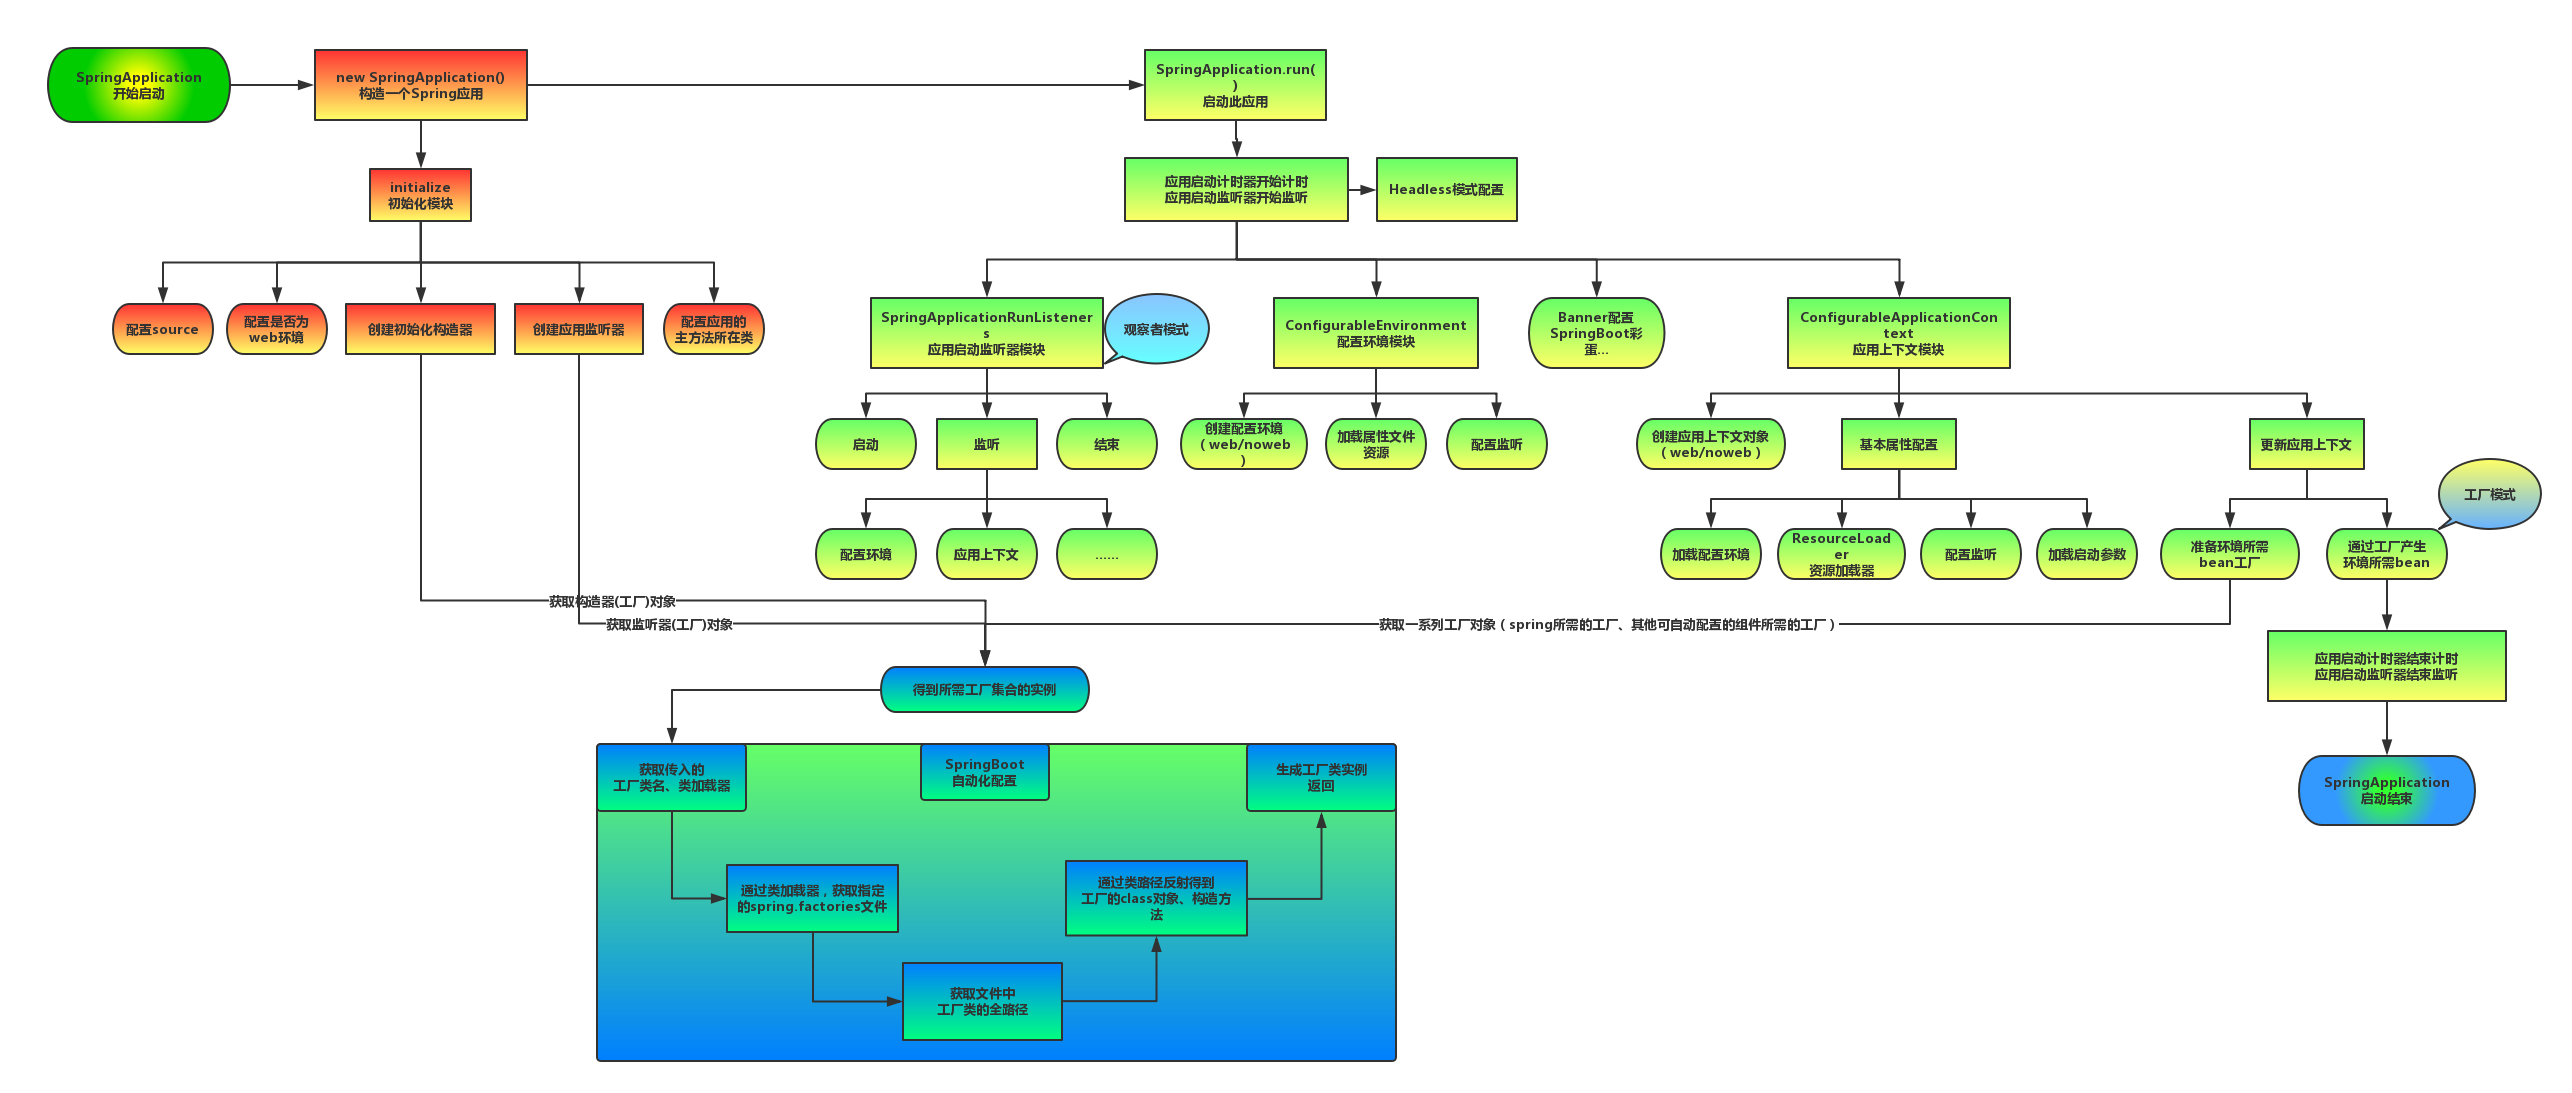
springboot启动流程分析:
springboot监控:
SpringBoot自带监控功能Actuator,可以帮助实现对程序内部运行情况监控,比如监控状况、Bean加载情况、配置属性 、日志信息等。
使用步骤:

在springboot里创建新模块,导入依赖:

启动项目:
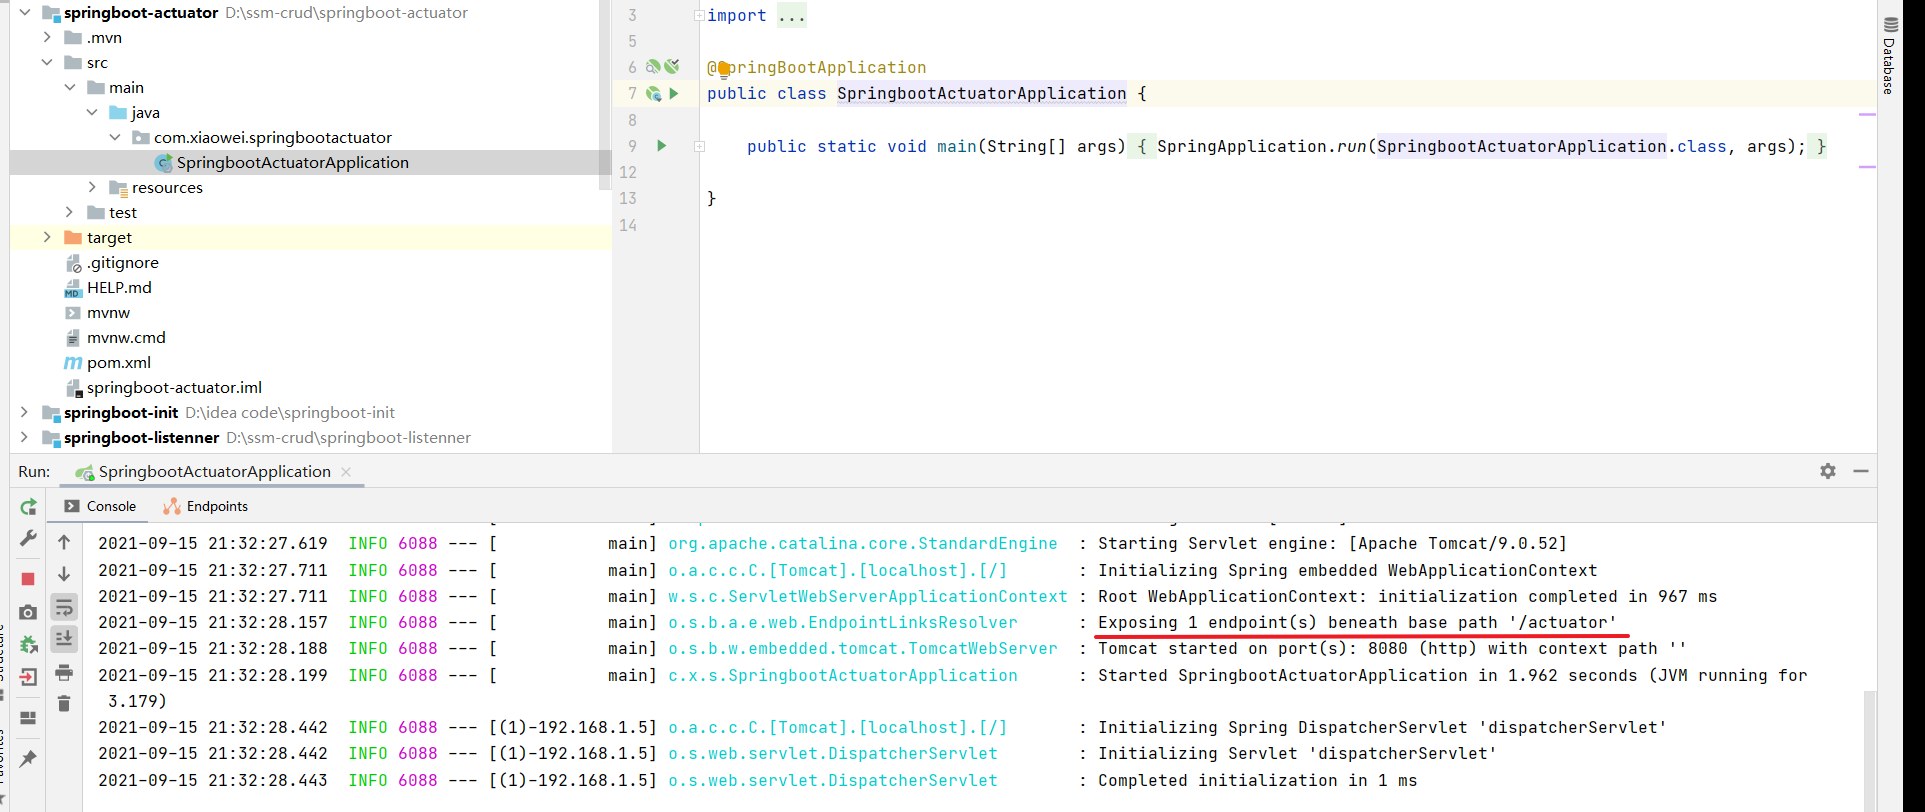
查看:
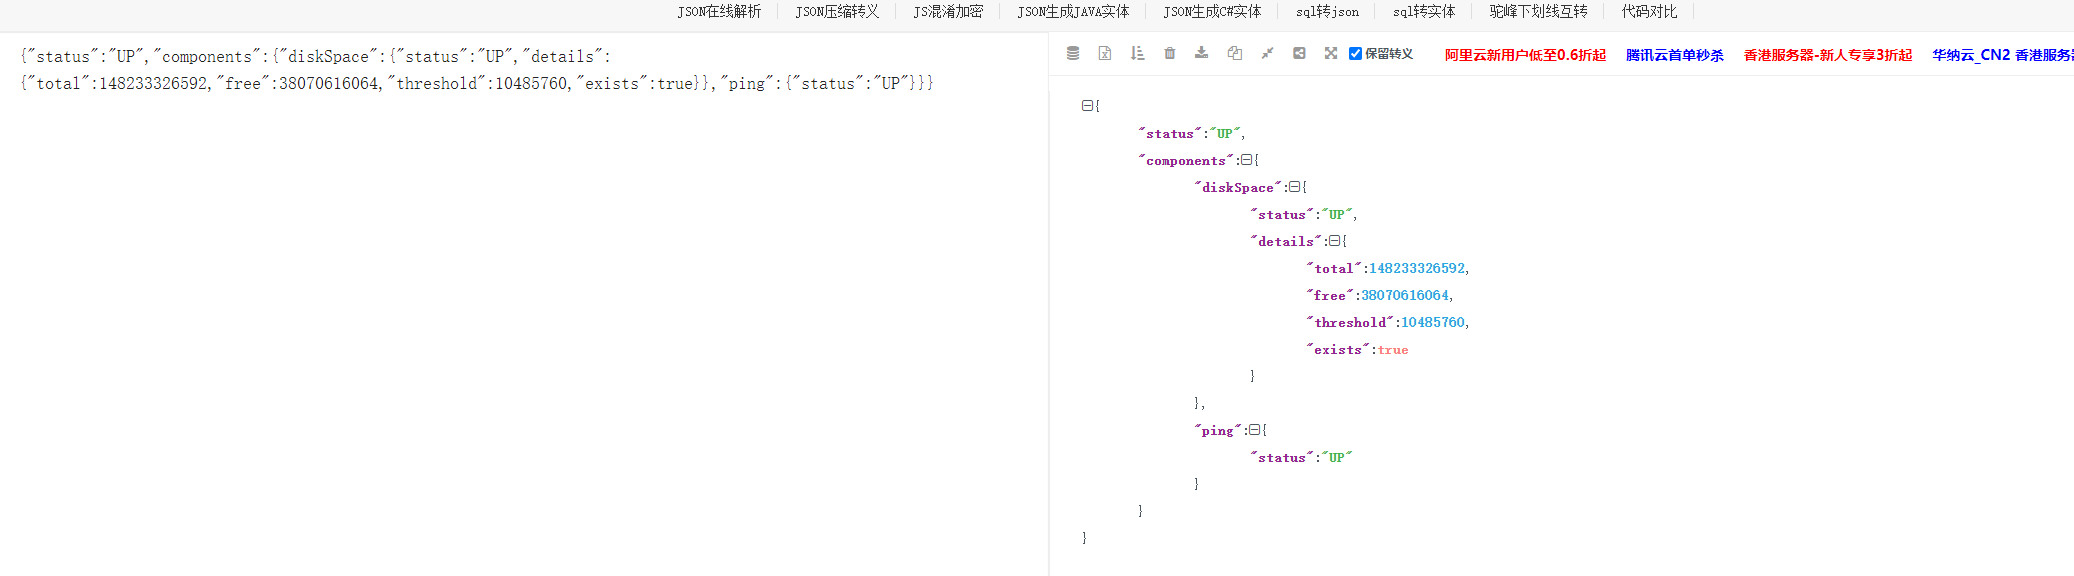
得到json字符串,解析有:

health是项目的健康信息,不暴露过多

在application.properties添加
#开启健康信息
management.endpoint.health.show-details=always
运行结果为:
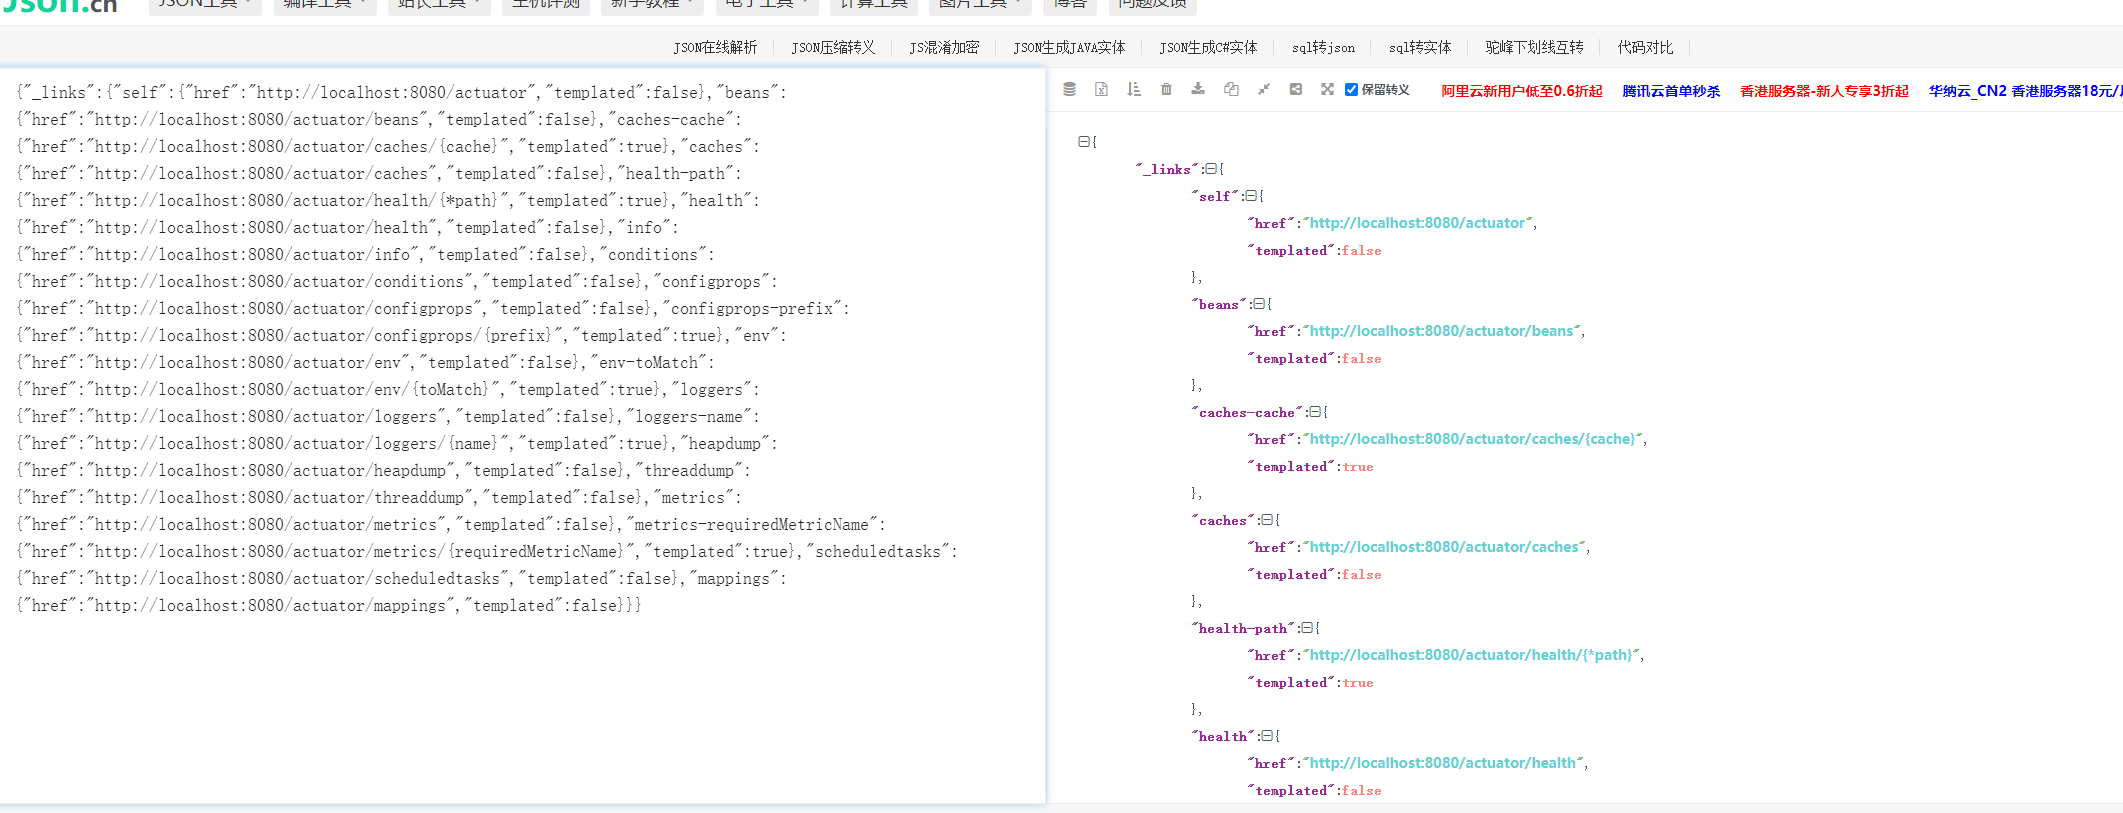
开启所有endpoint :
在application.properties添加
#将所有的endpoint暴露出来
management.endpoints.web.exposure.include=*
查看:
Admin图形化界面使用:
⚫ Spring Boot Admin是一个开源社区项目,用于管理和监控SpringBoot应用程序。
⚫ Spring Boot Admin 有两个角色,客户端(Client)和服务端(Server)。
⚫ 应用程序作为Spring Boot Admin Client向为Spring Boot Admin Server注册
⚫ Spring Boot Admin Server 的UI界面将Spring Boot Admin Client的Actuator Endpoint上的一些监控信息。
admin-server:
① 创建 admin-server 模块
② 导入依赖坐标 admin-starter-server
③ 在引导类上启用监控功能@EnableAdminServer
admin-client:
① 创建 admin-client 模块
② 导入依赖坐标 admin-starter-client
③ 配置相关信息:server地址等
④ 启动server和client服务,访问server
使用:
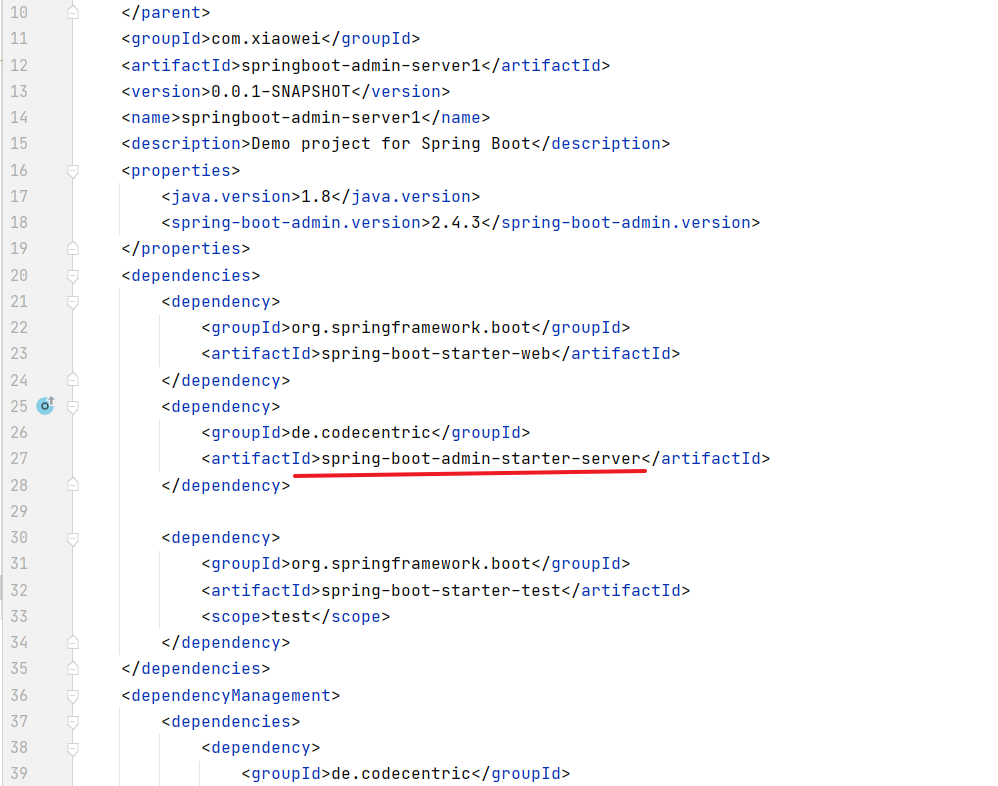
创建一个新模块:

查看pom.xml文件,引入了相关依赖:
在启动类加上EnableAdminServer:

创建一个client类:

查看依赖;
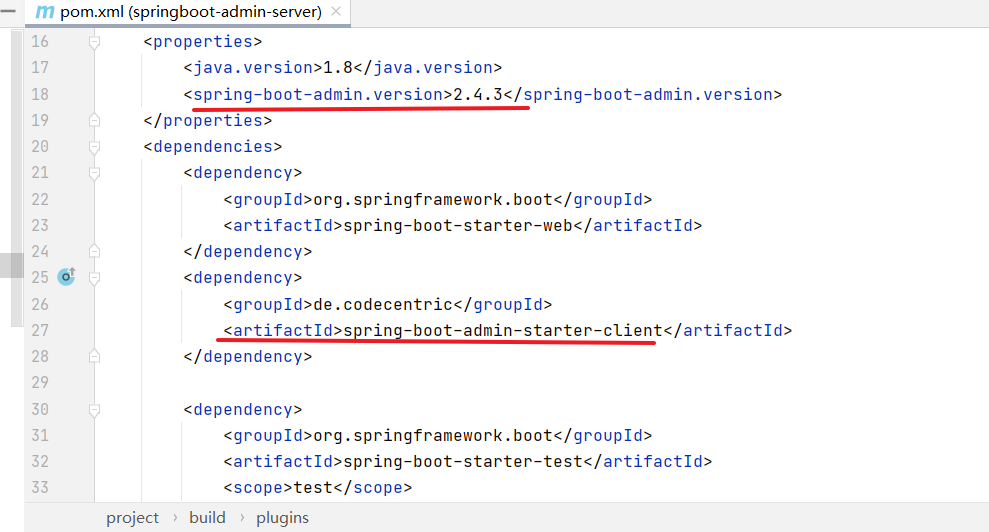
在属性中添加配置:
#执行admin.server地址
spring.boot.admin.client.url=http://localhost:9000

management.endpoint.health.show-details=always
management.endpoints.jmx.exposure.include=*
注意:server的端口号已改为9000
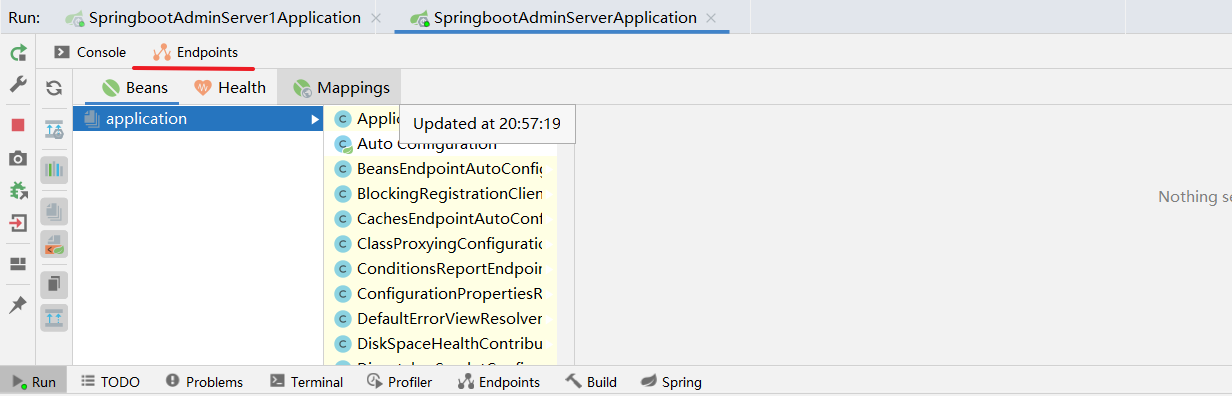
将两个模块都启动,并在浏览器输入:localhost:9000

同时在IDEA中我们也能直接看到endpoint相关的信息:
springboot项目部署:

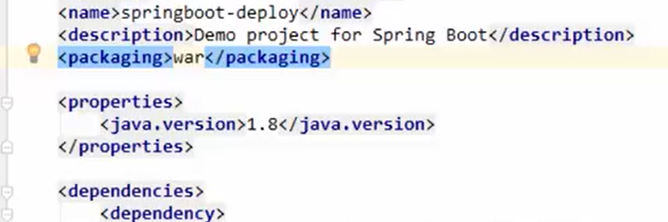
使用maven打包,默认打jar包;
如何打war包:在启动类:

将pom.xml中打包方式改为 war,可以指定外部服务器
打包好后如何部署:
直接放到外部服务器(tomcat)的webapps中,启动服务器即可

 浙公网安备 33010602011771号