
vue框架 各指令和实例成员
前言:
Vue是前台框架,轻量级,主要用于web端;
类比:
Angular企业级,比较厚重;
React主要用于ios/安卓端。
总结:Vue结合了其他框架优点、轻量级、中文API、数据驱动,双向绑定,MVVM设计模式、组件化开发、单页面应用
ps:vue是js渐进式框架,根据开发需求们可以决定vue框架控制项目的具体方位,可为一个标签,亦可为一个页面,甚至可为整个项目
一、vue运用
1、导入:同jQuery方法,在script标签的src内
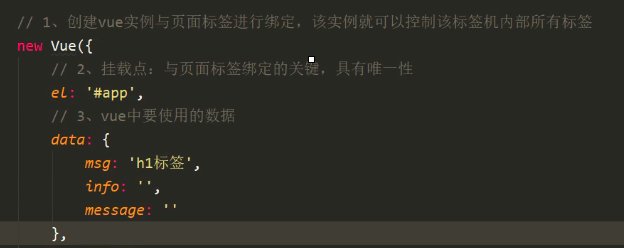
2、挂载点:
1)html与body不能作为挂载点
2)一个vue对象挂载点之后索引一个匹配结果,所以挂载点一般用id标识
3、数据:
1)用示例成员data为vue环境提供数据,数据采用字典{ }形式;
2)在插值表达式{{ }}中,直接书写数据的key来访问数据;
3)在外部通过接受实例的变量app,访问实例成员(实例成员都用$开头),间接访问到数据app.$data.info
4)在外部也可以通过实例变量app直接访问数据app.info
4、过滤器:
在插值表达式可以直接做简单运算
挂载点、数据、图示:
二、指令
1、文本指令
1)v-指令名="变量",变量是需要data提供数据值的(v-text="info")
2)v-指令名="常量",常量采用常量基本的语法,数字与布尔值等可以直接书写,字符串等需要特殊符号的需要添加
3)v-html可以解析 html 语法
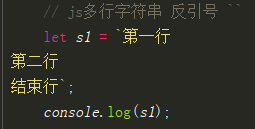
ps:js多行字符串,用反向``
2、事件指令
1)v-on:事件名="时间函数名" ;可以简写为@事件名="事件函数"。
2)事件传参:
@事件="方法" 默认传入事件对象 $event
@事件="方法()" 不传递任何参数
@事件="方法(参数...)" 只传递自定义参数
@事件="方法($event, 参数)" 自定义传参时传递事件对象


<!DOCTYPE html>
<html lang="zh">
<head>
    <meta charset="UTF-8">
    <title></title>
    <style>
        body {
            /*页面文本不允许选择*/
            user-select: none;
        }
        .low-num {
            cursor: pointer;
        }
        .low-num:hover {
            color: red;
        }
    </style>
</head>
<body>
    <div id="app">
        <!-- 事件指令:v-on:事件名="事件函数名"   -->
        <p class="low-num" v-on:click="lowNum">
            <span>点击减一:</span>
            <span>{{ num }}</span>
        </p>

        <p v-on:dblclick="dblAction">双击</p>

        <!-- v-on:事件名="事件函数" 可以简写为 @事件名="事件函数"  -->
        <p @mouseover="overAction()">悬浮</p>
        <p @mouseover="overAction(10)">悬浮1</p>
        <p @mouseover="overAction(10, 20)">悬浮2</p>
        <p @mouseover="overAction(10, 20, $event)">悬浮3</p>

        <!-- 事件传参:
         @事件='方法'  默认传入事件对象 $event
         @事件='方法()'  不传递任何参数
         @事件='方法(参数...)'  只传递自定义参数
         @事件='方法($event, 参数...)'  自定义传参时传递事件对象
         -->
    </div>
</body>
<script src="js/vue.js"></script>
<script>
    let app = new Vue({
        el: '#app',
        data: {
            num: 99
        },
        methods: {
            lowNum: function () {
                // 在vue实例内部的方法中,使用变量
                // alert(this.num)
                this.num -= 1;
            },
            dblAction (ev) {
                // alert('双击事件');
                console.log(ev)
            },
            overAction(a, b, c) {
                console.log(a, b, c)
            }
        }
    })
</script>

</html>
3、属性指令
1)v-bind:属性名="变量" 可以简写:属性名="变量"
2)style样式属性绑定
<p :style="myStyle">样式绑定1</p>

data: {
            myStyle: {
                backgroundColor: 'pink',
                color: 'deeppink',
                'border-radius': '50%'
            },
<p :style="{backgroundColor: c1, color: c2, 'border-radius': '50%'}">样式绑定2</p>

 new Vue({
        el: '#app',
        data: {
            c1: 'cyan',
            c2: 'tan',
    }
3)class类属性绑定
<p :class="myc1">样式绑定3</p>
<p :class="[myc2,myc3,myc4,'bbb']">样式绑定4</p>
<p :class="{xxx:yyy}">样式绑定5</p>
样式绑定可以单个;
多个及直接字符串书写;
yyy为 ture/false
<!DOCTYPE html>
<html lang="zh">
<head>
    <meta charset="UTF-8">
    <title>属性指令</title>
    <style>
        [index] {
            color: orange;
        }

        .ccc {
            background-color: yellowgreen;
            color: greenyellow;
            border-radius: 50%;
        }
        .ccc1 {
            background-color: yellowgreen;
        }
        .ccc2 {
            color: greenyellow;
        }
        .ccc3 {
            border-radius: 50%;
        }

        .ttt {
            background-color: gold;
            color: orange;
        }
    </style>
</head>
<body>
    <div id="app">
        <!--1) 语法:v-bind:属性名="变量" -->
        <p id="p1" class="p1" style="" title="" index="">属性指令1</p>
        <p id="p2" v-bind:class="p1" style="" title="" index="">属性指令2</p>

        <p v-bind:index="p1">自定义属性也可以被vue绑定1</p>
        <!--2) v-bind:属性名="变量" 简写 :属性名="变量" -->
        <p :index="p1">自定义属性也可以被vue绑定2</p>
        <p :title="'文本提示'">悬浮文本提示</p>

        <!--3) style样式属性绑定 -->
        <p :style="myStyle">样式绑定1</p>
        <p :style="{backgroundColor: c1, color: c2, 'border-radius': '50%'}">样式绑定2</p>

        <!--4) class类属性绑定 -->
        <p :class="myc1">样式绑定3</p>
        <p :class="[myc2,myc3,myc4,'bbb']">样式绑定4</p>
        <p :class="{xxx:yyy}">样式绑定5</p>


        <!--案例:点击切换类名是否起作用-->
        <p @click="clickAction" :class="{ttt:yyy}">点击切换类</p>
    </div>
</body>
<script src="js/vue.js"></script>
<script>
    new Vue({
        el: '#app',
        data: {
            p1: 'q1',
            myStyle: {
                backgroundColor: 'pink',
                color: 'deeppink',
                'border-radius': '50%'
            },
            c1: 'cyan',
            c2: 'tan',
            myc1: 'ccc ddd eee',
            myc2: 'ccc1',
            myc3: 'ccc2',
            myc4: 'ccc3',
            yyy: true,  // false
        },
        methods: {
            clickAction() {
                this.yyy = !this.yyy;
            }
        }
    })
</script>
</html>
4、表单指令
1)对表单标签value进行绑定操作变量,不能实时检测绑定的变量
2)表单标签的值有v-model="变量" 来绑定控制,操作的还是value,但是拥有实时变量值的检测
3)确认框
4)单选框
5)复选框
<!DOCTYPE html>
<html lang="zh">
<head>
    <meta charset="UTF-8">
    <title></title>
    <style>
        .p1 {
            width: 500px;
            height: 21px;
            background-color: orange;
        }
    </style>
</head>
<body>
    <div id="app">
        <form action="">
            <!--1) 对表单标签value进行绑定操作变量,不能时时检测绑定的变量-->
            <input class="inp1" type="text" :value="info">
            <input class="inp2" type="text" :value="info">
            <p class="p1">{{ info }}</p>
            <hr>
            <!--2) 表单标签的值有 v-model="变量" 来绑定控制,操作的还是value,但是拥有时时变量值的检测 -->
            <input class="inp1" type="text" v-model="info">
            <input class="inp2" type="text" v-model="info">
            <p class="p1">{{ info }}</p>
            <hr>
            <!-- 2) v-model操作单独复选框 - 确认框 -->
            是否同意:<input type="checkbox" name="agree" v-model="isAgree">
            <!--是否同意:<input type="checkbox" name="agree" true-value="yes" false-value="no" v-model="isAgree">-->
            <p>{{ isAgree }}</p>

            <!-- 3) 单选框-->
            性取向:
            男 <input type="radio" name="sex" value="male" v-model="mysex">
            女 <input type="radio" name="sex" value="female" v-model="mysex">
            哇塞 <input type="radio" name="sex" value="others" v-model="mysex">
            <p>{{ mysex }}</p>


            <!-- 4) 复选框-->
            兴趣爱好:
            男 <input type="checkbox" name="hobbies" value="male" v-model="myhobbies">
            女 <input type="checkbox" name="hobbies" value="female" v-model="myhobbies">
            哇塞 <input type="checkbox" name="hobbies" value="others" v-model="myhobbies">
            <p>{{ myhobbies }}</p>


            <hr>
            <input type="submit">
        </form>
    </div>
</body>
<script src="js/vue.js"></script>
<script>
    new Vue({
        el: '#app',
        data: {
            info: '123',
            isAgree: 0,
            // isAgree: 'no',
            mysex: 'others',
            myhobbies: ['male', 'female']
        }
    })
</script>
</html>
ps:v-once指令(唯一锁定)、v-cloak指令(斗篷,取消页面渲染闪烁)
<!DOCTYPE html>
<html lang="zh">
<head>
    <meta charset="UTF-8">
    <title></title>
    <style>
        .box {
            width: 200px;
            height: 200px;
            background-color: orange;
        }
        .center {
            text-align: center;
            line-height: 200px;
        }
        .rcenter {
            text-align: right;
            line-height: 200px;
        }
        .right {
            text-align: right;
        }
        .top {
            line-height: 21px;
        }
        .bottom {
            line-height: calc(400px - 21px);
        }
    </style>
</head>
<body>
    <div id="app">
        <div class="box" :class="[c1, {right:r, top:t, bottom:b}]" @mouseover="a1" @mousedown="a2" @mouseup="a3" @mouseout="a4">{{ msg }}</div>
    </div>
</body>
<script src="js/vue.js"></script>
<script>
    new Vue({
        el: '#app',
        methods: {
            a1(){
                this.msg = '被悬浮';
                // 正中
                this.c1 = 'center';
                this.r = 0;
                this.t = 0;
                this.b = 0;
            },
            a2(){
                this.msg = '被按下';
                // 右上
                this.r = 1;
                this.t = 1;
                this.b = 0;
            },
            a3(){
                this.msg = '被抬起';
                // 右中
                this.c1 = 'rcenter';
                this.r = 0;
                this.t = 0;
                this.b = 0;
            },
            a4(){
                this.msg = '被移开';
                // 右下
                this.r = 1;
                this.t = 0;
                this.b = 1;
            },
        },
        data: {
            msg: '',
            c1: '',
            r:0,
            t:0,
            b:0,
        }
    })
</script>
</html>
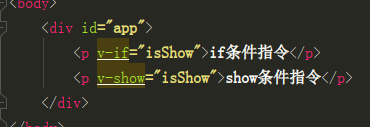
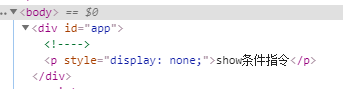
5、条件指令v-if
1)v-show与v-if区别:两种都可以控制标签的显隐,绑定的值是布尔类型值,当都隐藏标签时前者以 display:none方式渲染,后者不渲染标签
2)v-if、v-else-if、v-else;
<p>
                <button @click="changeBox('rBox')" :class="showName == 'rBox' ? 'active' : ''">红</button>
                <button @click="changeBox('yBox')" :class="showName == 'yBox' ? 'active' : ''">黄</button>
                <button @click="changeBox('bBox')" :class="showName == 'bBox' ? 'active' : ''">蓝</button>
            </p>
6、原义指令v-pre
v-pre 指令可以在vue控制范围内,形成局部vue不能控制的区域,类似于 r' 转义符的作用,是当前局部失去vue作用,表达原义
7、循环指令v-for
1)语句 v-for=" 元素 in 容器 "
2)针对循环遍历的标签,通过会提供key属性来优化渲染速度,但key的值必须是唯一
v-for="(ch , i) in str " : key = "ch + i" (用元素+索引拼接的key必定唯一)
3)循环字典
<p v-for="(ele , k, i) in dic"> {{ i }} {{ k }} : {{ ele }}</p>
8、todolist案例
<!DOCTYPE html>
<html lang="zh">
<head>
    <meta charset="UTF-8">
    <title></title>
    <style>
        li:hover {
            color: red;
            cursor: pointer;
        }
    </style>
</head>
<body>
    <div id="app">
        <p>
            <input type="text" v-model="userMsg">
            <button type="button" @click="sendMsg">留言</button>
        </p>
        <ul>
            <li v-for="(msg, index) in msgs" @click="deleteMsg(index)">
                {{ msg }}
            </li>
        </ul>
    </div>
</body>
<script src="js/vue.js"></script>
<script>
    new Vue({
        el: '#app',
        data: {
            msgs: localStorage.msgs ? JSON.parse(localStorage.msgs) : [],  // 所有留言
            userMsg: '',  // 用户留言
        },
        methods: {
            sendMsg() {  // 留言事件
                // 尾增
                // this.msgs.push(this.userMsg);
                // 首增
                // this.msgs.unshift(this.userMsg);

                let userMsg = this.userMsg;
                if (userMsg) {
                    this.msgs.unshift(userMsg);  // 渲染给页面
                    localStorage.msgs = JSON.stringify(this.msgs);  // 同步到数据库
                    this.userMsg = '';  // 清空留言框
                }
            },
            deleteMsg(index) {
                // 开始索引  操作长度  操作的结果们
                this.msgs.splice(index, 1)
            }
        }
    })
</script>

<script>
    // localStorage['num'] = 10;
    // sessionStorage.num = 888;
    // console.log(localStorage.num);

    // localStorage.msgs = JSON.stringify(['1111', '2222']);
    // console.log(JSON.parse(localStorage.msgs));
    // console.log(JSON.parse(localStorage.msgs)[0]);
</script>

</html>
三、实例成员
1、插值表达式符号
<div id="app">
    {{ msg }}
    {[ msg ]}
</div>
<script>
new Vue({
    el: '#app',
    data: {
        msg: '12345'
    },
    // delimiters: ['{{', '}}'],
    delimiters: ['{[', ']}'],
})
</script>
2、计算属性 computed
1)computed是用来声明方法属性的
2)声明的方法属性不能在data中重复定义
3)方法属性必须在页面中渲染使用,才会对内部出现的所有变量进行监听
<!DOCTYPE html>
<html lang="zh">
<head>
    <meta charset="UTF-8">
    <title></title>
</head>
<body>
    <div id="app">
        <p @click="fn">{{ num }}</p>
        <p>十位:{{ parseInt(num / 10) }}</p>
        <p>个位:{{ num % 10 }}</p>


        <!-- 一个变量的值依赖多个变量,且依赖的任意一个变量发生改变,该变量都会改变 -->
        十位:<input type="number" v-model="shi" min="0" max="9">
        个位:<input type="number" v-model="ge" min="0" max="9">
        结果:<b>{{ shi * 10 + +ge }}</b>
        结果:<b>{{ result }}</b>

    </div>

</body>
<script src="js/vue.js"></script>
<script>
    new Vue({
        el: '#app',
        data: {
            num: 99,
            shi: '',
            ge: '',
            // result: 0,
        },
        methods: {
            fn() {
                this.num -= 3;
            }
        },
        // 1) computed是用来声明 方法属性 的
        // 2) 声明的方法属性不能在data中重复定义
        // 3) 方法属性必须在页面中渲染使用,才会对内部出现的所有变量进行监听
        computed: {
            result() {
                // console.log('该方法被调用了');
                // this.shi;
                // this.ge;
                return this.shi * 10 + +this.ge
            }
        }

    })
</script>

</html>
3、属性监听 watch
1)watch为data中已存在的属性设置监听事件
2)监听的属性值发送改变,就会出发监听事件
3)监听事件的方法返回值没有任何意义
<div id="app">
    姓名:<input type="text" v-model="fullName">
    姓:<b>{{ firstName }}</b>
    名:<b>{{ lastName }}</b>
</div>
</body>
<script src="js/vue.js"></script>
<script>
    new Vue({
        el: '#app',
        data: {
            fullName: '',
            firstName: '',
            lastName: '',
        },
        watch: {
            // fullName值改变,就会调用绑定的事件方法
            fullName() {
                nameArr = this.fullName.split('');
                this.firstName = nameArr[0];
                this.lastName = nameArr[1];
            }
        }
    })
</script>

 浙公网安备 33010602011771号