

keepalived高可用+nginx证书代理
安装nginx
yum -y install gcc pcre-devel openssl-devel #安装依赖包
wget http://nginx.org/download/nginx-1.12.2.tar.gz (也可配置阿里源用yum安装)
tar -xf nginx-1.12.2.tar.gz
./configure \
--prefix=/usr/local/nginx \ #指定安装路径
--user=nginx \ #指定用户
--group=nginx \ #指定组
--with-http_ssl_module #开启SSL加密功能
make && make install #编译并安装 (如果没有安装make请自行安装)
nginx命令的用法
cat /etc/nginx/conf.d/default.conf (此路径为正式环境156的路径) conf.d/的意思为附加文件同源文件效果一样
server {listen 80; 这个是80端口的server_name www.chengshizhichuang.com cszc.top; (域名)client_max_body_size 100M;location / {proxy_pass http://192.168.1.134/; 访问www.chengshizhichuang.com cszc.top转到此ip}proxy_set_header Host $host;proxy_set_header X-Real-IP $remote_addr;proxy_set_header X-Forwarded-For $proxy_add_x_forwarded_for;location /pay/ {proxy_pass http://192.168.1.212:21612/pay/; 访问www.chengshizhichuang.com cszc.top/pay 转到此ip}location /publicgood/ {proxy_pass http://192.168.1.212:21612/publicgood/; 同上}location /shared/ {proxy_pass http://192.168.1.212:21612/shared/; 同上}location /zhyl/ {proxy_pass http://192.168.1.121:12102/zhyl/; 同上}# location /pay/static/ {# proxy_pass http://192.168.1.212:21612/pay/static/; 同上# }}server {listen 443; 443端口做了证书认证加密 但是直接访问域名时是不会自动跳到https上的 要手动加https 之前做的转发因为有的80端口转发不过来所以就没做了server_name www.chengshizhichuang.com cszc.top;client_max_body_size 100M;ssl on;ssl_certificate /etc/nginx/ssl/www.chengshizhichuang.com.crt;ssl_certificate_key /etc/nginx/ssl/www.chengshizhichuang.com.rsa;ssl_session_timeout 5m;ssl_protocols SSLv2 SSLv3 TLSv1;ssl_ciphers ALL:!ADH:!EXPORT56:RC4+RSA:+HIGH:+MEDIUM:+LOW:+SSLv2:+EXP;ssl_prefer_server_ciphers on;location / {proxy_pass http://192.168.1.134/;}location /pay/ {proxy_pass http://192.168.1.212:21612/pay/;}location /zhyl/ {proxy_pass http://192.168.1.121:12102/zhyl/;}location /shared/ {proxy_pass http://192.168.1.212:21612/shared/;}}
Keepalived的安装及配置
yum  -y  install keepliaved
vim /etc/keepliaved/keepliaved.conf
global_defs {notification_email {acassen@firewall.loc}notification_email_from Alexandre.Cassen@firewall.locsmtp_server 192.168.200.1smtp_connect_timeout 30router_id 112vrrp_skip_check_adv_addrvrrp_strictvrrp_garp_interval 0vrrp_gna_interval 0}vrrp_script chk_http_port {script "/opt/chk_nginx.sh" 设定一个监控nginx脚本链接nginxinterval 2weight -5fall 2rise 1}vrrp_instance VI_1 {state MASTER 从服务改为BACKUPinterface eth0 用ip a 查看自己的网卡名virtual_router_id 51priority 100 优先值 从服务不能高于主advert_int 1authentication {auth_type PASSauth_pass 1111}virtual_ipaddress {192.168.1.157/24 # 虚拟vip}track_script {chk_http_port}}
@@@分别在主备服务器/etc/keepalived目录下创建nginx_check.sh脚本,并为其添加执行权限chmod +x /opt/chk_nginx.sh。
用于keepalived定时检测nginx的服务状态,如果nginx停止了,会尝试重新启动nginx,如果启动失败,会将keepalived进程杀死,将vip漂移到备份机器上。
vim /opt/chk_nginx.sh
#!/bin/bash
counter=$(ps -C nginx --no-heading|wc -l)
if [ "${counter}" = "0" ]; then
/usr/sbin/nginx #尝试重新启动nginx
sleep 2 #睡眠2秒
counter=$(ps -C nginx --no-heading|wc -l)
if [ "${counter}" = "0" ]; then
killall keepalived #启动失败,将keepalived服务杀死。将vip漂移到其它备份节点
fi
fi
chmod +x /opt/chk_nginx.sh。

systemctl start  keepalived.service   启动keepalived
ip  a  查看vip有没有和本地ip绑定如下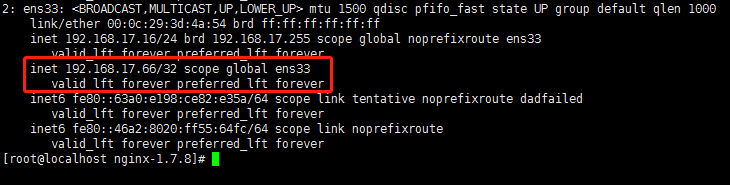
如果把keepalived关掉 vip就会调到另一个服务上

 浙公网安备 33010602011771号