
web服务器主要是提供上网信息浏览服务。
Apache HTTPD Server 简称 Apache,是 Apache 软件基金会的一个开源的网页服务器, 可以在大多数计算机操作系统中运行,由于其多平台和安全性被广泛使用,是最流行的 Web 服务器端软件之一。它快速、可靠并且可通过简单的 API 扩展,将 Perl/Python 等解释器编 译到服务器中!Apache HTTP 服务器是一个模块化的服务器,各个功能使用模块化进行插拔! 目前支持 Windows,Linux,Unix 等平台!
Web 服务器的工作模式和端口
工作模式是:B/S 模式
工作端口是:80/http 正常端口443/https SSL 端口
安装apache服务
[root@x101 ~]# yum -y install httpd

安装elink字符浏览器
[root@x101 ~]# yum -y install elinks


编辑httpd主配置文件
[root@x101 ~]# vim /etc/httpd/conf/httpd.conf

启动httpd服务
[root@x101 ~]# systemctl start httpd

字符浏览器访问测试
[root@x101 ~]# elinks 192.168.0.101
也可以使用windows客户端浏览器访问测试,
firefox地址栏输入  http://192.168.0.101
httpd服务主配置文件解析
[root@x101 ~]# vim /etc/httpd/conf/httpd.conf
ServerRoot "/etc/httpd"

httpd服务安装目录
Listen 80
监听端口

Include conf.modules.d/*.conf
包含conf.moudules.d目录下所有的.conf文件

User apache
运行的用户身份

Group apache
运行的组身份

ServerAdmin root@localhost
管理员邮箱

#ServerName www.example.com:80
服务器主机名,域名


<Directory />
    AllowOverride none
    Require all denied
</Directory>
httpd的一个功能模块

DocumentRoot "/var/www/html"
默认网站服务的主目录

<Directory "/var/www">
    AllowOverride None
    # Allow open access:
    Require all granted
</Directory>
对/var/www目录做的权限设置


<Directory "/var/www/html">
    Options Indexes FollowSymLinks MultiViews
    indexes表示如何网站主目录中没用默认首页时,会显示网站目录索引列表;FollowSymLinks表示允许在此目录中使用符号链接;MultiViews模糊查询;

    Order allow,deny
    这里默认后者生效,也就是 deny 生效

    Allow from all
    这里说允许所有

    AllowOverride None
    Require all granted
</Directory>
<Directory "/var/www/html">表示对/var/www/html目录做的权限设置


<IfModule dir_module>
    DirectoryIndex index.html
    指定默认首页
</IfModule>

ErrorLog "logs/error_log"
定义错误日志存放位置


</IfModule>
    CustomLog "logs/access_log" combined
定义访问日志存储路径
</IfModule>

AddDefaultCharset UTF-8
设置服务器的默认编码为: UTF-8

IncludeOptional conf.d/*.conf
加载conf.d目录下的所有conf文件,通常用于一台服务器配置多个虚拟主机,每个虚拟主机使用单独的.conf配置文件,存储在conf.d目录下
取消网站默认首页,配置文件welcome.conf,注释掉以下4行即可
[root@x101 html]# vim /etc/httpd/conf.d/welcome.conf
#<LocationMatch "^/+$">
#    Options -Indexes
#    ErrorDocument 403 /.noindex.html
#</LocationMatch>

[root@x101 html]# systemctl restart httpd
访问测试:
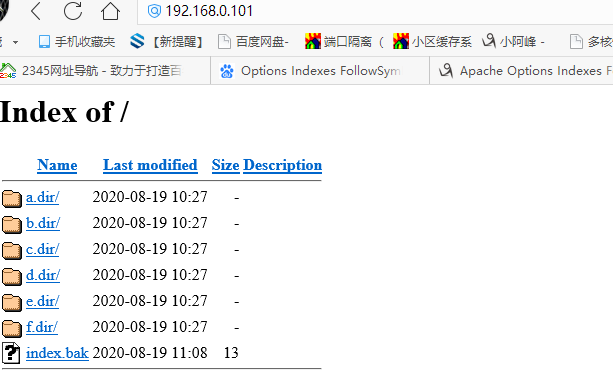
取消网站目录列表显示,编辑httpd.conf,去掉以下选项中的Indexes即可。
[root@x101 ~]# vim /etc/httpd/conf/httpd.conf
<Directory "/var/www/html">
Options Indexes FollowSymLinks
indexes表示如何网站主目录中没用默认首页时,会显示网站目录索引列表;FollowSymLinks表示允许在此目录中使用符号链接
</Directory>
修改配置文件,重启httpd服务生效。
[root@x101 html]# systemctl restart httpd
测试:

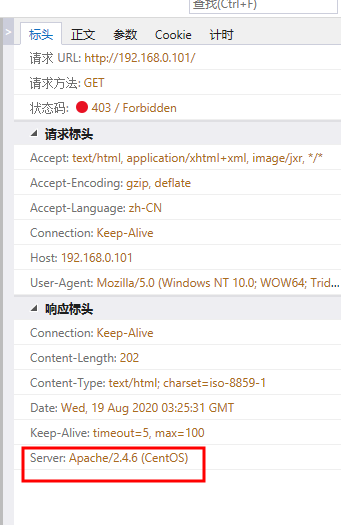
apache软件版本查看
[root@x101 html]# yum list httpd
Loaded plugins: fastestmirror, langpacks
Loading mirror speeds from cached hostfile
 * base: mirrors.aliyun.com
 * extras: mirrors.aliyun.com
 * updates: mirrors.aliyun.com
Installed Packages
httpd.x86_64                2.4.6-67.el7.centos                @rhel
Available Packages
httpd.x86_64                2.4.6-93.el7.centos                base

或者使用以下命令
[root@x101 html]# httpd -v
Server version: Apache/2.4.6 (CentOS)
Server built: Aug 4 2017 03:19:10
客户端与服务端查看结果一致:
创建默认首页
[root@x101 html]# echo "welcome to yuqianwan" > index.html
测试访问:

更改网站默认主目录为自定义目录wcg,并更改权限
[root@x101 html]# vim /etc/httpd/conf
DocumentRoot "/var/www/html/wcg"
<Directory "/var/www/html/wcg">
    Options FollowSymLinks
    AllowOverride None
    Order allow,deny
    allow from 192.168.0.0/24
    deny from 192.168.0.0/24
    Require all granted
</Directory>

注意权限,Order allow,deny,在Order最后面的权限较高
[root@x101 html]# mkdir /var/www/html/wcg
[root@x101 html]# cat /var/www/html/wcg/index.html
welcome to WCG
更改Order deny,allow之后,测试访问:

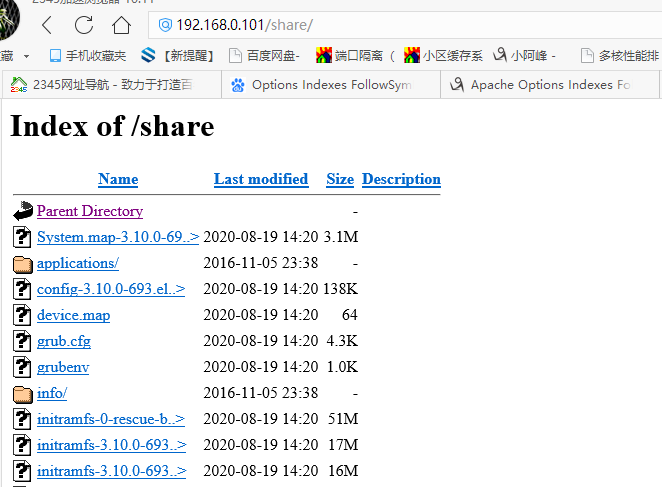
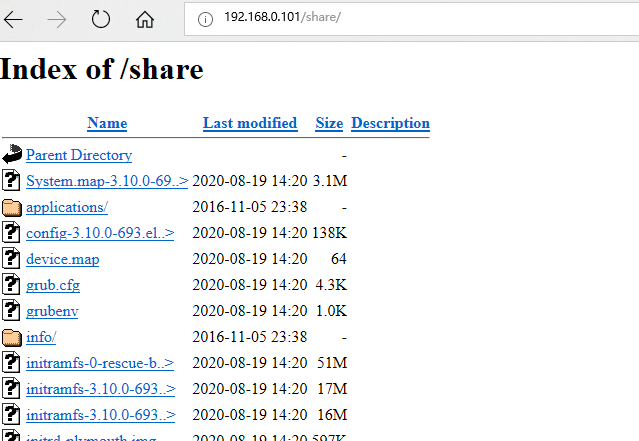
使用别名,引用网站更目录以外路径
将/usr/local/share目录通过虚拟目录功能添加到网站根目录。当访问http://192.168.0.101/share时,就可以访问目录/usr/local/share中的内容
注意;apache的别名也叫做虚拟目录
修改httpd.conf主配置文件
[root@x101 html]# vim /etc/httpd/conf/httpd.conf
Alias /share /usr/local/share
<Directory "/usr/local/share">
Options Indexes FollowSymLinks
AllowOverride None
Order allow,deny
Allow from 192.168.0.0/24
Require all granted
</Directory>
[root@x101 html]# systemctl restart httpd
[root@x101 ~]# mkdir /usr/local/share
[root@x101 share]# cp /boot/*    .
访问测试:
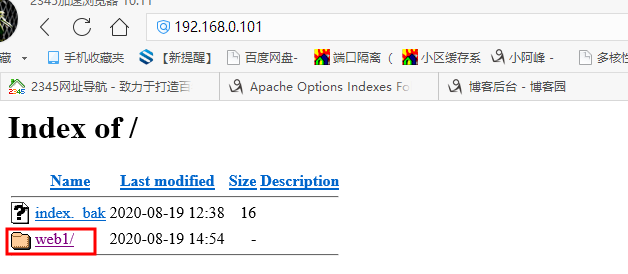
打开软链接功能,直接引用网站根目录以外内容

[root@x101 html]# mkdir /web1
[root@x101 html]# echo "hello web1" > /web1/a.html
[root@x101 html]# ln -s /web1  /var/www/html/wcg/web1
[root@x101 html]# ll  wcg/
total 4
-rw-r--r-- 1 root root 16 Aug 19 12:38 index.html
lrwxrwxrwx 1 root root  5 Aug 19 14:55 web1 -> /web1


[root@x101 html]# vim /etc/httpd/conf/httpd.conf
DocumentRoot "/var/www/html/wcg"
<Directory "/var/www/html/wcg">
    Options  Indexes FollowSymLinks
    AllowOverride None
    Order deny,allow
    allow from all
    deny from 192.168.0.0/24
    Require all granted
</Directory>
注意:httpd.conf文件中必需要有Options Indexes FollowSymLinks配置项,才可以使用软链接功能。
访问测试:
通过用户认证的方式,对网站下/usr/local/share目录进行保护。设置/usr/local/share目录,只能通过用户名密码方式访问。
方法一:[root@x101 html]# vim /etc/httpd/conf/httpd.conf
Alias   /share   /usr/local/share
<Directory "/usr/local/share">
    Options Indexes FollowSymLinks
    AllowOverride AuthConfig	#开启认证方式
    Order deny,allow
    Allow from all
    authtype basic				#基本认证
    authname “weicome to web”   #提示信息
    Authuserfile /etc/httpd/conf/passwd.secret #密码文件路径
    Require valid-user
</Directory>

方法二:
[root@x101 html]# vim /etc/httpd/conf/httpd.conf
Alias   /share   /usr/local/share
<Directory "/usr/local/share">
    Options Indexes FollowSymLinks
    AllowOverride AuthConfig #开启认证方式
    Order deny,allow
    Allow from all
</Directory>

在别名目录中新建头文件.htaccess,将auth相关的内容写入其中,重启服务生效。
[root@x101 html]# vim /usr/local/share/.htaccess
authtype basic #基本认证
authname “weicome to web”   #提示信息
Authuserfile /etc/httpd/conf/passwd.secret #密码文件路径
Require valid-user

[root@x101 html]# systemctl restart httpd


生成密码文件
[root@x101 html]# htpasswd -cm /etc/httpd/conf/passwd.secret feng
New password:
Re-type new password:
Adding password for user feng
[root@x101 html]#
参数详解:
authtype basic#authtype命令:指定认证类型为:basic。
authname "my web site " #AuthName命令:指定认证区域名称。区域名称是在提示要求认证的对话框中显示给用户的。
authuserfile /etc/httpd/conf/passwd.secret #AuthUserFile命令:指定一个包含用户名和密码的文本文件,每行一对。
require命令 #指定哪些用户或组才能被授权访问。如:
require user user1 user2(只有用户user1和user2可以访问)
require valid-user (在AuthUserFile指定的文件中任何用户都可以访问)
访问测试:


 浙公网安备 33010602011771号