python 全栈开发,Day86(上传文件,上传头像,CBV,python读写Excel,虚拟环境virtualenv)
一、上传文件
上传一个图片
使用input type="file",来上传一个文件。注意:form表单必须添加属性enctype="multipart/form-data"
在views.py视图函数中,获取文件对象,必须使用request.FILES.get
新建项目upload_file,在项目中新建static文件夹,在文件夹里面分别创建js和upload目录。
在js目录中,放入文件jquery.min.js,下载地址为:https://cdn.bootcdn.net/ajax/libs/jquery/3.1.0/jquery.min.js
此时,目录结构如下:
./
├── app01
│   ├── admin.py
│   ├── apps.py
│   ├── __init__.py
│   ├── migrations
│   │   └── __init__.py
│   ├── models.py
│   ├── tests.py
│   └── views.py
├── manage.py
├── static
│   ├── js
│   │   └── jquery.min.js
│   └── upload
├── templates
└── untitled1
    ├── __init__.py
    ├── settings.py
    ├── urls.py
    └── wsgi.py
请仔细对比文件结构,不要缺少文件。
修改settings.py,定义static路径


STATIC_URL = '/static/'
STATICFILES_DIRS = (
    os.path.join(BASE_DIR,'static'),
)
修改urls.py,增加路径
from app01 import views
urlpatterns = [
    path('admin/', admin.site.urls),
    path('index/', views.index),
]
修改views.py,增加视图函数
from django.shortcuts import render,HttpResponse
import os
from upload_file import settings  # 导入settings。注意:upload_file为项目名

# Create your views here.
def index(request):
    if request.method == "GET":
        return render(request,'index.html')
    user = request.POST.get('user')
    # 获取文件对象,必须使用request.FILES.get
    avatar = request.FILES.get('avatar')
    print(user)
    print(avatar,type(avatar))
    print(avatar.__dict__)  # 查看对象所有属性
    # 文件存储的绝对路径
    path = os.path.join(settings.BASE_DIR, "static", "upload", avatar.name)
    with open(path,'wb') as f:
        # 将大文件分割成若干小文件处理,处理完每个小文件后释放该部分内存
        for line in avatar.chunks():
            f.write(line)  # 写入文件

    return HttpResponse('上传成功')
新建index.html
<!DOCTYPE html>
<html lang="en">
<head>
    <meta charset="UTF-8">
    <title>Title</title>
</head>
<body>
{#上传文件必须指定enctype="multipart/form-data"#}
<form method="post" enctype="multipart/form-data">
    {% csrf_token %}
    <lable>上传图片</lable>
    <input type="file" name="avatar"><br>
    <lable>用户名</lable>
    <input type="text" name="user">
    <input type="submit" value="提交">

</form>
</body>
</html>
启动项目,访问url: http://127.0.0.1:8000/index/
选择一个图片
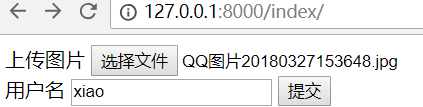
提示上传成功

在upload目录,就会多出一个图片 QQ图片20180327153648.jpg
上传按钮美化
所有好看的上传按钮,都是经过修饰的。那么它是如何做到的呢!原理如下:
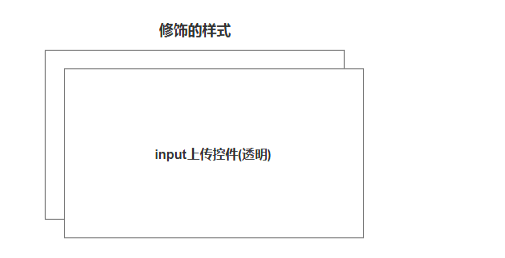
修饰的样式一般是用html做的,将前面的input上传控件变成透明。
那么用户看到的是一个经过修饰的按钮,实际点击的是input上传控件!
注意:上传控件的尺寸和后面的html控件,大小是一样的,比如div
举例:
修改index.html
<!DOCTYPE html>
<html lang="en">
<head>
    <meta charset="UTF-8">
    <title>Title</title>
</head>
<body>
{#上传文件必须指定enctype="multipart/form-data"#}
<form method="post" enctype="multipart/form-data">
    {% csrf_token %}
    <div style="position: relative;display: inline-block;height: 50px;min-width: 300px;overflow: hidden;">
        <div style="position: absolute;top: 0;left: 0;right: 0;bottom: 0;z-index: 1000;border: 1px dotted #9d9d9d;color: #9d9d9d;line-height: 50px;padding-left: 15px;">
            <i class="fa fa-cloud-upload" aria-hidden="true"></i>
            <span>点击上传文件</span>
        </div>
        {#opacity表示设置透明度,0表示完全透明#}
        <input name="avatar" type="file" id="avatarImg"
               style="position: absolute;top: 0;left: 0;right: 0;bottom: 0;background-color: #333333;z-index: 1001;opacity: 0;filter:alpha(opacity=0);">
    </div>
    <div>
        <lable>用户名: </lable><input type="text" name="user">
        <input type="submit" value="提交">
    </div>
</form>
<script src="/static/js/jquery.min.js"></script>
<script>
    $(function () {
        {#当元素的值发生改变时,会发生 change 事件#}
        $('#avatarImg').change(function (e) {
            {#event.currentTarget 属性是在事件冒泡阶段内的当前 DOM 元素,通常等于 this#}
            {#:file 选择器选取带有 type=file 的 input 元素#}
            {#0表示获取第一个元素,name表示获取文件名#}
            var fileName = e.currentTarget.files[0].name;
            {#prev() 获得匹配元素集合中每个元素紧邻的前一个同胞元素,通过选择器进行筛选是可选的#}
            {#$(this)表示上传控件,那么它前一个同胞元素为div style="position:...#}
            {#find() 方法获得当前元素集合中每个元素的后代,通过选择器、jQuery 对象或元素来筛选。#}
            {#text() 方法方法设置或返回被选元素的文本内容#}
            $(this).prev().find('span').text(fileName);
        })
    })
</script>
</body>
</html>
重新访问网页,效果如下:
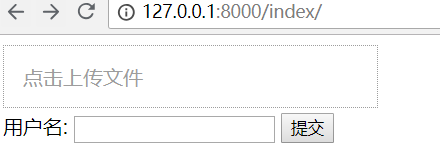
重新上传一个图片,效果如下:
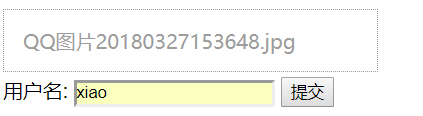
点击提交,提示上传成功!
这个是重点,考试必考!
二、上传头像
一般做上传头像功能,会有一个预览效果。总共有4种方法:
- createObjectURL
- FileReader
- FormData
- iframe
前2种,是在浏览器端可以做图片预览,没有上传图片到服务器!
后2种,图片需要上传到服务器。
兼容性效果对比: iframe > FormData > FileReader -> createObjectURL
iframe的兼容性是最好的,即使ie6也支持。FormData对浏览器,有一定要求
参考兼容性:
- https://developer.mozilla.org/zh-CN/docs/Web/API/URL/createObjectURL
- https://developer.mozilla.org/zh-CN/docs/Web/API/FileReader
- https://developer.mozilla.org/zh-CN/docs/Web/API/FormData
createObjectURL
举例:
修改urls.py,增加路径
urlpatterns = [
    path('admin/', admin.site.urls),
    path('index/', views.index),
    path('upload_file/', views.upload_file),
]
修改views.py,增加视图函数
def upload_file(request):
    if request.method == "GET":
        print(11)
        return render(request,'upload_file.html')

    user = request.POST.get('user')
    avatar = request.FILES.get('avatar')
    # 文件存储的绝对路径
    path = os.path.join(settings.BASE_DIR, "static", "upload", avatar.name)
    with open(path,'wb') as f:
        for line in avatar.chunks():
            f.write(line)
    return HttpResponse('上传成功')
在static目录下创建images文件夹,然后存放一个图片default.png,大家自己网上随便下载一个图片即可。
创建upload_file.html,注意:不是所有浏览器都有createObjectURL
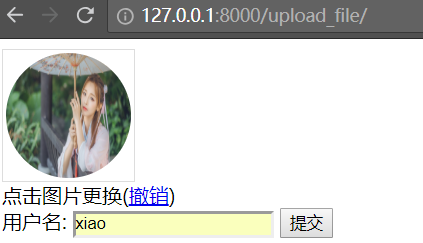
<!DOCTYPE html>
<html lang="en">
<head>
    <meta charset="UTF-8">
    <title>Title</title>
</head>
<body>
<form method="post" enctype="multipart/form-data">
    {% csrf_token %}
    <div style="height: 100px;width: 100px;padding: 2px;border: 1px solid #dddddd;position: relative;">
        <img style="height: 100%;width: 100%;border: 0;overflow: hidden;border-radius: 50%;" id="previewImg"
             src="/static/images/default.png">
        <input style="top: 0;left: 0;right: 0;bottom: 0;opacity: 0;position: absolute;z-index: 102;" id="avatarImg"
               name="avatar" type="file" class="img-file"/>
    </div>
    <div>点击图片更换(<a href="#">撤销</a>)</div>

    <lable>用户名:</lable>
    <input type="text" name="user">
    <input type="submit" value="提交">
</form>
<script src="/static/js/jquery.min.js"></script>
<script>
    {#浏览器加载资源完成后#}
    $(function () {
        {#执行函数#}
        bindChangeAvatar1();
    });

    function bindChangeAvatar1() {
        {#绑定change事件#}
        $('#avatarImg').change(function () {
            {#$(this)表示input上传控件,0表示第一个元素#}
            {#files[0] 获取file input中的File对象#}
            var file_obj = $(this)[0].files[0];
            console.log(file_obj);
            {#通过createObjectURL读取对象,生成url#}
            var blob = window.URL.createObjectURL(file_obj);
            {#修改src的值#}
            document.getElementById('previewImg').src = blob;
            {#load() 当资源加载完成之后才会执行#}
            $('#previewImg').on('load', function() {
                {#revokeObjectURL释放对象#}
                window.URL.revokeObjectURL(blob);
            })
        })
    }
</script>
</body>
</html>
访问url: http://127.0.0.1:8000/upload_file/
点击图片更改,可以发现图片会立即更换。注意:这个更换仅仅是前端js完成的,刷新页面后,还是会还原的。

FileReader
举例:
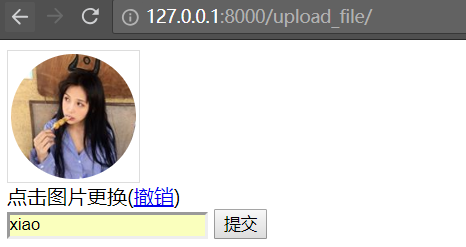
修改upload_file.html里面的js代码即可,readAsDataURL也有兼容问题
<!DOCTYPE html>
<html lang="en">
<head>
    <meta charset="UTF-8">
    <title>Title</title>
</head>
<body>
<form method="post" enctype="multipart/form-data">
    {% csrf_token %}
    <div style="height: 100px;width: 100px;padding: 2px;border: 1px solid #dddddd;position: relative;">
        <img style="height: 100%;width: 100%;border: 0;overflow: hidden;border-radius: 50%;" id="previewImg"
             src="/static/images/default.png">
        <input style="top: 0;left: 0;right: 0;bottom: 0;opacity: 0;position: absolute;z-index: 102;" id="avatarImg"
               name="avatar" type="file" class="img-file"/>
    </div>
    <div>点击图片更换(<a href="#">撤销</a>)</div>

    <lable>用户名:</lable>
    <input type="text" name="user">
    <input type="submit" value="提交">
</form>
<script src="/static/js/jquery.min.js"></script>
<script>
    $(function () {
        bindChangeAvatar2();
    });

    function bindChangeAvatar2() {
        $('#avatarImg').change(function () {
            var file_obj = $(this)[0].files[0];
            //使用fileReader对文件对象进行操作
            var reader = new FileReader();
            //readAsDataURL 将文件读取为 DataURL
            reader.readAsDataURL(file_obj);
            //onload 事件会在页面或图像加载完成后立即发生
            reader.onload = function (e) {
                // 修改src属性
                $('#previewImg')[0].src = this.result;
            };
        })
    }
</script>
</body>
</html>
点击图片更改,可以发现图片会立即更换。
FormData
上面的保存图片方式有问题,因为用户上传的图片,可能会重名。为了解决这个问题,需要使用uuid模块。
uuid
UUID是128位的全局唯一标识符,通常由32字节的字符串表示。
它可以保证时间和空间的唯一性,也称为GUID,全称为:
UUID —— Universally Unique IDentifier。Python 中叫 UUID
它通过MAC地址、时间戳、命名空间、随机数、伪随机数来保证生成ID的唯一性。
UUID主要有五个算法,也就是五种方法来实现:
1、uuid1()——基于时间戳

       由MAC地址、当前时间戳、随机数生成。可以保证全球范围内的唯一性,
       但MAC的使用同时带来安全性问题,局域网中可以使用IP来代替MAC。

2、uuid2()——基于分布式计算环境DCE(Python中没有这个函数)

        算法与uuid1相同,不同的是把时间戳的前4位置换为POSIX的UID。
        实际中很少用到该方法。

3、uuid3()——基于名字的MD5散列值

        通过计算名字和命名空间的MD5散列值得到,保证了同一命名空间中不同名字的唯一性,
        和不同命名空间的唯一性,但同一命名空间的同一名字生成相同的uuid。

4、uuid4()——基于随机数

        由伪随机数得到,有一定的重复概率,该概率可以计算出来。

5、uuid5()——基于名字的SHA-1散列值

        算法与uuid3相同,不同的是使用 Secure Hash Algorithm 1 算法
使用方面:
首先,Python中没有基于DCE的,所以uuid2可以忽略;
其次,uuid4存在概率性重复,由无映射性,最好不用;
再次,若在Global的分布式计算环境下,最好用uuid1;
最后,若有名字的唯一性要求,最好用uuid3或uuid5。
编码方法:
# -*- coding: utf-8 -*-
import uuid

name = "test_name"
namespace = "test_namespace"

print(uuid.uuid1())  # 带参的方法参见Python Doc
print(uuid.uuid3(namespace, name))
print(uuid.uuid4())
print(uuid.uuid5(namespace, name))
修改urls.py,增加路径form_data_upload,用来和ajax交互的
urlpatterns = [
    path('admin/', admin.site.urls),
    path('index/', views.index),
    path('upload_file/', views.upload_file),
    path('form_data_upload/', views.form_data_upload),
]
修改upload_file视图函数,使用uuid,完整代码如下:
import os
import json
import uuid
from django.shortcuts import render,HttpResponse
from upload_file import settings  # 导入settings。注意:upload_file为项目名


# Create your views here.
def index(request):
    if request.method == "GET":
        return render(request,'index.html')
    user = request.POST.get('user')
    # 获取文件对象,必须使用request.FILES.get
    avatar = request.FILES.get('avatar')
    print(user)
    print(avatar,type(avatar))
    print(avatar.__dict__)  # 查看对象所有属性
    # 文件存储的绝对路径
    path = os.path.join(settings.BASE_DIR, "static", "upload", avatar.name)
    with open(path,'wb') as f:
        # 将大文件分割成若干小文件处理,处理完每个小文件后释放该部分内存
        for line in avatar.chunks():
            f.write(line)  # 写入文件

    return HttpResponse('上传成功')

def upload_file(request):
    if request.method == "GET":
        return render(request, 'upload_file.html')

    # 直接获取图片地址即可,因为ajax已经将图片上传了
    avatar = request.POST.get('avatar')
    user = request.POST.get('user')

    print(avatar,user)
    return HttpResponse("上传成功")

def form_data_upload(request):
    """
    ajax上传文件
    :param request:
    :return:
    """
    img_upload = request.FILES.get('img_upload')  # 获取文件对象
    # 生成随机文件名
    file_name = str(uuid.uuid4()) + "." + img_upload.name.rsplit('.', maxsplit=1)[1]
    # 文件保存到static下的images目录
    img_file_path = os.path.join('static', 'images', file_name)
    with open(img_file_path, 'wb') as f:  # 写入问题
        for line in img_upload.chunks():
            f.write(line)
    # 因为ajax发送的图片路径的static前面没有带/,所以这里要拼接一下
    return HttpResponse(os.path.join("/",img_file_path))
修改upload_file.html,要全部修改
<!DOCTYPE html>
<html lang="en">
<head>
    <meta charset="UTF-8">
    <title>Title</title>
</head>
<body>
{% csrf_token %}
<div style="height: 100px;width: 100px;padding: 2px;border: 1px solid #dddddd;position: relative;">
    <img style="height: 100%;width: 100%;border: 0;overflow: hidden;border-radius: 50%;"
         id="previewImg"
         src="/static/images/default.png">
    <input style="top: 0;left: 0;right: 0;bottom: 0;opacity: 0;position: absolute;z-index: 102;" id="avatarImg"
           name="avatar_img" type="file" class="img-file"/>
</div>
<div>点击图片更换(<a href="#">撤销</a>)</div>

<form method="post" enctype="multipart/form-data">
    {% csrf_token %}
    <div>
        <input type="hidden" name="avatar" id="avatar">
        <input type="text" name="user">
        <input type="submit" value="提交">
    </div>
</form>
<script src="/static/js/jquery.min.js"></script>
    <script>
        $(function () {
            bindChangeAvatar3();
        });

        function bindChangeAvatar3() {
            $('#avatarImg').change(function () {
                var csrf = $("[name=csrfmiddlewaretoken]").val();
                var file_obj = $(this)[0].files[0];
                var formdata = new FormData();
                formdata.append('img_upload', file_obj);
                formdata.append("csrfmiddlewaretoken",csrf);
                $.ajax({
                    url: '/form_data_upload/',
                    type:'POST',
                    data: formdata,
                    processData: false,  // tell jQuery not to process the data
                    contentType: false,  // tell jQuery not to set contentType
                    success: function (arg) {
                        // 给img标签设置src属性,预览
                        console.log(arg);
                        $('#previewImg').attr('src',arg);
                        console.log(arg);
                        var avatar = $('#avatar').val(arg);
                        console.log(avatar);  //打印头像地址,用于后续表单提交
                    }
                })
            })
        }
    </script>
</body>
</html>
访问网页,上传一张图片
点击提交,提示上传成功

查看upload目录,会多一个文件 d405ecde-59bc-40f0-a2eb-c8dfe8c8645f.jpg
注意:form_data_upload和upload_file虽然都处理了POST数据。但是它们接收的数据是不一样的!
用户点击上传时,走form_data_upload视图函数,将图片上传到服务器
用户点击提交时,将服务器的图片url地址和用户名提交给upload_file视图函数。
为什么呢?因为用户点击上传时,已经将图片上传到服务器了。所以点击提交按钮时,需要再将图片上传一次。
只需要将图片的url地址传给服务器即可!
iframe
所有浏览器都支持 <iframe> 标签,它是兼容性最好的一种方式
iframe 元素会创建包含另外一个文档的内联框架(即行内框架)
举例:内嵌汽车之家
创建文件iframe.html
<!DOCTYPE html>
<html lang="en">
<head>
    <meta charset="UTF-8">
    <title>Title</title>
</head>
<body>
<iframe style="width: 960px;height: 800px;" src="https://www.autohome.com.cn/beijing/" frameborder="0"></iframe>
</body>
</html>
直接使用谷歌浏览器打开,效果如下:
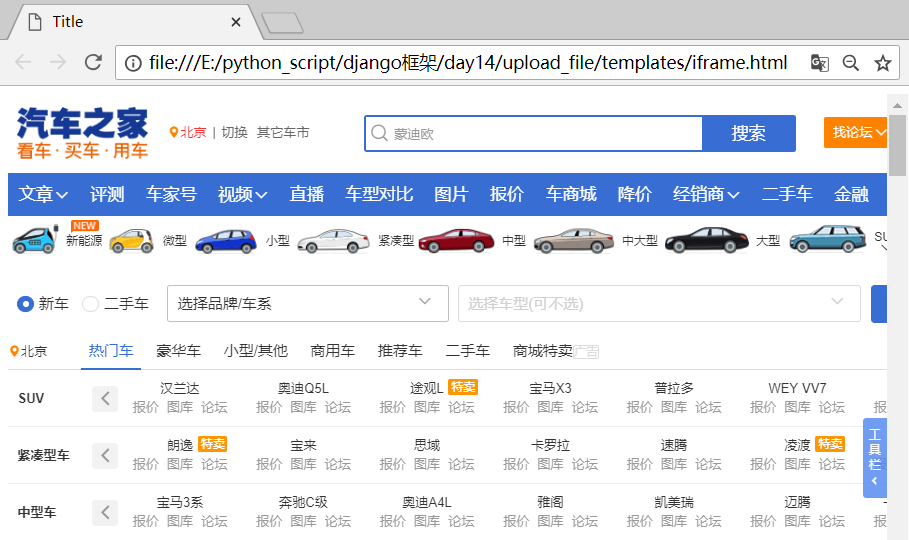
它直接内嵌了一个网页,如果width和height设置合理的话,打开网页,将会和汽车直接,是一摸一样的。
举例2:输入什么地址,就跳转什么地址
修改iframe.html,增加一个输入框,加入一段js代码。
<!DOCTYPE html>
<html lang="en">
<head>
    <meta charset="UTF-8">
    <title>Title</title>
</head>
<body>
<input type="text" id="addr">
<input type="submit" onclick="changeUrl()" value="访问">
<iframe id="ifr" style="width: 960px;height: 800px;" src="https://www.autohome.com.cn/beijing/" frameborder="0"></iframe>
<script>
    function changeUrl() {
        //获取输入框的值
        var addr = document.getElementById("addr").value;
        //修改iframe的src的值
        document.getElementById("ifr").src = addr;
    }
</script>
</body>
</html>
访问页面,效果如下:
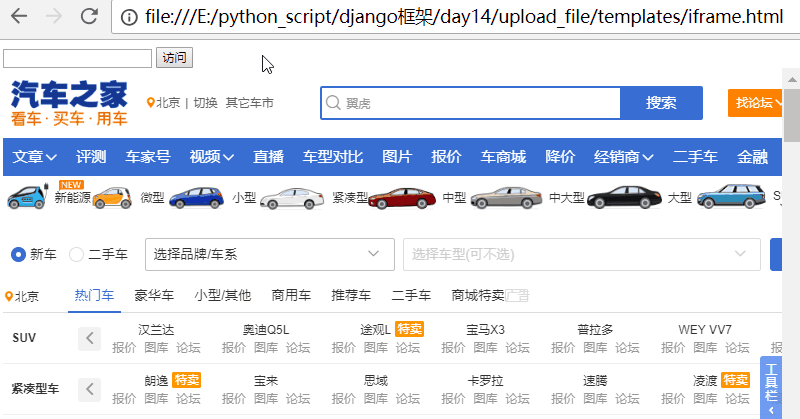
注意:整体页面并没有刷新,只是iframe里面刷新了!
它有2个应用场景:
1. iframe标签
可以修改src,且页面不刷新
2. form表单
提交表单数据,但刷新数据
修改urls.py,增加路径
urlpatterns = [
    path('admin/', admin.site.urls),
    path('index/', views.index),
    path('upload_file/', views.upload_file),
    path('form_data_upload/', views.form_data_upload),
    path('iframe_upload_img/', views.iframe_upload_img),
    path('upload_iframe/', views.upload_iframe),
]
修改views.py,增加视图函数
def iframe_upload_img(request):
    if request.method == "GET":
        return render(request,'iframe_upload_img.html')

    USER_LIST = []  # 空列表
    user = request.POST.get('user')
    pwd = request.POST.get('pwd')
    avatar = request.POST.get('avatar')
    # 最加到列表中
    USER_LIST.append(
        {
            'user':user,
            'pwd':pwd,
            'avatar':avatar
        }
    )
    return HttpResponse("上传成功")

def upload_iframe(request):  # iframe post提交
    ret = {'status':True,'data':None}
    try:
        avatar = request.FILES.get('avatar')
        file_name = str(uuid.uuid4()) + "." + avatar.name.rsplit('.', maxsplit=1)[1]
        img_file_path = os.path.join('static', 'upload', file_name)
        with open(img_file_path, 'wb') as f:
            for line in avatar.chunks():
                f.write(line)
        ret['data'] = os.path.join("/",img_file_path)

    except Exception as e:
        ret['status'] = False
        ret['error'] = '上传失败'

    return HttpResponse(json.dumps(ret))
增加iframe_upload_img.html
<!DOCTYPE html>
<html lang="en">
<head>
    <meta charset="UTF-8">
    <title>Title</title>
</head>
<body>
     <div style="height: 100px;width: 100px;padding: 2px;border: 1px solid #dddddd;position: relative;">
            <iframe style="display: none;" id="ifr" name="fffff"></iframe>
            <form method="POST" action="/upload_iframe/" enctype="multipart/form-data" target="fffff">
                {% csrf_token %}
                <img style="height: 100px;width: 100px;border: 0;overflow: hidden;border-radius: 50%;" id="prevImg"
                     src="/static/images/default.png">
                <input style="top: 0;left: 0;right: 0;bottom: 0;opacity: 0;position: absolute;z-index: 102;"
                       id="avatar"
                       name="avatar" type="file" class="img-file"/>
            </form>
        </div>

     <form method="post" action="/iframe_upload_img/">
         {% csrf_token %}
         <input type="text" name="avatar" id="formAvatar" style="display: none">
         <input type="text" name="user" placeholder="请输入用户名">
         <input type="submit" value="提交">
     </form>

    <script src="/static/js/jquery.min.js"></script>
    <script>
        $(function () {
            bindChangeAvatar4();
        });

         function bindChangeAvatar4() {
            $('#avatar').change(function () {
                //parent该变量指的是包含当前分割窗口的父窗口
                $(this).parent().submit();
                //onload 事件会在页面或图像加载完成后立即发生
                $('#ifr')[0].onload = function (){
                    //获取post返回值,比如{"status": true, "data": "/static\\upload\\bc72823e-b274-4a76-8ec2-af844a738959.jpg"}
                    var iframeContents = $('#ifr')[0].contentWindow.document.body.innerText;
                    console.log(iframeContents);
                    //反向序列化数据
                    iframeContents = JSON.parse(iframeContents);
                    if (iframeContents.status) {
                        //修改图片的src属性
                        $('#prevImg').attr('src', iframeContents.data);
                        //修改隐藏输入框的值
                        $('#formAvatar').val(iframeContents.data);
                    }
                }

            })
        }

    </script>
</body>
</html>
访问url: http://127.0.0.1:8000/iframe_upload_img/
上传一个图片
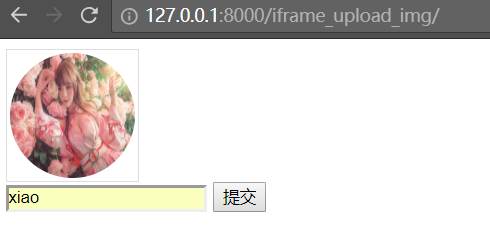
点击提交,提示上传成功

查看upload目录,会多一个文件 de83205e-2e8b-4839-a1c4-19656df9c49f.jpg
总结:
1. 在浏览器端可以做图片预览
    - createObjectURL
    - FileReader

2. 使用Ajax上传文件:
    - FormData对象

3. 伪ajax上传文件:
    - iframe
    - form

4. 图片预览
    本质就是修改img的src数据

5. 使用场景:
    a. 文件上传
        - FormData对象
        - iframe

    b. 图片预览
        - createObjectURL、FileReader
        - iframe
文件上传场景:
假如是政府,或者传统企业,使用最后一种
假如是互联网企业,使用第3种!
三、CBV
CBV(class base views) 就是在视图里使用类处理请求
之前我们写的视图函数,都是FBV(function base views)
路径url的配置
cbv 顾名知义就是通过类的方法来调用,我们在url中配置为如下路径
path('user/', views.UserView.as_view()),
这里的UserView是一个class 类,View不是必须的。一般约定成俗,会加一个View!
要想使用此方法,这个路径后面还得必须有一个as_view()这个是必须的固定格式
views里面函数的格式
在views里面配置类,需要导入一个模块View
from django.views import View
#这里必须要继承View这个类,只有继承了这个url那里的as_view()才会有这个方法
class UserView(View):
    def get(self, request):
        return HttpResponse('cbv-get')

    def post(self, request):
        return HttpResponse('cbv-post')
注意:get和post的方法名,必须是小写。因为在源码中,使用了request.method.lower(),通过反射来找到类中的方法!
详情请参考下面的内容
get方式访问

post方式访问
login登陆页面
修改views.py
from django.views import View
#这里必须要继承View这个类,只有继承了这个url那里的as_view()才会有这个方法
class UserView(View):
    def get(self, request):
        # return HttpResponse('cbv-get')
        return render(request, 'login.html')  # 发送到login.html

    def post(self, request):
        return HttpResponse('cbv-post')
新建login.html
<!DOCTYPE html>
<html lang="en">
<head>
    <meta charset="UTF-8">
    <title>Title</title>
</head>
<body>
<form action="" method="post">
    {% csrf_token %}
    <input type="text" name="username">
    <input type="submit" value="提交">
</form>
</body>
</html>
访问页面,点击提交

输出:

这里通过查看View的源码,可以看到里面会有很多种提交方法
http_method_names = ['get', 'post', 'put', 'patch', 'delete', 'head', 'options', 'trace']
使用ajax的时候这些方法都是可以使用的。
cbv匹配原理
这种根据url来匹配方法的是通过反射方法(getattr)来做的。请求过来后先走dispatch这个方法,这个方法存在View类中。
def dispatch(self, request, *args, **kwargs):
    # Try to dispatch to the right method; if a method doesn't exist,
    # defer to the error handler. Also defer to the error handler if the
    # request method isn't on the approved list.
    if request.method.lower() in self.http_method_names:
        handler = getattr(self, request.method.lower(), self.http_method_not_allowed)
    else:
        handler = self.http_method_not_allowed
    return handler(request, *args, **kwargs)
request.method.lower() 将请求方式变成小写。通过反射来找到类中对应的方法!
所有的框架,本质都是通过请求方式,反射不同的函数!
所以CBV的本质,实际还是用的FBV,只不过了类封装而已!
定制dispatch
如果需要批量对方法,例如get,post等方法做一些操作的时候,这里我们可以手动写一个dispatch,这个dispatch就和装饰器的效果一样。因为请求来的时候总是先走的dispatch。
from django.views import View
#这里必须要继承View这个类,只有继承了这个url那里的as_view()才会有这个方法
class UserView(View):
    def dispatch(self, request, *args, **kwargs):
        print('操作前的代码...')
        obj = super(UserView, self).dispatch(request, *args, **kwargs)
        print('操作后的代码...')
        return obj

    def get(self, request):
        # return HttpResponse('cbv-get')
        return render(request, 'login1.html')  # 发送到login.html

    def post(self, request):
        return HttpResponse('cbv-post')
这次我们再通过浏览器访问的时候,发现不管get或者post方法,都会走print代码

四、python读写Excel
python操作excel主要用到xlrd和xlwt这两个库,即xlrd是读excel,xlwt是写excel的库。
需要安装2个模块
pip3 install xlrd
pip3 install xlwt
读excel-->xlrd
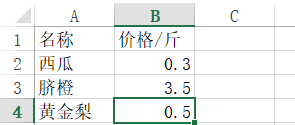
新建一个excel,文件名为fruits.xlsx,内容如下:
抛开django框架,新建一个test.py文件
import xlrd
#打开excel文件,创建一个workbook对象,book对象也就是fruits.xlsx文件,表含有sheet名
rbook=xlrd.open_workbook(r'C:\Users\xiao\Desktop\fruits.xlsx')
#sheets方法返回对象列表,[<xlrd.sheet.Sheet object at 0x103f147f0>]
rbook.sheets()
# xls默认有3个工作簿,Sheet1,Sheet2,Sheet3
rsheet=rbook.sheet_by_index(0)  # 取第一个工作簿
#获取总行数
rows=rsheet.nrows
#获取总列数
cols=rsheet.ncols
print('行数:',rows,'列数',cols)
#通过cell的位置坐标取得cell值
cell=rsheet.cell(0,0)
print('0,0坐标的值是:',cell.value)
print('3,1坐标的值是:',rsheet.cell(3,1).value)
#取得第二行的值,参数是(行数,起点,终点)
row1=rsheet.row_values(1)
print('第一行的值是:',row1)
执行输出:
行数: 4 列数 2
0,0坐标的值是: 名称
3,1坐标的值是: 0.5
第一行的值是: ['西瓜', 0.3]
注意:a1单元格的坐标为0,0。在xlrd模块里面,坐标都是数字,所以不能用a1表示。
坐标如下:
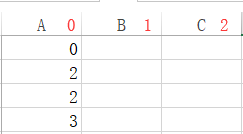
A,B,C纵坐标分别为0,1,2
所以3,1坐标的值是最后一行的价格,也就是0.5
循环工作簿的所有行和列
在末尾增加以下代码
# 循环工作簿的所有行
for row in rsheet.get_rows():
    # 循环一行的所有列
    for col in row:
        # 获取一个单元格中的值
        print(col.value)
执行输出:
名称
价格/斤
西瓜
0.3
脐橙
3.5
黄金梨
0.5
写excel-->xltw
import xlwt
f = xlwt.Workbook()
sheet1 = f.add_sheet('学生',cell_overwrite_ok=True)
row0 = ["姓名","年龄","出生日期","爱好"]
colum0 = ["张三","李四","王五"]
#写第一行
for i in range(0,len(row0)):
    sheet1.write(0,i,row0[i])

#写第一列
for i in range(0,len(colum0)):
    sheet1.write(i+1,0,colum0[i])

# 写入一行数据
sheet1.write(1,1,"23")
sheet1.write(1,2,"1990")
sheet1.write(1,3,"女")

f.save('test.xls')
执行程序,查看excel文件

OpenPyXL
由于xlrd不能对已存在的xlsx文件,进行修改!所以必须使用OpenPyXL
OpenPyXL:较好的支持对xlsx文件的修改,功能比较强大,适用于需要处理XLSX文件,需要修改XLSX文件中的值,最后生成xlsx。openpyxl(可读写excel表)专门处理Excel2007及以上版本产生的xlsx文件,xls和xlsx之间转换容易
注意:如果文字编码是“gb2312” 读取后就会显示乱码,请先转成Unicode。
官网上最推荐的是openpyxl:
综上,所以选择使用OpenPyX来做一个修改excel的小程序。
OpenPyXL的官网参考:
https://openpyxl.readthedocs.io/en/latest/usage.html
https://openpyxl.readthedocs.io/en/stable/
1、OpenPyXL模块的安装
pip3 install openpyxl
2、快速实现xlsx文件的单元格修改
举例:增加一列地区,并增加相应的值
from openpyxl import load_workbook
#excel文件绝对路径
file_home = r'C:\Users\xiao\Desktop\fruits.xlsx'

wb = load_workbook(filename= file_home)  # 打开excel文件
sheet_ranges = wb['Sheet1']
print(sheet_ranges['A1'].value)  # 打印A1单元格的值
ws = wb['Sheet1'] #根据Sheet1这个sheet名字来获取该sheet
ws["C1"] = '地区'   #修改C1的值为LJK5679842
ws['C2'] = '湖北'
ws['C3'] = '云南'
ws['C4'] = '四川'
wb.save(file_home)    #保存修改后的excel
执行代码,查看excel文件

五、虚拟环境virtualenv
windows 安装
安装模块virtualenv
pip3 install virtualenv
安装纯净环境
–no-site-packages表示不包括系统全局的Python安装包,这样会更令环境更干净
E:\python_script>virtualenv --no-site-packages pure_venv
Using base prefix 'c:\\python35'
New python executable in E:\python_script\pure_venv\Scripts\python.exe
Installing setuptools, pip, wheel...done.
E:\python_script>cd pure_venv
E:\python_script\pure_venv>cd Scripts
激活虚拟环境
E:\python_script\pure_venv\Scripts>activate.bat
查看当前模块列表
(pure_venv) E:\python_script\pure_venv\Scripts>pip3 list
Package    Version
---------- -------
pip        10.0.1
setuptools 40.0.0
wheel      0.31.1
安装指定版本的django
(pure_venv) E:\python_script\pure_venv\Scripts>pip3 install django==1.11
打开Pcharm,新建一个django项目
点击...
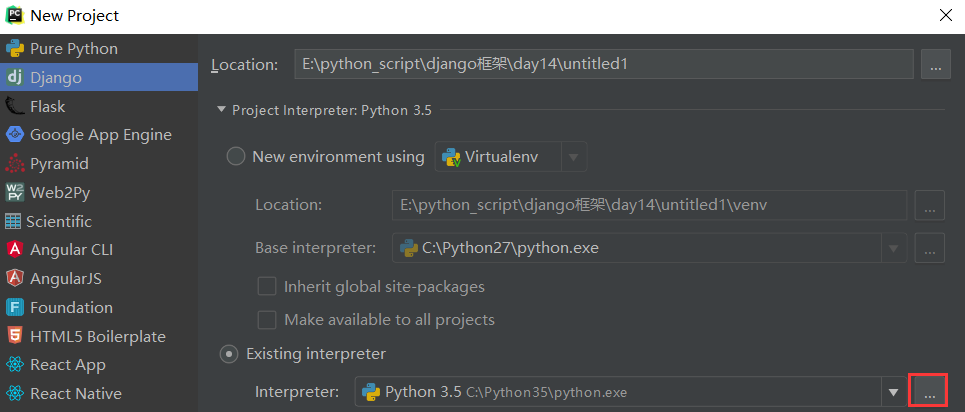
选择虚拟环境,点击...

选择虚拟目录的python.exe
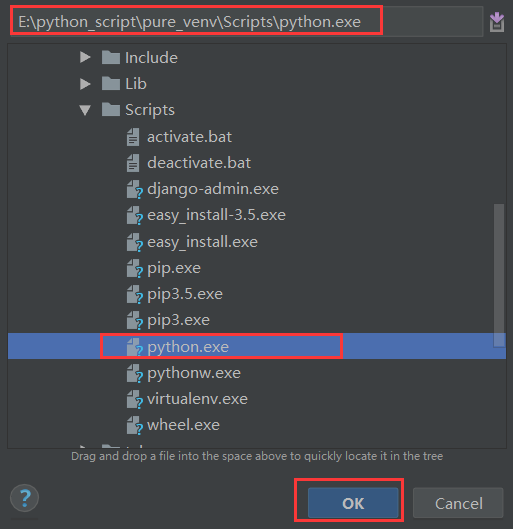
选择刚才添加的虚拟环境
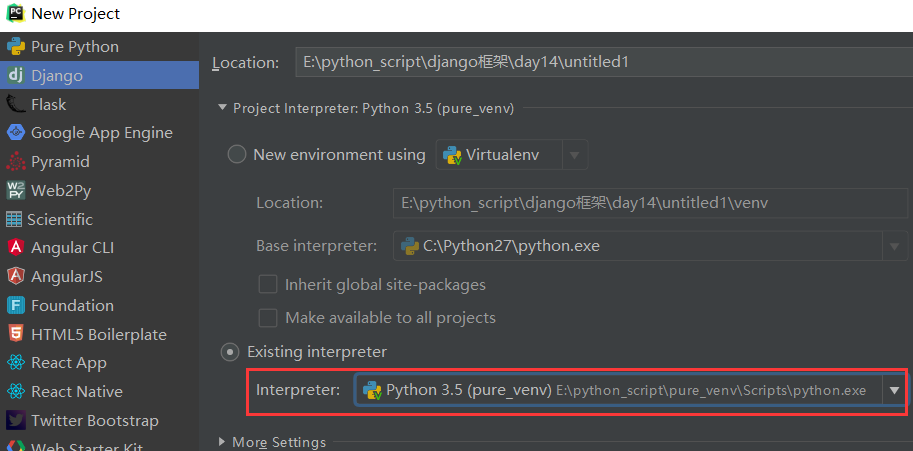
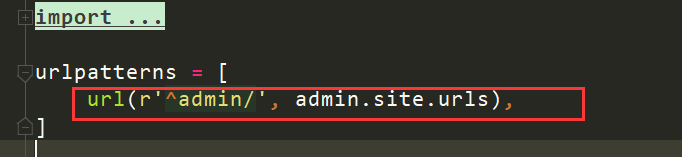
创建项目之后,发现url就是老版本的了!
pip安装包临时指定 从国内的清华pip源下载:
pip install django==1.11.11 -i https://pypi.tuna.tsinghua.edu.cn/simple
将虚拟环境的依赖包关系导出到requirements.txt
pip freeze > requirements.txt
注意:约定成熟使用requirements.txt,一些开源的django项目,里面一般使用这个名字!
查看requirements.txt文件,内容如下:
Django==1.11.11
pytz==2018.5
如果需要按照 requirements.txt 安装项目依赖的第三方包,使用命令:
pip install -r requirements.txt
新建一个虚拟环境,测试一下,就可以了!
linux安装
# 安装virtualenv
/usr/local/python3.5/bin/pip3 install virtualenv
# 创建虚拟目录
mkdir /virtualenvs
cd /virtualenvs
# 创建虚拟环境
# -p 指定python版本
# –no-site-packages表示不包括系统全局的Python安装包,这样会更令环境更干净
/usr/local/python3.5/bin/virtualenv -p /usr/local/python3.5/bin/python3.5 --no-site-packages venv
指定豆瓣源
#创建目录
mkdir ~/.pip
# 编辑配置文件
vi ~/.pip/pip.conf
内容如下:
[global]
index-url = http://pypi.douban.com/simple
trusted-host = pypi.douban.com
安装相关模块
# django指定版本为1.11
/virtualenvs/venv/bin/pip3 install django==1.11
# rest-framework
/virtualenvs/venv/bin/pip3 install djangorestframework
# 监控内存模块
 /virtualenvs/venv/bin/pip3 install memory_profiler
作业:
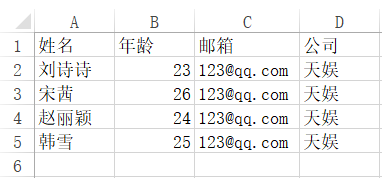
1.客户表,放到excel文件中。使用excel上传,将数据导入到数据中!
2.增加登录页面
答案:
1.excel文件上传
新建一个excel文件,比如客户表.xlsx,内容如下:
新建一个项目excel_upload
操作excel,需要安装2个模块。xlrd用来读取,xlwt用来写入!
pip3 install xlrd
pip3 install xlwt
修改settings.py,增加static路径
STATIC_URL = '/static/'
STATICFILES_DIRS = (
    os.path.join(BASE_DIR,'static'),
)
新建目录static,在里面创建2个目录,js和file。file用来存放上传的excel文件
将jquery.min.js放到js目录中!
修改models.py,增加客户表模型
from django.db import models

# Create your models here.
class Customer(models.Model):
    name = models.CharField(max_length=32,verbose_name="姓名")
    age = models.IntegerField(verbose_name="年龄")
    email = models.CharField(max_length=32,verbose_name="邮箱")
    company = models.CharField(max_length=32,verbose_name="公司")
使用2个命令,生成表
python manage.py makemigrations
python manage.py migrate
修改urls.py,增加2个路径
from app01 import views
urlpatterns = [
    path('admin/', admin.site.urls),
    path('upload_file/', views.upload_file),
    path('index/', views.index),
]
修改views.py,增加视图函数
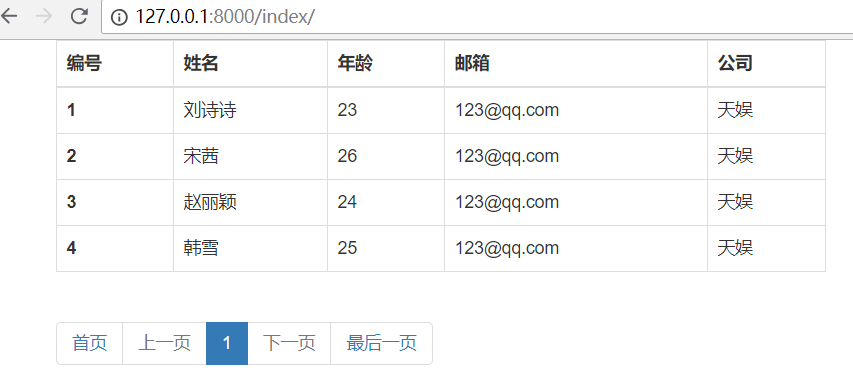
import os
import uuid
import xlrd
from app01 import models
from excel_upload import settings
from django.shortcuts import render, HttpResponse, redirect
from django.core.paginator import Paginator, EmptyPage, PageNotAnInteger

# Create your views here.

def upload_file(request):  # 上传文件
    if request.method == "GET":
        return render(request, 'upload_file.html')

    user = request.POST.get('user')
    file_upload = request.FILES.get('customer_excel')  # 获取excel文件对象
    # 判断上传的文件后缀
    if file_upload.name.rsplit('.', maxsplit=1)[1] not in ['xls','xlsx']:
        return HttpResponse('上传失败,只能上传xls格式')
    # 生成唯一的文件名
    file_name = str(uuid.uuid4()) + '.' + file_upload.name.rsplit('.', maxsplit=1)[1]
    # 拼接路径
    img_file_path = os.path.join('static', 'files', file_name)
    print(img_file_path)

    with open(img_file_path, 'wb') as f:  # 写入文件
        for line in file_upload.chunks():
            f.write(line)

    # 拼接excel文件的绝对路径
    file_path = os.path.join(settings.BASE_DIR, img_file_path)
    print(file_path)
    # 打开excel表
    data = xlrd.open_workbook(file_path)
    table = data.sheet_by_index(0)  # 读取第一个sheet
    nrows = table.nrows  # 获得总行数
    date_list = []  # 定义空列表,用来批量插入
    try:
        for i in range(1, nrows):  # 读取每一行数据
            rows = table.row_values(i)  # 行的数据放在数组里
            # 生成对象
            obj_list = models.Customer(name=rows[0],
                                       age=rows[1],
                                       email=rows[2],
                                       company=rows[3],

                                       )
            # 追加到列表中
            date_list.append(obj_list)

        # 使用bulk_create批量插入
        models.Customer.objects.bulk_create(date_list)

    except Exception as e:
        return HttpResponse('批量添加失败{}'.format(e))

    return redirect('/index/')  # 跳转首页


def index(request):  # 首页展示数据
    customer_list = models.Customer.objects.all()  # 读取表中的所有数据
    # print()
    paginator = Paginator(customer_list, 20)  # 每页显示2条

    # 异常判断
    try:
        # 当前页码,如果取不到page参数,默认为1
        current_num = int(request.GET.get("page", 1))  # 当前页码
        customer_list = paginator.page(current_num)  # 获取当前页码的数据
    except EmptyPage:  # 页码不存在时,报EmptyPage错误
        customer_list = paginator.page(1)  # 强制更新为第一页

    #  如果页数十分多时,换另外一种显示方式
    if paginator.num_pages > 9:  # 一般网页展示11页,左5页,右5页,加上当前页,共11页
        if current_num - 4 < 1:  # 如果前5页小于1时
            pageRange = range(1, 9)  # 页码的列表:范围是初始状态
        elif current_num + 4 > paginator.num_pages:  # 如果后5页大于总页数时
            # 页码的列表:范围是(当前页-5,总页数+1)。因为range顾头不顾尾,需要加1
            pageRange = range(current_num - 4, paginator.num_pages + 1)
        else:
            # 页码的列表:后5页正常时,页码范围是(当前页-5,当前页+6)。注意不是+5,因为range顾头不顾尾!
            pageRange = range(current_num - 4, current_num + 5)
    else:
        pageRange = paginator.page_range  # 页码的列表

    data = {"customer_list": customer_list, "paginator": paginator, "current_num": current_num, "pageRange": pageRange}
    return render(request, "index.html", data)
创建文件index.html
<!DOCTYPE html>
<html lang="en">
<head>
    <meta charset="UTF-8">
    <title>Title</title>
    <link rel="stylesheet" href="https://cdn.bootcss.com/bootstrap/3.3.7/css/bootstrap.min.css">
</head>
<body>
{#数据展示#}
<div class="container">
    <div class="row">
        <div class="col-md-8">
            <table class="table table-bordered">
                <thead>
                <tr>
                    <th>编号</th>
                    <th>姓名</th>
                    <th>年龄</th>
                    <th>邮箱</th>
                    <th>公司</th>
                </tr>
                </thead>
                <tbody>
                {% for customer in customer_list %}
                    <tr>
                        <th scope="row">{{ forloop.counter }}</th>
                        <td>{{ customer.name }}</td>
                        <td>{{ customer.age }}</td>
                        <td>{{ customer.email }}</td>
                        <td>{{ customer.company }}</td>
                    </tr>
                {% endfor %}
                </tbody>
            </table>
            {#分页展示#}
            <nav aria-label="Page navigation">
                <ul class="pagination">
                    <li><a href="?page=1" aria-label="Previous"><span aria-hidden="true">首页</span></a></li>

                    {#has_previous 判断是否有上一页#}
                    {% if customer_list.has_previous %}
                        {#previous_page_number 上一页的页码#}
                        <li><a href="?page={{ customer_list.previous_page_number }}" aria-label="Previous"><span
                                aria-hidden="true">上一页</span></a></li>
                    {% else %}
                        {#class="disabled" 禁止用户点击#}
                        <li class="disabled"><a href="" aria-label="Previous"><span aria-hidden="true">上一页</span></a>
                        </li>
                    {% endif %}

                    {#遍历页码的列表#}
                    {% for i in pageRange %}
                        {#判断当前页码数等于底部页码时#}
                        {% if current_num == i %}
                            {#增加class,加深按钮#}
                            <li class="active"><a href="?page={{ i }}">{{ i }}</a></li>
                        {% else %}
                            {#href参数为简写,它会自动获取当前路径,并拼接参数#}
                            <li><a href="?page={{ i }}">{{ i }}</a></li>
                        {% endif %}

                    {% endfor %}

                    {#has_next 判断是否有下一页#}
                    {% if customer_list.has_next %}
                        {#next_page_number 下一页的页码#}
                        <li><a href="?page={{ customer_list.next_page_number }}" aria-label="Next"><span
                                aria-hidden="true">下一页</span></a></li>
                    {% else %}
                        {#class="disabled" 禁止用户点击#}
                        <li class="disabled"><a href="" aria-label="Next"><span aria-hidden="true">下一页</span></a></li>
                    {% endif %}

                    <li><a href="?page={{ paginator.num_pages }}" aria-label="Next"><span aria-hidden="true">最后一页</span></a>
                    </li>

                </ul>
            </nav>
        </div>

    </div>
</div>


</body>
</html>
创建文件upload_file.html
<!DOCTYPE html>
<html lang="en">
<head>
    <meta charset="UTF-8">
    <title>Title</title>
</head>
<body>
    <form method="post" enctype="multipart/form-data">
        {% csrf_token %}
       <div style="position: relative;display: inline-block;height: 50px;min-width: 300px;overflow: hidden;">
            <div style="position: absolute;top: 0;left: 0;right: 0;bottom: 0;z-index: 1000;border: 1px dotted #9d9d9d;color: #9d9d9d;line-height: 50px;padding-left: 15px;">
                <i class="fa fa-cloud-upload" aria-hidden="true"></i>
                <span>点击上传文件</span>
            </div>
            <input name="customer_excel" type="file" id="excelFile"
                   style="position: absolute;top: 0;left: 0;right: 0;bottom: 0;background-color: #333333;z-index: 1001;opacity: 0;filter:alpha(opacity=0);">
        </div>
        <div>
            <input type="text" name="user">
            <input type="submit" value="提交">
        </div>
    </form>
    <script src="/static/js/1jquery.min.js"></script>
<script>
    !window.jQuery && alert('jQuery未导入!请确认路径是否正确');
    $(function () {
        $('#excelFile').change(function (e) {
            var fileName = e.currentTarget.files[0].name;
            $(this).prev().find('span').text(fileName);
        })
    })
</script>
</body>
</html>
启动django项目,访问页面
上传一个excel文件
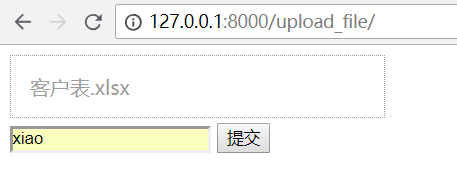
成功后,会跳转首页
2.登录页面
创建超级用户
python manage.py createsuperuser
完整代码在github:
https://github.com/987334176/excel_upload
登录效果如下:


 浙公网安备 33010602011771号