
postman + newman + jenkins API自动化
环境:windows 10 专业版
软件:postman客户端(插件亦可,推荐客户端) tomcat 8.0
nodejs v10.15.3 jenkins.war包
首当其冲最重要的是postman了,这里不对postman的使用做介绍了,网上大把的博客,
Postman使用教程:https://blog.csdn.net/fxbin123/article/details/80428216 (从不专业的角度来看,大部分博客都不够详细)
官方文档:https://learning.getpostman.com/docs/postman/launching_postman/installation_and_updates/
(建议先看官文,不懂再针对疑问点搜博客)
首先你得将所有接口调试好,连通正常,要加断言、优化结构、加点环境变量或全局变量啥的。

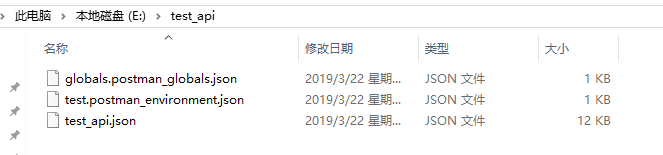
然后就是把接口集合导出json文件

选择推荐的导出格式,并放置在你想放置的路径下,我放在了E:\test_api目录下:

由于我在接口中存在环境变量和全局变量的存在,所以还需要导出环境变量和全局变量的json文件(下图用了全局和环境变量)

导出环境变量和全局变量(我还是比较推荐官方文档)
环境变量和全局变量的设置和使用:https://www.cnblogs.com/YouxiYouxi/p/7525424.html

都存在于同一目录下
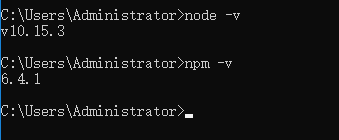
接下来是安装newman,安装之前,得先下载nodejs
在cmd中使用命令:node -v 显示了版本号即为安装完好了,nodejs中自动npm管理包的工具,也可以使用命令:npm -v 查看当前npm版本。
然后安装newman
npm install -g newman安装newman-reporter-html(用于后面生成html报告)
npm install -g newman-reporter-html查看newman安装版本: newman -v

想了解newman run的命令可以先查看帮助 newman run --help

先进入之前导出的文件夹路径,接下来我们就可以使用newman 运行之前导出的json文件了
newman run test_api.json -e test.postman_environment.json -g globals.postman_globals.json
这样就是运行了,翻到下面还会生成一个图表。
newman是弄好了,也试运行了一遍,接下来就是集成到jenkins上面了。
jenkins安装及使用:https://blog.csdn.net/hc_ttxs/article/details/79384535
使用jenkins遇到的一些问题:https://blog.csdn.net/ly021499/article/category/8787789
创建一个工程

工程配置configure, 定时构建语法:https://blog.csdn.net/weixin_41713592/article/details/80074934

build工程,输入windows处理命令(红色部分加入了报告生成和导出)
newman run test_api.json -e test.postman_environment.json -g globals.postman_globals.json -r html --reporter-html-export E:\test_api
newman运行可以生成各类测试报告,有html,cli,json格式等
指令:newman run xxx.postman_collection.json -r html[,cli,json,junit]
如果要生成多个格式,用逗号隔开不留空格 ,支持给测试报告命名和指定生成路径,可以定义测试报告的生成位置以及它的名称
指令:newman run xxx.postman_collection.json -r html –reporter-html-export G:\name.html

设置构建失败时自动发送邮件,最后记得保存,点击apply提交

然后立刻构建看工程是否能够正常运行

自此,postman + newman + jenknis API接口自动化测试就完成了

 浙公网安备 33010602011771号