

CentOS7:hadoop2.6.5 HA yarn 高可用集群搭建 hbase-0.98.12.1-hadoop2-bin.tar.gz mysql5.7 hbase-0.98.12.1 apache-hive-1.2.1-bin.tar.gz flume-1.6.0
操作系统是CentOS7
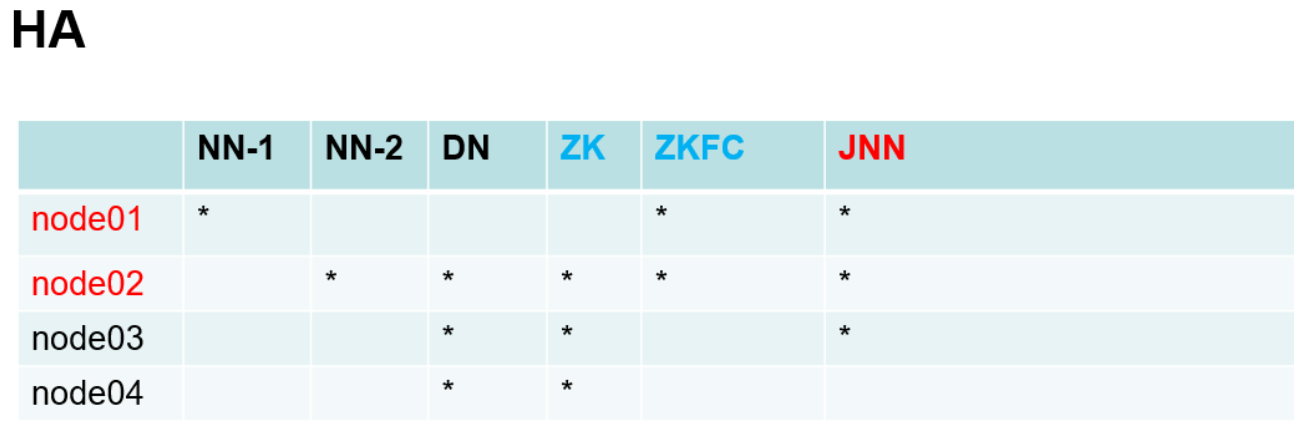
节点规划
ntp校时  ;每一台虚拟机
 yum install ntp -y
service ntpd restart
service ntpd stop
ntpdate 210.72.145.39

date  查看日期时间
timedatectl  查看时区
ln -sf /usr/share/zoneinfo/Asia/Shanghai /etc/localtime  设置时区

永久关闭防火墙
 systemctl stop firewalld.service
 systemctl disable firewalld.service
单独配置 node2,3,4 的zookeeper集群

[root@node2 sxt]# tail -7 /etc/profile

export JAVA_HOME=/usr/java/jdk1.8.0_221
export CLASSPATH=.:$JAVA_HOME/lib
export HADOOP_HOME=/opt/sxt/hadoop-2.6.5
export ZOOKEEPER_HOME=/opt/sxt/zookeeper-3.4.6
export PATH=$JAVA_HOME/bin:$PATH:$HADOOP_HOME/bin:$HADOOP_HOME/sbin:$ZOOKEEPER_HOME/bin


[root@node2 sxt]# cat /opt/sxt/zookeeper-3.4.6/conf/zoo.cfg
##....
dataDir=/var/sxt/zk
##...
#autopurge.purgeInterval=1
server.1=node2:2888:3888
server.2=node3:2888:3888
server.3=node4:2888:3888

在node 2 3 4 上执行 1 2 3 如下操作
[root@node202 ~]# mkdir /var/sxt/zk
[root@node202 ~]# echo 1 > /var/sxt/zk/myid      ## 与配置对应


node2 3 4同时启动,(批量下发指令)
zkServer.sh start 启动zookeeper集群成功。

##
NoRouteToHostException: No route to host (Host unreachable) : 启动zookeeper报错;可能是/etc/hostname不一致。 或者防火墙没有关闭
配置HA hadoop集群 .
配置hadoop
配置 hadoop-env.sh 环境
[root@node1 hadoop]# cat hadoop-env.sh | grep JAVA_HOME
export JAVA_HOME=/usr/java/jdk1.8.0_221
配置core-site.xml
<configuration>

  <property>
            <name>fs.defaultFS</name>
        <value>hdfs://mycluster</value>
    </property>
        <property>
            <name>hadoop.tmp.dir</name>
            <value>/var/sxt/hadoop/ha</value>
        </property>
        <property>
            <name>hadoop.http.staticuser.user</name>
            <value>root</value>
        </property>
<property>
   <name>ha.zookeeper.quorum</name>
   <value>node2:2181,node3:2181,node4:2181</value>
 </property>
</configuration>
配置hdfs-site.xml
<configuration>
<property>
	<name>dfs.replication</name>
	<value>2</value>
</property>
<property>
	<name>dfs.nameservices</name>
	<value>mycluster</value>
</property>
<property>
  <name>dfs.ha.namenodes.mycluster</name>
  <value>nn1,nn2</value>
</property>
<property>
	<name>dfs.namenode.rpc-address.mycluster.nn1</name>
	  <value>node1:8020</value>
</property>
<property>
	  <name>dfs.namenode.rpc-address.mycluster.nn2</name>
	  <value>node2:8020</value>
</property>

<property>
  <name>dfs.namenode.http-address.mycluster.nn1</name>
  <value>node1:50070</value>
</property>
<property>
  <name>dfs.namenode.http-address.mycluster.nn2</name>
  <value>node2:50070</value>
</property>
<property>
  <name>dfs.namenode.shared.edits.dir</name>
  <value>qjournal://node1:8485;node2:8485;node3:8485/mycluster</value>
</property>
<property>
  <name>dfs.client.failover.proxy.provider.mycluster</name>
  <value>org.apache.hadoop.hdfs.server.namenode.ha.ConfiguredFailoverProxyProvider</value>
</property>
<property>
  <name>dfs.ha.fencing.methods</name>
  <value>sshfence</value>
</property>

<property>
  <name>dfs.ha.fencing.ssh.private-key-files</name>
  <value>/root/.ssh/id_rsa</value>
</property>
<property>
  <name>dfs.journalnode.edits.dir</name>
  <value>/var/sxt/hadoop/ha/journalnode</value>
</property>
 <property>
   <name>dfs.ha.automatic-failover.enabled</name>
   <value>true</value>
 </property>
</configuration>

配置slaves
[root@node1 hadoop]# cat slaves
node2
node3
node4

分发到每一台主机。node1 分发到2 3 4

操作 node1 2 3
 hadoop-daemon.sh start journalnode

操作node1
hdfs namenode -format
hadoop-daemon.sh start namenode

操作node2
hdfs namenode -bootstrapStandby
##此处如果报错:(防火墙没有关死)
 FATAL ha.BootstrapStandby: Unable to fetch namespace information from active NN at node1/192.168.112.101:8020: No Route to Host from

操作node1
dfs zkfc -formatZK

操作node1
stop-dfs.sh
start-dfs.sh

启动集群


访问http://node1:50070  http://node2:50070   查看active standby

node1node2交替操作,
hadoop-daemon.sh stop namenode
hadoop-daemon.sh start namenode
查看 http://node1:50070  http://node2:50070   状态切换。

[root@node1 hadoop]# hadoop-daemon.sh stop zkfc
stopping zkfc
[root@node1 hadoop]# hadoop-daemon.sh start zkfc
查看 http://node1:50070  http://node2:50070   状态切换。

高可用配置完毕。

注意有几点:
防火墙一定要关死
ntp校时有可能时间又变为不准确的时间了。(不重要)
[root@node2 logs]# tail -f hadoop-root-zkfc-node2.log (切换不了active和standby)
报错 SshFenceByTcpPort: PATH=$PATH:/sbin:/usr/sbin fuser -v -k -n tcp 8020 via ssh: bash: fuser: command not found
需要  yum install psmisc

上传文件
  hdfs dfs -mkdir -p /data/logs/
  hdfs dfs -ls /
  hdfs dfs -put hadoop-root-zkfc-node2.log  /data/logs/
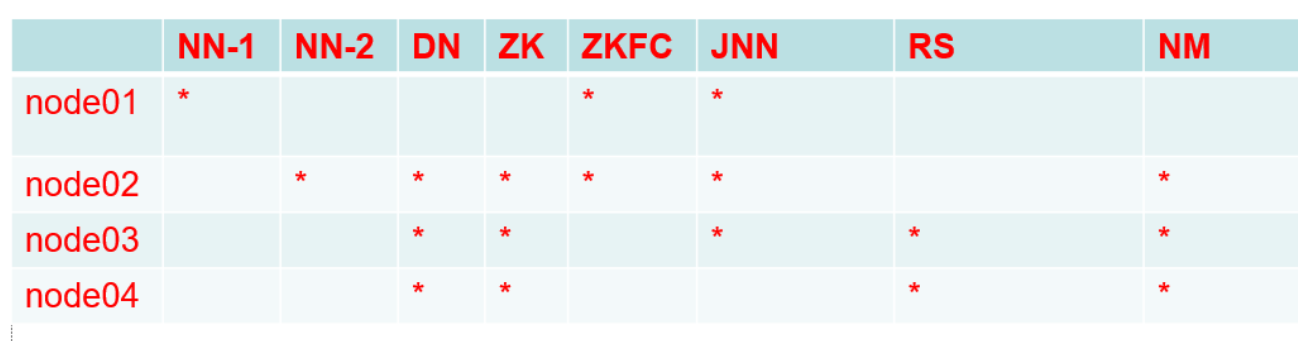
配置yarn集群(高可用HA)
[root@node1 shells]# cat /opt/sxt/hadoop-2.6.5/etc/hadoop/mapred-site.xml
<?xml version="1.0"?>
<?xml-stylesheet type="text/xsl" href="configuration.xsl"?>
<configuration>
<property>
        <name>mapreduce.framework.name</name>
        <value>yarn</value>
    </property>
</configuration>
[root@node1 shells]# cat /opt/sxt/hadoop-2.6.5/etc/hadoop/yarn-site.xml
<?xml version="1.0"?>
<configuration>
<property>
	<name>yarn.nodemanager.aux-services</name>
	<value>mapreduce_shuffle</value>
</property>
<property>
   <name>yarn.resourcemanager.ha.enabled</name>
   <value>true</value>
 </property>
 <property>
   <name>yarn.resourcemanager.cluster-id</name>
   <value>cluster1</value>
 </property>
 <property>
   <name>yarn.resourcemanager.ha.rm-ids</name>
   <value>rm1,rm2</value>
 </property>
 <property>
   <name>yarn.resourcemanager.hostname.rm1</name>
   <value>node3</value>
 </property>
 <property>
   <name>yarn.resourcemanager.hostname.rm2</name>
   <value>node4</value>
 </property>
 <property>
  <name>yarn.resourcemanager.webapp.address.rm1</name>
  <value>node3:8088</value>
</property>
<property>
  <name>yarn.resourcemanager.webapp.address.rm2</name>
  <value>node4:8088</value>
</property>
 <property>
   <name>yarn.resourcemanager.zk-address</name>
   <value>node2:2181,node3:2181,node4:2181</value>
 </property>
</configuration>

scp 两个文件到node2,3,4.

启动(重点步骤)
[root@node1 shells]# start-yarn.sh
starting yarn daemons
starting resourcemanager, logging to /opt/sxt/hadoop-2.6.5/logs/yarn-root-resourcemanager-node1.out
node2: starting nodemanager, logging to /opt/sxt/hadoop-2.6.5/logs/yarn-root-nodemanager-node2.out
node3: starting nodemanager, logging to /opt/sxt/hadoop-2.6.5/logs/yarn-root-nodemanager-node3.out
node4: starting nodemanager, logging to /opt/sxt/hadoop-2.6.5/logs/yarn-root-nodemanager-node4.out
为什么是上边的结果:
因为node1没有被配置为RM, 而slave配置了node2,3,4; 同样是yarn集群的slave.所以node2,3,4 的nodemanager程序能够被node1启动。但是resourceManager却没有被启动。如下:
## 之前已经启动过start-dfs.sh。
[root@node1 shells]# jps
12705 NameNode
12894 JournalNode
13054 DFSZKFailoverController
[root@node2 ~]# jps
11105 NameNode
11170 DataNode
13461 NodeManager
11255 JournalNode
11369 DFSZKFailoverController
6316 QuorumPeerMain
[root@node3 ~]# jps
17571 DataNode
17656 JournalNode
20490 NodeManager
15067 QuorumPeerMain
[root@node4 ~]# jps
19235 NodeManager
19350 Jps
16824 DataNode
15067 QuorumPeerMain
## node3,4 上的名称节点需要手动启动 (****必须注意,在node1上不能直接启动node3,4的RM)
[root@node3 ~]# yarn-daemon.sh start resourcemanager
[root@node4 ~]# yarn-daemon.sh start resourcemanager
## 此时地址栏 http://node4:8088/ http://node3:8088/ 可以看到active standby

所以综合以上配置。 hdfs的slaves;得到yarn的此情景正确启动和停止方式为;(自己编写的脚本)
[root@node1 shells]# cat start-yarn-ha.sh
start-yarn.sh
ssh root@node3 "$HADOOP_HOME/sbin/yarn-daemon.sh start resourcemanager"
ssh root@node4 "$HADOOP_HOME/sbin/yarn-daemon.sh start resourcemanager"
[root@node1 shells]# cat stop-yarn-ha.sh
stop-yarn.sh
ssh root@node3 "$HADOOP_HOME/sbin/yarn-daemon.sh stop resourcemanager"
ssh root@node4 "$HADOOP_HOME/sbin/yarn-daemon.sh stop resourcemanager"
因此:
正确启动hdfs,yarn,zookeeper集群

zkServer.sh start     node2,3,4 都执行

start-dfs.sh             node1执行

./start-yarn-ha.sh   node1执行(相当于node2,3,4 yarn-daemon.sh start nodemanager; node3,4  yarn-daemon.sh startresourcemanager )
Hive 搭建
安装mysql
https://www.cnblogs.com/luohanguo/p/9045391.html
https://www.cnblogs.com/yybrhr/p/9810375.html

  yum install wget
  wget -i -c http://dev.mysql.com/get/mysql57-community-release-el7-10.noarch.rpm
  yum -y install mysql57-community-release-el7-10.noarch.rpm
  yum -y install mysql-community-server
   systemctl start  mysqld.service
   systemctl status mysqld.service
   grep "password" /var/log/mysqld.log ## 获取临时密码用于下边登录。
    mysql -uroot -p
    alter user user() identified by "123456";
  use mysql;
  set global validate_password_policy=0;  ## 设置密码校验减弱
  set global validate_password_length=1;
 update user set Host ='%' where User='root';
 GRANT ALL PRIVILEGES ON *.* TO 'root'@'%' IDENTIFIED BY '123456' WITH GRANT OPTION;
  flush privileges;
## 至此,window上的navicate可以远程连接root,123456 到node1.
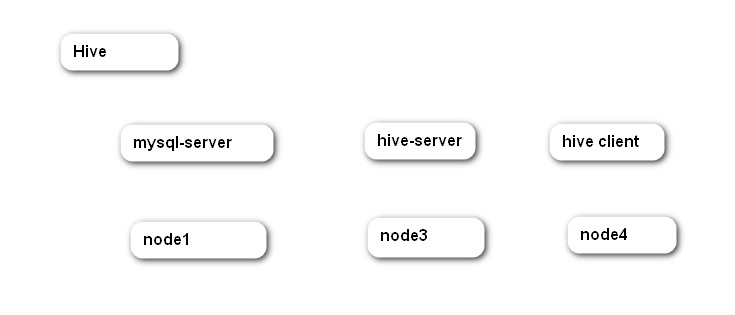
Hive 多用户模式
 node3 为hive server, node4 为hive clinet. node1 为mysql server.

[root@node3 ~]# tail -5 /etc/profile
export ZOOKEEPER_HOME=/opt/sxt/zookeeper-3.4.6
export HIVE_HOME=/opt/sxt/apache-hive-1.2.1-bin
export HBASE_HOME=/opt/sxt/hbase-0.98.12.1-hadoop2
export PATH=$JAVA_HOME/bin:$PATH:$HADOOP_HOME/bin:$HADOOP_HOME/sbin:$ZOOKEEPER_HOME/bin:$HIVE_HOME/bin:$HBASE_HOME/bin

[root@node3 conf]# pwd
/opt/sxt/apache-hive-1.2.1-bin/conf

[root@node3 conf]# cat hive-site.xml
<?xml version="1.0" encoding="UTF-8" standalone="no"?>

<?xml-stylesheet type="text/xsl" href="configuration.xsl"?>
<configuration>
<property>
  <name>hive.metastore.warehouse.dir</name>
  <value>/user/hive/warehouse</value>
</property>

<property>
  <name>javax.jdo.option.ConnectionURL</name>
  <value>jdbc:mysql://node1:3306/hive?createDatabaseIfNotExist=true</value>
</property>

<property>
  <name>javax.jdo.option.ConnectionDriverName</name>
  <value>com.mysql.jdbc.Driver</value>
</property>

<property>
  <name>javax.jdo.option.ConnectionUserName</name>
  <value>root</value>
</property>

<property>
  <name>javax.jdo.option.ConnectionPassword</name>
  <value>123456</value>
</property>

</configuration>

[root@node3 ~]# cp mysql-connector-java-5.1.32-bin.jar /opt/sxt/apache-hive-1.2.1-bin/lib/

[root@node3 ~]# schematool -dbType mysql -initSchema ## 初始化配置信息,报错。(hadoop hive jar 冲突)
Metastore connection URL:	 jdbc:mysql://node1:3306/hive?createDatabaseIfNotExist=true
Metastore Connection Driver :	 com.mysql.jdbc.Driver
Metastore connection User:	 root
Starting metastore schema initialization to 1.2.0
Initialization script hive-schema-1.2.0.mysql.sql
[ERROR] Terminal initialization failed; falling back to unsupported
java.lang.IncompatibleClassChangeError: Found class jline.Terminal, but interface was expected
[root@node3 ~]# cp  $HIVE_HOME/lib/jline-2.12.jar $HADOOP_HOME/share/hadoop/yarn/lib/
[root@node3 ~]# schematool -dbType mysql -initSchema
Metastore connection URL:	 jdbc:mysql://node1:3306/hive?createDatabaseIfNotExist=true
Metastore Connection Driver :	 com.mysql.jdbc.Driver
Metastore connection User:	 root
Starting metastore schema initialization to 1.2.0
Initialization script hive-schema-1.2.0.mysql.sql
Initialization script completed
schemaTool completed
[root@node3 ~]# hive --service metastore  ## 启动服务端  ## 必须启动此服务node4 hive才有用
Starting Hive Metastore Server

[root@node4 conf]# cat hive-site.xml
<?xml version="1.0" encoding="UTF-8" standalone="no"?>
<?xml-stylesheet type="text/xsl" href="configuration.xsl"?>
<configuration>
<property>
  <name>hive.metastore.warehouse.dir</name>
  <value>/user/hive/warehouse</value>
</property>

<property>
  <name>hive.metastore.local</name>
  <value>false</value>
</property>

<property>
  <name>hive.metastore.uris</name>
  <value>thrift://node3:9083</value>
</property>
</configuration>
配置 $HIVE_HOME
[root@node4 conf]# cp  $HIVE_HOME/lib/jline-2.12.jar $HADOOP_HOME/share/hadoop/yarn/lib/


[root@node4 ~]# cat data
id,姓名,爱好,住址
1,小明1,lol-book-movie,heijing:shangxuetang-shanghai:pudong
2,小明2,lol-book-movie,heijing:shangxuetang-shanghai:pudong
3,小明3,lol-book-movie,heijing:shangxuetang-shanghai:pudong
4,小明4,lol-book-movie,heijing:shangxuetang-shanghai:pudong
5,小明5,lol-book,heijing:shangxuetang-shanghai:pudong
6,小明6,lol-book,heijing:shangxuetang-shanghai:pudong


[root@node4 conf]# hive
19/09/01 01:08:02 WARN conf.HiveConf: HiveConf of name hive.metastore.local does not exist

Logging initialized using configuration in jar:file:/opt/sxt/apache-hive-1.2.1-bin/lib/hive-common-1.2.1.jar!/hive-log4j.properties
hive> show tables;
OK
Time taken: 0.948 seconds
hive> CREATE TABLE psn(
    > id int,
    > name string,
    > likes array<string>,
    > address map<string,string>
    > )
    > ROW FORMAT DELIMITED
    > FIELDS TERMINATED BY ','
    > COLLECTION ITEMS TERMINATED BY '-'
    > MAP KEYS TERMINATED BY ':'
    > LINES TERMINATED BY '\n';
OK
Time taken: 0.789 seconds
hive> LOAD DATA LOCAL INPATH '/root/data' INTO TABLE psn;
Loading data to table default.psn
Table default.psn stats: [numFiles=1, totalSize=384]
OK
Time taken: 1.07 seconds
hive> select * from psn;
OK
NULL	姓名	["爱好"]	{"住址":null}
1	小明1	["lol","book","movie"]	{"heijing":"shangxuetang","shanghai":"pudong"}
2	小明2	["lol","book","movie"]	{"heijing":"shangxuetang","shanghai":"pudong"}
3	小明3	["lol","book","movie"]	{"heijing":"shangxuetang","shanghai":"pudong"}
4	小明4	["lol","book","movie"]	{"heijing":"shangxuetang","shanghai":"pudong"}
5	小明5	["lol","book"]	{"heijing":"shangxuetang","shanghai":"pudong"}
6	小明6	["lol","book"]	{"heijing":"shangxuetang","shanghai":"pudong"}
Time taken: 0.341 seconds, Fetched: 7 row(s)
hive> quit;
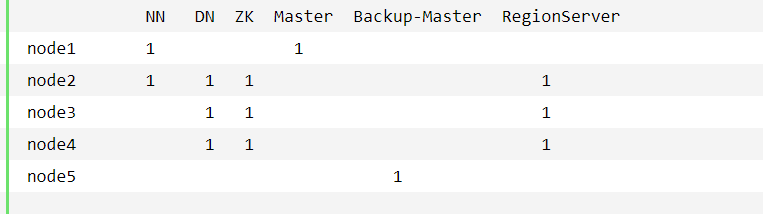
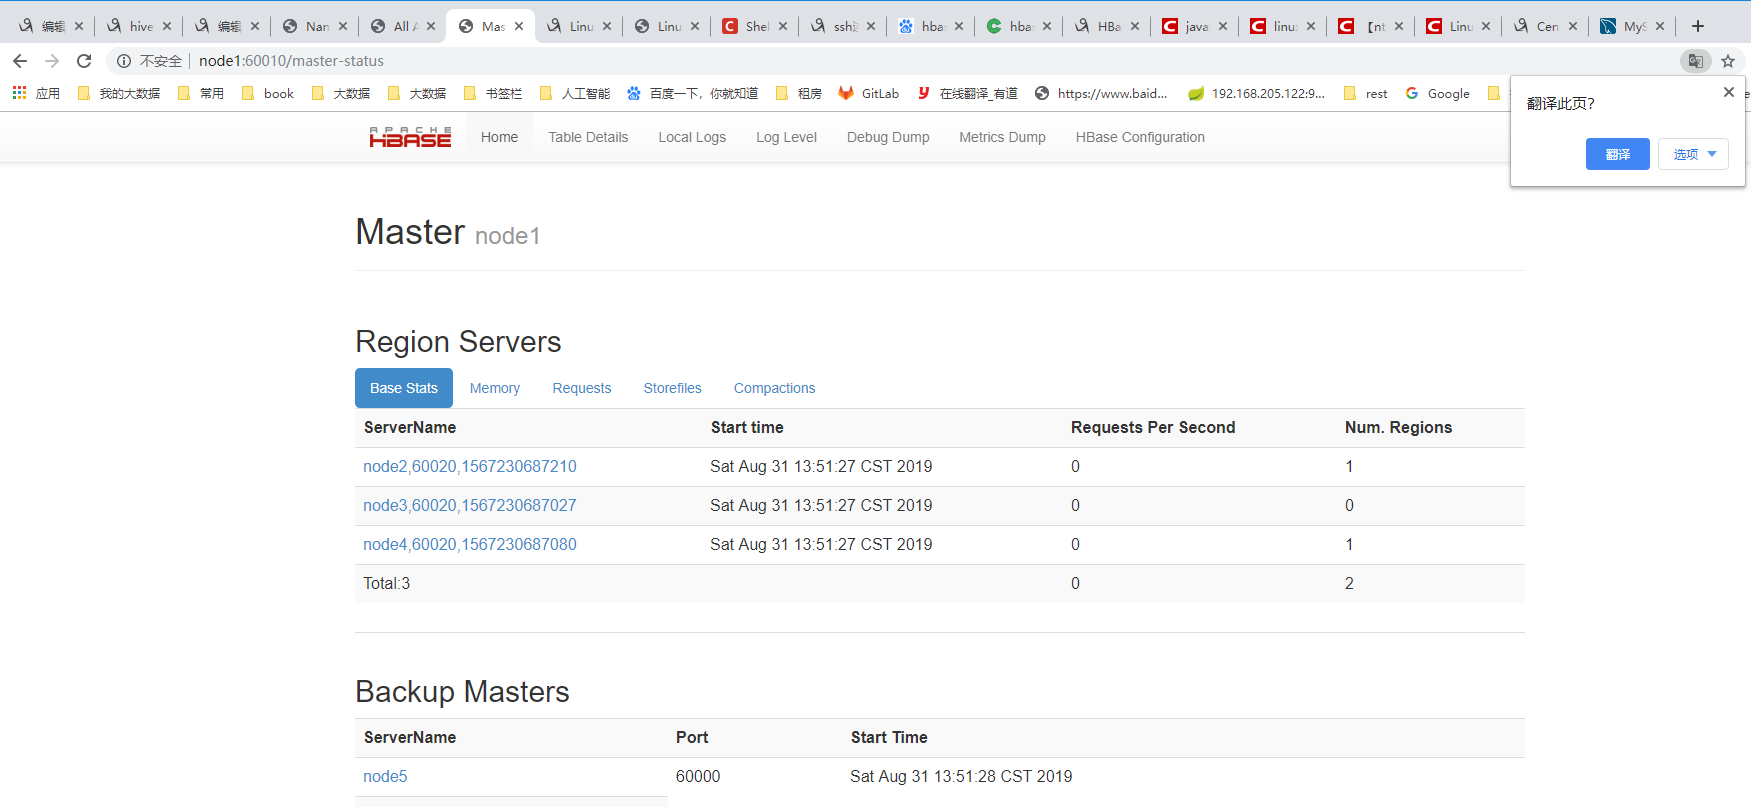
HBase搭建: 新克隆一台虚拟机,node5. 只安装jdk8; 关闭firewall。  ntp校时
node1 作为master,node5作为back-master,node2,3,4作为regionServer

配置环境
[root@node5 ~]# tail -f /etc/profile
export JAVA_HOME=/usr/java/jdk1.8.0_221
export CLASSPATH=.:$JAVA_HOME/lib
export HADOOP_HOME=/opt/sxt/hadoop-2.6.5
export HBASE_HOME=/opt/sxt/hbase-0.98.12.1-hadoop2
export PATH=$JAVA_HOME/bin:$PATH:$HADOOP_HOME/bin:$HADOOP_HOME/sbin:$HBASE_HOME/bin

配置 hbase-env.sh
[root@node5 conf]# pwd
/opt/sxt/hbase-0.98.12.1-hadoop2/conf
[root@node5 conf]# vi hbase-env.sh
export HBASE_MANAGES_ZK=false
export JAVA_HOME=/usr/java/jdk1.8.0_221
[root@node5 conf]# cat hbase-site.xml
<?xml version="1.0"?>
<?xml-stylesheet type="text/xsl" href="configuration.xsl"?>
<configuration>
<property>
<name>hbase.rootdir</name>
<value>hdfs://mycluster/hbase</value>
</property>
<property>
<name>hbase.cluster.distributed</name>
<value>true</value>
</property>
<property>
<name>hbase.zookeeper.quorum</name>
<value>node2,node3,node4</value>
</property>
</configuration>
[root@node5 conf]# cat regionservers
node2
node3
node4
[root@node5 conf]# cat backup-masters
node5
[root@node5 conf]# cat hdfs-site.xml  ### 复制hadoop配置下的hdfs-site.xml到此conf下。(hbase依赖hdfs)
<?xml version="1.0" encoding="UTF-8"?>
<?xml-stylesheet type="text/xsl" href="configuration.xsl"?>
<configuration>
<property>
	<name>dfs.replication</name>
	<value>2</value>
</property>
<property>
	<name>dfs.nameservices</name>
	<value>mycluster</value>
</property>
<property>
  <name>dfs.ha.namenodes.mycluster</name>
  <value>nn1,nn2</value>
</property>
<property>
	<name>dfs.namenode.rpc-address.mycluster.nn1</name>
	  <value>node1:8020</value>
</property>
<property>
	  <name>dfs.namenode.rpc-address.mycluster.nn2</name>
	  <value>node2:8020</value>
</property>

<property>
  <name>dfs.namenode.http-address.mycluster.nn1</name>
  <value>node1:50070</value>
</property>
<property>
  <name>dfs.namenode.http-address.mycluster.nn2</name>
  <value>node2:50070</value>
</property>
<property>
  <name>dfs.namenode.shared.edits.dir</name>
  <value>qjournal://node1:8485;node2:8485;node3:8485/mycluster</value>
</property>
<property>
  <name>dfs.client.failover.proxy.provider.mycluster</name>
  <value>org.apache.hadoop.hdfs.server.namenode.ha.ConfiguredFailoverProxyProvider</value>
</property>
<property>
  <name>dfs.ha.fencing.methods</name>
  <value>sshfence</value>
</property>

<property>
  <name>dfs.ha.fencing.ssh.private-key-files</name>
  <value>/root/.ssh/id_rsa</value>
</property>
<property>
  <name>dfs.journalnode.edits.dir</name>
  <value>/var/sxt/hadoop/ha/journalnode</value>
</property>
 <property>
   <name>dfs.ha.automatic-failover.enabled</name>
   <value>true</value>
 </property>
</configuration>
### 分发到node1,2,3,4主机。配置主机配置相应的HBASE_HOME
### 启动 node,2 3 4 的zookeeper  zkServer.sh start
### 在master node1上。启动
启动hdfs start-dfs.sh
启动 hbase  start-hbase.sh
start-hbase.sh 命令,查看日志:出现如下错误,并且node1:60010没有看到regionserver启动。
hbase  28800024ms > max allowed of 30000ms
是校时问题;需要ntp校时5台服务器。(坑了好久)
service ntpd start
ntpdate 210.72.145.39
[root@node4 ~]# hbase shell
hbase(main):001:0> list
hbase(main):002:0> create 't1','cf'  ## 创建表
hbase(main):002:0> put 't1','0001','cf:name','goudan'  ## 添加一行
hbase(main):003:0> scan 't1'
为安装protobuf 序列化工具(为hbase诗句存储提供方便)
准备安装protobuf ; 批量安装centOS开发依赖。
  yum grouplist
  yum group info Development Tools
  yum groupinstall Development Tools

cd ~/software
tar -zxvf protobuf-2.5.0.tar.gz

cd protobuf-2.5.0.tar.gz

./configure --prefix=/opt/sxt/protobuf-2.5.0

make && make install

cd /opt/sxt/protobuf-2.5.0/bin/

编辑文件
[root@node1 software]# cat phone.proto
package com.bjsxt.hbase;
message PhoneDetail
{
    required string dnum = 1;
    required string length = 2;
    required string type = 3;
    required string date = 4;
}

[root@node1 software]# which protoc
/usr/local/bin/protoc
[root@node1 software]# /usr/local/bin/protoc --java_out=/root/software/ phone.proto
[root@node1 software]# ll
total 457352
drwxr-xr-x.  3 root   root      4096 Sep  1 10:29 com
[root@node1 software]# ll ./com/bjsxt/hbase/Phone.java
-rw-r--r--. 1 root root 31743 Sep  1 10:29 ./com/bjsxt/hbase/Phone.java
配置niginx 为大数据项目做准备
node2 配置nginx
 cd software/
  tar -zxvf tengine-2.1.0.tar.gz
  cd tengine-2.1.0
  ./configure
  yum -y install gcc gcc-c++ openssl openssl-devel
  make && make install
  whereis nginx
  cd /usr/local/nginx/sbin/nginx  ## 启动
  netstat -tunlp
  cd /usr/local/nginx/conf/
  cp nginx.conf nginx.conf.bak
  vi nginx.conf   ## 配置nginx
#user  nobody;
worker_processes  1;

#error_log  logs/error.log;
#error_log  logs/error.log  notice;
#error_log  logs/error.log  info;

#pid        logs/nginx.pid;


events {
    worker_connections  1024;
}

# load modules compiled as Dynamic Shared Object (DSO)
#
#dso {
#    load ngx_http_fastcgi_module.so;
#    load ngx_http_rewrite_module.so;
#}

http {
    include       mime.types;
    default_type  application/octet-stream;

    #log_format  main  '$remote_addr - $remote_user [$time_local] "$request" '
    #                  '$status $body_bytes_sent "$http_referer" '
    #                  '"$http_user_agent" "$http_x_forwarded_for"';

    log_format my_format '$remote_addr^A$msec^A$http_host^A$request_uri';

    #access_log  logs/access.log  main;

    sendfile        on;
    #tcp_nopush     on;

    #keepalive_timeout  0;
    keepalive_timeout  65;

    #gzip  on;

    server {
        listen       80;
        server_name  localhost;

        #charset koi8-r;

        #access_log  logs/host.access.log  main;

        location / {
            root   html;
            index  index.html index.htm;
        }

         location = /log.gif {
            default_type image/gif;
            access_log /opt/data/access.log my_format;
        }

        #error_page  404              /404.html;

        # redirect server error pages to the static page /50x.html
        #
        error_page   500 502 503 504  /50x.html;
        location = /50x.html {
            root   html;
        }

        # proxy the PHP scripts to Apache listening on 127.0.0.1:80
        #
        #location ~ \.php$ {
        #    proxy_pass   http://127.0.0.1;
        #}

        # pass the PHP scripts to FastCGI server listening on 127.0.0.1:9000
        #
        #location ~ \.php$ {
        #    root           html;
        #    fastcgi_pass   127.0.0.1:9000;
        #    fastcgi_index  index.php;
        #    fastcgi_param  SCRIPT_FILENAME  /scripts$fastcgi_script_name;
        #    include        fastcgi_params;
        #}

        # deny access to .htaccess files, if Apache's document root
        # concurs with nginx's one
        #
        #location ~ /\.ht {
        #    deny  all;
        #}
    }


    # another virtual host using mix of IP-, name-, and port-based configuration
    #
    #server {
    #    listen       8000;
    #    listen       somename:8080;
    #    server_name  somename  alias  another.alias;

    #    location / {
    #        root   html;
    #        index  index.html index.htm;
    #    }
    #}


    # HTTPS server
    #
    #server {
    #    listen       443 ssl;
    #    server_name  localhost;

    #    ssl_certificate      cert.pem;
    #    ssl_certificate_key  cert.key;

    #    ssl_session_cache    shared:SSL:1m;
    #    ssl_session_timeout  5m;

    #    ssl_ciphers  HIGH:!aNULL:!MD5;
    #    ssl_prefer_server_ciphers  on;

    #    location / {
    #        root   html;
    #        index  index.html index.htm;
    #    }
    #}

}

-----------------------------------------------
  mkdir /opt/data ## 创建nginx 日志存放的目录
  vi /etc/init.d/nginx ## 以init.d service启动
#!/bin/sh
#
# nginx - this script starts and stops the nginx daemon
#
# chkconfig:   - 85 15
# description:  Nginx is an HTTP(S) server, HTTP(S) reverse \
#               proxy and IMAP/POP3 proxy server
# processname: nginx
# config:      /etc/nginx/nginx.conf
# config:      /etc/sysconfig/nginx
# pidfile:     /usr/local/nginx/logs/nginx.pid

# Source function library.
. /etc/rc.d/init.d/functions

# Source networking configuration.
. /etc/sysconfig/network

# Check that networking is up.
[ "$NETWORKING" = "no" ] && exit 0

nginx="/usr/local/nginx/sbin/nginx"
prog=$(basename $nginx)

NGINX_CONF_FILE="/usr/local/nginx/conf/nginx.conf"

[ -f /etc/sysconfig/nginx ] && . /etc/sysconfig/nginx

lockfile=/var/lock/subsys/nginx

make_dirs() {
   # make required directories
   user=`nginx -V 2>&1 | grep "configure arguments:" | sed 's/[^*]*--user=\([^ ]*\).*/\1/g' -`
   options=`$nginx -V 2>&1 | grep 'configure arguments:'`
   for opt in $options; do
       if [ `echo $opt | grep '.*-temp-path'` ]; then
           value=`echo $opt | cut -d "=" -f 2`
           if [ ! -d "$value" ]; then
               # echo "creating" $value
               mkdir -p $value && chown -R $user $value
           fi
       fi
   done
}

start() {
    [ -x $nginx ] || exit 5
    [ -f $NGINX_CONF_FILE ] || exit 6
    make_dirs
    echo -n $"Starting $prog: "
    daemon $nginx -c $NGINX_CONF_FILE
    retval=$?
    echo
    [ $retval -eq 0 ] && touch $lockfile
    return $retval
}

stop() {
    echo -n $"Stopping $prog: "
    killproc $prog -QUIT
    retval=$?
    echo
    [ $retval -eq 0 ] && rm -f $lockfile
    return $retval
}

restart() {
    configtest || return $?
    stop
    sleep 1
    start
}

reload() {
    configtest || return $?
    echo -n $"Reloading $prog: "
    killproc $nginx -HUP
    RETVAL=$?
    echo
}

force_reload() {
    restart
}

configtest() {
  $nginx -t -c $NGINX_CONF_FILE
}

rh_status() {
    status $prog
}

rh_status_q() {
    rh_status >/dev/null 2>&1
}

case "$1" in
    start)
        rh_status_q && exit 0
        $1
        ;;
    stop)
        rh_status_q || exit 0
        $1
        ;;
    restart|configtest)
        $1
        ;;
    reload)
        rh_status_q || exit 7
        $1
        ;;
    force-reload)
        force_reload
        ;;
    status)
        rh_status
        ;;
    condrestart|try-restart)
        rh_status_q || exit 0
            ;;
    *)
        echo $"Usage: $0 {start|stop|status|restart|condrestart|try-restart|reload|force-reload|configtest}"
        exit 2
esac

-----------------------------------------------
  chmod +x /etc/init.d/nginx
  service nginx restart
  service nginx stop
  service nginx start
[root@node2 html]# pwd
/usr/local/nginx/html
  cp /root/log.gif ./  ## 准备一个图片复制到html下;为了地址栏访问埋点地址时,有返回内容。

tail -f /opt/data/access.log  ## 监控日志文件
访问:http://node2/log.gif?name=zhangsan&age=19
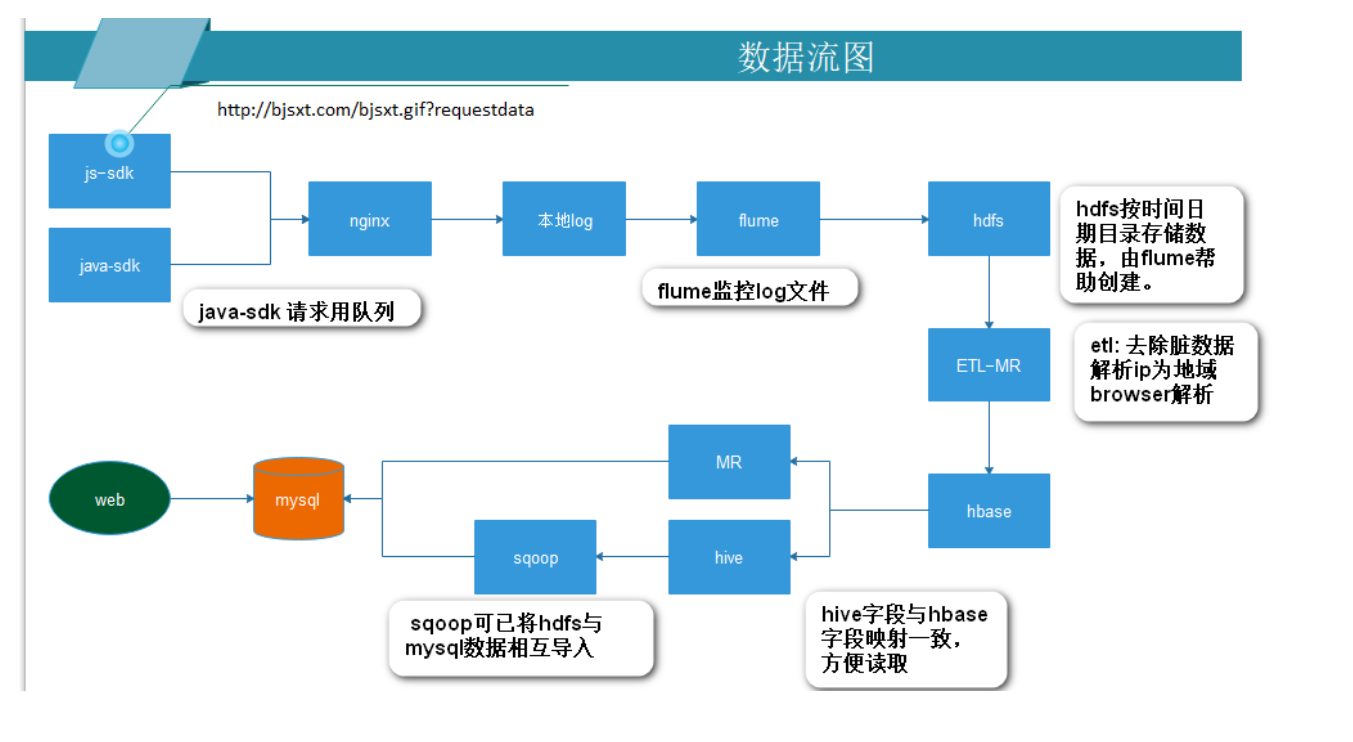
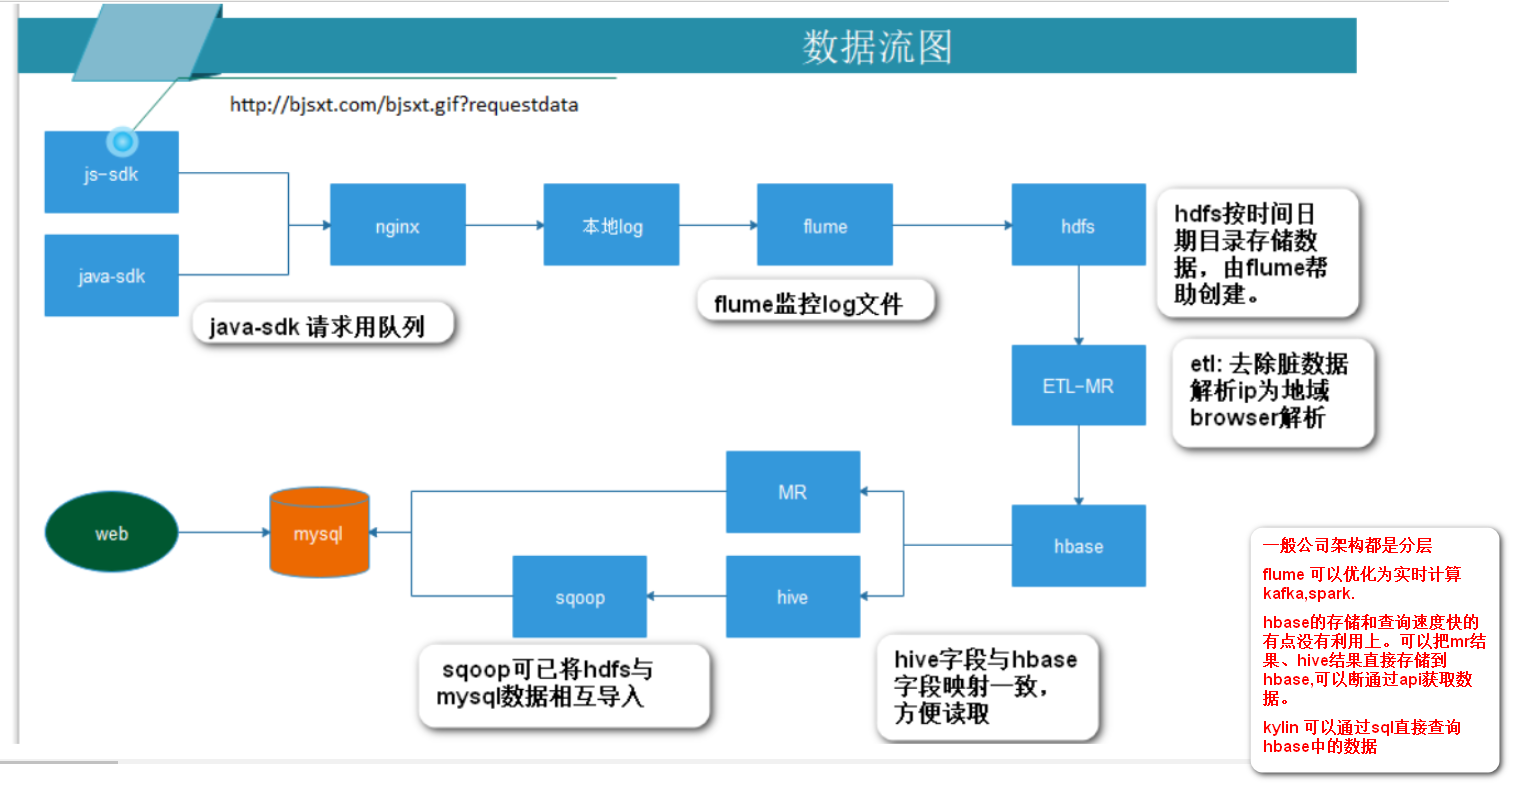
使用flume监控nginx文件,自动上传到hdfs.(以日期为目录)http://flume.apache.org/index.html 官网
配置flume 监控nginx access.log 将日志数据上传到hdfs
安装flume node2上
tar -zxvf apache-flume-1.6.0-bin.tar.gz -C /opt/sxt/
cd /opt/sxt/apache-flume-1.6.0-bin/conf/
cp flume-env.sh.template flume-env.sh
vi flume-env.sh
export JAVA_HOME=/usr/java/jdk1.8.0_221
vi /etc/profile
export FLUME_HOME=/opt/sxt/apache-flume-1.6.0-bin
export PATH=$PATH:$JAVA_HOME/bin:$HADOOP_HOME/bin:$HADOOP_HOME/sbin:$HIVE_HOME/bin:$HBASE_HOME/bin:$FLUME_HOME/bin
source /etc/profile
flume-ng
flume-ng version ## 查看版本
mkdir /opt/flumedir
cd /opt/flumedir
[root@node2 ~]# vi /opt/flumedir/option6
a1.sources = r1
a1.sinks = k1
a1.channels = c1
a1.sources.r1.type = exec
a1.sources.r1.command = tail -F /opt/data/access.log
a1.sinks.k1.type=hdfs
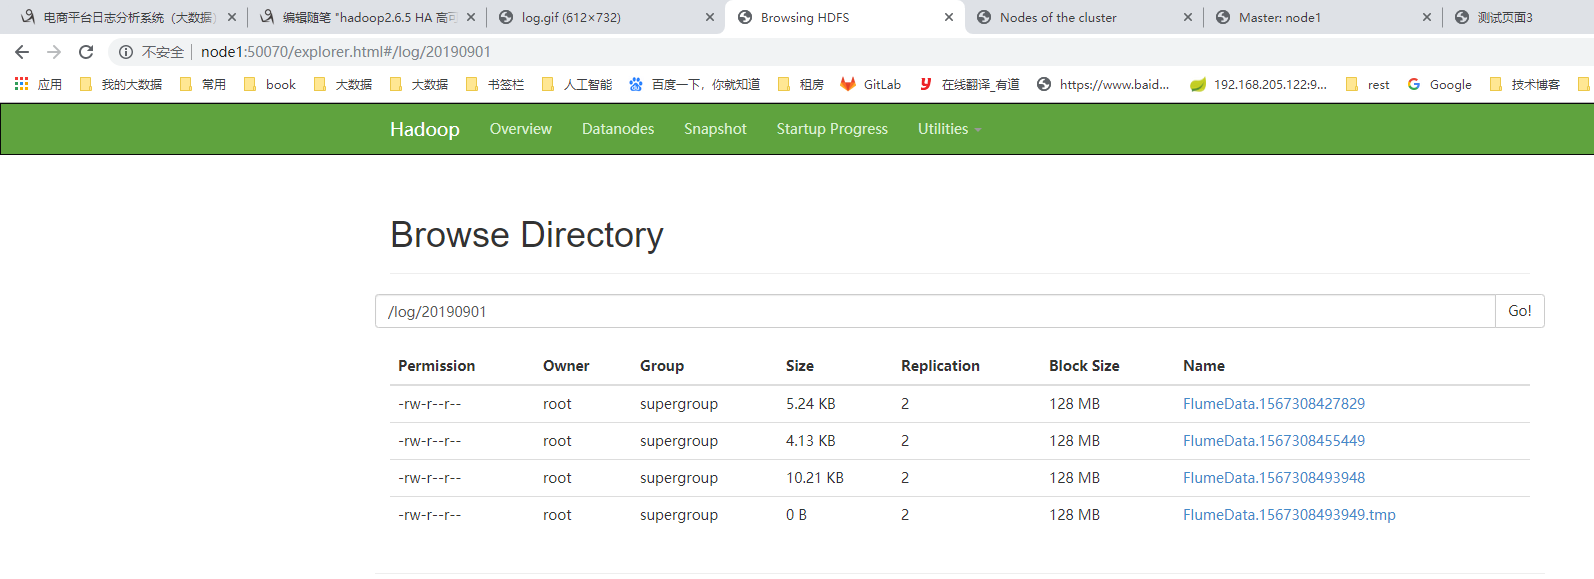
a1.sinks.k1.hdfs.path=hdfs://mycluster/log/%Y%m%d
a1.sinks.k1.hdfs.rollCount=0
a1.sinks.k1.hdfs.rollInterval=0
a1.sinks.k1.hdfs.rollSize=10240
a1.sinks.k1.hdfs.idleTimeout=5
a1.sinks.k1.hdfs.fileType=DataStream
a1.sinks.k1.hdfs.useLocalTimeStamp=true
a1.sinks.k1.hdfs.callTimeout=40000
a1.channels.c1.type = memory
a1.channels.c1.capacity = 1000
a1.channels.c1.transactionCapacity = 100
a1.sources.r1.channels = c1
a1.sinks.k1.channel = c1
[root@node2 flumedir]# flume-ng agent --conf-file option6 --name a1 -Dflume.root.logger=INFO,console ##启动监控。
## 使用项目BIG_DATA_LOG2修改node2. 不但访问node2/log.gif ## 会看到hdfs上的log下的文件增加。(上传成功)
一台机器最多挂载12块硬盘;1G 内存最大可以打开10,000个文件。 ulimit -a 查看操作系统允许最大的打开文件数。
《深入理解java虚拟机》
Scoop 将数据从mysql导入到hive,或从hive导出到mysql ## 建议使用sqoop1版本
http://sqoop.apache.org/docs/1.4.6/SqoopUserGuide.html
node4上安装sqoop. 因为node4上游hive,方便操作和配置sqoop需要的hive-home
tar -zxvf sqoop-1.4.6.bin__hadoop-2.0.4-alpha.tar.gz -C /opt/sxt/
mv sqoop-1.4.6.bin__hadoop-2.0.4-alpha sqoop-1.4.6.bin
[root@node4 sqoopdir]# tail -5 /etc/profile
export SQOOP_HOME=/opt/sxt/sqoop-1.4.6.bin
export PATH=$JAVA_HOME/bin:$PATH:$HADOOP_HOME/bin:$HADOOP_HOME/sbin:$ZOOKEEPER_HOME/bin:$HIVE_HOME/bin:$HBASE_HOME/bin:$SQOOP_HOME/bin
mv mysql-connector-java-5.1.32-bin.jar /opt/sxt/sqoop-1.4.6.bin/lib/
mv sqoop-env-template.sh sqoop-env.sh ## conf/
sqoop version
sqoop list-databases -connect jdbc:mysql://node1:3306/ -username root -password 123456
## 看到连接有warning vi bin/configure-sqoop 注释掉相应的内容
## Moved to be a runtime check in sqoop.
#if [ ! -d "${HBASE_HOME}" ]; then
# echo "Warning: $HBASE_HOME does not exist! HBase imports will fail."
# echo 'Please set $HBASE_HOME to the root of your HBase installation.'
#fi
## Moved to be a runtime check in sqoop.
#if [ ! -d "${HCAT_HOME}" ]; then
# echo "Warning: $HCAT_HOME does not exist! HCatalog jobs will fail."
# echo 'Please set $HCAT_HOME to the root of your HCatalog installation.'
#fi
#if [ ! -d "${ACCUMULO_HOME}" ]; then
# echo "Warning: $ACCUMULO_HOME does not exist! Accumulo imports will fail."
# echo 'Please set $ACCUMULO_HOME to the root of your Accumulo installation.'
#fi
[root@node3 ~]# hive --service metastore
[root@node4 ~]# hive
##测试导入导出
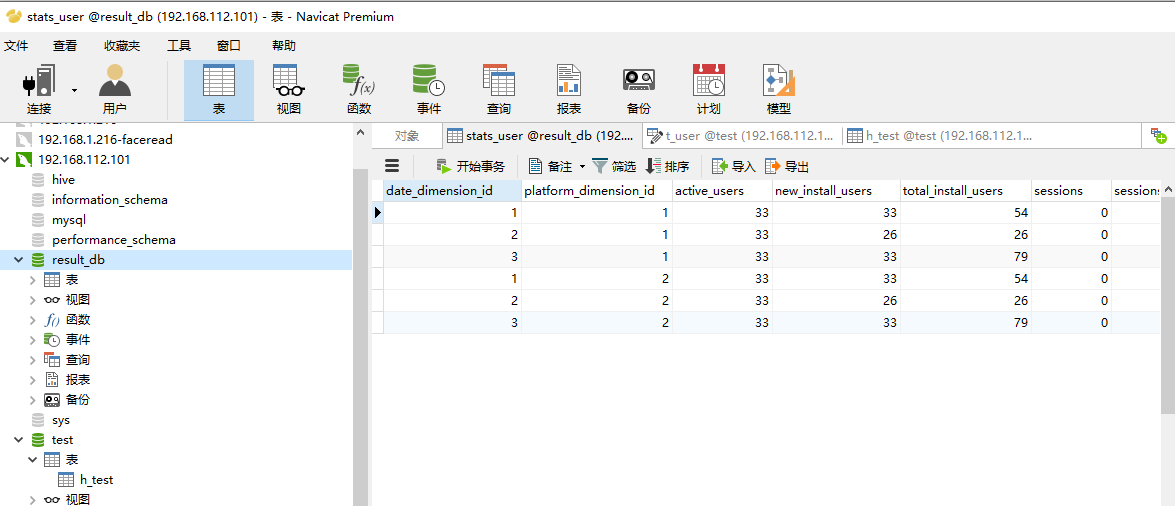
导入 mysql导入到hdfs
sqoop import --connect jdbc:mysql://node1:3306/result_db --username root --password 123456 --table stats_user --columns active_users,new_install_users -m 1 --target-dir /sqoop
[root@node4 sqoopdir]# cat option
import
--connect
jdbc:mysql://node1:3306/result_db
--username
root
--password
123456
--delete-target-dir
--table
stats_user
--columns
active_users,new_install_users
-m
1
--target-dir
/sqoop/
[root@node4 sqoopdir]# sqoop --options-file option
[root@node4 sqoopdir]# cat option2
import
--connect
jdbc:mysql://node1:3306/result_db
--username
root
--password
123456
--delete-target-dir
-e
select * from stats_user where $CONDITIONS
-m
1
--target-dir
/sqoop/
[root@node4 sqoopdir]# sqoop --options-file option2
[root@node4 sqoopdir]# cat option3
import
--connect
jdbc:mysql://node1:3306/result_db
--username
root
--password
123456
--table
stats_user
--columns
active_users,new_install_users
-m
1
--target-dir
/sqoop3/
--hive-home
/opt/sxt/apache-hive-1.2.1-bin
--hive-import
--hive-table
abc
--create-hive-table
[root@node4 sqoopdir]# sqoop --options-file option3
导出 /sqoop/临时存储的目录
[root@node4 sqoopdir]# cat option5 ## 需要提前创建mysql表
export
--connect
jdbc:mysql://node1/test
--password
123456
--username
root
-m
1
--columns
active_users,new_install_users
--export-dir
/sqoop/
--table
h_test
[root@node4 sqoopdir]# sqoop --options-file option5
Hive 与Hbase 整合
hive和hbase同步
https://cwiki.apache.org/confluence/display/Hive/HBaseIntegration

1、把hive-hbase-handler-1.2.1.jar  cp到hbase/lib 下
	同时把hbase中的所有的jar,cp到hive/lib

2、在hive的配置文件增加属性:
  <property>
    <name>hbase.zookeeper.quorum</name>
    <value>node1,node2,node3</value>
  </property>

3、在hive中创建临时表

CREATE EXTERNAL TABLE tmp_order
(key string, id string, user_id string)
STORED BY 'org.apache.hadoop.hive.hbase.HBaseStorageHandler'
WITH SERDEPROPERTIES ("hbase.columns.mapping" = ":key,order:order_id,order:user_id")
TBLPROPERTIES ("hbase.table.name" = "t_order");

CREATE TABLE hbasetbl(key int, value string)
STORED BY 'org.apache.hadoop.hive.hbase.HBaseStorageHandler'
WITH SERDEPROPERTIES ("hbase.columns.mapping" = ":key,cf1:val")
TBLPROPERTIES ("hbase.table.name" = "xyz", "hbase.mapred.output.outputtable" = "xyz");
实际操作如下:
node1启动hbase. start-hbase.sh

node4 hbase/lib下:  cp ./* /opt/sxt/apache-hive-1.2.1-bin/lib/
node4 hive/lib下 cp hive-hbase-handler-1.2.1.jar /opt/sxt/hbase-0.98.12.1-hadoop2/lib/

hive-site.xml 追加:
  <property>
    <name>hbase.zookeeper.quorum</name>
    <value>node2,node3,node4</value>
  </property>

[root@node4 ~]# hive
hive> CREATE TABLE hbasetbl(key int, value string)
    > STORED BY 'org.apache.hadoop.hive.hbase.HBaseStorageHandler'
    > WITH SERDEPROPERTIES ("hbase.columns.mapping" = ":key,cf1:val")
    > TBLPROPERTIES ("hbase.table.name" = "xyz", "hbase.mapred.output.outputtable" = "xyz");

[root@node4 ~]# hbase shell
hbase(main):002:0> list
=> ["eventlog", "t1", "xyz"]
hive> insert into hbasetbl values(1,'zhangssan');
hbase(main):006:0> flush 'xyz'
hbase(main):011:0> put 'xyz','2','cf1:val','lisi'
0 row(s) in 0.1720 seconds
hbase(main):016:0> scan 'xyz'
ROW                                               COLUMN+CELL
 1                                                column=cf1:val, timestamp=1567523182266, value=zhangssan
 2                                                column=cf1:val, timestamp=1567523480332, value=lisi

##创建hive映射外部表
hbase(main):017:0> create 't_order','order' ## 先创建hbase表
hive> CREATE EXTERNAL TABLE tmp_order
    > (key string, id string, user_id string)
    > STORED BY 'org.apache.hadoop.hive.hbase.HBaseStorageHandler'
    > WITH SERDEPROPERTIES ("hbase.columns.mapping" = ":key,order:order_id,order:user_id")
    > TBLPROPERTIES ("hbase.table.name" = "t_order");

hbase(main):020:0> put 't_order','1111','order:order_id','1'
0 row(s) in 0.0310 seconds

hbase(main):021:0> put 't_order','1111','order:user_id','2'
0 row(s) in 0.0140 seconds

hbase(main):022:0> scan 't_order'
ROW                                               COLUMN+CELL
 1111                                             column=order:order_id, timestamp=1567523716760, value=1
 1111                                             column=order:user_id, timestamp=1567523752037, value=2
hive> select * from tmp_order;
OK
1111	1	2
hive> insert into tmp_order values(2,'2222','2222');
Query ID = root_20190903231720_bd23e485-debb-4fb9-8403-da77b8d68bd7
Total jobs = 1
hive> select * from tmp_order;
OK
1111	1	2
2	2222	2222
hbase(main):023:0> scan 't_order'
ROW                                               COLUMN+CELL
 1111                                             column=order:order_id, timestamp=1567523716760, value=1
 1111                                             column=order:user_id, timestamp=1567523752037, value=2
 2                                                column=order:order_id, timestamp=1567523907249, value=2222
 2                                                column=order:user_id, timestamp=1567523907249, value=2222
用户深度:每个用户打开的页面个数,可以按天统计
用户浏览深度
## 在hive中创建临时表
CREATE EXTERNAL TABLE tmp_order
(key string, id string, user_id string)
STORED BY 'org.apache.hadoop.hive.hbase.HBaseStorageHandler'
WITH SERDEPROPERTIES ("hbase.columns.mapping" = ":key,order:order_id,order:user_id")
TBLPROPERTIES ("hbase.table.name" = "t_order");

## 建立hive与hbase的映射表
CREATE TABLE hbasetbl(key int, value string)
STORED BY 'org.apache.hadoop.hive.hbase.HBaseStorageHandler'
WITH SERDEPROPERTIES ("hbase.columns.mapping" = ":key,cf1:val")
TBLPROPERTIES ("hbase.table.name" = "xyz", "hbase.mapred.output.outputtable" = "xyz");

## 下边是查询和生成数据,导出到mysql

select
    pl, from_unixtime(cast(s_time/1000 as bigint),'yyyy-MM-dd') as day, u_ud
  from event_logs
  where
    en='e_pv'
    and p_url is not null
    and pl is not null
    and s_time >= unix_timestamp('2019-09-01','yyyy-MM-dd')*1000
    and s_time < unix_timestamp('2019-09-02','yyyy-MM-dd')*1000;


website	2019-09-01	39982907
website	2019-09-01	40857087
website	2019-09-01	15608994
website	2019-09-01	63189368


 select
    pl, from_unixtime(cast(s_time/1000 as bigint),'yyyy-MM-dd') as day, u_ud,
    (case when count(p_url) = 1 then "pv1"
      when count(p_url) = 2 then "pv2"
      when count(p_url) = 3 then "pv3"
      when count(p_url) = 4 then "pv4"
      when count(p_url) >= 5 and count(p_url) <10 then "pv5_10"
      when count(p_url) >= 10 and count(p_url) <30 then "pv10_30"
      when count(p_url) >=30 and count(p_url) <60 then "pv30_60"
      else 'pv60_plus' end) as pv
  from event_logs
  where
    en='e_pv'
    and p_url is not null
    and pl is not null
    and s_time >= unix_timestamp('2019-09-01','yyyy-MM-dd')*1000
    and s_time < unix_timestamp('2019-09-02','yyyy-MM-dd')*1000
  group by
    pl, from_unixtime(cast(s_time/1000 as bigint),'yyyy-MM-dd'), u_ud;


website	2019-09-01	03258153	pv3
website	2019-09-01	14210420	pv3
website	2019-09-01	15608994	pv3
website	2019-09-01	16364347	pv1
website	2019-09-01	18704819	pv1
website	2019-09-01	25173773	pv1
website	2019-09-01	26637529	pv2
website	2019-09-01	29667178	pv1
website	2019-09-01	31736226	pv1
website	2019-09-01	32058858	pv1


from (
  select
    pl, from_unixtime(cast(s_time/1000 as bigint),'yyyy-MM-dd') as day, u_ud,
    (case when count(p_url) = 1 then "pv1"
      when count(p_url) = 2 then "pv2"
      when count(p_url) = 3 then "pv3"
      when count(p_url) = 4 then "pv4"
      when count(p_url) >= 5 and count(p_url) <10 then "pv5_10"
      when count(p_url) >= 10 and count(p_url) <30 then "pv10_30"
      when count(p_url) >=30 and count(p_url) <60 then "pv30_60"
      else 'pv60_plus' end) as pv
  from event_logs
  where
    en='e_pv'
    and p_url is not null
    and pl is not null
    and s_time >= unix_timestamp('2019-09-01','yyyy-MM-dd')*1000
    and s_time < unix_timestamp('2019-09-02','yyyy-MM-dd')*1000
  group by
    pl, from_unixtime(cast(s_time/1000 as bigint),'yyyy-MM-dd'), u_ud
) as tmp
insert overwrite table stats_view_depth_tmp
  select pl,day,pv,count(distinct u_ud) as ct where u_ud is not null group by pl,day,pv;


 hive> select * from stats_view_depth_tmp;
OK
website	2019-09-01	pv1	13
website	2019-09-01	pv2	3
website	2019-09-01	pv3	8
website	2019-09-01	pv4	2
Time taken: 0.195 seconds, Fetched: 4 row(s)

website 2018-08-09 pv1 pv2 pv3 pv4 pv5-10 行列转换


hive> select pl,`date` as date1,ct as pv1,0 as pv2,0 as pv3,0 as pv4,0 as pv5_10,0 as pv10_30,0 as pv30_60,0 as pv60_plus from stats_view_depth_tmp where col='pv1';
....
OK
website	2019-09-01	13	0	0	0	0	0	0	0
website	2019-09-01	0	3	0	0	0	0	0	0


select pl,`date` as date1,ct as pv1,0 as pv2,0 as pv3,0 as pv4,0 as pv5_10,0 as pv10_30,0 as pv30_60,0 as pv60_plus from stats_view_depth_tmp where col='pv1' union all
select pl,`date` as date1,0 as pv1,ct as pv2,0 as pv3,0 as pv4,0 as pv5_10,0 as pv10_30,0 as pv30_60,0 as pv60_plus from stats_view_depth_tmp where col='pv2' union all
select pl,`date` as date1,0 as pv1,0 as pv2,ct as pv3,0 as pv4,0 as pv5_10,0 as pv10_30,0 as pv30_60,0 as pv60_plus from stats_view_depth_tmp where col='pv3' union all
select pl,`date` as date1,0 as pv1,0 as pv2,0 as pv3,ct as pv4,0 as pv5_10,0 as pv10_30,0 as pv30_60,0 as pv60_plus from stats_view_depth_tmp where col='pv4' union all
select pl,`date` as date1,0 as pv1,0 as pv2,0 as pv3,0 as pv4,ct as pv5_10,0 as pv10_30,0 as pv30_60,0 as pv60_plus from stats_view_depth_tmp where col='pv5_10' union all
select pl,`date` as date1,0 as pv1,0 as pv2,0 as pv3,0 as pv4,0 as pv5_10,ct as pv10_30,0 as pv30_60,0 as pv60_plus from stats_view_depth_tmp where col='pv10_30' union all
select pl,`date` as date1,0 as pv1,0 as pv2,0 as pv3,0 as pv4,0 as pv5_10,0 as pv10_30,ct as pv30_60,0 as pv60_plus from stats_view_depth_tmp where col='pv30_60' union all
select pl,`date` as date1,0 as pv1,0 as pv2,0 as pv3,0 as pv4,0 as pv5_10,0 as pv10_30,0 as pv30_60,ct as pv60_plus from stats_view_depth_tmp where col='pv60_plus'

Total MapReduce CPU Time Spent: 12 seconds 580 msec
OK
website	2019-09-01	13	0	0	0	0	0	0	0
website	2019-09-01	0	3	0	0	0	0	0	0
website	2019-09-01	0	0	8	0	0	0	0	0
website	2019-09-01	0	0	0	2	0	0	0	0

select 'all' as pl,`date` as date1,ct as pv1,0 as pv2,0 as pv3,0 as pv4,0 as pv5_10,0 as pv10_30,0 as pv30_60,0 as pv60_plus from stats_view_depth_tmp where col='pv1' union all
select 'all' as pl,`date` as date1,0 as pv1,ct as pv2,0 as pv3,0 as pv4,0 as pv5_10,0 as pv10_30,0 as pv30_60,0 as pv60_plus from stats_view_depth_tmp where col='pv2' union all
select 'all' as pl,`date` as date1,0 as pv1,0 as pv2,ct as pv3,0 as pv4,0 as pv5_10,0 as pv10_30,0 as pv30_60,0 as pv60_plus from stats_view_depth_tmp where col='pv3' union all
select 'all' as pl,`date` as date1,0 as pv1,0 as pv2,0 as pv3,ct as pv4,0 as pv5_10,0 as pv10_30,0 as pv30_60,0 as pv60_plus from stats_view_depth_tmp where col='pv4' union all
select 'all' as pl,`date` as date1,0 as pv1,0 as pv2,0 as pv3,0 as pv4,ct as pv5_10,0 as pv10_30,0 as pv30_60,0 as pv60_plus from stats_view_depth_tmp where col='pv5_10' union all
select 'all' as pl,`date` as date1,0 as pv1,0 as pv2,0 as pv3,0 as pv4,0 as pv5_10,ct as pv10_30,0 as pv30_60,0 as pv60_plus from stats_view_depth_tmp where col='pv10_30' union all
select 'all' as pl,`date` as date1,0 as pv1,0 as pv2,0 as pv3,0 as pv4,0 as pv5_10,0 as pv10_30,ct as pv30_60,0 as pv60_plus from stats_view_depth_tmp where col='pv30_60' union all
select 'all' as pl,`date` as date1,0 as pv1,0 as pv2,0 as pv3,0 as pv4,0 as pv5_10,0 as pv10_30,0 as pv30_60,ct as pv60_plus from stats_view_depth_tmp where col='pv60_plus'

Total MapReduce CPU Time Spent: 1 seconds 760 msec
OK
all	2019-09-01	13	0	0	0	0	0	0	0
all	2019-09-01	0	3	0	0	0	0	0	0
all	2019-09-01	0	0	8	0	0	0	0	0
all	2019-09-01	0	0	0	2	0	0	0	0


hive> select pl,`date` as date1,ct as pv1,0 as pv2,0 as pv3,0 as pv4,0 as pv5_10,0 as pv10_30,0 as pv30_60,0 as pv60_plus from stats_view_depth_tmp where col='pv1' union all
    > select pl,`date` as date1,0 as pv1,ct as pv2,0 as pv3,0 as pv4,0 as pv5_10,0 as pv10_30,0 as pv30_60,0 as pv60_plus from stats_view_depth_tmp where col='pv2' union all
    > select pl,`date` as date1,0 as pv1,0 as pv2,ct as pv3,0 as pv4,0 as pv5_10,0 as pv10_30,0 as pv30_60,0 as pv60_plus from stats_view_depth_tmp where col='pv3' union all
    > select pl,`date` as date1,0 as pv1,0 as pv2,0 as pv3,ct as pv4,0 as pv5_10,0 as pv10_30,0 as pv30_60,0 as pv60_plus from stats_view_depth_tmp where col='pv4' union all
    > select pl,`date` as date1,0 as pv1,0 as pv2,0 as pv3,0 as pv4,ct as pv5_10,0 as pv10_30,0 as pv30_60,0 as pv60_plus from stats_view_depth_tmp where col='pv5_10' union all
    > select pl,`date` as date1,0 as pv1,0 as pv2,0 as pv3,0 as pv4,0 as pv5_10,ct as pv10_30,0 as pv30_60,0 as pv60_plus from stats_view_depth_tmp where col='pv10_30' union all
    > select pl,`date` as date1,0 as pv1,0 as pv2,0 as pv3,0 as pv4,0 as pv5_10,0 as pv10_30,ct as pv30_60,0 as pv60_plus from stats_view_depth_tmp where col='pv30_60' union all
    > select pl,`date` as date1,0 as pv1,0 as pv2,0 as pv3,0 as pv4,0 as pv5_10,0 as pv10_30,0 as pv30_60,ct as pv60_plus from stats_view_depth_tmp where col='pv60_plus' union all
    >
    > select 'all' as pl,`date` as date1,ct as pv1,0 as pv2,0 as pv3,0 as pv4,0 as pv5_10,0 as pv10_30,0 as pv30_60,0 as pv60_plus from stats_view_depth_tmp where col='pv1' union all
    > select 'all' as pl,`date` as date1,0 as pv1,ct as pv2,0 as pv3,0 as pv4,0 as pv5_10,0 as pv10_30,0 as pv30_60,0 as pv60_plus from stats_view_depth_tmp where col='pv2' union all
    > select 'all' as pl,`date` as date1,0 as pv1,0 as pv2,ct as pv3,0 as pv4,0 as pv5_10,0 as pv10_30,0 as pv30_60,0 as pv60_plus from stats_view_depth_tmp where col='pv3' union all
    > select 'all' as pl,`date` as date1,0 as pv1,0 as pv2,0 as pv3,ct as pv4,0 as pv5_10,0 as pv10_30,0 as pv30_60,0 as pv60_plus from stats_view_depth_tmp where col='pv4' union all
    > select 'all' as pl,`date` as date1,0 as pv1,0 as pv2,0 as pv3,0 as pv4,ct as pv5_10,0 as pv10_30,0 as pv30_60,0 as pv60_plus from stats_view_depth_tmp where col='pv5_10' union all
    > select 'all' as pl,`date` as date1,0 as pv1,0 as pv2,0 as pv3,0 as pv4,0 as pv5_10,ct as pv10_30,0 as pv30_60,0 as pv60_plus from stats_view_depth_tmp where col='pv10_30' union all
    > select 'all' as pl,`date` as date1,0 as pv1,0 as pv2,0 as pv3,0 as pv4,0 as pv5_10,0 as pv10_30,ct as pv30_60,0 as pv60_plus from stats_view_depth_tmp where col='pv30_60' union all
    > select 'all' as pl,`date` as date1,0 as pv1,0 as pv2,0 as pv3,0 as pv4,0 as pv5_10,0 as pv10_30,0 as pv30_60,ct as pv60_plus from stats_view_depth_tmp where col='pv60_plus';


Total MapReduce CPU Time Spent: 2 seconds 20 msec
OK
website	2019-09-01	13	0	0	0	0	0	0	0
all	2019-09-01	13	0	0	0	0	0	0	0
website	2019-09-01	0	3	0	0	0	0	0	0
all	2019-09-01	0	3	0	0	0	0	0	0
website	2019-09-01	0	0	8	0	0	0	0	0
all	2019-09-01	0	0	8	0	0	0	0	0
website	2019-09-01	0	0	0	2	0	0	0	0
all	2019-09-01	0	0	0	2	0	0	0	0
Time taken: 19.994 seconds, Fetched: 8 row(s)


with tmp as
(
select pl,`date` as date1,ct as pv1,0 as pv2,0 as pv3,0 as pv4,0 as pv5_10,0 as pv10_30,0 as pv30_60,0 as pv60_plus from stats_view_depth_tmp where col='pv1' union all
select pl,`date` as date1,0 as pv1,ct as pv2,0 as pv3,0 as pv4,0 as pv5_10,0 as pv10_30,0 as pv30_60,0 as pv60_plus from stats_view_depth_tmp where col='pv2' union all
select pl,`date` as date1,0 as pv1,0 as pv2,ct as pv3,0 as pv4,0 as pv5_10,0 as pv10_30,0 as pv30_60,0 as pv60_plus from stats_view_depth_tmp where col='pv3' union all
select pl,`date` as date1,0 as pv1,0 as pv2,0 as pv3,ct as pv4,0 as pv5_10,0 as pv10_30,0 as pv30_60,0 as pv60_plus from stats_view_depth_tmp where col='pv4' union all
select pl,`date` as date1,0 as pv1,0 as pv2,0 as pv3,0 as pv4,ct as pv5_10,0 as pv10_30,0 as pv30_60,0 as pv60_plus from stats_view_depth_tmp where col='pv5_10' union all
select pl,`date` as date1,0 as pv1,0 as pv2,0 as pv3,0 as pv4,0 as pv5_10,ct as pv10_30,0 as pv30_60,0 as pv60_plus from stats_view_depth_tmp where col='pv10_30' union all
select pl,`date` as date1,0 as pv1,0 as pv2,0 as pv3,0 as pv4,0 as pv5_10,0 as pv10_30,ct as pv30_60,0 as pv60_plus from stats_view_depth_tmp where col='pv30_60' union all
select pl,`date` as date1,0 as pv1,0 as pv2,0 as pv3,0 as pv4,0 as pv5_10,0 as pv10_30,0 as pv30_60,ct as pv60_plus from stats_view_depth_tmp where col='pv60_plus' union all

select 'all' as pl,`date` as date1,ct as pv1,0 as pv2,0 as pv3,0 as pv4,0 as pv5_10,0 as pv10_30,0 as pv30_60,0 as pv60_plus from stats_view_depth_tmp where col='pv1' union all
select 'all' as pl,`date` as date1,0 as pv1,ct as pv2,0 as pv3,0 as pv4,0 as pv5_10,0 as pv10_30,0 as pv30_60,0 as pv60_plus from stats_view_depth_tmp where col='pv2' union all
select 'all' as pl,`date` as date1,0 as pv1,0 as pv2,ct as pv3,0 as pv4,0 as pv5_10,0 as pv10_30,0 as pv30_60,0 as pv60_plus from stats_view_depth_tmp where col='pv3' union all
select 'all' as pl,`date` as date1,0 as pv1,0 as pv2,0 as pv3,ct as pv4,0 as pv5_10,0 as pv10_30,0 as pv30_60,0 as pv60_plus from stats_view_depth_tmp where col='pv4' union all
select 'all' as pl,`date` as date1,0 as pv1,0 as pv2,0 as pv3,0 as pv4,ct as pv5_10,0 as pv10_30,0 as pv30_60,0 as pv60_plus from stats_view_depth_tmp where col='pv5_10' union all
select 'all' as pl,`date` as date1,0 as pv1,0 as pv2,0 as pv3,0 as pv4,0 as pv5_10,ct as pv10_30,0 as pv30_60,0 as pv60_plus from stats_view_depth_tmp where col='pv10_30' union all
select 'all' as pl,`date` as date1,0 as pv1,0 as pv2,0 as pv3,0 as pv4,0 as pv5_10,0 as pv10_30,ct as pv30_60,0 as pv60_plus from stats_view_depth_tmp where col='pv30_60' union all
select 'all' as pl,`date` as date1,0 as pv1,0 as pv2,0 as pv3,0 as pv4,0 as pv5_10,0 as pv10_30,0 as pv30_60,ct as pv60_plus from stats_view_depth_tmp where col='pv60_plus'
)
from tmp
insert overwrite table stats_view_depth
select 2,3,6,sum(pv1),sum(pv2),sum(pv3),sum(pv4),sum(pv5_10),sum(pv10_30),sum(pv30_60),sum(pv60_plus),'2019-09-01' group by pl,date1;

hive> select * from stats_view_depth;
OK
2	3	6	13	3	8	2	0	0	0	0	2019-09-01
2	3	6	13	3	8	2	0	0	0	0	2019-09-01

sqoop export --connect jdbc:mysql://node1:3306/result_db --username root --password 123456 --table stats_view_depth --export-dir /user/hive/warehouse/stats_view_depth/* --input-fields-terminated-by "\\t" --update-mode allowinsert --update-key platform_dimension_id,data_dimension_id,kpi_dimension_id

当谢伟脚本时:用 '\t' ,否则会报错
可以使用linux contab 设置定时执行脚本, java -jar 执行ETL
可以定制执行hive hql。

如: view_depth_run.sh

#!/bin/bash

startDate=''
endDate=''

until [ $# -eq 0 ]
do
	if [ $1'x' = '-sdx' ]; then
		shift
		startDate=$1
	elif [ $1'x' = '-edx' ]; then
		shift
		endDate=$1
	fi
	shift
done

if [ -n "$startDate" ] && [ -n "$endDate" ]; then
	echo "use the arguments of the date"
else
	echo "use the default date"
	startDate=$(date -d last-day +%Y-%m-%d)
	endDate=$(date +%Y-%m-%d)
fi
echo "run of arguments. start date is:$startDate, end date is:$endDate"
echo "start run of view depth job "

## insert overwrite
echo "start insert user data to hive tmp table"
hive  -e "from (select pl, from_unixtime(cast(s_time/1000 as bigint),'yyyy-MM-dd') as day, u_ud, (case when count(p_url) = 1 then 'pv1' when count(p_url) = 2 then 'pv2' when count(p_url) = 3 then 'pv3' when count(p_url) = 4 then 'pv4' when count(p_url) >= 5 and count(p_url) <10 then 'pv5_10' when count(p_url) >= 10 and count(p_url) <30 then 'pv10_30' when count(p_url) >=30 and count(p_url) <60 then 'pv30_60'  else 'pv60_plus' end) as pv from event_logs where en='e_pv' and p_url is not null and pl is not null and s_time >= unix_timestamp('$startDate','yyyy-MM-dd')*1000 and s_time < unix_timestamp('$endDate','yyyy-MM-dd')*1000 group by pl, from_unixtime(cast(s_time/1000 as bigint),'yyyy-MM-dd'), u_ud) as tmp insert overwrite table stats_view_depth_tmp select pl,day,pv,count(distinct u_ud) as ct where u_ud is not null group by pl,day,pv"

echo "start insert user data to hive table"
hive  -e "with tmp as (select pl,date,ct as pv1,0 as pv2,0 as pv3,0 as pv4,0 as pv5_10,0 as pv10_30,0 as pv30_60,0 as pv60_plus from stats_view_depth_tmp where col='pv1' union all select pl,date,0 as pv1,ct as pv2,0 as pv3,0 as pv4,0 as pv5_10,0 as pv10_30,0 as pv30_60,0 as pv60_plus from stats_view_depth_tmp where col='pv2' union all select pl,date,0 as pv1,0 as pv2,ct as pv3,0 as pv4,0 as pv5_10,0 as pv10_30,0 as pv30_60,0 as pv60_plus from stats_view_depth_tmp where col='pv3' union all select pl,date,0 as pv1,0 as pv2,0 as pv3,ct as pv4,0 as pv5_10,0 as pv10_30,0 as pv30_60,0 as pv60_plus from stats_view_depth_tmp where col='pv4' union all select pl,date,0 as pv1,0 as pv2,0 as pv3,0 as pv4,ct as pv5_10,0 as pv10_30,0 as pv30_60,0 as pv60_plus from stats_view_depth_tmp where col='pv5_10' union all select pl,date,0 as pv1,0 as pv2,0 as pv3,0 as pv4,0 as pv5_10,ct as pv10_30,0 as pv30_60,0 as pv60_plus from stats_view_depth_tmp where col='pv10_30' union all select pl,date,0 as pv1,0 as pv2,0 as pv3,0 as pv4,0 as pv5_10,0 as pv10_30,ct as pv30_60,0 as pv60_plus from stats_view_depth_tmp where col='pv30_60' union all select pl,date,0 as pv1,0 as pv2,0 as pv3,0 as pv4,0 as pv5_10,0 as pv10_30,0 as pv30_60,ct as pv60_plus from stats_view_depth_tmp where col='pv60_plus' union all select 'all' as pl,date,ct as pv1,0 as pv2,0 as pv3,0 as pv4,0 as pv5_10,0 as pv10_30,0 as pv30_60,0 as pv60_plus from stats_view_depth_tmp where col='pv1' union all select 'all' as pl,date,0 as pv1,ct as pv2,0 as pv3,0 as pv4,0 as pv5_10,0 as pv10_30,0 as pv30_60,0 as pv60_plus from stats_view_depth_tmp where col='pv2' union all select 'all' as pl,date,0 as pv1,0 as pv2,ct as pv3,0 as pv4,0 as pv5_10,0 as pv10_30,0 as pv30_60,0 as pv60_plus from stats_view_depth_tmp where col='pv3' union all select 'all' as pl,date,0 as pv1,0 as pv2,0 as pv3,ct as pv4,0 as pv5_10,0 as pv10_30,0 as pv30_60,0 as pv60_plus from stats_view_depth_tmp where col='pv4' union all select 'all' as pl,date,0 as pv1,0 as pv2,0 as pv3,0 as pv4,ct as pv5_10,0 as pv10_30,0 as pv30_60,0 as pv60_plus from stats_view_depth_tmp where col='pv5_10' union all select 'all' as pl,date,0 as pv1,0 as pv2,0 as pv3,0 as pv4,0 as pv5_10,ct as pv10_30,0 as pv30_60,0 as pv60_plus from stats_view_depth_tmp where col='pv10_30' union all select 'all' as pl,date,0 as pv1,0 as pv2,0 as pv3,0 as pv4,0 as pv5_10,0 as pv10_30,ct as pv30_60,0 as pv60_plus from stats_view_depth_tmp where col='pv30_60' union all select 'all' as pl,date,0 as pv1,0 as pv2,0 as pv3,0 as pv4,0 as pv5_10,0 as pv10_30,0 as pv30_60,ct as pv60_plus from stats_view_depth_tmp where col='pv60_plus' ) from tmp insert overwrite table stats_view_depth select platform_convert(pl),date_convert(date),5,sum(pv1),sum(pv2),sum(pv3),sum(pv4),sum(pv5_10),sum(pv10_30),sum(pv30_60),sum(pv60_plus),date group by pl,date"

echo "start insert session date to hive tmp table"
hive  -e "from (select pl, from_unixtime(cast(s_time/1000 as bigint),'yyyy-MM-dd') as day, u_sd, (case when count(p_url) = 1 then 'pv1' when count(p_url) = 2 then 'pv2' when count(p_url) = 3 then 'pv3' when count(p_url) = 4 then 'pv4' when count(p_url) >= 5 and count(p_url) <10 then 'pv5_10' when count(p_url) >= 10 and count(p_url) <30 then 'pv10_30' when count(p_url) >=30 and count(p_url) <60 then 'pv30_60'  else 'pv60_plus' end) as pv from event_logs where en='e_pv' and p_url is not null and pl is not null and s_time >= unix_timestamp('$startDate','yyyy-MM-dd')*1000 and s_time < unix_timestamp('$endDate','yyyy-MM-dd')*1000 group by pl, from_unixtime(cast(s_time/1000 as bigint),'yyyy-MM-dd'), u_sd ) as tmp insert overwrite table stats_view_depth_tmp select pl,day,pv,count(distinct u_sd) as ct where u_sd is not null group by pl,day,pv"

## insert into
echo "start insert session data to hive table"
hive --database bigdater -e "with tmp as (select pl,date,ct as pv1,0 as pv2,0 as pv3,0 as pv4,0 as pv5_10,0 as pv10_30,0 as pv30_60,0 as pv60_plus from stats_view_depth_tmp where col='pv1' union all select pl,date,0 as pv1,ct as pv2,0 as pv3,0 as pv4,0 as pv5_10,0 as pv10_30,0 as pv30_60,0 as pv60_plus from stats_view_depth_tmp where col='pv2' union all select pl,date,0 as pv1,0 as pv2,ct as pv3,0 as pv4,0 as pv5_10,0 as pv10_30,0 as pv30_60,0 as pv60_plus from stats_view_depth_tmp where col='pv3' union all select pl,date,0 as pv1,0 as pv2,0 as pv3,ct as pv4,0 as pv5_10,0 as pv10_30,0 as pv30_60,0 as pv60_plus from stats_view_depth_tmp where col='pv4' union all select pl,date,0 as pv1,0 as pv2,0 as pv3,0 as pv4,ct as pv5_10,0 as pv10_30,0 as pv30_60,0 as pv60_plus from stats_view_depth_tmp where col='pv5_10' union all select pl,date,0 as pv1,0 as pv2,0 as pv3,0 as pv4,0 as pv5_10,ct as pv10_30,0 as pv30_60,0 as pv60_plus from stats_view_depth_tmp where col='pv10_30' union all select pl,date,0 as pv1,0 as pv2,0 as pv3,0 as pv4,0 as pv5_10,0 as pv10_30,ct as pv30_60,0 as pv60_plus from stats_view_depth_tmp where col='pv30_60' union all select pl,date,0 as pv1,0 as pv2,0 as pv3,0 as pv4,0 as pv5_10,0 as pv10_30,0 as pv30_60,ct as pv60_plus from stats_view_depth_tmp where col='pv60_plus' union all select 'all' as pl,date,ct as pv1,0 as pv2,0 as pv3,0 as pv4,0 as pv5_10,0 as pv10_30,0 as pv30_60,0 as pv60_plus from stats_view_depth_tmp where col='pv1' union all select 'all' as pl,date,0 as pv1,ct as pv2,0 as pv3,0 as pv4,0 as pv5_10,0 as pv10_30,0 as pv30_60,0 as pv60_plus from stats_view_depth_tmp where col='pv2' union all select 'all' as pl,date,0 as pv1,0 as pv2,ct as pv3,0 as pv4,0 as pv5_10,0 as pv10_30,0 as pv30_60,0 as pv60_plus from stats_view_depth_tmp where col='pv3' union all select 'all' as pl,date,0 as pv1,0 as pv2,0 as pv3,ct as pv4,0 as pv5_10,0 as pv10_30,0 as pv30_60,0 as pv60_plus from stats_view_depth_tmp where col='pv4' union all select 'all' as pl,date,0 as pv1,0 as pv2,0 as pv3,0 as pv4,ct as pv5_10,0 as pv10_30,0 as pv30_60,0 as pv60_plus from stats_view_depth_tmp where col='pv5_10' union all select 'all' as pl,date,0 as pv1,0 as pv2,0 as pv3,0 as pv4,0 as pv5_10,ct as pv10_30,0 as pv30_60,0 as pv60_plus from stats_view_depth_tmp where col='pv10_30' union all select 'all' as pl,date,0 as pv1,0 as pv2,0 as pv3,0 as pv4,0 as pv5_10,0 as pv10_30,ct as pv30_60,0 as pv60_plus from stats_view_depth_tmp where col='pv30_60' union all select 'all' as pl,date,0 as pv1,0 as pv2,0 as pv3,0 as pv4,0 as pv5_10,0 as pv10_30,0 as pv30_60,ct as pv60_plus from stats_view_depth_tmp where col='pv60_plus' ) from tmp insert into table stats_view_depth select platform_convert(pl),date_convert(date),6,sum(pv1),sum(pv2),sum(pv3),sum(pv4),sum(pv5_10),sum(pv10_30),sum(pv30_60),sum(pv60_plus),'2015-12-13' group by pl,date"

## sqoop
echo "run the sqoop script,insert hive data to mysql table"
sqoop export --connect jdbc:mysql://hh:3306/report --username hive --password hive --table stats_view_depth --export-dir /hive/bigdater.db/stats_view_depth/* --input-fields-terminated-by "\\01" --update-mode allowinsert --update-key platform_dimension_id,data_dimension_id,kpi_dimension_id
echo "complete run the view depth job"

 浙公网安备 33010602011771号