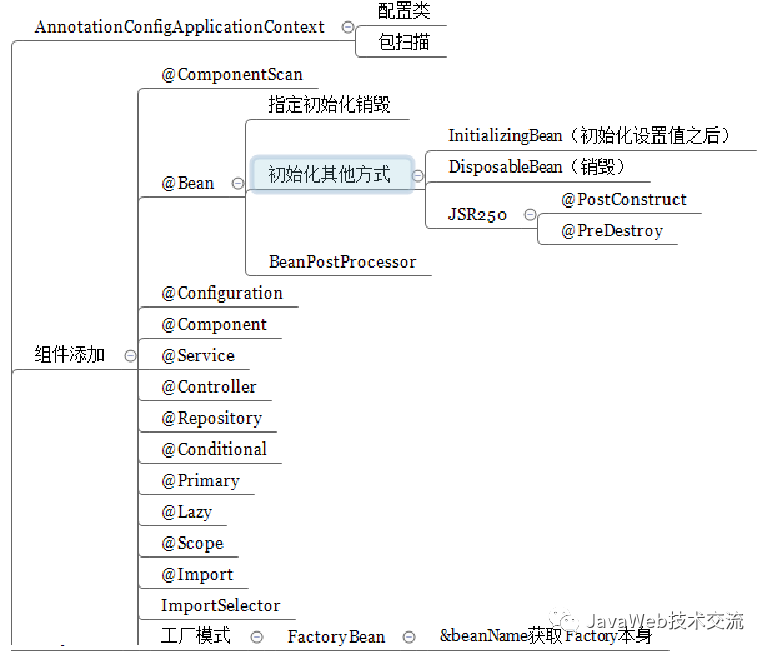
工作及面试的过程中,作为Java开发,Spring环绕在我们的身边,很多人都是一知半解,本次将用14天时间,针对容器中注解、组件、源码进行解读,AOP概念进行全方面360°无死角介绍,SpringMVC知识介绍与讲解,将整个Spring进行一个整体介绍,学会承包你后面所有的装逼,吊打面试官。你学“废”了嘛~

一、Spring基础
Spring是什么
Spring是一种开源轻量级框架,是为了解决企业应用程序开发复杂性而创建的。Spring致力于解决JavaEE的各层解决方案,而不仅仅于某一层方案。
Spring发展历程
2003年2月Spring框架正式成为一道开源项目,Spring致力于J2EE应用的各种解决方案,而不仅仅专注于某一层解决方案。可以说Spring是企业应用开发的“一站式”选择,Spring贯穿于表现层、业务层、持久层,然而Spring并不想取代那些已经有的框架,而是以高度的开放性,与这些已有的框架进行整合。
Spring的目标
-
让现有的技术更容易使用
-
促进良好的编程习惯
Spring是一个全面的解决方案,它坚持一个原则:从不重新造轮子。
已经有较好解决方案的领域,Spring绝不重复实现。比如:对象持久化和OR映射;
Spring只对现有的JDBC、Hibernate等技术提供支持,使之更容易使用,而不做重复实现。Spring框架有很多特性,这些特性由7个定义良好的模块构成。
Spring体系结构
| SpringCore | ApplicationContext | SpringWeb | MVC | SpringDAO | ORM | AOP |
1. Spring Core:Spring核心,它是框架最基础的部分,提供IOC和依赖注入的特性;
2. Spring Context:Spring上下文容器,它是BeanFactory功能加强的一个子接口;
3. Spring Web:它提供Web应用开发的支持;
4. Spring MVC:它针对Web应用中MVC思想的实现;
5. Spring DAO:提供对JDBC抽象层,简化了JDBC编码,同时,编码更具有健壮性;
6. Spring ORM:它支持用于流行的ORM框架的整合,比如:Spring + Hibernate、Spring + iBatis的整合等等;
7. Spring AOP:AOP,即面向切面编程,它提供了与AOP联盟兼容的编程实现。
(关于IOC、AOP等概念,后续会偷偷讲解)
Spring常用组件

接下来就将对各组件及注解进行详细分析
一、将工程从XML到注解
作为Javaer,都知道最开始时候,都是在xml文件里面去注入bean对象:
bean.xml
-
-
<beans xmlns="http://www.springframework.org/schema/beans"
-
xmlns:xsi="http://www.w3.org/2001/XMLSchema-instance"
-
xsi:schemaLocation="http://www.springframework.org/schema/beans http://www.springframework.org/schema/beans/spring-beans.xsd">
-
-
<bean id="person" class="com.cansluck.spring1.Person">
-
<property name="name" value="Cansluck"></property>
-
<property name="age" value="29"></property>
-
</bean>
-
</beans>
类似上面的bean对象,在xml文件里面将其注入并定义属性,这样非常的麻烦。
我们如果调用的话需要用到ClassPathXmlApplicationContext类,用来获取类路径下的xml。
创建一个person实体类:
-
public class Person {
-
private String name;
-
private Integer age;
-
-
public Person(){
-
super();
-
}
-
public String getName() {
-
return name;
-
}
-
public void setName(String name) {
-
this.name = name;
-
}
-
public Person(String name, Integer age) {
-
super();
-
this.name = name;
-
this.age = age;
-
}
-
public Integer getAge() {
-
return age;
-
}
-
-
public String toString() {
-
return "Person [name=" + name + ", age=" + age + "]";
-
}
-
public void setAge(Integer age) {
-
this.age = age;
-
}
-
}
再定义一个测试类:
-
import org.springframework.context.ApplicationContext;
-
import org.springframework.context.support.ClassPathXmlApplicationContext;
-
-
public class MainTest1 {
-
public static void main(String[] args) {
-
// 把beans.xml的类加载到容器
-
ApplicationContext app
-
= new ClassPathXmlApplicationContext("bean.xml");
-
// 从容器中获取bean
-
Person person = (Person) app.getBean("person");
-
System.out.println(person);
-
}
-
}
作为开发者,是不能忍受这样一个一个重复去造轮子去写的,如果用注解开发,很明显是不需要xml的。因此Spring提供了@Configuration注解,关于Configuration注解使用,官方文档描述:
1. @Configuration注释类表明其主要目的是作为bean定义的源
2. @Configuration类允许通过调用同一类中的其他@Bean方法来定义bean之间的依赖关系
作者认为,@Configuration就等于配置文件,配置文件如下:
-
package com.cansluck.spring1.config;
-
-
import org.springframework.context.annotation.Bean;
-
import org.springframework.context.annotation.Configuration;
-
-
import com.enjoy.cap1.Person;
-
-
// 配置类====配置文件
-
-
public class MainConfig {
-
-
// 给容器中注册一个bean, 类型为返回值的类型
-
-
public Person person01(){
-
return new Person("Cansluck", 20);
-
}
-
}
通过定义一个配置类MainConfig,加上@Configuration注解,就不需要再在xml文件里面写更多的bean对象实例。
通过使用:
@AnnoatationConfigApplicationContext注解,来获取IOC容器。
使用AnnotationConfigApplicationContext可以实现基于Java的配置类加载Spring的应用上下文。
避免使用application.xml进行配置。相比XML配置,更加便捷。
通过测试类可以发现,并不需要再定义xml文件,通过加载类就能直接获取到bean对象。
-
import org.springframework.context.ApplicationContext;
-
import org.springframework.context.annotation.AnnotationConfigApplicationContext;
-
import org.springframework.context.support.ClassPathXmlApplicationContext;
-
-
import com.enjoy.cap1.config.MainConfig;
-
-
public class MainTest2 {
-
public static void main(String[] args) {
-
// 把beans.xml的类加载到容器
-
// ApplicationContext app
-
// = new ClassPathXmlApplicationContext("beans.xml");
-
-
ApplicationContext app
-
= new AnnotationConfigApplicationContext(MainConfig.class);
-
-
// 从容器中获取bean
-
// Person person = (Person) app.getBean("person01");
-
// System.out.println(person);
-
-
String[] namesForBean = app.getBeanNamesForType(Person.class);
-
for (String name : namesForBean) {
-
System.out.println(name);
-
}
-
}
-
}
二、ComponentScan扫描规则
ComponentScan:定义扫描规则,制定扫描哪些组件
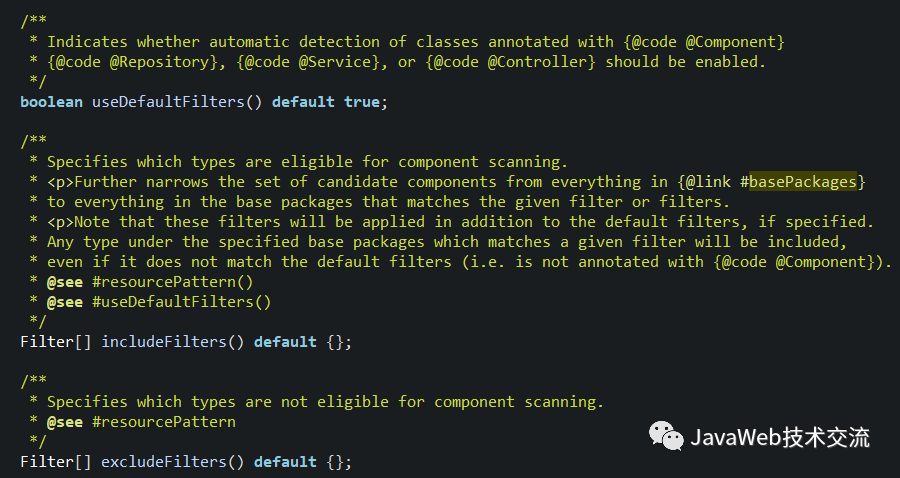
首先我们来看一下ComponentScan接口,我们主要关注以下几个参数:

value:指定要扫描的包
useDefaultFilters:默认为true,表示扫描所有组件,如果要自定义扫描范围,则必须将其改为false
includeFilters:Filter[] 指定扫描的时候,只需要包含哪些组件
excludeFilters:Filter[] 指定扫描的时候,按照什么规则,排除哪些组件
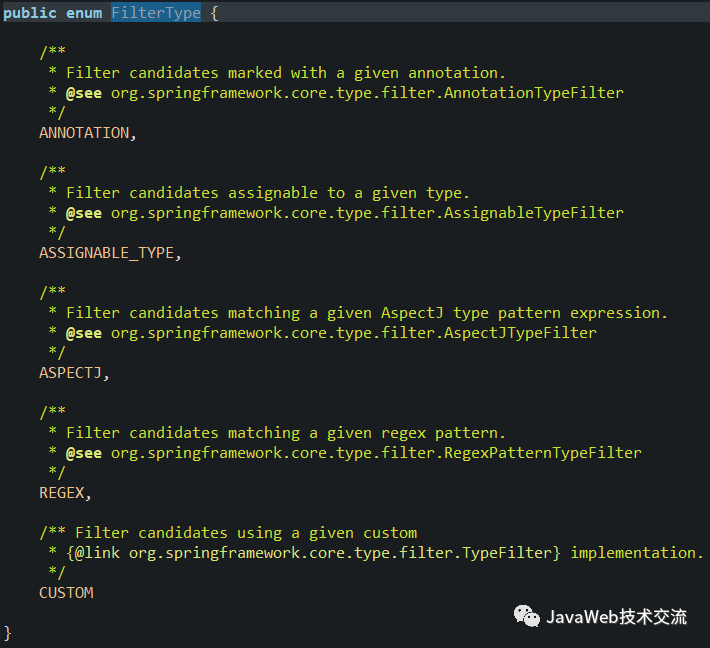
扫描规则有:

FilterType.ANNOTATION:按照注解扫描
FilterType.ASSIGNABLE_TYPE:按照给定的类型比如按照PersonService类型
FilterType.ASPECTJ:使用ASPECTJ表达式
FilterType.REGEX:使用正则表达式
FilterType.CUSTOM:使用自定义规则,自己写一个类,实现TypeFilter接口
看实现:
1.使用@ComponentScan(value="com.cansluck.spring1")表示扫描此目录下的所有包。
配置类:
-
import org.springframework.context.annotation.Bean;
-
import org.springframework.context.annotation.ComponentScan;
-
import org.springframework.context.annotation.ComponentScan.Filter;
-
import org.springframework.context.annotation.Configuration;
-
import org.springframework.context.annotation.FilterType;
-
-
import com.enjoy.cap1.Person;
-
-
-
-
public class MainConfig {
-
// 给容器中注册一个bean, 类型为返回值的类型,
-
-
public Person person01() {
-
return new Person("Cansluck", 20);
-
}
-
}
2.定制包扫描时的过滤规则
-
import org.springframework.context.annotation.Bean;
-
import org.springframework.context.annotation.ComponentScan;
-
import org.springframework.context.annotation.ComponentScan.Filter;
-
import org.springframework.context.annotation.Configuration;
-
import org.springframework.context.annotation.FilterType;
-
-
import com.enjoy.cap1.Person;
-
-
-
-
-
-
public class MainConfig {
-
// 给容器中注册一个bean, 类型为返回值的类型,
-
-
public Person person01(){
-
return new Person("Cansluck", 20);
-
}
-
}
在配置类MainConfig加入扫描配置@Filter:自定义扫描规则
扫描规则上面有讲过,有:
FilterType.ANNOTATION:按照注解扫描
FilterType.ASSIGNABLE_TYPE:按照给定的类型比如按照PersonService类型
FilterType.ASPECTJ:使用ASPECTJ表达式
FilterType.REGEX:使用正则表达式
FilterType.CUSTOM:使用自定义规则,自己写一个类,实现TypeFilter接口
5中扫描规则,上面为自定义规则,其余的可以自行去实现一下,主要可以实现Annotation(按照注解扫描) 和 ASSIGNABLE_TYPE(按照给定类型)。
自定义一个配置类:CansluckTypeFilter实现TypeFilter接口:
-
import java.io.IOException;
-
-
import org.springframework.core.io.Resource;
-
import org.springframework.core.type.AnnotationMetadata;
-
import org.springframework.core.type.ClassMetadata;
-
import org.springframework.core.type.classreading.MetadataReader;
-
import org.springframework.core.type.classreading.MetadataReaderFactory;
-
import org.springframework.core.type.filter.TypeFilter;
-
-
public class CansluckTypeFilter implements TypeFilter{
-
private ClassMetadata classMetadata;
-
-
/*
-
* MetadataReader:读取到当前正在扫描类的信息
-
* MetadataReaderFactory:可以获取到其他任何类信息
-
*/
-
public boolean match(MetadataReader metadataReader, MetadataReaderFactory metadataReaderFactory)
-
throws IOException {
-
// 获取当前类注解的信息
-
AnnotationMetadata annotationMetadata
-
= metadataReader.getAnnotationMetadata();
-
// 获取当前正在扫描的类信息
-
classMetadata = metadataReader.getClassMetadata();
-
// 获取当前类资源(类的路径)
-
Resource resource = metadataReader.getResource();
-
-
String className = classMetadata.getClassName();
-
System.out.println("----->" + className);
-
// 当类包含er字符, 则匹配成功,返回true
-
if(className.contains("er")) {
-
return true;
-
}
-
return false;
-
}
-
}
三、Scope扫描规则
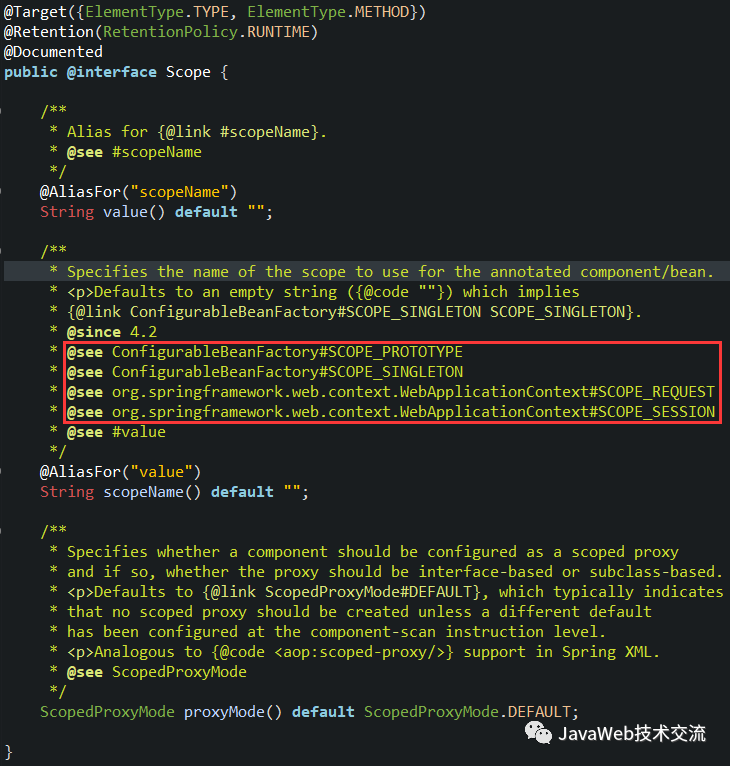
方法没有加@Scope注解之前,默认的bean是单例的

prototype:多实例,IOC容器启动并不会去调用方法创建对象在容器中,而是每次获取的时候才会调用方法创建对象,具体看下面实例
singleton:单实例(默认),IOC容器启动会调用方法创建对象到IOC容器中,以后每次获取就是直接从容器(可以理解为从map.get("")对象)中获取
request:主要针对Web应用,同义词请求创建一个实例
session:同一个session创建一个实例
(request、session两个用的不多,了解即可)
配置类:
-
import org.springframework.context.annotation.Bean;
-
import org.springframework.context.annotation.ComponentScan;
-
import org.springframework.context.annotation.ComponentScan.Filter;
-
import org.springframework.context.annotation.ComponentScans;
-
import org.springframework.context.annotation.Configuration;
-
import org.springframework.context.annotation.FilterType;
-
import org.springframework.context.annotation.Scope;
-
import org.springframework.stereotype.Controller;
-
-
import com.enjoy.cap1.Person;
-
import com.enjoy.cap2.controller.OrderController;
-
-
-
public class MainConfig {
-
// 给容器中注册一个bean, 类型为返回值的类型, 默认是单实例
-
/*
-
* prototype:多实例,IOC容器启动的时候,IOC容器启动并不会去调用方法创建对象, 而是每次获取的时候才会调用方法创建对象
-
* singleton:单实例(默认),IOC容器启动的时候会调用方法创建对象并放到IOC容器中,以后每次获取的就是直接从容器中拿(大Map.get)的同一个bean
-
* request: 主要针对web应用, 递交一次请求创建一个实例
-
* session:同一个session创建一个实例
-
*/
-
-
-
public Person person() {
-
return new Person("Cansluck", 20);
-
}
-
}
测试类:
-
public class Test {
-
-
public void test01(){
-
AnnotationConfigApplicationContext app
-
= new AnnotationConfigApplicationContext(MainConfig.class);
-
-
String[] names = app.getBeanDefinitionNames();
-
-
for(String name : names) {
-
System.out.println(name);
-
}
-
// 从容器中分别取两次person实例, 看是否为同一个bean
-
Object bean1 = app.getBean("person");
-
Object bean2 = app.getBean("person");
-
System.out.println(bean1 == bean2);
-
// 结论:bean1就是bean2,同一个对象
-
}
-
}
结论:
-
@Scope("singleton"),取的的结果true,证明取到的是同一个person的bean,只实例化了一次
-
@Scope("prototype"),取的的结果false,证明取到的不是同一个person的bean,说明被多次实例化
四、lazy懒加载
配置类:
-
import org.springframework.context.annotation.Bean;
-
import org.springframework.context.annotation.ComponentScan;
-
import org.springframework.context.annotation.ComponentScan.Filter;
-
import org.springframework.context.annotation.ComponentScans;
-
import org.springframework.context.annotation.Configuration;
-
import org.springframework.context.annotation.FilterType;
-
import org.springframework.context.annotation.Lazy;
-
import org.springframework.context.annotation.Scope;
-
import org.springframework.stereotype.Controller;
-
-
import com.enjoy.cap1.Person;
-
import com.enjoy.cap2.controller.OrderController;
-
-
-
public class MainConfig {
-
// 给容器中注册一个bean, 类型为返回值的类型, 默认是单实例
-
/*
-
* 懒加载: 主要针对单实例bean:默认在容器启动的时候创建对象
-
* 懒加载:容器启动时候不创建对象, 仅当第一次使用(获取)bean的时候才创建被初始化
-
*/
-
-
-
public Person person(){
-
System.out.println("给容器中添加person.......");
-
return new Person("Cansluck", 20);
-
}
-
}
测试类:
-
public class Test {
-
-
public void test01(){
-
AnnotationConfigApplicationContext app = new AnnotationConfigApplicationContext(MainConfig.class);
-
-
System.out.println("IOC容器创建完成........");
-
// 执行获取的时候才创建并初始化bean
-
app.getBean("person");
-
}
-
}
当配置类中加入@Lazy时,只有获取getBean()时才会加载到容器中。
往后14天会持续更新Spring相关的知识,并且针对注解,源码等结合代码做讲解。
< END >

Java极客思维
微信扫一扫,关注公众号


 浙公网安备 33010602011771号