Raspberry Pi GPIO pins All In One
Raspberry Pi GPIO pins All In One
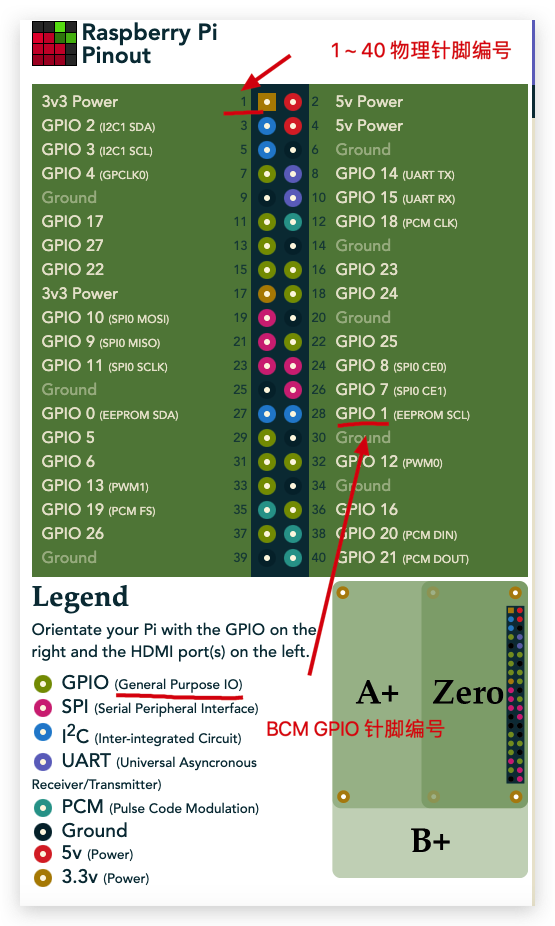
Raspberry Pi GPIO Pinout / 树莓派 GPIO 引脚大全
-
引脚编号分类:物理编号、BCM GPIO 编号、WiringPi 编号 -
通信方式分类:GPIO 通信、PWM 通信、I2C 通信、SPI 通信、UART 通信
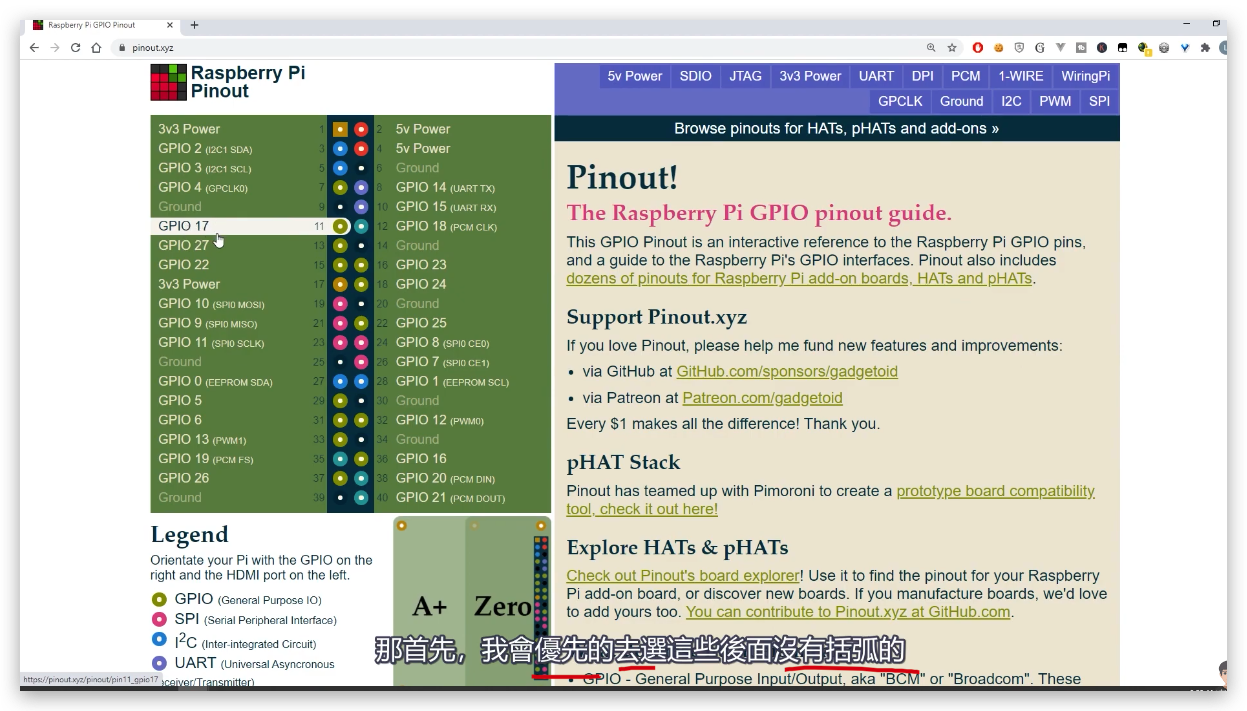
What do these numbers mean?
GPIO - General Purpose Input/Output, aka "BCM" or "Broadcom".
These are the big numbers, e.g. "GPIO 22".
You'll use these with RPi.GPIO and GPIO Zero.
Physical - or "Board" correspond to the pin's physical location on the header.
These are the small numbers next to the header, e.g. "Physical Pin 15".
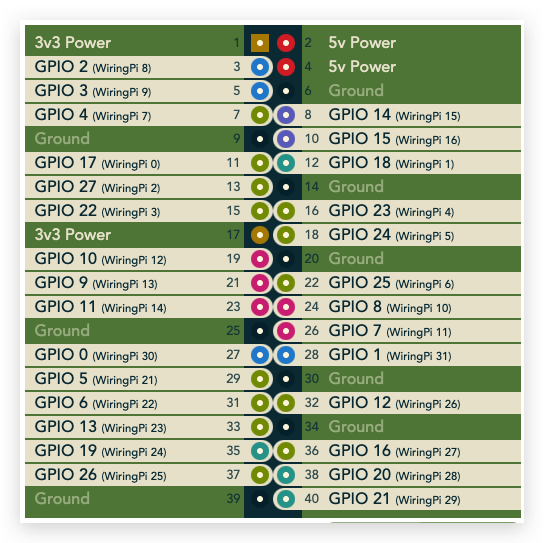
WiringPi - for Gordon Henderson's Wiring Pi library.
These are shown as a tooltip when you mouseover a pin.
Rev 1 Pi - alternate GPIO/BCM numbers for the original, 26-pin model "A" and "B" Pi.
zh-Hans
这些数字是什么意思?
GPIO - 通用输入/输出,又名“BCM”或“Broadcom”。
这些是大数字,例如 “GPIO 22”。 您将把它们与 RPi.GPIO 和 GPIO 零一起使用。
Physical - 或“Board”对应于引脚在插头上的物理位置。
这些是标题旁边的小数字,例如 “物理引脚 15”。
WiringPi - 用于 Gordon Henderson 的 Wiring Pi 库。
当您将鼠标悬停在图钉上时,这些将显示为工具提示。
Rev 1 Pi - 原始 26 针型号“A”和“B”Pi 的备用 GPIO/BCM 编号。
GPIO & Physical
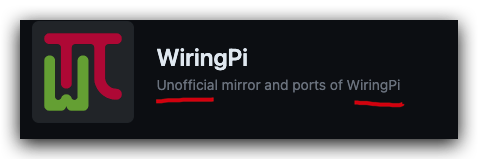
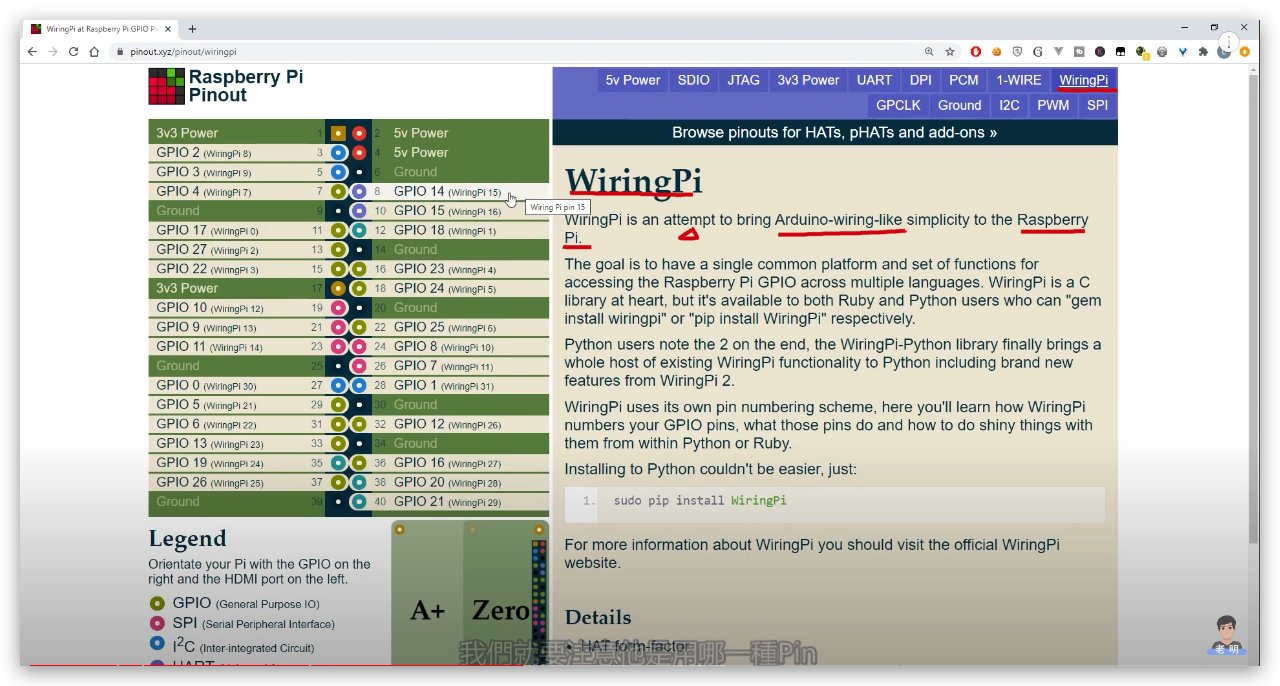
WiringPi
WiringPi 是一种将类似 Arduino 接线的简单性引入 Raspberry Pi 的尝试。
https://pinout.xyz/pinout/wiringpi
目标是拥有一个单一的通用平台和一组功能,用于跨多种语言访问 Raspberry Pi GPIO。
WiringPi 本质上是一个 C 库,但 Ruby 和 Python 用户都可以使用它,他们可以分别使用“gem install wiringpi”或“pip install wiringpi”。
WiringPi 使用自己的引脚编号方案,此页面说明了 WiringPi 如何为您的 GPIO 引脚编号。
WiringPi 已被其原作者弃用。 ⚠️
有关正在进行的社区维护版本和端口的更多信息和支持,请参阅 WiringPi GitHub 组织:https://github.com/WiringPi/
C
# C
$ sudo apt-get install wiringpi
https://github.com/WiringPi/WiringPi
Python
https://github.com/WiringPi/WiringPi-Python
# Python 2
$ pip install wiringpi

# Python 3
$ pip3 install wiringpi
# 或
$ python3 -m pip3 install wiringpi
https://www.cnblogs.com/xgqfrms/p/17365120.html#5173370
$ sudo vim .bashrc

$ source ~/.bashrc

$ cat ~/.bashrc
# source ~/.bashrc
# sourc ~./.zshrc
# Python3 => py3 🐍
alias py3='python3'

# update ✅
# source ~/.bashrc

Node.js
$ npm i wiring-pi

# $ npm i wiringpi-node
https://www.npmjs.com/package/wiring-pi
https://www.npmjs.com/package/wiringpi-node
https://github.com/WiringPi/WiringPi-Node#install
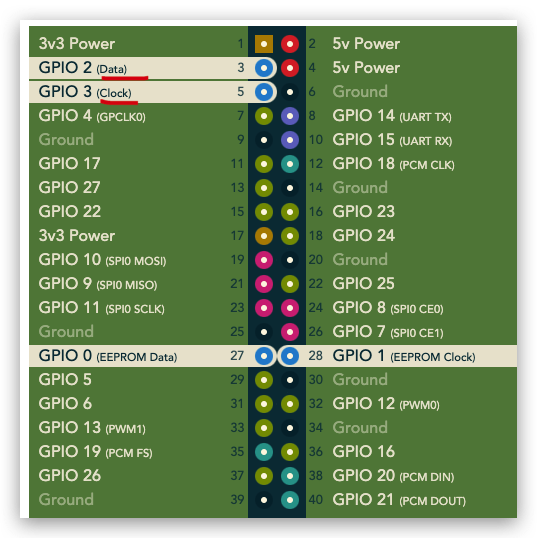
I2C
Inter Integrated Circuit/ 内部集成电路
GPIO 2 和 GPIO 3 - Raspberry Pi 的 I2C1 引脚 - 允许与各种外部传感器和设备进行两线通信。
I2C 引脚包括一个固定的 1.8 kΩ 上拉电阻至 3.3v。 它们不适合用作上拉可能会干扰的通用 IO。
I2C 是一种多点总线,多个设备可以连接到这两个相同的引脚。 每个设备都有自己唯一的 I2C 地址。
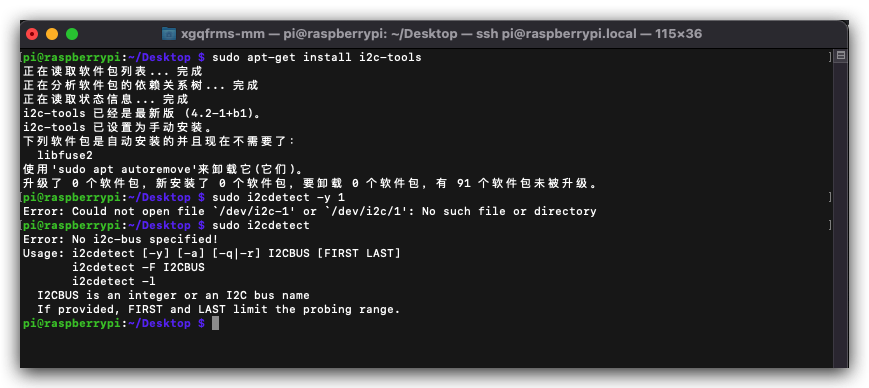
$ sudo apt-get install i2c-tools
$ sudo i2cdetect -y 1
#!/usr/bin/env python3
# coding: utf8

__author__ = 'xgqfrms'
__editor__ = 'vscode'
__version__ = '1.0.1'
__copyright__ = """
  Copyright (c) 2012-2050, xgqfrms; mailto:xgqfrms@xgqfrms.xyz
"""

import smbus

DEVICE_BUS = 1
DEVICE_ADDR = 0x15

bus = smbus.SMBus(DEVICE_BUS)
bus.write_byte_data(DEVICE_ADDR, 0x00, 0x01)
https://pinout.xyz/pinout/pin3_gpio2
https://pinout.xyz/pinout/pin5_gpio3
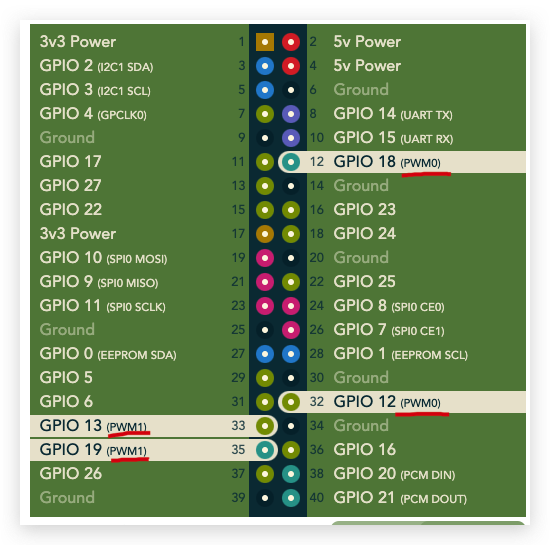
PWM
Pulse-width Modulation / 脉冲宽度调制
PWM(脉冲宽度调制)是一种通过打开和关闭数字引脚来产生模拟电压的方法。
数字信号 => 模拟信号
数模转换 / 模数转换
https://pinout.xyz/pinout/pin12_gpio18
https://pinout.xyz/pinout/pin32_gpio12
https://pinout.xyz/pinout/pin33_gpio13
https://pinout.xyz/pinout/pin35_gpio19
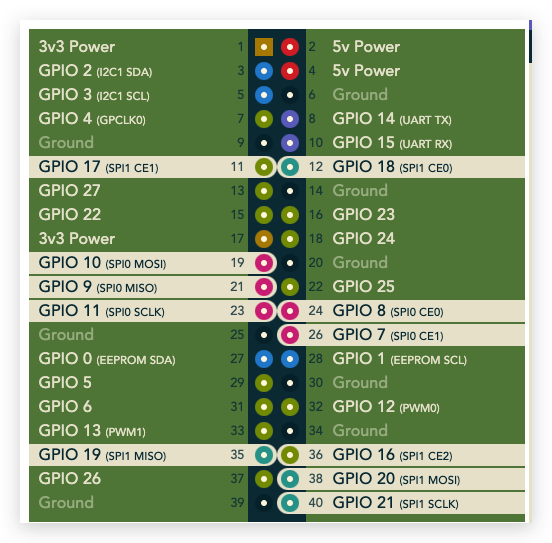
SPI
Serial Peripheral Interface / 串行外设接口
SPI 被称为四线串行总线,通过为它们分配不同的芯片选择引脚,您可以将多个兼容设备连接到一组引脚。
要与 SPI 设备通信,您需要断言其对应的片选引脚。
默认情况下,Pi 允许您将 SPI0 与 GPIO 8 上的 CE0 和 GPIO 7 上的 CE1 上的芯片选择引脚一起使用。
You can enable SPI1 with a dtoverlay configured in "/boot/config.txt"
dt overlay / 数据覆盖
$ vim /boot/config.txt
# dtoverlay=spi1-3cs
https://www.raspberrypi.org/documentation/hardware/raspberrypi/spi/
https://raw.githubusercontent.com/raspberrypi/firmware/master/boot/overlays/README
$ car /boot/config.txt > boot-config-txt.md

$ cat ./boot-config-txt.md
$ car /boot/config.txt > boot-config-txt.md
$ cat ./boot-config-txt.md
# For more options and information see
# http://rpf.io/configtxt
# Some settings may impact device functionality. See link above for details

# uncomment if you get no picture on HDMI for a default "safe" mode
#hdmi_safe=1

# uncomment the following to adjust overscan. Use positive numbers if console
# goes off screen, and negative if there is too much border
#overscan_left=16
#overscan_right=16
#overscan_top=16
#overscan_bottom=16

# uncomment to force a console size. By default it will be display's size minus
# overscan.
#framebuffer_width=1280
#framebuffer_height=720

# uncomment if hdmi display is not detected and composite is being output
#hdmi_force_hotplug=1

# uncomment to force a specific HDMI mode (this will force VGA)
#hdmi_group=1
#hdmi_mode=1

# uncomment to force a HDMI mode rather than DVI. This can make audio work in
# DMT (computer monitor) modes
#hdmi_drive=2

# uncomment to increase signal to HDMI, if you have interference, blanking, or
# no display
#config_hdmi_boost=4

# uncomment for composite PAL
#sdtv_mode=2

#uncomment to overclock the arm. 700 MHz is the default.
#arm_freq=800

# Uncomment some or all of these to enable the optional hardware interfaces
#dtparam=i2c_arm=on
#dtparam=i2s=on
#dtparam=spi=on

# Uncomment this to enable infrared communication.
#dtoverlay=gpio-ir,gpio_pin=17
#dtoverlay=gpio-ir-tx,gpio_pin=18

# Additional overlays and parameters are documented /boot/overlays/README

# Enable audio (loads snd_bcm2835)
dtparam=audio=on

# Automatically load overlays for detected cameras
camera_auto_detect=1

# Automatically load overlays for detected DSI displays
display_auto_detect=1

# Enable DRM VC4 V3D driver
dtoverlay=vc4-kms-v3d
max_framebuffers=2

# Run in 64-bit mode
arm_64bit=1

# Disable compensation for displays with overscan
disable_overscan=1

[cm4]
# Enable host mode on the 2711 built-in XHCI USB controller.
# This line should be removed if the legacy DWC2 controller is required
# (e.g. for USB device mode) or if USB support is not required.
otg_mode=1

[all]

[pi4]
# Run as fast as firmware / board allows
arm_boost=1

[all]
UART
Universal Asynchronous Receiver/Transmitter / 通用异步接收器/发送器
import wiringpi

wiringpi.wiringPiSetup()

serial = wiringpi.serialOpen('/dev/ttyAMA0', 9600)

wiringpi.serialPuts(serial, 'hello world!')
https://pinout.xyz/pinout/uart
demos
WiringPi
tips
优先选择纯 GPIO 功能的引脚✅
(🐞 反爬虫测试!打击盗版⚠️)如果你看到这个信息, 说明这是一篇剽窃的文章,请访问 https://www.cnblogs.com/xgqfrms/ 查看原创文章!
refs
©xgqfrms 2012-2021
www.cnblogs.com/xgqfrms 发布文章使用:只允许注册用户才可以访问!
原创文章,版权所有©️xgqfrms, 禁止转载 🈲️,侵权必究⚠️!
本文首发于博客园,作者:xgqfrms,原文链接:https://www.cnblogs.com/xgqfrms/p/17365120.html
未经授权禁止转载,违者必究!

 浙公网安备 33010602011771号