Java高并发之设计模式.
本文主要讲解几种常见并行模式, 具体目录结构如下图.
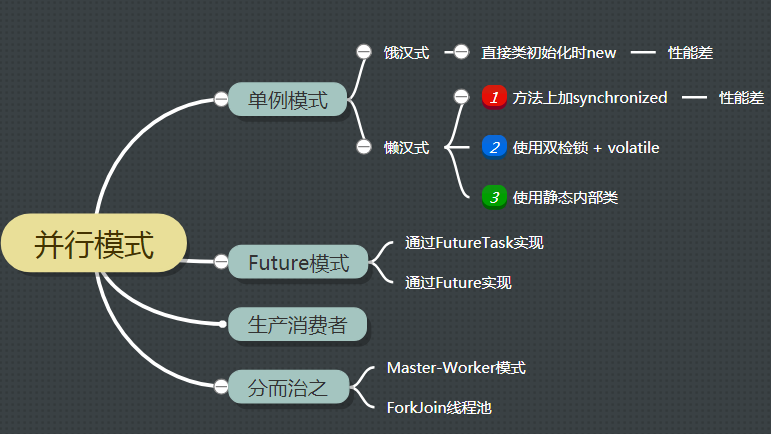
单例
单例是最常见的一种设计模式, 一般用于全局对象管理, 比如xml配置读写之类的.
一般分为懒汉式, 饿汉式.
懒汉式: 方法上加synchronized
1 public static synchronized Singleton getInstance() {
2          if (single == null) {
3              single = new Singleton();
4          }
5         return single;
6 }
这种方式, 由于每次获取示例都要获取锁, 不推荐使用, 性能较差
懒汉式: 使用双检锁 + volatile
 1     private volatile Singleton singleton = null;
 2     public static Singleton getInstance() {
 3         if (singleton == null) {
 4             synchronized (Singleton.class) {
 5                 if (singleton == null) {
 6                     singleton = new Singleton();
 7                 }
 8             }
 9         }
10         return singleton;
11     }
本方式是对直接在方法上加锁的一个优化, 好处在于只有第一次初始化获取了锁.
后续调用getInstance已经是无锁状态. 只是写法上稍微繁琐点.
至于为什么要volatile关键字, 主要涉及到jdk指令重排, 详见之前的博文: Java内存模型与指令重排
懒汉式: 使用静态内部类
1 public class Singleton {
2     private static class LazyHolder {
3        private static final Singleton INSTANCE = new Singleton();
4     }
5     private Singleton (){}
6     public static final Singleton getInstance() {
7        return LazyHolder.INSTANCE;
8     }
9 }
该方式既解决了同步问题, 也解决了写法繁琐问题. 推荐使用改写法.
缺点在于无法响应事件来重新初始化INSTANCE.
饿汉式
1 public class Singleton1 {
2     private Singleton1() {}
3     private static final Singleton1 single = new Singleton1();
4     public static Singleton1 getInstance() {
5         return single;
6     }
7 }
缺点在于对象在一开始就直接初始化了.
Future模式
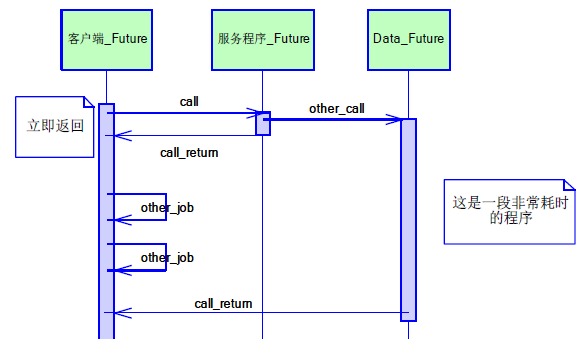
该模式的核心思想是异步调用. 有点类似于异步的ajax请求.
当调用某个方法时, 可能该方法耗时较久, 而在主函数中也不急于立刻获取结果.
因此可以让调用者立刻返回一个凭证, 该方法放到另外线程执行,
后续主函数拿凭证再去获取方法的执行结果即可, 其结构图如下
jdk中内置了Future模式的支持, 其接口如下:
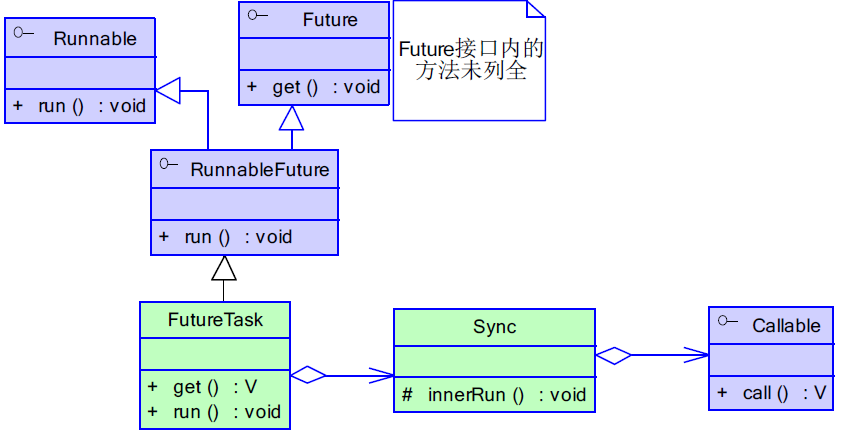
通过FutureTask实现
注意其中两个耗时操作.
- 如果doOtherThing耗时2s, 则整个函数耗时2s左右.
- 如果doOtherThing耗时0.2s, 则整个函数耗时取决于RealData.costTime, 即1s左右结束.
 1 public class FutureDemo1 {
 2
 3     public static void main(String[] args) throws InterruptedException, ExecutionException {
 4         FutureTask<String> future = new FutureTask<String>(new Callable<String>() {
 5             @Override
 6             public String call() throws Exception {
 7                 return new RealData().costTime();
 8             }
 9         });
10         ExecutorService service = Executors.newCachedThreadPool();
11         service.submit(future);
12
13         System.out.println("RealData方法调用完毕");
14         // 模拟主函数中其他耗时操作
15         doOtherThing();
16         // 获取RealData方法的结果
17         System.out.println(future.get());
18     }
19
20     private static void doOtherThing() throws InterruptedException {
21         Thread.sleep(2000L);
22     }
23 }
24
25 class RealData {
26
27     public String costTime() {
28         try {
29             // 模拟RealData耗时操作
30             Thread.sleep(1000L);
31             return "result";
32         } catch (InterruptedException e) {
33             e.printStackTrace();
34         }
35         return "exception";
36     }
37
38 }
通过Future实现
与上述FutureTask不同的是, RealData需要实现Callable接口.
 1 public class FutureDemo2 {
 2
 3     public static void main(String[] args) throws InterruptedException, ExecutionException {
 4         ExecutorService service = Executors.newCachedThreadPool();
 5         Future<String> future = service.submit(new RealData2());
 6
 7         System.out.println("RealData2方法调用完毕");
 8         // 模拟主函数中其他耗时操作
 9         doOtherThing();
10         // 获取RealData2方法的结果
11         System.out.println(future.get());
12     }
13
14     private static void doOtherThing() throws InterruptedException {
15         Thread.sleep(2000L);
16     }
17 }
18
19 class RealData2 implements Callable<String>{
20
21     public String costTime() {
22         try {
23             // 模拟RealData耗时操作
24             Thread.sleep(1000L);
25             return "result";
26         } catch (InterruptedException e) {
27             e.printStackTrace();
28         }
29         return "exception";
30     }
31
32     @Override
33     public String call() throws Exception {
34         return costTime();
35     }
36 }
另外Future本身还提供了一些额外的简单控制功能, 其API如下
 1     // 取消任务
 2     boolean cancel(boolean mayInterruptIfRunning);
 3     // 是否已经取消
 4     boolean isCancelled();
 5     // 是否已经完成
 6     boolean isDone();
 7     // 取得返回对象
 8     V get() throws InterruptedException, ExecutionException;
 9     // 取得返回对象, 并可以设置超时时间
10     V get(long timeout, TimeUnit unit)
11             throws InterruptedException, ExecutionException, TimeoutException;
生产消费者模式
生产者-消费者模式是一个经典的多线程设计模式. 它为多线程间的协作提供了良好的解决方案。
在生产者-消费者模式中,通常由两类线程,即若干个生产者线程和若干个消费者线程。
生产者线程负责提交用户请求,消费者线程则负责具体处理生产者提交的任务。
生产者和消费者之间则通过共享内存缓冲区进行通信, 其结构图如下
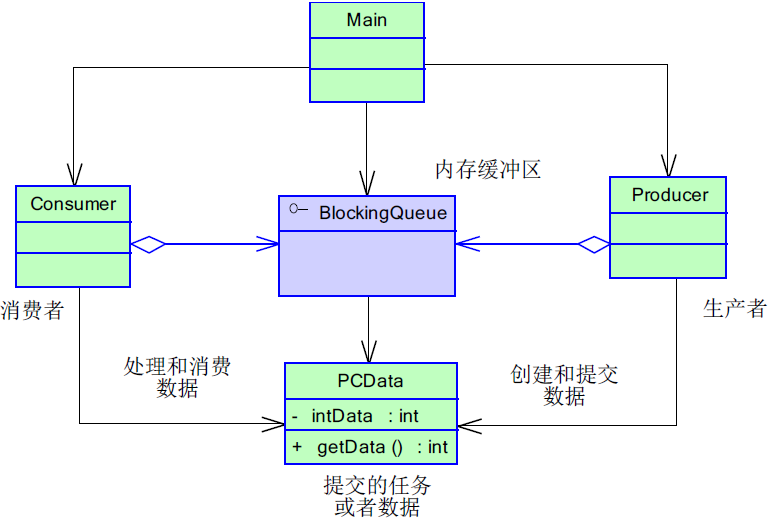
PCData为我们需要处理的元数据模型, 生产者构建PCData, 并放入缓冲队列.
消费者从缓冲队列中获取数据, 并执行计算.
生产者核心代码
 1         while(isRunning) {
 2             Thread.sleep(r.nextInt(SLEEP_TIME));
 3             data = new PCData(count.incrementAndGet);
 4             // 构造任务数据
 5             System.out.println(data + " is put into queue");
 6             if (!queue.offer(data, 2, TimeUnit.SECONDS)) {
 7                 // 将数据放入队列缓冲区中
 8                 System.out.println("faild to put data : " + data);
 9             }
10         }
消费者核心代码
 1         while (true) {
 2             PCData data = queue.take();
 3             // 提取任务
 4             if (data != null) {
 5                 // 获取数据, 执行计算操作
 6                 int re = data.getData() * 10;
 7                 System.out.println("after cal, value is : " + re);
 8                 Thread.sleep(r.nextInt(SLEEP_TIME));
 9             }
10         }
生产消费者模式可以有效对数据解耦, 优化系统结构.
降低生产者和消费者线程相互之间的依赖与性能要求.
一般使用BlockingQueue作为数据缓冲队列, 他是通过锁和阻塞来实现数据之间的同步,
如果对缓冲队列有性能要求, 则可以使用基于CAS无锁设计的ConcurrentLinkedQueue.
分而治之
严格来讲, 分而治之不算一种模式, 而是一种思想.
它可以将一个大任务拆解为若干个小任务并行执行, 提高系统吞吐量.
我们主要讲两个场景, Master-Worker模式, ForkJoin线程池.
Master-Worker模式
该模式核心思想是系统由两类进行协助工作: Master进程, Worker进程.
Master负责接收与分配任务, Worker负责处理任务. 当各个Worker处理完成后,
将结果返回给Master进行归纳与总结.
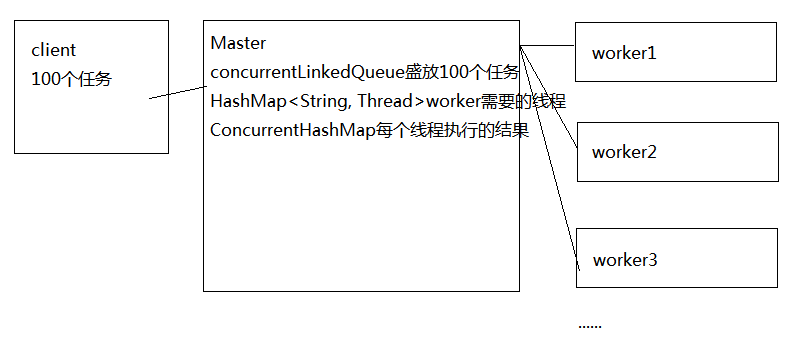
假设一个场景, 需要计算100个任务, 并对结果求和, Master持有10个子进程.
Master代码
 1 public class MasterDemo {
 2     // 盛装任务的集合
 3     private ConcurrentLinkedQueue<TaskDemo> workQueue = new ConcurrentLinkedQueue<TaskDemo>();
 4     // 所有worker
 5     private HashMap<String, Thread> workers = new HashMap<>();
 6     // 每一个worker并行执行任务的结果
 7     private ConcurrentHashMap<String, Object> resultMap = new ConcurrentHashMap<>();
 8
 9     public MasterDemo(WorkerDemo worker, int workerCount) {
10         // 每个worker对象都需要持有queue的引用, 用于领任务与提交结果
11         worker.setResultMap(resultMap);
12         worker.setWorkQueue(workQueue);
13         for (int i = 0; i < workerCount; i++) {
14             workers.put("子节点: " + i, new Thread(worker));
15         }
16     }
17
18     // 提交任务
19     public void submit(TaskDemo task) {
20         workQueue.add(task);
21     }
22
23     // 启动所有的子任务
24     public void execute(){
25         for (Map.Entry<String, Thread> entry : workers.entrySet()) {
26             entry.getValue().start();
27         }
28     }
29
30     // 判断所有的任务是否执行结束
31     public boolean isComplete() {
32         for (Map.Entry<String, Thread> entry : workers.entrySet()) {
33             if (entry.getValue().getState() != Thread.State.TERMINATED) {
34                 return false;
35             }
36         }
37
38         return true;
39     }
40
41     // 获取最终汇总的结果
42     public int getResult() {
43         int result = 0;
44         for (Map.Entry<String, Object> entry : resultMap.entrySet()) {
45             result += Integer.parseInt(entry.getValue().toString());
46         }
47
48         return result;
49     }
50
51 }
Worker代码
 1 public class WorkerDemo implements Runnable{
 2
 3     private ConcurrentLinkedQueue<TaskDemo> workQueue;
 4     private ConcurrentHashMap<String, Object> resultMap;
 5
 6     @Override
 7     public void run() {
 8         while (true) {
 9             TaskDemo input = this.workQueue.poll();
10             // 所有任务已经执行完毕
11             if (input == null) {
12                 break;
13             }
14             // 模拟对task进行处理, 返回结果
15             int result = input.getPrice();
16             this.resultMap.put(input.getId() + "", result);
17             System.out.println("任务执行完毕, 当前线程: " + Thread.currentThread().getName());
18         }
19     }
20
21     public ConcurrentLinkedQueue<TaskDemo> getWorkQueue() {
22         return workQueue;
23     }
24
25     public void setWorkQueue(ConcurrentLinkedQueue<TaskDemo> workQueue) {
26         this.workQueue = workQueue;
27     }
28
29     public ConcurrentHashMap<String, Object> getResultMap() {
30         return resultMap;
31     }
32
33     public void setResultMap(ConcurrentHashMap<String, Object> resultMap) {
34         this.resultMap = resultMap;
35     }
36 }


 1 public class TaskDemo {
 2
 3     private int id;
 4     private String name;
 5     private int price;
 6
 7     public int getId() {
 8         return id;
 9     }
10
11     public void setId(int id) {
12         this.id = id;
13     }
14
15     public String getName() {
16         return name;
17     }
18
19     public void setName(String name) {
20         this.name = name;
21     }
22
23     public int getPrice() {
24         return price;
25     }
26
27     public void setPrice(int price) {
28         this.price = price;
29     }
30 }
主函数测试
 1         MasterDemo master = new MasterDemo(new WorkerDemo(), 10);
 2         for (int i = 0; i < 100; i++) {
 3             TaskDemo task = new TaskDemo();
 4             task.setId(i);
 5             task.setName("任务" + i);
 6             task.setPrice(new Random().nextInt(10000));
 7             master.submit(task);
 8         }
 9
10         master.execute();
11
12         while (true) {
13             if (master.isComplete()) {
14                 System.out.println("执行的结果为: " + master.getResult());
15                 break;
16             }
17         }
ForkJoin线程池
该线程池是jdk7之后引入的一个并行执行任务的框架, 其核心思想也是将任务分割为子任务,
有可能子任务还是很大, 还需要进一步拆解, 最终得到足够小的任务.
将分割出来的子任务放入双端队列中, 然后几个启动线程从双端队列中获取任务执行.
子任务执行的结果放到一个队列里, 另起线程从队列中获取数据, 合并结果.
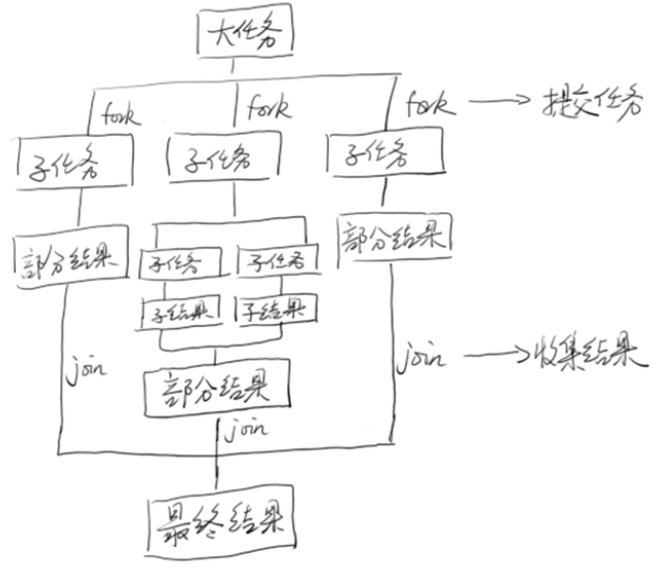
假设我们的场景需要计算从0到20000000L的累加求和. CountTask继承自RecursiveTask, 可以携带返回值.
每次分解大任务, 简单的将任务划分为100个等规模的小任务, 并使用fork()提交子任务.
在子任务中通过THRESHOLD设置子任务分解的阈值, 如果当前需要求和的总数大于THRESHOLD, 则子任务需要再次分解,
如果子任务可以直接执行, 则进行求和操作, 返回结果. 最终等待所有的子任务执行完毕, 对所有结果求和.
 1 public class CountTask extends RecursiveTask<Long>{
 2     // 任务分解的阈值
 3     private static final int THRESHOLD = 10000;
 4     private long start;
 5     private long end;
 6
 7
 8     public CountTask(long start, long end) {
 9         this.start = start;
10         this.end = end;
11     }
12
13     public Long compute() {
14         long sum = 0;
15         boolean canCompute = (end - start) < THRESHOLD;
16         if (canCompute) {
17             for (long i = start; i <= end; i++) {
18                 sum += i;
19             }
20         } else {
21             // 分成100个小任务
22             long step = (start + end) / 100;
23             ArrayList<CountTask> subTasks = new ArrayList<CountTask>();
24             long pos = start;
25             for (int i = 0; i < 100; i++) {
26                 long lastOne = pos + step;
27                 if (lastOne > end) {
28                     lastOne = end;
29                 }
30                 CountTask subTask = new CountTask(pos, lastOne);
31                 pos += step + 1;
32                 // 将子任务推向线程池
33                 subTasks.add(subTask);
34                 subTask.fork();
35             }
36
37             for (CountTask task : subTasks) {
38                 // 对结果进行join
39                 sum += task.join();
40             }
41         }
42         return sum;
43     }
44
45     public static void main(String[] args) throws ExecutionException, InterruptedException {
46         ForkJoinPool pool = new ForkJoinPool();
47         // 累加求和 0 -> 20000000L
48         CountTask task = new CountTask(0, 20000000L);
49         ForkJoinTask<Long> result = pool.submit(task);
50         System.out.println("sum result : " + result.get());
51     }
52 }
ForkJoin线程池使用一个无锁的栈来管理空闲线程, 如果一个工作线程暂时取不到可用的任务, 则可能被挂起.
挂起的线程将被压入由线程池维护的栈中, 待将来有任务可用时, 再从栈中唤醒这些线程.

 浙公网安备 33010602011771号