dubbo源码分析4(spring配置文件解析机制)
我们知道dubbo一般也不会单独使用的吧,都会和spring一起使用,知道为什么吗?
因为dubbo是基于spring的扩展机制进行扩展的,所以首先我们要知道spring提供了一种什么扩展机制?
先看下图,基于spring的配置文件都会有如下所示这段东西,这是干啥的呢?
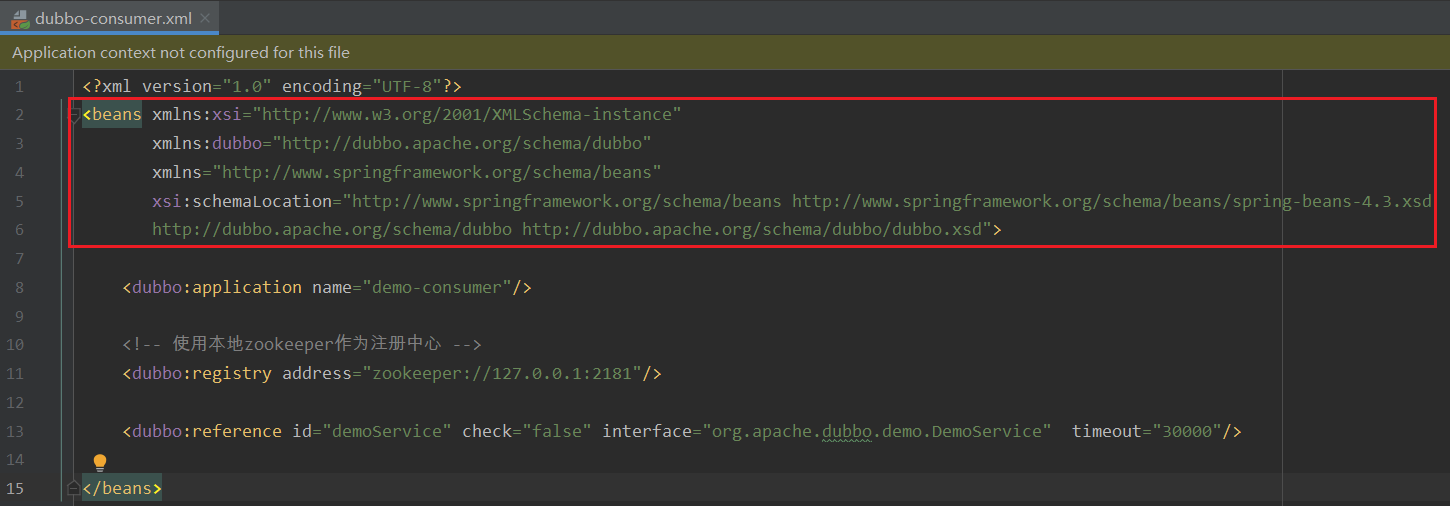
1.spring配置文件的文件头
首先我为了偷懒,要去找一个spring配置文件的网图,下图所示,这是一个很常见的spring配置文件,但是前面那一堆xmlns是什么东西啊,我擦(╯—﹏—)╯(┷━━━┷
<?xml version="1.0" encoding="UTF-8"?>
<beans xmlns="http://www.springframework.org/schema/beans"
    xmlns:xsi="http://www.w3.org/2001/XMLSchema-instance"
    xmlns:context="http://www.springframework.org/schema/context"
    xmlns:aop="http://www.springframework.org/schema/aop"
    xmlns:tx="http://www.springframework.org/schema/tx"
    xsi:schemaLocation="http://www.springframework.org/schema/beans  http://www.springframework.org/schema/beans/spring-beans-3.0.xsd
           http://www.springframework.org/schema/context http://www.springframework.org/schema/context/spring-context-3.0.xsd
           http://www.springframework.org/schema/aop http://www.springframework.org/schema/aop/spring-aop-3.0.xsd
           http://www.springframework.org/schema/tx http://www.springframework.org/schema/tx/spring-tx-3.0.xsd">

    <bean id="txManager"    class="org.springframework.jdbc.datasource.DataSourceTransactionManager">
        <property name="dataSource" ref="dataSource" />
    </bean>


    <tx:advice id="txAdvice" transaction-manager="txManager">
        <tx:attributes>
            <tx:method name="find*" propagation="NOT_SUPPORTED" />
        </tx:attributes>
    </tx:advice>

    <aop:config>
        <aop:aspect id="***" ref="***"/>
        <aop:pointcut id="***" expression="****" />
    </aop:config>

    </beans>
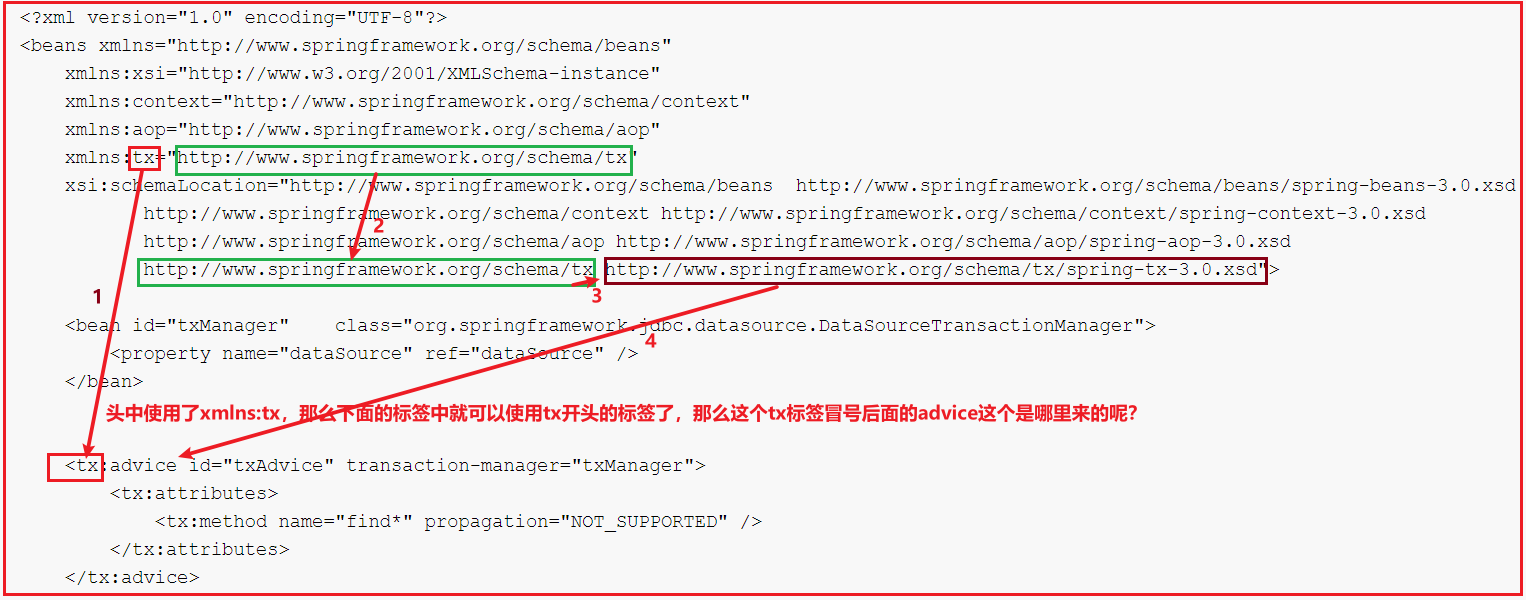
而且我们看看上述的标签,可以分为三块,第一部分是文件头(也就是xmlns那一堆), 第二部分是<bean id="xx" class="xx.xx.xxx"></bean>这种bean的标签,第三部分是<tx:advice id="txAdvice" transaction-manager="txManager"></tx:advice>这类标签名字还带有冒号,冒号还跟着一个奇怪的东西的๑乛◡乛๑
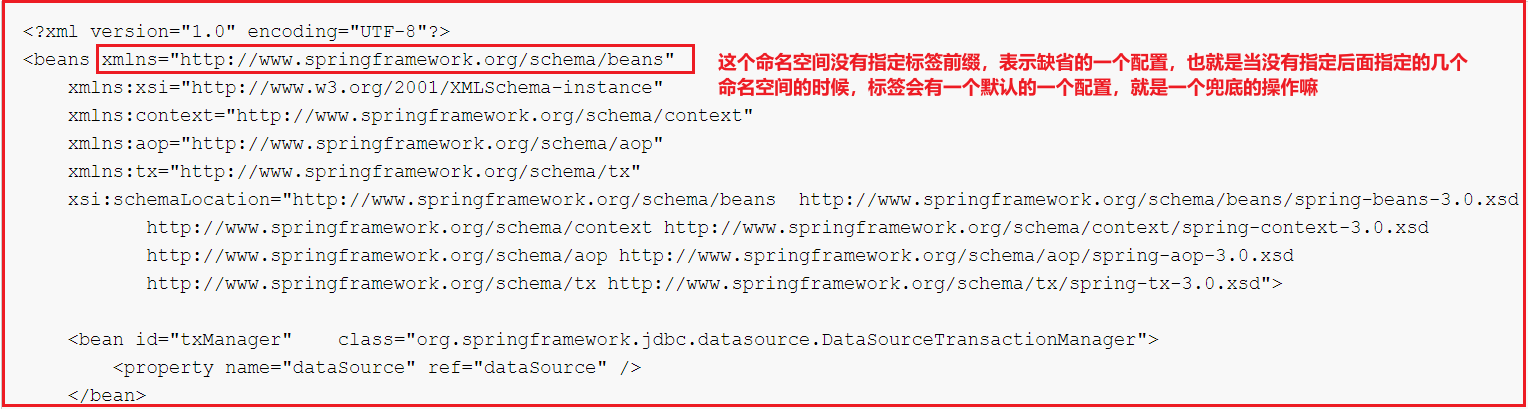
1.1 xmlns部分
xmlns全程是xml namespace,翻译一下就是xml命名空间,你非要问这个有什么用?其实啥用没有,你把他看成一个键值对,key-->uuid(例如下图tx--->http://www.springframework.org/schema/tx), 键表示标签的前缀,值就是一个唯一标识,下图步骤1所示
但是这个唯一标识的话,还需要在xsi:schemaLocation中对应起来,如步骤2所示;
而且每一个唯一标识还会对应一个xsd文件,步骤3所示
每一个xsd文件中就是描述了当前命名空间中指定的标签中,规范了各个属性,步骤4所示
说出来你可能不信,现在根据上图步骤4的url找到xsd文件(默认先从jar包中找,没有的话,才会去网络上下载)
注意,这个文件其实在spring-tx.jar中META-INF/spring.schemas中可以找到本地该文件的地址,如果没有,才会联网去spring官方地址那里去下载
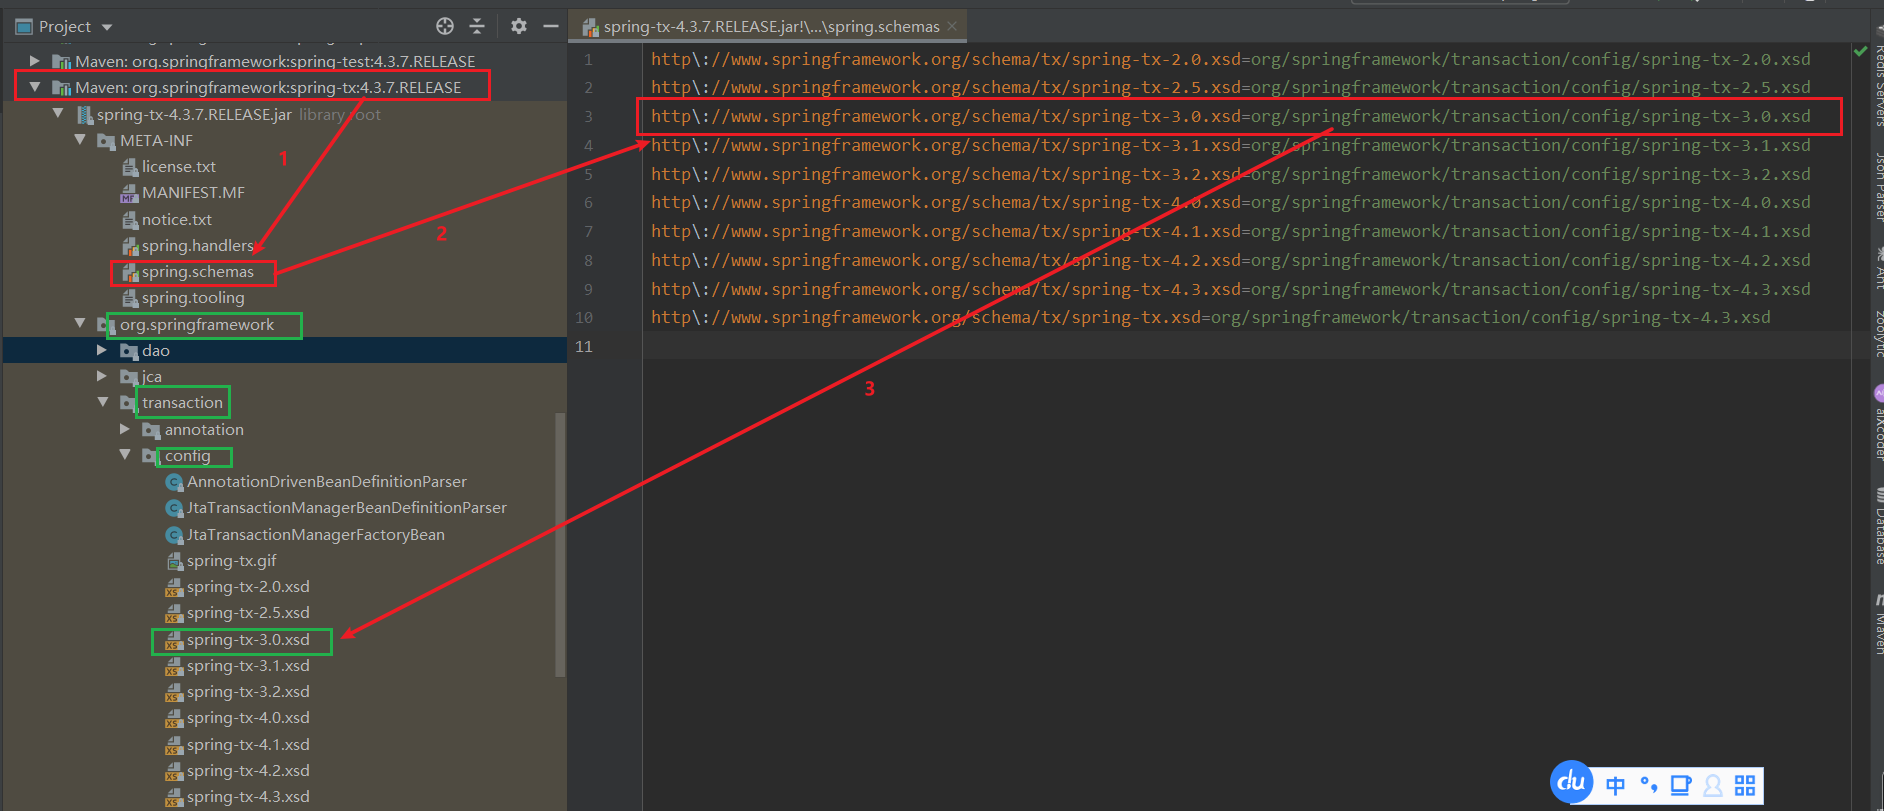
我们轻轻一点开这个xsd文件康康,随意看看就能看到<tx:advice>标签中各个属性值,以及规定的子标签了(有兴趣了解xsd文件语法的可以自己学习一下,可以自定义spring配置文件的标签, 反正我不怎么会这个,嘿嘿( ̄▽ ̄)ノ,我明明不会,但是我就是不学)
注意:spring配置文件中命名空间xmlns:tx="http://www.springframework.org/schema/tx" 要和xsd文件头中的xmlns 、targetNamespace保持一致的呀

1.2 bean标签
上面说了一大堆没啥用的东西,我们可以在spring配置文件中看到<bean>这种标签, 这种标签名是没有带冒号的?这是为啥?
1.3 带有标签前缀的标签
我擦,好像已经在1.1中说过了,那么我们就过\(@ ̄∇ ̄@)/,其实我很想写的更多,但是这里空白太小了,写不下,嘿嘿~
2.自定义spring标签栗子
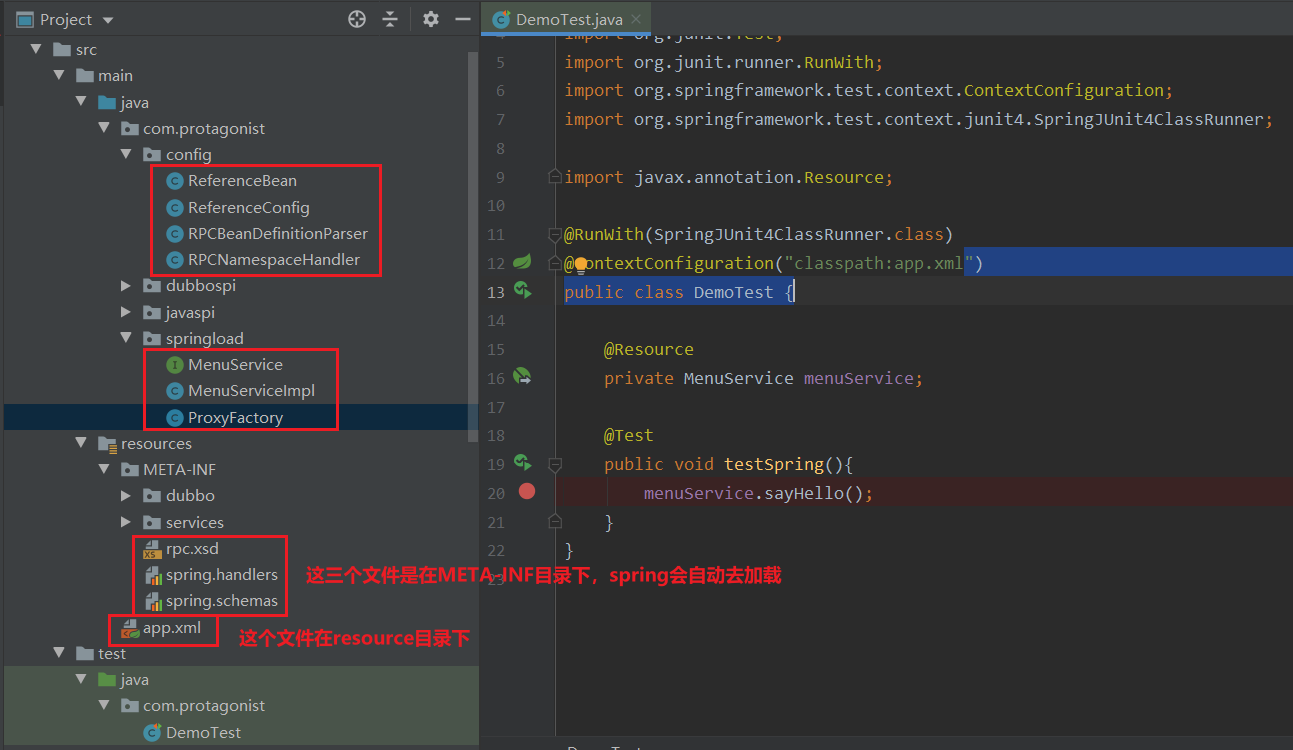
说了这么多,我们自己来捣鼓一个自定义标签出来,目录结构如下:
2.1.接口和实现类:
public interface MenuService {
    void sayHello();
}

public class MenuServiceImpl implements MenuService{
    @Override
    public void sayHello() {
        System.out.println("hello world");
    }
}
2.2. 编写app.xml文件
<?xml version="1.0" encoding="UTF-8"?>
<beans xmlns="http://www.springframework.org/schema/beans"
       xmlns:xsi="http://www.w3.org/2001/XMLSchema-instance"
       xmlns:myrpc="http://com.protagonist.com/schema"
       xsi:schemaLocation="http://www.springframework.org/schema/beans
        http://www.springframework.org/schema/beans/spring-beans-2.5.xsd
        http://com.protagonist.com/schema http://com.protagonist.com/schema/rpc.xsd">

    <myrpc:reference id="menuService" interface="com.protagonist.springload.MenuService" />
</beans>
2.3 编写spring.handlers文件
描述上面那个命名空间xmlns:myrpc 对应的命名空间处理器,以及标签解析器
http\://com.protagonist.com/schema=com.protagonist.config.RPCNamespaceHandler
下面的代码可能略多,其实核心的就是在解析到reference标签的时候,获取到interface属性的接口全路径,然后使用jdk动态代理对这个接口生成一个动态代理类
package com.protagonist.config;
import org.springframework.beans.factory.xml.NamespaceHandlerSupport;
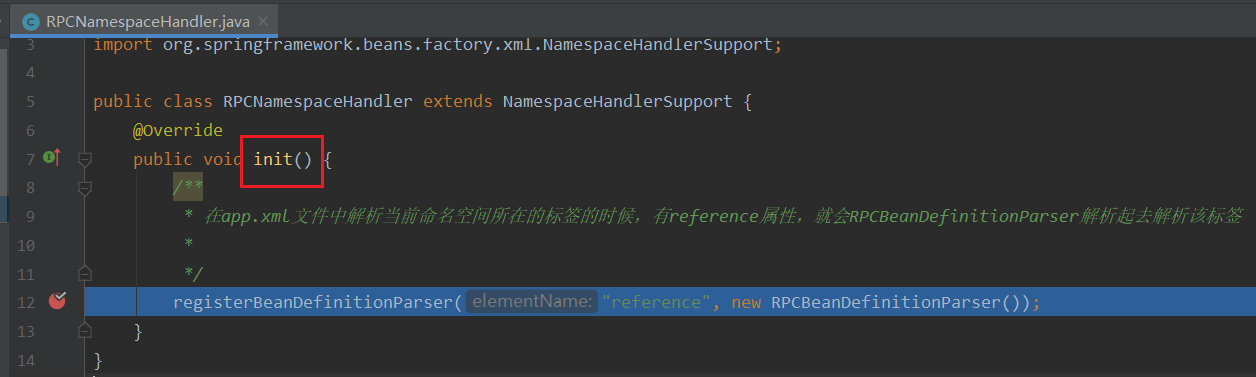
public class RPCNamespaceHandler extends NamespaceHandlerSupport {
@Override
public void init() {
/**
* 在app.xml文件中解析当前命名空间所在的标签的时候,有reference属性,就会RPCBeanDefinitionParser解析起去解析该标签
*
*/
registerBeanDefinitionParser("reference", new RPCBeanDefinitionParser());
}
}
这里的getBeanClass方法中,注意返回的对象是ReferenceBean.class
import org.springframework.beans.factory.support.BeanDefinitionBuilder;
import org.springframework.beans.factory.xml.AbstractSingleBeanDefinitionParser;
import org.springframework.util.StringUtils;
import org.w3c.dom.Element;

public class RPCBeanDefinitionParser extends AbstractSingleBeanDefinitionParser {
    /**
     * app.xml配置文件中, 解析标签对应的javaBean对象
     * @param element
     * @return
     */
    protected Class getBeanClass(Element element) {
        return ReferenceBean.class;
    }

    /**
     * 解析标签,取出interface属性的值
     * @param element
     * @param bean
     */
    protected void doParse(Element element, BeanDefinitionBuilder bean) {
        String interfaceClass = element.getAttribute("interface");
        if (StringUtils.hasText(interfaceClass)) {
            bean.addPropertyValue("interfaceClass", interfaceClass);
        }
    }
}
ReferenceBean类实现了FactoryBean接口,只要spring容器初始化创建bean实例的话就会调用getObject方法
import org.springframework.beans.factory.FactoryBean;

public class ReferenceBean<T> extends ReferenceConfig<T> implements FactoryBean {
    @Override
    public Object getObject() throws Exception {
        return get();
    }
    @Override
    public Class<?> getObjectType() {
        return getInterfaceClass();
    }
    @Override
    public boolean isSingleton() {
        return true;
    }
}
ReferenceConfig类其实就是根据接口的全名称,生成一个动态代理类
import com.protagonist.springload.ProxyFactory;

public class ReferenceConfig<T> {
    private Class<?> interfaceClass;
    /**
     * 接口代理类引用
     */
    private transient volatile T ref;
    public synchronized T get() {
        if (ref == null) {
            init();
        }
        return ref;
    }

    /**
     * 将xml文件中的接口的全路径,使用jdk动态代理生成一个代理对象
     */
    private void init() {
        ref = new ProxyFactory(interfaceClass).getProxyObject();
    }
    public Class<?> getInterfaceClass() {
        return interfaceClass;
    }
    public void setInterfaceClass(Class<?> interfaceClass) {
        this.interfaceClass = interfaceClass;
    }
}
ProxyFactory类,其实就是封装了一下jdk动态代理,在下面的invoke方法中,我们可以使用Socket去连接远程服务器,进行交互,获取响应数据
import java.lang.reflect.InvocationHandler;
import java.lang.reflect.Method;
import java.lang.reflect.Proxy;

public class ProxyFactory implements InvocationHandler {
    private Class interfaceClass;
    public ProxyFactory(Class interfaceClass) {
        this.interfaceClass = interfaceClass;
    }
    /**
     *  返回代理对象,此处用泛型为了调用时不用强转,用Object需要强转
     */
    public <T> T getProxyObject(){
        return (T) Proxy.newProxyInstance(this.getClass().getClassLoader(),//类加载器
                new Class[]{interfaceClass},//为哪些接口做代理
                this);//(把这些方法拦截到哪处理)
    }

    @Override
    public Object invoke(Object proxy, Method method, Object[] args) throws Throwable {
        System.out.println(method);
        System.out.println("将要发送的数据进行编码");
        System.out.println("开始发送网络请求");
        System.out.println("获取响应数据");
        System.out.println("开始解码,获取明文数据");
        return null;
    }
}
2.4.编写spring.schemas文件
用于描述上面app.xml文件中绿色部分对应的xsd文件的实际位置
http\://com.protagonist.com/schema/rpc.xsd=META-INF/rpc.xsd
2.5 编写xsd文件
用于描述当前命名空间的标签内都有啥属性,注意下面xmls和targetNamespace要和app.xml文件中保持一致
<?xml version="1.0" encoding="UTF-8" standalone="no"?>
<xsd:schema
        xmlns="http://com.protagonist.com/schema"
        xmlns:xsd="http://www.w3.org/2001/XMLSchema"
        xmlns:beans="http://www.springframework.org/schema/beans"
        xmlns:tool="http://www.springframework.org/schema/tool"
        targetNamespace="http://com.protagonist.com/schema">
    <xsd:import namespace="http://www.w3.org/XML/1998/namespace"/>
    <xsd:import namespace="http://www.springframework.org/schema/beans"/>
    <xsd:import namespace="http://www.springframework.org/schema/tool"/>
    <xsd:complexType name="referenceType">
        <xsd:complexContent>
            <xsd:extension base="beans:identifiedType">
                <xsd:attribute name="interface" type="xsd:token" use="required">
                    <xsd:annotation>
                        <xsd:documentation><![CDATA[ The service interface class name. ]]></xsd:documentation>
                        <xsd:appinfo>
                            <tool:annotation>
                                <tool:expected-type type="java.lang.Class"/>
                            </tool:annotation>
                        </xsd:appinfo>
                    </xsd:annotation>
                </xsd:attribute>
            </xsd:extension>
        </xsd:complexContent>
    </xsd:complexType>
    <xsd:element name="reference" type="referenceType">
        <xsd:annotation>
            <xsd:documentation><![CDATA[ Reference service config ]]></xsd:documentation>
        </xsd:annotation>
    </xsd:element>
</xsd:schema>
2.6 单元测试类以及结果
import com.protagonist.springload.MenuService;
import org.junit.Test;
import org.junit.runner.RunWith;
import org.springframework.test.context.ContextConfiguration;
import org.springframework.test.context.junit4.SpringJUnit4ClassRunner;

import javax.annotation.Resource;

@RunWith(SpringJUnit4ClassRunner.class)
@ContextConfiguration("classpath:app.xml")
    public class DemoTest {

    @Resource
    private MenuService menuService;

    @Test
    public void testSpring(){
        menuService.sayHello();
    }
}

3.解析spring配置文件的原理
就使用上面举了一个很简单的栗子,我们调试一下,看看spring的xml配置文件中我们自定义的那个标签,是怎么解析的呢?
这个时候对spring源码了解过的小伙伴肯定就会跳出来说,不就是会把配置文件中的一个个bean解析成BeanDefinition对象么?道友我五百年前就知道了( ̄o ̄) . z Z
这就很不给面子呀,我擦,对于这种小伙伴,我都会把你毒打一顿,让你体会社会的险恶๑乛◡乛๑
言归正传,我们就大概看看是怎么从一个xml文件编程BeanDefinition的吧,我们只看大概流程,毕竟这不是讲spring源码的....

3.1 spring容器初始化的过程,会将app.xml文件封装为Resource对象

3.2 读取Resource中的内容, 转为Document对象
3.3. 根据Document中的头标签内容,解析出来指定的命名空间uri
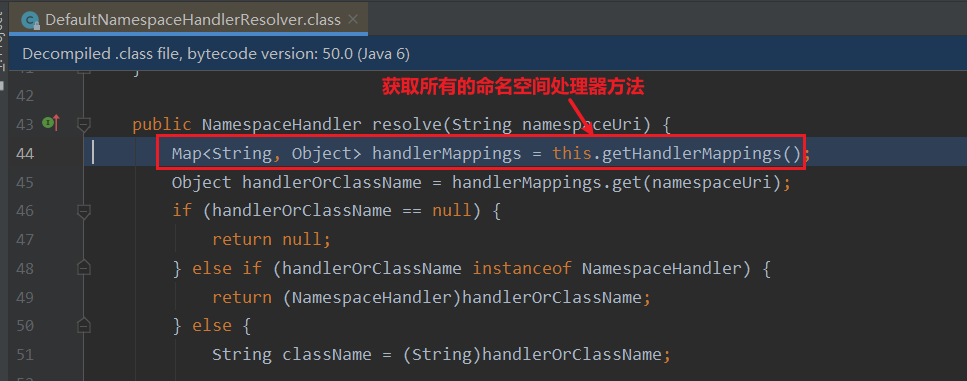
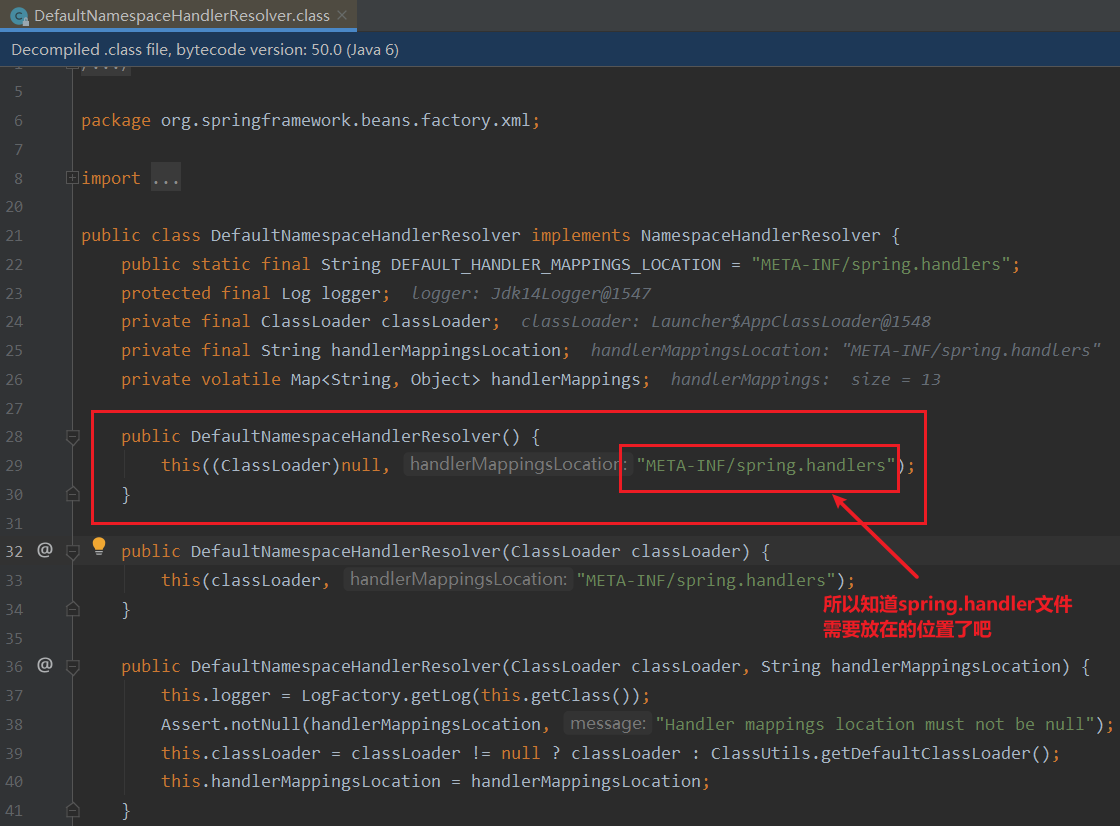
3.4 将配置文件META-INF/spring.handler中内容转为Properties对象,这个类就是继承了HashTable,就是一个Map
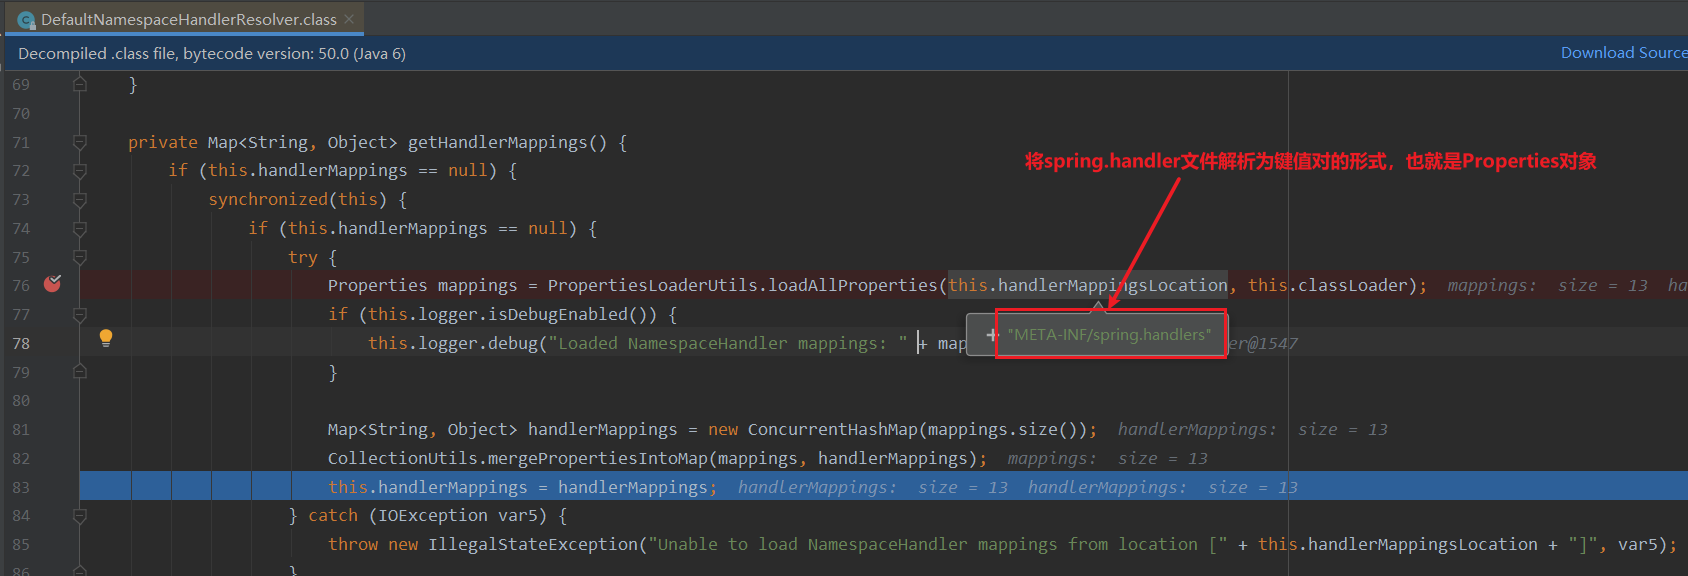
3.5. 前面几步就获取到了命名空间处理器的全类名,这里就是使用反射进行实例化,执行初始化方法
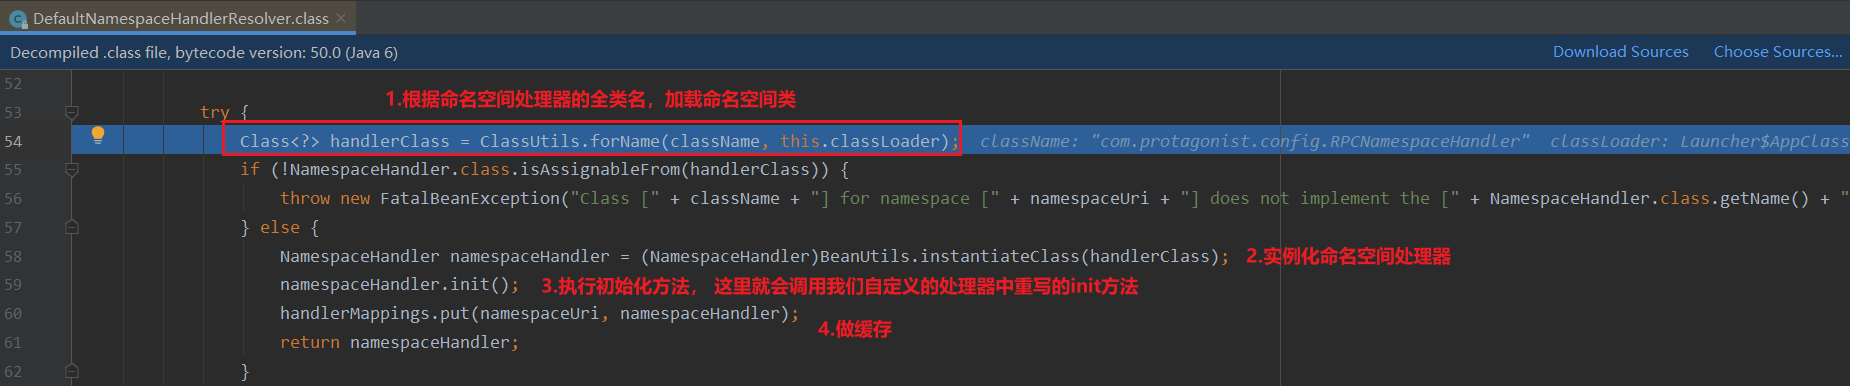
3.6 到了我们自定义命名空间处理器重写的方法中,然后就是实例化RPCBeanDefinitionParser,后续初始化的流程会执行RPCBeanDefinitionParser的doParse方法,由于篇幅有限,有兴趣的可以自己调试
4.总结
这篇写的还是蛮多的,其实就是简单的使用了一下spring的自定义标签的功能,我们自己也简单的实现了一个没什么用的超级简易版的dubbo远程调用的mock(虽然说还没有真正的去调用,哈哈哈),dubbo实现的大概思路就是这个样子;
就是根据dubbo的配置文件,找到我们要引用的接口的全路径,然后使用动态代理生成对象,去注册中心中找到该接口和方法的所在的服务器的ip和端口,然后通过建立tcp连接的方式去向那个服务器发送数据并得到响应,然后解析数据;
说起来是不是很简单,但是其中我们要考虑的东西特别多,比如注册中心用啥?注册中心挂了怎么办?序列化方式?远程调用服务时候负载均衡?超时时间?容错方案?通讯协议?等等问题都需要考虑到,后续我们慢慢说

 浙公网安备 33010602011771号