


Kubernetes存储卷
######################################Volume存储卷#########################################
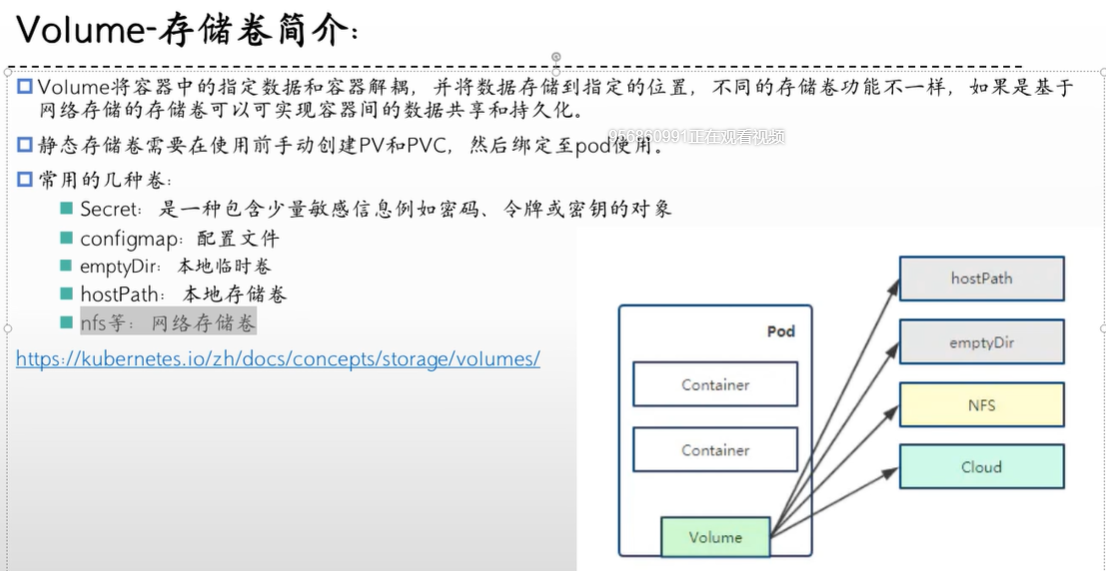
简介:Volume将容器中的指定数据和容器解耦,并将数据存储到指定的位置,不同的存储卷功能不一样,如果基于网络存储的存储卷可以实现容器间的数据共享和持久化
静态存储卷:需要在使用前创建pv和pvc,然后绑定至pod使用
常用的几种卷:
Secret:是一种包含少量敏感信息,列如密码。密钥或令牌的对象
configmap:配置文件
emptyDir:本地临时卷,重启pod后数据会丢失
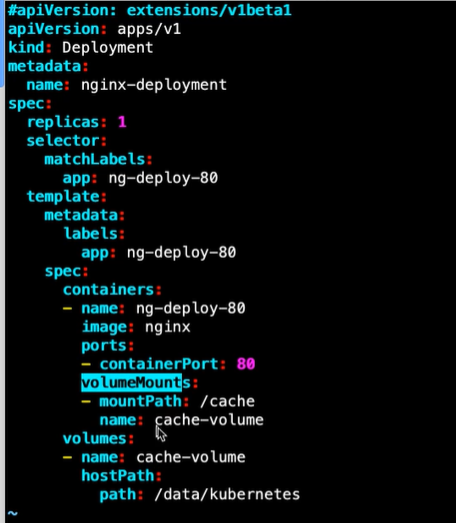
hostPath:本地存储卷
nfs等:网络存储
emptyDir的yaml:
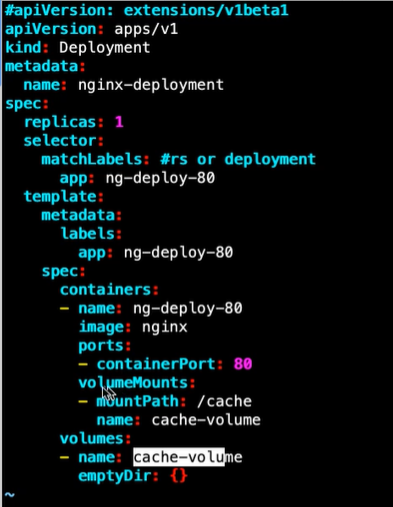
#emptyDir会将文件存储在/var/lib/kubelet/pods/目录下,涉及容器id,可能需要find来找
hostPath的yaml:
nfs的yaml:

#########################################################################################
######################################实战测试emptyDir#####################################
#创建deploy+service
cat <<EOF >nginx.yaml
apiVersion: apps/v1
kind: Deployment
metadata:
  name: nginx-deploy
  namespace: wyh-test1-ns
  labels:
    app: nginx-deploy-debug
spec:
  selector:
    matchLabels:
      app: nginx-test
  template:
    metadata:
      labels:
        app: nginx-test
    spec:
      containers:
      - name: nginx
        image: nginx
        ports:
        - containerPort: 80
        volumeMounts:
        - name: data-volume
          mountPath: /data
      volumes:
      - name: data-volume
        emptyDir: {}
---
apiVersion: v1
kind: Service
metadata:
  name: nginx-svc
  namespace: wyh-test1-ns
  labels:
    app: nginx-svc-debug
spec:
  type: ClusterIP
  ports:
  - name: http
    port: 80
    targetPort: 80
  selector:
    app: nginx-test
EOF
#执行文件
kubectl apply -f nginx-test.yaml
#查看pod是否启动成功,启动成功后在pod的/data目录创建test.txt文件
kubectl get pod -nwyh-test1-ns -owide

kubectl exec -it nginx-deploy-59444f857-6lflq -nwyh-test1-ns bash
echo "111" /data/test.txt
#去pod运行的服务器中的/var/lib/kubelet/pod下去找文件是否存在

##emptyDir实验成功
########################################################################################
######################################实战测试HostPath#####################################
#创建deploy+service
cat <<EOF >nginx-test.yaml
apiVersion: apps/v1
kind: Deployment
metadata:
  name: nginx-deploy
  namespace: wyh-test1-ns
  labels:
    app: nginx-deploy-debug
spec:
  selector:
    matchLabels:
      app: nginx-test
  template:
    metadata:
      labels:
        app: nginx-test
    spec:
      containers:
      - name: nginx
        image: nginx
        ports:
        - containerPort: 80
        volumeMounts:
        - name: data-volume
          mountPath: /data
      volumes:
      - name: data-volume
        hostPath:
          path: /data/kubernetes
---
apiVersion: v1
kind: Service
metadata:
  name: nginx-svc
  namespace: wyh-test1-ns
  labels:
    app: nginx-svc-debug
spec:
  type: ClusterIP
  ports:
  - name: http
    port: 80
    targetPort: 80
  selector:
    app: nginx-test
EOF
#执行文件
kubectl apply -f nginx-test.yaml
#查看pod是否启动成功,启动成功后在pod的/data目录创建test.txt文件
kubectl get pod -nwyh-test1-ns -owide

kubectl exec -it nginx-deploy-76b6c9cfc5-ft45f -nwyh-test1-ns bash
echo "hostPath" > /data/test.txt
#去pod运行的服务器中的/data/kubernetes下去找文件是否存在

##hostPath实战完成
#########################################################################################
######################################实战测试HostPath#####################################
#找一台服务器作为存储节点(本次实战使用192.168.213.21服务器)
#在nfs服务器上安装nfs服务端
apt-get install nfs-kernel-server
#其他服务器上安装客户端
apt-get install nfs-common ##此为客户端,安装后有showmount命令
#在nfs服务器上创建目录并分配访问权限
mkdir /data/kubernetes -p
echo "/data/kubernetes 192.168.213.0/24(rw,sync,no_root_squash)" >> /etc/exports
#rw:读写权限
#ro:只读权限
#sync:同步写入内存硬盘
#no_root_squash:访问共享目录时,如果是root用户,那么你针对共享用户也有root权限(可能存在风险)
#root_squash:如果访问共享目录是root权限用户,对共享目录的权限会被压缩到nfsnobody用户权限
#all_squash:不管你访问的用户是谁,都会压缩到nfsnobody用户权限
#subtree_check(默认):若配置的目录是一个子目录,则nfs服务器将检查其父目录的权限
#no_subtree_check:即使配置的目录是一个子目录,nfs服务器也不会检查其父目录的权限(会提高效率,配置场景需要自己斟酌)
exportfs -arv
showmount -e 192.168.213.21
#在管理节点编写yaml文件并运行
cat <<EOF >nginx-test.yaml
apiVersion: apps/v1
kind: Deployment
metadata:
  name: nginx-deploy
  namespace: wyh-test1-ns
  labels:
    app: nginx-deploy-debug
spec:
  selector:
    matchLabels:
      app: nginx-test
  template:
    metadata:
      labels:
        app: nginx-test
    spec:
      containers:
      - name: nginx
        image: nginx
        ports:
        - containerPort: 80
        volumeMounts:
        - name: data-volume
          mountPath: /usr/share/nginx/html/wyh
      volumes:
      - name: data-volume
        nfs:
          server: 192.168.213.21
          path: /data/kubernetes
---
apiVersion: v1
kind: Service
metadata:
  name: nginx-svc
  namespace: wyh-test1-ns
  labels:
    app: nginx-svc-debug
spec:
  type: ClusterIP
  ports:
  - name: http
    port: 80
    targetPort: 80
  selector:
    app: nginx-test
EOF
kubectl apply -f nginx-test.yaml
#在nfs服务器的存储目录创建个html文件
echo "<h1>Hellow word!!</h1>" >> /data/kubernetes/test.html
#访问测试
curl -v 172.200.190.20/wyh/test.html

##nfs实战完成
#########################################################################################
###存储卷类型
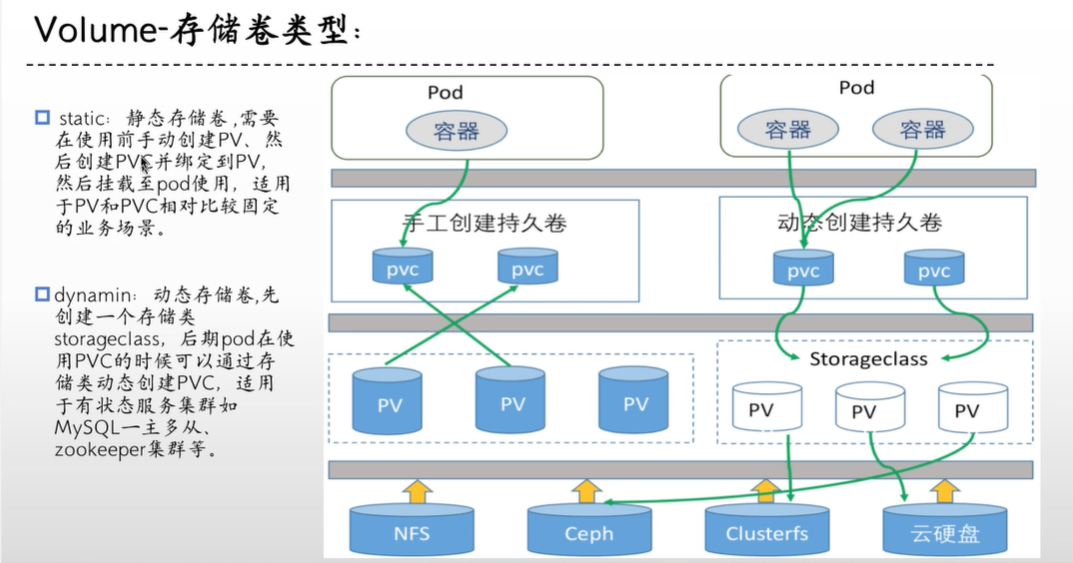
######################################pv+pvc(静态存储)#####################################
作用:
用于实现pod和storage的解耦,这样修改storage的时候就不需要修改pod了
与nfs的区别是可以在pv和pvc层面实现对存储服务器的空间分配,存储的访问权限等
kubernertes从1.0版本开始支持PersistentVolume和PersistentVolumeClaim

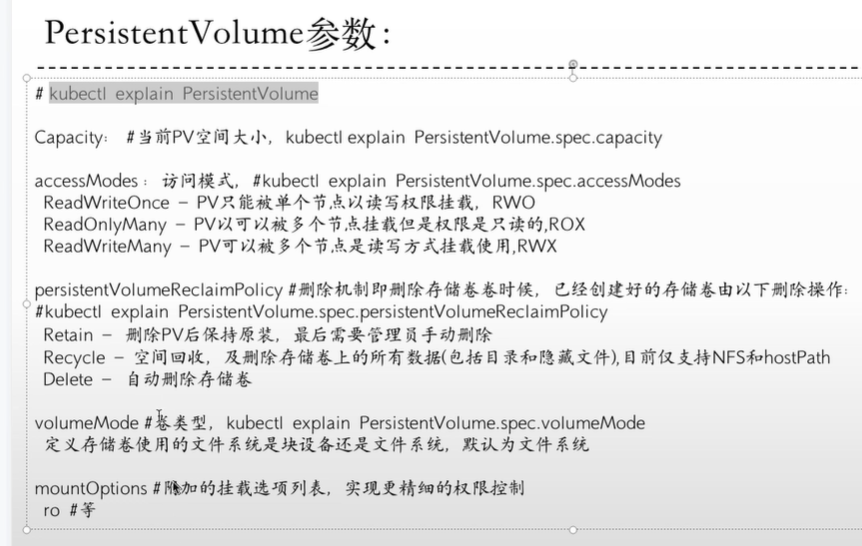
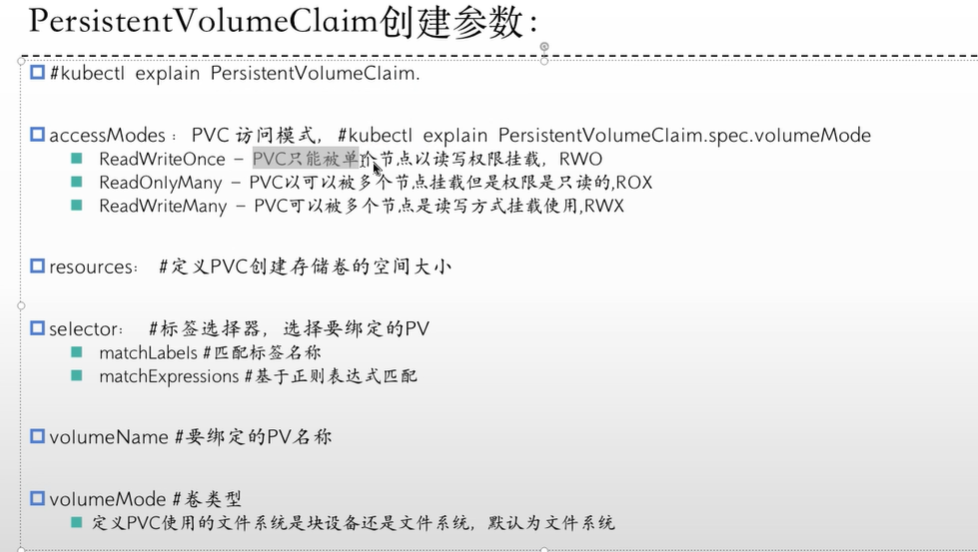
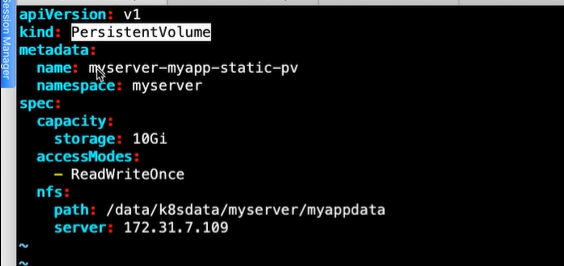
PV:和后端存储(nfs,ceph等等)做绑定,将一整块空间拆分成多份来供不同应用使用,本身不负责持久化,数据会放在后端存储
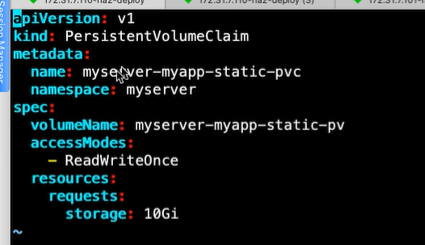
PVC:绑定pv,然后pod挂载pvc来做持久化写入到网络存储
#!!!!pvc和pv都能限制存储空间,但是pvc限制的空间要小于等于pv!!!!
#pv配置参数:
#pvc配置参数
##pv的yaml文件写法
##pvc的yaml文件写法:
#pvc绑定pv的方式:
selector:根据matchLables或者matchExpressions通过标签选择器找到对应pv
volumeName:直接指定Pv Name(常用方式)
#deploy使用pvc的yaml文件:

###################################storageclass(动态存储)###################################
静态存储:每次都要手动创建pv和pvc
动态存储:配置好后动态生成pvc,适用于有状态服务
##创建名称空间和用户
apiVersion: v1
kind: Namespace
metadata:
    name: nfs
---
#创建用户
apiVersion:
kind: ServiceAccount
metadata:
  name: nfs-client-provisioner
  namespace: nfs
---
#创建角色
kind: ClusterRole
apiVersion: rbac.authorization.k8s.io/v1
metadata:
  name: nfs-client-provisioner-runner
rules:
  - apiGroups: [""]
     resources: ["nodes"]
     verbs: ["get", "list", "watch"]
 - apiGroups: [""]
   resources: ["persistentvolumes"]
   verbs: ["get", "list", "watch", "create", "delete"]
 - apiGroups: [""]
   resources: ["persistentvolumeclaims"]
   verbs: ["get", "list", "watch", "update"]
 - apiGroups: ["storage.k8s.io"]
   resources: ["storageclasses"]
   verbs: ["get", "list", "watch"]
 - apiGroups: [""]
   resources: ["events"]
   verbs: ["create", "update", "patch"]
---
#将角色绑定用户
kind: ClusterRoleBinding
apiVersion: rabc.authorization.k8s.io/v1
metadata:
    name: run-nfs-client-provisioner
subjects:
  - kind: ServiceAccount
    name: nfs-client-provisioner
    namespace: nfs
roleRef:
  kind: ClusterRole
  name: nfs-client-provisioner-runner
  apiGroup:  rabc.authorization.k8s.io
---
kind: Role
apiVersion: rabc.authorization.k8s.io/v1
metadata:
  name: leader-locking-nfs-client-provisioner
  namespace: nfs
rules:
  - apiGroups: [""]
    resource: ["endpoints"]
    verbs: ["get", "list", "watch", "create", "update", "patch"]
---
kind: RoleBinding
apiVersion: rabc.authorization.k8s.io/v1
metadata:
  name: leader-locking-nfs-client-provisioner
  namespace: nfs
subjects:
  - kind: ServiceAccount
    name: nfs-client-provisioner
    namespace: nfs
roleRef:
  kind: Role
  name: leader-locking-nfs-client-provisioner
  apiGroup: rabc.authorization.k8s.io
#创建存储类(storageclass)
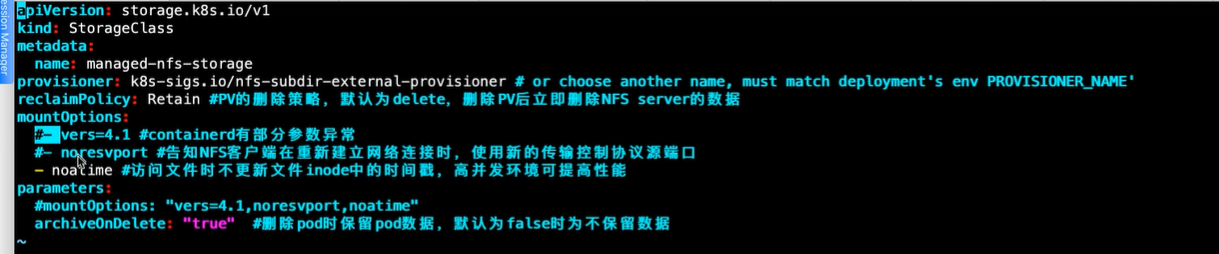
apiVersion: storage.k8s.io/v1
kind: StorageClass
metadata:
  name: wyh-nfs-storage
provisioner: k8s-sigs.io/nfs-subdir-external-provisioner #这个配置一定要和deployment的env中的PROVISIONER_NAME一致
raclaimPolicy: Retain #PV的删除策略,默认为delete,删除pv后立即删除nfs server的数据
mountOptions:
  - noatime #访问文件时不更新inode中的时间戳,高并发环境可提高性能
parameters:
  archiveOnDelete: "true" #删除pod时保留pod数据,默认为false
#定义到哪个nfs创建pv
apiVersion: apps/v1
kind: Deployment
metadata:
  name: nfs-client-provisioner
  labels:
    app: nfs-client-provisioner
  # replace with namespace where provisioner is deployed
  namespace: nfs
spec:
  replicas: 1
  strategy: 部署策略
    type: Recreate
  selector:
    matchLabels:
      app: nfs-client-provisioner
  template:
    metadata:
      labels:
        app: nfs-client-provisioner
    spec:
      serviceAccountName: nfs-client-provisioner
      containers:
        - name: nfs-client-provisioner
          #image: k8s.gcr.io/sig-storage/nfs-subdir-external-provisioner:v4.0.2
          image: registry.cn-qingdao.aliyuncs.com/zhangshijie/nfs-subdir-external-provisioner:v4.0.2
          volumeMounts:
            - name: nfs-client-root
              mountPath: /persistentvolumes
          env:
            - name: PROVISIONER_NAME
              value: k8s-sigs.io/nfs-subdir-external-provisioner
            - name: NFS_SERVER
              value: 172.31.7.109
            - name: NFS_PATH
              value: /data/volumes
      volumes:
        - name: nfs-client-root
          nfs:
            server: 172.31.7.109
            path: /data/volumes
#创建pvc连接存储类
kind: PersistentVolumeClaim
apiVersion: v1
metadata:
  name: test-claim
  namespace: wyh-test1-ns
spec:
  storageClassName: wyh-nfs-storage
  accessModes:
    - ReadWriteMany
  resources:
    requests:
      storage: 500Mi
#deploy连接pvc
volumes:
  - name: nfs-pvc
    persistentVolumeClaim:
      claimName: test-claim
#########################################################################################
#######################################configmap#########################################
Configmap作用:配置信息和镜像的解耦,实现的方式是将配置信息放到configmap对象中,然后在使用volume的方式挂载到pod中从而实现导入配置信息的目的
使用场景:
给pod定义全局变量
给pod中的容器服务提供配置文件,通过挂载的形式使用
注意事项:

Configmap使用配置文件挂载的yaml文件:
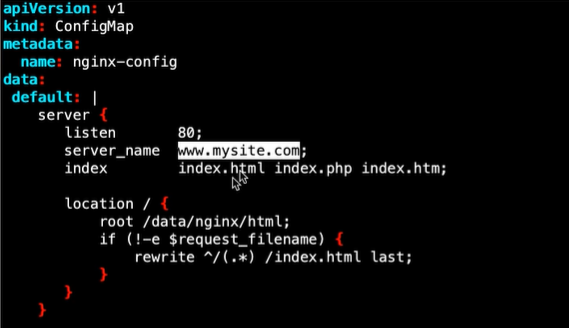
deploy挂载Configap:
containers:
...........
...........
volumeMounts:
- name: nginx-config
mountPath: /etc/nginx/conf.d
volumes:
configMap:
name: nginx-config
items:
- key: default
path: mysite.conf
Confingmap配置变量的方式(使用方式较少):

#########################################################################################
#######################################Secret#########################################
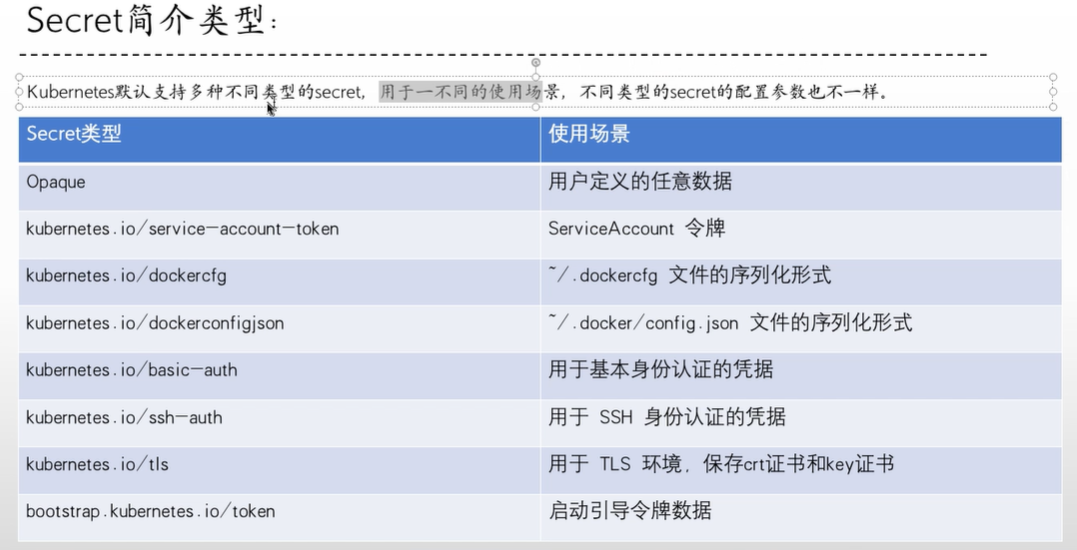
简介:类似于configmap的使用方式,但是用于密码、密钥和令牌,secret会base64加密

secret类型:
##data类型
echo "admin" | base64

stringdata可以不用base64加密,创建好后会自动加密
!!!此数据会在etcd中保存,所以不建议太多!!!
##tls类型
上传证书或者签发证书
kubectl create secret tls wyh-test-tls --cert=/opt/wyh/wyh.crt --key=/opt/wyh/wyh.key -nwyh-test1-ns
##imagepull类型(两种方式):
#第一种:
kubectl create secret docker-registry wyh-test-name --docker-server=harbor.wyh.net --docker-username=admin --docker-password=123456
#第二种:
先使用crictl或者docker登陆
docker login --username=wyh harbor.wyh.net
然后去用户家目录下找.docker/config.json(里面是redgistry的认证信息)
kubectl create secret generic wyh-test-name --from-file=.dockerconfigjson=/root/.docker/config.json --type=kuberneter.io/dockerconfigjson -nwyh-test1-ns
##挂载方式:
deploy挂载secret:
containers:
...........
...........
volumeMounts:
- name: wyh-auth-secret
mountPath: /data/auth
volumes:
- name: wyh-auth-secret
secret:
secretName: mysecret-data
#####################################################################################

 浙公网安备 33010602011771号