

20200614_facegate接口实现
后台使用java实现, 所以函数命名是遵循java的规则
1. 如果只想从设备上接收通行数据, 则只需要实现下面的接口即可:
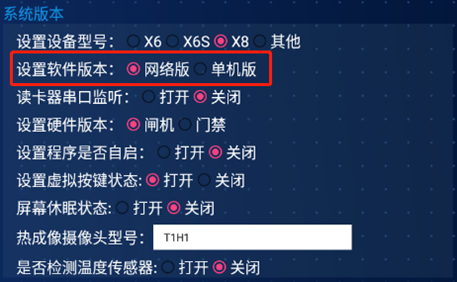
a) 首先再设备上做如下配置, 前后不能有空格 :
i. 设置版本到网络版:
ii. 配置上报接口参数:
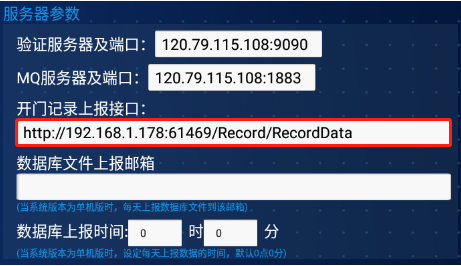
如果觉得一个一个输入太麻烦, 可以通过TeamViewer工具, 或者adb直接推进去, 命令是:
adb shell input text http://192.168.1.178:61469/Record/RecordData
b) 对象:
  /// <summary>
   /// 大小写不要更改
   /// </summary>
    public class RecordJson
    {
        /// <summary>
        /// 就是userid, 如果是所有人模式, 则会采用一个随机的uuid
        /// </summary>
        public string qrcode { get; set; }

        /// <summary>
        /// 设备上的二维码编号
        /// </summary>
        public string device_no { get; set; }

        /// <summary>
        /// 当前通行人员的抓拍
        /// </summary>

        public string base64 { get; set; }

        /// <summary>
        /// 开门方式('0'、人脸;'1'、扫码;'2'、刷卡)
        /// </summary>
        public string oper_type { get; set; }

        /// <summary>
        /// 当前通行人员的体温
        /// </summary>
        public string temperature { get; set; }

        /// <summary>
        /// 当前通行人员名字
        /// </summary>
        public string userName { get; set; }

        /// <summary>
        /// 自己实现接口, 不用理会这个
        /// </summary>
        public string nonce { get; set; }

        /// <summary>
        /// 自己实现接口, 不用理会这个
        /// </summary>
        public string sign { get; set; }

    }
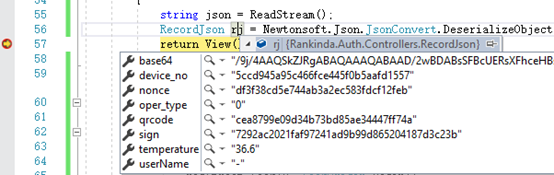
c) 然后实现接口:
public class RecordController : Controller
{
        /// <summary>
        /// 这里是MVC, 所以使用的InputStream, 如果使用WebAPI可以使用[FromBody]接收
        /// </summary>
       [HttpPost]
        public ActionResult RecordData ()
        {
            string json = ReadStream();
            RecordJson rj = Newtonsoft.Json.JsonConvert.DeserializeObject<RecordJson>(json);
            return View();
        }

        public string ReadStream()
        {
            try
            {
                Stream reqStream = Request.InputStream;
                reqStream.Seek(0, SeekOrigin.Begin);
                byte[] buffer = new byte[(int)reqStream.Length];
                reqStream.Read(buffer, 0, (int)reqStream.Length);
                string json = "";
                foreach (char a in buffer)
                {
                    json = json + a.ToString();
                }
                return json;
            }
            catch
            {

            }
            return null;
        }
}
d) 然后可以去做人脸识别了, 如果识别成功, 就会发现接口已经被访问了;
e) 调试:
i. 在防火墙上开放你指定的端口, 或者直接暂时关闭你服务器的防火墙
ii. 首先要在内网PC(非你的本机)上能够访问你的接口, 接口必须是Post
iii. 如果在局域网使用IIS调试, 请参考 https://www.cnblogs.com/wxylog/p/6566163.html
☺☺☺☺☺☺☺☺☺☺☺☺ 宇宙第一分隔符 割一下☺☺☺☺☺☺☺☺☺☺☺☺
以下演示实现所有接口:
- 环境准备:
- 启动MQ, 下载MQ, 这里演示使用apache-activemq-5.15.12 , MQ启动后默认使用3个端口, 8161, 1883, 61616 ; 默认的用户名密码都是admin
- 设备配置:
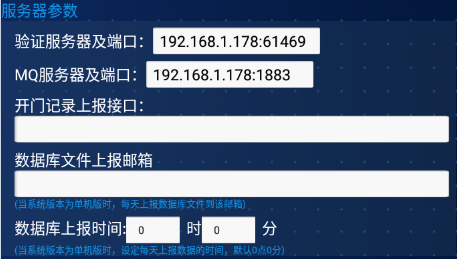
验证服务器及端口: 接口所在服务器地址和端口
MQ服务器及端口: MQ应用所在的服务器地址和端口
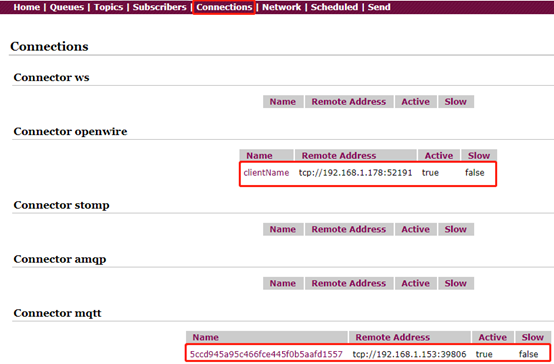
- 连接后的示例:
2. 人脸下发:
2.1 对象:
 /// <summary>

    /// 大小写不要更改, 所有字段中不能使用 _ (下划线), 因为下发到设备上后, 设备会使用这个符号组织字段
    /// </summary>
    public class ImageJson
    {
        /// <summary>
        /// 用户Id
        /// </summary>
        public string userId { get; set; }

        /// <summary>
        /// 设备Id, 就是人脸识别程序的设置界面的二维码
        /// </summary>
        public string deviceId { get; set; }

        /// <summary>
        /// 卡号, 一般指的是卡的表面号码, 根据业务自行调整
        /// </summary>
        public string cardNum { get; set; }

        /// <summary>
        /// 卡号, 一般指的是卡的内置号码, 根据业务自行调整
        /// </summary>
        public string newCardNum { get; set; }

        /// <summary>
        /// 姓名
        /// </summary>
        public string name { get; set; }

        /// <summary>
        /// 人脸图片, 一般要求生活大头照, 大小在2M左右
        /// </summary>
        public string base64 { get; set; }

        /// <summary>
        /// 部门名称
        /// </summary>
        public string deptName { get; set; }
        /// <summary>
        /// 是否删除
        /// </summary>
        public string delFlag { get; set; }
}
2.2 人脸下发实现:
//需要添加 Apache.NMS和Apache.NMS.ActiveMQ两个dll引用
        private IConnectionFactory factory;
        private ImageJson imageJson = new ImageJson();
        private IMessageProducer prod;
//设备设置界面的二维码
        private string deviceId = "5ccd945a95c466fce445f0b5aafd1557";
        /// <summary>
        /// 队列的名称
        /// </summary>
        private string TOPIC_NAME = string.Empty;
        public Form1()
        {
            InitializeComponent();
            InitProducer();
            TOPIC_NAME = $"image/mq/topic/{deviceId}";
        }

        public void InitProducer()
        {
            try
            {
                //初始化工厂,这里默认的URL是不需要修改的
                //创建接工厂, 连接到服务器
                factory = new ConnectionFactory("tcp://192.168.1.178:61616");
            }
            catch
            {
                lbMessage.Text = "初始化失败!!";
            }
        }

        /// <summary>
        /// 开始mq
        /// </summary>
        /// <param name="sender"></param>
        /// <param name="e"></param>
        private void btnStartActiveMq_Click(object sender, EventArgs e)
        {
            try
            {
                //protected virtual Connection CreateActiveMQConnection(string userName, string password);
                //通过工厂创建连接
                using (IConnection connection = factory.CreateConnection())
                {
                    connection.ClientId = "clientName";
                    connection.Start();
                    //通过连接创建
                    using (ISession session = connection.CreateSession())
                    {
                        ////监听消息
                        ////订阅testing主题, 并开始监听, 这个是监听的消费者回来的消息
                        //IMessageConsumer consumer = session.CreateDurableConsumer(new Apache.NMS.ActiveMQ.Commands.ActiveMQTopic(TOPIC_NAME), connection.ClientId, null, false);
                        //consumer.Listener += new MessageListener(consumer_Listener);
                        //IDestination destination = session.GetDestination("");
                        //session.CreateConsumer()
                        //创建主题
                        Apache.NMS.ActiveMQ.Commands.ActiveMQTopic activeMQTopic = new Apache.NMS.ActiveMQ.Commands.ActiveMQTopic(TOPIC_NAME);
                        //创建生产者
                        prod = session.CreateProducer(activeMQTopic);
                        imageJson.userId = "8899988";
                        imageJson.deptName = "operation";
                        imageJson.deviceId = deviceId;
                        imageJson.cardNum = "13609986302";
                        imageJson.newCardNum = "000000000000";
                        imageJson.name = "test";
                        #region
                        imageJson.base64 = "你的base64图片, 不包含【data:image/jpeg;base64,】前缀";
                        #endregion
                        imageJson.delFlag = "0";
                        ITextMessage msg = prod.CreateTextMessage();
                        msg.Text = JsonConvert.SerializeObject(imageJson);
                        System.Diagnostics.Debug.WriteLine("发送当前i的值是: " + msg.ToString());
                        prod.Send(msg, Apache.NMS.MsgDeliveryMode.NonPersistent, Apache.NMS.MsgPriority.Normal, TimeSpan.MinValue);
                    }
                }
            }
            catch (System.Exception ex)
            {
                System.Diagnostics.Debug.WriteLine("{0}", ex.Message);
            }
        }
3. 数据上报(内置接口):
3.1 对象使用的是前面的 RecordJson
3.2接口代码:
 /// <summary>
    /// 此Controller下的所有接口名字, 必须要和文档中保持一致, 因为这里已经在android端固定了
    /// </summary>
    public class DoorControllerController : Controller
    {
        /// <summary>
        /// 上报记录, 内置函数, 函数名字不要改动
        /// </summary>
        public ActionResult temperatureRecord()
        {
            string json = ReadStream();
            RecordJson rj = Newtonsoft.Json.JsonConvert.DeserializeObject<RecordJson>(json);
            return View();
        }
}
3.3 断点如下:

4. 人脸图片插入失败(将base64赋值为: abc即可测试失败):
4.1 对象:
   /// <summary>
    /// 大小写不要更改
    /// </summary>
    public class FailImage
    {
        /// <summary>
        /// 导入失败的图片的名字; 格式为【 1009_张三1009_1009_研发部-test.jpg 】
        /// 1009→userid
        /// 张三1009→name
        /// 1009→工号
        /// 研发部→部门名称
        /// -test→固定写法, 必须要有的
        /// .jpg→人脸图片后缀
        /// </summary>
        public string image { get; set; }

        /// <summary>
        /// 设备编号
        /// </summary>
        public string device_no { get; set; }

        /// <summary>
        /// 不用理会
        /// </summary>
        public string nonce { get; set; }

        /// <summary>
        /// 不用理会
        /// </summary>
        public string sign { get; set; }

}
4.2接口代码:
 /// <summary>
    /// 此Controller下的所有接口名字, 必须要和文档中保持一致, 因为这里已经在android端固定了
    /// </summary>
    public class DoorControllerController : Controller
    {
        /// <summary>
        /// 接口名字, 和Controller名字一定要是这个
        /// </summary>
        /// <returns></returns>
        [HttpPost]
        public ActionResult imgFailimport()
        {
            try
            {
                string json = ReadStream();
                json = "{\"" + json.Replace("&", "\",\"").Replace("=", "\":\"") + "\"}";
                FailImage fi = Newtonsoft.Json.JsonConvert.DeserializeObject<FailImage>(json);
                return View();
            }
            catch (Exception ex)
            {
                throw;
            }
        }
}
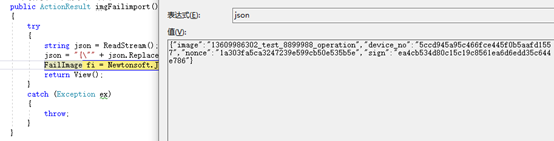
4.3 截图:
5. 心跳接收:
5.1 对象:
 /// <summary>
    /// Heartbeat
    /// </summary>
    public class Heartbeat
    {
        /// <summary>
        /// 设备编码
        /// </summary>
        public string device_id{ get; set; }

        /// <summary>
        /// 不用理会
        /// </summary>
        public string nonce { get; set; }

        /// <summary>
        /// 不用理会
        /// </summary>
        public string sign { get; set; }

}
5.2 接口代码:
 public class DeviceController : Controller
    {
        /// <summary>
        /// 人脸识别应用, 每次启动会调用一次, 后续每隔30分钟调用一次
        /// </summary>
        /// <returns></returns>
        [HttpPost]
        public ActionResult modifyDeviceOnline()
        {
            string json = ReadStream();
            Heartbeat heartbeat = Newtonsoft.Json.JsonConvert.DeserializeObject<Heartbeat>(json);
           return View();
        }
}
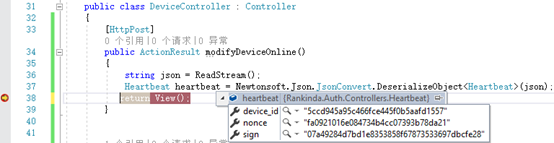
5.3 截图:

 浙公网安备 33010602011771号