「后端小伙伴来学前端了」Vue中组件绑定自定义事件实现通信
傍晚的月亮
前言
原本这篇打算写Vue中的那个全局事件总线的原理,但是发现自己少写了这个自定义事件,不讲明白这个自定义事件的操作,不好写全局事件原理,于是就有了这篇文章拉。
一、v-on指令
要讲自定义事件,就得先说说v-on指令。因为v-on就是实现自定义事件的基础。
基本介绍
v-on指令可以缩写为@,并且我们使用v-on指令时,其实它有一个默认参数event.
可以和它一起搭配的修饰符大致有以下几种:
.stop- 调用event.stopPropagation()。 停止冒泡.prevent- 调用event.preventDefault()。 阻止默认行为.capture- 添加事件侦听器时使用 capture 模式。.self- 只当事件是从侦听器绑定的元素本身触发时才触发回调。.{keyCode | keyAlias}- 只当事件是从特定键触发时才触发回调。 键修饰符,键别名.native- 监听组件根元素的原生事件。.once- 只触发一次回调。.left- (2.2.0) 只当点击鼠标左键时触发。.right- (2.2.0) 只当点击鼠标右键时触发。.middle- (2.2.0) 只当点击鼠标中键时触发。.passive- (2.3.0) 以{ passive: true }模式添加侦听器
这些修饰符部分是可以串联起来使用的。
作用:
-
绑定事件监听器。事件类型由参数指定。表达式可以是一个方法的名字或一个内联语句,如果没有修饰符也可以省略。
-
用在普通元素上时,只能监听原生 DOM 事件。用在自定义元素组件上时,也可以监听子组件触发的自定义事件。
今天第二点才是我们滴重点哈。
示例:
<!-- 方法处理器 -->
<button v-on:click="doThis"></button>

<!-- 动态事件 (2.6.0+) -->
<button v-on:[event]="doThis"></button>

<!-- 内联语句 -->
<button v-on:click="doThat('hello', $event)"></button>

<!-- 缩写 -->
<button @click="doThis"></button>

<!-- 动态事件缩写 (2.6.0+) -->
<button @[event]="doThis"></button>

<!-- 停止冒泡 -->
<button @click.stop="doThis"></button>

<!-- 阻止默认行为 -->
<button @click.prevent="doThis"></button>

<!-- 阻止默认行为,没有表达式 -->
<form @submit.prevent></form>

<!--  串联修饰符 -->
<button @click.stop.prevent="doThis"></button>

<!-- 键修饰符,键别名 -->
<input @keyup.enter="onEnter">

<!-- 键修饰符,键代码 -->
<input @keyup.13="onEnter">

<!-- 点击回调只会触发一次 -->
<button v-on:click.once="doThis"></button>

<!-- 对象语法 (2.4.0+) -->
<button v-on="{ mousedown: doThis, mouseup: doThat }"></button>
在子组件上监听自定义事件 (当子组件触发“my-event”时将调用事件处理器):
<my-component @my-event="handleThis"></my-component>

<!-- 内联语句 -->
<my-component @my-event="handleThis(123, $event)"></my-component>

<!-- 组件中的原生事件 -->
<my-component @click.native="onClick"></my-component>
看了这个v-on之后,不知道大家有没有想起VueComponent实例上的$on,即vm.$on(event,callback)。
-
vm.$on(event,callback)用法:监听当前实例上的自定义事件。事件可以由
vm.$emit触发。回调函数会接收所有传入事件触发函数的额外参数。
在此处,建议大家思考一下他们的区别,因为vm.$on其实就是实现全局事件总线的原理。
二、自定义事件
简单图示:
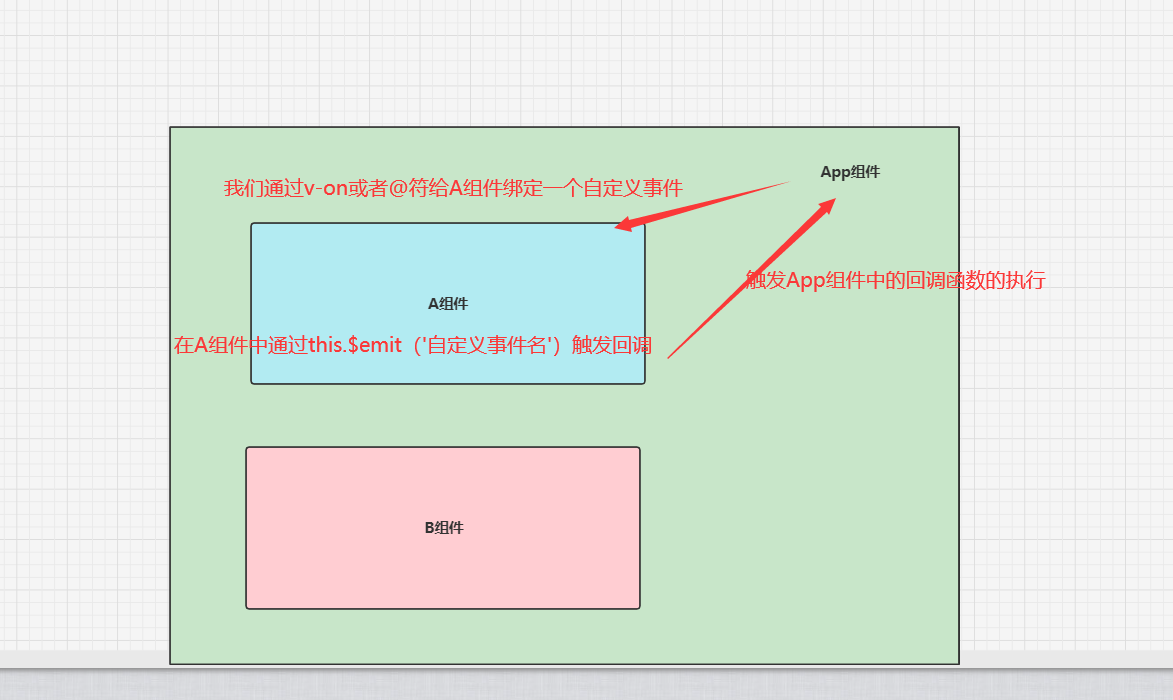
我们给在App组件中,通过v-on或者@给A组件绑定一个自定义事件,它的触发时机是等到A组件在内部调用this.$emit(’myevent‘),之后就会触发App组件中的回调。
实际上我们给A组件通过v-on绑定一个自定义事件,其本质就是我们在A组件实例对象VC上绑定了一个事件,事件名字叫我们自定义的名称。
因为我们写了一个<A></A>组件标签,Vue底层也是要帮我们 new VueComponent()对象。
关于自定义事件名
自定义事件名它不同于组件和prop,事件名不存在任何自动化的大小写转换。只有事件名称完全匹配时才能监听这个事件。
v-on事件监听器在 DOM 模板中会被自动转换为全小写,所以 v-on:myEvent 将会变成 v-on:my-event 从而导致 myEvent不可能被监听到。
vue 始终推荐你始终使用kebab-case的事件名。
三、入门案例
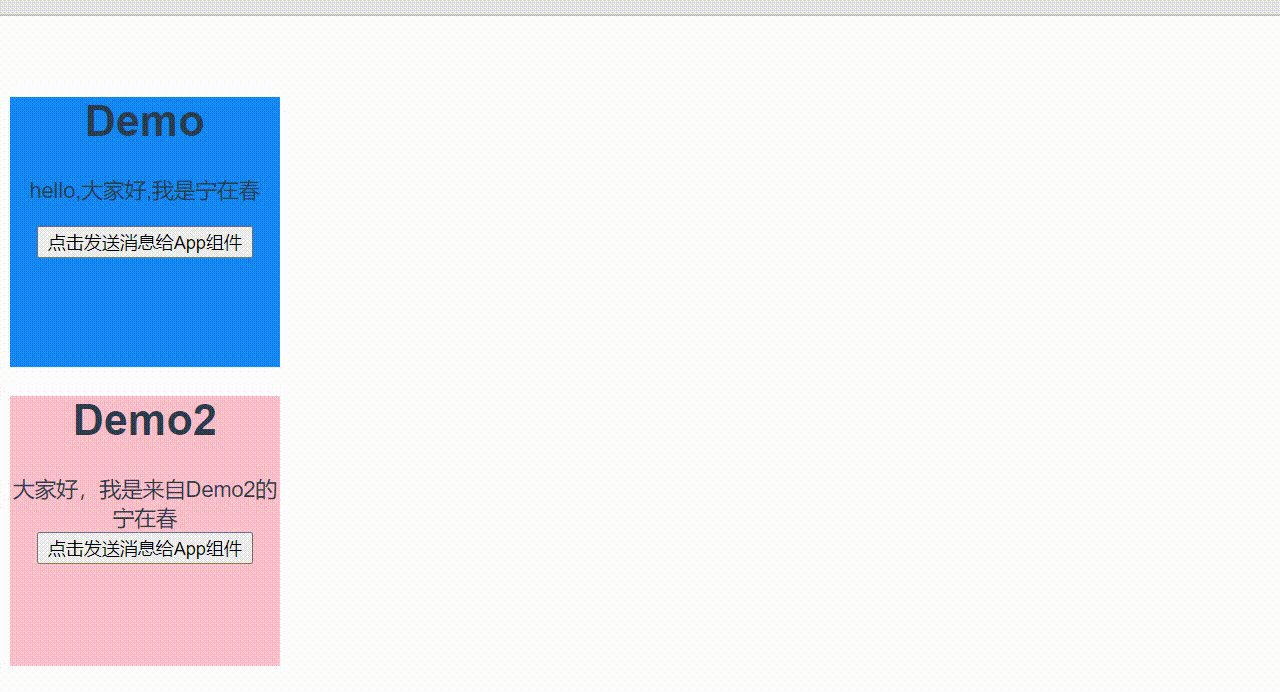
实现效果
App组件
<template>
  <div id="app">
    <!-- props方法传递 -->
    <Demo :showMsg="showMsg"></Demo>
    <!--绑定自定义事件 send-message:是我们自定义事件名, 后面的sendMessage自定义事件被触发执行的回调函数 -->
    <Demo1 v-on:send-message="sendMessage"></Demo1>
  </div>
</template>

<script>
import Demo from "./components/Demo.vue";
import Demo1 from "./components/Demo1.vue";

export default {
  name: "App",
  components: {
    Demo,
    Demo1,
  },
  methods: {
    showMsg() {
      alert("收到来自demo的信息");
    },
    sendMessage(value) {
      alert("sendMessage自定义事件被触发拉!!!收到来自demo2的信息:" + value);
    },
  },
};
</script>

<style>
#app {
  font-family: Avenir, Helvetica, Arial, sans-serif;
  -webkit-font-smoothing: antialiased;
  -moz-osx-font-smoothing: grayscale;
  text-align: center;
  color: #2c3e50;
  margin-top: 60px;
}
</style>
Demo组件
<template>
  <div class="demo">
    <h1>Demo</h1>
    <p>{{ msg }}</p>
    <button type="button" @click="sendMsg">点击发送消息给App组件</button>
  </div>
</template>
<script>
export default {
  props: {
    showMsg: Function,
  },
  data() {
    return {
      msg: "hello,大家好,我是宁在春",
    };
  },
  methods: {
    sendMsg() {
      this.showMsg();
    },
  },
};
</script>
<style>
.demo {
  width: 200px;
  height: 200px;
  background-color: #1488f5;
}
</style>
demo1
<template>
  <div class="demo1">
    <h1>Demo2</h1>
    <span>{{ msg }}</span>

    <button @click="sendAppMsg(msg)" type="button">
      点击发送消息给App组件
    </button>
  </div>
</template>
<script>
export default {
  data() {
    return {
      msg: "大家好,我是来自Demo2的宁在春",
    };
  },
  methods: {
    sendAppMsg(message) {
      this.$emit("send-message", message);
    },
  },
};
</script>
<style>
.demo1 {
  width: 200px;
  height: 200px;
  background-color: pink;
}
</style>
今天是先写个头,下一节再说全局事件总线的原理。
后语
大家一起加油!!!如若文章中有不足之处,请大家及时指出,在此郑重感谢。
纸上得来终觉浅,绝知此事要躬行。大家好,我是博主
宁在春:主页一名喜欢文艺却踏上编程这条道路的小青年。
希望:
我们,待别日相见时,都已有所成。

 浙公网安备 33010602011771号