

Python中__get__, __getattr__, __getattribute__的区别及延迟初始化
本节知识点
1、__get__, __getattr__, __getattribute__的区别
2、__getattr__巧妙应用
3、延迟初始化(lazy property)
1、__get__, __getattr__, __getattribute__的区别
obj.__getattribute__(self, name)
在实例访问属性的时候无条件被调用。如果class中定义了__getattr__(),__getattr__()也不会被调用,除非显示的调用或者没有访问到属性引发AttributeError异常
obj.__getattr__(self, name)
当一般位置找不到属性时,会调用__getattr__()返回一个值,如果不存在__getattr__()方法则会引发AttributeError异常。
obj.__get__(self, instance, owner)
如果类定义了它,则这个类可以被称为descriptor(描述符),owner是所有者的类,instance是访问descriptor的实例,如果不是通过实例访问,而是通过类访问的画,instance则为None。
descriptor的实例自己访问自己是不会触发__get__,而会触发__call__,只有descriptor作为其它类的属性才有意义。
类里面是默认不会提供__get__()方法的
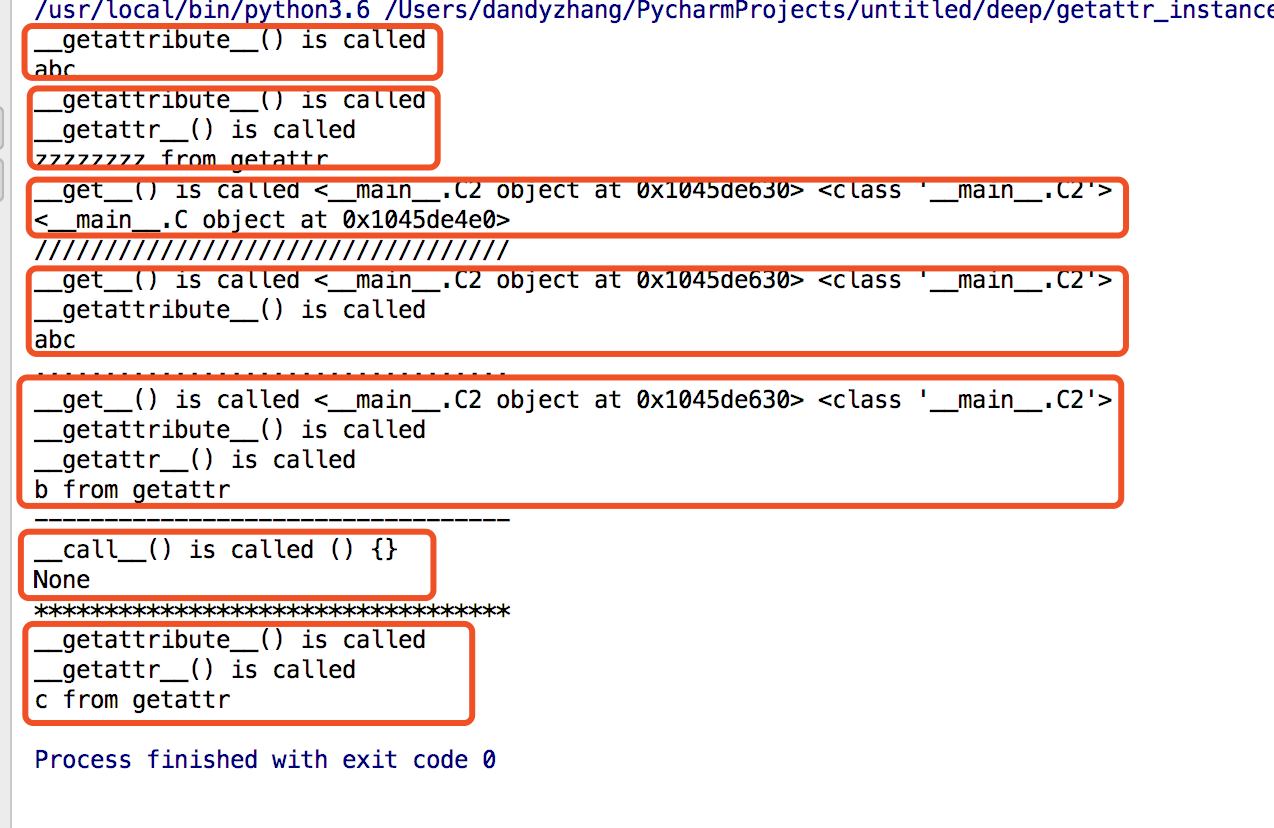
class C:
    a = 'abc'

    def __getattribute__(self, *args, **kwargs):
        print("__getattribute__() is called")
        # print(1, object.__getattribute__(self, *args, **kwargs))
        return object.__getattribute__(self, *args, **kwargs)

    def __getattr__(self, name):
        print("__getattr__() is called")
        return name + " from getattr"

    def __get__(self, instance, owner):
        print("__get__() is called", instance, owner)  # instance 是访问desciptor的实例
        return self

    def foo(self, x):
        print(x)

    def __call__(self, *args, **kwargs):
        print('__call__() is called', args, kwargs)


class C2:
    d = C()


if __name__ == '__main__':
    c = C()
    c2 = C2()
    print(c.a)  # 1、__getattribute__() is called 2、abc  先调用__getattribute__()方法,然后获取属性
    print(c.zzzzzzzz)  # 1、__getattribute__() is called 2、__getattr__() is called 3、zzzzzzzz from getattr
    print(c2.d)  # d是C类的实例,而C因为存在__get__()方法,而变成描述符,访问文件描述符的实例的时候,默认应该是不走__getattribute__方法,所以也就更不可能调用到__getattr__()方法
    # 1、__get__() is called 2、C2 object 3、C2 4、d指向的实例C object
    print('//////////////////////////////////')
    print(c2.d.a)  # 同上面一样会先获取d,走__get__()方法,然后获取a属性的时候又会走__getattribute__
    # 1、__get__() is called 2、C2 object 3、C2 4、__getattribute__ 5、abc
    print('..................................')
    print(c2.d.b)  # 继续上面的逻辑,是描述符,到获取b属性,没有找到走__getattr__()方法返回
    # 1、__get__() is called 2、C2 object 3、C2 4、__getattribute__ 5、__get__ 6、b from getattr
    print('----------------------------------')
    print(c())  # 实例本身调用是调用的call方法
    print('**********************************')
    print(c.c)  # 非文件描述符的还是老思路 getattribute==>getattr
    # 1、__getattribute__ 2、__getattr__ 3、c from getattr
参考:https://www.cnblogs.com/saolv/p/6890645.html 并做了简单修改
__getattr__应用
根据上面的介绍大概可以发现__getattr__函数的作用
在进行属性查找事,如果在实例跟类上都查找失败的时候,就会走到__getattr__函数上,如果没有定义这个函数,就会抛出AttributeError异常。所以,这里大概我们可以人为__getattr__方法是属性查找的最后一个关卡。
示例1
很简单的示例,通过__getattr__像访问属性一样访问键值对
class ObjectDict(dict):
    def __init__(self, *args, **kwargs):
        super().__init__(*args, **kwargs)  # 继承父类dict的构造方法

    def __getattr__(self, name):
        value = self[name]  # self ==> {'asf': {'a': 1}, 'd': True}
        if isinstance(value, dict):
            value = ObjectDict(value)
        return value


if __name__ == '__main__':
    od = ObjectDict(asf={'a': 1}, d=True)  # 实例化对象od ==>  {'asf': {'a': 1}, 'd': True}
    print(od.asf)       # {'a': 1}
    print(od.asf.a)     # 1
    print(od.d)         # True
实例化对象od,通过.attribute的方式来获取key对应的value
示例2
class WidgetShowLazyLoad:
    def fetch_complex_attr(self, attrname):
        return attrname

    def __getattr__(self, name):
        if name not in self.__dict__:  # 没在__dict__字典内找到key
            self.__dict__[name] = self.fetch_complex_attr(name)  # 添加attribute键值对
        return self.__dict__[name]


if __name__ == '__main__':
    w = WidgetShowLazyLoad()
    print('before', w.__dict__)  # 刚开始实例化的时候,__dict__是空的字典
    w.lazy_loaded_attr  # 属性查找,没找到,调用__getattr__方法
    print('after', w.__dict__)  # {'lazy_loaded_attr': 'lazy_loaded_attr'}
结果:
before {}
after {'lazy_loaded_attr': 'lazy_loaded_attr'}
这里的核心,就是利用了__getattr__属性的机制,在查找不存在的属性的时候进行改写,动态懒加载出来一个字典。这个例子就是类实例的惰性初始化
示例3
import functools
class lazy_attribute:
    """ A property that caches itself to the class object. """
    def __init__(self, func):
        functools.update_wrapper(self, func, updated=[])
        self.getter = func  # complex_attr_may_not_need

    def __get__(self, obj, cls):  # 调用类本身, obj自身调用为空
        value = self.getter(cls)  # complex_attr_may_not_need(Widget)
        setattr(cls, self.__name__, value)  # self ==> complex_attr_may_not_need=lazy_attribute(complex_attr_may_not_need)
        # self 所以是lazy_attribute的对象,装饰器的原理就是complex_attr_may_not_need=lazy_attribute实例化对象,所以self.__name__就是complex_attr_may_not_need
        # {'complex_attr_may_not_need': 332833500}
        return value

class Widget:
    @lazy_attribute  # complex_attr_may_not_need=lazy_attribute(complex_attr_may_not_need)
    def complex_attr_may_not_need(clz):
        print('complex_attr_may_not_need is needed now')
        return sum(i*i for i in range(1000))

if __name__ == '__main__':
    print(Widget.__dict__.get('complex_attr_may_not_need'))  # <__main__.lazy_attribute object at 0x02B12450>
    Widget.complex_attr_may_not_need                        # complex_attr_may_not_need is needed now
    print(Widget.__dict__.get('complex_attr_may_not_need'))  # 332833500
上面的代码里面,用到了一个类装饰器,它的使用其实也还没没有离开装饰器的基础定义,被装饰的函数相当于
complex_attr_may_not_need=lazy_attribute(complex_attr_may_not_need)
这相当于实例化了这个函数,所以可以发现,__init__方法内有一个func参数。
functool.update_wrapper
使用update_wrapper(),从原始对象拷贝或加入现有对象
它可以把被封装函数的__name__、__module__、__doc__和 __dict__都复制到封装函数去
所以上述过程的执行流程可以理解为:
1、print(Widget.__dict__.get('complex_attr_may_not_need'))
此方法实际上是获取Wdiget方法的__dict__字典内的complex_attr_may_not_need的key,但是因为complex_attr_may_not_need这个方法被类装饰器lazy_attribute装饰(装饰器的本质,其实就是把被装饰的方法传进去),所以此时的结果应该是指向lazy_attribute的实例化对象的。
2、Widget.complex_attr_may_not_need
首先需要注意的是,这个方法传入的参数complex_attr_may_not_need(clz)。类装饰器初始化的时候,传入了func就是被装饰的方法,并赋值给了实例属性getter,此时lazy_attribute里面有__get__()方法,所以lazy_attribute是一个描述符descriptor。因为是外部的Widget类调用的complex_attr_may_not_need方法,所以此时会先运训__get__方法。value = self.getter(cls),其中self.getter=func即complex_attr_may_not_need方法,cls是调用的类本身即Widget,变成value = self.complex_attr_may_not_need(Widget),执行此方法,打印出complex_attr_may_not_need is needed now,value=计算的和,并内部设置了Widget类的complex_attr_may_not_need对应的value为计算和。
3、print(Widget.__dict__.get('complex_attr_may_not_need'))
现在这一句就很好理解了,取值并打印。
关于setattr不理解可以看下下面随手写的案例
class Foo:

    def __init__(self):
        setattr(Foo, 'aaa', 'bbb')
    def aaa(self):
        return 'a'
f = Foo()
print(Foo.__dict__)
执行一次,再把f = Foo()注释掉执行一下,看看aaa的值就知道了。
实例4
class adaptee:
    def foo(self):
        print('foo in adaptee')

    def bar(self):
        print('bar in adaptee')

class adapter:
    def __init__(self):
        self.adaptee = adaptee()

    def foo(self):
        print('foo in adapter')
        self.adaptee.foo()

    def __getattr__(self, name):
        return getattr(self.adaptee, name)


if __name__ == '__main__':
    a = adapter()
    a.foo()  # 1、foo in adapter 2、foo in adaptee
    a.bar()  # 1、bar in adaptee
执行a.foo()应该是没什么问题的,顺序执行而已,但是在执行a.bar()的时候,因为adapter里面没有此属性,所以会走到最后一道关卡__getattr__方法,所以就很好理解了。
__getattr__使得实现adapter wrapper模式非常容易,我们都知道“组合优于继承”,__getattr__实现的adapter就是以组合的形式。
实例5
class AlgoImpA:
    def __init__(self):
        self.obj_attr = 'obj_attr in AlgoImpA'

    def foo(self):
        print('foo in AlgoImpA')

    def bar(self):
        print('bar in AlgoImpA')


class AlgoImpB(object):
    def __init__(self):
        self.obj_attr = 'obj_attr in AlgoImpB'

    def foo(self):
        print('foo in AlgoImpB')

    def bar(self):
        print('bar in AlgoImpB')


class Algo:
    def __init__(self):
        self.imp_a = AlgoImpA()
        self.imp_b = AlgoImpB()
        self.cur_imp = self.imp_a

    def switch_imp(self):
        if self.cur_imp == self.imp_a:
            self.cur_imp = self.imp_b
        else:
            self.cur_imp = self.imp_a

    def __str__(self):
        return 'Algo with imp %s' % str(self.cur_imp)

    def __getattr__(self, name):
        return getattr(self.cur_imp, name)


if __name__ == '__main__':
    algo = Algo()  # imp_a

    print(algo)  # Algo with imp IMPA
    print(algo.obj_attr)  # obj_attr in AlgoImpA
    algo.foo()  # foo in AlgoImpA

    algo.switch_imp()

    print(algo)  # Algo with imp IMPB
    print(algo.obj_attr)  # obj_attr in AlgoImpB
    algo.bar()  # bar in AlgoImpB
3、延迟初始化(lazy property)
概念
Python对象的延迟初始化是指,当它第一次被创建时才进行初始化,或者保存第一次创建的结果,然后每次调用的时候直接返回结果。
延迟初始化主要是用于提高性能,避免浪费计算,并减少程序的内存需求。
property
首先,再来回顾下property的用法,property可以将属性的访问转变成方法的调用
class Circle(object):
    def __init__(self, radius):
        self.radius = radius

    @property
    def area(self):
        return 3.14 * self.radius ** 2


c = Circle(4)
print(c.radius)
print(c.area)
area被定义成一个方法的形式,但是加上@property后,可以直接用c.area来调用,当成属性访问。
但这样写面临的一个问题就是,每次调用c.are都会去计算一次,浪费cpu,怎么养才能只计算一次呢?这就是延迟初始化lazy property
lazy property
这里,我们趁热打铁,使用文件描述符来来实现。
class lazy(object):
    def __init__(self, func):
        self.func = func

    def __get__(self, instance, cls):
        val = self.func(instance)
        setattr(instance, self.func.__name__, val)
        return val


class Circle(object):
    def __init__(self, radius):
        self.radius = radius

    @lazy
    def area(self):
        print('evalute')
        return 3.14 * self.radius ** 2

c = Circle(4)
print(c.radius)
print(c.area)
print(c.area)
结果:
4
evalute
50.24
50.24
可以发现evalute只输出一次。在lazy类里面,因为定义了__get__()方法,所以它是一个描述符。当第一次执行c.are时,python解释器会先从_c._ditc__中查找,没有找到就会去Circle.__dict__中进行查找,这个时候因为area被定义为描述符,所以调用__get__方法。
上面已经铺垫过def __get__(self, instance, cls)里面三个参数的代表什么,所以很明了val = self.func(instance) ,是执行了area方法,并返回结果,最后setattr完成了赋值操作。这样相当于设置c.__dict__['area']=val。
当我们再次调用c.area时,直接从c.__dict__中进行查找,这时就会直接返回之前计算好的值了。
这里再提供另一种方法
def lazy_property(func):
    attr_name = "_lazy_" + func.__name__

    @property
    def _lazy_property(self):
        if not hasattr(self, attr_name):
            setattr(self, attr_name, func(self))
        return getattr(self, attr_name)

    return _lazy_property


class Circle(object):
    def __init__(self, radius):
        self.radius = radius

    @lazy_property
    def area(self):
        print('evalute')
        return 3.14 * self.radius ** 2
c = Circle(4)
print("before first visit")
print(c.__dict__  )
c.area
print("after first visit")
print(c.__dict__)
结果:
before first visit
{'radius': 4}
evalute
after first visit
{'radius': 4, '_lazy_area': 50.24}
表示,其实楼主也还是不太懂,等看明白了再来注解。
参考自http://python.jobbole.com/85553/

 浙公网安备 33010602011771号