
MonekyDev的安装
二、MonkeyDev插件的安装
官方给出的步骤:
环境要求
1、安装最新的theos
sudo git clone --recursive https://github.com/theos/theos.git/opt/theos2、安装ldid
brew install ldid安装
1、选择指定的Xcode进行安装
sudo xcode-select -s /Applications/Xcode.app
2、默认安装的Xcode
xcode-select -p
3、执行安装命令
sudo /bin/sh -c "$(curl -fsSL https://raw.githubusercontent.com/AloneMonkey/MonkeyDev/master/bin/md-install)"
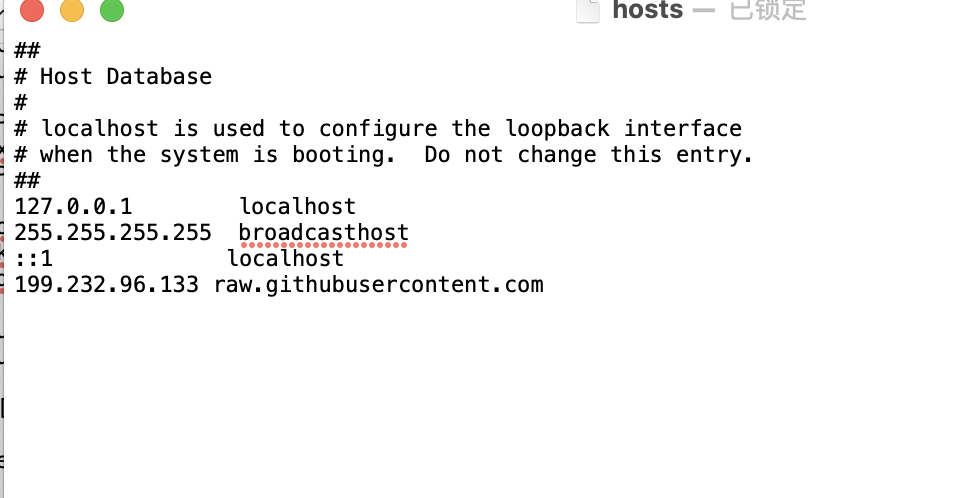
或者从github上下载MonkeyDev的源码包进行安装,像这样 sudo /Users/wxy/Downloads/MonkeyDev-master/bin/md-installcurl: (7) Failed to connect to raw.githubusercontent.com port 443: Connection refused这种报错需要登录https://www.ipaddress.com/在网站里输入
raw.githubusercontent.com查看github的ip地址
后修改文件 /etc/hosts
File /Applications/Xcode.app/Contents/Developer/Platforms/MacOSX.platform/Developer/Library/Xcode/Specifications/MacOSX Package Types.xcspec not found
此报错需要修改本地下载好的MOkeydev文件,md-install 把里面的macosxSDKSpecificationsPath修改成这样macosxSDKSpecificationsPath=$macosSdkPlatformPath/Developer/Library/Xcode/PrivatePlugIns/IDEOSXSupportCore.ideplugin/Contents/Resources
4、卸载命令
sudo /bin/sh -c "$(curl -fsSL https://raw.githubusercontent.com/AloneMonkey/MonkeyDev/master/bin/md-uninstall)"
- 1
5、更新命令
sudo /bin/sh -c "$(curl -fsSL https://raw.githubusercontent.com/AloneMonkey/MonkeyDev/master/bin/md-update)"
- 1
安装完成后重启Xcode即可。如下:

至此就可以开始逆向开发了。
三、MonkeyApp的简单使用
MonkeyApp原理和 《动态库注入》 的原理一毛一样,这里逆向一个应用,只需要将相应的ipa包加入到TargetApp文件中即可,此处的TargetApp既是 《动态库注入》 中的app文件夹。
在MonkeyApp工程中,使用的是Logos语法,使用比较简单,可以参考相关用法:《Logos语法》
下面使用MonkeyApp完成一个简单的功能。
破壳
ipa获取:
1、通过越狱手机获取破壳应用;
2、通过PP助手获取越狱应用。
创建MonkeyApp工程
创建工程,选择MonkeyApp工程,点击create会自动生成逆向相关的文件:

TargetApp:放目标ipa的文件,将需要逆向的破壳ipa放在此处Logos:编写相关hook的文件,所有hook操作在此处fishhook:用来hook系统函数的库
常用logos语法
选择Logos下的MonkeyDemoDylib.xm文件,这里有说明
// See http://iphonedevwiki.net/index.php/Logos

#import <UIKit/UIKit.h>

@interface CustomViewController

@property (nonatomic, copy) NSString* newProperty;

+ (void)classMethod;

- (NSString*)getMyName;

- (void)newMethod:(NSString*) output;

@end

%hook CustomViewController

+ (void)classMethod
{
	%log;

	%orig;
}

%new
-(void)newMethod:(NSString*) output{
    NSLog(@"This is a new method : %@", output);
}

%new
- (id)newProperty {
    return objc_getAssociatedObject(self, @selector(newProperty));
}

%new
- (void)setNewProperty:(id)value {
    objc_setAssociatedObject(self, @selector(newProperty), value, OBJC_ASSOCIATION_RETAIN_NONATOMIC);
}

- (NSString*)getMyName
{
	%log;

    NSString* password = MSHookIvar<NSString*>(self,"_password");

    NSLog(@"password:%@", password);

    [%c(CustomViewController) classMethod];

    [self newMethod:@"output"];

    self.newProperty = @"newProperty";

    NSLog(@"newProperty : %@", self.newProperty);

	return %orig();
}

%end
和iOS应用开发类似,不同之处,逆向在于修改其他应用代码的执行流程,因此需要hook方法、添加方法。这里以%开头的都是逆向插件所特有的一些功能。
1、%hook指定需要hook的类名,以%end结尾。
%hook CustomViewController

+ (void)classMethod {
	//编写hook代码
	%orig;//执行原始方法
}

%end
classMethod为要hook的应用的方法,在内部编写自己的代码。
2、% orig调用原有方法,根据原有方法有无参数,可以选择添加参数%orig(arge1,arge2)
%orig;
或
%orig(1,2);
3、%log用来打印log的,将信息输入到syslog中,格式%log([(<type><expr>,…)])。
+ (void)classMethod {
	%orig;
	%log((NSString *)@"iOSRE",(NSString *)@"Debug");
}
4、%new该指令用来给指定的class添加一个新的函数。与Runtime中的class_addMethod相同。
%new
-(void)newMethod:(NSString*) output{
    NSLog(@"This is a new method : %@", output);
}
- 1
- 2
- 3
- 4
如果方法没找到,在%hook上方加入interface,如下:
@interface UIViewController
-(void)newMethod:(NSString*) output;
@end
5、%c该指令用来获取一个类的名称,类似于objc_getClass。
[%c(CustomViewController) classMethod];
其他标签
6、%group该指令用于给%hook分组,%group后边跟的是组名,以%end结尾,可以包含多个%hook。
%group1
%hook class
-(void)function {
	nslog();
}
%end
%end

%group2
%hook class
-(void)function {
	nslog();
}
%end
%end

//构造函数,初始化那一组使用哪一组
%ctor{
    NSString *v = [UIDevice currentDevice].systemVersion;
    CGFloat version = [v floatValue];
    if(version >= 12.0){
        %init(group1);
    }else {
        %init(group2);
    }
}
7、%init指令用来初始化某个%group,group被初始化后生效。
%init(group1);8、%ctor为构造器,用来做初始化操作。
%ctor{
    NSString *v = [UIDevice currentDevice].systemVersion;
    CGFloat version = [v floatValue];
    if(version >= 12.0){
        %init(group1);
    }else {
        %init(group2);
    }
}
编写logos代码
1、准备工具
Class-dump:能够将存储在Mach-O文件中的@interface、@protocal信息提取并生产对应的.h文件,通过该文件可查看被逆向应用所有的类,及类的属性、成员变量、方法。
sublime:编辑器,帮助开始定位代码位置。
安装后找到微信ipa包中的可执行二进制,执行如下命令:
class-dump -H WeChat -o wxh
头文件便全部导出,根据头文件信息,通过sublime搜索,快速定位类和方法的位置。
2、使用monkey工程运行被逆向的应用
将砸壳后的ipa包放入到TargetApp文件中,并运行,通过图层调试(Debug > View Debugging > Capture View Hierarchy或快捷方式),如下:
在图层属性中很快定位到了登录按钮的方法Action onFirstViewLogin,和所在的控制器,也可以使用sublime打开头文件,全局搜索该方法,能够定位到方法所在的类WCAccountLoginControlLogic。
3、监听登录按钮
基于以上信息,编写相关代码,来监听登录按钮。代码如下:
#import <UIKit/UIKit.h>

%hook WCAccountLoginControlLogic

- (void)onFirstViewLogin {
    UIAlertController *alert = [UIAlertController alertControllerWithTitle:@"提示" message:@" 这个按钮是我的!"   preferredStyle:UIAlertControllerStyleAlert];
    [alert addAction:[UIAlertAction actionWithTitle:@"好的" style:UIAlertActionStyleDefault handler:nil]];
    [[[UIApplication sharedApplication] keyWindow].rootViewController presentViewController:alert animated:YES completion:nil];
}

%end
运行代码,点击登录按钮,显示如下:
该工程帮助我们来hook相关类的方法,这里我们只需要插入要修改的内容即可,除了Logos限定的规则,具体修改内容还是使用OC相关的语法,使用很简单。
四、微信步数修改
这里只上一张图作为参考,具体查看 《动态库注入》。
通过class-dump工具获取头文件信息,结合视图属性,查找对应的方法及方法所在类。
使用MonkeyDev插件来逆向应用就很简单了,只需要几行代码就能修改原有业务。步数修改代码如下:
#import <UIKit/UIKit.h>

%hook WCDeviceStepObject
- (int)m7StepCount {
    return 54321;
}
%end
代码就这些,不能再多了,看一下微信排行:
五、自动抢红包
六、修改钉钉打卡位置
转自https://blog.csdn.net/yahibo/article/details/103944782

 浙公网安备 33010602011771号