

SpringMVC最基本流程
1.web-xml的配置
1)用<context-param>节点指定applicationContext.xml配置文件,
2)配置监听器
3)DispatcherServlet的配置,用<init-param>节点指定springmvc-servlet路径
4)字符编码过滤器


<?xml version="1.0" encoding="UTF-8"?>
<web-app xmlns:xsi="http://www.w3.org/2001/XMLSchema-instance" xmlns="http://xmlns.jcp.org/xml/ns/javaee" xsi:schemaLocation="http://xmlns.jcp.org/xml/ns/javaee http://xmlns.jcp.org/xml/ns/javaee/web-app_3_1.xsd" id="WebApp_ID" version="3.1">
    <context-param>
        <param-name>contextConfigLocation</param-name>
        <param-value>classpath:applicationContext.xml</param-value>
    </context-param>

    <listener>
        <listener-class>org.springframework.web.context.ContextLoaderListener</listener-class>
    </listener>

    <servlet>
        <servlet-name>DispatcherServlet</servlet-name>
        <servlet-class>org.springframework.web.servlet.DispatcherServlet</servlet-class>
        <init-param>
            <param-name>contextConfigLocation</param-name>
            <param-value>classpath:springmvc-servlet.xml</param-value>
        </init-param>
    </servlet>
    <servlet-mapping>
        <servlet-name>DispatcherServlet</servlet-name>
        <url-pattern>/</url-pattern>
    </servlet-mapping>

    <!--字符编码过滤器-->
    <filter>
        <filter-name>CharacterEncodingFilter</filter-name>
        <filter-class>org.springframework.web.filter.CharacterEncodingFilter</filter-class>
        <init-param>
            <param-name>encoding</param-name>
            <param-value>utf-8</param-value>
        </init-param>
    </filter>
    <filter-mapping>
        <filter-name>CharacterEncodingFilter</filter-name>
        <url-pattern>/*</url-pattern>
    </filter-mapping>
</web-app>
2.配置springmvc.xml
//非注解方式请求URL定位:注入id为SimpleUrlHandlerMapping的bean,property里的prop节点包含了映射的方法名及路径,表示访问路径/index会交给id=indexController的bean处理
<bean id="simpleUrlHandlerMapping"
          class="org.springframework.web.servlet.handler.SimpleUrlHandlerMapping">
        <property name="mappings">
            <props>
                <prop key="hello">indexController</prop>
            </props>
        </property>
    </bean>
1)组件扫描,扫描下一步配置的controller层
2)前缀后缀的配置,视图解析器

3)创建controller的bean//也可通过@controller注解省略

3.编写controller类
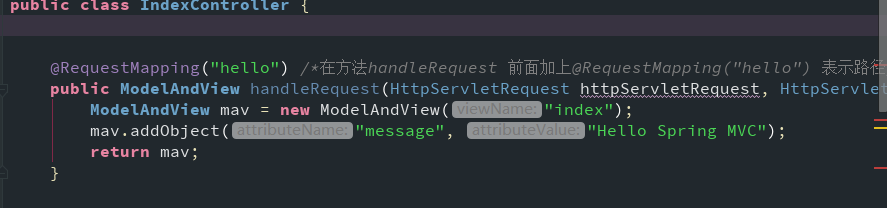
ModelAndView的构造方法里可传一个对应的__.jsp的前缀
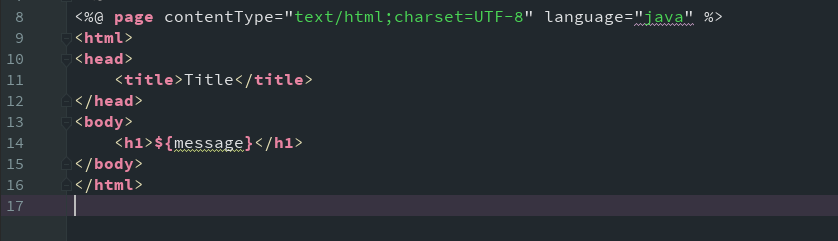
4.写jsp接收渲染

 浙公网安备 33010602011771号