

SpringBoot学习笔记(完结)
微服务阶段
javaSE:OOP
mySQL:持久化
html+css+js+jquery+框架:视图,框架不熟练,css不好;
javaweb:独立开发MVC三层架构的的网站:原始
ssm:框架:简化了我们的开发流程,配置也开始较为复杂;
war:tomcat运行
spring再简化:springBoot-jar:内嵌tomcat;微服务架构!
服务越来越多:springcloud!

高内聚,低耦合
微服务(Microservices)——Martin Flower阅读笔记
整体风格(monolithic style):一个完整应用程序(monolithic application)构建成一个单独的单元。企业级应用通常被构建成三个主要部分:客户端用户界面(由运行在客户机器上的浏览器的 HTML 页面、Javascript 组成)、数据库(由许多的表构成一个通用的、相互关联的数据管理系统)、服务端应用。服务端应用处理 HTTP 请求,执行领域逻辑(domain logic),检索并更新数据库中的数据,使用适当的 HTML 视图发送给浏览器。服务端应用是完整的 ,是一个单独的的逻辑执行。任何对系统的改变都涉及到重新构建和部署一个新版本的服务端应用程序。(单一应用程序的弊端,可拓展性较差,维护难度较大)
微服务架构风格(microservice architectural style):把应用程序构建为一套服务。事实是,服务可以独立部署和扩展,每个服务提供了一个坚实的模块边界,甚至不同的服务可以用不同的编程语言编写。它们可以被不同的团队管理。
微服务风格的特性:
-
组件化(Componentization )与服务(Services)
-
围绕业务功能的组织
不是按照技术构建团队而是按照业务进行组建,意味着团队内将由不同技术方向的成员构成,如UI工程师、后端工程师、数据工程师等,而非先前的单一专业。
-
产品不是项目:团队应该负责产品的整个生命周期
-
强化终端及弱化通道:微服务的应用致力松耦合和高内聚
-
分散治理:不同的需求,不同的业务,不同的微服务,不同的技术,不同的语言,相同的项目。
-
分散数据管理:当对概念模式下决心进行分散管理时,微服务也决定着分散数据管理。微服务让每个服务管理自己的数据库:无论是相同数据库的不同实例,或者是不同的数据库系统。这种方法叫Polyglot Persistence(多种持久化方法)。微服务架构强调服务间事务的协调,并清楚的认识一致性只能是最终一致性以及通过补偿运算处理问题。
-
基础设施自动化:微服务的出现使得系统的运维测试工作难度加大,需要对系统的打包发布测试等环节尽可能的采取自动化手段进行,因此有必要对软件开发流程中的部分环节采取自动化改进。
-
容错性设计:使用服务作为组件的一个结果在于应用需要有能容忍服务的故障的设计。任务服务可能因为供应商的不可靠而故障,客户端需要尽可能的优化这种场景的响应。跟整体构架相比,这是一个缺点,因为它带来的额外的复杂性。
服务可以随时故障,快速故障检测,乃至,自动恢复变更非常重要。监控系统可以提供一种早期故障告警系统,让开发团队跟进并调查。对于微服务框架来说,这相当重要,因为微服务相互的通信可能导致紧急意外行为。
-
设计改进:决定拆分我们应用的原则是什么呢?首要的因素,组件可以被独立替换和更新的,这意味着我们寻找的关键在于,我们要想象着重写一个组件而不影响它们之前的协作关系。事实上,许多的微服务小组给它进一步的预期:服务应该能够报废的,而不是要长久的发展的。其次,可代替是模块化开发中的一个特例,它是用模块来应对需要变更的。把组件改成服务,增加了细化发布计划的一个机会。
微服务是未来吗?
微服务构架风格是一个非常重要的想法:一个值得企业应用中认真考虑的东西。
微服务架构的成功依赖于软件如何拆分成适合的模块。指出不同模块的准确边界实际上是非常困难的。改良设计要承认边界的权益困境和因此带来的易于重构的重要性。
spring Boot
环境:
-
jdk:1.8
-
maven:3.6.1
-
springboot:最新版
-
IDEA
一、第一个SpringBoot程序
1.1 如何创建springboot项目
-
方法一:可以在管网配置后直接下载,导入IDEA开发(Spring Initializr)或者使用aliyun的Cloud Native App Initializer (aliyun.com)来创建新的springboot项目
注:aliyun目前支持使用java8创建springboot项目,
-
方法二:直接使用IDEA创建一个springboot项目(其实和官网类似,一般开发直接在IDEA中创建)
注:如果初学者电脑安装的是1.8,可以额外安装jdk17
1.2 Springboot自动装配原理
-
pom.xml
- spring-boot-dependencies:核心依赖在父工程中!
- 我们在写或者引入一些springboot依赖的时候,不需要指定版本,就是因为有这些版本仓库
-
启动器
-
<dependency> <groupId>org.springframework.boot</groupId> <artifactId>spring-boot-starter</artifactId> </dependency> -
启动器说白了就是springboot的启动场景
-
比如spring-boot-starter-web,它就会帮我们自动导入web环境的所有依赖!
-
springboot会将所有的功能场景都变成一个个的启动器
-
我们要使用什么功能,就只需要找到对应的启动器就可以了
-
所有springboot启动器列表(version2.7.18)Spring Boot Reference Documentation
-
-
主程序
-
//程序主入口 //本身就是spring的一个组件 //@SpringBootApplication标注这个类是一个springboot的应用 @SpringBootApplication public class SpringBoot17Application { public static void main(String[] args) { SpringApplication.run(SpringBoot17Application.class, args); } } -
注解:
-
@SpringBootConfiguration:springboot的配置 @Configuration:spring的配置类 @Component:说明这也是一个spring的组件 -
@EnableAutoConfiguration:自动配置,获取pom中的全部依赖并导入 @AutoConfigurationPackage:自动配置包 @Import({AutoConfigurationPackages.Registrar.class}):自动配置`包注册` @Import({AutoConfigurationImportSelector.class}):自动配置导入选择器 -
//获取所有的配置 List<String> configurations = getCandidateConfigurations(annotationMetadata, attributes); -
//获取候选的配置 protected List<String> getCandidateConfigurations(AnnotationMetadata metadata, AnnotationAttributes attributes) { List<String> configurations = ImportCandidates.load(AutoConfiguration.class, getBeanClassLoader()) .getCandidates(); Assert.notEmpty(configurations, "No auto configuration classes found in " + "META-INF/spring/org.springframework.boot.autoconfigure.AutoConfiguration.imports. If you " + "are using a custom packaging, make sure that file is correct."); return configurations; } -
需要注意,springboot2和3在这个地方的写法略微有些不同,上面的是springboot3的代码,下满是2的
-
protected List<String> getCandidateConfigurations(AnnotationMetadata metadata, AnnotationAttributes attributes) { List<String> configurations = SpringFactoriesLoader.loadFactoryNames(this.getSpringFactoriesLoaderFactoryClass(), this.getBeanClassLoader()); Assert.notEmpty(configurations, "No auto configuration classes found in META-INF/spring.factories. If you are using a custom packaging, make sure that file is correct."); return configurations; } protected Class<?> getSpringFactoriesLoaderFactoryClass() { return EnableAutoConfiguration.class; } -
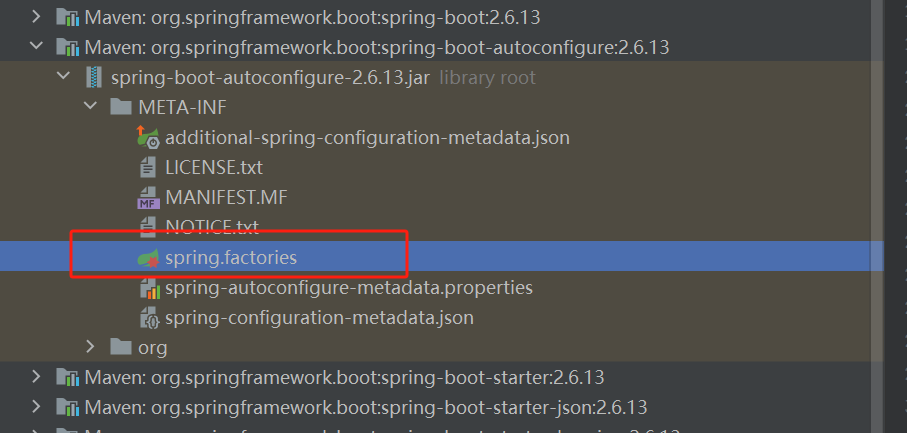
META-INF/spring.factories:自动配置的核心文件
-
Properties properties = PropertiesLoaderUtils.loadProperties(resource);
所有资源加载到配置类中!
-
-
-
结论:springboot所有自动配置都是在启动的时候扫描并加载:spring.factories所有的自动配置类都在这里面,但是不一定生效,要判断条件是否成立。如果导入了对应的start,就有对应的启动器了,有了启动器,自动装配就会生效,然后就配置成功。
- springboot在启动的时候,从类路径下/META-INF/spring.factories获取指定的值;
- 将这些自动配置的类导入容器,自动配置就会生效,帮程序员进行自动配置
- 以前我们需要自动配置的东西,现在springboot帮我们做了
- 整合JavaEE,解决方案和自动配置的东西都在spring-boot-autoconfigure
- 它会把所有需要导入的组件,以类名的方式返回,这些组件就会被添加到容器中。
- 容器中也会存在非常多的xxxAutoConfiguration的文件(@Bean),就是这些类给容器中导入了这个场景需要的所有组件,并自动配置,@Configuration
- 有了自动配置类,免去了我们手动编写配置类的需求。
1.3 SpringApplication.Run
-
SpringApplication.run分析
 public static void main(String[] args) {
        SpringApplication.run(SpringLearningApplication.class, args);
    }
该方法分成两部分,一部分是SpringApplication的实例化,另一个是run方法的执行。
-
SpringApplication分析
这个类主要做了以下四件事情
- 推断应用的类型是普通项目还是Web项目
- 查找并加载所有可用的初始化器,设置到initializers属性中
- 找出所有的应用程序监听器,设置到listeners属性中
- 推断并设置main方法的定义类,找到运行的主类
构造器如下:
public SpringApplication(ResourceLoader resourceLoader, Class<?>... primarySources) {
        this.sources = new LinkedHashSet();
        this.bannerMode = Mode.CONSOLE;
        this.logStartupInfo = true;
        this.addCommandLineProperties = true;
        this.addConversionService = true;
        this.headless = true;
        this.registerShutdownHook = true;
        this.additionalProfiles = Collections.emptySet();
        this.isCustomEnvironment = false;
        this.lazyInitialization = false;
        this.applicationContextFactory = ApplicationContextFactory.DEFAULT;
        this.applicationStartup = ApplicationStartup.DEFAULT;
        this.resourceLoader = resourceLoader;
        Assert.notNull(primarySources, "PrimarySources must not be null");
        this.primarySources = new LinkedHashSet(Arrays.asList(primarySources));
        this.webApplicationType = WebApplicationType.deduceFromClasspath();
        this.bootstrapRegistryInitializers = new ArrayList(this.getSpringFactoriesInstances(BootstrapRegistryInitializer.class));
        this.setInitializers(this.getSpringFactoriesInstances(ApplicationContextInitializer.class));
        this.setListeners(this.getSpringFactoriesInstances(ApplicationListener.class));
        this.mainApplicationClass = this.deduceMainApplicationClass();
    }
Docker:进程
关于Springboot,谈谈个人理解:
- 自动装配
- run()
全面接管SpringMVC的配置
1.4 SpringBoot:配置文件及自动装配原理
-
配置文件
SpringBoot使用一个全局配置文件,配置文件名称是固定的(application)
- application.properties(等号取值)
- 语法结构:key=value
- application.yml(冒号取值,一定注意空格)
- 语法结构:key:空格 value
配置文件的作用:修改SpringBoot自动装配的默认值,因为SpringBoot在底层都给我们自动配置好了;
- application.properties(等号取值)
-
YAML
标记语言
- 以前的配置文件,大多数使用xml来配置;比如一个简单的端口配置,我们来对比下yaml和xml
yaml配置
-
server:
  port: 8081
xml配置
-
<server>
    <port>8081</port>
</server>
YAML基本语法
-
spring.application.name=springboot-02-config # 官方配置太多了,需要了解原理:一通百通 # properties智能保存键值对 -
# 注意,yaml文件对空格的要求十分严格,一旦空格有误容易导致上下级属性关系错位
# 可以注入到配置类中

# 普通的key-value
server:
  port: 8081

# 还可以存储对象
student:
  name: wut
  age: 25

# 或者将对象写在行内

student1: {name: wut,age: 24}

# 甚至可以保存数组
pets:
  - cat
  - dog
  - pig

# 数组也可以这么写
pets1: [cat,dog,pig]
-
松散绑定
使用@ConfigurationProperties(prefix = "xxx")注解可以进行松散绑定,采取驼峰命名规则就可以实现前后端赋值,但是注意如果是字段上采取@Value("xx")这种针对某个单一字段进行辅助,没有松散绑定,需要字段名一致才能实现。
-
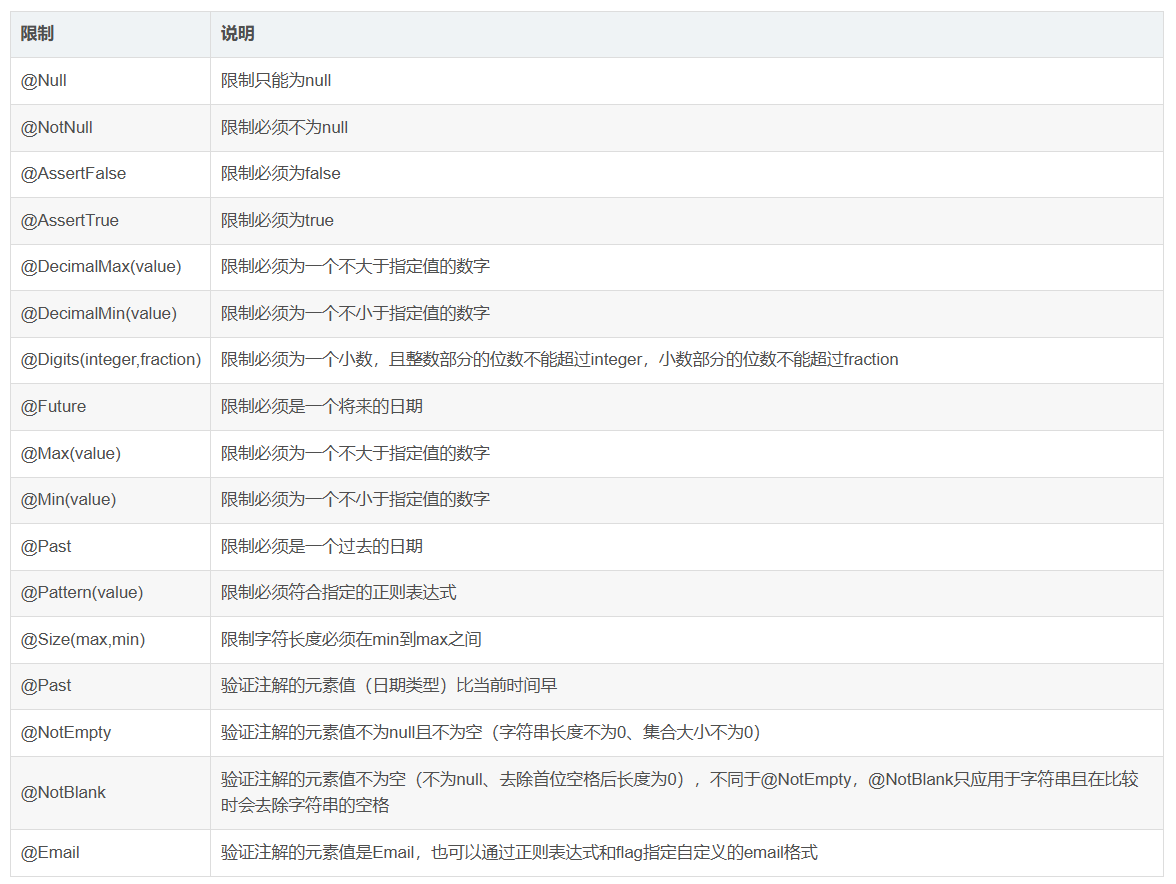
JSR303数据校验
-
相当于在赋值的时候添加一层过滤器,对赋值内容进行校验,有点类似于前端的内容检查。
-
开启方法是在类上添加@Validated注解

-
@ConfigurationProperties @Value 功能 批量注入配置文件中的属性 一个个指定代码中参数取值 松散绑定(松散语法) 支持 不支持 SpEl(Spring Expression Language) 不支持 支持 JSR303数据校验 支持 不支持 复杂类型封装 支持 不支持
-
注:
-

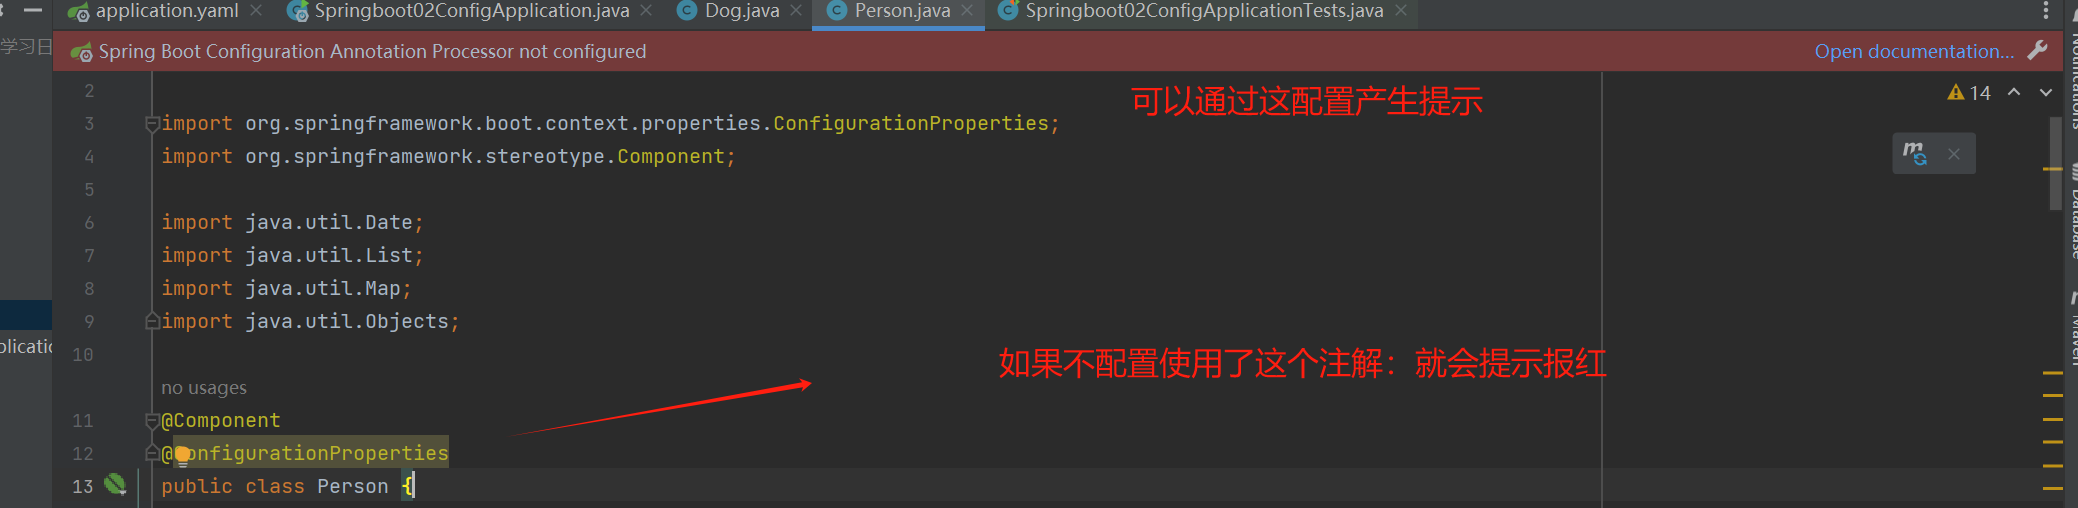
在使用@ConfigurationProperties(prefix = "xxx")注解时,会出现这样的东西,原因是“Spring Boot配置注解执行器没有配置”。配置注解执行器配置完成后,当执行类中已经定义了对象和该对象的字段后,在配置文件中对该类赋值时,便会非常方便的弹出提示信息。但不配置也不影响系统运行。解决这个问题的方法如下:
<dependency> <groupId>org.springframework.boot</groupId> <artifactId>spring-boot-configuration-processor</artifactId> <optional>true</optional> </dependency> -
这个地方有一个需要注意的地方,如果当前springboot版本为2.3.0以上,则需要手动在springboot的启动中引入相关的校验包
<dependency> <groupId>org.springframework.boot</groupId> <artifactId>spring-boot-starter-validation</artifactId> </dependency> 另外注意一点springboot3不再支持使用原来的javax.validatio,需要使用jakarta.validation,这一点是springboot2和springboot3之间的区别。
-
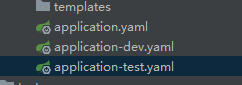
多环境配置以及配置文件位置
-
配置环境优先级,springboot项目一共有四个地方可以配置相关环境,分别是
optional:classpath:/config/optional:file:./config/*/optional:classpath:custom-config/optional:file:./custom-config/
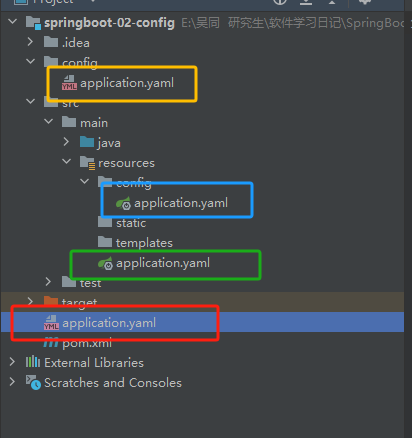
-
黄色优先级最高,红色其次,蓝色第三,绿色第四
-
多环境配置实现:通过spring.profiles.active指定生效文件,如下所示:
-
spring:
  profiles:
    active: dev
-
-
或者通过yaml实现多配置模块
-
spring: profiles: active: dev --- server: port: 8082 spring: config: activate: on-profile: dev --- server: port: 8083 spring: config: activate: on-profile: test -
此处需要注意不同版本的书写格式不太一样
-
-
1.5 自动装配原理再理解
-
springboot中的yaml配置文件到底能写什么?
看springboot2源码可知
# 在这个配置文件中能配置的东西,都存在一个固有的规律 # xxxAutoConfiguration: 默认值 xxxProperties和配置文件绑定,我们就可以使用自定义的配置了。 # 可以通过debug = true来检查哪些生效了 在spring-boot-autoConfig包中,可以从spring.factories看到有很多的配置文件,但需要注意的是。这些configuration并不是都生效的,其取决于当前启动类的类型以及相关配置。例如如下配置:
spring.activemq.broker-url = xxx 可以看到这个activemq对应了ActiveMQConfiguration.java和ActiveMQPropertiess两个文件。其中ACtiveMQProperties中的属性决定了这个activemq共可以配置哪些参数,通过@ConfigurationProperties(prefix = "spring.activemq"),这个bean对象的取值和配置文件所定义的对象相关联。
package org.springframework.boot.autoconfigure.jms.activemq;

import java.time.Duration;
import java.util.ArrayList;
import java.util.List;

import org.springframework.boot.autoconfigure.jms.JmsPoolConnectionFactoryProperties;
import org.springframework.boot.context.properties.ConfigurationProperties;
import org.springframework.boot.context.properties.NestedConfigurationProperty;

/**
 * Configuration properties for ActiveMQ.
 *
 * @author Greg Turnquist
 * @author Stephane Nicoll
 * @author Aurélien Leboulanger
 * @author Venil Noronha
 * @since 1.0.0
 */
@ConfigurationProperties(prefix = "spring.activemq")
public class ActiveMQProperties {

	/**
	 * URL of the ActiveMQ broker. Auto-generated by default.
	 */
	private String brokerUrl;

	/**
	 * Whether the default broker URL should be in memory. Ignored if an explicit broker
	 * has been specified.
	 */
	private boolean inMemory = true;

	/**
	 * Login user of the broker.
	 */
	private String user;

	/**
	 * Login password of the broker.
	 */
	private String password;

	/**
	 * Time to wait before considering a close complete.
	 */
	private Duration closeTimeout = Duration.ofSeconds(15);

	/**
	 * Whether to stop message delivery before re-delivering messages from a rolled back
	 * transaction. This implies that message order is not preserved when this is enabled.
	 */
	private boolean nonBlockingRedelivery = false;

	/**
	 * Time to wait on message sends for a response. Set it to 0 to wait forever.
	 */
	private Duration sendTimeout = Duration.ofMillis(0);

	@NestedConfigurationProperty
	private final JmsPoolConnectionFactoryProperties pool = new JmsPoolConnectionFactoryProperties();

	private final Packages packages = new Packages();

	public String getBrokerUrl() {
		return this.brokerUrl;
	}

	public void setBrokerUrl(String brokerUrl) {
		this.brokerUrl = brokerUrl;
	}

	public boolean isInMemory() {
		return this.inMemory;
	}

	public void setInMemory(boolean inMemory) {
		this.inMemory = inMemory;
	}

	public String getUser() {
		return this.user;
	}

	public void setUser(String user) {
		this.user = user;
	}

	public String getPassword() {
		return this.password;
	}

	public void setPassword(String password) {
		this.password = password;
	}

	public Duration getCloseTimeout() {
		return this.closeTimeout;
	}

	public void setCloseTimeout(Duration closeTimeout) {
		this.closeTimeout = closeTimeout;
	}

	public boolean isNonBlockingRedelivery() {
		return this.nonBlockingRedelivery;
	}

	public void setNonBlockingRedelivery(boolean nonBlockingRedelivery) {
		this.nonBlockingRedelivery = nonBlockingRedelivery;
	}

	public Duration getSendTimeout() {
		return this.sendTimeout;
	}

	public void setSendTimeout(Duration sendTimeout) {
		this.sendTimeout = sendTimeout;
	}

	public JmsPoolConnectionFactoryProperties getPool() {
		return this.pool;
	}

	public Packages getPackages() {
		return this.packages;
	}

	public static class Packages {

		/**
		 * Whether to trust all packages.
		 */
		private Boolean trustAll;

		/**
		 * Comma-separated list of specific packages to trust (when not trusting all
		 * packages).
		 */
		private List<String> trusted = new ArrayList<>();

		public Boolean getTrustAll() {
			return this.trustAll;
		}

		public void setTrustAll(Boolean trustAll) {
			this.trustAll = trustAll;
		}

		public List<String> getTrusted() {
			return this.trusted;
		}

		public void setTrusted(List<String> trusted) {
			this.trusted = trusted;
		}

	}

}
那么再回来看另一个文件ActiveMQAutoConfiguration.java,可以看到这个文件有非常大量的注解,总的来说注解分为三类
//表示这是一个配置类 @Configuration(proxyBeanMethods = false) //生效场景:spring底层注解,根据不同的条件来判断当前配置或者类是否生效! @ConditionalOnClass({ ConnectionFactory.class, ActiveMQConnectionFactory.class }) @ConditionalOnMissingBean(ConnectionFactory.class) //自动配置属性:ActiveMQProperties和JmsProperties @EnableConfigurationProperties({ ActiveMQProperties.class, JmsProperties.class }) //其他相关注解 @AutoConfigureBefore(JmsAutoConfiguration.class) @AutoConfigureAfter({ JndiConnectionFactoryAutoConfiguration.class }) @Import({ ActiveMQXAConnectionFactoryConfiguration.class, ActiveMQConnectionFactoryConfiguration.class }) public class ActiveMQAutoConfiguration { } 一句话总结,这些配置注解将根据当前的不同条件判断,决定这个配置类是否生效,一旦这个配置类生效,这个配置类就会给容器中添加各种组件;这些组件的属性是从对应的properties类中获取的,这些类里面的每一个属性又是和配置文件绑定的。所有能在配置文件中配置的属性都被封装在各种xxxProperties中
-
自动装配的原理
-
springboot在启动时会加载大量的自动配置类
-
我们需要检查我们需要的功能有没有在Springboot默认写好的自动配置类当中
-
接着再检查这个配置类中到底装配了哪些组件(如果需要的组件已经存在就不需要手动配置了)
-
给容器中自动装配类添加组件的时候,会从properties类中获取某些属性。只需要在配置文件中指定这些属性的值即可
-
xxxAutoConfiguration:自动装配类;给容器中添加组件
-
xxxxProperties:封装配置文件中相关属性
-
-
@Conditional注解
- 那么是什么条件决定一个配置类是否生效呢?需要注意@Conditional注解
- 必须是@Conditional指定的条件成立,才给容器中添加组件,配置配里面的所有内容才会生效
@Conditional扩展注解 作用(判断是否满足当前条件) @ConditionalOnJava 系统的Java版本是否符合需求 @ConditionalOnBean 容器中存在指定Bean @ConditionalOnMissingBean 容器中不存在指定Bean @ConditionalOnExpression @ConditionalOnClass @ConditionalOnMissingClass @ConditionalOnSingleCandidate @ConditionalOnProperty @ConditionalOnResource @ConditionalOnWebApplication @ConditionalOnNotWebApplication @ConditionalOnJndi
二、SpringBoot Web开发
jar/war:webapp!
自动装配
springboot到底帮我们配置了什么?能不能进行修改?能修改哪些东西?能不能扩展?
- xxxAutoConfiguration:向容器中自动配置组件
- xxxProperties:自动配置类,装配配置文件中自定义的一些内容!
要解决的问题:
- 导入静态资源
- 首页
- jsp,模版引擎Thymeleaf
- 装配扩展SpringMVC
- crud
- 拦截器
- 国际化(中英切换)
2.1 静态资源
@Override
		public void addResourceHandlers(ResourceHandlerRegistry registry) {
			if (!this.resourceProperties.isAddMappings()) {
				logger.debug("Default resource handling disabled");
				return;
			}
			addResourceHandler(registry, this.mvcProperties.getWebjarsPathPattern(),
					"classpath:/META-INF/resources/webjars/");
			addResourceHandler(registry, this.mvcProperties.getStaticPathPattern(), (registration) -> {
				registration.addResourceLocations(this.resourceProperties.getStaticLocations());
				if (this.servletContext != null) {
					ServletContextResource resource = new ServletContextResource(this.servletContext, SERVLET_LOCATION);
					registration.addResourceLocations(resource);
				}
			});
		}
-
什么是webjars?实际上就是把一些包当成静态资源进行调度,然后可以从前端查看这些导入的包。但个人感觉不是很好,不如使用maven,而且把一些依赖暴露在外面不是明智之举。
-
静态资源路径包括如下几个:
-
classpath:/META-INF/resources/ -
classpath:/resources/ -
classpath:/static/ -
classpath:/public/
-
-
也就是说,如果没有特殊配置,则静态资源放置于如下四个位置都是可以通过url直接访问到的
-
最上面那个META-INF,用的较少,咱们比较一下剩下三个的优先级。
-
resources>static>public
注意如下properties/yaml配置:
spring.mvc.static-path-pattern=/test/**
这个的配置意思不是说更改访问静态资源的路径,实际上还是上面那几个,只是在浏览器内如果想访问相关资源时需要前面加上/test,有点类似于资源映射这种。
如:
http://localhost:8080/.js
http://localhost:8080/test/2.js
2.2 首页和图标定制
-
首页地址

可以看到,在没有特殊指定首页地址的情况下,首页在刚刚下面那三个静态资源中的任一的index.html文件中
-
图标定制
- 注意此部分内容从springboot2.2.0版本之后再后端就被废弃了,无法实现后端的配置。
2.3 thymeleaf模板引擎
- 官网文档链接:Tutorial: Using Thymeleaf
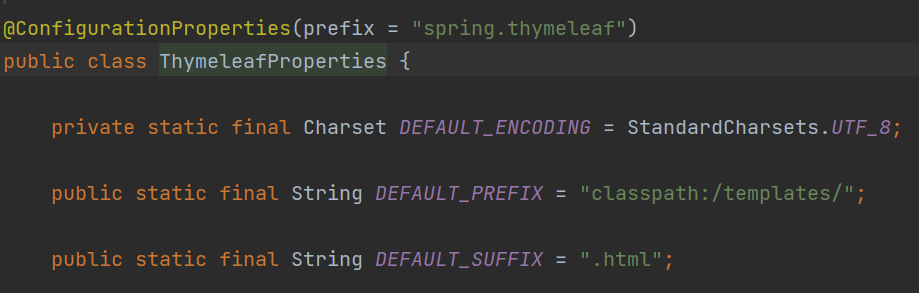
-
上图是springboot中关于Thymeleaf的配置。可以看到,只需要使用Thymeleaf模板引擎,则文件只要在resources目录下的templates(默认)目录中且以.html为后缀即可实现映射。
-
想使用Thymeleaf模板引擎,只需要导入对应的模版引擎就好
<!-- https://mvnrepository.com/artifact/org.springframework.boot/spring-boot-starter-thymeleaf --> <dependency> <groupId>org.springframework.boot</groupId> <artifactId>spring-boot-starter-thymeleaf</artifactId> <version>3.1.2</version> </dependency> -
此外需要注意,如果需要在html页面中使用thymeleaf表达式则需要做一些额外配置:
<html lang="en" xmlns:th="http://www.thymeleaf.org">
2.4 SpringMVC配置和扩展
2.4.1 配置类
举个例子,如果我们想自定义一个视图解析器,可以按照如下代码
需要注意的是没如果是自己要新定义的配置类,需要打上注解@Configuration,而不能使用@EnableWebMvc
package web.config;
import org.springframework.context.annotation.Bean;
import org.springframework.context.annotation.Configuration;
import org.springframework.web.servlet.View;
import org.springframework.web.servlet.ViewResolver;
import org.springframework.web.servlet.config.annotation.WebMvcConfigurer;
import java.util.Locale;
//如果想diy一些定制化的功能,只要写这个组件,然后将他交给springboot
//扩展springmvc dispatchservlet 视图解析器
@Configuration
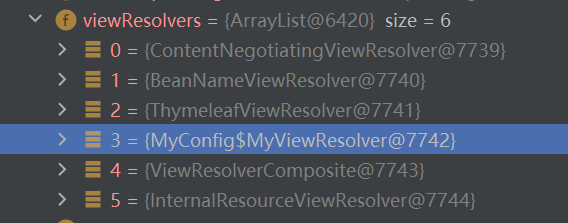
public class MyConfig implements WebMvcConfigurer {
//public interface ViewResolver 实现了视图解析接口的类可视为一个视图解析器
@Bean
public ViewResolver returnMyResolver(){
return new MyViewResolver();
}
//自定义了一个自己的视图解析器myViewResolver
public static class MyViewResolver implements ViewResolver{
@Override
public View resolveViewName(String viewName, Locale locale) throws Exception {
return null;
}
}
}
为什么不能加入注解@EnableWebMvc
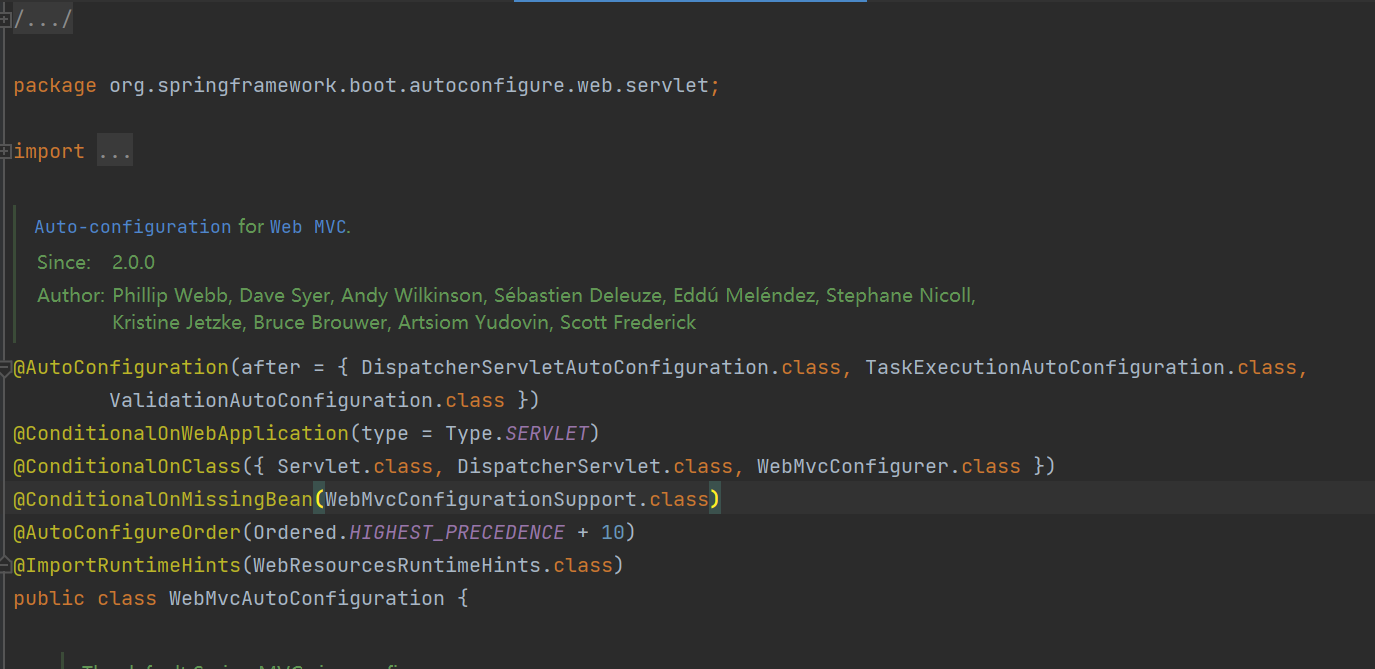
注意自动配置类中的生效条件
@ConditionalOnMissingBean(WebMvcConfigurationSupport.class)
也就是说只有当容器中不存在WebMvcConfigurationSupport类时这个才会生效。
但是观察一下@EnableWebMvc这个注解,会发现
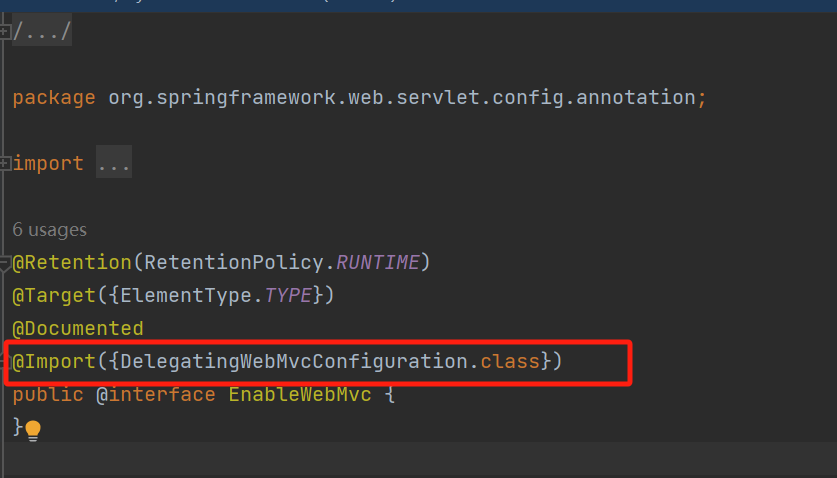
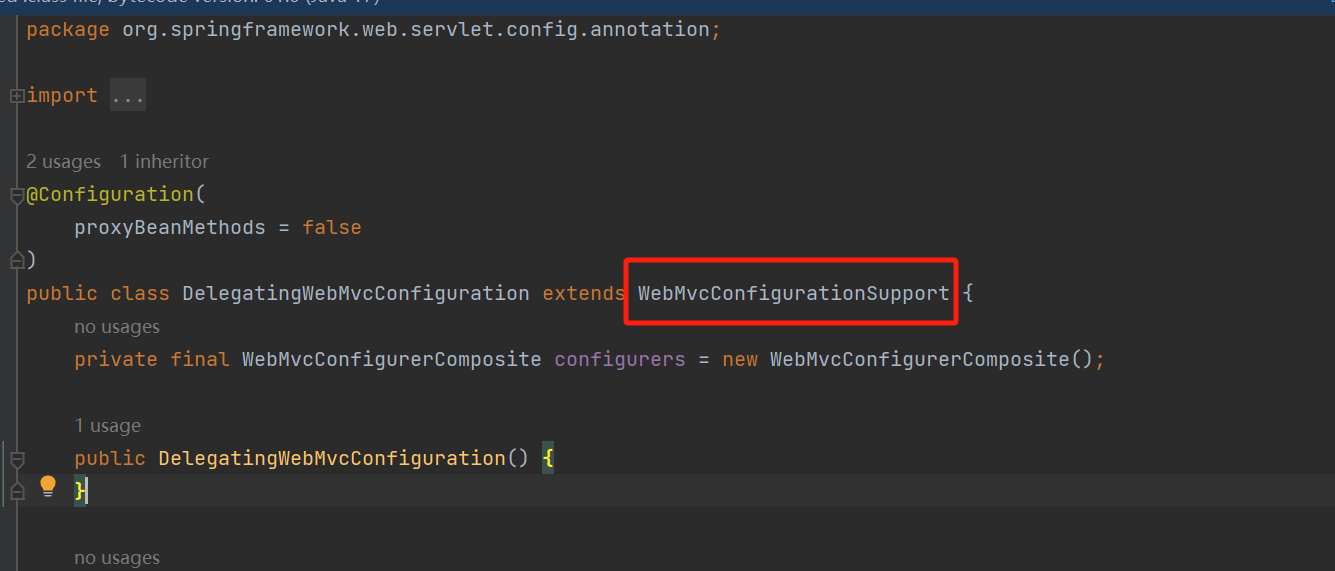
再点进去会发现,这个DelegatingWebMvcConfiguration继承了WebMvcConfigurationSupport,说明如果使用该注解@EnableWebMvc会导致自定义配置类的@Configuration注解失效。
注意:
此处还需注意一个问题,使用@EnableWebMvc将使得springboot无法加载静态资源连接,使得spring跳过springboot的自动装配过程,从而无法扫描到src/main/resource/static下的静态资源。
2.5 鸡汤时刻
前端:
- 模版:别人写好的,拿来改成我们需要的
- 框架:组件:自己手动组合拼接! bootstrap Layui semantic-ui
- 栅格系统
- 导航栏
- 侧边栏
- 表单页
数据库(设计难点):
- 业务
- 表结构
- 索引
前端让他能够独立化运行
- 需要让前端在设计时能够自动运行,独立化工程
数据接口如何对接:json
前后端联调测试
- 有一套自己熟悉的后台模版:x-admin
- 前端界面:至少自己能够通过前端框架,组合出来一个网站页面
- 让这个网站能够独立运行
三 数据资源整合springboot
3.1 整合JDBC
3.2 整合Druid数据源
3.3 整合Mybatis
整合包
mybatis-spring-boot-start
- 导入包
- 配置文件
- mybatis配置
- 编写sql
- 业务层调用dao层
- controller调用
M:数据和业务
V:HTML 视图展示
C:交接
3.4 SpringSecurity(安全)
在web开发中,安全第一位!过滤器,拦截器~
功能性需求:否
做网站:安全应该在什么时候考虑?设计之初
- 漏洞,隐私泄漏
- 架构一旦确定很不好修改
在Web 开发中,安全一直是非常重要的一个方面。安全虽然属于应用的非功能性需求,但是应该在应用开发的初期就考虑进来。如果在应用开发的后期才考虑安全的问题,就可能陷入一个两难的境地:一方面,应用存在严重的安全漏洞,无法满足用户的要求,并可能造成用户的隐私数据被攻击者窃取;另一方面,应用的基本架构已经确定,要修复安全漏洞,可能需要对系统的架构做出比较重大的调整,因而需要更多的开发时间,影响应用的发布进程。因此,从应用开发的第一天就应该把安全相关的因素考虑进来,并在整个应用的开发过程中时刻关注应用的安全性问题。
详细参考原文链接:【SpringBoot新手篇】SpringBoot集成SpringSecurity前后端分离开发_springboot整合springsecurity前后端分离
shiro、SpringSecurity:很像~除了类不一样,名字不一样
认证、授权
- 功能权限
- 访问权限
- 菜单权限
- 。。。拦截器或过滤器:使用大量的原生代码~冗余
AOP:切面~配置类
常见的安全管理技术栈组合如下:
- SSM + Shiro
- Spring Boot/Spring Cloud + Spring Security
SpringSecurity
简介
spring Security是针对Spring项目的安全框架,也是Spring Boot底层安全模块默认的技术选型,可以实现强大的Web安全控制。对于安全控制,只需要引入spring-boot-starter-security模块并进行少量配置即可实现强大的安全管理
需要记住以下几个类:
- WebSecurityConfigurerAdapter:自定义Security策略
- AuthenticationManagerBuilder:自定义认证策略
- @EnableWebSecurity:开启WebSecurity模式,@Enablexxxx开启某个功能
Spring Security的两个主要目标是“认证”和“授权”(访问控制)
“认证”(Authentication)
“授权”(Authorization)
这个概念是通用的,而不是只在Spring Security中存在。
3.5 Shiro安全框架
shiro官网:Apache Shiro Tutorial | Apache Shiro
快速开始:
-
导入依赖,见下面注意事项
-
配置文件:shiro.ini
# # Licensed to the Apache Software Foundation (ASF) under one # or more contributor license agreements. See the NOTICE file # distributed with this work for additional information # regarding copyright ownership. The ASF licenses this file # to you under the Apache License, Version 2.0 (the # "License"); you may not use this file except in compliance # with the License. You may obtain a copy of the License at # # http://www.apache.org/licenses/LICENSE-2.0 # # Unless required by applicable law or agreed to in writing, # software distributed under the License is distributed on an # "AS IS" BASIS, WITHOUT WARRANTIES OR CONDITIONS OF ANY # KIND, either express or implied. See the License for the # specific language governing permissions and limitations # under the License. # # ============================================================================= # Quickstart INI Realm configuration # # For those that might not understand the references in this file, the # definitions are all based on the classic Mel Brooks' film "Spaceballs". ;) # ============================================================================= # ----------------------------------------------------------------------------- # Users and their assigned roles # # Each line conforms to the format defined in the # org.apache.shiro.realm.text.TextConfigurationRealm#setUserDefinitions JavaDoc # ----------------------------------------------------------------------------- [users] # user 'root' with password 'secret' and the 'admin' role root = secret, admin # user 'guest' with the password 'guest' and the 'guest' role guest = guest, guest # user 'presidentskroob' with password '12345' ("That's the same combination on # my luggage!!!" ;)), and role 'president' presidentskroob = 12345, president # user 'darkhelmet' with password 'ludicrousspeed' and roles 'darklord' and 'schwartz' darkhelmet = ludicrousspeed, darklord, schwartz # user 'lonestarr' with password 'vespa' and roles 'goodguy' and 'schwartz' lonestarr = vespa, goodguy, schwartz # ----------------------------------------------------------------------------- # Roles with assigned permissions # # Each line conforms to the format defined in the # org.apache.shiro.realm.text.TextConfigurationRealm#setRoleDefinitions JavaDoc # ----------------------------------------------------------------------------- [roles] # 'admin' role has all permissions, indicated by the wildcard '*' admin = * # The 'schwartz' role can do anything (*) with any lightsaber: schwartz = lightsaber:* # The 'goodguy' role is allowed to 'drive' (action) the winnebago (type) with # license plate 'eagle5' (instance specific id) goodguy = winnebago:drive:eagle5 -
QuickStart.java
/*
 * Licensed to the Apache Software Foundation (ASF) under one
 * or more contributor license agreements.  See the NOTICE file
 * distributed with this work for additional information
 * regarding copyright ownership.  The ASF licenses this file
 * to you under the Apache License, Version 2.0 (the
 * "License"); you may not use this file except in compliance
 * with the License.  You may obtain a copy of the License at
 *
 *     http://www.apache.org/licenses/LICENSE-2.0
 *
 * Unless required by applicable law or agreed to in writing,
 * software distributed under the License is distributed on an
 * "AS IS" BASIS, WITHOUT WARRANTIES OR CONDITIONS OF ANY
 * KIND, either express or implied.  See the License for the
 * specific language governing permissions and limitations
 * under the License.
 */

import org.apache.shiro.SecurityUtils;
import org.apache.shiro.authc.*;
import org.apache.shiro.env.BasicIniEnvironment;
import org.apache.shiro.ini.IniSecurityManagerFactory;
import org.apache.shiro.mgt.SecurityManager;
import org.apache.shiro.session.Session;
import org.apache.shiro.subject.Subject;
import org.apache.shiro.lang.util.Factory;
import org.slf4j.Logger;
import org.slf4j.LoggerFactory;

/**
 * Simple Quickstart application showing how to use Shiro's API.
 *
 * @since 0.9 RC2
 */
public class Quickstart {

    private static final transient Logger log = LoggerFactory.getLogger(Quickstart.class);


    public static void main(String[] args) {

        // The easiest way to create a Shiro SecurityManager with configured
        // realms, users, roles and permissions is to use the simple INI config.
        // We'll do that by using a factory that can ingest a .ini file and
        // return a SecurityManager instance:

        // Use the shiro.ini file at the root of the classpath
        // (file: and url: prefixes load from files and urls respectively):
        SecurityManager securityManager = new BasicIniEnvironment("classpath:shiro.ini").getSecurityManager();

        // for this simple example quickstart, make the SecurityManager
        // accessible as a JVM singleton.  Most applications wouldn't do this
        // and instead rely on their container configuration or web.xml for
        // webapps.  That is outside the scope of this simple quickstart, so
        // we'll just do the bare minimum, so you can continue to get a feel
        // for things.
        SecurityUtils.setSecurityManager(securityManager);

        // Now that a simple Shiro environment is set up, let's see what you can do:

        // get the currently executing user:
        Subject currentUser = SecurityUtils.getSubject();

        // Do some stuff with a Session (no need for a web or EJB container!!!)
        Session session = currentUser.getSession();
        session.setAttribute("someKey", "aValue");
        String value = (String) session.getAttribute("someKey");
        if (value.equals("aValue")) {
            log.info("Retrieved the correct value! [" + value + "]");
        }

        // let's login the current user so we can check against roles and permissions:
        if (!currentUser.isAuthenticated()) {
            UsernamePasswordToken token = new UsernamePasswordToken("lonestarr", "vespa");
            token.setRememberMe(true);
            try {
                currentUser.login(token);
            } catch (UnknownAccountException uae) {
                log.info("There is no user with username of " + token.getPrincipal());
            } catch (IncorrectCredentialsException ice) {
                log.info("Password for account " + token.getPrincipal() + " was incorrect!");
            } catch (LockedAccountException lae) {
                log.info("The account for username " + token.getPrincipal() + " is locked.  " +
                        "Please contact your administrator to unlock it.");
            }
            // ... catch more exceptions here (maybe custom ones specific to your application?
            catch (AuthenticationException ae) {
                //unexpected condition?  error?
            }
        }

        //say who they are:
        //print their identifying principal (in this case, a username):
        log.info("User [" + currentUser.getPrincipal() + "] logged in successfully.");

        //test a role:
        if (currentUser.hasRole("schwartz")) {
            log.info("May the Schwartz be with you!");
        } else {
            log.info("Hello, mere mortal.");
        }

        //test a typed permission (not instance-level)
        if (currentUser.isPermitted("lightsaber:wield")) {
            log.info("You may use a lightsaber ring.  Use it wisely.");
        } else {
            log.info("Sorry, lightsaber rings are for schwartz masters only.");
        }

        //a (very powerful) Instance Level permission:
        if (currentUser.isPermitted("winnebago:drive:eagle5")) {
            log.info("You are permitted to 'drive' the winnebago with license plate (id) 'eagle5'.  " +
                    "Here are the keys - have fun!");
        } else {
            log.info("Sorry, you aren't allowed to drive the 'eagle5' winnebago!");
        }

        //all done - log out!
        currentUser.logout();

        System.exit(0);
    }
}
注意事项:
-
需要注意jdk版本,使用如下这个配置不能用jdk1.8,我改用了jdk17;如果要使用jdk1.8可能要降版本
-
在pom引入依赖时需要加入版本号,具体版本号可以参考maven仓库下面相关依赖的版本号,如下给出一个我的配置
<dependencies>
        <dependency>
            <groupId>org.apache.shiro</groupId>
            <artifactId>shiro-core</artifactId>
            <version>2.0.1</version>
        </dependency>
        <!-- Shiro uses SLF4J for logging.  We'll use the 'simple' binding
             in this example app.  See https://www.slf4j.org for more info. -->
        <!-- configure logging -->
        <dependency>
            <groupId>org.slf4j</groupId>
            <artifactId>jcl-over-slf4j</artifactId>
            <version>2.0.9</version>
            <scope>runtime</scope>
        </dependency>
        <dependency>
            <groupId>org.apache.logging.log4j</groupId>
            <artifactId>log4j-slf4j2-impl</artifactId>
            <version>2.23.1</version>
            <scope>runtime</scope>
        </dependency>
        <dependency>
            <groupId>org.apache.logging.log4j</groupId>
            <artifactId>log4j-core</artifactId>
            <version>2.23.1</version>
            <scope>runtime</scope>
        </dependency>
    </dependencies>
Spring Security都有一下这几个核心:
//获取当前用户对象subject
Subject currentUser = SecurityUtils.getSubject();

//通过当前用户拿到session
Session session = currentUser.getSession();

//判断当前用户是否被认证
currentUser.isAuthenticated()

//获取当前用户的权限
currentUser.getPrincipal()

//判断是否有这个角色
currentUser.hasRole("xxx")

//判断用户的角色是否有权限
currentUser.isPermitted("yyy")
3.6 SpringBoot集成Shiro框架
四 、Swagger
学习目标:
- 了解Swagger的作用和概念
- 了解前后端分离
- 在Springboot中集成Swagger
4.1 Swagger 简介
从前后端分离讲起
Vue+SpringBoot
后端时代:前端只用管理静态页面;html==>后端。模板引擎 JSP=>后端是主力
前后端分离时代:
- 后端:后端控制层,服务层,数据交互层【后端团队】
- 前端:前端控制层,视图层【前端团队】
- 伪后端数据,json;不需要后端,前端依旧能够跑起来
- 前后端如何交互?===>API格式
- 前后端相对独立而且松耦合
- 前后端甚至可以部署在不同的服务器上
产生一个问题:
- 前后端集成联调,前端人员和后端人员无法做到,“及时协商,尽早解决”
解决方案:
- 首先制定Schema ,实时更新最新的API,降低集成风险
- 早些年:制定word计划文档;
- 前后端分离:
- 前端测试后端接口:postman
- 后端提供接口,需要实时更新最新的消息及改动!
Swagger
- 号称世界上最流行的API框架;
- RestFul Api 文档在线自动生成工具=>Api文档与API定义同步更新
- 直接运行,可以在线可视化测试API接口
- 支持多种语言:java php
官网:Swagger
在项目使用Swagger需要springbox;
- swagger2
- ui
4.2 SpringBoot集成Swagger2
1、新建一个spring-web项目
2、导入相关依赖(以下依赖支持jdk1.8,推荐springboot版本为2.5.1,否则可能启动项目失败会出现空指针异常)
<!-- https://mvnrepository.com/artifact/io.springfox/springfox-swagger2 -->
<dependency>
    <groupId>io.springfox</groupId>
    <artifactId>springfox-swagger2</artifactId>
    <version>2.9.2</version>
</dependency>
<!-- https://mvnrepository.com/artifact/io.springfox/springfox-swagger-ui -->
<dependency>
    <groupId>io.springfox</groupId>
    <artifactId>springfox-swagger-ui</artifactId>
    <version>2.9.2</version>
</dependency>
3、编写helloworld
4、配置Swagger==>config
5、访问测试页面
4.3 配置Swagger
4.4 Swagger配置扫描接口
4.5 Swagger分组和接口注释及小结
以上三者看下面完整代码即可
package com.wu.config;

import org.springframework.context.annotation.Bean;
import org.springframework.context.annotation.Configuration;
import org.springframework.core.env.Environment;
import org.springframework.core.env.Profiles;
import org.springframework.stereotype.Controller;
import springfox.documentation.builders.RequestHandlerSelectors;
import springfox.documentation.service.ApiInfo;
import springfox.documentation.service.Contact;
import springfox.documentation.spi.DocumentationType;
import springfox.documentation.spring.web.plugins.Docket;
import springfox.documentation.swagger2.annotations.EnableSwagger2;

import java.util.ArrayList;

@Configuration
@EnableSwagger2//开启swagger
public class SwaggerConfig {

    //配置了Swagger的Docket的bean实例
    @Bean(name = "docket")
    public Docket getDocket(Environment environment){

        //首先获取当前项目的运行环境 Environment environment
        //配置要显示的Swagger环境
        Profiles profiles = Profiles.of("dev","test");
        //判断当前生效的配置文件是否处在我们设定的环境中
        boolean flag = environment.acceptsProfiles(profiles);

        return new Docket(DocumentationType.SWAGGER_2)
                .apiInfo(apiInfo())
                .enable(flag)//enable是否启动Swagger,如果为false,则Swagger不能在浏览器中访问
                .groupName("WT")
                .select()
                //RequestHandlerSelectors :配置要扫描接口的方式
                //basePackage:指定需要扫描的包
                .apis(RequestHandlerSelectors.basePackage("com.wu.controller"))
                //扫描全部
                //.apis(RequestHandlerSelectors.any())
                //都不扫描
                //.apis(RequestHandlerSelectors.none())
                //扫描指定注解
                //.apis(RequestHandlerSelectors.withClassAnnotation(Controller.class))
                //扫描指定注解
                .apis(RequestHandlerSelectors.withClassAnnotation(Controller.class))
                .build();
    }

    @Bean(name = "docket1")
    public Docket getDocket1(){
        return new Docket(DocumentationType.SWAGGER_2).groupName("A");
    }

    @Bean(name = "docket2")
    public Docket getDocket2(){
        return new Docket(DocumentationType.SWAGGER_2).groupName("B");
    }

    @Bean(name = "docket3")
    public Docket getDocket3(){
        return new Docket(DocumentationType.SWAGGER_2).groupName("C");
    }

    //配置Swagger信息
    public ApiInfo apiInfo(){
        Contact contact = new Contact("wut","https://home.cnblogs.com/u/wutong666","229572451@qq.com");
        return new ApiInfo("wt的swaggerAPI文档",
                "努力学习",
                "1.0",
                "https://www.neu.edu.cn",
                contact,
                "Apache 2.0",
                "http://www.apache.org/licenses/LICENSE-2.0",
                new ArrayList());
    }


}
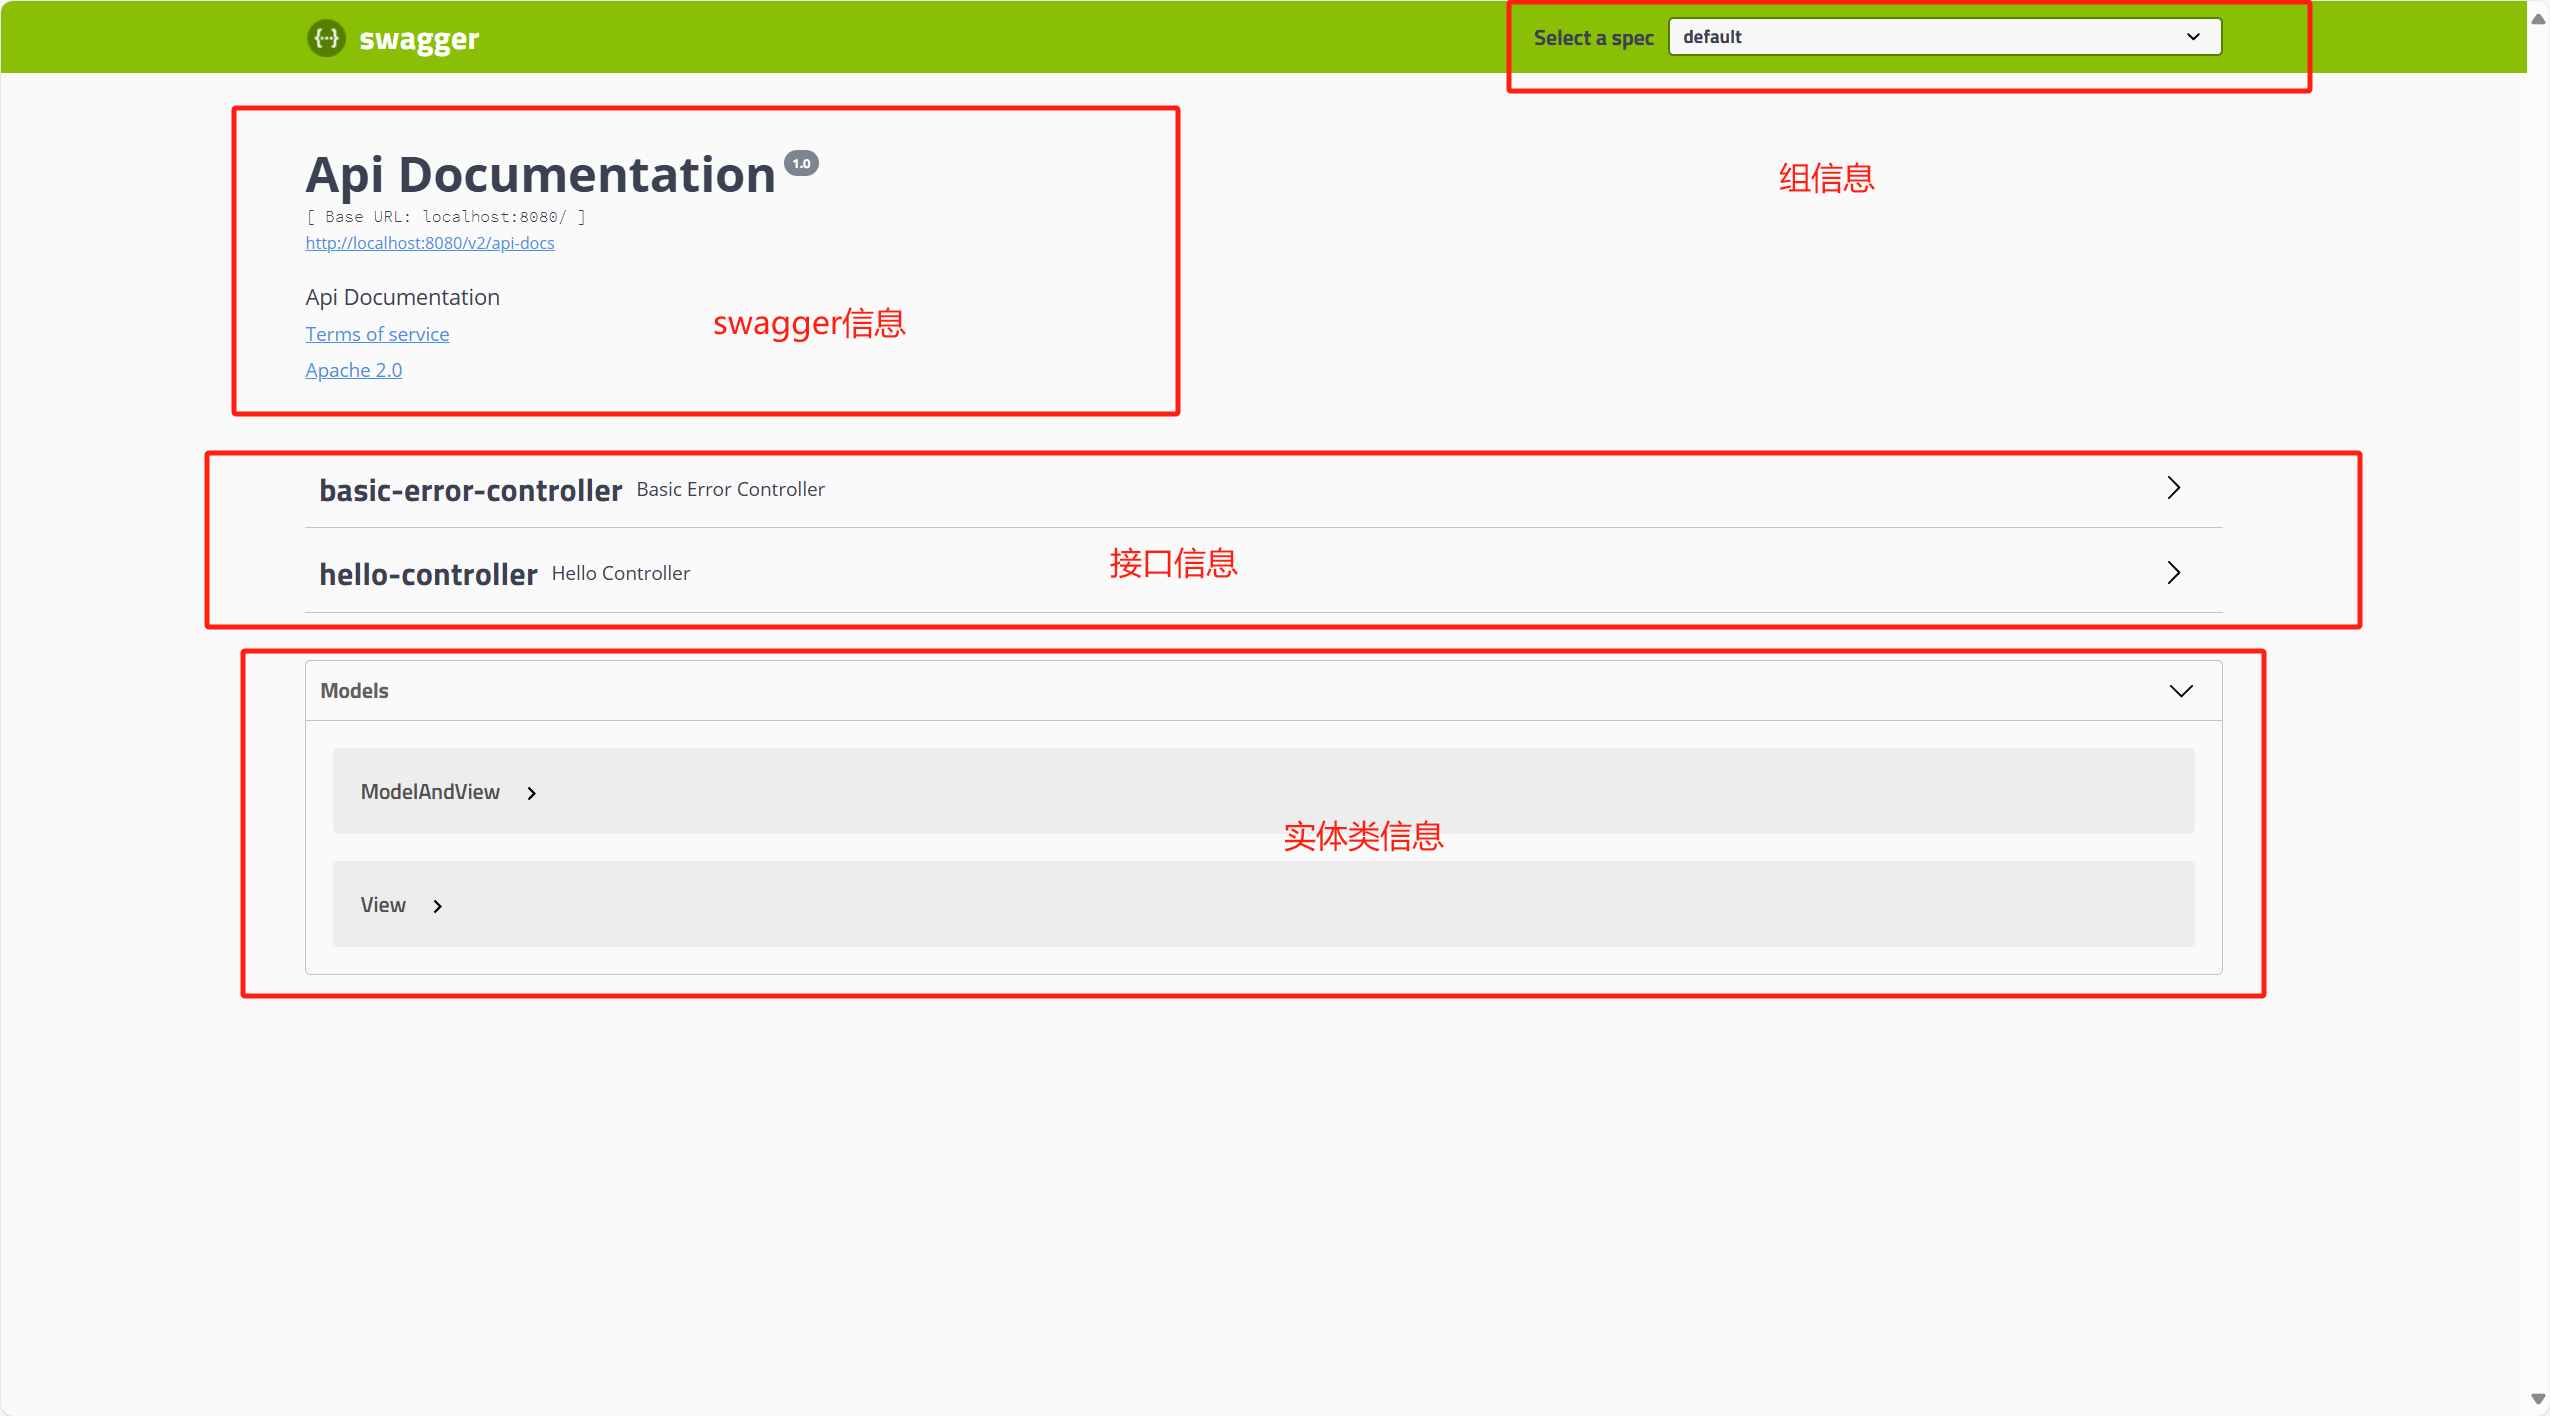
总结:
-
可以通过Swagger给一些比较难理解的属性或者接口,增加注释信息
-
接口文档实时更新
-
可以在线测试
Swagger是一个比较优秀的工具,几乎所有大公司都有使用
【注意点】
在正式发布的时候,需要关闭Swagger!!处于安全考虑,而且节省运行的内存。
五、任务
5.1 异步任务
- 开启异步任务就两步
- 首先在要使用thread的方法上使用@Async注解,告诉Spring这是异步方法
- 其次在启动类注解上使用@EnableAsync
@SpringBootApplication
@EnableAsync//开启异步任务
public class Springboot09AsynchronousApplication {

    public static void main(String[] args) {
        SpringApplication.run(Springboot09AsynchronousApplication.class, args);
    }

}
    @Async
    public void hello(){
        try{
            Thread.sleep(3000);
        }catch (InterruptedException e){
            e.printStackTrace();
        }
        System.out.println("数据正在处理。。。");
    }
5.2 定时任务
TaskScheduler 任务调度程序
TaskExecutor 任务执行程序

@EnableScheduling  开启定时功能注解
@Scheduled   什么时候执行
操作流程类似于异步任务,首先需要在启动类开启相关模块的允许,之后在需要使用定时任务的方法上使用相关注解,同时还需要设置什么时候执行
@SpringBootApplication
@EnableAsync//开启异步任务
@EnableScheduling//开启定时功能的注解
public class Springboot09AsynchronousApplication {

    public static void main(String[] args) {
        SpringApplication.run(Springboot09AsynchronousApplication.class, args);
    }

}
    //cron表达式
    //秒 分 时 日 月 0-7是星期
    //比如0 0 21 * * 0-7 代表每天21点执行
    //比如0 0 9,21 * * 1-6 代表每周的周一到周六的早上9点和晚上21点执行
    //比如0 0 21 L * 0-7 代表每个月的最后一天21点执行(可以采取通配符的方式)
    @Scheduled(cron = "0 0 21 * * 0-7")
    public void hello(){
        System.out.println("hello,你被执行了");
    }
cron表达式的编撰可以参考网上一些网站的帮助
5.3 邮件发送
首先导包
<dependency>
    <groupId>org.springframework.boot</groupId>
    <artifactId>spring-boot-starter-mail</artifactId>
</dependency>
其次注意邮箱需要开启支持SMTP模式并生成一个校验码(类似token辅助登录邮箱服务器)(建议使用QQ邮箱)
之后需要在配置文件中配置发送邮箱的相关信息
spring.mail.username=xxxxxxxxx@qq.com
spring.mail.password=填qq邮箱给你的授权码
spring.mail.host=smtp.qq.com
# 开启加密验证
spring.mail.properties.mail.smtp.ssl.enable =true;
在写代码时主要是新建一个对象以及调用一个spring对象
@Autowired
JavaMailSenderImpl mailSender;
一个简单的邮件发送
//一个简单的邮件发送
        SimpleMailMessage mailMessage = new SimpleMailMessage();
        mailMessage.setSubject("wut");
        mailMessage.setText("要努力啊!");
        mailMessage.setTo("xxxxxxx@stu.neu.edu.cn");
        mailMessage.setFrom("xxxxxxxxx@qq.com");
        mailSender.send(mailMessage);
六、分布式系统理论(Dubbo+Zookeeper+springboot)
6.1 分布式理论
什么是分布式系统?
分布式系统是若干独立计算机的集合,这些计算机对于用户来说就像单个相关系统;
分布式系统是由一组通过网络进行通信、为了完成共同的任务而协调工作的计算机节点组成的系统。分布式系统的出现是为了用廉价的、普通的机器完成单个计算机无法完成的计算、存储任务、其目的是利用更多的机器、处理更多的数据。
分布式系统(distributed system)是建立在网络之上的软件系统。
首先需要明确的是,只有当单个节点的处理能力无法满足日益增长的计算、存储任务的时候,且硬件的提升(加内存、加磁盘、使用更好的CPU)高昂到得不偿失的时候(也就是说一般情况下不会采取这种分布式策略),应用程序也不能进一步优化的时候,我们才需要考虑分布式系统。因为,分布式系统要解决的问题本身就是和单机系统一样的,而由于分布式系统多节点、通过网络通信的拓扑结构,会引入很多单机系统没有的问题,为了解决这些问题又会引入更多的机制、协议,带来更多的问题。。。
- 单一应用架构
- 当网站流量很小时,只需一个应用,将所有功能都部署在一起,以减少部署节点和成本。此时,用于简化增删改查工作量的数据访问框架(ORM)是关键。
- 适合小型网站和管理系统,将所有功能集合到一个功能里,简单易用
- 缺点:
- 性能扩展比较难
- 协同开发问题
- 不利于升级维护
- 垂直应用架构
- 当访问量逐渐增大,单一应用增加机器带来的加速度越来越小,将应用拆成互不相干的几个应用,以提升效率。此时,用于
加速前端页面开发的Web框架(MVC)是关键。 - 通过切分业务来实现各个模块独立部署,降低了维护和部署的难度,团队各司其职更易管理,性能扩展方便,更有针对性
- 缺点:公共模块无法重复利用,开发浪费
- 当访问量逐渐增大,单一应用增加机器带来的加速度越来越小,将应用拆成互不相干的几个应用,以提升效率。此时,用于
- 分布式服务架构
- 当垂直应用越来越多,应用之间交互不可避免,将核心业务抽取出来,作为独立的服务,逐渐形成稳定的服务中心,使前端应用能更快速的响应多变的市场需求。此时,用于提高业务复用及整合的分布式服务框架(RPC)是关键。
- 流动计算架构
- 当服务越来越多,容量的评估,小服务资源的浪费等问题逐渐显现,此时需增加一个调度中心基于访问压力实时管理集群容量,提高集群利用率。此时,用于提高机器利用率的资源调度和治理中心(SOA)[Service Oriented Architecture]是关键。
6.2 RPC
什么是RPC?
RPC【Remote Procedure Call】是指远程过程调用,是一种进程间通信方式,他是一种技术的思想,而不是规范。它允许程序调用另一个地址空间(通常是共亨网络的另一台机器上)的过程或函数,而不用程序员显式编码这个远程调用的细节。即程序员无论是调用本地的还是远程的函数,本质上编写的调用代码基本相同。
也就是说两台服务器A,B,一个应用部署在A服务器上,想要调用B服务器上应用提供的函数/方法,由于不在一个内存空间,不能直接调用,需要通过网络来表达调用的语义和传达调用的数据。为什么要用RPC呢?就是无法在一个进程内,甚至-个计算机内通过本地调用的方式完成的需求,比如不同的系统间的通讯,甚至不同的组织间的通讯,由于计算能力需要横向扩展,需要在多台机器组成的集群上部署应用。RPC就是要像调用本地的函数一样去调远程函数;
RPC基本原理
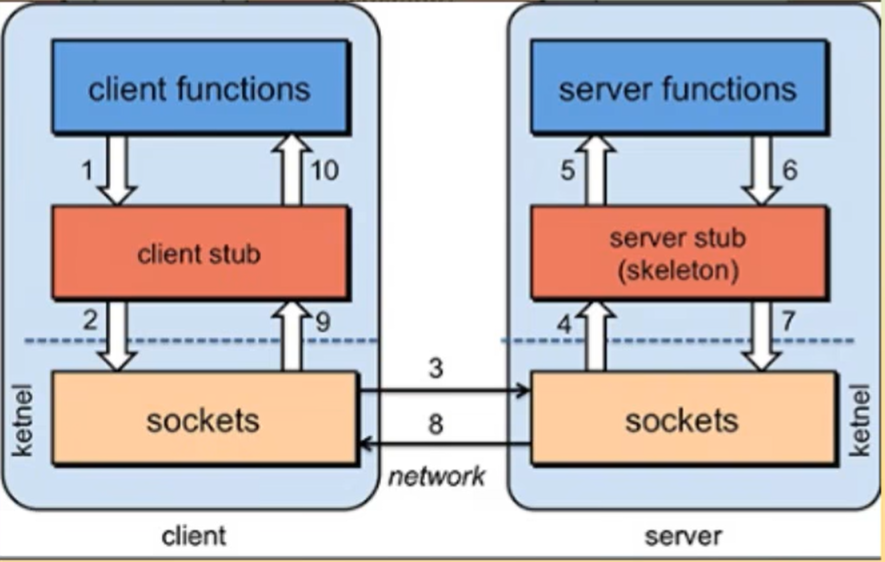
RPC两个核心模块:通讯、序列化
(反)序列化:负责数据传输需要转换
6.3 Dubbo

服务提供者(Provider):暴露服务的服务提供方,服务提供者在启动时,向注册中心注册自己提供的服务。
服务消费者(Consumer):调用远程服务的服务消费方,服务消费者在启动时,向注册中心订阅自己所需的服务,服务消费者,从提供者地址列表中,基于软负载均衡算法,选一台提供者进行调用,如果调用失败,再选另一台调用。(发布者—订阅者模式)
注册中心(Registry):注册中心返回服务提供者地址列表给消费者,如果有变更,注册中心将基于长连接推送变更数据给消费者
监控中心(Monitor):服务消费者和提供者,在内存中累计调用次数和调用时间,定时每分钟发送一次统计数据到监控中。
6.4 ZooKeeper
6.5 Zookeeper+dubbo+Springboot测试集成(踩了太多坑了)
步骤:
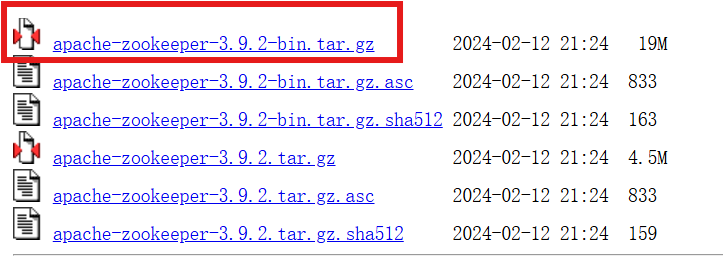
1、安装Zookeeper,我选择的版本是3.9.2,直接下载地址:Index of /zookeeper (apache.org)注意需要选择带有bin后缀的,因为这个是编译好的,拿到就能直接用
2、解压后进入bin目录下修改zkServer.sh文件,需要调整里面一个参数(建议记事本打开然后全局搜索JVMFLAGS),不修改这个参数可能会报错(好像是说jvm值太小了运行会出错)

3、双击zkServer.cmd即可正常运行zookeeper
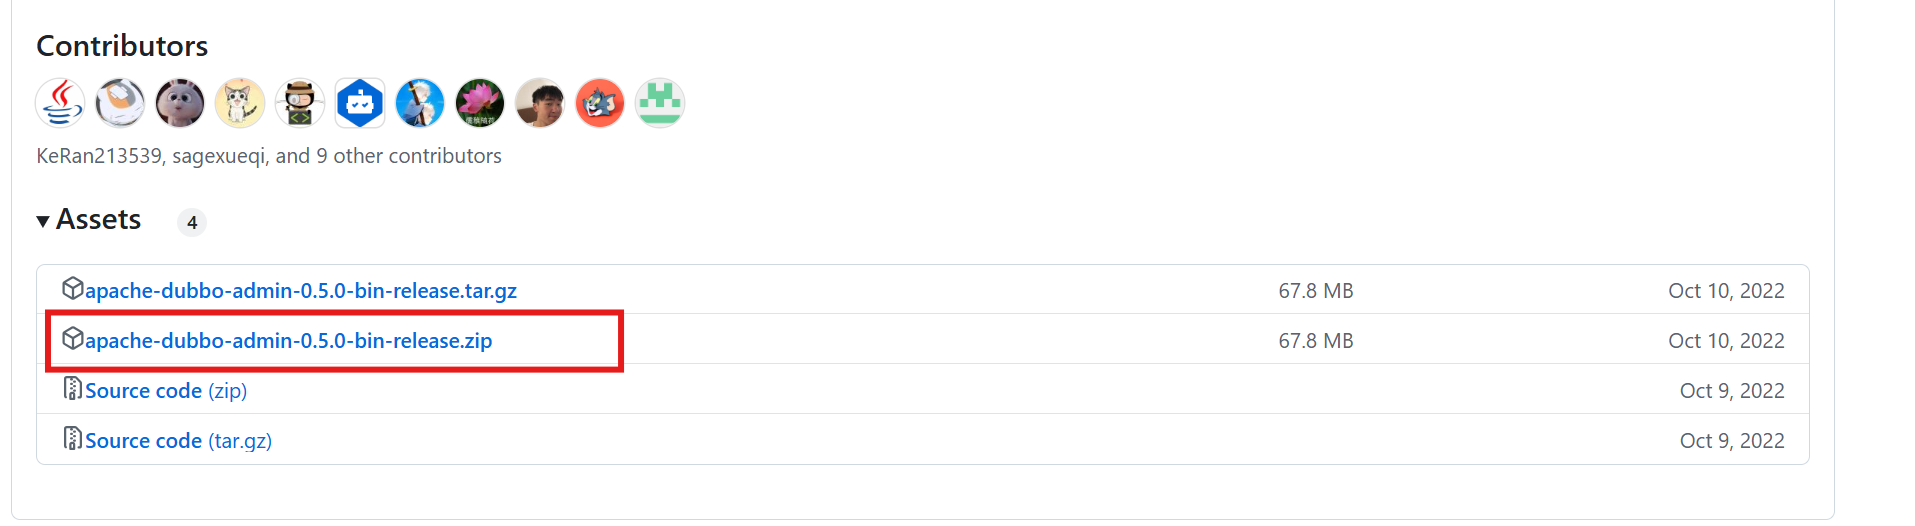
4、安装Dubbo admin,下载地址Release 0.5.0 · apache/dubbo-admin · GitHub,可以选择下载源码然后手动编辑打包部署,我这里直接偷懒也下载打包好的,启动方便
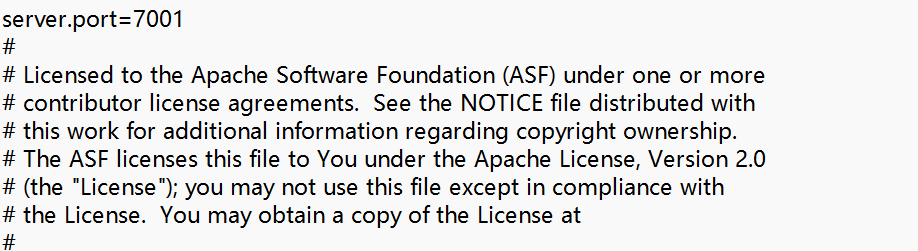
5、解压后同样需要进入/bin/config目录,修改application.properties
在最上面加上运行端口配置,我这里设置成和老版本dubbo版本一样的7001端口
server.port=7001
6、然后点击bin中的startup.cmd运行,类似Tomcat
在浏览器输入127.0.0.1:7001访问Dubbo admin即可进入 账户密码默认均为root

注意,这里由于对外开放Dubbo协议,因此暴露了一个默认服务以及服务端口20880,记住这个,后面有坑!
7、创建提供者和消费者springboot项目,附上重点部分代码已经配置文件
- 提供者
@SpringBootApplication
@EnableDubbo//允许Dubbo
public class ProviderServerApplication {

    public static void main(String[] args) {
        SpringApplication.run(ProviderServerApplication.class, args);
    }

}
public interface TicketService {

    public String getTicket();

}
import org.apache.dubbo.config.annotation.Service;
import org.springframework.stereotype.Component;

/**
 * @author: 22957
 * @className: TicketServiceImpl
 * @description:
 * @version: 1.0
 * @createTime 2024/9/11 9:14
 */
//服务注册与发现
@Component//使用Dubbo后尽量不要用service注解
@Service//可以被扫描到,项目启动就自动注册到注册中心
public class TicketServiceImpl implements TicketService{
    @Override
    public String getTicket() {
        return "z102";
    }
}
注意:此处的service和component分别是哪来的!
# 应用服务 WEB 访问端口
server.port=8001


# 注册中心地址
dubbo.registry.address=zookeeper://127.0.0.1:2181
# 服务应用名字
dubbo.application.name=provider-server
#哪些服务要被注册
dubbo.scan.base-packages=com.wu.service

dubbo.application.qosEnable=true

dubbo.application.qosPort=33333

dubbo.application.qosAcceptForeignIp=false

# 注意在dubbo上的端口号,不填默认是20880,会和默认服务冲突而无法启动
dubbo.protocol.name=dubbo
dubbo.protocol.port=20882
- 消费者
import org.apache.dubbo.config.annotation.Reference;
import org.springframework.stereotype.Service;

//注意这里注解的引用
@Service//注意是Service
public class UserService {

    //想拿到provider-server提供的票,需要去注册中心拿到服务
    @Reference//引用,pom坐标或可以定义路径相同的接口名
    TicketService ticketService;

    public void buyTicket(){
        String ticket = ticketService.getTicket();
        System.out.println("在zookeeper中拿到=>"+ticket);
    }

}
//注意这里想实现RPC也需要在service包下建一个一模一样的接口类
public interface TicketService {

    public String getTicket();

}
@SpringBootApplication
@EnableDubbo
public class ConsumerServerApplication {

    public static void main(String[] args) {
        SpringApplication.run(ConsumerServerApplication.class, args);
    }

}
# 应用服务 WEB 访问端口
server.port=8002

#消费者拿服务需要暴露自己的名字
dubbo.application.name=consumer-server
dubbo.registry.address=zookeeper://127.0.0.1:2181
#哪些服务要被注册
dubbo.scan.base-packages=com.wu.service

dubbo.protocol.name=dubbo
dubbo.protocol.port=20881
测试
    @Autowired
    UserService userService;

    @Test
    void contextLoads() {

        userService.buyTicket();

    }
可以实现RPC远程调用!
附上我的pom.xml配置
<!-- https://mvnrepository.com/artifact/org.apache.dubbo/dubbo-spring-boot-starter -->
        <dependency>
            <groupId>org.apache.dubbo</groupId>
            <artifactId>dubbo-spring-boot-starter</artifactId>
            <version>2.7.3</version>
        </dependency>

        <!-- https://mvnrepository.com/artifact/com.github.sgroschupf/zkclient -->
        <dependency>
            <groupId>com.github.sgroschupf</groupId>
            <artifactId>zkclient</artifactId>
            <version>0.1</version>
        </dependency>

        <!-- https://mvnrepository.com/artifact/org.apache.curator/curator-framework -->
        <dependency>
            <groupId>org.apache.curator</groupId>
            <artifactId>curator-framework</artifactId>
            <version>2.12.0</version>
        </dependency>
        <!-- https://mvnrepository.com/artifact/org.apache.curator/curator-recipes -->
        <dependency>
            <groupId>org.apache.curator</groupId>
            <artifactId>curator-recipes</artifactId>
            <version>2.8.0</version>
        </dependency>
        <!-- https://mvnrepository.com/artifact/org.apache.zookeeper/zookeeper -->
        <dependency>
            <groupId>org.apache.zookeeper</groupId>
            <artifactId>zookeeper</artifactId>
            <version>3.4.14</version>
            <!--日志可能会冲突-->
            <exclusions>
                <exclusion>
                    <groupId>org.slf4j</groupId>
                    <artifactId>slf4j-log4j12</artifactId>
                </exclusion>
            </exclusions>
        </dependency>
最后再提一个需要注意的地方,如果有人的电脑内有不止一个jdk版本,需注意打版以及启动时不同服务间的jdk版本是否一致,避免出现一些奇怪的异常

 浙公网安备 33010602011771号