消息中间件-ActiveMQ高可用集群和持久化机制
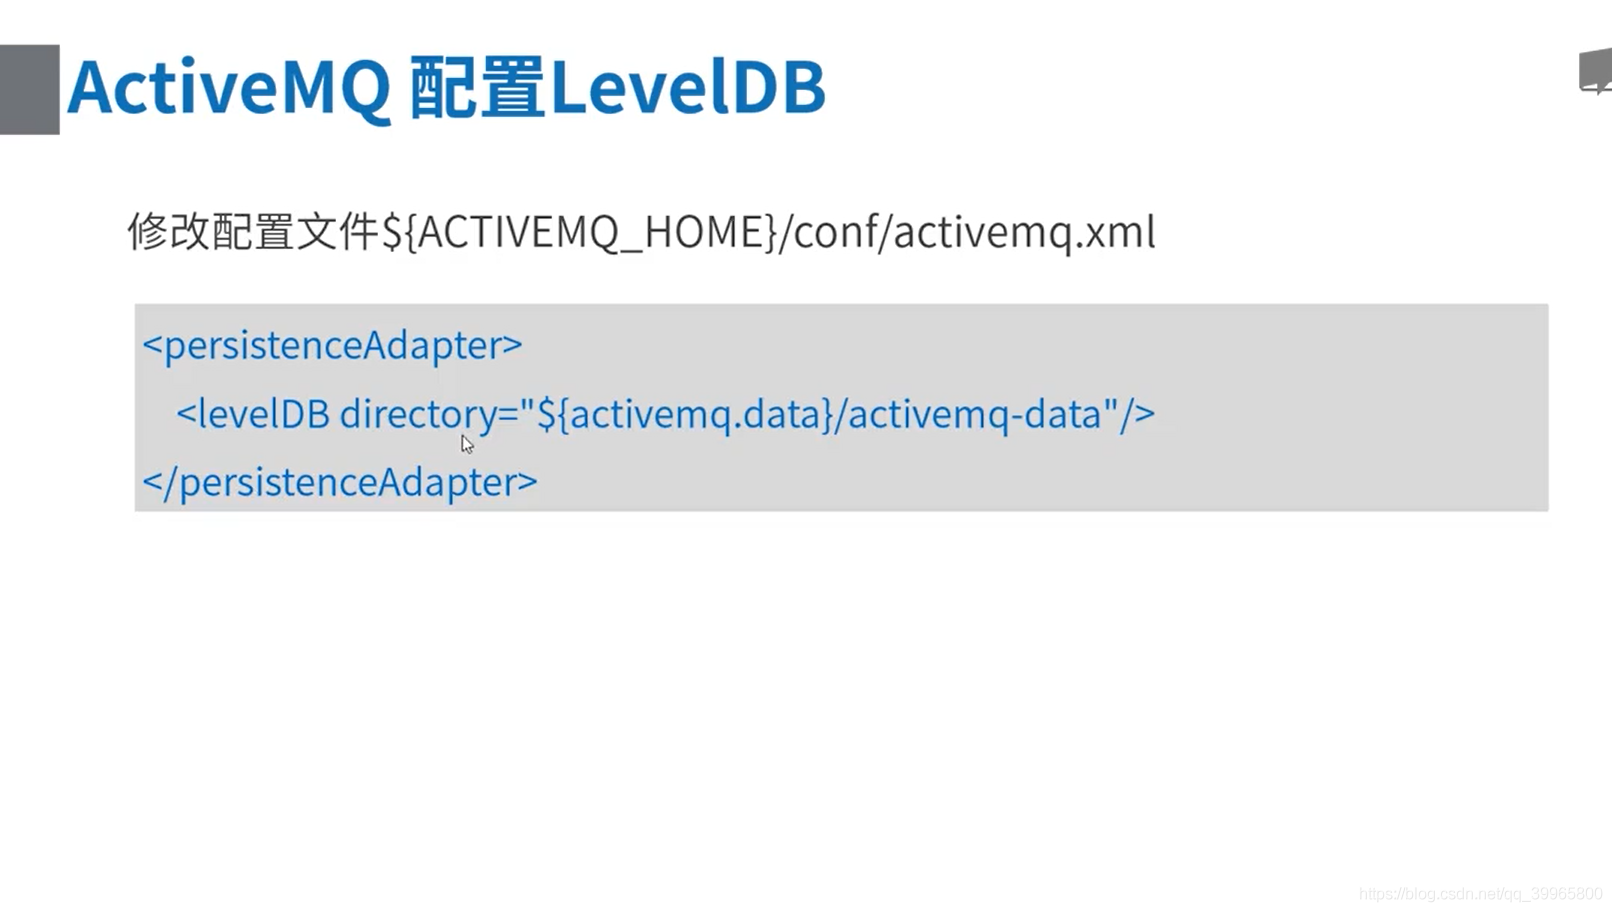
1、修改active.mq的xml文件
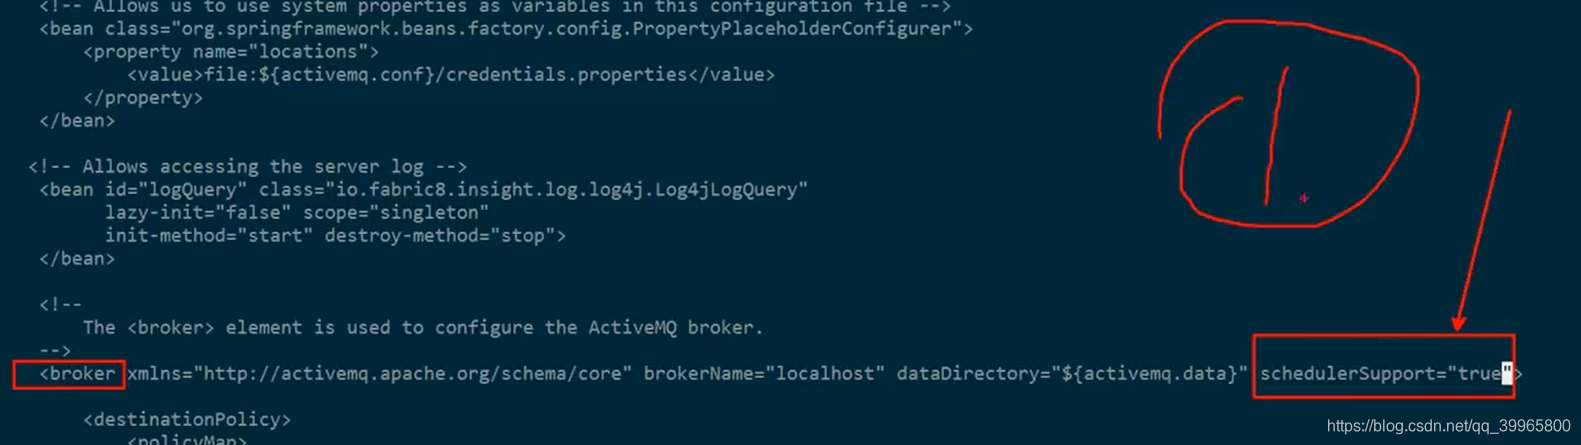
2、延时、调度消息
package com.study.mq.b1_message;

import org.apache.activemq.ActiveMQConnectionFactory;
import org.apache.activemq.ScheduledMessage;

import javax.jms.*;

// 延时、调度消息 http://activemq.apache.org/delay-and-schedule-message-delivery.html
// 定时发送邮件通知,或者触发代码执行
public class DelayScheduleMessageDemo {
    public static void main(String[] args) {
        new ProducerThread("tcp://activemq.tony.com:61616", "queue1").start();
    }

    static class ProducerThread extends Thread {
        String brokerUrl;
        String destinationUrl;

        public ProducerThread(String brokerUrl, String destinationUrl) {
            this.brokerUrl = brokerUrl;
            this.destinationUrl = destinationUrl;
        }

        @Override
        public void run() {
            ActiveMQConnectionFactory connectionFactory;
            Connection conn;
            Session session;

            try {
                // 1、创建连接工厂
                connectionFactory = new ActiveMQConnectionFactory(brokerUrl);
                // 2、创建连接对象md
                conn = connectionFactory.createConnection();
                conn.start();
                // 3、创建会话
                session = conn.createSession(false, Session.AUTO_ACKNOWLEDGE);
                // 4、创建点对点发送的目标
                Destination destination = session.createQueue(destinationUrl);
                // 5、创建生产者消息
                MessageProducer producer = session.createProducer(destination);
                // 设置生产者的模式,有两种可选 持久化 / 不持久化
                producer.setDeliveryMode(DeliveryMode.PERSISTENT);
                // 6、示例消息
                //  延时 5秒
                TextMessage message = session.createTextMessage("Hello world - 1!");
                message.setLongProperty(ScheduledMessage.AMQ_SCHEDULED_DELAY, 5 * 1000L);

                //  延时 5秒,投递3次,间隔10秒 (投递次数=重复次数+默认的一次)
                TextMessage message2 = session.createTextMessage("Hello world - 2!");
                message2.setLongProperty(ScheduledMessage.AMQ_SCHEDULED_DELAY, 5 * 1000L); // 延时
                message2.setLongProperty(ScheduledMessage.AMQ_SCHEDULED_PERIOD, 2 * 1000L); // 投递间隔
                message2.setIntProperty(ScheduledMessage.AMQ_SCHEDULED_REPEAT, 2); // 重复次数

                //  CRON 表达式的方式 以及 和上面参数的组合
                TextMessage message3 = session.createTextMessage("Hello world - 3!");
                message3.setStringProperty(ScheduledMessage.AMQ_SCHEDULED_CRON, "0 * * * *");

                // 7、发送消息
                producer.send(message);
                producer.send(message2);
                producer.send(message3);


                // 8、 关闭连接
                session.close();
                conn.close();
            } catch (JMSException e) {
                e.printStackTrace();
            }
        }
    }
}
package com.study.mq.b1_message;

import org.apache.activemq.ActiveMQConnectionFactory;

import javax.jms.*;

/**
 * 简单消费者
 */
// http://activemq.apache.org/consumer-features.html
public class Consumer {
    public static void main(String[] args) throws InterruptedException {
        ConsumerThread queue1 = new ConsumerThread("tcp://activemq.tony.com:61616", "queue1");
        queue1.start();
        queue1.join();
    }
}

class ConsumerThread extends Thread {

    String brokerUrl;
    String destinationUrl;

    public ConsumerThread(String brokerUrl, String destinationUrl) {
        this.brokerUrl = brokerUrl;
        this.destinationUrl = destinationUrl;
    }

    @Override
    public void run() {
        ActiveMQConnectionFactory connectionFactory;
        Connection conn;
        Session session;
        MessageConsumer consumer;

        try {
            // brokerURL http://activemq.apache.org/connection-configuration-uri.html
            // 1、创建连接工厂
            connectionFactory = new ActiveMQConnectionFactory(this.brokerUrl);
            // 2、创建连接对象
            conn = connectionFactory.createConnection();
            conn.start(); // 一定要启动
            // 3、创建会话(可以创建一个或者多个session)
            session = conn.createSession(false, Session.AUTO_ACKNOWLEDGE);
            // 4、创建点对点接收的目标,queue - 点对点
            Destination destination = session.createQueue(destinationUrl);

            // 5、创建消费者消息 http://activemq.apache.org/destination-options.html
            consumer = session.createConsumer(destination);

            // 6、接收消息
            consumer.setMessageListener(message -> {
                try {
                    if (message instanceof TextMessage) {
                        System.out.println("收到文本消息:" + ((TextMessage) message).getText());
                    } else {
                        System.out.println(message);
                    }
                } catch (JMSException e) {
                    e.printStackTrace();
                }
            });
        } catch (JMSException e) {
            e.printStackTrace();
        }
    }
}
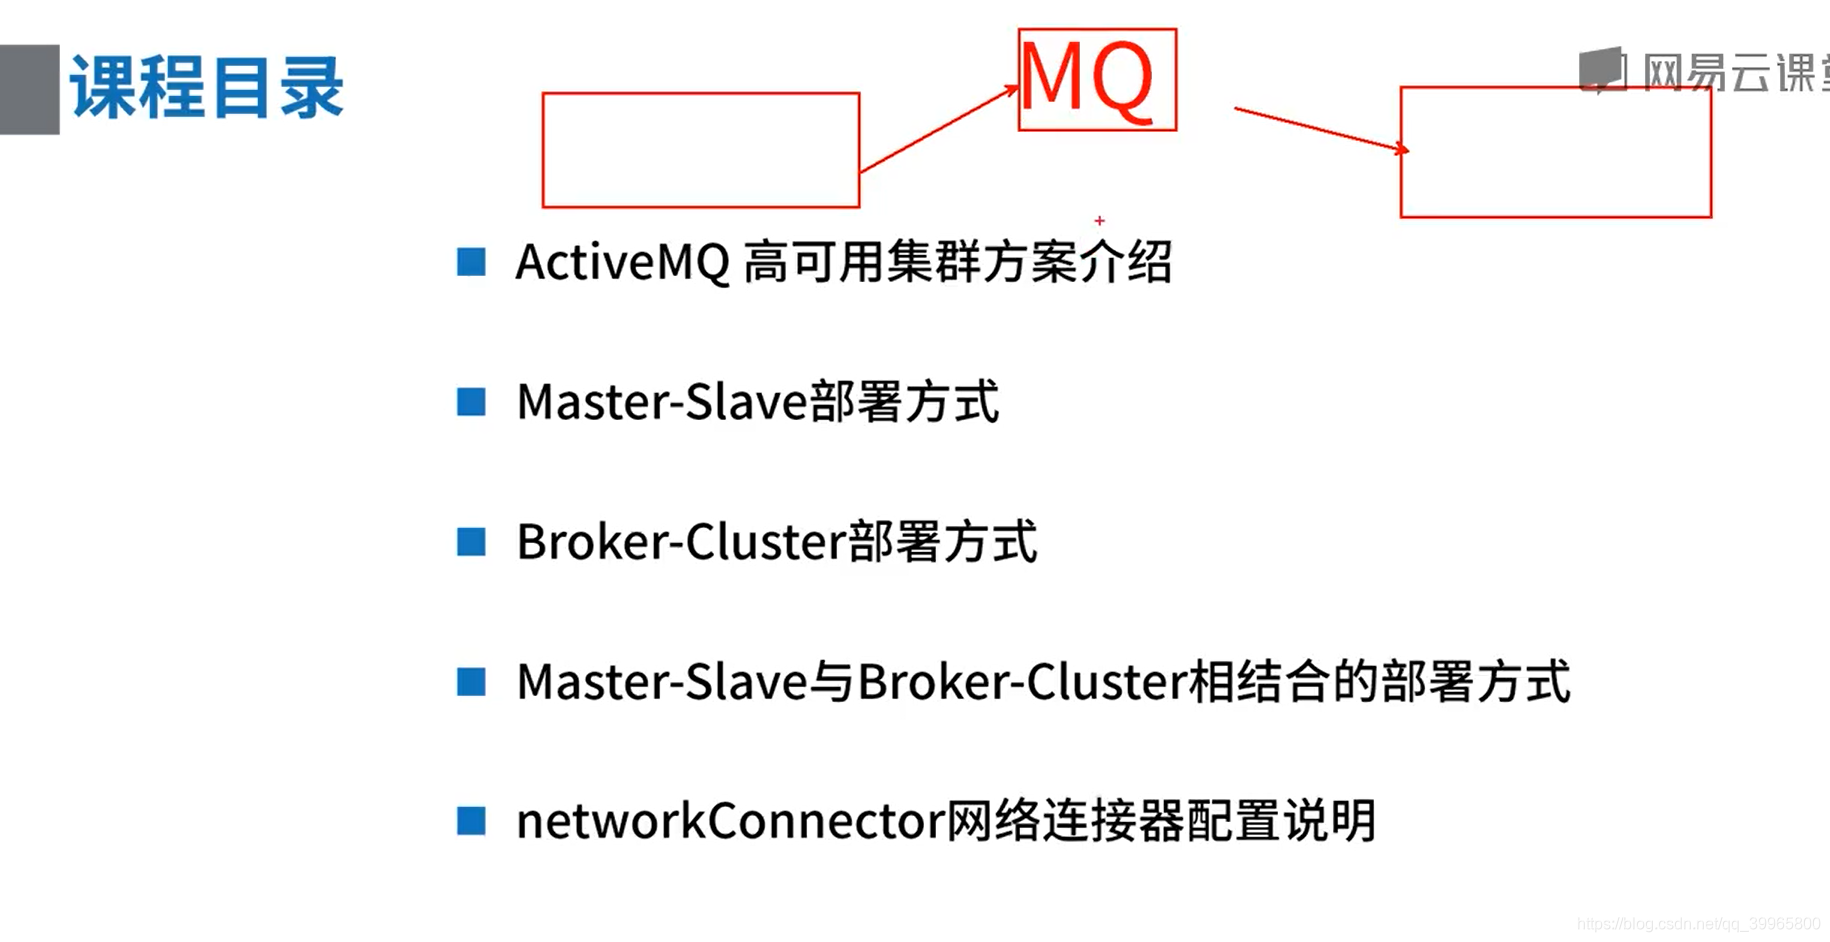
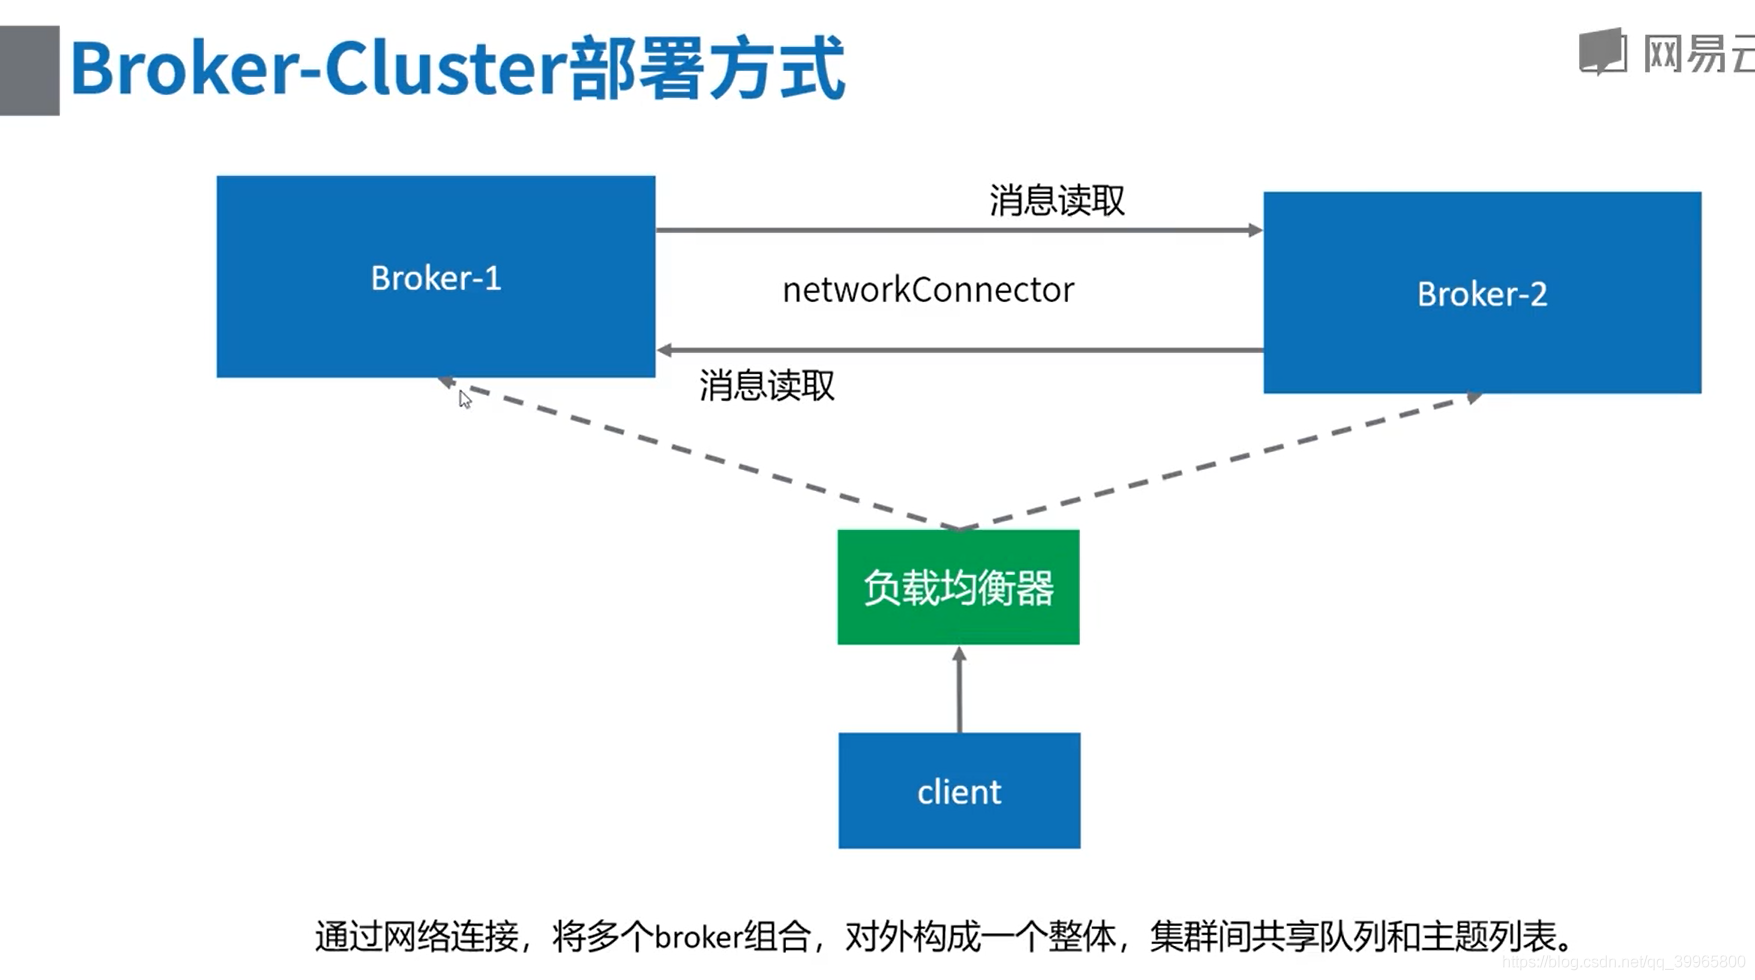
1、ActiveMQ高可用集群方案介绍
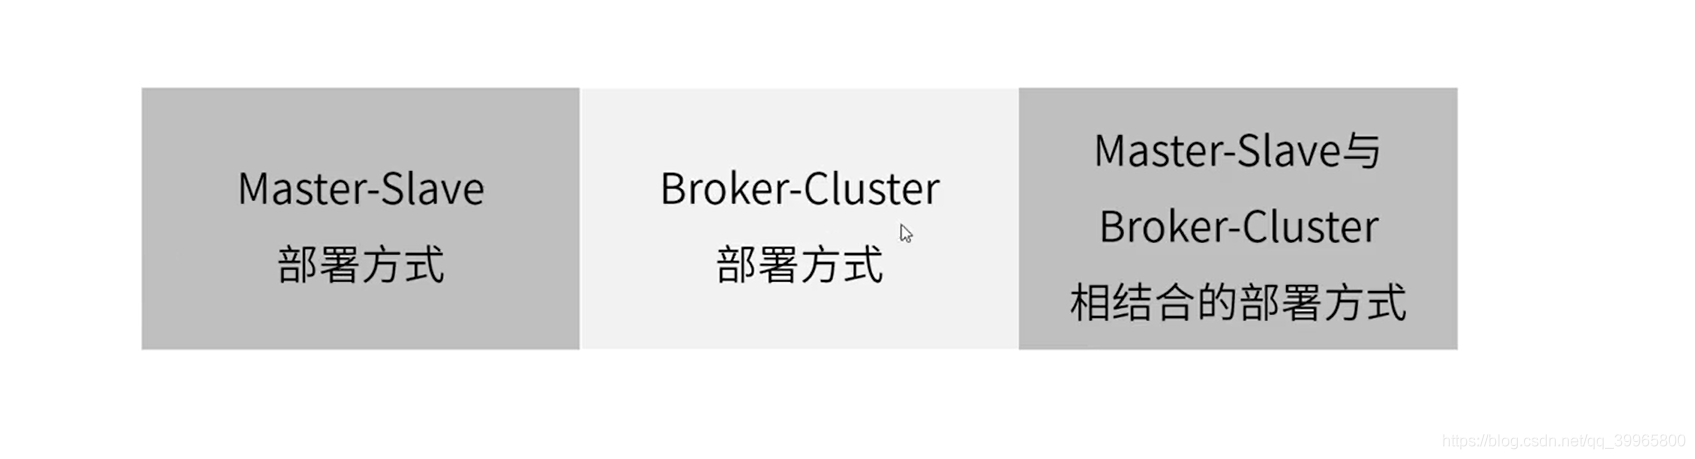
主从部署、多主部署
Master-Slave主从部署
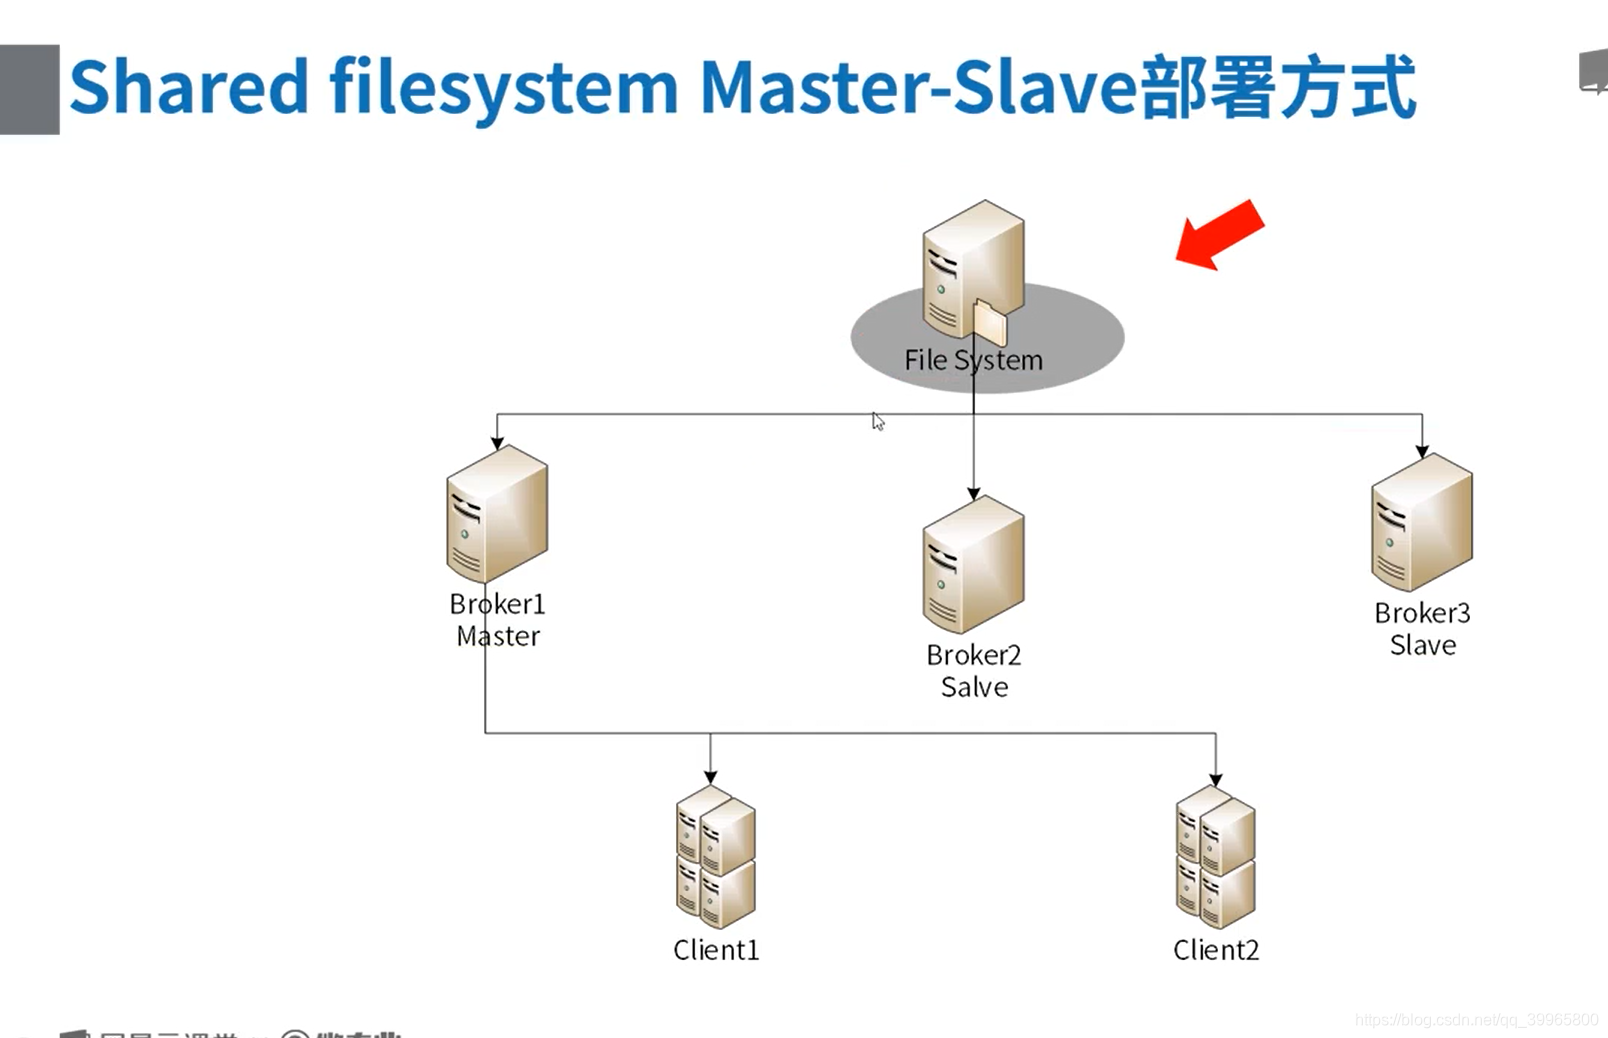
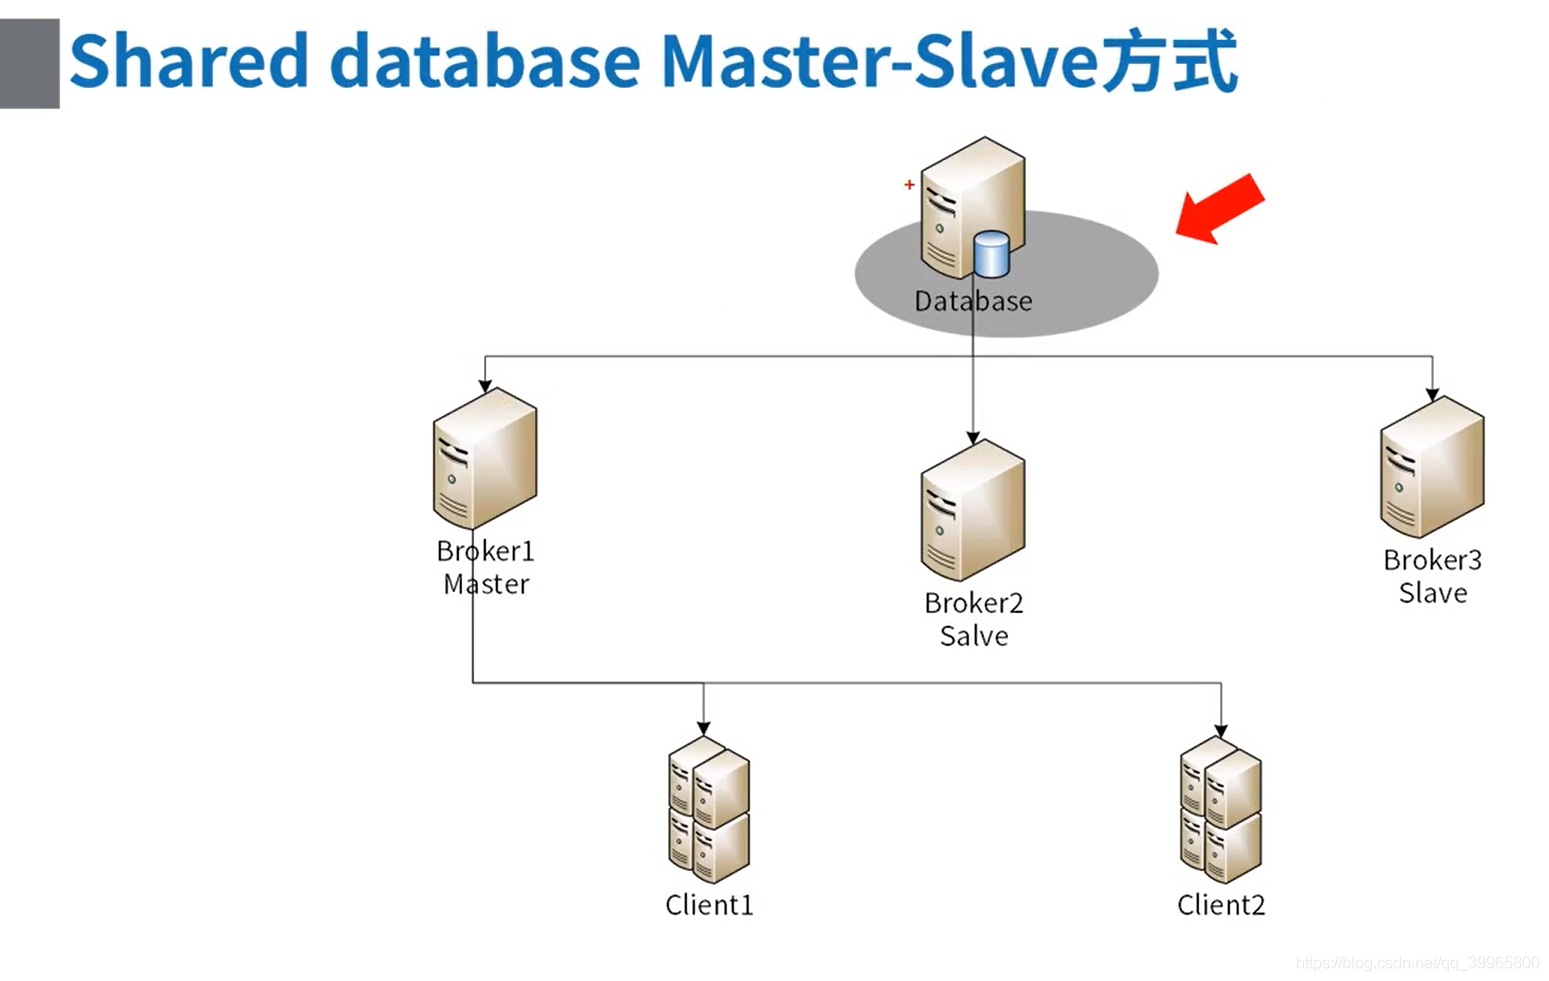
1、数据库集群的方案
配置mysql进行主从部署,以及持久化的操作

多个broker公用一个mysql
只有一个服务器可以修改数据库,会有lock进行锁住
package com.study.mq.b2_clustering;
import org.apache.activemq.ActiveMQConnectionFactory;
import javax.jms.*;
/**
* 简单生产者
*/
public class Producer {
public static void main(String[] args) {
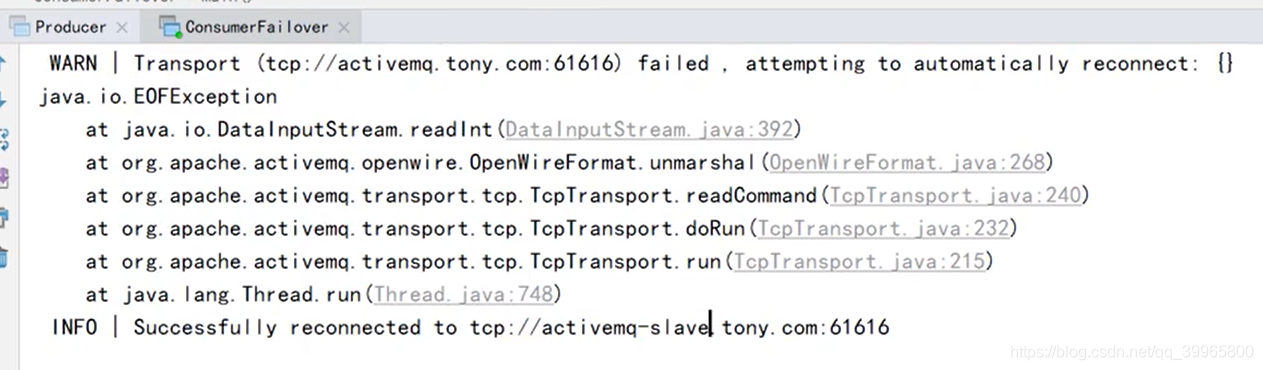
String brokerUrl = "failover:(tcp://activemq.tony.com:61616,tcp://activemq-slave.tony.com:61616)?initialReconnectDelay=100";
new ProducerThread(brokerUrl, "queue1").start();
}
static class ProducerThread extends Thread {
String brokerUrl;
String destinationUrl;
public ProducerThread(String brokerUrl, String destinationUrl) {
this.brokerUrl = brokerUrl;
this.destinationUrl = destinationUrl;
}
@Override
public void run() {
ActiveMQConnectionFactory connectionFactory;
Connection conn;
Session session;
try {
// 1、创建连接工厂
connectionFactory = new ActiveMQConnectionFactory(brokerUrl);
// 2、创建连接对象md
conn = connectionFactory.createConnection();
conn.start();
// 3、创建会话
session = conn.createSession(false, Session.AUTO_ACKNOWLEDGE);
// 4、创建点对点发送的目标
Destination destination = session.createQueue(destinationUrl);
// 5、创建生产者消息
MessageProducer producer = session.createProducer(destination);
// 设置生产者的模式,有两种可选 持久化 / 不持久化
producer.setDeliveryMode(DeliveryMode.PERSISTENT);
// 6、创建一条文本消息
String text = "Hello world!";
TextMessage message = session.createTextMessage(text);
for (int i = 0; i < 1; i++) {
// 7、发送消息
producer.send(message);
}
// 8、 关闭连接
session.close();
conn.close();
} catch (JMSException e) {
e.printStackTrace();
}
}
}
}
package com.study.mq.b2_clustering;

import org.apache.activemq.ActiveMQConnectionFactory;

import javax.jms.*;

// http://activemq.apache.org/failover-transport-reference.html
public class ConsumerFailover {
    public static void main(String[] args) throws InterruptedException {
        // 非failover的公共参数配置通过nested.*,例如 failover:(...)?nested.wireFormat.maxInactivityDuration=1000
        // ?randomize=false 随机选择,默认是顺序
        // 指定优先切换 failover:(tcp://host1:61616,tcp://host2:61616,tcp://host3:61616)?priorityBackup=true&priorityURIs=tcp://local1:61616,tcp://local2:61616
        // maxReconnectDelay重连的最大间隔时间(毫秒)
        String brokerUrl = "failover:(tcp://activemq.tony.com:61616,tcp://activemq-slave.tony.com:61616)?initialReconnectDelay=100";
        ConsumerThread queue1 = new ConsumerThread(brokerUrl, "queue1");
        queue1.start();
        queue1.join();
    }
}

class ConsumerThread extends Thread {

    String brokerUrl;
    String destinationUrl;

    public ConsumerThread(String brokerUrl, String destinationUrl) {
        this.brokerUrl = brokerUrl;
        this.destinationUrl = destinationUrl;
    }

    @Override
    public void run() {
        ActiveMQConnectionFactory connectionFactory;
        Connection conn;
        Session session;
        MessageConsumer consumer;

        try {
            // brokerURL http://activemq.apache.org/connection-configuration-uri.html
            // 1、创建连接工厂
            connectionFactory = new ActiveMQConnectionFactory(this.brokerUrl);
            // 2、创建连接对象
            conn = connectionFactory.createConnection();
            conn.start(); // 一定要启动
            // 3、创建会话(可以创建一个或者多个session)
            session = conn.createSession(false, Session.AUTO_ACKNOWLEDGE);
            // 4、创建点对点接收的目标,queue - 点对点
            Destination destination = session.createQueue(destinationUrl);

            // 5、创建消费者消息 http://activemq.apache.org/destination-options.html
            consumer = session.createConsumer(destination);

            // 6、接收消息
            consumer.setMessageListener(message -> {
                try {
                    if (message instanceof TextMessage) {
                        System.out.println("收到文本消息:" + ((TextMessage) message).getText());
                    } else {
                        System.out.println(message);
                    }
                } catch (JMSException e) {
                    e.printStackTrace();
                }
            });
        } catch (JMSException e) {
            e.printStackTrace();
        }
    }
}
挂掉其中一个服务器,还是可以正常使用的,不支持负载均衡
非failover的公共参数配置通过nested.*,例如 failover:(...)?nested.wireFormat.maxInactivityDuration=1000
?randomize=false 随机选择,默认是顺序
指定优先切换 failover:(tcp://host1:61616,tcp://host2:61616,tcp://host3:61616)?priorityBackup=true&priorityURIs=tcp://local1:61616,tcp://local2:61616
maxReconnectDelay重连的最大间隔时间(毫秒)
http://activemq.apache.org/failover-transport-reference.html

数据库层面进行副本复制
2、内置消费者
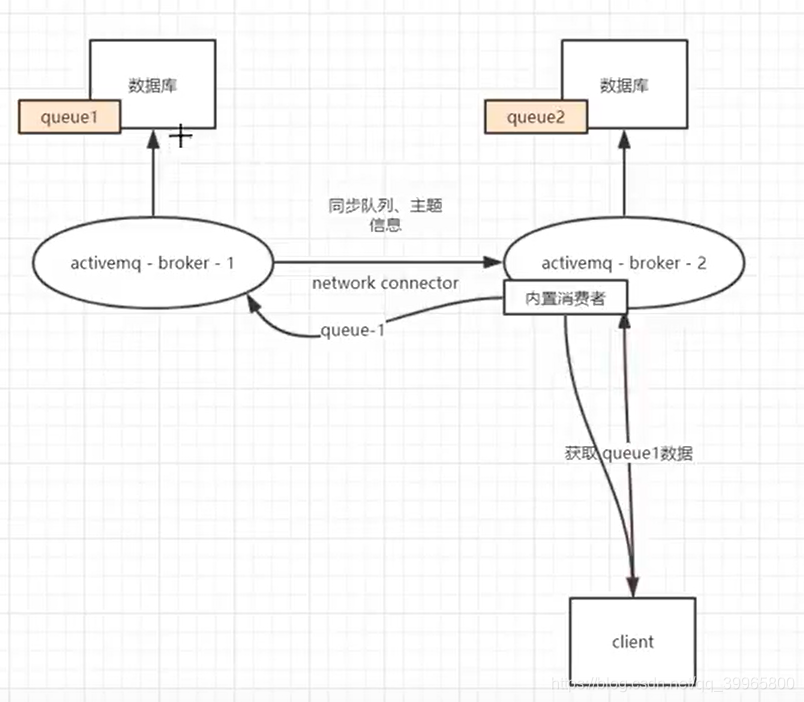
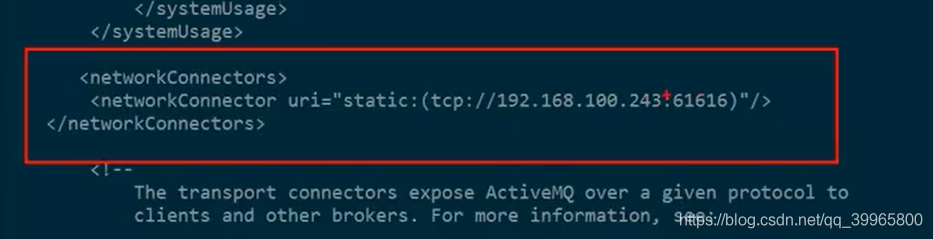
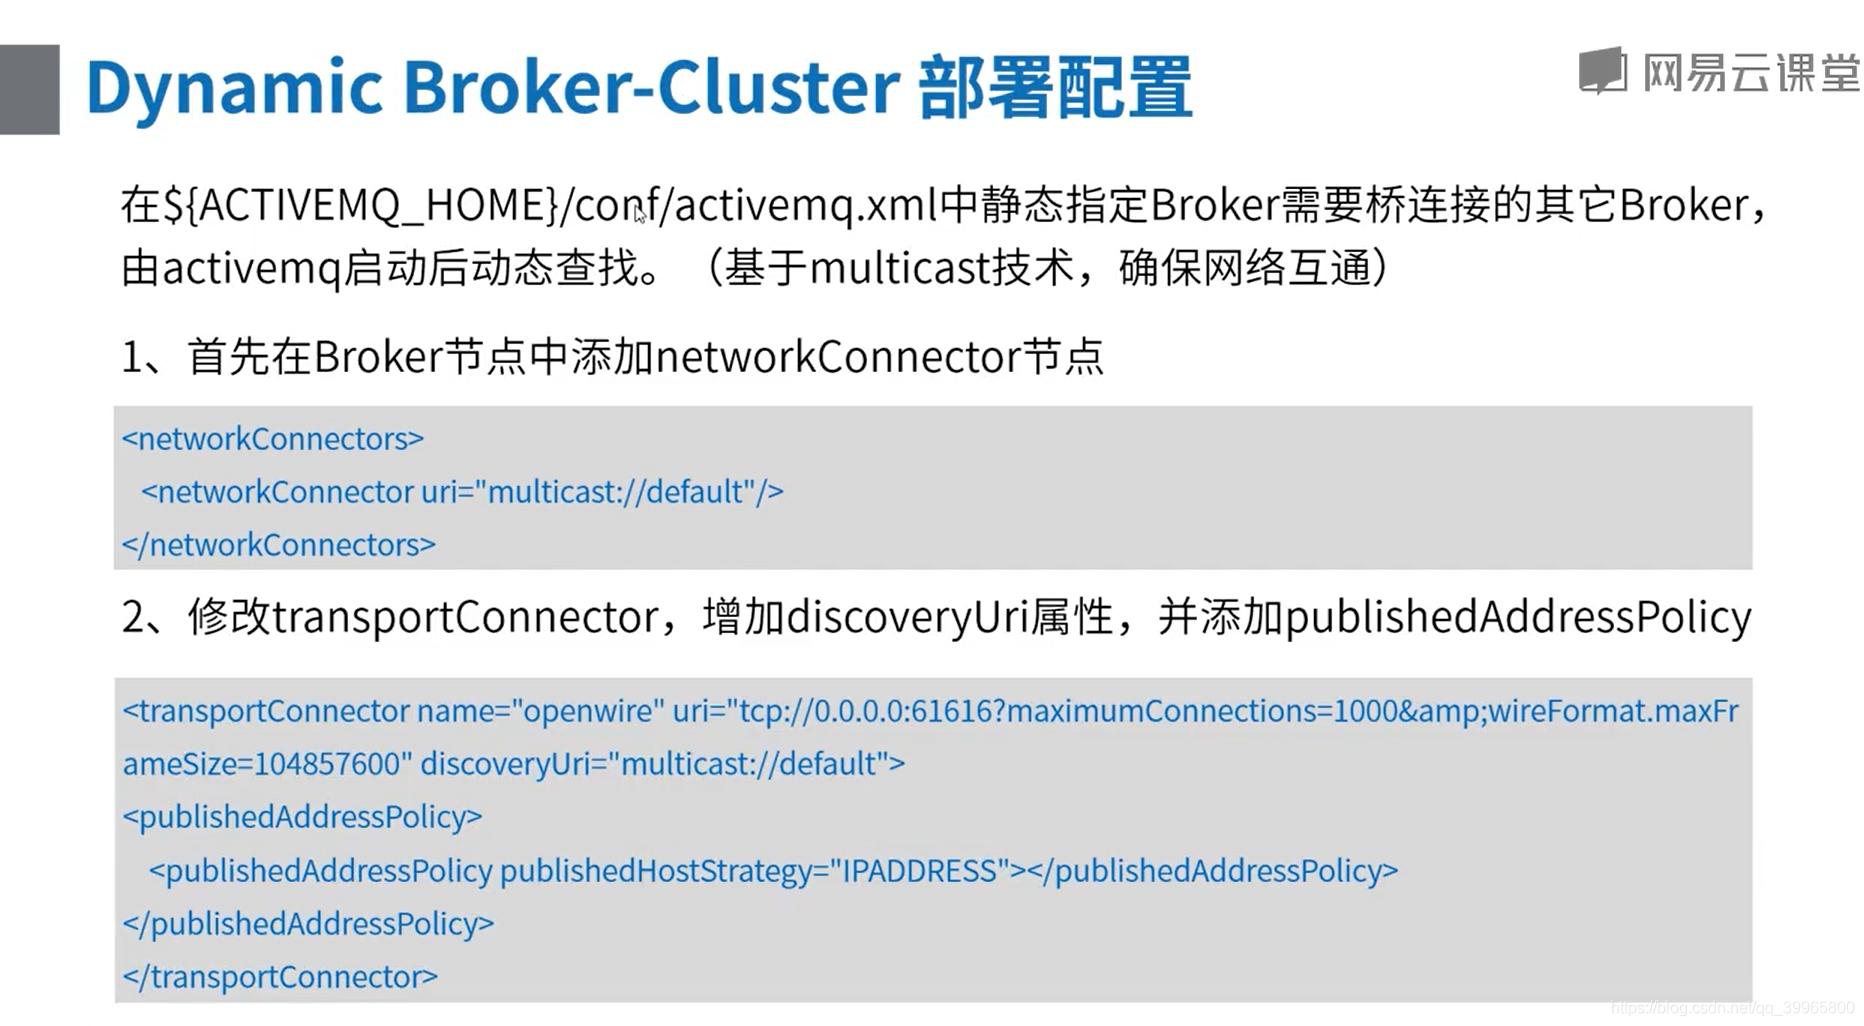
服务器242启动后需要连接243组成 网络集群
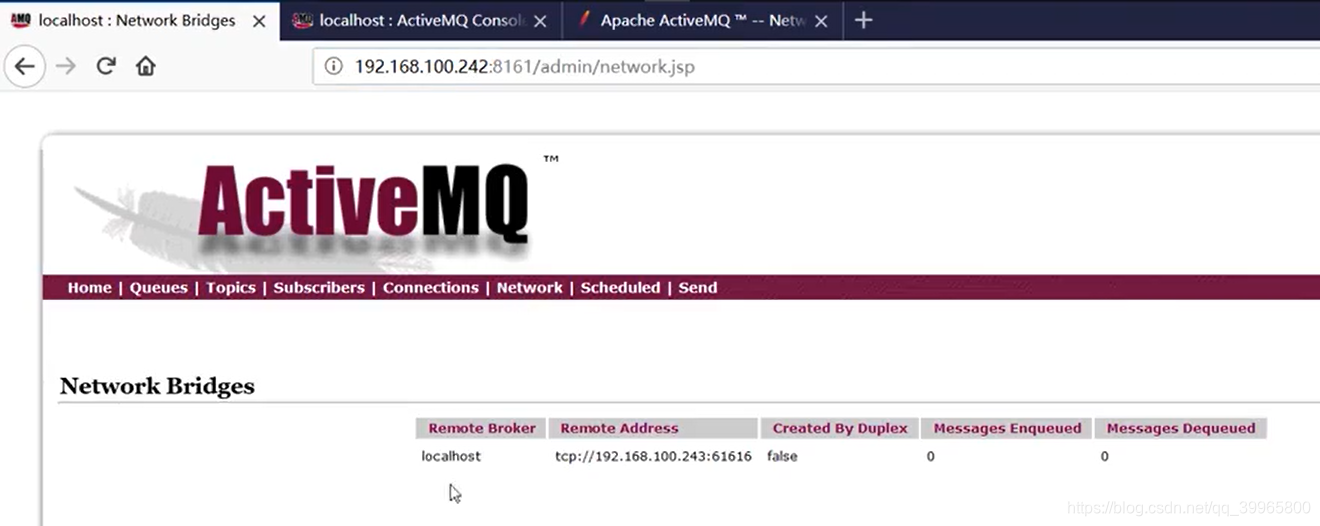
也可以使用网络组播的方式,动态定义
package com.study.mq.b2_clustering.network_connector;

import org.apache.activemq.ActiveMQConnectionFactory;

import javax.jms.*;

// http://activemq.apache.org/networks-of-brokers.html
public class ConsumerNetowork {
    public static void main(String[] args) throws InterruptedException {
        // 消费者用192.168,100.242
        String brokerUrl = "failover:(tcp://192.168.100.242:61616)?initialReconnectDelay=100";
        ConsumerThread queue1 = new ConsumerThread(brokerUrl, "queue1");
        queue1.start();
        queue1.join();
    }
}

class ConsumerThread extends Thread {

    String brokerUrl;
    String destinationUrl;

    public ConsumerThread(String brokerUrl, String destinationUrl) {
        this.brokerUrl = brokerUrl;
        this.destinationUrl = destinationUrl;
    }

    @Override
    public void run() {
        ActiveMQConnectionFactory connectionFactory;
        Connection conn;
        Session session;
        MessageConsumer consumer;

        try {
            // brokerURL http://activemq.apache.org/connection-configuration-uri.html
            // 1、创建连接工厂
            connectionFactory = new ActiveMQConnectionFactory(this.brokerUrl);
            // 2、创建连接对象
            conn = connectionFactory.createConnection();
            conn.start(); // 一定要启动
            // 3、创建会话(可以创建一个或者多个session)
            session = conn.createSession(false, Session.AUTO_ACKNOWLEDGE);
            // 4、创建点对点接收的目标,queue - 点对点
            Destination destination = session.createQueue(destinationUrl);

            // 5、创建消费者消息 http://activemq.apache.org/destination-options.html
            consumer = session.createConsumer(destination);

            // 6、接收消息
            consumer.setMessageListener(message -> {
                try {
                    if (message instanceof TextMessage) {
                        System.out.println("收到文本消息:" + ((TextMessage) message).getText());
                    } else {
                        System.out.println(message);
                    }
                } catch (JMSException e) {
                    e.printStackTrace();
                }
            });
        } catch (JMSException e) {
            e.printStackTrace();
        }
    }
}
package com.study.mq.b2_clustering.network_connector;

import org.apache.activemq.ActiveMQConnectionFactory;

import javax.jms.*;

/**
 * 简单生产者
 */
public class Producer {
    public static void main(String[] args) {
        // 生产者用192.168,100.243
        String brokerUrl = "failover:(tcp://192.168.100.243:61616)?initialReconnectDelay=100";
        new ProducerThread(brokerUrl, "queue1").start();
    }

    static class ProducerThread extends Thread {
        String brokerUrl;
        String destinationUrl;

        public ProducerThread(String brokerUrl, String destinationUrl) {
            this.brokerUrl = brokerUrl;
            this.destinationUrl = destinationUrl;
        }

        @Override
        public void run() {
            ActiveMQConnectionFactory connectionFactory;
            Connection conn;
            Session session;

            try {
                // 1、创建连接工厂
                connectionFactory = new ActiveMQConnectionFactory(brokerUrl);
                // 2、创建连接对象md
                conn = connectionFactory.createConnection();
                conn.start();
                // 3、创建会话
                session = conn.createSession(false, Session.AUTO_ACKNOWLEDGE);
                // 4、创建点对点发送的目标
                 Destination destination = session.createQueue(destinationUrl);
                // 5、创建生产者消息
                MessageProducer producer = session.createProducer(destination);
                // 设置生产者的模式,有两种可选 持久化 / 不持久化
                producer.setDeliveryMode(DeliveryMode.PERSISTENT);
                // 6、创建一条文本消息
                String text = "Hello world!";
                TextMessage message = session.createTextMessage(text);
                for (int i = 0; i < 1; i++) {
                    // 7、发送消息
                    producer.send(message);
                }
                // 8、 关闭连接
                session.close();
                conn.close();
            } catch (JMSException e) {
                e.printStackTrace();
            }
        }
    }
}
消费者和生产者连接不同的服务器,但是能互通数据,构成网络集群
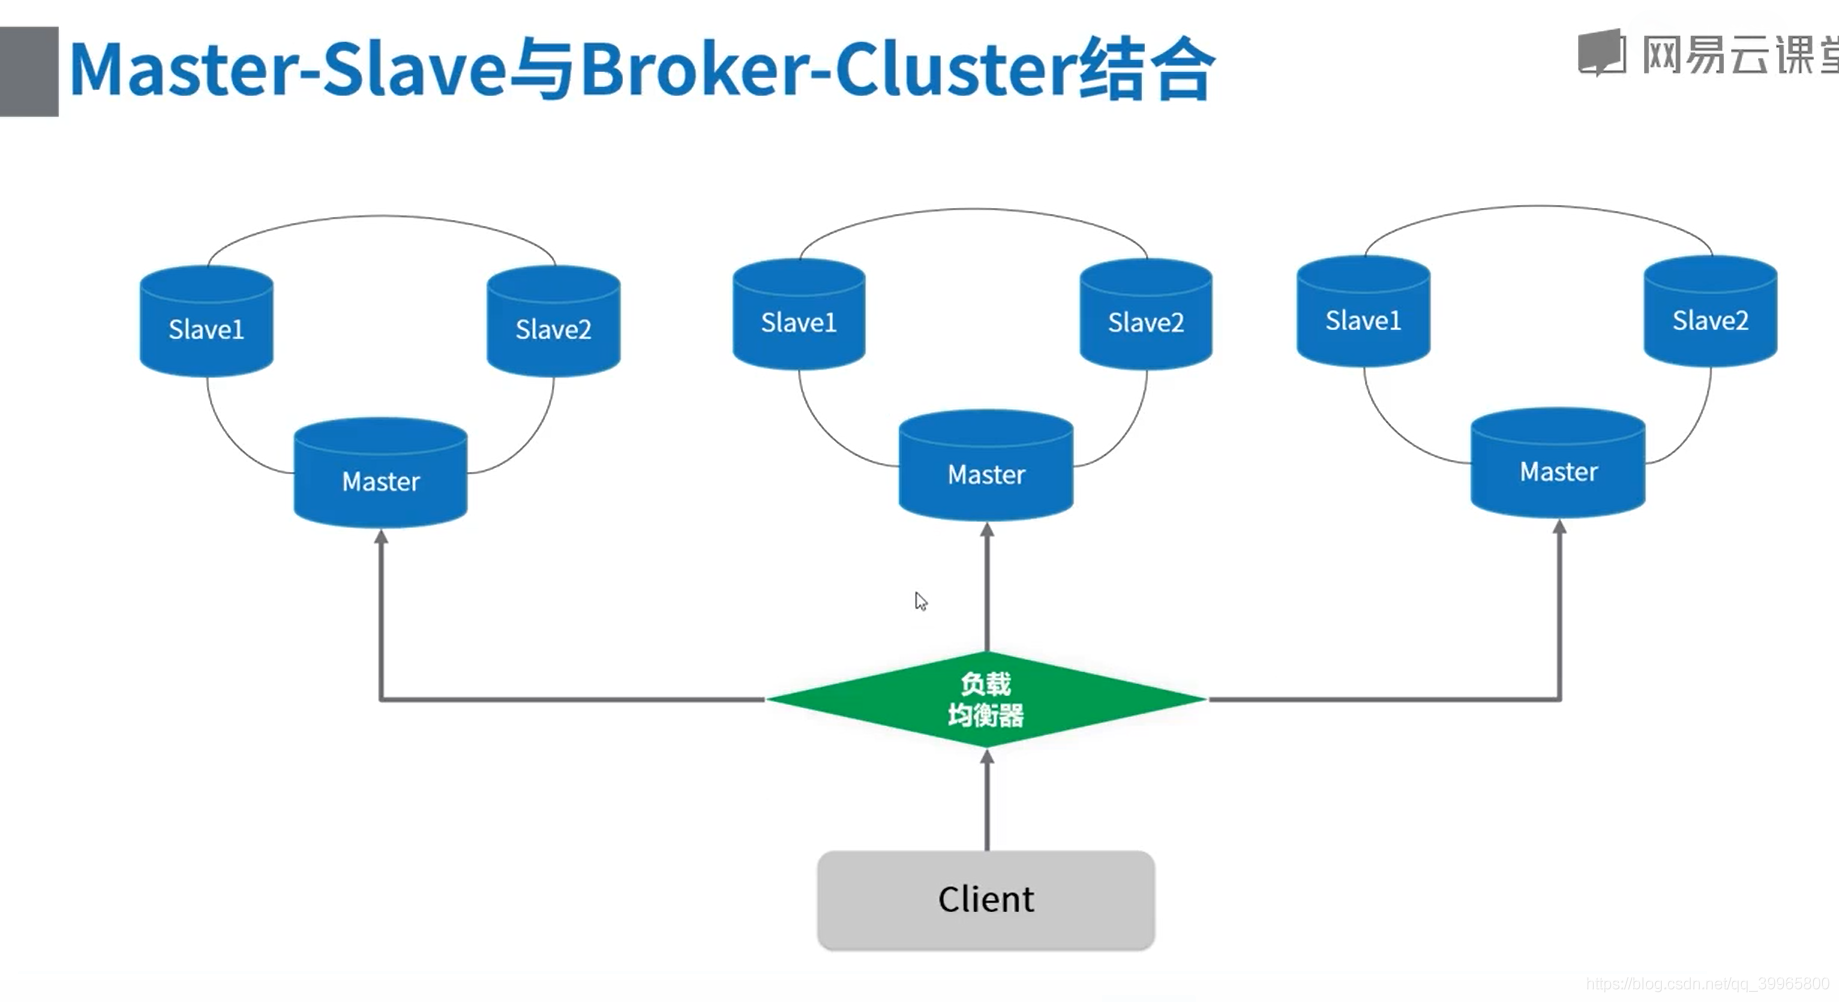
3、组合实现
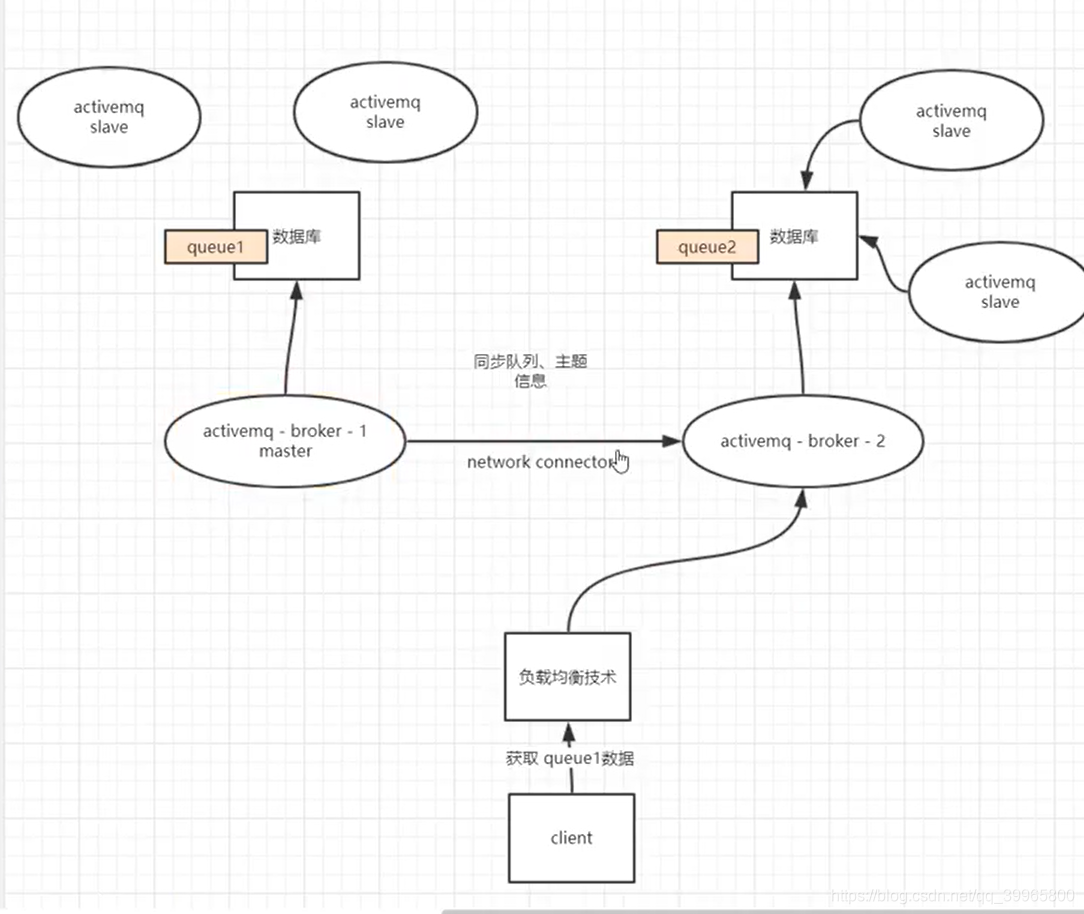
能负载均衡也能高可用
当出现宕机的情况,master连接挂了,继续连接slave中
使用集群

挂载负载均衡器
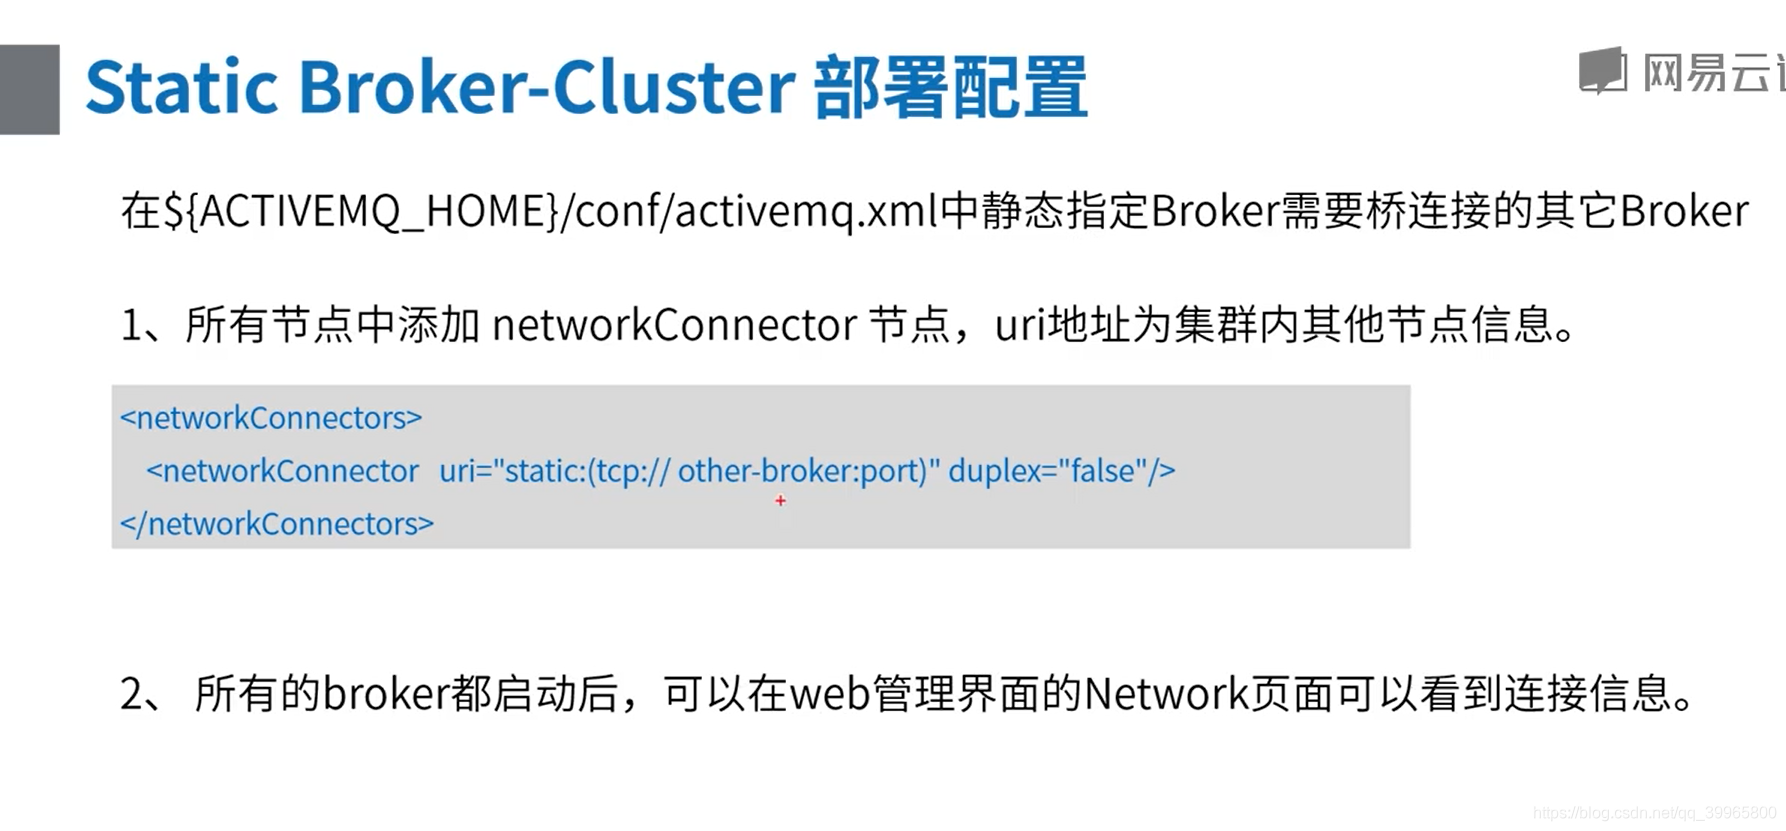

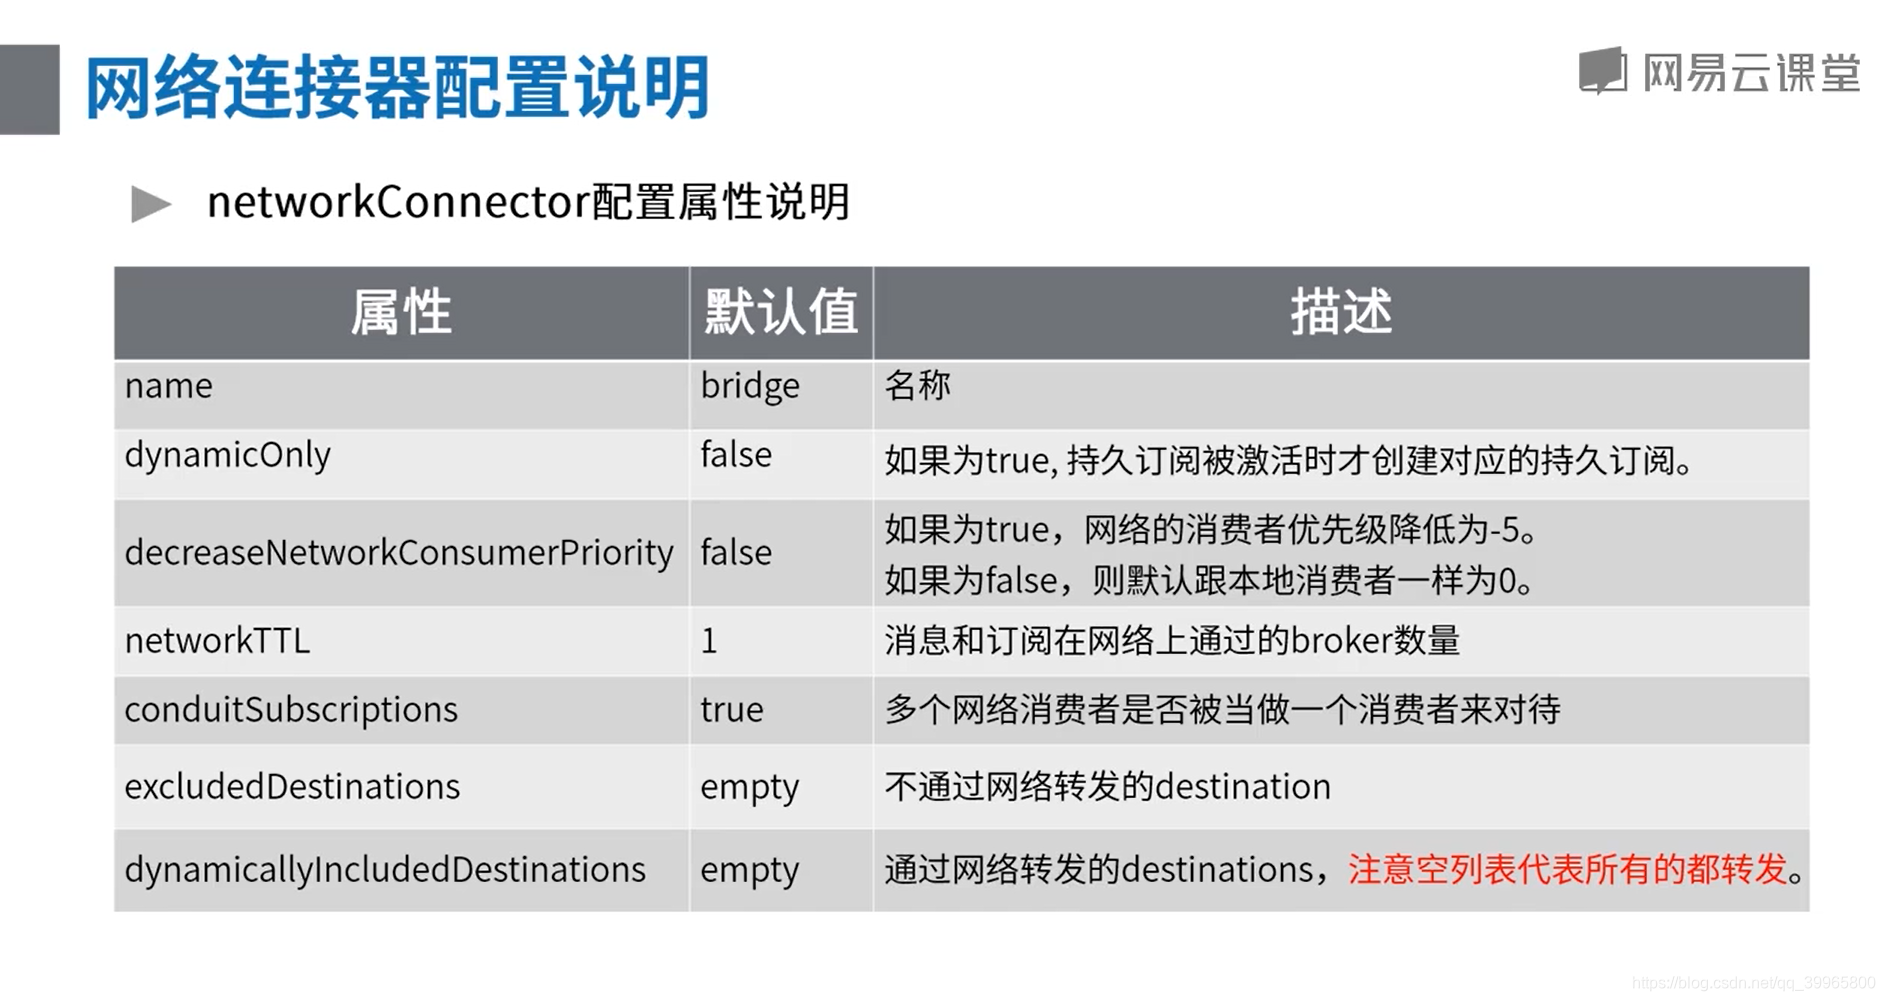
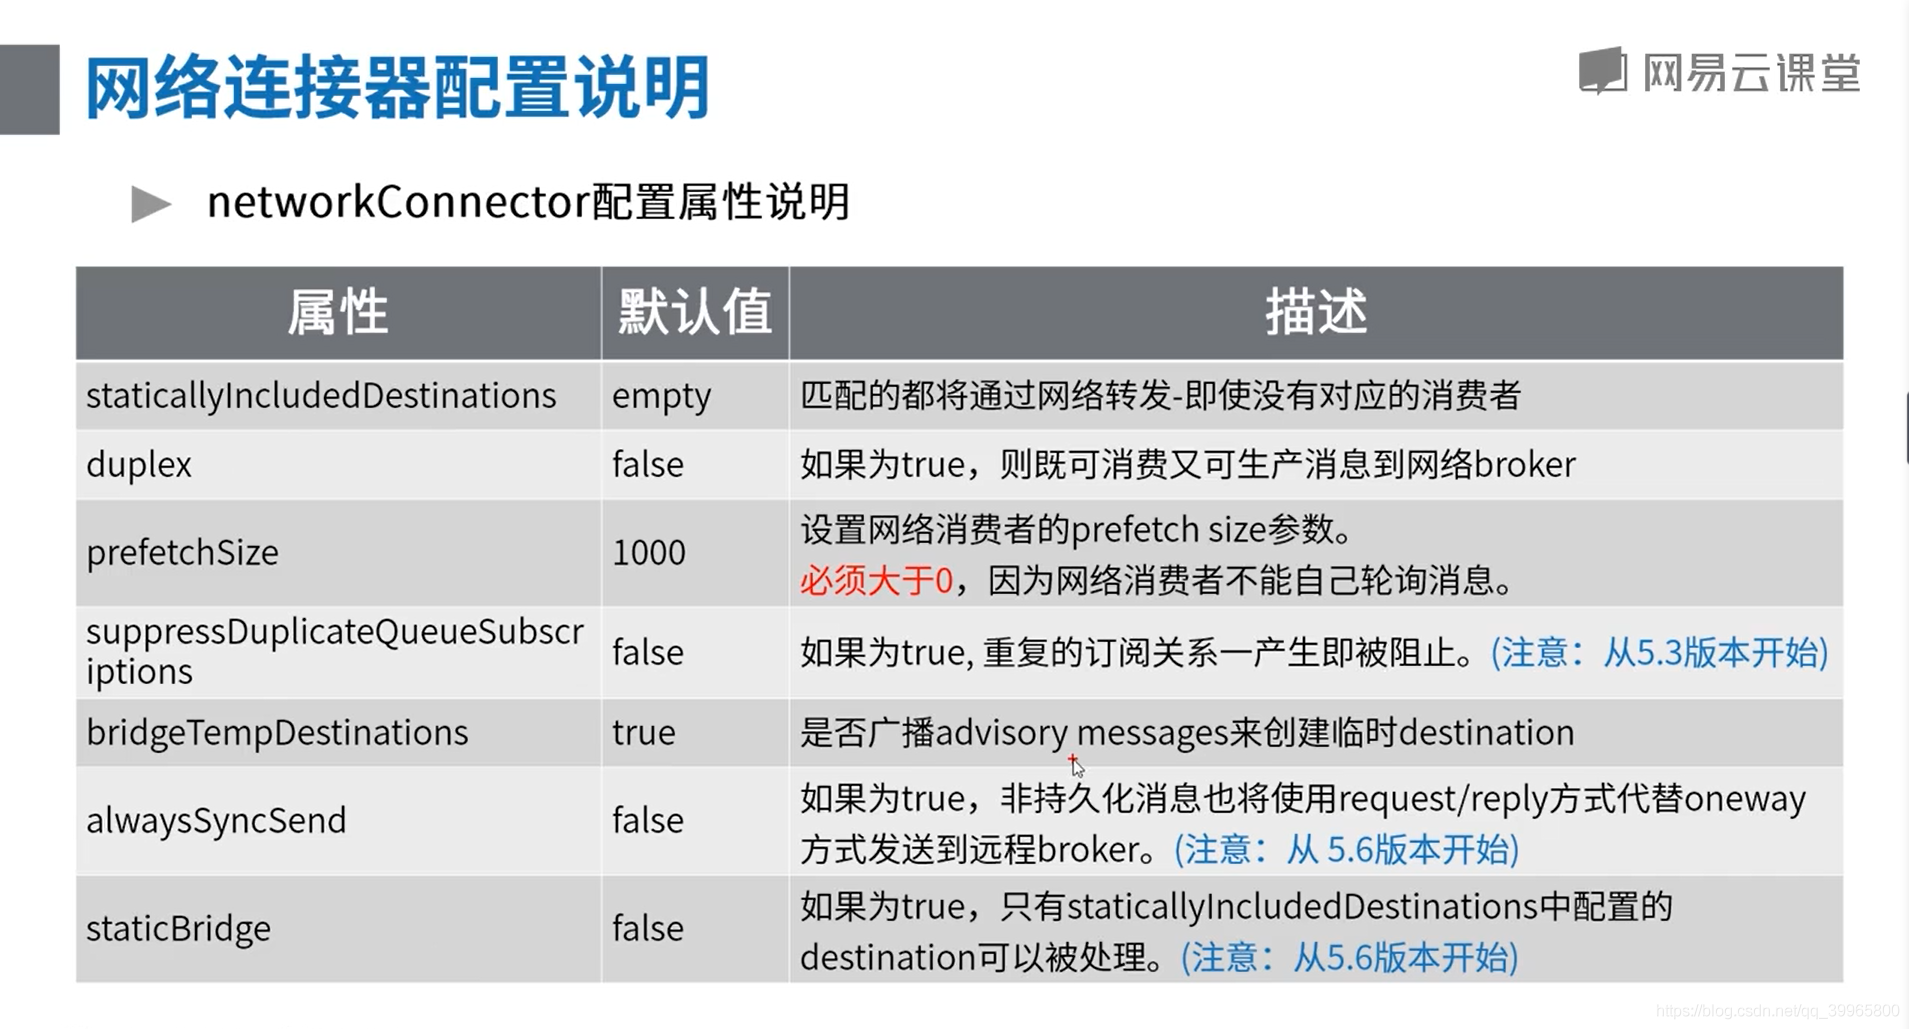
网络连接器配置说明
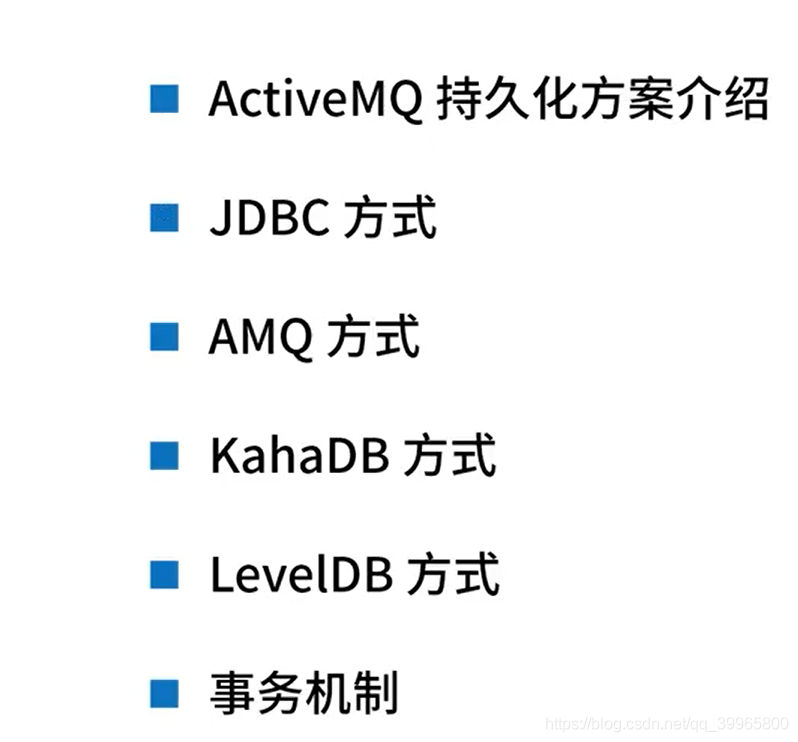
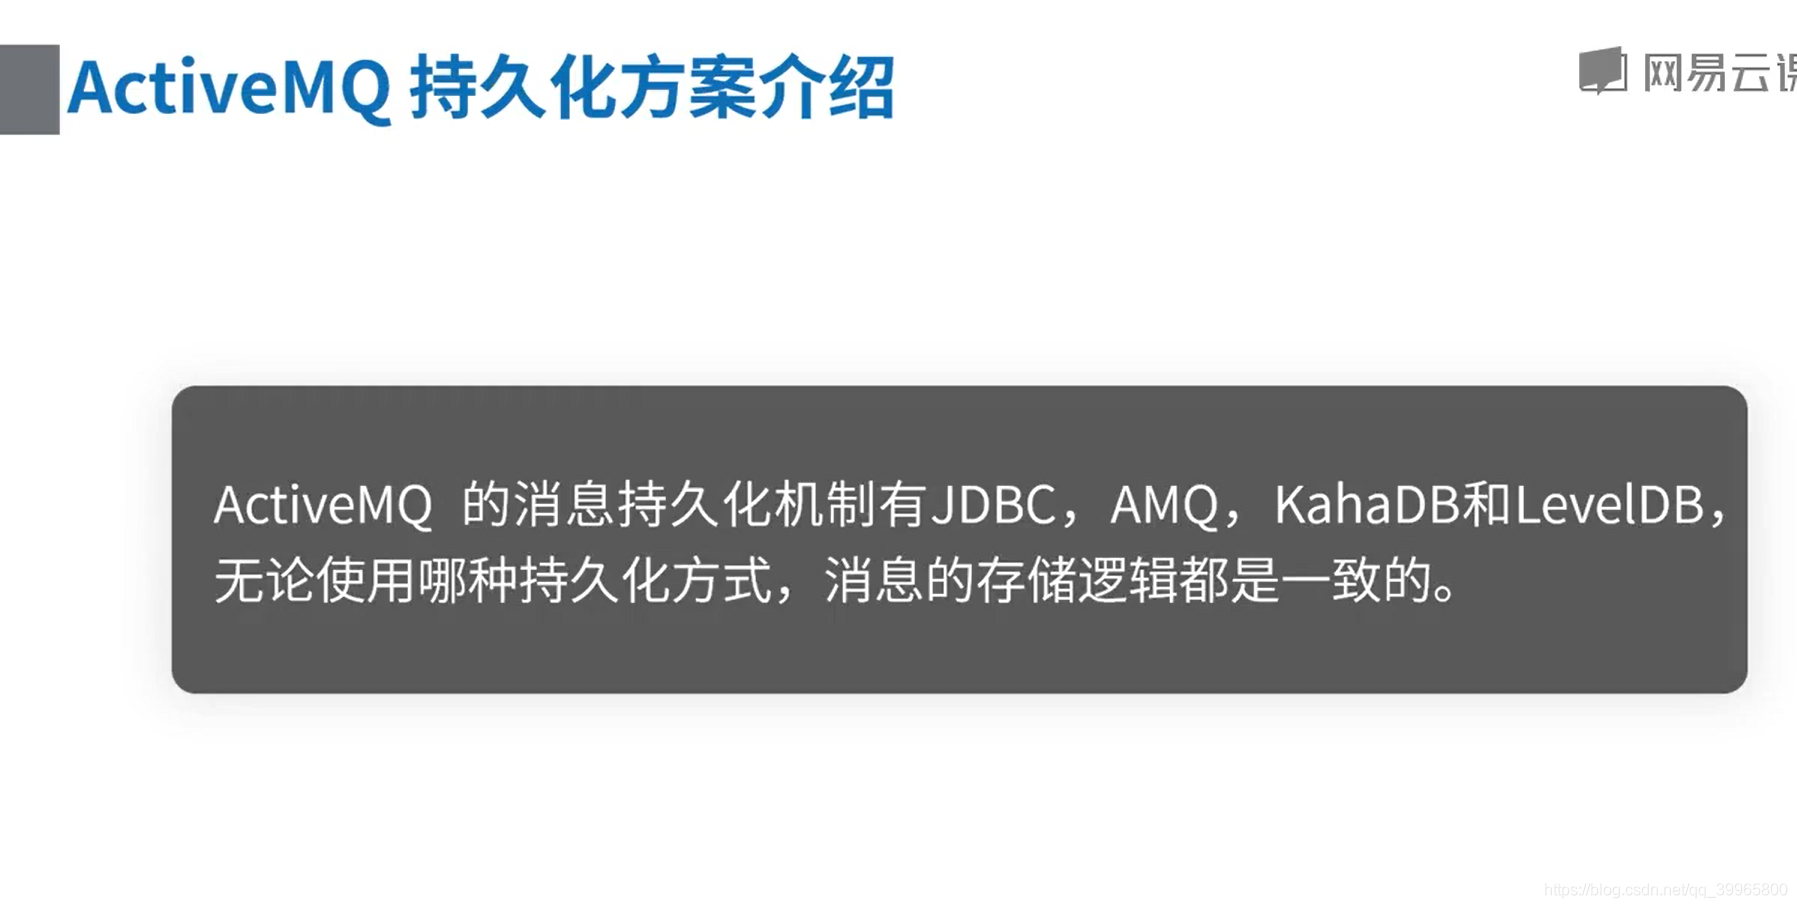
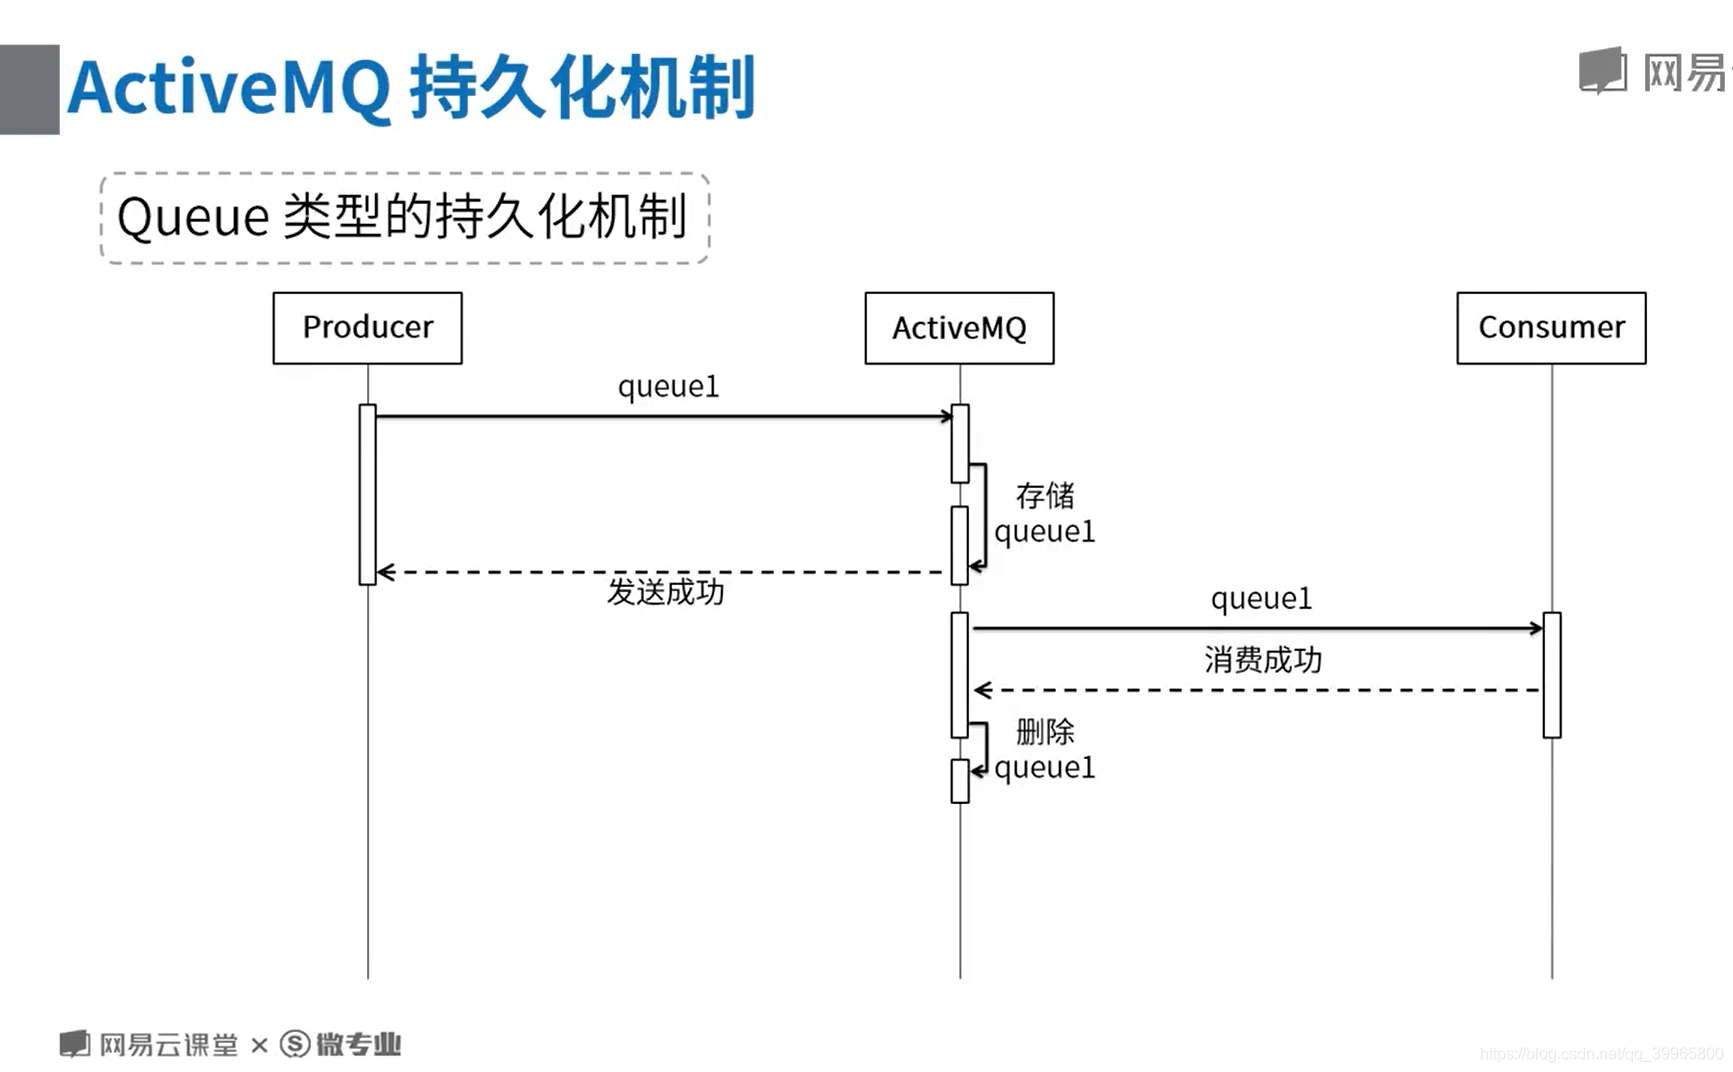
ActiveMQ 持久化原理以及事务机制
定期清除,会记录处理的进度

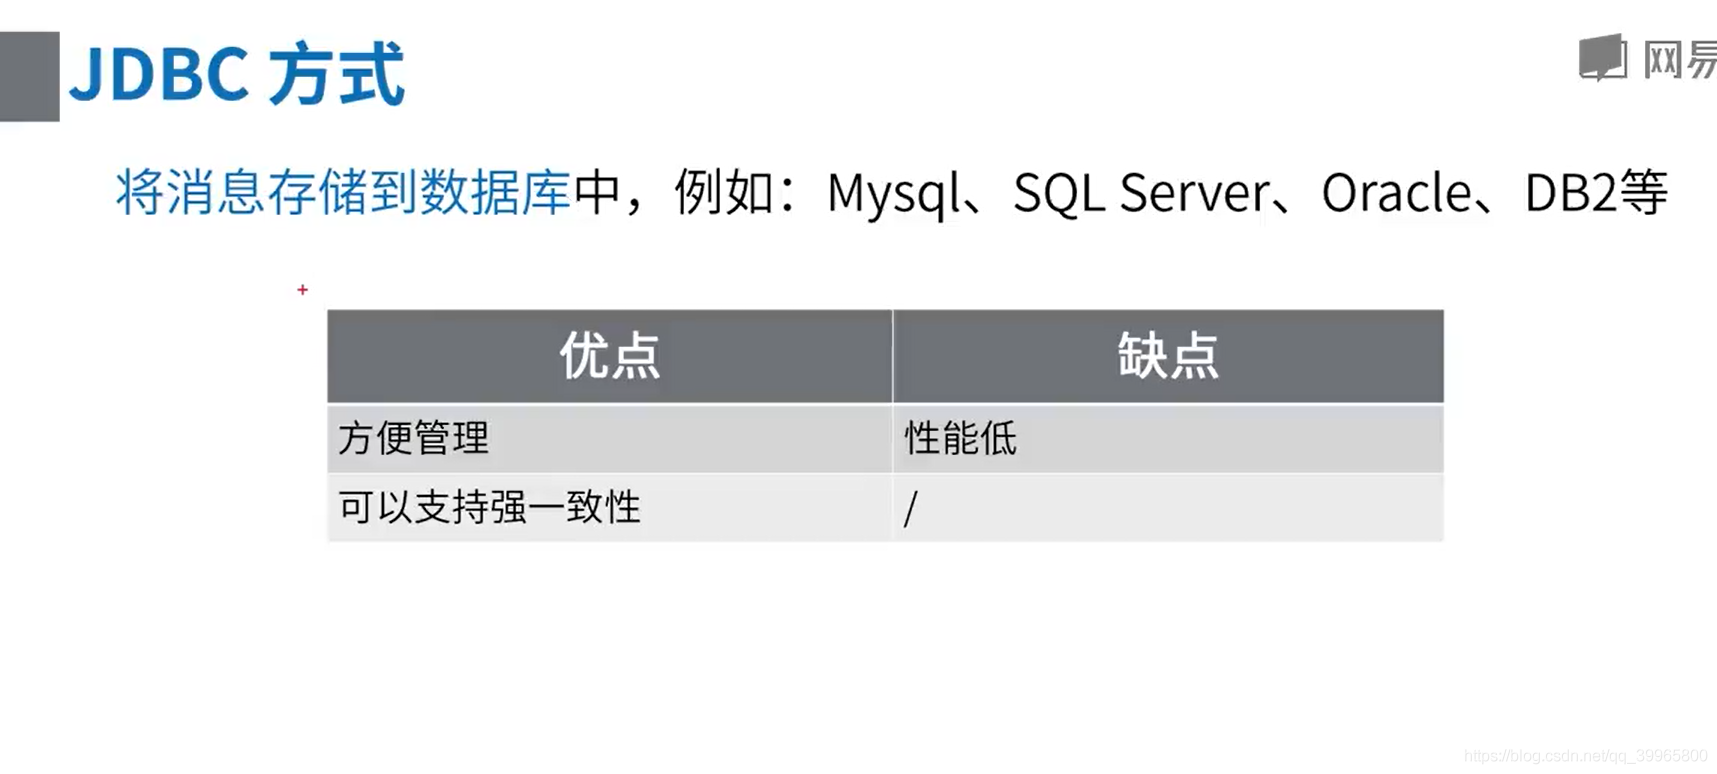
很笨的方法,用的是数据库的特性
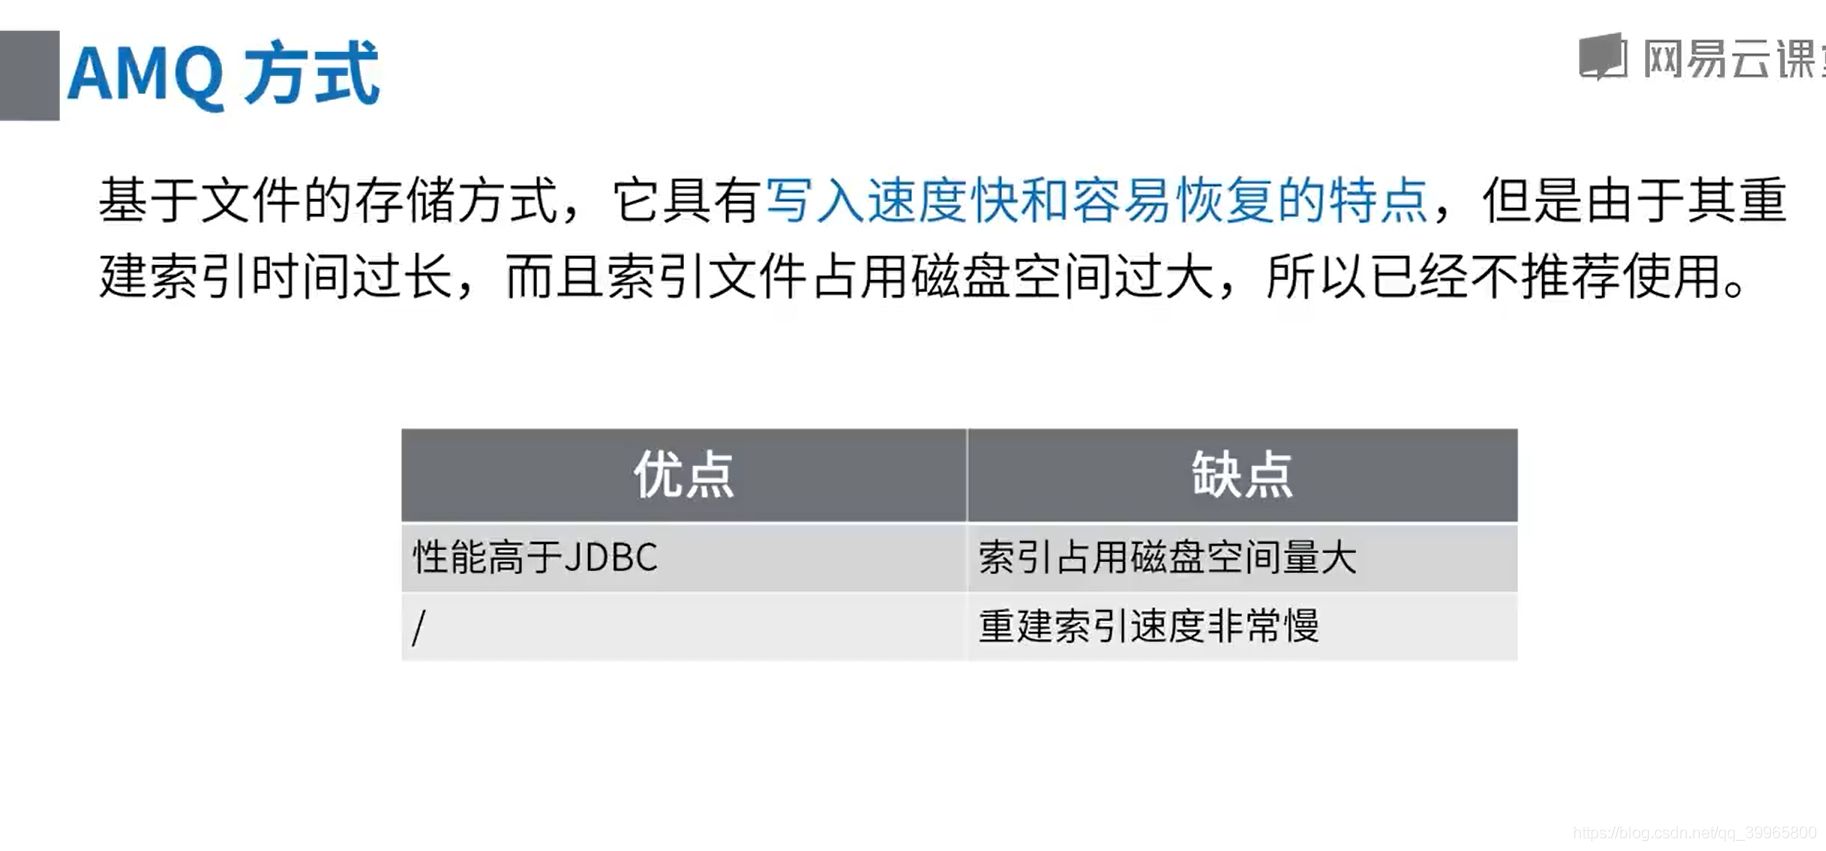
建立索引太麻烦了
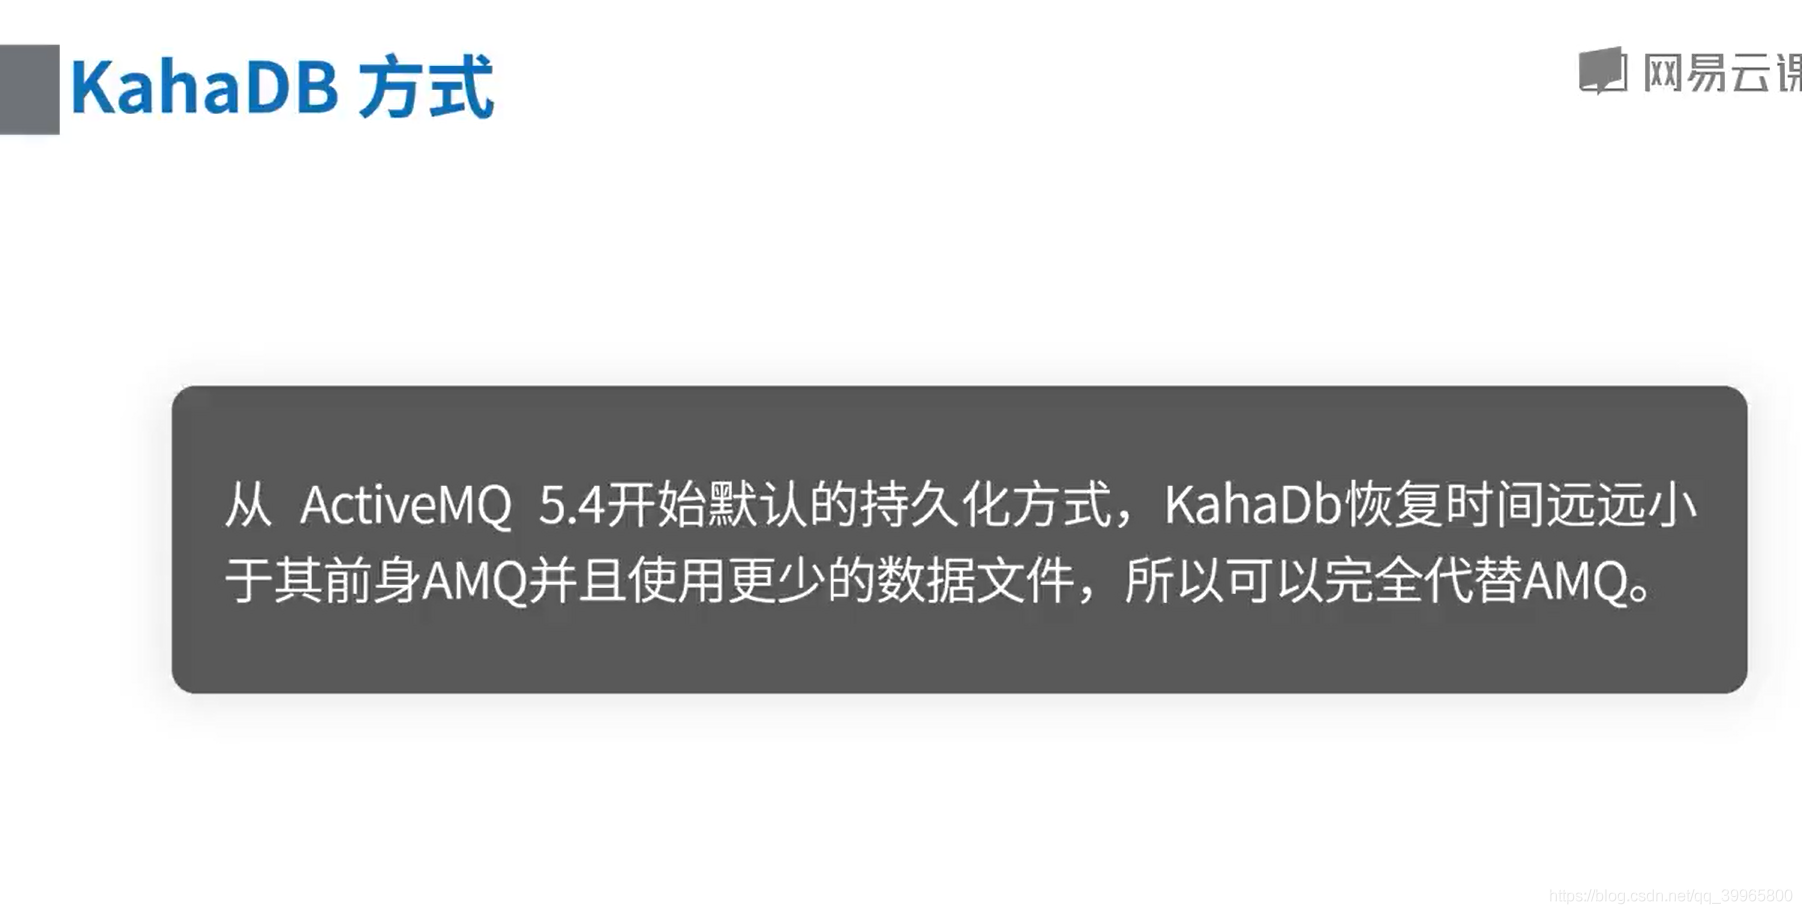
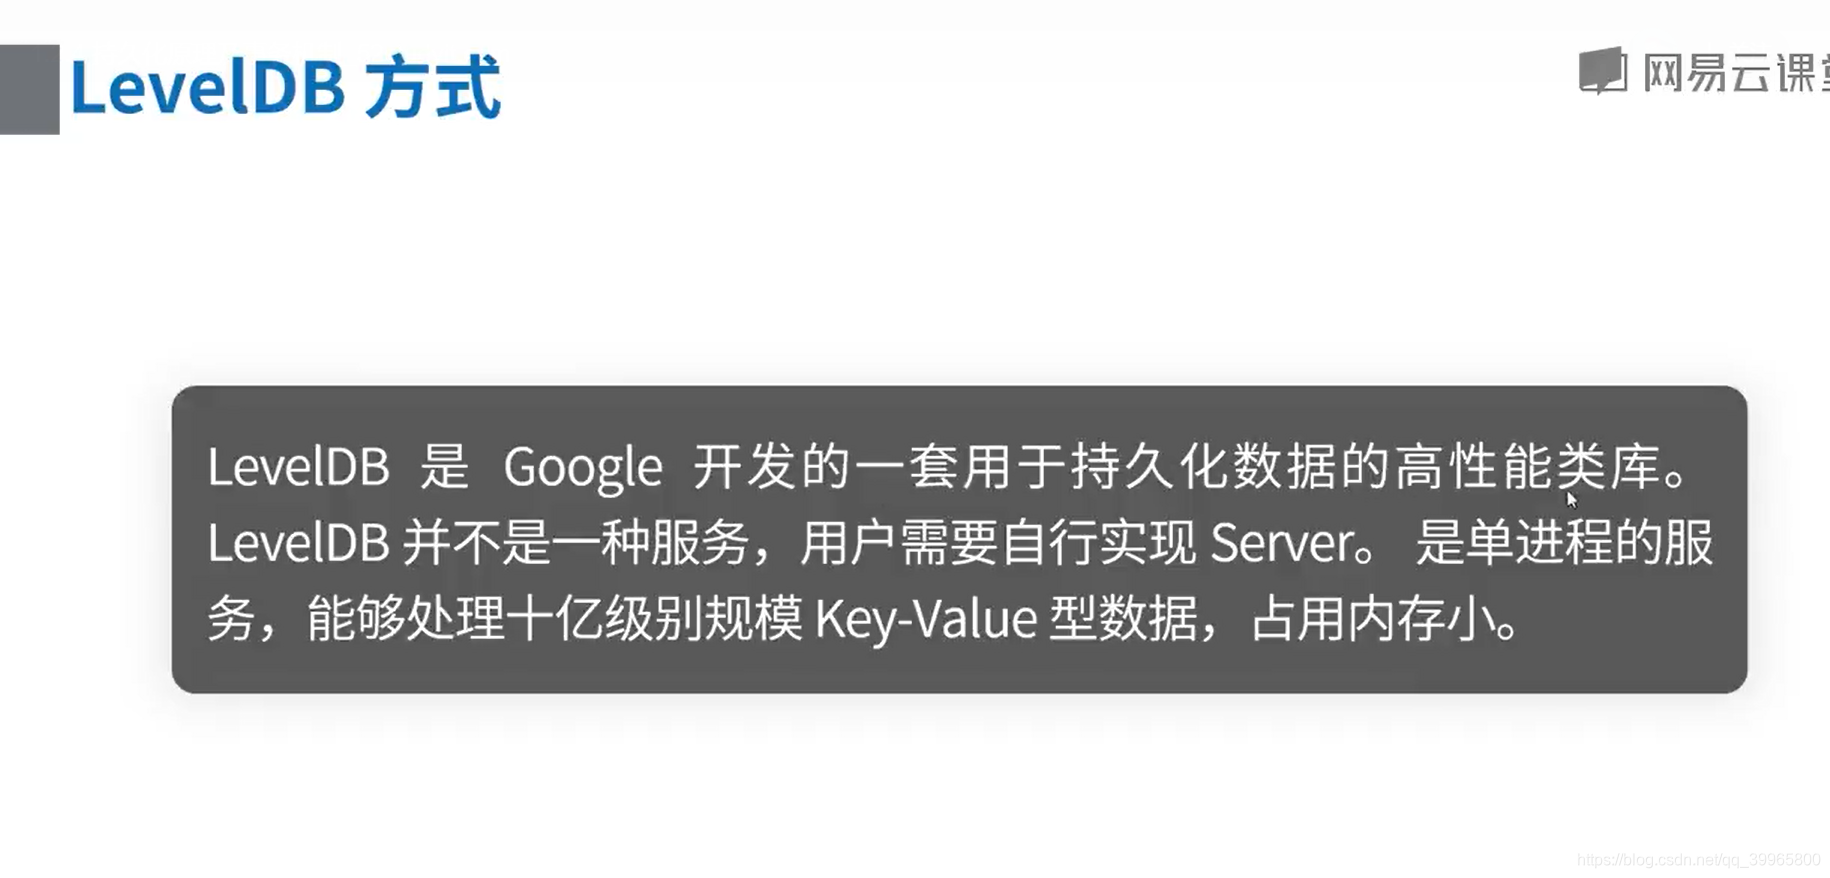
KahaDB是一个基于文件支持事务的消息存储器,是一个可靠,高性能,可扩展的消息存储器。
KahaDB的持久化机制同样是基于日志文件,索引和缓存。
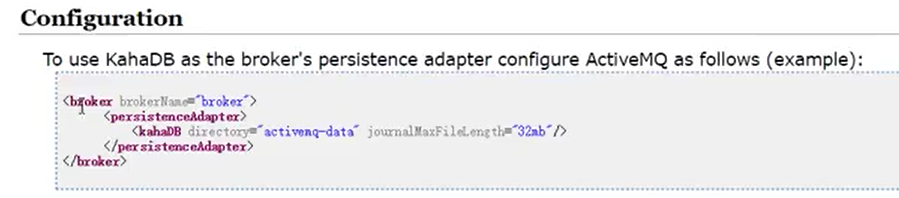

一个data文件只能存储32mb


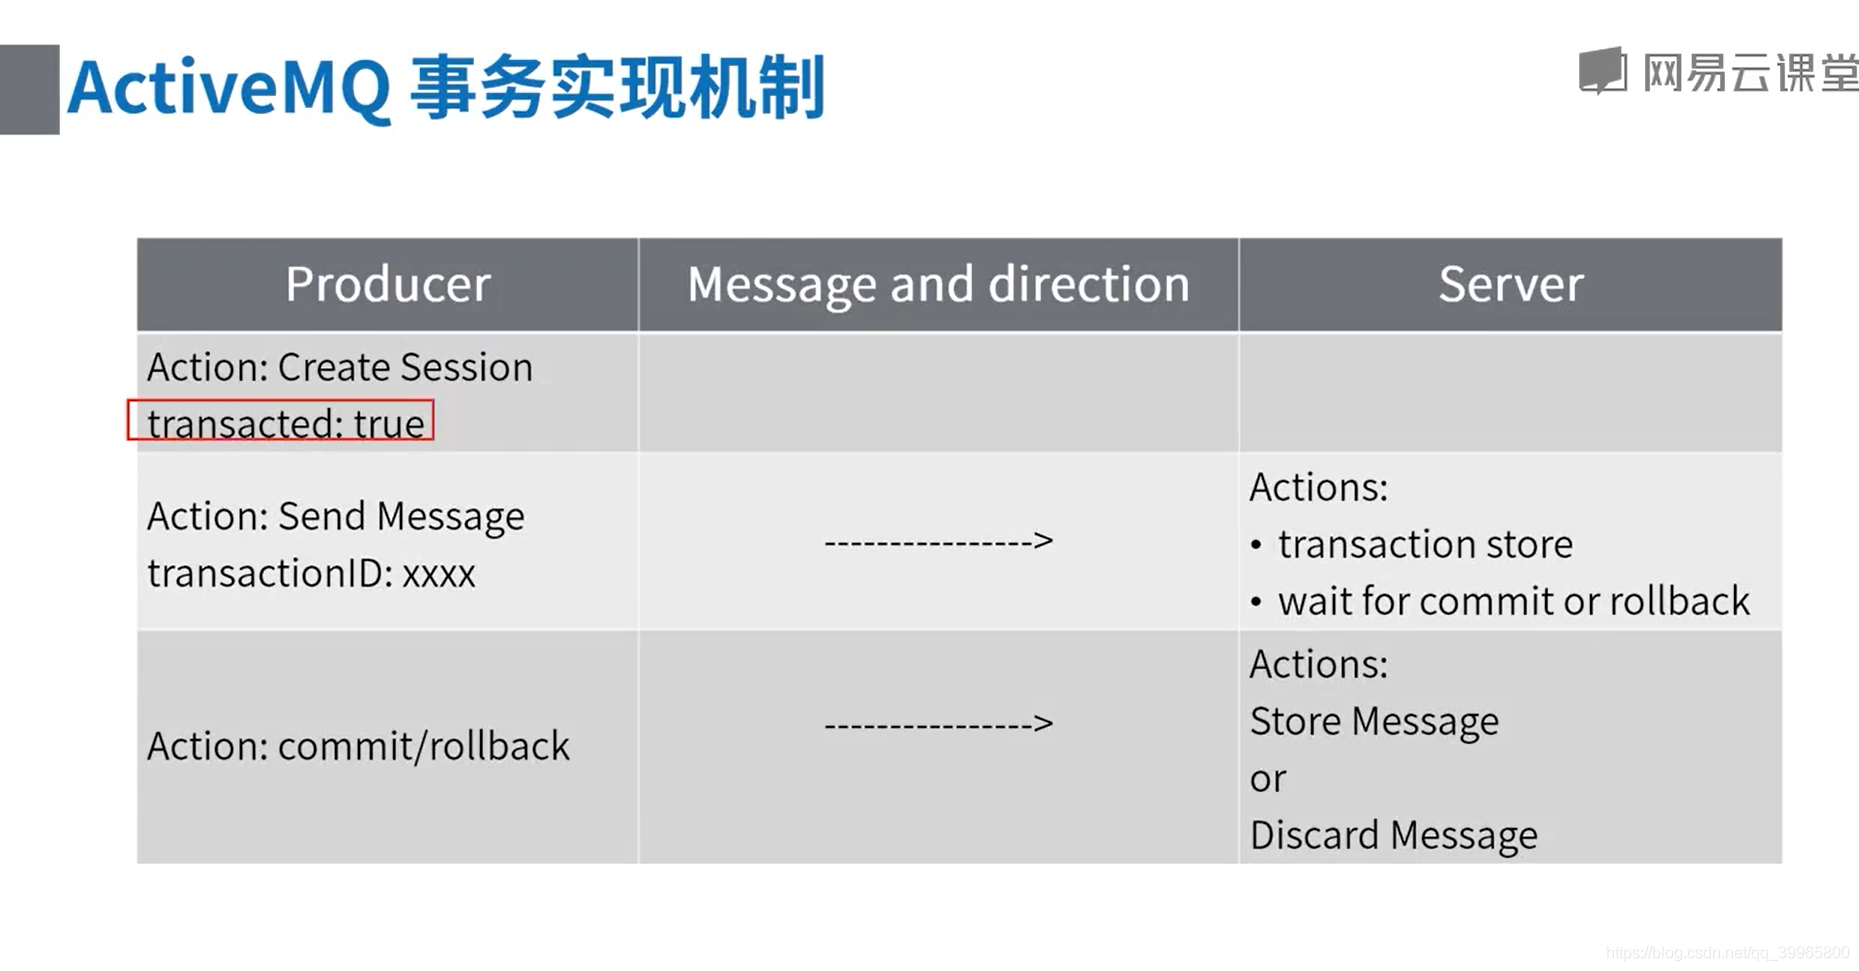
事务机制
package com.study.mq.b7_transaction;
import org.apache.activemq.ActiveMQConnectionFactory;
import javax.jms.*;
import java.io.IOException;
/**
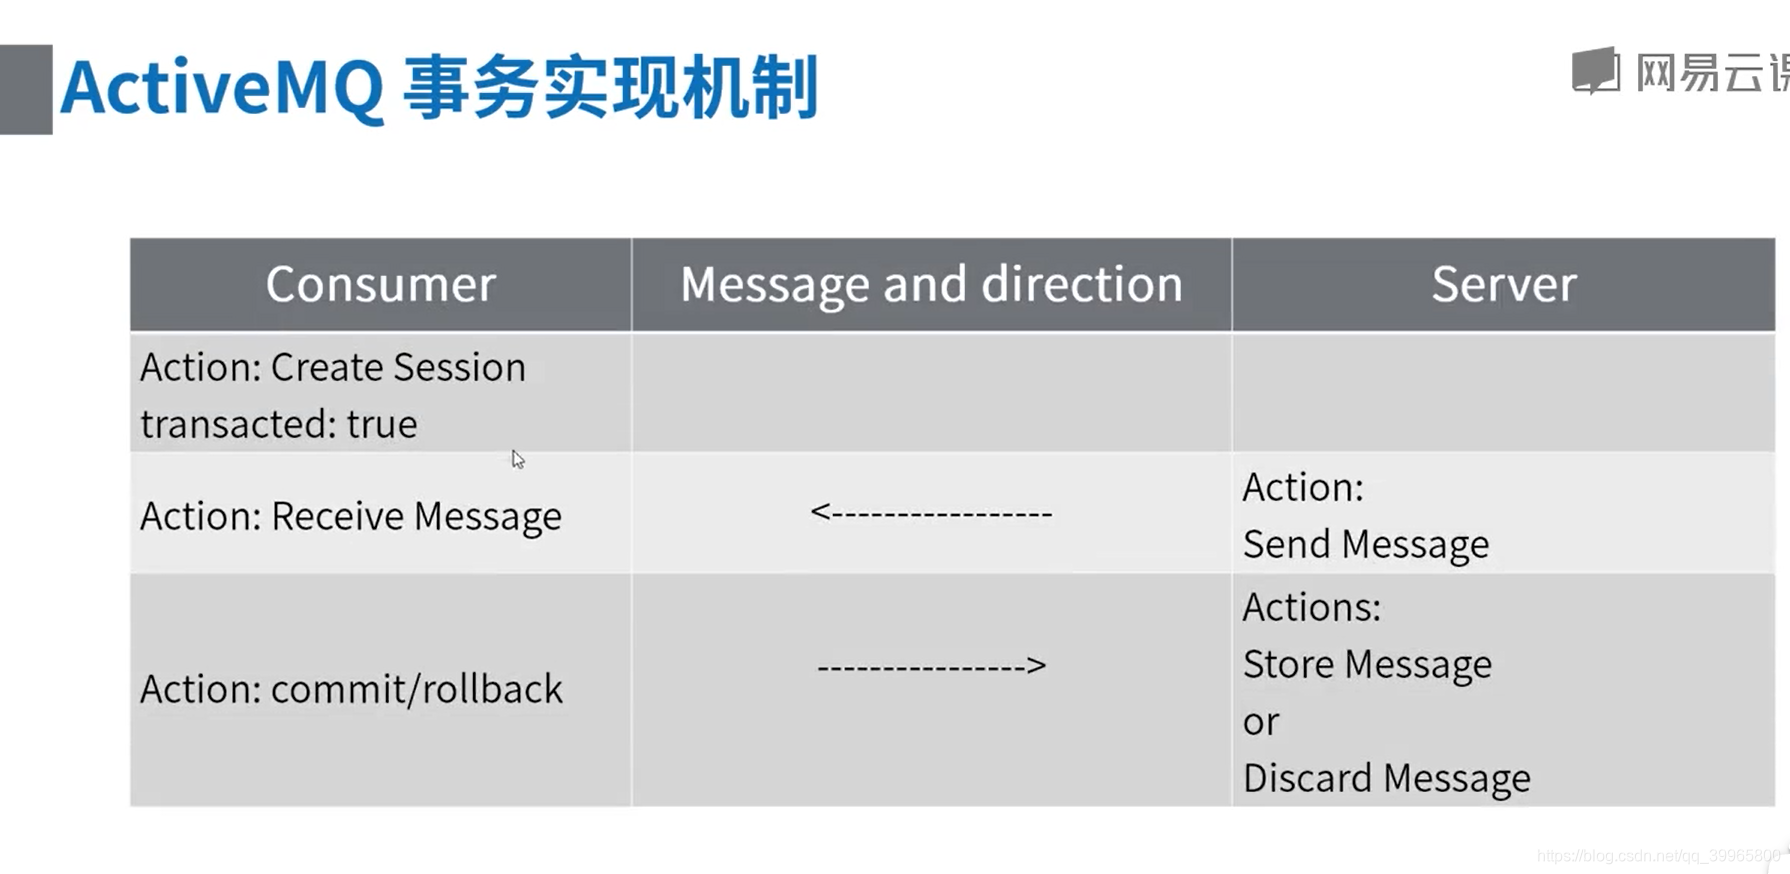
* 消费者事务
*
* 消费者开启事务后,接收到消息后,需要手动提交事务,否则broker上的消息不会真正被消费
*/
// http://activemq.apache.org/destination-options.html
public class Consumer {
public static void main(String[] args) {
ActiveMQConnectionFactory connectionFactory = null;
Connection conn = null;
Session session = null;
MessageConsumer consumer = null;
try {
// brokerURL http://activemq.apache.org/connection-configuration-uri.html
// 1、创建连接工厂
connectionFactory = new ActiveMQConnectionFactory("tcp://192.168.100.242:61616");
// 2、创建连接对象
conn = connectionFactory.createConnection("admin", "admin");
conn.start();
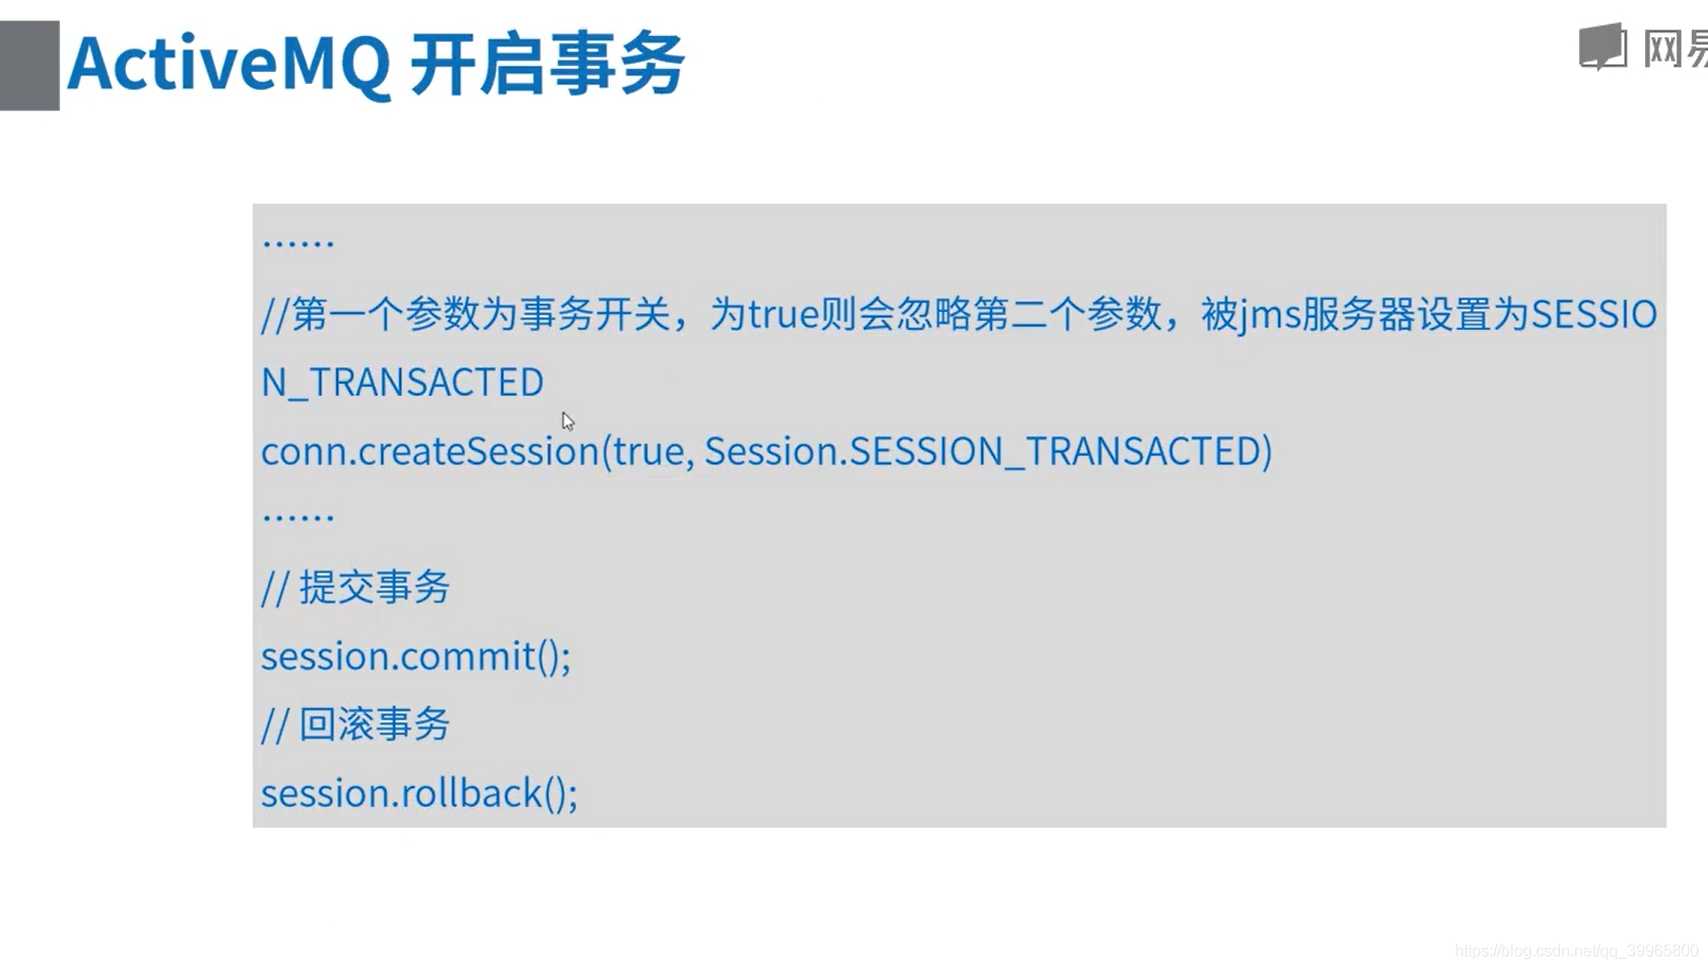
// 3、创建会话
// 第一个参数:是否支持事务,如果为true,则会忽略第二个参数,被jms服务器设置为SESSION_TRANSACTED
// 第一个参数为false时,第二个参数的值可为Session.AUTO_ACKNOWLEDGE,Session.CLIENT_ACKNOWLEDGE,DUPS_OK_ACKNOWLEDGE其中一个。
// Session.AUTO_ACKNOWLEDGE为自动确认,客户端发送和接收消息不需要做额外的工作。哪怕是接收端发生异常,也会被当作正常发送成功。
// Session.CLIENT_ACKNOWLEDGE为客户端确认。客户端接收到消息后,必须调用javax.jms.Message的acknowledge方法。jms服务器才会当作发送成功,并删除消息。
// DUPS_OK_ACKNOWLEDGE允许副本的确认模式。一旦接收方应用程序的方法调用从处理消息处返回,会话对象就会确认消息的接收;而且允许重复确认。
session = conn.createSession(true, Session.AUTO_ACKNOWLEDGE);
// 4、创建点对点接收的目标
Destination destination = session.createQueue("queue2");
// 创建订阅的目标
// Destination b4_destination = session.createTopic("topic1");
// 5、创建消费者消息 http://activemq.apache.org/destination-options.html
consumer = session.createConsumer(destination);
// 6、接收消息
Session finalSession = session;
consumer.setMessageListener(new MessageListener() {
@Override
public void onMessage(Message message) {
if (message instanceof TextMessage) {
try {
System.out.println("收到文本消息:" + ((TextMessage) message).getText());
} catch (JMSException e) {
e.printStackTrace();
}
} else {
System.out.println(message);
}
try {
finalSession.commit();
//finalSession.rollback();
} catch (JMSException e) {
e.printStackTrace();
}
}
});
System.in.read();
} catch (JMSException e) {
e.printStackTrace();
} catch (IOException e) {
e.printStackTrace();
} finally {
if (consumer != null) {
try {
consumer.close();
} catch (JMSException e) {
e.printStackTrace();
}
}
if (session != null) {
try {
session.close();
} catch (JMSException e1) {
e1.printStackTrace();
}
}
if (conn != null) {
try {
conn.close();
} catch (JMSException e1) {
e1.printStackTrace();
}
}
}
}
}
package com.study.mq.b7_transaction;

import org.apache.activemq.ActiveMQConnectionFactory;

import javax.jms.*;

/**
 * 生产者事务
 *
 * 生产者开启事务后,消息发送后,提交事务后,broker上的消息才能发到消费者
 */
public class Producer {
    public static void main(String[] args) {
        ActiveMQConnectionFactory connectionFactory;
        Connection conn = null;
        Session session = null;

        try {
            // 1、创建连接工厂
//            connectionFactory = new ActiveMQConnectionFactory("admin", "admin", "udp://vm1.tony.com:61616");
            connectionFactory = new ActiveMQConnectionFactory("admin", "admin", "tcp://192.168.158.129:61616");
            // 2、创建连接对象
            conn = connectionFactory.createConnection();
            conn.start();

            // 3、创建会话
            // 第一个参数:是否支持事务,如果为true,则会忽略第二个参数,被jms服务器设置为SESSION_TRANSACTED
            // 第一个参数为false时,第二个参数的值可为Session.AUTO_ACKNOWLEDGE,Session.CLIENT_ACKNOWLEDGE,DUPS_OK_ACKNOWLEDGE其中一个。
            // Session.AUTO_ACKNOWLEDGE为自动确认,客户端发送和接收消息不需要做额外的工作。哪怕是接收端发生异常,也会被当作正常发送成功。
            // Session.CLIENT_ACKNOWLEDGE为客户端确认。客户端接收到消息后,必须调用javax.jms.Message的acknowledge方法。jms服务器才会当作发送成功,并删除消息。
            // DUPS_OK_ACKNOWLEDGE允许副本的确认模式。一旦接收方应用程序的方法调用从处理消息处返回,会话对象就会确认消息的接收;而且允许重复确认。
            session = conn.createSession(true, Session.AUTO_ACKNOWLEDGE);

            // 4、创建点对点发送的目标
            Destination destination = session.createQueue("queue2");
            // 创建发布的目标
//            Destination b4_destination = session.createTopic("topic1");

            // 5、创建生产者消息
            MessageProducer producer = session.createProducer(destination);
            // 设置生产者的模式,有两种可选
            // DeliveryMode.PERSISTENT 当activemq关闭的时候,队列数据将会被保存
            // DeliveryMode.NON_PERSISTENT 当activemq关闭的时候,队列里面的数据将会被清空
            producer.setDeliveryMode(DeliveryMode.NON_PERSISTENT);

            for (int i = 0; i < 10; i++) {
                // 6、创建一条消息
                // 有6中消息类型:
                // BytesMessage  用来传递字节
                // MapMessage    用来传递字节
                // ObjectMessage 用来传递序列化对象
                // StreamMessage 用来传递文件等
                // TextMessage   用来传递字符串
                String text = "Hello world! " + i;
                TextMessage message = session.createTextMessage(text);

                // 7、发送消息
                producer.send(message);

                if (i % 3 == 0) { // 3的倍数,发送,但回滚
                    session.rollback();
                } else {
                    // 在开启持久化模式时,commit后,会同步到磁盘
                    // 所以当一个原子步骤中发送大批量消息,不建议每条消息发送后提交,而是批量发送完后一次性提交,以最大限度地减少磁盘同步产生的延迟.
                    session.commit();
                }
            }
        } catch (JMSException e) {
            e.printStackTrace();
        } finally {
            if (conn != null) {
                try {
                    conn.close();
                } catch (JMSException e1) {
                    e1.printStackTrace();
                }
            }

            if (session != null) {
                try {
                    session.close();
                } catch (JMSException e1) {
                    e1.printStackTrace();
                }
            }
        }
    }
}
异步分发 http://activemq.apache.org/consumer-dispatch-async.html
 独占消费 http://activemq.apache.org/exclusive-consumer.html
 优先级消费 http://activemq.apache.org/consumer-priority.html
 持久订阅者 http://activemq.apache.org/manage-durable-subscribers.html
 消费分组 http://activemq.apache.org/message-groups.html
 消息重发 http://activemq.apache.org/redelivery-policy.html
 消息追溯 http://activemq.apache.org/retroactive-consumer.html
 消息过滤 http://activemq.apache.org/selectors.html
 慢消费者处理 http://activemq.apache.org/slow-consumer-handling.html
 订阅恢复策略 http://activemq.apache.org/subscription-recovery-policy.html
不通过事务进行重复提交package com.study.mq.b3_consumer;
import org.apache.activemq.ActiveMQConnection;
import org.apache.activemq.ActiveMQConnectionFactory;
import org.apache.activemq.RedeliveryPolicy;
import org.apache.activemq.broker.region.policy.RedeliveryPolicyMap;
import org.apache.activemq.command.ActiveMQQueue;
import javax.jms.*;
import java.util.concurrent.CountDownLatch;
/**
* 消息重发
*/
public class RedeliveryPolicyConsumer {
public static void main(String[] args) {
ActiveMQConnectionFactory connectionFactory;
Connection conn = null;
Session session = null;
MessageConsumer consumer = null;
String brokerUrl = "tcp://192.168.100.242:61616";
String name = Thread.currentThread().getName();
try {
// 创建队列重发策略
RedeliveryPolicy queuePolicy = new RedeliveryPolicy();
queuePolicy.setInitialRedeliveryDelay(0); // 初始重发延迟时间,单位:毫秒
queuePolicy.setRedeliveryDelay(5000); // 第一次以后的延迟时间
queuePolicy.setUseExponentialBackOff(false);// 是否以指数递增的方式增加超时时间
queuePolicy.setMaximumRedeliveries(3); // 最大重发次数,从0开始计数,为-1则不使用最大次数
// brokerURL http://activemq.apache.org/consumer-dispatch-async.html
// 1、创建连接工厂
connectionFactory = new ActiveMQConnectionFactory(brokerUrl);
// 设置重发策略
connectionFactory.setRedeliveryPolicy(queuePolicy);
// 2、创建连接对象
conn = connectionFactory.createConnection();
// 3、启动连接
conn.start(); // 一定要启动
// 4、创建会话(可以创建一个或者多个session)
// 确认模式设置为客户端手动确认
session = conn.createSession(false, Session.CLIENT_ACKNOWLEDGE);
// 5、创建点对点接收的目标,即接收哪个队列的消息
// http://activemq.apache.org/destination-options.html
Destination destination = session.createQueue("queue2");
// 6、创建消费者消息
consumer = session.createConsumer(destination);
// 7、监听消息
Session finalSession = session;
consumer.setMessageListener(new MessageListener() {
@Override
public void onMessage(Message message) {
try {
// 模拟消费者异常
if (((TextMessage) message).getText().endsWith("4")) {
throw new RuntimeException("消息重发");
}
if (message instanceof TextMessage) {
System.out.println(name + " 收到文本消息:" + ((TextMessage) message).getText());
} else {
System.out.println(name + " " + message);
}
// 8、确认收到消息
message.acknowledge();
} catch (JMSException e) {
e.printStackTrace();
} catch (RuntimeException e) {
System.out.println(e.getMessage());
try {
// 消息重发
finalSession.recover();
} catch (JMSException e1) {
e1.printStackTrace();
}
}
}
});
System.out.println(name + " 已启动,等待接收消息!");
// 阻塞程序
new CountDownLatch(1).await();
} catch (JMSException e) {
e.printStackTrace();
} catch (InterruptedException e) {
e.printStackTrace();
} finally {
if (consumer != null) {
try {
consumer.close();
} catch (JMSException e) {
e.printStackTrace();
}
}
if (session != null) {
try {
session.close();
} catch (JMSException e) {
e.printStackTrace();
}
}
if (conn != null) {
try {
conn.close();
} catch (JMSException e) {
e.printStackTrace();
}
}
}
}
}
永久订阅者
package com.study.mq.b3_consumer.e4_durable_subscriber;

import org.apache.activemq.ActiveMQConnectionFactory;

import javax.jms.*;

// 永久订阅者
// 持久订阅时,客户端向JMS 注册一个识别自己身份的ID(clientId必须有)
// 当这个客户端处于离线时,JMS Provider 会为这个ID 保存所有发送到主题的消息
// 当客户再次连接到JMS Provider时,会根据自己的ID 得到所有当自己处于离线时发送到主题的消息。
// tips: ActiveMQ.Advisory开头的消息是activemq提供的一个管理消息推送
// http://activemq.apache.org/advisory-message.html
// 虚拟主题:https://www.cnblogs.com/jiangxiaoyaoblog/p/5659734.html
// http://activemq.apache.org/what-is-the-difference-between-a-virtual-topic-and-a-composite-destination.html
public class DurableSubscriber {
    public static void main(String[] args) {
        // brokerUrl参数: http://activemq.apache.org/connection-configuration-uri.html
        // 持久订阅者上生效
        // optimizedMessageDispatch 使用更大的预取限制 true
        new ConsumerThread("tcp://activemq.tony.com:61616?jms.clientID=x", "topic2").start();
        new ConsumerThread("tcp://activemq.tony.com:61616?jms.clientID=y", "topic2").start();
    }

    static class ConsumerThread extends Thread {

        String brokerUrl;
        String destinationUrl;

        public ConsumerThread(String brokerUrl, String destinationUrl) {
            this.brokerUrl = brokerUrl;
            this.destinationUrl = destinationUrl;
        }

        @Override
        public void run() {
            ActiveMQConnectionFactory connectionFactory;
            Connection conn;
            Session session;
            MessageConsumer consumer;

            try {
                // brokerURL http://activemq.apache.org/connection-configuration-uri.html
                // 1、创建连接工厂
                connectionFactory = new ActiveMQConnectionFactory(this.brokerUrl);
                // 2、创建连接对象
                conn = connectionFactory.createConnection();
                conn.start(); // 一定要启动
                // 3、创建会话(可以创建一个或者多个session)
                session = conn.createSession(false, Session.AUTO_ACKNOWLEDGE);
                // 4、创建订阅的目标 topic  一条消息,多个订阅者接收
                Topic topic = session.createTopic(destinationUrl);
                // 5、创建订阅者
                consumer = session.createDurableSubscriber(topic, "xxx");

                // 6、接收消息(没有消息就持续等待)
                consumer.setMessageListener(new MessageListener() {
                    @Override
                    public void onMessage(Message message) {
                        try {
                            if (message instanceof TextMessage) {
                                System.out.println("收到文本消息:" + ((TextMessage) message).getText());
                            } else {
                                System.out.println(message);
                            }
                        } catch (JMSException e) {
                            e.printStackTrace();
                        }
                    }
                });

                System.out.println(" 已启动,等待接收消息!");
                System.in.read();

                consumer.close();
                session.close();
                conn.close();
            } catch (Exception e) {
                e.printStackTrace();
            }
        }
    }

}
消费者异步调度package com.study.mq.b3_consumer;
import org.apache.activemq.ActiveMQConnection;
import org.apache.activemq.ActiveMQConnectionFactory;
import org.apache.activemq.ActiveMQMessageConsumer;
import javax.jms.*;
import java.io.IOException;
import java.util.concurrent.TimeUnit;
/**
* 消费者异步调度
* 从ActiveMQ v4开始,消费者异步调度的配置更加灵活,可以在连接URI、Connection和ConnectionFactory上进行配置,而在以前的版本中,只能在broker服务器上配置。<br/>
* 可以在broker的配置中,通过disableAsyncDispatch属性禁用transportConnector上的异步调度,禁用这个传输连接后,在客户端将无法开启。
* <transportConnector name="openwire" uri="tcp://0.0.0.0:61616" disableAsyncDispatch="true"/>
*
* 通过这种灵活的配置,可以实现为较慢的消费者提供异步消息传递,而为较快的消费者提供同步消息传递。<br/>
* 使用同步消息的缺点是:如果向较慢的消费者发送消息时,可能造成生产者阻塞。
*/
public class ConsumerDispatchAsync {
public static void main(String[] args) {
ActiveMQConnectionFactory connectionFactory;
Connection conn = null;
Session session = null;
MessageConsumer consumer = null;
String brokerUrl = "tcp://192.168.100.242:61616";
try {
// brokerURL http://activemq.apache.org/consumer-dispatch-async.html
// 1、创建连接工厂
connectionFactory = new ActiveMQConnectionFactory(brokerUrl);
// 在连接工厂设置是否异步分发,作用于通过此工厂创建的所有连接
// connectionFactory.setDispatchAsync(false);
// 2、创建连接对象
conn = connectionFactory.createConnection();
// 在连接上设置是否异步分发,作用于通过此链接创建的所有session
// ((ActiveMQConnection) conn).setDispatchAsync(false);
// 3、启动连接
conn.start(); // 一定要启动
// 4、创建会话(可以创建一个或者多个session)
// 确认模式设置为客户端手动确认
session = conn.createSession(false, Session.AUTO_ACKNOWLEDGE);
// 5、创建点对点接收的目标,即接收哪个队列的消息
// 在队列上设置consumer.dispatchAsync是否异步分发,将仅作用于此队列
// http://activemq.apache.org/destination-options.html
Destination destination = session.createQueue("queue1?consumer.dispatchAsync=false");
// 6、创建消费者消息
consumer = session.createConsumer(destination);
// 7、监听消息
consumer.setMessageListener(new MessageListener() {
@Override
public void onMessage(Message message) {
try {
if (message instanceof TextMessage) {
System.out.println("收到文本消息:" + ((TextMessage) message).getText());
} else {
System.out.println(message);
}
} catch (JMSException e) {
e.printStackTrace();
}
}
});
System.in.read();
} catch (JMSException e) {
e.printStackTrace();
} catch (IOException e) {
e.printStackTrace();
} finally {
if (consumer != null) {
try {
consumer.close();
} catch (JMSException e) {
e.printStackTrace();
}
}
if (session != null) {
try {
session.close();
} catch (JMSException e) {
e.printStackTrace();
}
}
if (conn != null) {
try {
conn.close();
} catch (JMSException e) {
e.printStackTrace();
}
}
}
}
}

 浙公网安备 33010602011771号