Mongodb分片集群技术+用户验证
随着数据量持续增多,后续迟早会出现一台机器硬件瓶颈问题的。而mongodb主打的就是海量数据架构,“分片”就用这个来解决这个问题。
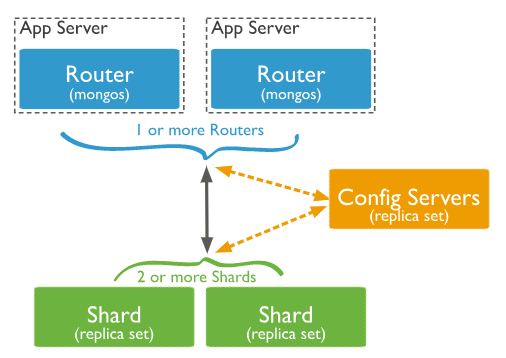
从图中可以看到有四个组件:mongos、config server、shard、replica set。
mongos,数据库集群请求的入口,所有的请求都通过mongos进行协调,不需要在应用程序添加一个路由选择器,mongos自己就是一个请求分发中心,它负责把对应的数据请求请求转发到对应的shard服务器上。在生产环境通常有多mongos作为请求的入口,防止其中一个挂掉所有的mongodb请求都没有办法操作。
config server,顾名思义为配置服务器,存储所有数据库元信息(路由、分片)的配置。mongos本身没有物理存储分片服务器和数据路由信息,只是缓存在内存里,配置服务器则实际存储这些数据。mongos第一次启动或者关掉重启就会从 config server 加载配置信息,以后如果配置服务器信息变化会通知到所有的 mongos 更新自己的状态,这样 mongos 就能继续准确路由。在生产环境通常有多个 config server 配置服务器,因为它存储了分片路由的元数据,防止数据丢失!
shard,分片(sharding)是指将数据库拆分,将其分散在不同的机器上的过程。将数据分散到不同的机器上,不需要功能强大的服务器就可以存储更多的数据和处理更大的负载。基本思想就是将集合切成小块,这些块分散到若干片里,每个片只负责总数据的一部分,最后通过一个均衡器来对各个分片进行均衡(数据迁移)。
replica set,中文翻译副本集,其实就是shard的备份,防止shard挂掉之后数据丢失。复制提供了数据的冗余备份,并在多个服务器上存储数据副本,提高了数据的可用性, 并可以保证数据的安全性。
仲裁者(Arbiter),是复制集中的一个MongoDB实例,它并不保存数据。仲裁节点使用最小的资源并且不要求硬件设备,不能将Arbiter部署在同一个数据集节点中,可以部署在其他应用服务器或者监视服务器中,也可部署在单独的虚拟机中。为了确保复制集中有奇数的投票成员(包括primary),需要添加仲裁节点做为投票,否则primary不能运行时不会自动切换primary。.
总结一下,应用请求mongos来操作mongodb的增删改查,配置服务器存储数据库元信息,并且和mongos做同步,数据最终存入在shard(分片)上,为了防止数据丢失同步在副本集中存储了一份,仲裁在数据存储到分片的时候决定存储到哪个节点
config server存储分片集群的元数据。元数据反应了分片集群内所有数据和组件的状态和组织,它包括每个分片的chunk列表及定义chunk的范围。
mongos 实例缓存这些数据,并将读写操作路由到正确的分片上。mongos在集群发生元数据更改(例如,“块拆分”或者添加shard)是更新缓存,shard从config server读取chunk元数据。
config server 还存储身份验证配置信息,如基于角色的访问控制或集群的内部身份验证设置。
config server可用性
1)如果所有的config server都变得不可用,则集群可能无法使用。为确保config server保持可用且完好无损,config server的备份很重要。config server上的数据及存储与整个shard集群的数据相比比较小,并且config server的负载相对较低。
2)config server 将元数据存储在config库中,在对config server上进行任何维护之前,应始终备份config库。
下面开始准备部署mongodb分片群集

这个架构是不是足够好呢?其实还有很多地方可以优化,比如我们把所有的仲裁节点放在一台机器,其余两台机器承担了全部读写操作,但是作为仲裁节点的机器非常的空闲的,例如机器出现故障,会直接导致整个分片不可用。
所以,我们采取下面这种结构来部署

环境部署:mongodb版本3.6.6
服务器214 服务器215 服务器216
mongos mongos mongos
config server config server config server
shard server1 主节点 shard server1 副节点 shard server1 仲裁
shard server2 仲裁 shard server2 主节点 shard server2 副节点
shard server3 副节点 shard server3 仲裁 shard server3 主节点
1、端口分配
mongos:20000
config:21000
shard1:27001
shard2:27002
shard3:27003
2、安装部署mongodb
配置文件路径:/etc/mongodb
数据存放路径:/data/mongodb
启动对应服务:mongod -f logpath
关闭对应服务:mongod --shutdown -f logpath
分别在每台机器建立mongos、config、shard1、shard2、shard3六个目录,因为mongos不存储数据,只需要建立日志文件目录即可
[root@localhost ~]# cat mkdir.sh
#!/bin/bash
mkdir /etc/mongodb/
mkdir -p /data/mongodb/mongos/log
mkdir -p /data/mongodb/config/data
mkdir -p /data/mongodb/config/log
mkdir -p /data/mongodb/shard1/data
mkdir -p /data/mongodb/shard1/log
mkdir -p /data/mongodb/shard2/data
mkdir -p /data/mongodb/shard2/log
mkdir -p /data/mongodb/shard3/data
mkdir -p /data/mongodb/shard3/log
3、config server集群配置
mongodb3.4以后要求配置服务器也创建副本集,不然集群搭建不成功
[root@localhost ~]# cat /etc/mognodb/config.conf |egrep -v "^$|^#"
systemLog:
  destination: file
  logAppend: true
  path: /var/log/mongodb/config.log
storage:
  #dbPath: /data/mongodb
  dbPath: /data/mongodb/config/data
  journal:
    enabled: true
processManagement:
  fork: true  # fork and run in background
  pidFilePath: /var/run/mongodb/config.pid  # location of pidfile
  timeZoneInfo: /usr/share/zoneinfo
net:
  port: 21000
  #bindIp: 127.0.0.1  # Listen to local interface only, comment to listen on all interfaces.
  bindIp: 192.168.214.214  # Listen to local interface only, comment to listen on all interfaces.
sharding:
  clusterRole: configsvr
replication:
   replSetName: configs
启动三台服务器的config server
[root@localhost ~]# mongod -f /etc/mongodb/config.conf
about to fork child process, waiting until server is ready for connections.
forked process: 2154
child process started successfully, parent exiting
登录任意一台配置服务器,初始化配置副本集
[root@localhost ~]# mongo 192.168.214.214:21000
> config = {
... id : "configs",
... members : [
...     {_id : 0, host : "192.168.214.214:21000" },
...     {_id : 1, host : "192.168.214.215:21000" },
...     {_id : 2, host : "192.168.214.216:21000" }
...     ]
... }
{
    "id" : "configs",
    "members" : [
        {
            "_id" : 0,
            "host" : "192.168.214.214:21000"
        },
        {
            "_id" : 1,
            "host" : "192.168.214.215:21000"
        },
        {
            "_id" : 2,
            "host" : "192.168.214.216:21000"
        }
    ]
}
# 初始化配置
rs.initiate(config)
其中,"_id" : "configs"应与配置文件中配置的 replicaction.replSetName 一致,"members" 中的 "host" 为三个节点的 ip 和 port
4、分片副本集配置
1)配置第一个分片副本集shard1
[root@localhost ~]# cat /etc/mongodb/shard1.conf |egrep -v "^$|^#"
systemLog:
  destination: file
  logAppend: true
  path: /data/mongodb/shard1/shard1.log
storage:
  #dbPath: /var/lib/mongo
  dbPath: /data/mongodb/shard1/data
  journal:
    enabled: true
processManagement:
  fork: true  # fork and run in background
  pidFilePath: /var/run/mongodb/shard1.pid  # location of pidfile
  timeZoneInfo: /usr/share/zoneinfo
net:
  port: 27001
  #bindIp: 127.0.0.1  # Listen to local interface only, comment to listen on all interfaces.
  bindIp: 192.168.214.214  # Listen to local interface only, comment to listen on all interfaces.
sharding:
  clusterRole: shardsvr
replication:
   replSetName: shard1
启动三台服务器的shard1 server
[root@localhost ~]# mongod -f /etc/mongodb/config.conf
about to fork child process, waiting until server is ready for connections.
forked process: 2360
child process started successfully, parent exiting
登陆任意一台服务器,初始化副本集
[root@localhost ~]# mongo 192.168.214.214:27001
> config = {
... _id : "shard1",
... members : [
...     {_id : 0, host : "192.168.214.214:27001" },
...     {_id : 1, host : "192.168.214.215:27001" },
...     {_id : 2, host : "192.168.214.216:27001" , arbiterOnly: true}
...     ]
... }
{
    "_id" : "shard1",
    "members" : [
        {
            "_id" : 0,
            "host" : "192.168.214.214:27001"
        },
        {
            "_id" : 1,
            "host" : "192.168.214.215:27001"
        },
        {
            "_id" : 2,
            "host" : "192.168.214.216:27001"
        }
    ]
}
# 初始化配置
rs.initiate(config)
2)配置第二个分片副本集shard2
[root@localhost mongodb]# cat /etc/mongodb/shard2.conf |egrep -v "^#|^$"
systemLog:
  destination: file
  logAppend: true
  path: /data/mongodb/shard2/shard2.log
storage:
  #dbPath: /var/lib/mongo
  dbPath: /data/mongodb/shard2/data
  journal:
    enabled: true
processManagement:
  fork: true  # fork and run in background
  pidFilePath: /var/run/mongodb/shard2.pid  # location of pidfile
  timeZoneInfo: /usr/share/zoneinfo
net:
  port: 27002
  #bindIp: 127.0.0.1  # Listen to local interface only, comment to listen on all interfaces.
  bindIp: 192.168.214.215  # Listen to local interface only, comment to listen on all interfaces.
sharding:
  clusterRole: shardsvr
replication:
   replSetName: shard2
启动三台服务器的shard2 server
[root@localhost mongodb]# mongod -f /etc/mongodb/shard2.conf
about to fork child process, waiting until server is ready for connections.
forked process: 2482
child process started successfully, parent exiting
陆任意一台服务器,初始化副本集
[root@localhost mongodb]# mongo 192.168.214.215:27002
> config = {
... _id : "shard2",
... members : [
...     {_id : 0, host : "192.168.214.214:27002" , arbiterOnly: true },
...     {_id : 1, host : "192.168.214.215:27002" },
...     {_id : 2, host : "192.168.214.216:27002" }
...     ]
... }
{
    "_id" : "shard2",
    "members" : [
        {
            "_id" : 0,
            "host" : "192.168.214.214:27002",
            "arbiterOnly" : true
        },
        {
            "_id" : 1,
            "host" : "192.168.214.215:27002"
        },
        {
            "_id" : 2,
            "host" : "192.168.214.216:27002"
        }
    ]
}
# 初始化配置
rs.initiate(config)
3)配置第三个分片副本集shard3
[root@localhost mongodb]# cat /etc/mongodb/shard3.conf  |egrep -v "^$|^#"
systemLog:
  destination: file
  logAppend: true
  path: /data/mongodb/shard3/shard3.log
storage:
  #dbPath: /var/lib/mongo
  dbPath: /data/mongodb/shard3/data
  journal:
    enabled: true
processManagement:
  fork: true  # fork and run in background
  pidFilePath: /var/run/mongodb/shard3.pid  # location of pidfile
  timeZoneInfo: /usr/share/zoneinfo
net:
  port: 27003
  #bindIp: 127.0.0.1  # Listen to local interface only, comment to listen on all interfaces.
  bindIp: 192.168.214.216  # Listen to local interface only, comment to listen on all interfaces.
sharding:
  clusterRole: shardsvr
replication:
   replSetName: shard3
启动三台服务器的shard3 server
[root@localhost mongodb]# mongod -f shard3.conf
about to fork child process, waiting until server is ready for connections.
forked process: 2755
child process started successfully, parent exiting
陆任意一台服务器,初始化副本集
> config = {
... _id : "shard3",
... members : [
...     {_id : 0, host : "192.168.214.214:27003" },
...     {_id : 1, host : "192.168.214.215:27003" , arbiterOnly: true},
...     {_id : 2, host : "192.168.214.216:27003" }
...     ]
... }
{
    "_id" : "shard3",
    "members" : [
        {
            "_id" : 0,
            "host" : "192.168.214.214:27003"
        },
        {
            "_id" : 1,
            "host" : "192.168.214.215:27003",
            "arbiterOnly" : true
        },
        {
            "_id" : 2,
            "host" : "192.168.214.216:27003"
        }
    ]
}

> rs.initiate(config);
{ "ok" : 1 }
5、配置路由服务器mongos
先启动配置服务器和分片服务器,后启动路由实例启动路由实例:(三台机器)
[root@localhost mongodb]# cat mongos.conf |egrep -v "^#|^$"
systemLog:
  destination: file
  logAppend: true
  path: /data/mongodb/mongos/mongos.log
  #dbPath: /var/lib/mongo
processManagement:
  fork: true  # fork and run in background
  pidFilePath: /var/run/mongodb/mongos.pid  # location of pidfile
  timeZoneInfo: /usr/share/zoneinfo
net:
  port: 20000
  #bindIp: 127.0.0.1  # Listen to local interface only, comment to listen on all interfaces.
  bindIp: 192.168.214.214  # Listen to local interface only, comment to listen on all interfaces.
#监听的配置服务器,只能有1个或者3个 configs为配置服务器的副本集名字
sharding:
  configDB: configs/192.168.214.214:21000,192.168.214.215:21000,192.168.214.216:21000
#设置最大连接数
maxConns=20000
启动三台服务器的mongos server
[root@localhost mongodb]# mongos -f /etc/mongodb/mongos.conf
about to fork child process, waiting until server is ready for connections.
forked process: 2858
child process started successfully, parent exiting
6、启用分片
目前搭建了mongodb配置服务器、路由服务器,各个分片服务器,不过应用程序连接到mongos路由服务器并不能使用分片机制,还需要在程序里设置分片配置,让分片生效。
片键是集合的一个键,MongoDB根据这个键拆分数据。例如,如果选择基于“username”进行分片,MongoDB会根据不同的用户名进行分片。选择片键可以认为是选择集合中数据的顺序。它与索引是个相似的概念:随着集合的不断增长,片键就会成为集合上最重要的索引。只有被索引过的键才能够作为片键
[root@localhost ~]# mongo 192.168.214.214:20000
#使用admin数据库
mongos> use admin
switched to db admin
#串联路由服务器与分配副本集
mongos> sh.addShard("shard1/192.168.214.214:27001,192.168.214.215:27001,192.168.214.216:27001")
27003"){
    "shardAdded" : "shard1",
    "ok" : 1,
    "$clusterTime" : {
        "clusterTime" : Timestamp(1555544056, 5944),
        "signature" : {
            "hash" : BinData(0,"AAAAAAAAAAAAAAAAAAAAAAAAAAA="),
            "keyId" : NumberLong(0)
        }
    },
    "operationTime" : Timestamp(1555544056, 5944)
}
mongos> sh.addShard("shard2/192.168.214.214:27002,192.168.214.215:27002,192.168.214.216:27002")
{
    "shardAdded" : "shard2",
    "ok" : 1,
    "$clusterTime" : {
        "clusterTime" : Timestamp(1555544056, 5948),
        "signature" : {
            "hash" : BinData(0,"AAAAAAAAAAAAAAAAAAAAAAAAAAA="),
            "keyId" : NumberLong(0)
        }
    },
    "operationTime" : Timestamp(1555544056, 5948)
}
mongos> sh.addShard("shard3/192.168.214.214:27003,192.168.214.215:27003,192.168.214.216:27003")
{
    "shardAdded" : "shard3",
    "ok" : 1,
    "$clusterTime" : {
        "clusterTime" : Timestamp(1555544056, 5955),
        "signature" : {
            "hash" : BinData(0,"AAAAAAAAAAAAAAAAAAAAAAAAAAA="),
            "keyId" : NumberLong(0)
        }
    },
    "operationTime" : Timestamp(1555544056, 5955)
}
#查看集群状态
mongos> sh.status()
--- Sharding Status ---
  sharding version: {
      "_id" : 1,
      "minCompatibleVersion" : 5,
      "currentVersion" : 6,
      "clusterId" : ObjectId("5cb6b39a03fdf8f1e8c882d1")
  }
  shards:
        {  "_id" : "shard1",  "host" : "shard1/192.168.214.214:27001,192.168.214.215:27001",  "state" : 1 }
        {  "_id" : "shard2",  "host" : "shard2/192.168.214.215:27002,192.168.214.216:27002",  "state" : 1 }
        {  "_id" : "shard3",  "host" : "shard3/192.168.214.214:27003,192.168.214.216:27003",  "state" : 1 }
  most recently active mongoses:
        "3.6.6" : 1
  autosplit:
        Currently enabled: yes
  balancer:
        Currently enabled:  yes
        Currently running:  no
        Failed balancer rounds in last 5 attempts:  0
        Migration Results for the last 24 hours:
                No recent migrations
  databases:
        {  "_id" : "config",  "primary" : "config",  "partitioned" : true }
7、测试
目前配置服务、路由服务、分片服务、副本集服务都已经串联起来了,但我们的目的是希望插入数据,数据能够自动分片。连接在mongos上,准备让指定的数据库、指定的集合分片生效。
设置分片chunk大小
use config
db.settings.save({ "_id" : "chunksize", "value" : 1 })
设置1M是为了测试,否则要插入大量数据才能分片。
激活数据库分片功能
语法:( { enablesharding : "数据库名称" } )
mongos> db.runCommand( { enablesharding : "test" } )
或者mongos>sh.enableSharding("test")
##use到admin库下执行,否则会报错
mongos>use admin
switched to db admin
mongos> sh.enableSharding("test")
{
    "ok" : 1,
    "$clusterTime" : {
        "clusterTime" : Timestamp(1555544056, 6258),
        "signature" : {
            "hash" : BinData(0,"AAAAAAAAAAAAAAAAAAAAAAAAAAA="),
            "keyId" : NumberLong(0)
        }
    },
    "operationTime" : Timestamp(1555544056, 6258)
}
##指定数据库里需要分片的集合和片键
#指定数据库里需要分片的集合和片键
use test
db.users.createIndex({user_id : 1})
db.runCommand( { shardcollection : "test.users",key : {user_id: 1} } )
或者sh.shardCollection("test.users", {user_id: 1})
mongos> sh.shardCollection("test.users", {user_id: 1})
{
    "collectionsharded" : "test.users",
    "collectionUUID" : UUID("da124f00-1ddd-445d-8bb9-d443a4b113ac"),
    "ok" : 1,
    "$clusterTime" : {
        "clusterTime" : Timestamp(1555544056, 6427),
        "signature" : {
            "hash" : BinData(0,"AAAAAAAAAAAAAAAAAAAAAAAAAAA="),
            "keyId" : NumberLong(0)
        }
    },
    "operationTime" : Timestamp(1555544056, 6427)
}
我们设置test的users表需要分片,根据 id 自动分片到 shard1 ,shard2,shard3 上面去。要这样设置是因为不是所有mongodb 的数据库和表 都需要分片!
##插入数据测试分片效果
mongos> use test
switched to db test
mongos> for (var i = 1; i <= 1000000; i++) db.users.save({user_id:i,username:"user"+i});
WriteResult({ "nInserted" : 1 })
#查看分片情况如下,此处省略其他信息
db.集合.stats();
mongos> db.users.stats()
{
    "sharded" : true,
    "capped" : false,
    "ns" : "test.users",
    "count" : 177864,
    "size" : 11272191,
    "storageSize" : 4935680,
    "totalIndexSize" : 4984832,
    "indexSizes" : {
        "_id_" : 2232320,
        "user_id_1" : 2752512
    },
    "avgObjSize" : 63,
    "nindexes" : 2,
    "nchunks" : 21,
    "shards" : {
        "shard1" : {
            "ns" : "test.users",
            "size" : 3401817,
            "count" : 53604,
            "avgObjSize" : 63,
            "storageSize" : 2142208,
            "capped" : false,
            "wiredTiger" : {
                "metadata" : {
                    "formatVersion" : 1
                },
        "shard2" : {
            "ns" : "test.users",
            "size" : 3417868,
            "count" : 53971,
            "avgObjSize" : 63,
            "storageSize" : 1355776,
            "capped" : false,
            "wiredTiger" : {
                "metadata" : {
                    "formatVersion" : 1
                },
        "shard3" : {
            "ns" : "test.users",
            "size" : 4452506,
            "count" : 70289,
            "avgObjSize" : 63,
            "storageSize" : 1437696,
            "capped" : false,
            "wiredTiger" : {
                "metadata" : {
                    "formatVersion" : 1
                },
}
上面集合的基本信息,可以看到分片成功,各个分片都有数据(count)
#查看分片信息
mongos> db.printShardingStatus()
或mongos>sh.status()
mongos> sh.status()
--- Sharding Status ---
  sharding version: {
      "_id" : 1,
      "minCompatibleVersion" : 5,
      "currentVersion" : 6,
      "clusterId" : ObjectId("5cb6b39a03fdf8f1e8c882d1")
  }
  shards:
        {  "_id" : "shard1",  "host" : "shard1/192.168.214.214:27001,192.168.214.215:27001",  "state" : 1 }
        {  "_id" : "shard2",  "host" : "shard2/192.168.214.215:27002,192.168.214.216:27002",  "state" : 1 }
        {  "_id" : "shard3",  "host" : "shard3/192.168.214.214:27003,192.168.214.216:27003",  "state" : 1 }
  active mongoses:
        "3.6.6" : 1
  autosplit:
        Currently enabled: yes
  balancer:
        Currently enabled:  yes
        Currently running:  no
        Collections with active migrations:
                wsy.wsy started at Wed Apr 24 2019 18:42:13 GMT+0800 (CST)
        Failed balancer rounds in last 5 attempts:  0
        Migration Results for the last 24 hours:
                8 : Success
  databases:
        {  "_id" : "config",  "primary" : "config",  "partitioned" : true }
                config.system.sessions
                        shard key: { "_id" : 1 }
                        unique: false
                        balancing: true
                        chunks:
                                shard1    1
                        { "_id" : { "$minKey" : 1 } } -->> { "_id" : { "$maxKey" : 1 } } on : shard1 Timestamp(1, 0)
        {  "_id" : "test",  "primary" : "shard2",  "partitioned" : true }
                test.users
                        shard key: { "user_id" : 1 }
                        unique: false
                        balancing: true
                        chunks:
                                shard1    7
                                shard2    7
                                shard3    7
                        too many chunks to print, use verbose if you want to force print
        {  "_id" : "wsy",  "primary" : "shard1",  "partitioned" : true }
                wsy.wsy
                        shard key: { "user_id" : 1 }
                        unique: false
                        balancing: true
                        chunks:
                                shard1    2
                                shard2    3
                                shard3    4
                        { "user_id" : { "$minKey" : 1 } } -->> { "user_id" : 2 } on : shard2 Timestamp(5, 1)
                        { "user_id" : 2 } -->> { "user_id" : 16914 } on : shard3 Timestamp(3, 0)
                        { "user_id" : 16914 } -->> { "user_id" : 25370 } on : shard1 Timestamp(4, 1)
                        { "user_id" : 25370 } -->> { "user_id" : 38126 } on : shard1 Timestamp(3, 3)
                        { "user_id" : 38126 } -->> { "user_id" : 46582 } on : shard2 Timestamp(4, 2)
                        { "user_id" : 46582 } -->> { "user_id" : 56101 } on : shard2 Timestamp(4, 3)
                        { "user_id" : 56101 } -->> { "user_id" : 64557 } on : shard3 Timestamp(5, 2)
                        { "user_id" : 64557 } -->> { "user_id" : 74077 } on : shard3 Timestamp(5, 3)
                        { "user_id" : 74077 } -->> { "user_id" : { "$maxKey" : 1 } } on : shard3 Timestamp(5, 4)
至此,mongodb数据分片集群部署并测试完成。
出现:
too many chunks to print, use verbose if you want to force print

想要看到详细的信息则需要执行:
mongos> sh.status({"verbose":1})
或则
mongos> db.printShardingStatus("vvvv")
或则
mongos> printShardingStatus(db.getSisterDB("config"),1)
8、chunk
在一个shard server内部,MongoDB还是会把数据分为chunks,每个chunk代表这个shard server内部一部分数据。chunk的产生,会有以下两个用途:
Splitting:当一个chunk的大小超过配置中的chunk size时,MongoDB的后台进程会把这个chunk切分成更小的chunk,从而避免chunk过大的情况。
Balancing:在MongoDB中,balancer是一个后台进程,负责chunk的迁移,从而均衡各个shard server的负载,系统初始1个chunk,chunk size默认值64M,生产库上选择适合业务的chunk size是最好的。MongoDB会自动拆分和迁移chunks。
分片集群的数据分布(shard节点)
(1)使用chunk来存储数据
(2)进群搭建完成之后,默认开启一个chunk,大小是64M,
(3)存储需求超过64M,chunk会进行分裂,如果单位时间存储需求很大,设置更大的chunk
(4)chunk会被自动均衡迁移。
1)chunksize的选择
小的chunksize:数据均衡是迁移速度快,数据分布更均匀。数据分裂频繁,路由节点消耗更多资源。大的chunksize:数据分裂少。数据块移动集中消耗IO资源。通常100-200M
2)chunk分裂与迁移
随着数据的增长,其中的数据大小超过了配置的chunk size,默认是64M,则这个chunk就会分裂成两个。数据的增长会让chunk分裂得越来越多

此时,每个shard 上的chunk数量就会不平衡。这时候,mongos中的一个组件balancer 就会执行自动平衡。把chunk从chunk数量最多的shard节点挪动到数量最少的节点

3)chunksize对分裂及迁移的影响
MongoDB 默认的 chunkSize 为64MB,如无特殊需求,建议保持默认值;chunkSize 会直接影响到 chunk 分裂、迁移的行为。
chunkSize 越小,chunk 分裂及迁移越多,数据分布越均衡;反之,chunkSize 越大,chunk 分裂及迁移会更少,但可能导致数据分布不均。
chunkSize 太小,容易出现 jumbo chunk(即shardKey 的某个取值出现频率很高,这些文档只能放到一个 chunk 里,无法再分裂)而无法迁移;chunkSize 越大,则可能出现 chunk 内文档数太多(chunk 内文档数不能超过 250000 )而无法迁移。
chunk 自动分裂只会在数据写入时触发,所以如果将 chunkSize 改小,系统需要一定的时间来将 chunk 分裂到指定的大小。
chunk 只会分裂,不会合并,所以即使将 chunkSize 改大,现有的 chunk 数量不会减少,但 chunk 大小会随着写入不断增长,直到达到目标大小。
9、balancer操作
在上面步骤中,本来每个分片上只有一个块,最后最后在shard0000、shard0001、shard0002都被拆分了,这是因为mongos在收到写请求的时候,会检查当前块的拆分阀值点。到达该阀值的时候,会向分片发起一个拆分的请求。分片内的数据进行了迁移(有一定的消耗),最后通过一个均衡器来对数据进行转移分配
均衡器:均衡器负责数据迁移,周期性的检查分片是否存在不均衡,如果不存在则会开始块的迁移,config.locks集合里的state表示均衡器是否找正在运行,0表示非活动状态,2表示正在均衡。均衡迁移数据的过程会增加系统的负载:目标分片必须查询源分片的所有文档,将文档插入目标分片中,再清除源分片的数据。可以关闭均衡器(不建议):关闭会导致各分片数据分布不均衡,磁盘空间得不到有效的利用。
以上步骤中实验了users集合和wsy集合进行数据分片,可看出users集合的数据已经进过经过balancer,进行数据分配达到了均衡,都是7,而wsy集合还没有达到均衡。过段时间可查看效果。(可发现都已经是3,分配均衡)
{  "_id" : "wsy",  "primary" : "shard1",  "partitioned" : true }
                wsy.wsy
                        shard key: { "user_id" : 1 }
                        unique: false
                        balancing: true
                        chunks:
                                shard1    3
                                shard2    3
                                shard3    3
                        { "user_id" : { "$minKey" : 1 } } -->> { "user_id" : 2 } on : shard2 Timestamp(5, 1)
                        { "user_id" : 2 } -->> { "user_id" : 16914 } on : shard3 Timestamp(6, 1)
                        { "user_id" : 16914 } -->> { "user_id" : 25370 } on : shard1 Timestamp(4, 1)
                        { "user_id" : 25370 } -->> { "user_id" : 38126 } on : shard1 Timestamp(3, 3)
                        { "user_id" : 38126 } -->> { "user_id" : 46582 } on : shard2 Timestamp(4, 2)
                        { "user_id" : 46582 } -->> { "user_id" : 56101 } on : shard2 Timestamp(4, 3)
                        { "user_id" : 56101 } -->> { "user_id" : 64557 } on : shard3 Timestamp(5, 2)
                        { "user_id" : 64557 } -->> { "user_id" : 74077 } on : shard3 Timestamp(5, 3)
                        { "user_id" : 74077 } -->> { "user_id" : { "$maxKey" : 1 } } on : shard1 Timestamp(6, 0)
查看mongo集群是否开启了 balance 状态
mongos> sh.getBalancerState()
true
也可以通过在路由节点mongos上执行sh.status() 查看balance状态。如果balance开启,查看是否正在有数据的迁移
mongos> sh.isBalancerRunning()
false
如果未开启,执行命令
sh.setBalancerState( true )
10、启动关闭
mongodb的启动顺序是,先启动配置服务器,在启动分片,最后启动mongos.
mongod -f /usr/local/mongodb/conf/config.conf
mongod -f /usr/local/mongodb/conf/shard1.conf
mongod -f /usr/local/mongodb/conf/shard2.conf
mongod -f /usr/local/mongodb/conf/shard3.conf
mongod -f /usr/local/mongodb/conf/mongos.conf
关闭时,直接killall杀掉所有进程
killall mongod
killall mongos
或者 ps -ef|grep mongo|grep -v grep|awk '{print $2}'|xargs kill -9
11、若需添加用户验证功能,则需要在每个配置文件中指定keyfile文件。
先创建对应库的用户及相应权限
关闭实例,创建keyfile文件,修改配置文件
重新启动实例,验证
创建用户
db.createUser(

... {

... user: "root",

... pwd: "root",

... roles: [ { role: "root", db: "admin" } ]

... }

... );
Successfully added user: {
"user" : "root",
"roles" : [
{
"role" : "root",
"db" : "admin"
}
]
}
db.createUser({

... user: "admin",

... pwd: "admin",

... roles: [ { role: "userAdminAnyDatabase", db: "admin" } ]

... });
Successfully added user: {
"user" : "admin",
"roles" : [
{
"role" : "userAdminAnyDatabase",
"db" : "admin"
}
]
}
创建keyfile文件:
openssl rand -base64 666 > /root/keyfile

 其中666是文件大小           /root/keyfile : 文件存放路径
##该key的权限必须是600;也可改为400

chmod 600 /root/keyfile
添加以下配置(每个实例的配置文件中):
security:
authorization: enabled   #若启动实例报错,可删除此行
keyFile: /root/keyfile
clusterAuthMode: keyFile
启动实例:
[root@localhost ~]# mongod -f /etc/mongodb/config.conf
about to fork child process, waiting until server is ready for connections.
forked process: 11662
child process started successfully, parent exiting
[root@localhost ~]# mongod -f /etc/mongodb/shard1.conf
about to fork child process, waiting until server is ready for connections.
forked process: 11748
child process started successfully, parent exiting
[root@localhost ~]# mongod -f /etc/mongodb/shard2.conf
about to fork child process, waiting until server is ready for connections.
forked process: 11837
child process started successfully, parent exiting
[root@localhost ~]# mongod -f /etc/mongodb/shard3.conf
about to fork child process, waiting until server is ready for connections.
forked process: 11927
child process started successfully, parent exiting
[root@localhost ~]# vim /etc/mongodb/mongos.conf
[root@localhost ~]# mongos -f /etc/mongodb/mongos.conf
about to fork child process, waiting until server is ready for connections.
forked process: 12023
child process started successfully, parent exiting
[root@localhost ~]# ps -ef |grep mongo
root      11662      1  1 21:58 ?        00:00:03 mongod -f /etc/mongodb/config.conf
root      11748      1  1 21:58 ?        00:00:03 mongod -f /etc/mongodb/shard1.conf
root      11837      1  2 21:58 ?        00:00:04 mongod -f /etc/mongodb/shard2.conf
root      11927      1  1 21:59 ?        00:00:02 mongod -f /etc/mongodb/shard3.conf
root      12023      1  1 22:01 ?        00:00:00 mongos -f /etc/mongodb/mongos.conf
root      12056  10913  0 22:01 pts/0    00:00:00 grep mongo
#只有再启动mongos路由分片是会报错,其他都正常,可删除authorization: enabled配置即可
[root@localhost ~]# mongos -f /etc/mongodb/mongos.conf
Unrecognized option: security.authorization
try 'mongos --help' for more information
登陆验证
[root@localhost ~]# mongo 192.168.214.214:20000
MongoDB shell version v3.6.6
connecting to: mongodb://192.168.214.214:20000/test
MongoDB server version: 3.6.6
mongos> show dbs
2019-04-25T13:50:32.370+0800 E QUERY    [thread1] Error: listDatabases failed:{
    "ok" : 0,
    "errmsg" : "not authorized on admin to execute command { listDatabases: 1.0, $clusterTime: { clusterTime: Timestamp(1556171350, 1), signature: { hash: BinData(0, 3BB007B2D5254E4F53B248B18D9020A666CFEC91), keyId: 6680724571257045010 } }, $db: \"admin\" }",
    "code" : 13,
    "codeName" : "Unauthorized",
    "$clusterTime" : {
        "clusterTime" : Timestamp(1556171425, 2),
        "signature" : {
            "hash" : BinData(0,"p35bBX0K45G/nrC4Q0Q288vpBmM="),
            "keyId" : NumberLong("6680724571257045010")
        }
    },
    "operationTime" : Timestamp(1556171425, 2)
} :
_getErrorWithCode@src/mongo/shell/utils.js:25:13
Mongo.prototype.getDBs@src/mongo/shell/mongo.js:65:1
shellHelper.show@src/mongo/shell/utils.js:849:19
shellHelper@src/mongo/shell/utils.js:739:15
@(shellhelp2):1:1
mongos> use admin
switched to db admin
mongos> db.auth('root','root')
1
mongos> show dbs
admin   0.000GB
config  0.002GB
test    0.014GB
wsy     0.005GB
至此,mongodb分片集群加用户验证都已完成。
参考文献
https://www.cnblogs.com/liqing1009/p/8611954.html
https://www.cnblogs.com/clsn/p/8214345.html#auto_id_28
http://www.cnblogs.com/zhoujinyi/p/4635444.html

 浙公网安备 33010602011771号