React Native知识6-NavigatorIOS组件
NavigatorIOS包装了UIKit的导航功能,可以使用左划功能来返回到上一界面。本组件并非由Facebook官方开发组维护。这一组件的开发完全由社区主导。如果纯js的方案能够满足你的需求的话,那么我们建议你选择Navigator组件(理论知识可以见React Native中文网)。
一:概念内容
1:路由:一个路由是用于描述导航器中一页的对象。NavigatorIOS的第一个路由通过initialRoute属性来提供。
render: function() {
  return (
    <NavigatorIOS
      initialRoute={{
        component: MyView,
        title: 'My View Title',
        passProps: { myProp: 'foo' },
      }}
    />
  );
},
现在MyView会被导航器渲染出来。它可以通过route属性获得对应的路由对象,导航器本身,还有所有passProps中传递的属性。 查看initialRoute的propTypes来了解路由(route)的完整定义。
2:导航器:导航器是一个object,包含了一系列导航函数,可供视图调用。它会作为props传递给NavigatorIOS渲染的任何组件。
var MyView = React.createClass({
  _handleBackButtonPress: function() {
    this.props.navigator.pop();
  },
  _handleNextButtonPress: function() {
    this.props.navigator.push(nextRoute);
  },
  ...
});
一个导航器对象包含如下的函数:
push(route) - 导航器跳转到一个新的路由。
pop() - 回到上一页。
popN(n) - 回到N页之前。当N=1的时候,效果和pop()一样。
replace(route) - 替换当前页的路由,并立即加载新路由的视图。
replacePrevious(route) - 替换上一页的路由/视图。
replacePreviousAndPop(route) - 替换上一页的路由/视图并且立刻切换回上一页。
resetTo(route) - 替换最顶级的路由并且回到它。
popToRoute(route) - 一直回到某个指定的路由。
popToTop() - 回到最顶层的路由。
导航函数也可以从NavigatorIOS的子组件中获得:
var MyView = React.createClass({
  _handleNavigationRequest: function() {
    this.refs.nav.push(otherRoute);
  },
  render: () => (
    <NavigatorIOS
      ref="nav"
      initialRoute={...}
    />
  ),
});
二:属性
1:barTintColor string
导航条的背景颜色。
2:initialRoute {component: function, title: string, passProps: object, backButtonIcon: Image.propTypes.source, backButtonTitle: string, leftButtonIcon: Image.propTypes.source, leftButtonTitle: string, onLeftButtonPress: function, rightButtonIcon: Image.propTypes.source, rightButtonTitle: string, onRightButtonPress: function, wrapperStyle: [object Object]}
NavigatorIOS使用"路由"对象来包含要渲染的子视图、它们的属性、以及导航条配置。"push"和任何其它的导航函数的参数都是这样的路由对象。
3:itemWrapperStyle View#style
导航器中的组件的默认属性。一个常见的用途是设置所有页面的背景颜色。
4:navigationBarHidden bool
一个布尔值,决定导航栏是否隐藏。
5:shadowHidden bool
一个布尔值,决定是否要隐藏1像素的阴影
6:tintColor string
导航栏上按钮的颜色。
7:titleTextColor string
导航器标题的文字颜色。
8:translucent bool
一个布尔值,决定是否导航条是半透明的。
9:interactivePopGestureEnabled bool
决定是否启用滑动返回手势。不指定此属性时,手势会根据navigationBar的显隐情况决定是否启用(显示时启用手势,隐藏时禁用手势)。指定此属性后,手势与navigationBar的显隐情况无关。
三:方法
1:push(route: { component: Function; title: string; passProps?: Object; backButtonTitle?: string; backButtonIcon?: Object; leftButtonTitle?: string; leftButtonIcon?: Object; onLeftButtonPress?: Function; rightButtonTitle?: string; rightButtonIcon?: Object; onRightButtonPress?: Function; wrapperStyle?: any; }) 跳转
2:popN(n: number) 返回第N层
3:pop() 返回上一层
4:replaceAtIndex(route: { component: Function; title: string; passProps?: Object; backButtonTitle?: string; backButtonIcon?: Object; leftButtonTitle?: string; leftButtonIcon?: Object; onLeftButtonPress?: Function; rightButtonTitle?: string; rightButtonIcon?: Object; onRightButtonPress?: Function; wrapperStyle?: any; }, index: number) 替换navigation栈的路由,索引指定要替换的堆栈中的路由。如果它是负面的,它从后面计数。
5:replace(route: { component: Function; title: string; passProps?: Object; backButtonTitle?: string; backButtonIcon?: Object; leftButtonTitle?: string; leftButtonIcon?: Object; onLeftButtonPress?: Function; rightButtonTitle?: string; rightButtonIcon?: Object; onRightButtonPress?: Function; wrapperStyle?: any; })
替换当前页面的路由,并立即加载新路由的视图。
6:replacePrevious(route: { component: Function; title: string; passProps?: Object; backButtonTitle?: string; backButtonIcon?: Object; leftButtonTitle?: string; leftButtonIcon?: Object; onLeftButtonPress?: Function; rightButtonTitle?: string; rightButtonIcon?: Object; onRightButtonPress?: Function; wrapperStyle?: any; })
替换上一页的路由/视图。
7:popToTop() 返回到顶层
8:popToRoute(route: { component: Function; title: string; passProps?: Object; backButtonTitle?: string; backButtonIcon?: Object; leftButtonTitle?: string; leftButtonIcon?: Object; onLeftButtonPress?: Function; rightButtonTitle?: string; rightButtonIcon?: Object; onRightButtonPress?: Function; wrapperStyle?: any; })
返回特定路由对象的项目
9:replacePreviousAndPop(route: { component: Function; title: string; passProps?: Object; backButtonTitle?: string; backButtonIcon?: Object; leftButtonTitle?: string; leftButtonIcon?: Object; onLeftButtonPress?: Function; rightButtonTitle?: string; rightButtonIcon?: Object; onRightButtonPress?: Function; wrapperStyle?: any; })
替换前面的路由/视图并返回到它。
10:resetTo(route: { component: Function; title: string; passProps?: Object; backButtonTitle?: string; backButtonIcon?: Object; leftButtonTitle?: string; leftButtonIcon?: Object; onLeftButtonPress?: Function; rightButtonTitle?: string; rightButtonIcon?: Object; onRightButtonPress?: Function; wrapperStyle?: any; })
取代顶级和并执行poptotop
三:实例代码
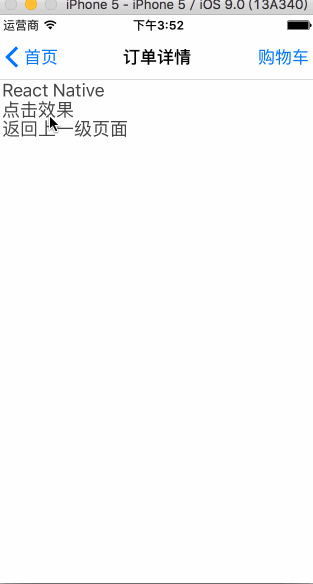
import React, { Component } from 'react';
import {
  AppRegistry,
  StyleSheet,
  Text,
  View,
  TextInput,
  Alert,
  Image,
  TouchableHighlight,
  TouchableOpacity,
  NavigatorIOS,
  ScrollView
} from 'react-native';

//导航栏
class ReactNativeProject extends Component {
  render() {
    return (
      <NavigatorIOS style={{flex:1}} initialRoute={{ component:ListPage,title:'首页'}}/>
    );
  }
}


//列表页面
class ListPage extends Component {
  render(){
  return (
    <ScrollView style={styles.flex}>
      <Text style={styles.list_item} onPress={this._goToDetailPage.bind(this)}>订单1详情</Text>
      <Text style={styles.list_item} onPress={this._goToDetailPage.bind(this)}>订单2详情</Text>
      <Text style={styles.list_item} onPress={this._goToDetailPage.bind(this)}>订单3详情</Text>
    </ScrollView>
    );
}

_goToDetailPage(){
  this.props.navigator.push({
    component: DetailPage,
    title: '订单详情',
    rightButtonTitle: '购物车',
    onRightButtonPress: function(){
        alert('进入我的购物车');
      }
  });
}
}

//详情页
class DetailPage extends Component {
  _show(text) {
    alert(text);
  }

  _handleBackButtonPress() {
    this.props.navigator.pop();
  }

  render() {
    return (
      <View style={styles.container}>
              <TouchableOpacity
                 onPress={this._show.bind(this,'React Native')}
                 activeOpacity={0.5}>
                 <Text style={styles.item}>React Native</Text>
               </TouchableOpacity>

               <TouchableOpacity
                 onPress={this._handleBackButtonPress.bind(this)}>
                 <Text style={styles.item}>返回上一级页面</Text>
               </TouchableOpacity>
      </View>
    );
  }
}

const styles = StyleSheet.create({
  container: {
    flex: 1,
    marginTop:64
  },
  item:
  {
    fontSize:18,
    marginLeft:5,
    color:'#434343'
  },
  flex:{
    flex: 1,
  },
  list_item:{
    lineHeight:25,
    fontSize:16,
    marginLeft:10,
    marginRight:10
  }
});

AppRegistry.registerComponent('ReactNativeProject', () => ReactNativeProject);
效果图:
最近有个妹子弄的一个关于扩大眼界跟内含的订阅号,每天都会更新一些深度内容,在这里如果你感兴趣也可以关注一下(嘿对美女跟知识感兴趣),当然可以关注后输入:github 会有我的微信号,如果有问题你也可以在那找到我;当然不感兴趣无视此信息;


 浙公网安备 33010602011771号