
学习saltstack (六)
Slatstack 介绍
官方源:http://repo.saltstack.com/ (介绍各操作系统安装方法)
centos 6源
|
1
|
yum install https://repo.saltstack.com/yum/redhat/salt-repo-latest-1.el6.noarch.rpm |
centos 7 源
|
1
|
yum install https://repo.saltstack.com/yum/redhat/salt-repo-latest-1.el7.noarch.rpm |
http://repo.saltstack.com/yum/redhat/7/x86_64
基于python开发,提供REST API接口
三大功能: 远程执行、配置管理(状态)、云管理
其它:Puppet(ruby)、ansible(python)
四种运行方式:Local、Minion/Master(C/S)、Syndic(代理,类似zabbix proxy)、Salt SSH
快速安装
- 安装
服务端
|
1
|
yum install salt-master salt-minion -y |
客户端
|
1
|
yum install salt-minion -y |
启动服务端
|
1
|
systemctl start salt-master |
配置客户端
|
1
2
3
|
vim /etc/salt/minionmaster: 192.168.137.11 # 配置master地址id: # 每台主机的唯一标识,不配置默认为主机名 |
启动客户端
|
1
|
systemctl start salt-minion |
启动后/etc/salt下生成minion_id文件,默认为主机名
如果修改id,需要删除minion_id
- master和minion启动后pki介绍
第一次启动minion在/etc/salt下生成pki文件目录
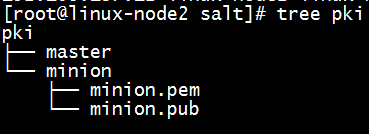
包含minion的公钥minion.pub和私钥minion.pem
第一次启动master在/etc/salt下生成pki文件目录
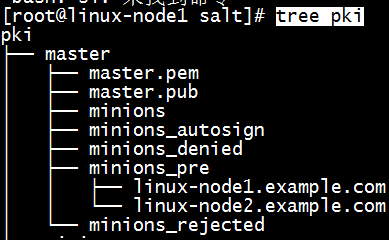
包含master的公钥master.pub和私钥master.pem
linux-node1.example.com和linux-node2.example.com为minion的公钥,名称为id名
minions_pre为预认证目录
- 认证
|
1
|
salt-key |

Accepted Keys 已同意的key
Denied Keys 拒绝的key
Unaccepted Keys 未认证的key
|
1
|
salt-key -a linux-node1.example.com |
指定linux-node1.example.com这台minion被信任
|
1
|
salt-key -a linux* # 通配符 |
说明:-a :accept ,-A:accept-all,-d:delete,-D:delete-all

两台minion已认证成功,此时再次查看master pki文件目录,minion的公钥文件放入了minions目录下

再次查看minion pki文件目录,存在minion_master.pub公钥文件

- 远程执行
语法: 命令 目标 模块.方法 方法参数
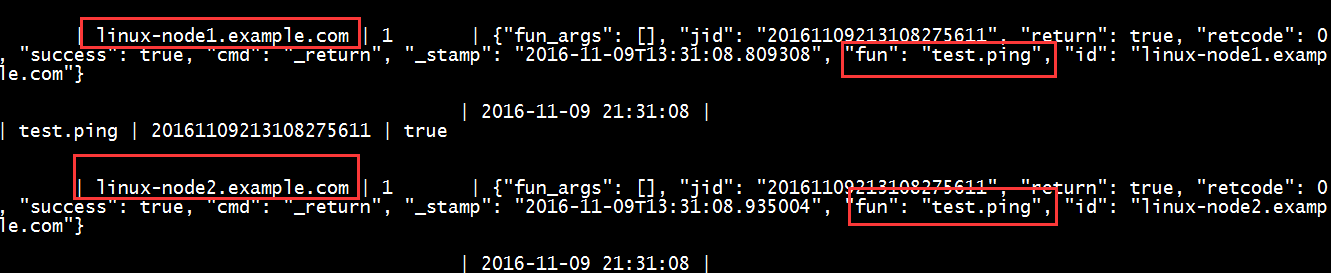
检查所有主机状态
|
1
|
salt '*' test.ping |
检查指定主机状态
|
1
|
salt "linux-node2.example.com" test.ping |
指定主机,远程执行shell命令
|
1
|
salt "linux-node2.example.com" cmd.run "ls -lrt /root" |
重启所有主机的zabbix agent
|
1
|
salt "*" cmd.run "systemctl restart zabbix-agent" |

- 状态模块
state 写一个描述文件。格式:YAML ,后缀:.sls
YAML介绍(重要)
YAML是"YAML Ain't a Markup Language"(YAML不是一种置标语言)的递归缩写。(可以查看百度百科介绍)
格式:数据结构可以用类似大纲的缩排方式呈现,结构通过缩进来表示,连续的项目通过减号“-”来表示,map结构里面的key/value对用冒号“:”来分隔。
样例如下:

salt管理理解YAML介绍 https://docs.saltstack.com/en/latest/topics/yaml/index.html
salt YAML三个规则:
1)缩进,需要用2个空格,不能使用Tab键;
2)冒号,冒号和缩进共用、键值对(中间有空格)
3)短横线, 于后面的值有空格
- master配置
|
1
2
|
vim /etc/salt/masterfile_roots # 定义base、测试、灰度、生产环境配置文件路径,base名称不能改 |

重启master
systemctl restart salt-master
创建配置文件目录
|
1
2
|
cd /srvmkdir salt |
- sls文件创建
apache.sls,放入到/srv/salt/web目录下

|
1
2
3
4
5
6
7
8
9
10
|
apache-install: # 自定义的id,名称 pkg.installed: # 状态模块,salt自带的, 模块.方法 - names: # 参数 - httpd - httpd-develapache-service: # 自定义的id,名称 service.running: # 状态模块,salt自带的, 模块.方法 - name: httpd # 参数 - enable: True |

执行这个文件
|
1
|
salt "*" state.sls web.apache |
执行流程:
1)master将这个文件发送至minion
2)minion放在/var/cache/salt/minion目录下

3)minion根据这个文件从上往下执行

执行结果


  1 linux-node2.example.com:
  2 ----------
  3           ID: apache-install
  4     Function: pkg.installed
  5         Name: httpd
  6       Result: True
  7      Comment: The following packages were installed/updated: httpd
  8      Started: 13:12:23.142622
  9     Duration: 103093.75 ms
 10      Changes:
 11               ----------
 12               apr:
 13                   ----------
 14                   new:
 15                       1.4.8-3.el7
 16                   old:
 17               apr-util:
 18                   ----------
 19                   new:
 20                       1.5.2-6.el7
 21                   old:
 22               httpd:
 23                   ----------
 24                   new:
 25                       2.4.6-40.el7.centos.4
 26                   old:
 27               httpd-tools:
 28                   ----------
 29                   new:
 30                       2.4.6-40.el7.centos.4
 31                   old:
 32               mailcap:
 33                   ----------
 34                   new:
 35                       2.1.41-2.el7
 36                   old:
 37 ----------
 38           ID: apache-install
 39     Function: pkg.installed
 40         Name: httpd-devel
 41       Result: True
 42      Comment: The following packages were installed/updated: httpd-devel
 43      Started: 13:14:06.266419
 44     Duration: 75699.845 ms
 45      Changes:
 46               ----------
 47               apr-devel:
 48                   ----------
 49                   new:
 50                       1.4.8-3.el7
 51                   old:
 52               apr-util-devel:
 53                   ----------
 54                   new:
 55                       1.5.2-6.el7
 56                   old:
 57               cyrus-sasl-devel:
 58                   ----------
 59                   new:
 60                       2.1.26-20.el7_2
 61                   old:
 62               expat-devel:
 63                   ----------
 64                   new:
 65                       2.1.0-8.el7
 66                   old:
 67               httpd-devel:
 68                   ----------
 69                   new:
 70                       2.4.6-40.el7.centos.4
 71                   old:
 72               libdb-devel:
 73                   ----------
 74                   new:
 75                       5.3.21-19.el7
 76                   old:
 77               openldap-devel:
 78                   ----------
 79                   new:
 80                       2.4.40-9.el7_2
 81                   old:
 82 ----------
 83           ID: apache-service
 84     Function: service.running
 85         Name: httpd
 86       Result: True
 87      Comment: Service httpd has been enabled, and is running
 88      Started: 13:15:22.549732
 89     Duration: 509.773 ms
 90      Changes:
 91               ----------
 92               httpd:
 93                   True
 94
 95 Summary for linux-node2.example.com
 96 ------------
 97 Succeeded: 3 (changed=3)
 98 Failed:    0
 99 ------------
100 Total states run:     3
101 Total run time: 179.303 s
102 linux-node1.example.com:
103 ----------
104           ID: apache-install
105     Function: pkg.installed
106         Name: httpd
107       Result: True
108      Comment: Package httpd is already installed
109      Started: 21:12:17.773014
110     Duration: 1030.017 ms
111      Changes:
112 ----------
113           ID: apache-install
114     Function: pkg.installed
115         Name: httpd-devel
116       Result: True
117      Comment: The following packages were installed/updated: httpd-devel
118      Started: 21:12:18.803216
119     Duration: 179505.346 ms
120      Changes:
121               ----------
122               apr-devel:
123                   ----------
124                   new:
125                       1.4.8-3.el7
126                   old:
127               apr-util-devel:
128                   ----------
129                   new:
130                       1.5.2-6.el7
131                   old:
132               cyrus-sasl-devel:
133                   ----------
134                   new:
135                       2.1.26-20.el7_2
136                   old:
137               expat-devel:
138                   ----------
139                   new:
140                       2.1.0-8.el7
141                   old:
142               httpd-devel:
143                   ----------
144                   new:
145                       2.4.6-40.el7.centos.4
146                   old:
147               libdb-devel:
148                   ----------
149                   new:
150                       5.3.21-19.el7
151                   old:
152               openldap-devel:
153                   ----------
154                   new:
155                       2.4.40-9.el7_2
156                   old:
157 ----------
158           ID: apache-service
159     Function: service.running
160         Name: httpd
161       Result: True
162      Comment: The service httpd is already running
163      Started: 21:15:18.523234
164     Duration: 62.391 ms
165      Changes:
166
167 Summary for linux-node1.example.com
168 ------------
169 Succeeded: 3 (changed=1)
170 Failed:    0
171 ------------
172 Total states run:     3
173 Total run time: 180.598 s
- top file
默认文件名top.sls,放在base目录下,base目录在file_roots配置项配置

通过top.sls文件可以实现根据不同的minion执行不同的sls文件
|
1
2
3
4
5
|
base: # 固定名称,必填 'linux-node1.example.com': # minion id - web.apache # apache.sls 'linux-node2.example.com': - web.apache |

|
1
|
salt "*" state.highstate |
上面命令执行state高级状态,它只会执行入口文件top.sls, 根据top文件中内容执行
生产环境中不建议使用*,需要指定具体主机,先用test测试
|
1
|
salt "linux-node1.example.com" state.highstate test=True |
测试正常后执行
|
1
|
salt "linux-node1.example.com" state.highstate |
########################################################################
- SaltStack与ZeroMQ
SaltStack底层是基于ZeroMQ进行高效的网络通信。
ZeroMQ简介
ØMQ (也拼写作ZeroMQ,0MQ或ZMQ)是一个为可伸缩的分布式或并发应用程序设计的高性能异步消息库。它提供一个消息队列, 但是与面向消息的中间件不同,ZeroMQ的运行不需要专门的消息代理(message broker)。该库设计成常见的套接字风格的API。能够提供进程内(inproc)、进程间(IPC)、网络(TCP)和广播方式的消息信道, 并支持扇出(fan-out)、发布-订阅(pub-sub)、任务分发(task distribution)、请求/响应(request-reply)等通信模式。
- SaltStack第一种模式:发布与订阅
ZeroMQ支持Publish/Subscribe,即发布与订阅模式,我们经常简称Pub/Sub。
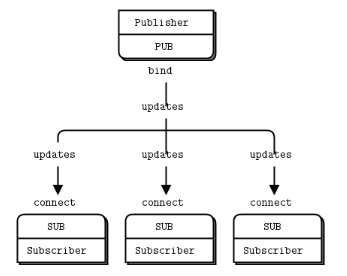
Salt Master运行两个网络服务,其中一个是ZeroMQ PUB系统,默认监听4505端口。
可以通过修改/etc/salt/master配置文件的publish_port参数设置。
它是salt的消息发布系统,如果查看4505端口,会发现所有的Minion连接到Master的4505端口,TCP状态持续保持为ESTABLISHED。
lsof -i:4505


- SaltStack第一种模式:请求与响应
ZeroMQ支持Request-Reply,即请求与响应模式,我们经常简称REQ/REP。

Salt Master运行的第二个网络服务就是ZeroMQ REP系统,默认监听4506端口,可以通过修改/etc/salt/master配置文件的ret_port参数设置。
它是salt客户端与服务端通信的端口。比如说Minion执行某个命令后的返回值就是发送给Master的4506这个REP端口
如果安装了python-setproctitle软件包,所以我们可以直接看到Salt Master启动的进程的名称。
|
1
|
yum install -y python-setproctitle |
重启master和minion
|
1
2
|
systemctl restart salt-mastersystemctl restart salt-minion |

|
1
2
3
4
5
6
7
8
9
10
11
|
/usr/bin/salt-master -d ProcessManager # 中心进程管理器/usr/bin/salt-master -d _clear_old_jobs # 清除旧的Jobs文件及更新fileserver/usr/bin/salt-master -d Publisher # 将任务PUB到Minion端/usr/bin/salt-master -d EventPublisher # Event Publisher进程/usr/bin/salt-master -d ReqServer_ProcessManager # ReqServer进程管理器/usr/bin/salt-master -d MWorker # 工作进程/usr/bin/salt-master -d MWorker # 工作进程/usr/bin/salt-master -d MWorker # 工作进程/usr/bin/salt-master -d MWorker # 工作进程/usr/bin/salt-master -d MWorker # 工作进程/usr/bin/salt-master -d MWorkerQueue # 将Ret接口(ROUTER)数据转发到Worker(DEALER) |
########################################################################
- Saltstack数据系统
分为Grains和Pillar
一、Grains
静态数据,当Minion启动的时候收集的MInion本地的相关信息。(包含操作系统版本、内核版本、CPU、内存、硬盘、设备型号等)
备注:不重启minion,这些信息数据是不会改变的。
1)信息管理,包括资产管理;
例:
|
1
2
3
4
|
salt 'linux-node1*' grains.ls # 列出ID为linux-node1的主机,grains的所有keysalt 'linux-node1*' grains.items # 列出主机的详细信息,可用于资产管理salt '*' grains.item os # 列出所有主机的系统版本salt '*' grains.item fqdn_ip4 # 列出所有主机的IP地址 |
2)用于目标选择;(查询具体id的主机,查询系统版本为centos的主机 等场景)
例:
|
1
2
|
salt -G 'os:Centos' test.ping # 所有主机系统为centos版本ping测试salt -G 'os:Centos' cmd.run 'echo 123' # 所有主机系统为centos版本执行命令'echo 123' |
3)配置管理中使用
自定义grains的item
方式一: 修改配置文件 vim /etc/salt/minion
重启 systemctl restart salt-minion

通过自定义的item,可以实现重启所有角色为apache的主机
|
1
2
|
salt '*' grains.item roles # 获取所有主机的rolessalt -G 'roles:apache' cmd.run 'systemctl restart httpd' # 所有主机roles为apache的执行命令systemctl restart httpd |
方式二:(生产环境使用)
修改配置文件 vim /etc/salt/grains,写法
|
1
|
cloud: openstack |
重启 systemctl restart salt-minion
|
1
|
salt '*' grains.item cloud # 获取所有主机的cloud |
修改/etc/salt/grains不重启服务的方法,刷新命令如下(备注:方式一和方式二修改配置文件,通过此命令都可以不用重启服务)
|
1
|
salt '*' saltutil.sync_grains |
grains在top FILE中的使用案例
vim /srv/salt/top.sls
|
1
2
3
4
5
6
|
base: 'linux-node1.example.com': - web.apache 'roles:apache': - match: grain - web.apach |

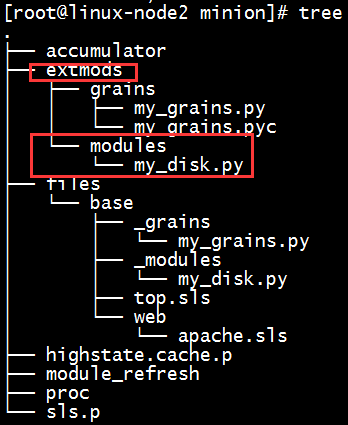
grains脚本目录,必须是base下创建_grains目录(如:/srv/salt/_grains)
创建一个python脚本在/srv/salt/_grains目录下
脚本名:my_grains.py
|
1
2
3
4
5
6
7
8
9
10
11
|
#!/usr/bin/env python#-*- coding: utf-8 -*-def my_grains(): # 初始化grains字典 grains = {} # 设置字典中的key-value grains['iaas'] = 'openstack' grains['edu'] = 'shhnwangjian' # 返回字典 return grains |
通过master同步脚本文件至每台minion
|
1
|
salt '*' saltutil.sync_grains |

文件放在minion主机的/var/cache/salt/minion/extmods/grains目录下

|
1
|
salt '*' grains.item edu # 获取所有主机的edu |

grains优先级(item名称相同的情况下): 1. 系统自带 2. grains文件写到 3. minion配置文件写的 4. 自己写的脚本
二、Pillar
动态数据,给特定的minion指定特定的数据。只有指定的minion自己能看到自己的数据。
|
1
|
salt '*' pillar.items |
开启系统自带,修改配置文件
|
1
|
vim /etc/salt/master |

重启systemctl restart salt-master
执行salt '*' pillar.items 可以看到系统自带的item
piller存在文件路径设置

mkdir /srv/pillar
重启systemctl restart salt-master

实现pillar流程
1)创建一个piller文件,python jinja2写法
|
1
2
3
|
mkdir /srv/pillar/webcd /srv/pillar/webvim apache.sls |
|
1
2
3
4
5
|
{% if grains['os'] == 'CentOS' %}apache: httpd{% elif grains['os'] == 'Debian' %}apache: apache2{% endif %} |
2)创建TOP FILE文件
|
1
|
vim /srv/pillar/top.sls |
|
1
2
3
|
base: 'linux-node2.example.com': - web.apache |
|
1
2
|
salt '*' saltutil.refresh_pillar # 刷新salt '*' pillar.items apache |

目标选择
|
1
|
salt -I 'apache:httpd' test.ping |

三、Grains VS Pillar

#######################################################################
- Saltstack远程执行
语法例:salt '*' cmd.run 'w'
- 命令:salt
- 目标:'*'
- 模块:cmd.run,自带150+模块,也可以自己写模块
- 返回:执行后结果返回,Returnners组件
1、指定目标(targeting)
官网文档:https://docs.saltstack.com/en/latest/topics/targeting/index.html
两种定位方法:一种和minion ID有关,一种和monion ID无关
1)minion ID有关的方法
指定具体的minion ID
|
1
|
salt 'linux-node2.example.com' test.ping |
通配符
|
1
2
3
4
5
6
|
salt '*' test.ping salt 'linux-node2*' test.pingsalt 'linux-node[1|2].example.com' test.pingsalt 'linux-node[1-2].example.com' test.pingsalt 'linux-node[!2].example.com' test.pingsalt 'linux-node?.example.com' test.ping |
列表
|
1
|
salt -L 'linux-node1.example.com,linux-node2.example.com' test.ping |
正则表达式
|
1
2
|
salt -E 'linux-(node1|node2)*' test.pingsalt -E 'linux-(node1|node2).example.com' test.ping |
备注: 所有匹配目标的方式,都可以用到top file里面来指定目标。
minion ID设置方案:IP地址、根据业务来进行设置
|
1
2
3
4
5
6
|
例:redis-node1-redis04-idc04-h5web.example.comredis-node1 # redis第一个节点redis04 # 集群idc04 # 机房h5web # 业务线 |
2)minion ID无关的方法
IP地址、子网
|
1
2
|
salt -S 192.168.137.12 test.pingsalt -S 192.168.137.0/24 test.ping |
分组,需要配置master文件
|
1
|
vim /etc/salt/master |

重启systemctl restart salt-master
|
1
|
salt -N web test.ping |
混合匹配
官方文档 https://docs.saltstack.com/en/latest/topics/targeting/compound.html

批处理 ,可用于重启所有主机或进程场景,百分比或固定数量的一点一点重启主机或进程
官方文档 https://docs.saltstack.com/en/latest/topics/targeting/batch.html

2、执行模块
官网文档 https://docs.saltstack.com/en/latest/ref/modules/all/index.html#all-salt-modules
列出salt所有模块,以及如何使用的帮助文档
通过yum默认安装salt所有模块存放路径 /usr/lib/python2.7/site-packages/salt/modules(centos 7)
例:
|
1
2
3
4
5
6
7
8
9
10
11
|
salt '*' network.active_tcp # 列出所有主机运行的tcp连接salt '*' network.arp # 列出所有主机arpsalt '*' service.available sshd # 列出所有主机sshdsalt '*' service.get_all # 列出所有主机的所有运行服务salt '*' service.status sshd # 列出所有主机sshd运行状态salt-cp '*' /etc/hosts /tmp/test # 将master上/etc/hosts文件拷贝到所有主机的/tmp/testsalt '*' state.show_top # 查看topsalt '*' state.single pkg.installed name=lsof # 所有主机安装lsof |
3、返回程序
官方文档 https://docs.saltstack.com/en/latest/ref/returners/index.html
1)将返回写入mysql库,是由minion直接写入mysql库
所有minion安装python mysql模块
|
1
2
3
|
salt '*' state.single pkg.installed name=MySQL-python或salt '*' cmd.run 'yum install MySQL-python -y' |
创建salt库
|
1
2
3
|
CREATE DATABASE `salt` DEFAULT CHARACTER SET utf8 DEFAULT COLLATE utf8_general_ci; |
|
1
|
USE `salt`; |
创建表
|
1
2
3
4
5
6
7
8
9
10
11
|
---- Table structure for table `jids`--DROP TABLE IF EXISTS `jids`;CREATE TABLE `jids` ( `jid` varchar(255) NOT NULL, `load` mediumtext NOT NULL, UNIQUE KEY `jid` (`jid`)) ENGINE=InnoDB DEFAULT CHARSET=utf8;CREATE INDEX jid ON jids(jid) USING BTREE; |
|
1
2
3
4
5
6
7
8
9
10
11
12
13
14
15
16
17
|
---- Table structure for table `salt_returns`--DROP TABLE IF EXISTS `salt_returns`;CREATE TABLE `salt_returns` ( `fun` varchar(50) NOT NULL, `jid` varchar(255) NOT NULL, `return` mediumtext NOT NULL, `id` varchar(255) NOT NULL, `success` varchar(10) NOT NULL, `full_ret` mediumtext NOT NULL, `alter_time` TIMESTAMP DEFAULT CURRENT_TIMESTAMP, KEY `id` (`id`), KEY `jid` (`jid`), KEY `fun` (`fun`)) ENGINE=InnoDB DEFAULT CHARSET=utf8; |
|
1
2
3
4
5
6
7
8
9
10
11
12
13
14
|
---- Table structure for table `salt_events`--DROP TABLE IF EXISTS `salt_events`;CREATE TABLE `salt_events` (`id` BIGINT NOT NULL AUTO_INCREMENT,`tag` varchar(255) NOT NULL,`data` mediumtext NOT NULL,`alter_time` TIMESTAMP DEFAULT CURRENT_TIMESTAMP,`master_id` varchar(255) NOT NULL,PRIMARY KEY (`id`),KEY `tag` (`tag`)) ENGINE=InnoDB DEFAULT CHARSET=utf8; |
授权
|
1
2
|
grant all on salt.* to salt@'%' identified by 'salt@pw';FLUSH PRIVILEGES; |
|
1
2
3
|
exitmysql -h192.168.137.11 -usalt -psalt@pw saltshow tables; |

配置minion文件
|
1
2
3
4
5
6
|
vim /etc/salt/minionmysql.host: '192.168.137.11'mysql.user: 'salt'mysql.pass: 'salt@pw'mysql.db: 'salt'mysql.port: 3306 |

重启 systemctl restart salt-minion
测试

|
1
|
salt '*' test.ping --return mysql |
|
1
|
salt '*' cmd.run 'df -h' --return mysql |

4、编写执行模块
1)放置路径
|
1
2
|
cd /srv/saltmkdir _modules |
2) 命名
文件名就是模块名
例: my_disk.py
|
1
2
3
4
5
|
vim /srv/salt/_modules/my_disk.pydef list(): cmd = 'df -h' ret = __salt__['cmd.run'](cmd) return ret |
3)刷新
|
1
|
salt '*' saltutil.sync_modules |

会放到指定目标的/var/cache/salt/minion下
4)执行
|
1
|
salt '*' my_disk.list |

####################################################################
官方文档 https://docs.saltstack.com/en/latest/topics/states/index.html
配置管理之SLS
Salt State SLS描述文件(YAML)
名称ID声明 默认是name声明
备注: 一个ID声明下面。状态模块不能重复使用
例:
|
1
2
3
4
5
6
7
8
9
10
11
12
13
|
apache-install: pkg.installed: - names: - httpd - httpd-develapache-service: # ID声明,高级状态,ID必须唯一。 service.running: # State声明 状态声明 - name: httpd # 选项声明 - enable: True php: pkg.installed |
常用状态模块介绍
1)pkg (https://docs.saltstack.com/en/latest/ref/states/all/salt.states.pkg.html#module-salt.states.pkg)
pkg.installed # 安装
pkg.latest # 确保最新版本
pkg.remove # 卸载
pkg.purge # 卸载并删除配置文件
# 同时安装多个包
|
1
2
3
4
5
6
|
common_packages: pkg.installed: - pkgs: - unzip - dos2unix - salt-minion: 2015.8.5-1.el6 |
2)file (https://docs.saltstack.com/en/latest/ref/states/all/salt.states.file.html#module-salt.states.file)
salt:// 表示当前环境的根目录。例如:

那么salt://lamp/files/httpd.conf 表示 /srv/salt/lamp/files/httpd.conf
3)service (https://docs.saltstack.com/en/latest/ref/states/all/salt.states.service.html#module-salt.states.service)
|
1
2
3
4
|
redis: service.running: - enable: True # 开机自启动 - reload: True # 重载 |
LAMP架构slat实现安装、配置、启动
1.安装软件包 pkg
2.修改配置文件 file
3.启动服务 service

lamp.sls文件内容如下
|
1
2
3
4
5
6
7
8
9
10
11
12
13
14
15
16
17
18
19
20
21
22
23
24
25
26
27
28
29
30
31
32
33
34
35
36
37
38
39
40
41
42
43
44
45
46
|
lamp-pkg: pkg.installed: - pkgs: - httpd - php - mariadb - mariadb-server - php-mysql - php-cli - php-mbstringapache-config: file.managed: - name: /etc/httpd/conf/httpd.conf - source: salt://lamp/files/httpd.conf - user: root - group: root - mode: 644php-config: file.managed: - name: /etc/php.ini - source: salt://lamp/files/php.ini - user: root - group: root - mode: 644mysql-config: file.managed: - name: /etc/my.cnf - source: salt://lamp/files/my.cnf - user: root - group: root - mode: 644apache-service: service.running: - name: httpd - enable: True - reload: Truemysql-service: service.running: - name: mariadb - enable: True - reload: True |
命令: salt 'linux-node2*' state.sls lamp.lamp
执行结果
 1 linux-node2.example.com:
 2 ----------
 3           ID: lamp-pkg
 4     Function: pkg.installed
 5       Result: True
 6      Comment: 4 targeted packages were installed/updated.
 7               The following packages were already installed: httpd, mariadb-server, mariadb
 8      Started: 12:56:16.178765
 9     Duration: 194279.377 ms
10      Changes:
11               ----------
12               libzip:
13                   ----------
14                   new:
15                       0.10.1-8.el7
16                   old:
17               php:
18                   ----------
19                   new:
20                       5.4.16-36.3.el7_2
21                   old:
22               php-cli:
23                   ----------
24                   new:
25                       5.4.16-36.3.el7_2
26                   old:
27               php-common:
28                   ----------
29                   new:
30                       5.4.16-36.3.el7_2
31                   old:
32               php-mbstring:
33                   ----------
34                   new:
35                       5.4.16-36.3.el7_2
36                   old:
37               php-mysql:
38                   ----------
39                   new:
40                       5.4.16-36.3.el7_2
41                   old:
42               php-pdo:
43                   ----------
44                   new:
45                       5.4.16-36.3.el7_2
46                   old:
47 ----------
48           ID: apache-config
49     Function: file.managed
50         Name: /etc/httpd/conf/httpd.conf
51       Result: True
52      Comment: File /etc/httpd/conf/httpd.conf is in the correct state
53      Started: 12:59:30.519583
54     Duration: 98.547 ms
55      Changes:
56 ----------
57           ID: php-config
58     Function: file.managed
59         Name: /etc/php.ini
60       Result: True
61      Comment: File /etc/php.ini is in the correct state
62      Started: 12:59:30.620067
63     Duration: 36.824 ms
64      Changes:
65 ----------
66           ID: mysql-config
67     Function: file.managed
68         Name: /etc/my.cnf
69       Result: True
70      Comment: File /etc/my.cnf is in the correct state
71      Started: 12:59:30.657074
72     Duration: 58.78 ms
73      Changes:
74 ----------
75           ID: apache-service
76     Function: service.running
77         Name: httpd
78       Result: True
79      Comment: The service httpd is already running
80      Started: 12:59:30.853149
81     Duration: 40.481 ms
82      Changes:
83 ----------
84           ID: mysql-service
85     Function: service.running
86         Name: mariadb
87       Result: True
88      Comment: The service mariadb is already running
89      Started: 12:59:30.893939
90     Duration: 33.928 ms
91      Changes:
92
93 Summary for linux-node2.example.com
94 ------------
95 Succeeded: 6 (changed=1)
96 Failed:    0
97 ------------
98 Total states run:     6
99 Total run time: 194.548 s
第二种方式:
文件lamp2.sls 内容如下:
|
1
2
3
4
5
6
7
8
9
10
11
12
13
14
15
16
17
18
19
20
21
22
23
24
25
26
27
28
29
30
31
32
33
34
35
36
37
38
39
|
apache-server: pkg.installed: - pkgs: - httpd - php file.managed: - name: /etc/httpd/conf/httpd.conf - source: salt://lamp/files/httpd.conf - user: root - group: root - mode: 644 service.running: - name: httpd - enable: True - reload: Truemysql-server: pkg.installed: - pkgs: - mariadb - mariadb-server file.managed: - name: /etc/my.cnf - source: salt://lamp/files/my.cnf - user: root - group: root - mode: 644 service.running: - name: mariadb - enable: True - reload: Truephp-config: file.managed: - name: /etc/php.ini - source: salt://lamp/files/php.ini - user: root - group: root - mode: 644 |
命令: salt 'linux-node2*' state.sls lamp.lamp2
执行结果
 1 linux-node2.example.com:
 2 ----------
 3           ID: apache-server
 4     Function: pkg.installed
 5       Result: True
 6      Comment: All specified packages are already installed
 7      Started: 13:13:53.886308
 8     Duration: 665.948 ms
 9      Changes:
10 ----------
11           ID: apache-server
12     Function: file.managed
13         Name: /etc/httpd/conf/httpd.conf
14       Result: True
15      Comment: File /etc/httpd/conf/httpd.conf is in the correct state
16      Started: 13:13:54.553919
17     Duration: 19.867 ms
18      Changes:
19 ----------
20           ID: apache-server
21     Function: service.running
22         Name: httpd
23       Result: True
24      Comment: The service httpd is already running
25      Started: 13:13:54.574411
26     Duration: 29.927 ms
27      Changes:
28 ----------
29           ID: mysql-server
30     Function: pkg.installed
31       Result: True
32      Comment: All specified packages are already installed
33      Started: 13:13:54.604496
34     Duration: 0.771 ms
35      Changes:
36 ----------
37           ID: mysql-server
38     Function: file.managed
39         Name: /etc/my.cnf
40       Result: True
41      Comment: File /etc/my.cnf is in the correct state
42      Started: 13:13:54.605362
43     Duration: 15.125 ms
44      Changes:
45 ----------
46           ID: mysql-server
47     Function: service.running
48         Name: mariadb
49       Result: True
50      Comment: The service mariadb is already running
51      Started: 13:13:54.620592
52     Duration: 29.75 ms
53      Changes:
54 ----------
55           ID: php-config
56     Function: file.managed
57         Name: /etc/php.ini
58       Result: True
59      Comment: File /etc/php.ini is in the correct state
60      Started: 13:13:54.650496
61     Duration: 17.036 ms
62      Changes:
63
64 Summary for linux-node2.example.com
65 ------------
66 Succeeded: 7
67 Failed:    0
68 ------------
69 Total states run:     7
70 Total run time: 778.424 ms
配置管理之状态间关系
状态间关系:
1.我依赖谁 require
|
1
2
3
4
5
6
7
8
|
apache-service: service.running: - name: httpd - enable: True - reload: True - require: - pkg: lamp-pkg # pkg ID - file: apache-config # file ID |
2 我被谁依赖 require_in
|
1
2
3
4
5
6
7
8
9
|
mysql-config: file.managed: - name: /etc/my.cnf - source: salt://lamp/files/my.cnf - user: root - group: root - mode: 644 - require_in: - service: mysql-service |
3 我监控谁 watch
|
1
2
3
4
5
6
7
8
9
10
11
|
apache-service: service.running: - name: httpd - enable: True - reload: True - require: - pkg: lamp-pkg - watch: - file: apache-config1. 若果apache-config这个id的状态发生变化就reload2. 如果不加reload: True,那么就restart |
4 我被谁监控 watch_in
5 我引用谁 include
例:lamp第一种方法中,将安装、配置、启动分别保存3个文件, 由一个总文件引用
init.sls文件内容
|
1
2
3
4
|
include: - lamp.lamp_pkg - lamp.lamp_config - lamp.lamp_service |
lamp_pkg.sls文件内容
|
1
2
3
4
5
6
7
8
9
10
|
lamp-pkg: pkg.installed: - pkgs: - httpd - php - mariadb - mariadb-server - php-mysql - php-cli - php-mbstring |
lamp_config.sls文件内容
|
1
2
3
4
5
6
7
8
9
10
11
12
13
14
15
16
17
18
19
20
21
22
23
24
25
|
apache-config: file.managed: - name: /etc/httpd/conf/httpd.conf - source: salt://lamp/files/httpd.conf - user: root - group: root - mode: 644php-config: file.managed: - name: /etc/php.ini - source: salt://lamp/files/php.ini - user: root - group: root - mode: 644mysql-config: file.managed: - name: /etc/my.cnf - source: salt://lamp/files/my.cnf - user: root - group: root - mode: 644 - require_in: - service: mysql-service |
lamp_service.sls文件内容
|
1
2
3
4
5
6
7
8
9
10
11
12
13
14
15
|
apache-service: service.running: - name: httpd - enable: True - reload: True - require: - pkg: lamp-pkg - watch: - file: apache-configmysql-service: service.running: - name: mariadb - enable: True - reload: True |
执行命令:salt 'linux-node2*' state.sls lamp.init
6 我扩展谁
如何编写SLS技巧:
1.按状态分类 如果单独使用,很清晰。
2.按服务分类 可以被其他的SLS include。例如LNMP include mysql的服务。
jinja2
文档:http://docs.jinkan.org/docs/jinja2/
模板包含 变量 或 表达式,两种分隔符: {% ... %} 和 {{ ... }} 。前者用于执行诸如 for 循环 或赋值的语句,后者把表达式的结果打印到模板上。
salt中如何使用jinja2:
文档:https://docs.saltstack.com/en/latest/topics/jinja/index.html
1)告诉File模块,你要使用jinja
|
1
2
3
4
5
6
7
8
|
apache-config: file.managed: - name: /etc/httpd/conf/httpd.conf - source: salt://lamp/files/httpd.conf - user: root - group: root - mode: 644 - template: jinja |
2)列出参数列表
|
1
2
3
4
5
6
7
8
9
10
|
apache-config: file.managed: - name: /etc/httpd/conf/httpd.conf - source: salt://lamp/files/httpd.conf - user: root - group: root - mode: 644 - template: jinja - defaults: PORT: 8080 |
3)模板引用
httpd.conf配置文件引用如下

执行命令:salt 'linux-node2*' state.sls lamp.init
执行结果:
 1 linux-node2.example.com:
 2 ----------
 3           ID: lamp-pkg
 4     Function: pkg.installed
 5       Result: True
 6      Comment: All specified packages are already installed
 7      Started: 11:15:02.903236
 8     Duration: 4591.748 ms
 9      Changes:
10 ----------
11           ID: apache-config
12     Function: file.managed
13         Name: /etc/httpd/conf/httpd.conf
14       Result: True
15      Comment: File /etc/httpd/conf/httpd.conf updated
16      Started: 11:15:07.558365
17     Duration: 90.859 ms
18      Changes:
19               ----------
20               diff:
21                   ---
22                   +++
23                   @@ -39,7 +39,7 @@
24                    # prevent Apache from glomming onto all bound IP addresses.
25                    #
26                    #Listen 12.34.56.78:80
27                   -Listen 80
28                   +Listen 8080
29
30                    #
31                    # Dynamic Shared Object (DSO) Support
32 ----------
33           ID: php-config
34     Function: file.managed
35         Name: /etc/php.ini
36       Result: True
37      Comment: File /etc/php.ini is in the correct state
38      Started: 11:15:07.649429
39     Duration: 63.754 ms
40      Changes:
41 ----------
42           ID: mysql-config
43     Function: file.managed
44         Name: /etc/my.cnf
45       Result: True
46      Comment: File /etc/my.cnf is in the correct state
47      Started: 11:15:07.713515
48     Duration: 49.273 ms
49      Changes:
50 ----------
51           ID: apache-service
52     Function: service.running
53         Name: httpd
54       Result: True
55      Comment: Service reloaded
56      Started: 11:15:07.800629
57     Duration: 135.15 ms
58      Changes:
59               ----------
60               httpd:
61                   True
62 ----------
63           ID: mysql-service
64     Function: service.running
65         Name: mariadb
66       Result: True
67      Comment: The service mariadb is already running
68      Started: 11:15:07.936165
69     Duration: 95.71 ms
70      Changes:
71
72 Summary for linux-node2.example.com
73 ------------
74 Succeeded: 6 (changed=2)
75 Failed:    0
76 ------------
77 Total states run:     6
78 Total run time:   5.026 s

- 模板里面支持: salt执行模块 grinas 进行赋值
例:修改配置文件httpd.conf,将IP地址指向本机IP,通过grains['fqdn_ip4'][0]可以获取本机IP地址

salt 'linux-node2*' grains.item fqdn_ip4

- 模板里面支持:salt远程执行模块
例:修改配置文件httpd.conf,{{ salt['netwrok.hw_addr']('eth0') }}

salt 'linux-node2*' network.hw_addr eth0

执行命令:salt 'linux-node2*' state.sls lamp.init
执行结果

 1 linux-node2.example.com:
 2 ----------
 3           ID: lamp-pkg
 4     Function: pkg.installed
 5       Result: True
 6      Comment: All specified packages are already installed
 7      Started: 11:51:57.213758
 8     Duration: 664.953 ms
 9      Changes:
10 ----------
11           ID: apache-config
12     Function: file.managed
13         Name: /etc/httpd/conf/httpd.conf
14       Result: True
15      Comment: File /etc/httpd/conf/httpd.conf updated
16      Started: 11:51:57.880642
17     Duration: 82.912 ms
18      Changes:
19               ----------
20               diff:
21                   ---
22                   +++
23                   @@ -39,7 +39,9 @@
24                    # prevent Apache from glomming onto all bound IP addresses.
25                    #
26                    #Listen 12.34.56.78:80
27                   -Listen 8080
28                   +Listen 192.168.137.12:8080
29                   +
30                   +# MAC IS: 00:0c:29:fd:dd:02
31
32                    #
33                    # Dynamic Shared Object (DSO) Support
34 ----------
35           ID: php-config
36     Function: file.managed
37         Name: /etc/php.ini
38       Result: True
39      Comment: File /etc/php.ini is in the correct state
40      Started: 11:51:57.963715
41     Duration: 14.577 ms
42      Changes:
43 ----------
44           ID: mysql-config
45     Function: file.managed
46         Name: /etc/my.cnf
47       Result: True
48      Comment: File /etc/my.cnf is in the correct state
49      Started: 11:51:57.978393
50     Duration: 12.482 ms
51      Changes:
52 ----------
53           ID: apache-service
54     Function: service.running
55         Name: httpd
56       Result: True
57      Comment: Service reloaded
58      Started: 11:51:58.021471
59     Duration: 127.043 ms
60      Changes:
61               ----------
62               httpd:
63                   True
64 ----------
65           ID: mysql-service
66     Function: service.running
67         Name: mariadb
68       Result: True
69      Comment: The service mariadb is already running
70      Started: 11:51:58.148913
71     Duration: 58.592 ms
72      Changes:
73
74 Summary for linux-node2.example.com
75 ------------
76 Succeeded: 6 (changed=2)
77 Failed:    0
78 ------------
79 Total states run:     6
80 Total run time: 960.559 ms
- 模板里面支持: salt执行模块 pillar进行赋值
例:修改配置文件httpd.conf,{{ pillar['apache'] }}

salt 'linux-node2*' pillar.item apache

执行命令:salt 'linux-node2*' state.sls lamp.init
执行结果:

 1 linux-node2.example.com:
 2 ----------
 3           ID: lamp-pkg
 4     Function: pkg.installed
 5       Result: True
 6      Comment: All specified packages are already installed
 7      Started: 12:01:16.490143
 8     Duration: 712.121 ms
 9      Changes:
10 ----------
11           ID: apache-config
12     Function: file.managed
13         Name: /etc/httpd/conf/httpd.conf
14       Result: True
15      Comment: File /etc/httpd/conf/httpd.conf updated
16      Started: 12:01:17.204369
17     Duration: 93.136 ms
18      Changes:
19               ----------
20               diff:
21                   ---
22                   +++
23                   @@ -42,6 +42,7 @@
24                    Listen 192.168.137.12:8080
25
26                    # MAC IS: 00:0c:29:fd:dd:02
27                   +# pillar: httpd
28
29                    #
30                    # Dynamic Shared Object (DSO) Support
31 ----------
32           ID: php-config
33     Function: file.managed
34         Name: /etc/php.ini
35       Result: True
36      Comment: File /etc/php.ini is in the correct state
37      Started: 12:01:17.297764
38     Duration: 17.209 ms
39      Changes:
40 ----------
41           ID: mysql-config
42     Function: file.managed
43         Name: /etc/my.cnf
44       Result: True
45      Comment: File /etc/my.cnf is in the correct state
46      Started: 12:01:17.315170
47     Duration: 15.217 ms
48      Changes:
49 ----------
50           ID: apache-service
51     Function: service.running
52         Name: httpd
53       Result: True
54      Comment: Service httpd is already enabled, and is running
55      Started: 12:01:17.331369
56     Duration: 184.591 ms
57      Changes:
58               ----------
59               httpd:
60                   True
61 ----------
62           ID: mysql-service
63     Function: service.running
64         Name: mariadb
65       Result: True
66      Comment: The service mariadb is already running
67      Started: 12:01:17.516431
68     Duration: 32.057 ms
69      Changes:
70
71 Summary for linux-node2.example.com
72 ------------
73 Succeeded: 6 (changed=2)
74 Failed:    0
75 ------------
76 Total states run:     6
77 Total run time:   1.054 s
###########################################################################
SaltStack项目实战
- 系统架构图

一、初始化
1、salt环境配置,定义基础环境、生产环境(base、prod)
|
1
2
3
4
5
6
7
8
9
10
|
vim /etc/salt/master修改file_rootsfile_roots: base: - /srv/salt/base prod: - /srv/salt/prod mkdir -p /srv/salt/basemkdir -p /srv/salt/prod |
pillar配置
|
1
2
3
4
5
6
7
8
9
10
|
vim /etc/salt/master修改pillar_rootspillar_roots: base: - /srv/pillar/base pord: - /srv/pillar/prod mkdir -p /srv/pillar/basemkdir -p /srv/pillar/prod |
服务重启 systemctl restart salt-master
2、salt base环境初始化:
|
1
2
|
mkdir -p /srv/salt/base/init # 环境初始化目录mkdir -p /srv/salt/base/init/files # 配置文件目录 |
1)dns配置
准备dns配置文件,放入/srv/salt/base/init/files目录下
cp /etc/resolv.conf /srv/salt/base/init/files/
|
1
2
3
4
5
6
7
|
vi /srv/salt/base/init/dns.sls/etc/resolv.conf: file.managed: - source: salt://init/files/resolv.conf - user: root - gourp: root - mode: 644 |
2)histroy记录时间
|
1
2
3
4
5
|
vi /srv/salt/base/init/history.sls/etc/profile: file.append: - text: - export HISTTIMEFORMAT="%F %T `whoami` " |
3)记录命令操作
|
1
2
3
4
5
|
vi /srv/salt/base/init/audit.sls/etc/bashrc: file.append: - text: - export PROMPT_COMMAND='{ msg=$(history 1 | { read x y; echo $y; });logger "[euid=$(whoami)]":$(who am i):[`pwd`]"$msg"; }' |
4)内核参数优化
|
1
2
3
4
5
6
7
8
9
10
11
12
13
|
vi /srv/salt/base/init/sysctl.slsnet.ipv4.ip_local_port_range: sysctl.present: - value: 10000 65000fs.file-max: sysctl.present: - value: 2000000net.ipv4.ip_forward: sysctl.present: - value: 1vm.swappiness: sysctl.present: - value: 0 |
5)安装yum仓库
|
1
2
3
4
5
6
|
vi /srv/salt/base/init/epel.slsyum_repo_release: pkg.installed: - sources: - epel-release: http://mirrors.aliyun.com/epel/epel-release-latest-7.noarch.rpm - unless: rpm -qa | grep epel-release-latest-7 |
6)安装zabbix-agent
准备zabbix-agent配置文件,放入/srv/salt/base/init/files目录下
cp /etc/zabbix/zabbix_agentd.conf /srv/salt/base/init/files/
修改 vi /etc/zabbix/zabbix_agentd.conf

|
1
2
3
4
5
6
7
8
9
10
11
12
13
14
15
16
17
18
19
20
21
22
23
24
25
26
27
28
|
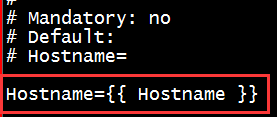
vi /srv/salt/base/init/zabbix_agent.slszabbix-agent: pkg.installed: - name: zabbix-agent file.managed: - name: /etc/zabbix/zabbix_agentd.conf - source: salt://init/files/zabbix_agentd.conf - template: jinja - backup: minion - defaults: Server: {{ pillar['zabbix-agent']['Zabbix_Server'] }} Hostname: {{ grains['fqdn'] }} - require: - pkg: zabbix-agent service.running: - enable: True - watch: - pkg: zabbix-agent - file: zabbix-agentzabbix_agentd.d: file.directory: - name: /etc/zabbix/zabbix_agentd.d - watch_in: - service: zabbix-agent - require: - pkg: zabbix-agent - file: zabbix-agent |
备注:“- backup: minion”表示备份,如果文件改动,会将之前的文件备份到/var/cache/salt/file_backup目录下

7)编写init.sls总文件,引用其它文件
|
1
2
3
4
5
6
7
8
|
vi /srv/salt/base/init/init.slsinclude: - init.dns - init.history - init.audit - init.sysctl - init.epel - init.zabbix_agent |
执行命令: salt "*" state.sls init.init
执行结果
  1 linux-node1.example.com:
  2 ----------
  3           ID: /etc/resolv.conf
  4     Function: file.managed
  5       Result: True
  6      Comment: File /etc/resolv.conf is in the correct state
  7      Started: 04:39:32.998314
  8     Duration: 181.548 ms
  9      Changes:
 10 ----------
 11           ID: /etc/profile
 12     Function: file.append
 13       Result: True
 14      Comment: File /etc/profile is in correct state
 15      Started: 04:39:33.180034
 16     Duration: 6.118 ms
 17      Changes:
 18 ----------
 19           ID: /etc/bashrc
 20     Function: file.append
 21       Result: True
 22      Comment: Appended 1 lines
 23      Started: 04:39:33.186266
 24     Duration: 6.608 ms
 25      Changes:
 26               ----------
 27               diff:
 28                   ---
 29
 30                   +++
 31
 32                   @@ -90,3 +90,4 @@
 33
 34                        unset -f pathmunge
 35                    fi
 36                    # vim:ts=4:sw=4
 37                   +export PROMPT_COMMAND='{ msg=$(history 1 | { read x y; echo $y; });logger "[euid=$(whoami)]":$(who am i):[`pwd`]"$msg"; }'
 38 ----------
 39           ID: net.ipv4.ip_local_port_range
 40     Function: sysctl.present
 41       Result: True
 42      Comment: Updated sysctl value net.ipv4.ip_local_port_range = 10000 65000
 43      Started: 04:39:33.261448
 44     Duration: 212.528 ms
 45      Changes:
 46               ----------
 47               net.ipv4.ip_local_port_range:
 48                   10000 65000
 49 ----------
 50           ID: fs.file-max
 51     Function: sysctl.present
 52       Result: True
 53      Comment: Updated sysctl value fs.file-max = 2000000
 54      Started: 04:39:33.474197
 55     Duration: 122.497 ms
 56      Changes:
 57               ----------
 58               fs.file-max:
 59                   2000000
 60 ----------
 61           ID: net.ipv4.ip_forward
 62     Function: sysctl.present
 63       Result: True
 64      Comment: Updated sysctl value net.ipv4.ip_forward = 1
 65      Started: 04:39:33.596905
 66     Duration: 35.061 ms
 67      Changes:
 68               ----------
 69               net.ipv4.ip_forward:
 70                   1
 71 ----------
 72           ID: vm.swappiness
 73     Function: sysctl.present
 74       Result: True
 75      Comment: Updated sysctl value vm.swappiness = 0
 76      Started: 04:39:33.632208
 77     Duration: 36.226 ms
 78      Changes:
 79               ----------
 80               vm.swappiness:
 81                   0
 82 ----------
 83           ID: yum_repo_release
 84     Function: pkg.installed
 85       Result: True
 86      Comment: All specified packages are already installed
 87      Started: 04:39:39.085699
 88     Duration: 12627.626 ms
 89      Changes:
 90 ----------
 91           ID: zabbix-agent
 92     Function: pkg.installed
 93       Result: True
 94      Comment: Package zabbix-agent is already installed
 95      Started: 04:39:51.713592
 96     Duration: 6.677 ms
 97      Changes:
 98 ----------
 99           ID: zabbix-agent
100     Function: file.managed
101         Name: /etc/zabbix/zabbix_agentd.conf
102       Result: True
103      Comment: File /etc/zabbix/zabbix_agentd.conf updated
104      Started: 04:39:51.720994
105     Duration: 152.077 ms
106      Changes:
107               ----------
108               diff:
109                   ---
110                   +++
111                   @@ -90,7 +90,7 @@
112                    #
113                    # Mandatory: no
114                    # Default:
115                   -Server={{ Server }}
116                   +Server=192.168.137.11
117
118                    ### Option: ListenPort
119                    #    Agent will listen on this port for connections from the server.
120 ----------
121           ID: zabbix_agentd.d
122     Function: file.directory
123         Name: /etc/zabbix/zabbix_agentd.d
124       Result: True
125      Comment: Directory /etc/zabbix/zabbix_agentd.d is in the correct state
126      Started: 04:39:51.875082
127     Duration: 0.908 ms
128      Changes:
129 ----------
130           ID: zabbix-agent
131     Function: service.running
132       Result: True
133      Comment: Service restarted
134      Started: 04:39:51.932698
135     Duration: 205.223 ms
136      Changes:
137               ----------
138               zabbix-agent:
139                   True
140
141 Summary for linux-node1.example.com
142 -------------
143 Succeeded: 12 (changed=7)
144 Failed:     0
145 -------------
146 Total states run:     12
147 Total run time:   13.593 s
148 linux-node2.example.com:
149 ----------
150           ID: /etc/resolv.conf
151     Function: file.managed
152       Result: True
153      Comment: File /etc/resolv.conf is in the correct state
154      Started: 12:46:38.639870
155     Duration: 182.254 ms
156      Changes:
157 ----------
158           ID: /etc/profile
159     Function: file.append
160       Result: True
161      Comment: Appended 1 lines
162      Started: 12:46:38.822236
163     Duration: 3.047 ms
164      Changes:
165               ----------
166               diff:
167                   ---
168
169                   +++
170
171                   @@ -74,3 +74,4 @@
172
173
174                    unset i
175                    unset -f pathmunge
176                   +export HISTTIMEFORMAT="%F %T `whoami` "
177 ----------
178           ID: /etc/bashrc
179     Function: file.append
180       Result: True
181      Comment: Appended 1 lines
182      Started: 12:46:38.825423
183     Duration: 3.666 ms
184      Changes:
185               ----------
186               diff:
187                   ---
188
189                   +++
190
191                   @@ -90,3 +90,4 @@
192
193                        unset -f pathmunge
194                    fi
195                    # vim:ts=4:sw=4
196                   +export PROMPT_COMMAND='{ msg=$(history 1 | { read x y; echo $y; });logger "[euid=$(whoami)]":$(who am i):[`pwd`]"$msg"; }'
197 ----------
198           ID: net.ipv4.ip_local_port_range
199     Function: sysctl.present
200       Result: True
201      Comment: Updated sysctl value net.ipv4.ip_local_port_range = 10000 65000
202      Started: 12:46:39.011409
203     Duration: 132.499 ms
204      Changes:
205               ----------
206               net.ipv4.ip_local_port_range:
207                   10000 65000
208 ----------
209           ID: fs.file-max
210     Function: sysctl.present
211       Result: True
212      Comment: Updated sysctl value fs.file-max = 2000000
213      Started: 12:46:39.144117
214     Duration: 33.556 ms
215      Changes:
216               ----------
217               fs.file-max:
218                   2000000
219 ----------
220           ID: net.ipv4.ip_forward
221     Function: sysctl.present
222       Result: True
223      Comment: Updated sysctl value net.ipv4.ip_forward = 1
224      Started: 12:46:39.177821
225     Duration: 43.489 ms
226      Changes:
227               ----------
228               net.ipv4.ip_forward:
229                   1
230 ----------
231           ID: vm.swappiness
232     Function: sysctl.present
233       Result: True
234      Comment: Updated sysctl value vm.swappiness = 0
235      Started: 12:46:39.221788
236     Duration: 39.882 ms
237      Changes:
238               ----------
239               vm.swappiness:
240                   0
241 ----------
242           ID: yum_repo_release
243     Function: pkg.installed
244       Result: True
245      Comment: All specified packages are already installed
246      Started: 12:46:47.608597
247     Duration: 13989.554 ms
248      Changes:
249 ----------
250           ID: zabbix-agent
251     Function: pkg.installed
252       Result: True
253      Comment: Package zabbix-agent is already installed
254      Started: 12:47:01.598548
255     Duration: 1.265 ms
256      Changes:
257 ----------
258           ID: zabbix-agent
259     Function: file.managed
260         Name: /etc/zabbix/zabbix_agentd.conf
261       Result: True
262      Comment: File /etc/zabbix/zabbix_agentd.conf updated
263      Started: 12:47:01.600712
264     Duration: 82.425 ms
265      Changes:
266               ----------
267               diff:
268                   ---
269                   +++
270                   @@ -90,8 +90,6 @@
271                    #
272                    # Mandatory: no
273                    # Default:
274                   -# Server=
275                   -
276                    Server=192.168.137.11
277
278                    ### Option: ListenPort
279                   @@ -117,7 +115,7 @@
280                    # Mandatory: no
281                    # Range: 0-100
282                    # Default:
283                   -StartAgents=3
284                   +# StartAgents=3
285
286                    ##### Active checks related
287
288                   @@ -133,7 +131,7 @@
289                    # Default:
290                    # ServerActive=
291
292                   -#ServerActive=192.168.137.11
293                   +ServerActive=192.168.137.11
294
295                    ### Option: Hostname
296                    #    Unique, case sensitive hostname.
297                   @@ -144,7 +142,7 @@
298                    # Default:
299                    # Hostname=
300
301                   -Hostname=linux-node2
302                   +Hostname=Zabbix server
303
304                    ### Option: HostnameItem
305                    #    Item used for generating Hostname if it is undefined. Ignored if Hostname is defined.
306                   @@ -174,7 +172,7 @@
307                    #
308                    # Mandatory: no
309                    # Default:
310                   -HostMetadataItem=system.uname
311                   +# HostMetadataItem=
312
313                    ### Option: RefreshActiveChecks
314                    #    How often list of active checks is refreshed, in seconds.
315 ----------
316           ID: zabbix_agentd.d
317     Function: file.directory
318         Name: /etc/zabbix/zabbix_agentd.d
319       Result: True
320      Comment: Directory /etc/zabbix/zabbix_agentd.d is in the correct state
321      Started: 12:47:01.684357
322     Duration: 0.93 ms
323      Changes:
324 ----------
325           ID: zabbix-agent
326     Function: service.running
327       Result: True
328      Comment: Service restarted
329      Started: 12:47:01.751277
330     Duration: 275.781 ms
331      Changes:
332               ----------
333               zabbix-agent:
334                   True
335
336 Summary for linux-node2.example.com
337 -------------
338 Succeeded: 12 (changed=8)
339 Failed:     0
340 -------------
341 Total states run:     12
342 Total run time:   14.788 s
8)创建top文件
|
1
2
3
4
|
vi /srv/salt/base/top.slsbase: '*': - init.init |
测试 salt "*" state.highstate test=True
执行 salt "*" state.highstate
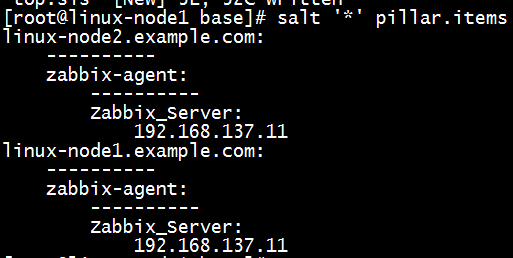
3、pillar base初始化
1)zabbix agent配置,指定zabbix server地址,用于sls文件引用
|
1
2
3
4
|
mkdir -p /srv/pillar/base/zabbixvi /srv/pillar/base/zabbix/agent.slszabbix-agent: Zabbix_Server: 192.168.137.11 |
编写top,引用/srv/pillar/base/zabbix/agent文件
|
1
2
3
4
|
vi /srv/pillar/base/top.slsbase: '*': - zabbix.agent |
测试 salt '*' pillar.items
二、haproxy
|
1
2
3
4
5
6
7
8
9
|
mkdir -p /srv/salt/prod/modules/haproxymkdir -p /srv/salt/prod/modules/keepalivedmkdir -p /srv/salt/prod/modules/memcachedmkdir -p /srv/salt/prod/modules/nginxmkdir -p /srv/salt/prod/modules/phpmkdir -p /srv/salt/prod/modules/pkgmkdir -p /srv/salt/prod/clustermkdir -p /srv/salt/prod/modules/haproxy/files/mkdir -p /srv/salt/prod/cluster/files |
1)系统gcc编译包等
|
1
2
3
4
5
6
7
8
9
10
11
12
13
|
vi /srv/salt/prod/pkg/make.slsmake-pkg: pkg.installed: - names: - gcc - gcc-c++ - glibc - make - autoconf - openssl - openssl-devel - pcre - pcre-devel |
2) 自安装
|
1
2
3
4
5
6
|
cd /usr/local/src tar xvf haproxy-1.6.3.tar.gzcd haproxy-1.6.3/make TARGET=linux2628 PREFIX=/usr/local/haproxy-1.6.3make install PREFIX=/usr/local/haproxy-1.6.3ln -s /usr/local/haproxy-1.6.3 /usr/local/haproxy |
修改启动脚本,放入salt下
|
1
2
3
|
vi /usr/local/src/haproxy-1.6.3/examples/haproxy.initBIN=/usr/local/haproxy/sbin/$BASENAMEcp /usr/local/src/haproxy-1.6.3/examples/haproxy.init /srv/salt/prod/modules/haproxy/files/ |
haproxy-1.6.3.tar.gz安装包放入/srv/salt/prod/modules/haproxy/files/目录下
3)创建install.sls文件,用于安装haproxy
|
1
2
3
4
5
6
7
8
9
10
11
12
13
14
15
16
17
18
19
20
21
22
23
24
25
26
27
28
29
30
31
32
33
34
35
36
37
38
39
40
41
|
vi /srv/salt/prod/modules/haproxy/install.slsinclude: - modules.pkg.make haproxy-install: file.managed: - name: /usr/local/src/haproxy-1.6.3.tar.gz - source: salt://modules/haproxy/files/haproxy-1.6.3.tar.gz - mode: 755 - user: root - group: root cmd.run: - name: cd /usr/local/src && tar zxf haproxy-1.6.3.tar.gz && cd haproxy-1.6.3 && make TARGET=linux2628 PREFIX=/usr/local/haproxy-1.6.3 && make install PREFIX=/usr/local/haproxy-1.6.3 && ln -s /usr/local/haproxy-1.6.3 /usr/local/haproxy - unless: test -L /usr/local/haproxy - require: - pkg: make-pkg - file: haproxy-installhaproxy-init: file.managed: - name: /etc/init.d/haproxy - source: salt://modules/haproxy/files/haproxy.init - mode: 755 - user: root - group: root - require_in: - file: haproxy-install cmd.run: - name: chkconfig --add haproxy - unless: chkconfig --list| grep haproxy net.ipv4.ip_nonlocal_bind: sysctl.present: - value: 1haproxy-config-dir: file.directory: - name: /etc/haproxy - mode: 755 - user: root - group: root |
备注: “- unless” 如果unless后面的命令返回为True,那么就不执行当前状态命令
4)创建haproxy配置文件
|
1
2
3
4
5
6
7
8
9
10
11
12
13
14
15
16
17
18
19
20
21
22
23
24
25
26
27
28
29
30
31
32
33
34
35
36
|
vi /srv/salt/prod/cluster/files/haproxy-outside.cfgglobalmaxconn 100000chroot /usr/local/haproxyuid 99gid 99daemonnbproc 1pidfile /usr/local/haproxy/logs/haproxy.pidlog 127.0.0.1 local3 infodefaultsoption http-keep-alivemaxconn 100000mode httptimeout connect 5000mstimeout client 50000mstimeout server 50000mslisten statsmode httpbind 0.0.0.0:8888stats enablestats uri /haproxy-statusstats auth haproxy:saltstackfrontend frontend_www_example_combind 192.168.137.21:80mode httpoption httploglog globaldefault_backend backend_www_example_combackend backend_www_example_comoption forwardfor header X-REAL-IPoption httpchk HEAD / HTTP/1.0balance sourceserver web-node1 192.168.137.11:8080 check inter 2000 rise 30 fall 15server web-node2 192.168.137.12:8080 check inter 2000 rise 30 fall 15 |
创建haproxy-outside.sls文件,用于配置haproxy
|
1
2
3
4
5
6
7
8
9
10
11
12
13
14
15
16
17
18
19
|
vi /srv/salt/prod/cluster/haproxy-outside.slsinclude: - modules.haproxy.installhaproxy-service: file.managed: - name: /etc/haproxy/haproxy.cfg - source: salt://cluster/files/haproxy-outside.cfg - user: root - group: root - mode: 644 service.running: - name: haproxy - enable: True - reload: True - require: - cmd: haproxy-install - watch: - file: haproxy-service |
5)配置top file
|
1
2
3
4
5
6
7
|
vi /srv/pillar/base/top.slsbase: '*': - zabbix.agentprod: 'linux-node*': - cluster.haproxy-outside |
测试 salt "*" state.highstate test=True
执行 salt "*" state.highstate
结果:

三、keepalived
1)创建files目录,将keepalived-1.2.17.tar.gz安装包、keepalived.sysconfig、keepalived.init放入
|
1
|
mkdir -p /srv/salt/prod/modules/keepalived/files |
2)创建install.sls文件
|
1
2
3
4
5
6
7
8
9
10
11
12
13
14
15
16
17
18
19
20
21
22
23
24
25
26
27
28
29
30
31
32
33
34
35
36
37
38
39
40
41
42
|
vi /srv/salt/prod/modules/keepalived/install.sls{% set keepalived_tar = 'keepalived-1.2.17.tar.gz' %}{% set keepalived_source = 'salt://modules/keepalived/files/keepalived-1.2.17.tar.gz' %}keepalived-install: file.managed: - name: /usr/local/src/{{ keepalived_tar }} - source: {{ keepalived_source }} - mode: 755 - user: root - group: root cmd.run: - name: cd /usr/local/src && tar zxf {{ keepalived_tar }} && cd keepalived-1.2.17 && ./configure --prefix=/usr/local/keepalived --disable-fwmark && make && make install - unless: test -d /usr/local/keepalived - require: - file: keepalived-install/etc/sysconfig/keepalived: file.managed: - source: salt://modules/keepalived/files/keepalived.sysconfig - mode: 644 - user: root - group: root/etc/init.d/keepalived: file.managed: - source: salt://modules/keepalived/files/keepalived.init - mode: 755 - user: root - group: rootkeepalived-init: cmd.run: - name: chkconfig --add keepalived - unless: chkconfig --list | grep keepalived - require: - file: /etc/init.d/keepalived/etc/keepalived: file.directory: - user: root - group: root |
执行命令:salt '*' state.sls modules.keepalived.install saltenv=prod
3)创建keepalived配置文件haproxy-outside-keepalived.conf
|
1
2
3
4
5
6
7
8
9
10
11
12
13
14
15
16
17
18
19
20
21
22
23
24
25
|
! Configuration File for keepalivedglobal_defs { notification_email { saltstack@example.com } notification_email_from keepalived@example.com smtp_server 127.0.0.1 smtp_connect_timeout 30 router_id {{ROUTEID}}}vrrp_instance haproxy_ha {state {{STATEID}}interface eth0 virtual_router_id 36priority {{PRIORITYID}} advert_int 1authentication {auth_type PASS auth_pass 1111 } virtual_ipaddress { 192.168.137.21 }} |
创建haproxy-outside-keepalived.sls
|
1
2
3
4
5
6
7
8
9
10
11
12
13
14
15
16
17
18
19
20
21
22
23
24
25
26
|
vi /srv/salt/prod/cluster/haproxy-outside-keepalived.slsinclude: - modules.keepalived.installkeepalived-server: file.managed: - name: /etc/keepalived/keepalived.conf - source: salt://cluster/files/haproxy-outside-keepalived.conf - mode: 644 - user: root - group: root - template: jinja {% if grains['fqdn'] == 'linux-node1.example.com' %} - ROUTEID: haproxy_ha - STATEID: MASTER - PRIORITYID: 150 {% elif grains['fqdn'] == 'linux-node2.example.com' %} - ROUTEID: haproxy_ha - STATEID: BACKUP - PRIORITYID: 100 {% endif %} service.running: - name: keepalived - enable: True - watch: - file: keepalived-server |
4)将keepalived加入top FILE
|
1
2
3
4
5
6
7
8
|
vi /srv/salt/base/top.slsbase: '*': - init.initprod: 'linux-node*': - cluster.haproxy-outside - cluster.haproxy-outside-keepalived |
测试 salt "*" state.highstate test=True
执行 salt "*" state.highstate
##########################################################################
四、memcached
1)创建www用户
|
1
2
3
4
5
6
7
8
9
10
11
12
13
|
mkdir -p /srv/salt/prod/modules/uservi /srv/salt/prod/modules/user/www.slswww-user-group: group.present: - name: www - gid: 1000 user.present: - name: www - fullname: www - shell: /sbin/nologin - uid: 1000 - gid: 1000 |
2)libevent,将安装包放入/srv/salt/prod/modules/libevent/files
|
1
2
3
4
5
6
7
8
9
10
11
12
13
14
|
mkdir -p /srv/salt/prod/modules/libevent/filesvi /srv/salt/prod/modules/libevent/install.slslibevent-source-install: file.managed: - name: /usr/local/src/libevent-2.0.22-stable.tar.gz - source: salt://modules/libevent/files/libevent-2.0.22-stable.tar.gz - user: root - group: root - mode: 644 cmd.run: - name: cd /usr/local/src && tar zxf libevent-2.0.22-stable.tar.gz && cd libevent-2.0.22-stable && ./configure --prefix=/usr/local/libevent && make && make install - unless: test -d /usr/local/libevent - require: - file: libevent-source-install |
3)创建files目录,将memcached-1.4.24.tar.gz安装包放入
|
1
|
mkdir -p /srv/salt/prod/modules/memcached/files |
4)创建install.sls文件
|
1
2
3
4
5
6
7
8
9
10
11
12
13
14
15
16
17
|
vi /srv/salt/prod/modules/memcached/install.slsinclude: - modules.libevent.installmemcached-source-install: file.managed: - name: /usr/local/src/memcached-1.4.24.tar.gz - source: salt://modules/memcached/files/memcached-1.4.24.tar.gz - user: root - group: root - mode: 644 cmd.run: - name: cd /usr/local/src && tar zxf memcached-1.4.24.tar.gz && cd memcached-1.4.24&& ./configure --prefix=/usr/local/memcached --enable-64bit --with-libevent=/usr/local/libevent && make && make install - unless: test -d /usr/local/memcached - require: - cmd: libevent-source-install - file: memcached-source-install |
5)负责业务部分的放入一个目录,如bbs
|
1
2
3
4
5
6
7
8
9
10
11
12
13
|
mkdir -p /srv/salt/prod/bbsvi /srv/salt/prod/bbs/memcached.slsinclude: - modules.memcached.install - modules.user.wwwmemcached-service: cmd.run: - name: /usr/local/memcached/bin/memcached -d -m 128 -p 11211 -c 8096 -u www - unless: netstat -ntlp | grep 11211 - require: - cmd: memcached-source-install - user: www-user-group |
6)将memcached加入top FILE
|
1
2
3
4
5
6
7
8
9
10
11
|
vi /srv/salt/base/top.slsbase: '*': - init.initprod: 'linux-node*': - cluster.haproxy-outside - cluster.haproxy-outside-keepalived 'linux-node2*': - bbs.memcached |
测试 salt "*" state.highstate test=True
执行 salt "*" state.highstate
五、php
1)php安装包和相关文件放入/srv/salt/prod/modules/php/files
|
1
|
mkdir -p /srv/salt/prod/modules/php/files |

2)创建install.sls
vi /srv/salt/prod/modules/php/install.sls
|
1
2
3
4
5
6
7
8
9
10
11
12
13
14
15
16
17
18
19
20
21
22
23
24
25
26
27
28
29
30
31
32
33
34
35
36
37
38
39
40
41
42
43
44
45
46
47
48
49
50
51
52
53
54
55
56
57
58
59
60
61
62
|
include: - modules.pkg.make - modules.user.wwwpkg-php: pkg.installed: - names: - swig - libjpeg-turbo - libjpeg-turbo-devel - libpng - libpng-devel - freetype - freetype-devel - libxml2 - libxml2-devel - zlib - zlib-devel - libcurl - libcurl-develphp-source-install: file.managed: - name: /usr/local/src/php-5.6.9.tar.gz - source: salt://modules/php/files/php-5.6.9.tar.gz - user: root - group: root - mode: 755 cmd.run: - name: cd /usr/local/src && tar zxf php-5.6.9.tar.gz && cd php-5.6.9&& ./configure --prefix=/usr/local/php-fastcgi --with-pdo-mysql=mysqlnd --with-mysqli=mysqlnd --with-mysql=mysqlnd --with-jpeg-dir --with-png-dir --with-zlib --enable-xml --with-libxml-dir --with-curl --enable-bcmath --enable-shmop --enable-sysvsem --enable-inline-optimization --enable-mbregex --with-openssl --enable-mbstring --with-gd --enable-gd-native-ttf --with-freetype-dir=/usr/lib64 --with-gettext=/usr/lib64 --enable-sockets --with-xmlrpc --enable-zip --enable-soap --disable-debug --enable-opcache --enable-zip --with-config-file-path=/usr/local/php-fastcgi/etc --enable-fpm --with-fpm-user=www --with-fpm-group=www && make && make install - require: - file: php-source-install - user: www-user-group - unless: test -d /usr/local/php-fastcgipdo-plugin: cmd.run: - name: cd /usr/local/src/php-5.6.9/ext/pdo_mysql/ && /usr/local/php-fastcgi/bin/phpize && ./configure --with-php-config=/usr/local/php-fastcgi/bin/php-config && make&& make install - unless: test -f /usr/local/php-fastcgi/lib/php/extensions/*/pdo_mysql.so - require: - cmd: php-source-installphp-fpm: file.managed: - name: /usr/local/php-fastcgi/etc/php-fpm.conf - source: salt://modules/php/files/php-fpm.conf.default - user: root - group: root - mode: 644php-fastcgi-service: file.managed: - name: /etc/init.d/php-fpm - source: salt://modules/php/files/init.d.php-fpm - user: root - group: root - mode: 755 cmd.run: - name: chkconfig --add php-fpm - unless: chkconfig --list | grep php-fpm - require: - file: php-fastcgi-service |
创建php-memcache.sls
vi /srv/salt/prod/modules/php/php-memcache.sls
|
1
2
3
4
5
6
7
8
9
10
11
12
13
14
|
memcache-plugin: file.managed: - name: /usr/local/src/memcache-2.2.7.tgz - source: salt://modules/php/files/memcache-2.2.7.tgz - user: root - group: root - mode: 755 cmd.run: - name: cd /usr/local/src && tar zxf memcache-2.2.7.tgz && cd memcache-2.2.7&& /usr/local/php-fastcgi/bin/phpize && ./configure --enable-memcache --with-php-config=/usr/local/php-fastcgi/bin/php-config && make&& make install - unless: test -f /usr/local/php-fastcgi/lib/php/extensions/*/memcache.so require: - file: memcache-plugin - cmd: php-install |
创建php-redis.sls
vi /srv/salt/prod/modules/php/php-redis.sls
|
1
2
3
4
5
6
7
8
9
10
11
12
13
|
redis-plugin: file.managed: - name: /usr/local/src/redis-2.2.7.tgz - source: salt://modules/php/files/redis-2.2.7.tgz - user: root - group: root - mode: 755 cmd.run: - name: cd /usr/local/src && tar zxf redis-2.2.7.tgz && cd redis-2.2.7&& /usr/local/php-fastcgi/bin/phpize && ./configure --with-php-config=/usr/local/php-fastcgi/bin/php-config && make&& make install - unless: test -f /usr/local/php-fastcgi/lib/php/extensions/*/redis.so require: - file: redis-plugin - cmd: php-install |
执行命令:salt '*' state.sls modules.php.install saltenv=prod
六、nginx
1)nginx安装包和相关文件放入/srv/salt/prod/modules/nginx/files
|
1
|
mkdir -p /srv/salt/prod/modules/nginx/files |

2)创建install.sls
vi /srv/salt/prod/modules/nginx/install.sls
|
1
2
3
4
5
6
7
8
9
10
11
12
13
14
15
16
17
18
|
include: - modules.pkg.make - modules.user.wwwnginx-source-install: file.managed: - name: /usr/local/src/nginx-1.9.1.tar.gz - source: salt://modules/nginx/files/nginx-1.9.1.tar.gz - user: root - group: root - mode: 755 cmd.run: - name: cd /usr/local/src && tar zxf nginx-1.9.1.tar.gz && cd nginx-1.9.1&& ./configure --prefix=/usr/local/nginx --user=www --group=www --with-http_ssl_module --with-http_stub_status_module --with-file-aio --with-http_dav_module && make && make install && chown -R www:www /usr/local/nginx - unless: test -d /usr/local/nginx - require: - user: www-user-group - file: nginx-source-install - pkg: make-pkg |
创建service.sls
vi /srv/salt/prod/modules/nginx/service.sls
|
1
2
3
4
5
6
7
8
9
10
11
12
13
14
15
16
17
18
19
20
21
22
23
24
25
26
27
28
29
30
31
32
33
34
35
36
37
38
39
40
41
|
include: - modules.nginx.installnginx-init: file.managed: - name: /etc/init.d/nginx - source: salt://modules/nginx/files/nginx-init - mode: 755 - user: root - group: root cmd.run: - name: chkconfig --add nginx - unless: chkconfig --list | grep nginx - require: - file: nginx-init/usr/local/nginx/conf/nginx.conf: file.managed: - source: salt://modules/nginx/files/nginx.conf - user: www - group: www - mode: 644 nginx-service: service.running: - name: nginx - enable: True - reload: True - require: - cmd: nginx-init - watch: - file: /usr/local/nginx/conf/nginx.conf - file: nginx-onlinenginx-online: file.directory: - name: /usr/local/nginx/conf/vhost_onlinenginx-offline: file.directory: - name: /usr/local/nginx/conf/vhost_offline |
执行命令:salt '*' state.sls modules.nginx.install saltenv=prod
4)/srv/salt/prod/bbs/files/nginx-bbs.conf
|
1
2
3
4
5
6
7
8
9
10
11
|
server { listen 8080; root /usr/local/nginx/html; index index.htm index.html index.php; location ~ \.php$ { fastcgi_pass unix:/usr/local/php-fastcgi/php-fpm.sock; fastcgi_index index.php; include fastcgi.conf; } } |
5)/srv/salt/prod/bbs目录下创建web.sls
|
1
2
3
4
5
6
7
8
9
10
11
12
13
14
15
16
17
18
19
20
21
22
23
24
25
26
27
28
29
30
31
32
|
include: - modules.php.install - modules.php.php-memcache - modules.php.php-redis - modules.nginx.servicebbs-php: file.managed: - name: /usr/local/php-fastcgi/etc/php.ini - source: salt://bbs/files/php.ini-production - user: root - group: root - mode: 644 service.running: - name: php-fpm - enable: True - require: - cmd: php-fastcgi-service - watch: - file: bbs-phpweb-bbs: file.managed: - name: /usr/local/nginx/conf/vhost_online/bbs.conf - source: salt://bbs/files/nginx-bbs.conf - user: root - group: root - mode: 644 - require: - service: bbs-php - watch_in: - service: nginx-service |
执行命令:salt '*' state.sls bbs.web saltenv=prod
6)将php、nginx加入top FILE
vi /srv/salt/base/top.sls
|
1
2
3
4
5
6
7
8
9
10
11
|
base: '*': - init.initprod: 'linux-node*': - cluster.haproxy-outside - cluster.haproxy-outside-keepalived - bbs.web 'linux-node2*': - bbs.memcached |
测试 salt "*" state.highstate test=True
执行 salt "*" state.highstate
###########################################################################
SaltStack之Job管理和Runner
配置文件/etc/salt/master
|
1
2
|
cachedir: /var/cache/salt/master # cache路径keep_jobs: 24 # job保存时间 |
salt执行模块官方文档 https://docs.saltstack.com/en/latest/ref/modules/all/index.html
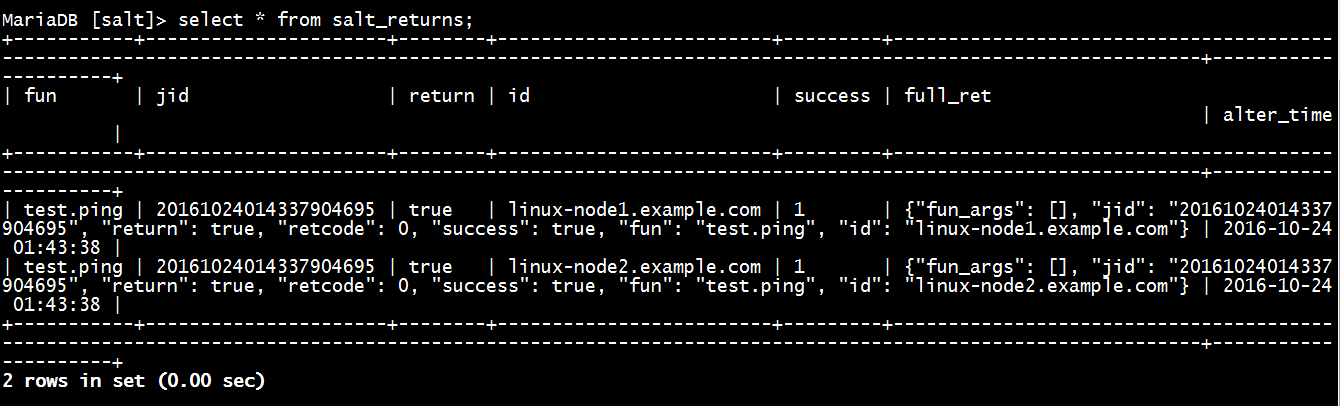
- 如何将master的返回加入mysql数据库?
1)数据库表结构创建可参考 http://www.cnblogs.com/shhnwangjian/p/5986964.html 的第三节“返回程序”
2)yum install -y MySQL-python 创建python的mysql模块
3)修改master配置文件
|
1
2
3
4
5
6
7
|
vi /etc/salt/mastermaster_job_cache: mysqlmysql.host: '192.168.137.11'mysql.user: 'salt'mysql.pass: 'salt@pw'mysql.db: 'salt'mysql.port: 3306 |
4)重启 systemctl restart salt-master.service
5)测试:
|
1
2
|
salt '*' test.ping数据中查询 select * from salt_returns; |
- 如何kill salt正在执行的任务?
salt '*' saltutil.running # 查看正在运行的任务,找到jid
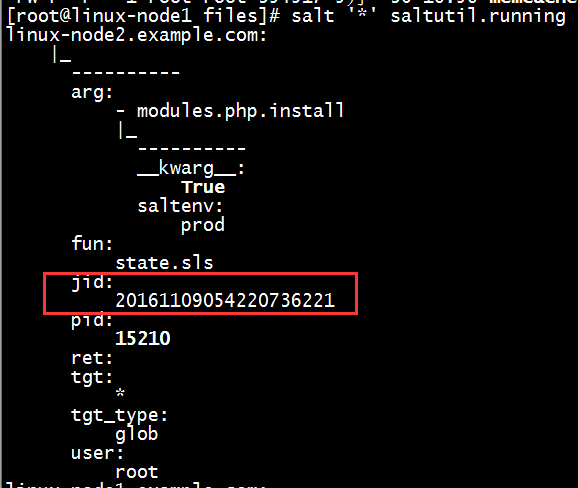
salt '*' saltutil.kill_job jid # 根据jid杀掉任务
salt '*' saltutil.clear_cache # 清除minion缓存
备注:
1)正在执行的salt任务,job id会存在minion端的/var/cache/salt/minion/proc目录下
2)正在执行的salt任务,根据上面master cache的配置,Job的路径/var/cache/salt/master/jobs目录下
salt runners
官方文档 https://docs.saltstack.com/en/latest/ref/runners/index.html
命令:salt-run
举例:
|
1
2
|
salt-run jobs.list_jobs # 列出当前保存在job cache中的历史执行任务salt-run jobs.lookup_jid jid # 查看历史jid执行结果 |
备注: 我们通过salt命令开头执行时,所有的命令master端分发至minion端,由minion端自己执行,如果一个模块在master存在,在minion端不存在,就会出现执行失败的情况。为了解决这个问题,提供salt runners模块,它是将所有的命令在master端执行。
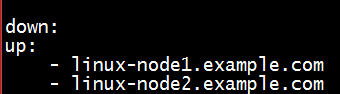
salt-run manage.status # 查看minion的状态
|
1
2
|
salt-run manage.downsalt-run manage.up |
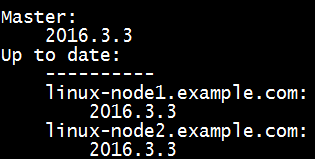
salt-run manage.versions # 查看minion的版本
#######################################################################
SaltStack之无Master和多Master
- Masterless架构,无Master
实现方式:
1)关闭minion进程
2)修改配置文件
|
1
2
|
vi /etc/salt/minionfile_client: local |
备注:其它配置项如file_roots、pillar_roots跟master一样,区别在于上面的配置项,将从master获取cache数据,改成了从本地获取cache数据。
3)编写SLS文件
4)执行命令:salt-call --local state.highstate
- 多master架构
实现方式:
1)minion配置
|
1
2
3
4
|
vi /etc/salt/minionmaster: - 192.168.137.11 - 192.168.137.21 |
2)SLS使用git或者SVN管理
另一种方式: NFS共享keys 、file_roots、pillar_roots,但是不安全。
###################################################################
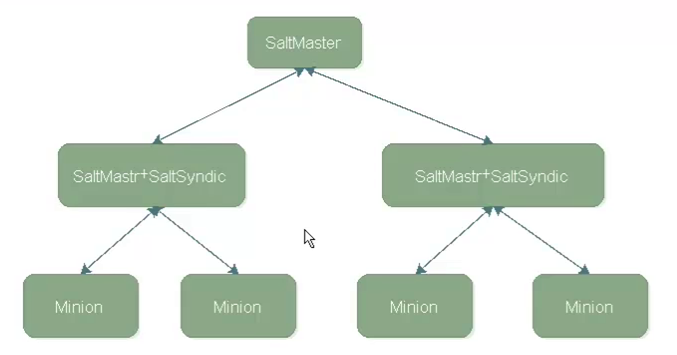
- Saltstack之Syndic
使用条件:
1、salt syndic必须运行在一台master上
2、salt syndic必须依赖更高级的master
安装
|
1
|
yum install -y salt-syndic |
配置
|
1
2
|
vi /etc/salt/mastersyndic_master: 192.168.137.12 |
备注:syndic和master共用一个配置文件
重启master: systemctl restart salt-master
启动sydic: systemctl start salt-syndic
更高级master修改配置(上图中第一排的master)
|
1
2
|
vi /etc/salt/masterorder_masters: True # 管理syndic |
启动高级master:systemctl start salt-master
使用
1)认证,master与syndic需要认证
|
1
|
salt-key -A |
2)master执行命令,通过syndic分发到个minion,然后返回结果
重点:syndic的file_roots和pillar_rotts必须与高级master一致。
缺点:高级master并不知道自己到底有多少minion。
#################################################################
- Saltstack之SSH
安装
|
1
|
yum install -y salt-ssh |
官方文档 https://docs.saltstack.com/en/latest/topics/ssh/index.html
配置
管理/etc/salt/roster文件,配置需要管理的所有主机
|
1
2
3
4
5
6
7
8
9
10
|
vi /etc/salt/rosterlinux-node1.example.com: host: 192.168.137.11 user: root port: 22 linux-node2.example.com: host: 192.168.137.12 user: root port: 22 |
如何通过证书认证?
1)执行 salt-ssh '*' test.ping -i,提示输入密码;
2)用户输入一次密码后salt-ssh会将公钥发送到对应主机,例如:/root/.ssh/authorized_keys;
3)/etc/salt/pki/master/ssh目录下存master公钥和私钥。
备注:取消证书提示
|
1
2
|
vi /root/.ssh/configStricHostKeyChecking no |
命令
|
1
|
salt-ssh '*' -r 'df -h' # -r参数直接执行Linux命令 |
使用场景
1、不使用minion,通过salt-ssh控制所有主机
2、minion升级、重启,通过salt-ssh可以实现
###########################################################################
Saltstack-API
官方文档 https://docs.saltstack.com/en/latest/ref/netapi/all/salt.netapi.rest_cherrypy.html
使用条件:1)https调用,需要生成证书 2)配置文件 3)使用PAM验证 4)启动salt-api
安装
|
1
|
yum install -y salt-api |
实现方式
1)创建用户useradd -M -s /sbin/nologin saltapi
2)设置密码passwd saltapi
3)生成自签名证书
cd /etc/pki/tls/certs
mv localhost.crt /tmp
make testcert

cd /etc/pki/tls/private
如果上面生成证书时输入了密码,需要取消密码
openssl rsa -in localhost.key -out salt_nopass.key
4)安装Cherrypy模块,版本3.2.6
|
1
|
pip install Cherrypy==3.2.6 |
备注:centos6、7可以使用3.2.6版本,centos5安装时不要选版本号
5)修改master配置文件
|
1
2
|
vi /etc/salt/masterdefault_include: master.d/*.conf |

6)创建api配置文件
|
1
2
3
4
5
6
7
|
cd /etc/salt/master.d/vi api.confrest_cherrypy: host: 192.168.137.11 port: 8000 ssl_crt: /etc/pki/tls/certs/localhost.crt ssl_key: /etc/pki/tls/private/salt_nopass.key |
备注:如果加disable_ssl: True,可以通过http请求。
性能优化:
|
1
2
|
thread_pool: 100socket_queue_size: 30 |

7)认证文件
|
1
2
3
4
5
6
7
|
vi eauth.confexternal_auth: pam: saltapi: - .* - '@wheel' - '@runner' |
备注: .* # 所有模块可执行, '@wheel' # salt key
centos5.9上yum安装的salt,eauth.conf配置需要注意,如下配置
|
1
2
3
4
5
6
7
8
9
10
|
external_auth: pam: saltapi: - .* - '@local' - '@local_async' - '@wheel' - '@wheel_async' - '@runner' - '@runner_async' |
8)重启master
|
1
|
systemctl restart salt-master.service |
9)启动api
|
1
|
systemctl restart salt-api |
10)需要修改master的配置对saltapi用户进行授权
|
1
2
3
4
5
6
7
8
9
|
[root@test1 ~]# vim /etc/salt/masterexternal_auth: pam: saltapi: - .* - '@wheel'[root@test1 ~]# /etc/init.d/salt-master restartStopping salt-master daemon: [ OK ]Starting salt-master daemon: [ OK ] |
使用介绍
1)登录测试,使用curl请求
|
1
2
3
4
5
|
curl -k https://192.168.137.11:8000/login \ -H 'Accept: application/x-yaml' \ -d username=saltapi \ -d password=saltapi \ -d eauth=pam |
登录成功后系统返回token,用于后续交互使用。

2)获取minion资产数据测试,节点为linux-node1.example.com主机
|
1
2
3
|
curl -k https://192.168.137.11:8000/minions/linux-node1.example.com \ -H 'Accept: application/x-yaml' \ -H 'X-Auth-Token: token内容' |
3)查看所有minion存活主机
|
1
2
3
4
5
|
curl -k https://192.168.137.11:8000/ \ -H 'Accept: application/x-yaml' \ -H 'X-Auth-Token: token内容' \ -d client='runner' \ -d fun='manage.status' |
备注:client='runner'指的是在master执行,client='local'指的是在minion执行

4)ping测试
|
1
2
3
4
5
6
|
curl -k https://192.168.137.11:8000/ \ -H 'Accept: application/x-yaml' \ -H 'X-Auth-Token: token内容' \ -d client='local' \ -d tgt='*' \ -d fun='test.ping' |
tgt表示目标,可以指定某一台minion
5)查看jobs
|
1
2
3
|
curl -k https://192.168.137.11:8000/jobs \ -H 'Accept: application/x-yaml' \ -H 'X-Auth-Token: token内容' |
6)查看具体一个jobs的执行结果
|
1
2
3
|
curl -k https://192.168.137.11:8000/jobs/jobid \ -H 'Accept: application/x-yaml' \ -H 'X-Auth-Token: token内容' |
#############################################################
Saltstack异步执行命令
salt执行命令有时候会有超时的问题,就是命令下发下去了,部分主机没有返回信息,这时候就很难判断命令或任务是否执行成功。因此,salt提供异步执行的功能,发出命令后立即返回一个jid。然后我们就可以根据这个jid来查询任务是否执行成功。
命令行实现异步
参数--async,返回job ID,根据job ID我们可以查询执行结果。
|
1
|
salt --async '*' test.ping |

|
1
|
salt-run jobs.lookup_jid 20161117163153353501 |

-v参数在返回结果的同时,一同返回本次任务的jid,如果超时还是会返回jid
|
1
|
salt -v '*' test.ping |

API实现异步
任务执行代码样例,通过async方法执行异步命令获取返回job id,通过job方法查看执行结果。
|
1
2
3
4
5
6
7
8
9
10
11
12
13
14
15
16
17
18
19
20
21
22
23
24
25
26
27
28
29
30
31
32
33
34
35
|
import requestsimport jsondef async(fun, tgt): """ 异步任务,获取jid """ params = {'client': 'local_async', 'fun': fun, 'tgt': tgt} headers = {'X-Auth-Token': 登陆时获取的token} try: ret = requests.post(https://ip:port/, data=params, headers=headers, verify=False) ret = json.loads(ret.text) return ret['return'][0]['jid'] except Exception as err: print err def jobs_all(jid=None): """ job_id=None, 查看salt cache中所有的job任务的执行结果 job_id传值时,查看指定job id的执行结果 """ headers = {'X-Auth-Token': 登陆时获取的token} try: if jid is None: ret = requests.get(https://ip:port/jobs, headers=headers, verify=False) else: ret = requests.get('https://ip:port/jobs' + jid, headers=headers, verify=False) ret = json.loads(ret.text) return ret except Exception as err: logger.error(err) jid = async('test.ping', '*')jobs_all()jobs_all(jid=jid) |
查看官方文档获取详细帮助 https://docs.saltstack.com/en/latest/ref/netapi/all/salt.netapi.rest_cherrypy.html#id1
#######################################################################
在windows下通过Salt-Minion-xxxx.xx.x-AMD64-Setup.exe安装salt-minion的时候,默认是安装并开机启动salt-minion服务。但是如果以服务的方式启动salt-minion的话,windows的可视化操作是不能被控制的。为了能够通过salt-minion来操控windows的可视化界面,需要禁用salt-minion服务,并且用进程的方式启动salt-minion。
解决方案
1. 开始>>运行>>services.msc 将salt-minion服务给停止并将启动类型设为手动

2.命令行方式运行C:\salt\salt-minion.exe

3.将C:\salt\salt-minion.exe加入启动,以后服务器重启可以实现salt自启动


 浙公网安备 33010602011771号