

Vue.js起手式+Vue小作品实战
本文是小羊根据Vue.js文档进行解读的第一篇文章,主要内容涵盖Vue.js的基础部分的知识的,文章顺序基本按照官方文档的顺序,每个知识点现附上代码,然后根据代码给予个人的一些理解,最后还放上在线编辑的代码以供练习和测试之用;
在最后,我参考SegmentFault上的一篇技博,对Vue进行初入的实战,目的是将新鲜学到的知识立即派上用场;
如果你还是前端的小白,相信这篇文章可能会对产生一些帮助和引起思想的碰撞,因为大家的学习历程是相似的,遇到的困惑也有一定的共通性,如果文章出现谬误之处,欢迎各位童鞋及时指正;
目录
1.Vue.js是什么
2.Vue.js的基本语法
3.Vue.js的小作品
1. Vue.js是什么
Vue.js(读音 /vjuː/, 类似于 view) 是一套构建用户界面的 渐进式框架。与其他重量级框架不同的是Vue 的核心库只关注视图层。
Vue.js 的目标是通过尽可能简单的 API 实现响应的数据绑定和组合的视图组件。
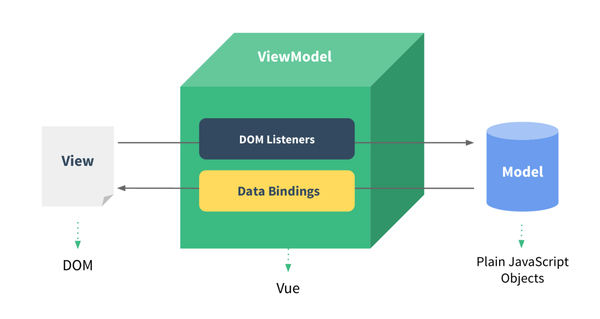
Vue.js是一种MVVM框架,其中html是view层,js是model层,通过vue.js(使用v-model这个指令)完成中间的底层逻辑,实现绑定的效果。改变其中的任何一层,另外一层都会改变;
2.Vue的基本语法
2.1 Vue构造函数开启Vue之旅
通过构造函数Vue创建一个Vue的根实例
 1 <div id='#el'></div>
 2 ---
 3 var vm = new Vue({
 4   //options
 5   el:'#el',
 6   data:{},
 7   methods:{}
 8 })
 9 ---
10 //扩展Vue构造器
11 var MyComponent = Vue.extend({
12     //扩展选项
13 })
14 var vm = new MyComponent({})
解读:
- 使用Vue构造函数创建一个Vue实例,然后通过Vue实例的el接口实现和HTML元素的挂载;
- 构造函数Vue需要传入一个选项对象,可包含挂载元素、数据、方法和生命周期钩子等;
- 构造函数Vue可以通过extend方法实现扩展,从而可以用预定义的选项创建可复用的组件构造函数,但是构建组件的常用方法是使用Vue.component()接口去实现;
2.2 Vue实例的属性和方法
Vue实例将代理data对象的所有属性,也就是说部署在data对象上的所有属性和方法都将直接成为Vue实例的属性和方法
 1 <div id="app">{{message}}
 2   <button v-on:click="sayHello">click me</button>
 3 </div>
 4 ---
 5 var app = new Vue({
 6     el:'#app',
 7     data:{
 8       message:'hello world!',
 9       sayHello:function(){
10           console.log(1)
11       }
12   }
13 })
14 ---
15 //如果想要获取到app这一实例中选项的对象,Vue提供$进行获取
16 app.$el === document.getElementById('app')//true
17 app.$data.message//hello world
【TIP】
Vue实例所代理data对象上的属性只有在实例创建的同时进行初始化才具有响应式更新,若在实例创建之后添加是不会触发视图更新的;
2.3数据绑定操作
绑定文本和HTML
 1 <div id = "app">
 2     {{msg}}
 3     <div v-html="hi"></div>
 4 </div>
 5 ---
 6 var app  = new Vue({
 7     el: '#app',
 8     data:{
 9       msg: 'hello world!',
10       hi:'<h1>hi</h1>'
11   }
12 })
解读:
- HTML部分实现数据的动态绑定,这个数据是vue实例的属性值;
- JS部分的语法可以从jQuery角度去理解,相当于创建一个Vue实例,这个实例指向#app,并在Vue提供的固定接口data上定义Vue实例的属性;
- 使用{{message}}的mustache语法只能将数据解释为纯文本,为了输出HTML,可以使用v-html指令;
绑定数据在元素的属性
 1 <div id="app" v-bind:title='message' v-bind:style='red' v-once>
 2      {{message}}
 3   </div>
 4 ---
 5 var app = new Vue({
 6   el: '#app',
 7   data:{
 8     message: 'hello world!',
 9     red: 'color:red'
10   }
11 })
解读:
- 定义在Vue实例的data接口上的数据的绑定灵活的,可以绑定在DOM节点内部,也可以绑在属性上;
- 绑定数据到节点属性上时,需要使用v-bind指令,这个元素节点的 title属性和 Vue 实例的 message属性绑定到一起,从而建立数据与该属性值的绑定,也可以使用v-bind:href="url"的缩写方式:href="url";
- v-once指令能够让你执行一次性的插值,当数据改变时,插值处的内容不会更新;
【demo】
使用JS表达式处理数据
 1  <div id='#app'>
 2     <p v-once>{{num + 10 }}</p>
 3     <p v-if='seen'>{{message + 'jirengu'}}</p>
 4 </div>
 5 ---
 6 var app = new Vue({
 7   el: '#app',
 8   data:{
 9     num:10,
10     message: 'hello world!',
11     seen:true
12   }
13 })
使用过滤器来格式化数据
<div id="app" >
    <p v-if='seen'>{{message | capitalize}}</p>
  </div>
---
var app = new Vue({
  el: '#app',
  data:{
    message: 'hello world!',
    seen:true,
  },
  filters:{
    capitalize:function(value){
      if(!value) return ''
      value = value.toString()
      return value.charAt(0).toUpperCase() + value.slice(1)
    }
  }
})
条件指令控制DOM元素的显示操作
 1 <div id="app" >
 2      <p v-if='seen'>{{message}}</p>
 3   </div>
 4 ---
 5 var app = new Vue({
 6   el: '#app',
 7   data:{
 8     message: 'hello world!',
 9     seen:true
10   }
11 })
解读:
- v-if指令可以绑定一个属性值为布尔型的属性,当值为真时,元素将显示,反之则消失;
循环指令实现数据的遍历
 1  <div id="app">
 2     <ol>
 3       <li v-for='item in items'>
 4         {{ item.text }}
 5       </li>
 6     </ol>
 7 </div>
 8 ---
 9 var app = new Vue({
10   el: '#app',
11   data:{
12     items:[
13       {text:'Vue'},
14       {text:'React'},
15       {text:'Angular'}
16     ]
17   }
18 })
解读:
- v-for可以绑定数组型数据进行绑定,并使用item in items形式,从而数据的遍历操作;
事件绑定指令可以实现事件监听
 1 <div id='app'>
 2   <p>{{message}}</p>
 3   <button v-on:click='reverseMessage'>reverseMesssage</button>
 4 </div>
 5 ---
 6 var app = new Vue({
 7   el: '#app',
 8   data:{
 9     message: 'hello world!'
10   },
11   methods:{
12   reverseMessage:function(){
13     this.message = this.message.split('').reverse().join('')
14     }
15   }
16 })
解读:
- v-on指令用于监听事件操作,click="reverseMessage"定义点击事件后执行的回调函数;
- v-on指令也可以采用缩写方式:@click="method"
- 在Vue实例中,提供methods接口用于统一定义函数;
小结
本章涉及Vue的基础的数据绑定操作,内容包括:
- {{message}}实现文本数据的绑定,并且文本数据可以使用JS表达式和过滤器进行进一步处理;
-v-html="hi"实现HTML数据的绑定; - v-bind:href="url"实现属性数据的绑定;
- v-if="seen"和v-for="item in items"指令实现流程控制;
- v-on:click="method"指令实现事件监听
2.4计算属性
使用计算属性完成一些数据计算操作
 1 <div id="app" >
 2     <p>Original message : {{message}}</p>
 3     <p>Reversed message : {{ReversedMessage}}</p>
 4   </div>
 5 ---
 6 var app = new Vue({
 7   el: '#app',
 8   data:{
 9     message: 'hello world!',
10   },
11   computed:{
12     ReversedMessage:function(){
13      return  this.message.split('').reverse().join('')
14     }
15   }
16 })
解读:
- Vue实例提供computed对象,我们可以在对象内部定义需要进行计算的属性ReverseMessage,而提供的函数将作为属性的getter,即获取器;
- 上述的代码使得app.ReverseMessage依赖于app.message;
- 与先前直接在{{message.split('').reverse().join('') }}使用表达式相比,它让模板过重并且难以维护代码;
计算属性 VS Methods
 1 <div id="app" >
 2     <p>Original message : {{message}}</p>
 3     <p>Reversed message : {{ReversedMessage}}</p>
 4      <p>Reversed message:{{reversedMessage()}}</p>
 5   </div>
 6 ---
 7 var app = new Vue({
 8   el: '#app',
 9   data:{
10     message: 'hello world!',
11   },
12   computed:{
13     ReversedMessage:function(){
14      return  this.message.split('').reverse().join('')
15     }
16   },
17   methods:{
18     reversedMessage:function(){
19      return  this.message.split('').reverse().join('')
20     }
21   }
22 })
23 解读:
24
25 通过Vue实例的methods接口,我们在模板中调用reversedMessage函数同样实现需求;
26 methods与computed方法的区别在于:computed的数据依赖于app.message,只要message未变,则访问ReverseMessage计算属性将立即返回之前的计算结果,而methods则每次重新渲染时总是执行函数;
27 如果有缓存需要,请使用computed方法,否则使用methods替代;
28 计算属性的setter
29
30 Vue实例的computed对象默认只有getter,如果你要设置数据,可以提供一个setter,即设置器;
31
32 <div id="app" >
33     <p>Hi,I'm{{fullName}}</p>
34 </div>
35 ---
36 var app = new Vue({
37   el: '#app',
38   data:{
39     message: 'hello world!',
40     name:'Teren'
41   },
42   computed:{
43     fullName:{
44       get:function(){
45          return this.name
46       },
47       set:function(value){
48         this.name = value
49       }
50     }
51   }
52 })
2.5Class与Style的绑定
绑定Class
 1 <div id="app" >
 2     <!-- 直接绑定对象的内容 -->
 3       <p class='static' v-bind:class="{active:isActive,error:hasError}">Hello world!</p>
 4    <!--  绑定对象 -->
 5  <p v-bind:class="classObj">こんにちは </p>
 6    <p v-bind:class='style' >你好</p>
 7     <!-- 绑定数组 -->
 8     <p v-bind:class="[staticClass,activeClass,errorClass]">
 9 Olá</p>
10     <button @click='changeColor'>click me</button>
11   </div>
12 ---
13 //css
14 .static{
15   width: 200px;
16   height: 100px;
17   background: #ccc;
18 }
19 .active{
20   color:red;
21 }
22 .error{
23   font-weight: 800;
24 }
25 ---
26 var app = new Vue({
27   el: '#app',
28   data:{
29    isActive:true,
30    hasError:true,
31    classObj:{
32      static:true,
33      active:true,
34      error:true,
35    },
36   staticClass:'static',
37   activeClass:'active',
38   errorClass:'error',
39
40   },
41   computed:{
42     style:function(){
43       return {
44         active: this.isActive,
45         static:true,
46         error:this.hasError
47       }
48     }
49   },
50   methods:{
51     changeColor:function(){
52       this.isActive = !this.isActive
53     }
54   }
55 })
解读:
- 通过v-bind:class="{}"或v-bind:class=[]方式为模板绑定class
- 通过v-bind:class="{active:isActive,error:hasError}"绑定class,首先要在css中设置.active和,error,然后在Vue实例的data对象中设置isActive和hasError的布尔值;也可以直接传一个对象给class,即v-bind:class="classObj,再在data对象上直接赋值:
data:{
   classObj:{
     static:true,
     active:true,
     error:true,
   }
你也可以通过传递数组的方式为class赋值v-bind:class="[staticClass,activeClass,errorClass]",此时你要在data对象上为数组的元素的属性赋值:
data:{
  staticClass:'static',
  activeClass:'active',
  errorClass:'error',
  }
【TIP】无论是哪种方式,前提都是css中的class要先设定
绑定style
 1 <div id="app" >
 2     <p v-bind:style='styleObj'>Hello World!</p>
 3     <p v-bind:style='[styleObj,bgObj]'>你好</p>
 4   </div>
 5 ---
 6 var app = new Vue({
 7   el: '#app',
 8   data:{
 9     styleObj:{
10     fontWeight:800,
11     color:'red'
12   },
13     bgObj:{
14       width:'100px',
15       height:'80px',
16       background:'#ccc'
17     }
18   },
19 })
解读:
- 绑定style到模板的方法有两种,一是v-bind:style="styleObj",然后在data对象上定义styleObj;而是可以通过数组方式为style传入多个样式对象
2.6条件渲染和列表渲染
前面简单介绍了一下v-if、v-for和v-on指令,下面的部分将详细介绍以上3个指令;
条件渲染
 1 <div id="app" >
 2   <p v-if='ok'>Hello World!</p>
 3   <p v-else>Hello Universal</p>
 4   <template v-if='motto'>
 5      <h1>Steve Jobs</h1>
 6      <p>motto:stay hungry ! stay foolish</p>
 7   </template>
 8   <p v-show='ok'>Show Me</p>
 9   </div>
10 ---
11 var app = new Vue({
12   el: '#app',
13   data:{
14      ok:true,
15      motto:true,
16   },
17 })
解读:
- 通过v-if和v-else指令实现条件渲染,其中v-if="value"的valuey
要在data对象中赋布尔值,v-if支持<template>语法 - v-show="value"是另一种条件渲染的方法;
【TIP】 v-if和v-show的区别
- v-if是真实的条件渲染,当进行条件切换时,它会销毁和重建条件块的内容,并且它支持<template>语法;
- v-show的条件切换时基于css的display属性,所以不会销毁和重建条件块的内容;
- 当你频繁需要切换条件时,推荐使用v-show;否则使用v-if;
列表渲染
  1 <div id="app" >
  2     <ol>
  3       <li v-for='car in cars'>
  4          {{car.name}}
  5       </li>
  6     </ol>
  7     <ul>
  8       <li v-for='(food,index) in foods'>
  9       {{index}}---{{food}}---{{delicious}}
 10       </li>
 11     </ul>
 12     <ul>
 13       <li v-for='(value,key,index) in object'>
 14         {{index}}.{{key}}.{{value}}
 15       </li>
 16     </ul>
 17     <div>
 18       <span v-for='n in 10' style="margin-left:5px">{{n}}</span>
 19     </div>
 20        <span v-for='n in evenNumbers' style="margin-left:5px">{{n}}</span>
 21     </div>
 22    <!--  <div>
 23        <span v-for='n in odd(counts)' style="margin-left:5px">{{n}}</span>
 24     </div> -->
 25   </div>
 26 ---
 27 var app = new Vue({
 28   el: '#app',
 29   data:{
 30     delicious:'delicious',
 31      cars:[
 32        {name:'Benz'},
 33        {name:'BMW'}
 34      ],
 35     foods:[
 36       'tomato',
 37       'potato',
 38       'ice cream'
 39     ],
 40     object :{
 41       name:'Benz',
 42       age:'18'
 43     },
 44     numbers:[1,2,3,4,5,6,7,8,9,10],
 45     counts:[1,2,3,4,5]
 46   },
 47   computed:{
 48       evenNumbers:function(){
 49         return this.numbers.filter(function(number){
 50           return number%2 === 0
 51         })
 52       }
 53   },
 54   methods:{
 55     odd:function(counts){
 56      return counts.filter(function(count){
 57         return count%2 === 1;
 58       })
 59     }
 60   }
 61 })
 62 解读:
 63
 64 v-for指令能够让我们循环渲染列表型数据,数据放在data对象中,类型可以如下:
 65 data:{
 66 //数字数组
 67   numbers:[1,2,3,4,5,6,7,8,9,10],
 68   counts:[1,2,3,4,5]
 69 //字符串数组
 70   foods:[
 71       'tomato',
 72       'potato',
 73       'ice cream'
 74     ],
 75 //对象数组
 76     cars:[
 77        {name:'Benz'},
 78        {name:'BMW'}
 79      ],
 80 //对象
 81  object :{
 82       name:'Benz',
 83       age:'18'
 84     },
 85 }
 86 根据不同类型的数据,v-for指令在模板中具体采用的语法如下:
 87 //数据为数字数组
 88 <div>
 89   <span v-for="n in numbers">{{n}}</span>
 90 </div>
 91 ---
 92 //数据为字符数组
 93 <ul>
 94     <ol v-for='food in foods'>{{food}}</ol>
 95 </ul>
 96 ---
 97 //数据为对象
 98 <ul>
 99   <ol v-for="value in object">{{value}}</ol>
100 </ul>
101 //或者
102 <ul>
103   <ol v-for="(value,key,index) in object">{{index}}.{{key}}.{{value}}</ol>
104 </ul>
105 ---
106 //数据为对象数组
107 <ul>
108   <ol v-for="car in cars">{{car.name}}</ol>
109 </ul>
110 在 v-for块中,我们拥有对父作用域属性的完全访问权限;
111 【demo】
112
113 2.7 事件监听
114
115 简单的事件监听——直接在指令上处理数据
116
117 <div id="#app">
118     <p v-on:click="counter+=1">{{counter}}</p>
119 </div>
120 ---
121 var app = new Vue({
122   el: "#app",
123   data:{
124     counter: 0,
125   }
126 })
127 复杂的事件监听——在methods对象定义回调函数
128
129 <div id="#app">
130     <p v-on:click="greet">{{vue}</p>
131 </div>
132 ---
133 var app = new Vue({
134   el: "#app",
135   data:{
136        vue:"hello Vue.js"
137   },
138 methods:{
139     greet:function(event){
140           console.log(this.vue)
141       }
142   }
143 })
事件修饰符——调用事件对象函数的快捷方式
1 <div v-on:click.prevent="greet">1</div>//等价于event.preventDefault()
2   <div v-on:click.stop="greet">2</div>//等价于event.stopPropagation()
3   <div v-on:click.capture="greet">3</div>//等价于事件回调函数采用捕获阶段监听事件
4   <div v-on:click.self="greet">4</div>//等价于event.target
按键修饰符——按键事件的快捷方式
常见按键别名包括:
- enter
- tab
- delete
- esc
- space
- up
- down
- left
- right
2.8 表单控件绑定
文本控件
 1 <div id="app">
 2     <p>{{message}}</p>
 3     <input type="text" v-model='message'>
 4   </div>
 5 ---
 6 var app = new Vue({
 7   el:'#app',
 8   data:{
 9     message:'Hello World!'
10   },
11 })
解读:
- 通过v-model指令可以实现数据的双向绑定,即View层的数据变化可以直接改变Model层的数据,而Model层的数据改变也可以直接反映在View层;
- 上述代码v-model="message"使得input的value属性和message属性绑定,在输入框输入值,即改变value同时也改变message;
单选控件
 1  <input id="man" value="man" type="radio" v-model='picked'>
 2     <label for="man">Man</label>
 3     <br>
 4      <input id="woman" value="woman" type="radio" v-model='picked'>
 5     <label for="woman">Woman</label>
 6     <div style="margin-left:10px">{{picked}}</div>
 7 ---
 8 var app = new Vue({
 9   el:'#app',
10   data:{
11     message:'Hello World!',
12     picked:'man'
13   },
14 })
解读:
- v-model指令绑定data对象的picked属性,该属性默认指向type='radio'的input的value;
复选框
 1 <input type="checkbox" id="Benz" v-model='checked' value='Benz'>
 2     <label for="Benz">Benz</label>
 3    <input type="checkbox" id="BMW" v-model='checked' value="BMW">
 4     <label for="BMW">BMW</label>
 5     <div>Checked Name:{{checked}}</div>
 6 ---
 7 var app = new Vue({
 8   el:'#app',
 9   data:{
10     message:'Hello World!',
11     picked:'man',
12     selected:"A",
13     checked:[],
14   },
15 })
2.9 组件
组件可以扩展 HTML 元素,封装可重用的代码。在较高层面上,组件是自定义元素;
通过Vue.component()接口将大型应用拆分为各个组件,从而使代码更好具有维护性、复用性以及可读性注册组件
 1 <div id="app">
 2    <my-component></my-component>
 3   </div>
 4 ---
 5
 6 Vue.component('my-component',{
 7   template:'<div>my-first-component</div>'
 8 })
 9
10 var app = new Vue({
11   el:'#app',
12   data:{
13   }
14 })
解读:
- 注册行为必须在创建实例之前;
- component的template接口定义组件的html元素;
局部注册组件
 1  <div id="app">
 2    <my-component>
 3      <heading></heading>
 4    </my-component>
 5   </div>
 6 ---
 7 Vue.component('my-component',{
 8   template:'<div>my-first-component</div>'
 9 })
10
11 var Child = {
12   template: '<h3>Hello World</h3>'
13 }
14
15 var app = new Vue({
16   el:'#app',
17   components:{
18     'my-component':Child
19   }
20 })
解读:
- 可以定义一个子组件,在实例的components接口中将子组件挂载到父组件上,子组件只在父组件的作用域下有效;
特殊DOM模板将会限制组件的渲染
像这些包含固定样式的元素<ul>, <ol>, <table>, <select>,
自定义组件中使用这些受限制的元素时会导致渲染失败;
通的方案是使用特殊的 is属性:
1  <table>
2       <tr is="my-component">
3  </table>
创建组件的data对象必须是函数
 1 <counter></counter>
 2  <counter></counter>
 3  <counter></counter>
 4 ---
 5 Vue.component('counter',{
 6   template:'<button @click="count+=1">{{count}}</button>',
 7   data:function(){
 8     return {
 9       count: 0
10     }
11   }
12 })
解读:
- 在组件当中定义的数据count必须以函数的形式返回;
使用Props实现父组件向子组件传递数据
 1 <child some-text='hello'></child>
 2     <br>
 3     <child v-bind:some-text='message'> </child>
 4 ---
 5 Vue.component('child',{
 6   template:'<div>{{someText}}</div>',
 7   props:['someText']
 8 })
 9 var app = new Vue({
10   el:'#app',
11   components:{
12     'my-component':Child
13   },
14   data:{
15     message:"你好"
16   }
17 })
解读:
-
组件实例的作用域是孤立的。这意味着不能并且不应该在子组件的模板内直接引用父组件的数据。可以使用 props 把数据传给子组件;
-
可以用 v-bind动态绑定 props 的值到父组件的数据中。每当父组件的数据变化时,该变化也会传导给子组件,注意这种绑定方式是单向绑定;
父组件是使用 props 传递数据给子组件,但如果子组件要把数据传递回去则使用自定义事件!
 1 <div id="app">
 2       <p>{{total}}</p>
 3       <button-counter v-on:increment='incrementTotal'></button-counter>
 4       <button-counter @increment='incrementTotal'></button-counter>
 5   </div>
 6 ---
 7 Vue.component('button-counter',{
 8   template:'<button v-on:click="increment">{{counter}}</button>',
 9   data:function(){
10     return {
11       counter:0
12     }
13   },
14   methods:{
15     increment:function(){
16       this.counter +=1;
17       this.$emit('increment')
18     }
19   }
20 })
21
22 var app = new Vue({
23   el:'#app',
24   data:{
25     total:0
26   },
27   methods:{
28     incrementTotal:function(){
29       this.total += 1;
30     }
31   }
32 })
解读:
- 父组件可以通过监听子组件的自定义事件,从而改变父组件的数据;
- 子组件每点击一次,触发increment函数,该函数在执行过程中通过$emit('increment')发出increment事件;
- button控件同时监听increment事件,每次发出该事件就改变父组件的total值;
【demo】
使用Slots分发内容
内容分发指的是混合父组件的内容与子组件自己的模板;
 1 <div id="app">
 2      <h1>I'm the parent title</h1>
 3   <my-component>
 4     <p>This is some original content</p>
 5     <p>This is some more original content</p>
 6   </my-component>
 7     <hr>
 8   </div>
 9 ---
10 Vue.component('my-component',{
11   template:"<div><h2>I'm the child title</h2><slot>如果没有分发内容则显示我。</slot></div>"
12 })
13 var app = new Vue({
14   el:'#app',
15   data:{
16   }.
17 })
解读:
- 如果子组件模板一个<slot>都不包含,则父组件内容将会被丢弃;
- 当子组件模板只有一个没有属性的 slot 时,父组件整个内容片段将插入到 slot 所在的 DOM 位置,并替换掉 slot 标签本身;
- 只有在宿主元素为空,且没有要插入的内容时才显示备用内容;
 1 //子组件app-layout模板
 2 <div class="container">
 3 <header>
 4 <slot name="header"></slot>
 5 </header>
 6 <main>
 7 <slot></slot>
 8 </main>
 9 <footer>
10 <slot name="footer"></slot>
11 </footer>
12 </div>
13 //父组件模板
14 <app-layout>
15 <h1 slot="header">Here might be a page title</h1>
16
17 <p>A paragraph for the main content.</p>
18 <p>And another one.</p>
19
20 <p slot="footer">Here's some contact info</p>
21 </app-layout>
22 //渲染结果
23 <div class="container">
24 <header>
25 <h1>Here might be a page title</h1>
26 </header>
27 <main>
28 <p>A paragraph for the main content.</p>
29 <p>And another one.</p>
30 </main>
31 <footer>
32 <p>Here's some contact info</p>
33 </footer>
34 </div>
解读:
- 具名slot相当于给slot设置标识符,只要在父组件的元素上设置<div slot="name"></div>就可以把该元素插入子组件定义的模板;
【TIP】关于组件的命名规范
- 当注册组件(或者 props)时,可以使用 kebab-case ,camelCase ,或 TitleCase
1 // 在组件定义中
2 components: {
3 // 使用 camelCase 形式注册
4 'kebab-cased-component': { /* ... */ },
5 'camelCasedComponent': { /* ... */ },
6 'TitleCasedComponent': { /* ... */ }
7 }
- 在 HTML 模版中,请使用 kebab-case 形式:
1 <kebab-cased-component></kebab-cased-component>
2 <camel-cased-component></camel-cased-component>
3 <title-cased-component></title-cased-component>
- 为了记忆方便,建议统一使用kebab-case形式;
2.10 vue-resource插件
使用vue-rescource实现前后端的通信
在vue实例中新增ready对象,当页面完成加载时发出请求
 1 new Vue({
 2     el: '#app',
 3     ready: function() {
 4         this.$http.get('book.json', function(data) {
 5             this.$set('books', data);
 6         }).error(function(data, status, request) {
 7             console.log('fail' + status + "," + request);
 8         })
 9       //post方法:this.$http.post(url,postdata,function callback)
10     },
11     data: {
12         ....
13         books:''
14     },
15     .....
【TIP】
这个$http请求和jquery的ajax还是有点区别,这里的post的data默认不是以form data的形式,而是request payload。解决起来也很简单:在vue实例中添加headers字段:
http: { headers: {'Content-Type': 'application/x-www-form-urlencoded'} }
3. 实战之Vue小作品

上面的Vue小作品是小羊仿照SegmentFault的一篇技博的练手之作,建议各位对照源码亲手练习一次,以便初步熟悉Vue的使用;
【注】版权归Teren所有,转载请联系作者。
参考资料:

 浙公网安备 33010602011771号